1
VT CS 6604: Digital Libraries
IDEAL Pages
Project Group
Project Client
Ahmed Elbery
Mohammed Farghally
Mohammed Magdy
Under Supervision Of
Prof. Edward A. Fox.
Computer Science department, Virginia Tech
Blacksburg, VA
5/8/2014
1
IDEAL Pages
Table of Contents
1.
Abstract ..............................................................................................................................................................4
2.
Developer's Manual............................................................................................................................................5
2.1.
Document Indexing ....................................................................................................................................5
2.1.1.
2.1.1.1.
Solr Features ...............................................................................................................................6
2.1.1.2.
SolrCloud.....................................................................................................................................6
2.1.1.3.
schema.xml .................................................................................................................................7
2.1.1.4.
Customizing the Schema for the IDEAL Pages ............................................................................8
2.1.1.5.
Solrctl Tool ..................................................................................................................................8
2.1.1.6.
Typical SolrCloud Configurations ................................................................................................9
2.1.2.
2.2.
Introduction to Solr ............................................................................................................................5
Hadoop ............................................................................................................................................ 11
2.1.2.1.
Hadoop File System (HDFS) ..................................................................................................... 11
2.1.2.2.
MapReduce.............................................................................................................................. 14
2.1.2.3.
Event Indexer ........................................................................................................................... 15
2.1.2.4.
IndexDriver.java ....................................................................................................................... 16
2.1.2.5.
IndexMapper.java .................................................................................................................... 17
2.1.2.6.
Event_IndexerUsage Tutorial .................................................................................................. 17
Web Interface for the indexed documents ............................................................................................. 21
2.2.1.
Solr REST API .................................................................................................................................... 21
2.2.2.
Solarium ........................................................................................................................................... 22
2.2.2.1.
Installing Solarium ................................................................................................................... 24
2.2.2.2.
Using Solarium in your PHP code ............................................................................................ 25
2.2.3.
Other tools for the web interface.................................................................................................... 26
2.2.4.
Web Interface Architecture ............................................................................................................. 27
3.
User's Manual .................................................................................................................................................. 28
4.
Results and contributions ................................................................................................................................ 31
5.
Future works.................................................................................................................................................... 32
6.
References ....................................................................................................................................................... 32
7.
Appendix .......................................................................................................................................................... 33
2
IDEAL Pages
List of Figures
Figure 1 Big Picture .....................................................................................................................................................4
Figure 2 Solr Server vs. SolrCloud ...............................................................................................................................7
Figure 3 SolrCloudCollections and Shards ............................................................................................................... 11
Figure 4 HDFS architecture ...................................................................................................................................... 13
Figure 5 MapReduce Operation .............................................................................................................................. 15
Figure 6 The Events directory structure .................................................................................................................. 16
Figure 7 Map-Reduce terminal Output ................................................................................................................... 20
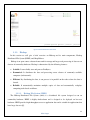
Figure 8 Solr Web interface ..................................................................................................................................... 21
Figure 9 A Solr query result formatted in JSON....................................................................................................... 22
Figure 10 Web Interface Architecture ..................................................................................................................... 27
Figure 11 Web Interface Main Screen ..................................................................................................................... 29
Figure 12 Viewing Documents related to a particular event .................................................................................. 30
Figure 13 Document Details .................................................................................................................................... 30
Figure 14 Search results and Pagination ................................................................................................................. 31
3
IDEAL Pages
1. Abstract
Events create our most impressive memories. We remember birthdays, graduations, holidays,
weddings, and other events that mark important stages of our life, as well as the lives of family and
friends. As a society were member assassinations, natural disasters, political uprisings, terrorist attacks,
and wars as well as elections, heroic acts, sporting events, and other events that shape community,
national, and international opinions. Web and Twitter content describes many of these societal events.
Permanent storage and access to big data collections of event related digital information, including
webpages, tweets, images, videos, and sounds, could lead to an important national asset. Regarding that
asset, there is need for digital libraries (DLs) providing immediate and effective access and archives
with historical collections that aid science and education, as well as studies related to economic,
military, or political advantage. So, to address this important issue, we will research an Integrated
Digital Event Archive and Library (IDEAL). [10]
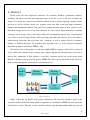
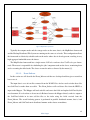
Our objective here in this project is to take the roughly 10TB of webpages collected for a variety of
events, and use the available cluster to ingest, filter, analyze, and provide convenient access. In order to
achieve this, automation of Web Archives (.warc files) extraction will be run on the cluster using
Hadoop to distribute and speed up the process. HTML files will be parsed and indexed into Solr to be
made available through the web interface for convenient access.
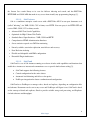
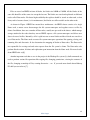
Figure 1 Big Picture
Figure 1 show the big picture of the project architecture, the .warc files should be input to the
extraction module on Hadoop cluster which is responsible of extracting the HTML files and extract the
file body into .txt files. Then the .txt files should be indexed using indexing module which runs also on
4
IDEAL Pages
Hadoop, the indexing module will directly update SolrCloud index which is also distributed on a cluster
of machines. Using Hadoop cluster and SolrCloud for storing, processing and searching provide the
required level of efficiency, fault tolerance and scalability will be shown in upcoming sections. Finally
the users can access the indexed documents using a convenient web interface that communicates with
SorlCloud service.
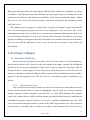
This technical report is organized as follows: First we present a developer's manual describing the
tools used in developing the project and how it was configured to meet our needs. Also a brief
background about each tool is presented. Next we present a user manual describing how the end user can
use our developed web interface to browse and search the indexed document. Next Finally we present an
appendix describing for subsequent groups that will continue and contribute to this project in the future,
how they can install the application on their servers and how they can make it work in their own
infrastructure.
2. Developer's Manual
2.1. Document Indexing
In this section, the first phase of our project will be described which is "Document Indexing".
Most of our discussion will be focused on the tools applied in this phase (Apache Solr and Hadoop
mainly) and the step by step configuration of these tools to work as required for this project. First we
will present Solr, a search engine based on Lucene java search library used to index and store our
documents, and then we will present Hadoop which is required for fast distributed processing which is
applied for the indexing process into Solr since we have a tremendous amount of documents to be
indexed.
2.1.1. Introduction to Solr
Solr is an open source enterprise search server based on the Lucene Java search library. Its major
features include powerful full-text search, hit highlighting, faceted search, near real-time indexing,
dynamic clustering, database integration, rich document (e.g., Word, PDF) handling, and geospatial
search. Solr is highly reliable, scalable and fault tolerant, providing distributed indexing, replication and
load-balanced querying, automated failover and recovery, centralized configuration and more. Solr
powers the search and navigation features of many of the world's largest internet sites. Solr is written in
Java and runs as a standalone full-text search server within a servlet container such as Jetty. Solr uses
5
IDEAL Pages
the Lucene Java search library at its core for full-text indexing and search, and has REST-like
HTTP/XML and JSON APIs that make it easy to use from virtually any programming language [1].
2.1.1.1.
Solr Features
Solr is a standalone enterprise search server with a REST-like API. You can post documents to it
(called "indexing") via XML, JSON, CSV or binary over HTTP. You can query it via HTTP GET and
receive XML, JSON, CSV or binary results.
Advanced Full-Text Search Capabilities
Optimized for High Volume Web Traffic
Standards Based Open Interfaces - XML, JSON and HTTP
Comprehensive HTML Administration Interfaces
Server statistics exposed over JMX for monitoring
Linearly scalable, auto index replication, auto failover and recovery
Near Real-time indexing
Flexible and Adaptable with XML configuration
Extensible Plugin Architecture
2.1.1.2.
SolrCloud
SolrCloud is a set of Solr instances running on a cluster of nodes with capabilities and functions that
enable these instances to interact and communicate so as to provide fault tolerant scaling [2].
SolrCloud supports the following features:
Central configuration for the entire cluster
Automatic load balancing and fail-over for queries
ZooKeeper integration for cluster coordination and configuration.
SolrCloud uses ZooKeeper to manage nodes, shards and replicas, depending on configuration files
and schemas. Documents can be sent to any server and ZooKeeper will figure it out. SolrCloud is based
on the concept of shard and replicate, Shard to provide scalable storage and processing, and Replicate
for fault tolerance and throughput.
6
IDEAL Pages
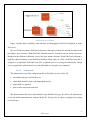
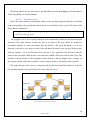
Figure 2 Solr Server vs. SolrCloud
Figure 2 briefly shows scalability, fault tolerance and throughput in SolrCloud compared to single
Solr server.
We use Cloudera in which a SolrCloud collection is the top level object for indexing documents and
providing a query interface. Each SolrCloud collection must be associated with an instance directory,
though note that different collections can use the same instance directory. Each SolrCloud collection is
typically replicated among several SolrCloud instances. Each replica is called a SolrCloud core and is
assigned to an individual SolrCloud node. The assignment process is managed automatically, though
users can apply fine-grained control over each individual core using the core command.
2.1.1.3.
schema.xml
The schema.xml is one of the configuration files of Solr that is used to declare [5]:
what kinds and types of fields there are.
which field should be used as the unique/primary key.
which fields are required.
how to index and search each field.
The default schema file comes with a number of pre-defined field types. It is also a self-documentary
so you can find documentation for each part in the file. You can also use them as templates for creating
new field types.
7
IDEAL Pages
2.1.1.4.
Customizing the Schema for the IDEAL Pages
For our project we need to customize the schema file to add the required fields that we need to use
for indexing the events’ files. The fields we used are:id : indexed document ID, this ID should be unique for each document.
category: the event category or type such as (earthquake, Bombing…etc.)
name: event name
title: the file name
content: the file content
URL: the file path on the HDFS system
version: automatically generated by Solr.
text: a copy of the name, title, content and URL fields.
We need to make sure that these fields are in the schema.xml file, if any of them is not found we
have to add it to the schema file. Also we need to change the “indexed” and “stored” properties of both
the “content” and the “text” fields to be “true”.
2.1.1.5.
Solrctl Tool
We use Cloudera Hadoop, in which solrctl tool is used to manage a SolrCloud deployment,
completing tasks such as manipulating SolrCloud collections, SolrCloud collection instance directories,
and individual cores[3].
A typical deployment workflow with solrctl consists of deploying ZooKeeper coordination service,
deploying Solr server daemons to each node, initializing the state of the ZooKeeper coordination service
using solrctl init command, starting each Solr server daemon, generating an instance directory,
uploading it to ZooKeeper, and associating a new collection with the name of the instance directory.
In general, if an operation succeeds, solrctl exits silently with a success exit code. If an error
occurs, solrctl prints a diagnostics message combined with a failure exit code [3].
The solrctl command details are on solrctl Reference on Cloudera documentation website. And you
can use solrctl --help command to show the commands and options[4].The following is a list of detailed
tutorials about installing, configuring and running SolrCloud, these tutorials are found on Cloudera
website:Deploying Cloudera Search in SolrCloud Mode
Installing Solr Packages
Initializing Solr for SolrCloud Mode
8
IDEAL Pages
Configuring Solr for Use with HDFS
Creating the /solr Directory in HDFS
Initializing ZooKeeper Namespace
Starting Solr in SolrCloud Mode
Administering Solr with the solrctl Tool
Runtime Solr Configuration
Creating Your First Solr Collection
Adding Another Collection with Replication
2.1.1.6.
Typical SolrCloud Configurations
We use the solrctl tool to configure SolrCloud, create the configuration files and create collections.
Also we can use it for other purpose such as deleting the index for a particular collection. Following are
the steps we use to configure and run the SolrCloud.
a- Initializing SolrCloud
If the SolrCloud is not initialized then we need to start the Cloudera Search server. So first you need
to create the /solr directory in HDFS. The Cloudera Search master runs as solr:solr so it does not have
the required permissions to create a top-level directory. To create the directory we can use the Hadoop fs
shield as shown in the next commands
$ sudo -u hdfshadoop fs -mkdir /solr
$ sudo -u hdfshadoop fs -chownsolr /solr
Then we need to create a Zookeeper Namespace using the command
$ solrctlinit
Now SolrCloud should be running properly but without any data collection created.
9
IDEAL Pages
b- Creating a Configuration
In order to start using Solr for indexing the data, we must configure a collection holding the index. A
configuration for a collection requires a solrconfig.xml file, schema.xml and any helper files may be
referenced from the xml files. The solrconfig.xml file contains all of the Solr settings for a given
collection, and theschema.xml file specifies the schema that Solr uses when indexing documents.
To generate a skeleton of the instance directory run:
$ solrctlinstancedir --generate $HOME/solr_configs
After creating the configuration, we need to customize the schema.xml as mentioned in schema.xml
section.
c- Creating a Collection
After customizing the configuration we need to make it available for Solr to use by issuing the
following command, which uploads the content of the entire instance directory to ZooKeeper:
$ solrctlinstanced --create collection1 $HOME/solr_configs
Now we can create the collection by issuing the following command in which we specify the collection
name and the number of shards for this collection
$ solrctl collection --create collection1 -s {{numOfShards}}
d- Verifying the Collection
Once you create a collection you can use Solr web interface through http://host:port/solr (the host
is the URL or the IP address of the Solr server, the port is the Solr service port by default it is 8983). By
going to the Cloud menu, it will show the collections created and the shards for each one. as shown in
Figure 3, there are two collections collection1 and collection3. Collection 3 has two shards and all of
them are on the same server instance.
10
IDEAL Pages
Figure 3 SolrCloudCollections and Shards
2.1.2. Hadoop
In this section we will give a brief overview on Hadoop and its main components, Hadoop
Distributed File System (HDFS) and, Map-Reduce.
Hadoop is an open-source software framework for storage and large-scale processing of data-sets on
clusters of commodity hardware. Hadoop is characterized by the following features:
Scalable: It can reliably store and process PetaBytes.
Economical: It distributes the data and processing across clusters of commonly available
computers (in thousands).
Efficient: By distributing the data, it can process it in parallel on the nodes where the data is
located.
Reliable: It automatically maintains multiple copies of data and automatically redeploys
computing tasks based on failures.
2.1.2.1.
Hadoop File System (HDFS)
The Hadoop Distributed File System (HDFS) is a distributed file system designed to run on
commodity hardware. HDFS is highly fault-tolerant and is designed to be deployed on low-cost
hardware. HDFS provides high throughput access to application data and is suitable for applications that
have large data sets [6].
11
IDEAL Pages
Files are stored on HDFS in form of blocks, the block size 16MB to 128MB. All the blocks of the
same file should be of the same size except the last one. The blocks are stored and replicated on different
nodes called Data nodes. For better high availability the replicas should be stored on other rack, so that
if any rack is becomes down (i.e. for maintenance) the blocks are still accessible on the other racks.
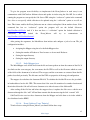
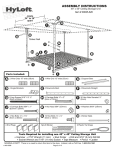
As shown in Figure 4 HDFS has master/slave architecture. An HDFS cluster consists of a single
Name node, a master server that manages the file system namespace and regulates access to files by
clients. In addition, there are a number of Data nodes, usually one per node in the cluster, which manage
storage attached to the nodes that they run on. HDFS exposes a file system namespace and allows user
data to be stored in files. Internally, a file is split into one or more blocks and these blocks are stored in a
set of Data nodes. The Name node executes file system namespace operations like opening, closing, and
renaming files and directories. It also determines the mapping of blocks to Data nodes. The Data nodes
are responsible for serving read and write requests from the file system’s clients. The Data nodes also
perform block creation, deletion, and replication upon instruction from the Name node. For more details
about HDFS refer to [6].
Another important tool that we use in the project is the Hadoop file system (fs) shell commands are
used to perform various file operations like copying file, changing permissions, viewing the contents of
the file, changing ownership of files, creating directories… etc. If you need more details about Hadoop
FS shell you can refer to [7].
12
IDEAL Pages
Figure 4 HDFS architecture
But here we will discuss the some commands that we will use or need in our project. For example to
create a directory on HDFS and change its user permissions we use the following two commands
$ hadoop fs -mkdir /user/cloudera
$ hadoop fs -chowncloudera /user/cloudera
To remove a directory we can use
$ hadoop fs -rmdir
or
$ hadoop fs -rmrdir
The -rm command removes the directory while the -rmr is a recursive version to delete none empty
directories.
To move a directory we can use
$ hadoop fs -mv source1 [source1 …] <dest>
Moves files from source to destination. This command allows multiple sources as well in which case
the destination needs to be a directory.
13
IDEAL Pages
An important command that we need is the -put command that uploads data from the local file
system to HDFS.
$ hadoop fs -put <localsrc> ... <dst>
This command can copy single source , or multiple sourcesfrom local file system to the destination
HDFS as shown in the following commands.
$ hadoop fs -put localfile /user/hadoop/hadoopfile
$ hadoop fs -put localfile1 localfile2 /user/hadoop/hadoopdir
$ hadoop fs -put localfile hdfs://nn.example.com/hadoop/hadoopfile
2.1.2.2.
MapReduce
Hadoop Map-Reduce is a software framework for writing applications which process vast amounts
of data (multi-terabyte data-sets) in-parallel on large clusters (thousands of nodes) of commodity
hardware in a reliable, fault-tolerant manner[8].
MapReduce uses the following terminologies to differentiate between kinds of process it runs.
Job – A “full program” - an execution of a Mapper and Reducer across a data set
Task – An execution of a Mapper or a Reducer on a slice of data
Task Attempt – A particular instance of an attempt to execute a task on a machine
Atypical Map-Reduce program consists of Map and Reduce tasks in addition to a Master task that
drives the whole program. The Master task can also overwrite the default configuration of the
MapReduce such as the data flow between the Mappers and Reducer.
A Map-Reduce job usually splits the input data-set into independent chunks called inputsplitseachinput-split is a set of conjunct blocks. These splits are processed by the map tasks in a
completely parallel manner. The framework sorts the outputs of the maps, which are then input to
the reduce tasks as shown in Figure 5. The framework takes care of scheduling tasks, monitoring them
and re-executes the failed tasks.
14
IDEAL Pages
Figure 5 MapReduce Operation
Typically the compute nodes and the storage nodes are the same, that is, the MapReduce framework
and the Hadoop Distributed File System are running on the same set of nodes. This configuration allows
the framework to effectively schedule tasks on the nodes where data is already present, resulting in very
high aggregate bandwidth across the cluster.
The Map-Reduce framework has a single master JobTracker and one slave TaskTracker per clusternode. The master is responsible for scheduling the jobs' component tasks on the slaves, monitoring them
and re-executing the failed tasks. The slaves execute the tasks as directed by the master [8].
2.1.2.3.
Event Indexer
In this section we will describe the Event_Indexer tool that we developed and then give a tutorial on
how to use it.
The input data is a set of text files extracted from the WARC files. And we need to index these files
into SolrCloud to make them accessible. The Event_Indexer will read those files from the HDFS as
input to the Mapper. The Mapper will read each file and create the fields and update SolrCloud by this
new document. It is clear that we do not need a Reducer because the Mapper directly sends its output to
the SolrCloud which in its turn add the files to the index using the fields received from the
Event_Indexer. The overall indexing process is performed in parallel distributed manner, that is, both
Event_Indexer and SolrCloud run in distributed manner on the cluster on machines.
15
IDEAL Pages
The Event_Indexer has two main classes; the IndexDriver and the IndexMapper. We built them in
JAVA using Eclipse on CentOS machine.
2.1.2.4.
IndexDriver.java
This is the master module of the program, which receives the input arguments from the system then
creates and configures the job and then submit this job to be scheduled on the system. The syntax of the
Event_Indexer command is:$ hadoop jar Event_Indexer.jar
-input input_dir/**/* -output outdir
-solrserver SolrServer
–collection collection_name
The program receives two required parameters in the command line which are the input and output
directories. The input directory contains the files to be indexed. The files should be arranged in
hierarchical structure of “input_dir/category_dir/event_dir/files”. The input_dircontains a set of subdirectories; each one is for a category of the events and should be named as the category. Each category
directory contains a set of sub-directories also each one is for a particular event and also should be
named as the event name. Each of these event directories contains all the files related to this event. This
structure is shown in Figure 6. The importance of this structure is that the mapper uses it to figure out
the category and the event name of each file. So this structure works as a metadata for the event files.
The output directory will be used as a temporary and log directory for the Event_Indexer. It will not
has any indexing data because the index will be sent to the Solr server.
Figure 6 The Events directory structure
16
IDEAL Pages
To give the program more flexibility we implemented the Event_Indexer in such away it can
communicate with SolrCloud on different cluster and update its index using the Solr API. So we when
running the program we can specify the Solr Server URL using the “-solrserver” option in the command
line. Also we can specify which collection to be updated using the “-collection” option as we will see
later. This feature enables the Event_Indexerto run on a cluster and update Solron another cluster. If the
command line has no “-solrserver” option the program will use the default Solrserver
http://localhost:8983/solr. And if it does not have a “-collection” option the default collection is
collection1.
So
by
default
the
Event_Indexer
will
try
to
communicate
to
http://localhost:8983/solr/collection1.
After parsing the arguments, the IndexDriver then initiate and configure a job to be run. The job
configuration includes:
Assigning the Mapper using the to be the IndexMapper.class
Setting the number of Reducer to Zero because we do not need Reducers.
Setting the input directory
Setting the output directory
2.1.2.5.
IndexMapper.java
The IndexMapper reads all the lines from the file and sum-up them to form the content of the file. It
also finds out the event category, the event name, the file URL as well as the file name which are some
of the fields of the document to be indexed. The category and the event name are extracted from the file
path as described previously. The file name and the URL are properties of the map job configuration.
The mapper also calculates the document ID field. To calculate the find the ID we use the java builtin hashcodebased on the file URL. This means that if the same file transferred to another location and
then indexed then the Solr will add a new document to its index because of the different ID.
After reading all the file line and before the mapper closes, it updates the Solr server with the new
document through the Solr “add” API and then commits this document using the Solr “commit” API.
SolrCloud Service receives these documents from the Mapper and adds them to its index which is
also distributed on the HDFS.
2.1.2.6.
Event_Indexer Usage Tutorial
To index data set using the Event_Indexer you should follow these steps
17
IDEAL Pages
1. First you must make sure that the Solr Service is running properly. You can do that by browsing
the Solr Server URL on port 8983
2. If Solr Service is not running you can restart it from the Cloudera Service Manager
3. If it is running but has no collections, you can add collections as shown in the SolrCloud section
using the solrctl tool
4. If you wish to clear the index of the collection, you can use the command
$ solrctl collection --deletedocscollection_name
5. Prepare the data to be indexed: the files should be organized in the hierarchical structure
described earlier. We assume the data are in the $HOME/sample_datadirectory.
6. Upload the data to the HDFS using this command. assuming that we will upload the data from
$HOME/sample_data to the hdfs_sample_datadirectory on HDFS, we will use
$ hadoop fs -put $HOME/ sample_datahdfs_sample_data
7. Confirm that the data is correctly uploaded to the HDFS using the Hue file manager or using the
command
$ hadoop fs -lshdfs_sample_data
8. Use the Event_Indexer.jar to index the files, the command is
$ hadoop jar Event_Indexer.jar –input hdfs_sample_data/**/* -output outdir
This command will update the index on the default Solr server and the default collection
(http://localhost:8983/solr/collection1/). We have to note that if the outdir already exists this will
result in an error.
9. If you want to specify another server and/or collection you can use the “-solrserver” and/or “collection” options as follow
$ hadoop jar Event_Indexer.jar
-input
solrserverhttp://12.34.56.78:4321/solr
hdfs_sample_data/**/* -output
outdir
-
-collection collection3
This command tells the indexer to update the Solr server on the IP address 12.34.56.78 on port
number 4321 and add the documents to the index of collection3.
18
IDEAL Pages
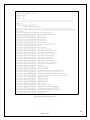
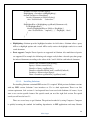
If the Event_Indexer runs correctly you will receive output similar to Figure 7. However this output
may change based on the Hadoop version. The first set of lines (first 11 lines) in the output is generated
by the IndexDriver class to show the program parameters. The other output is reported from the MapReduce to give some statistics about the job running.
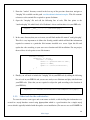
Line 13in this output gives us important information which “Total input paths to process:
8”statement. It says that there are 8 files to be indexed. You can also consult the Solr Server web
interface, the number of documents should be increased by 8 if these documents were not indexed
before. This is shown in Figure 8 where the number of documents is 8 because we deleted all the
documents before running the Event_Indexer.
19
IDEAL Pages
.
Figure 7 Map-Reduce terminal Output
20
IDEAL Pages
Figure 8 Solr Web interface
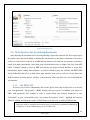
2.2. Web Interface for the indexed documents
After Indexing the documents into Solr using Hadoop's map-reduce function, the next major step in
the project comes into action which is building the web interface for the indexed documents. In order to
do this we need to find a web tool or an API that can interface well with Solr and provides an interface
for all of its major functionality. After doing some research in this issue we found a web Solr client API
called "Solarium" which is based on PHP and provides an Object oriented interface to major Solr
functionality. Before talking about Solarium, we will first briefly discuss the available Solr REST API
and its difficulties that led us to think about other interface, then next we will give a brief discussion
about Solarium, and after that we will have a subsection for other tools that were used in building the
web interface.
2.2.1. Solr REST API
In order to access Solr's functionality and execute queries from your web browser or even from
your web application, Solr provides a REST interface that you can use to formulate your queries as
URLs with parameters. For example in order to search within your indexed documents in core
"collection1" on your "preston.dlib.vt.edu" server about the keyword "sisters", highlight the keyword
within its context, and return the results in JSON format, you may need to define a URL like this:
http://preston.dlib.vt.edu:8983/solr/collection1/select?q=Sisters&wt=json&indent=true&hl=true&
hl.simple.pre=%3Cem%3E&hl.simple.post=%3C%2Fem%3E
21
IDEAL Pages
As we see, formulating complex queries this way is tedious and inconvenient for users accessing
Solr from the browser and also for developers trying to create dynamic queries programmatically.
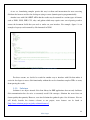
Another issue with Solr's REST API is that the results may be returned in a various types of formats
such as XML, JSON, PHP, CSV, ruby, and python which may require some sort of parsing work to
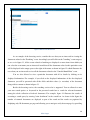
extract the document fields that you need to render on your interface. For example, figure 9 is an
example of a query result returned by Solr formatted in JSON.
Figure 9 A Solr query result formatted in JSON
For these reasons, we decided to search for another way to interface with Solr that makes it
easier for developers to access Solr functionality without the need to formulate complex URLs or worry
about parsing the results.
2.2.2. Solarium
Solarium is an object oriented Solr client library for PHP applications that not only facilitates
Solr communication but also tries to accurately model Solr concepts. Solarium has more focus on
feature quality than quantity. However, over time Solarium has gathered quite a list of features. Next we
will briefly describe the features relevant to our project, more features can be found at
[http://www.solarium-project.org/why-solarium/features/].
22
IDEAL Pages
Query building API: Solarium makes it easier for formulating queries. Rather than using Solr's
REST interface described previously and defining URL queries with complex parameters
manually, Solarium provides a powerful querying API that allows developers to build Solr
queries easily and conveniently using object oriented concepts. For example, the following code
snippet describes how can we formulate the same query defined in the previous subsection easily
using Solarium.
$client = new Solarium\Client($config);
$query = $client->createSelect();
$query->setFields(array('id','url'));
$query->setStart($start)->setRows(10);
// get highlighting component and apply settings
$hl = $query->getHighlighting();
$hl->setFields('content');
$hl->setSimplePrefix('<b><span style="color: red;">');
$hl->setSimplePostfix('</b></span>');
$query->setQuery($keyword);
As we see in the previous code everything in Solarium is treated as object with their own
methods that models Solr concepts and functionality. For example the $client variable is an
object that is used to establish a connection between a PHP program and a Solr instance by using
the $config variable which holds the server name and access port and the path of the Solr core.
The same for the query ($query) and the highlight objects ($hl).
Receiving result sets: Solarium also provides a result API to easily retrieve results for a search
result document. Using this feature, the developer now would not worry about parsing the results
to extract the information he wants to render on the interface. For example, the following code
snippet is used to render the results of the defined query in the previous subsection by displaying
each document's fields and values in the result set of the query.
23
IDEAL Pages
$resultset = $client->execute($query);
$highlighting = $resultset->getHighlighting();
foreach ($resultset as $document){
foreach ($document as $field=>$value){
echo "<b>$field</b>: $value<br>";
}
$highlightedDoc = $highlighting->getResult($document->id);
if ($highlightedDoc) {
foreach ($highlightedDoc as $field => $highlight) {
echo "<b>$field</b>: " .implode(' (...) ', $highlight) . '<br/>';
}
}
}
Highlighting: Solarium provides highlighted matches for field values. Solarium offers a query
API to set highlight options and a result API to easily retrieve the highlight results for a search
result document.
Facet support: Complex Faceted queries are supported in Solarium. Also multi-faceted queries
are supported. For example, the following code snippet easily defines a faceted query that groups
the indexed documents according to the values of the "stock" field for each indexed document.
$client = new Solarium\Client($config);
$query = $client->createSelect();
$facetSet = $query->getFacetSet();
$facetSet->createFacetField('stock')->setField('inStock');
$resultset = $client->select($query);
$facet = $resultset->getFacetSet()->getFacet('stock');
2.2.2.1.
Installing Solarium
For installing Solarium a minimal PHP version 5.3 is required. While previous Solarium versions
with any PHP5 version, Solarium 3 uses interfaces so 5.3+ is a hard requirement. There is no Solr
version requirement. Solr versions 1.4 and upwards have been tested with Solarium. Of course, if you
want to use version specific features like spatial search you need the right Solr version. For spatial
search you will need at least 3.1.
There are several ways to get Solarium. The preferred method is by using Composer. Composer
is quickly becoming the standard for handling dependencies in PHP applications and many libraries
24
IDEAL Pages
support it. Alternatively you can download a pre-packed release from GitHub, or use Git. Next we will
describe the steps of installing Solarium using composer.
1. First go to [https://getcomposer.org/] where you can download and install composer
according to your platform. You can download and install composer from the command line
or you can just download a windows installer (Of course if you are using windows). Our
project's development apache server was installed on a windows machine as so our choice
was to download and install the windows installer.
2. After installing composer, go to the location (Typically a directory on your apache web
server in which your entire project code will reside) in which you want to install Solarium.
Create a text file and name it composer.json. Open the file and write the following JSON
code which instructs composer to download Solarium version 3.2.0.
{
"require": {
"solarium/solarium": "3.2.0"
}
}
3. After that, open a terminal or command line and point to the directory of the composer.json
file you have just created in the previous step. Then type the following comand and hit enter.
This command will fetch Solarium 3.2.0 for you.
composer install
4. After fetching Solarium, you will find a directory called "vendor" created on the same
directory as the file composer.json was created. The folder "vendor" contains all Solarium
files required for interfacing with Solr.
2.2.2.2.
Using Solarium in your PHP code
In order to include Solarium functionality in your PHP file, you need to do the following steps:
25
IDEAL Pages
1. From the "vendor" directory created in the last step of the previous discussion, navigate to
"init.php" file available on this path: vendor\solarium\solarium\examples. This file contains
references to the seminal files required to operate Solarium.
2. Open the "init.php" file and add the following line of code. This line points to the
"autoloader.php" file which loads all of Solarium's classes and interfaces for your PHP code.
require __DIR__.'/../../../autoload.php';
3. In the same directory that you are in now you will find another file named "config-dist.php".
This file is very important as it defines the $config variable which will hold the information
required to connect to a particular Solr instance installed on a server. Open this file and
update the code according to your own server location and Solr installation. For our project,
the next lines of code points to our Solr instance.
$config = array(
'endpoint' => array(
'server' => array(
'host' => 'preston.dlib.vt.edu',
'port' => 8983,
'path' => '/solr/collection1',
)
)
);
4. Finally, you will need to include the "init.php" file in your PHP code by adding the following
line of code in your PHP file and you are now ready to use Solarium and play with Solr from
your PHP code. (Note that you are required to adjust the path according to the location of
your PHP file).
require('../../vendor/solarium/solarium/examples/init.php');
2.2.3. Other tools for the web interface
To store the various event types and event names available, a table holding this information was
created in a mysql database created using phpmyadmin which is a good interface for a simple mysql
server which is typically included with the apache server installation. (For our case we used XAMPP for
26
IDEAL Pages
windows,
a
completely free, easy to install Apache distribution containing MySQL, PHP, and
Perl. available at [https://www.apachefriends.org/index.html]).
To speed up the communication with the Solr instance as well as the mysql database, JQuery's
AJAX HTTP GET requests were applied. Requests are sent from the main HTML interface, packaged as
an HTTP GET request in JQuery and then posted to a server file written in PHP for processing and then
the results are returned back to be rendered to the user as HTML.
For a better interface colors and styles, Twitter Bootstrap was adopted for the HTML user
interface. Bootstrap can be downloaded from [http://getbootstrap.com/]. To use Bootstrap in your
HTML interface, you can follow these steps:
1. After downloading Bootstrap and extracting the contents of the downloaded zip file, you will
find three main folders: css, img, and js. (This may differ according to your Bootstrap
version; here I am using an older version).
2. In your HTML file you need to include two files: "bootstrap.css" and "bootstrap.js". The first
one contains the various CSS styles that you can apply to your HTML DOM elements, and
the second file contains the JavaScript code that is required for these styles to work.
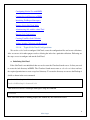
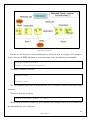
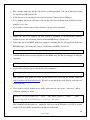
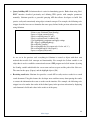
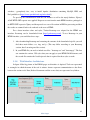
2.2.4. Web Interface Architecture
In figure 10 the big picture of the IDEAL pages web interface is depicted. Tools are represented
as rectangles in which the name of the tool is written. Arrows represent communication or data flows
between the various tools. Data (Indexed documents and the events data) are represented as cylinders.
Figure 10 Web Interface Architecture
27
IDEAL Pages
To better understand the web interface architecture, it is better to describe a typical use case and
describe how each component perform its work and interact with other components and how data flows
between them.
Consider for example a typical search query as the one presented in section 2.1. The user is
interacting with the HTML interface in which he can enter search keywords and execute queries. When
the user submits his search keyword an HTTP AJAX request is packaged using JQuery holding the
search keyword, the request type (i.e. Search) and the starting point from which results are required to be
returned (This is required in the case of paginated search as we will see in the next section). A server
PHP program resides on an Apache server listening for requests sent from the HTML interface and
respond accordingly. In our search example, the PHP server program receives the packaged search
request sent from JQuery and it executes the request by first creating a connection to the Solr Server
instance (Which may reside on another server) using Solarium and formulating a Solarium search query
using the received user's keyword. The Solr server receives the search request created by Solarium and it
executes the query on the indexed documents stored in the referenced core and it returns the response in
whatever format (Default is JSON). Solarium receives the results and it creates a result set object
formatted as associative arrays that can be easily dealt with in PHP. Then the PHP server program
renders the results to the HTML interface in whichever form required. The HTML interface also
provides a browsing capability by allowing the user to browse the documents by events information
(Event category and Event Name). Accordingly a database of events information was created on a
MySQL Server using PHPMyAdmin tool holding all the events categories (i.e. Earthquake, bombing,
flood,...etc) and event names (i.e. Chile Earthquake) which is communicated to the PHP server to be
rendered on the HTML interface as menus to select from (See the next section).
3. User's Manual
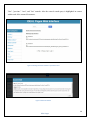
When the application is first loaded, the screen in figure 11 appears displaying all the event
categories and event names extracted from the mysql database as stated in the previous section and
populated into a vertical menu to allow you to browse documents by events information. Also as we see
in the figure, there is a search box in which you can enter your keywords to search within all the indexed
documents and return those documents matching the entered keyword.
28
IDEAL Pages
Figure 11 Web Interface Main Screen
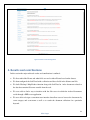
As an example of the browsing service, consider the case that you are interested in viewing the
documents related to the "Bombing" event. Accordingly you will click on the "bombing" event category,
as we see in figure 11, all the events related to bombing are displayed as menu items from which you
can select the event name you are interested in and then all the documents related to this particular event
will be displayed in the empty space to the right of the menu as shown in figure 12 which illustrates the
case when you are interested to view all the documents related to the "Somalia Bomb Blast" event.
You are also allowed to view a particular document with all its details by clicking on its
displayed information. For example, if you click on the displayed information of the first displayed
document, you will be presented with all the fields and their values (i.e. metadata) of the document
along with its content as shown in figure 13.
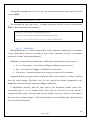
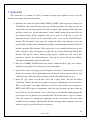
Beside the browsing service, the searching service also is supported. You are allowed to enter
your own search queries or keywords in the presented search box to search for relevant documents
among the whole collection of indexed documents. For example, figure 14 illustrates the results of
executing a search query by entering "train derailment" in the search box. As shown in the figure the
number of returned documents are displayed as part of the result and the results are paginated by
displaying only 10 documents per page and allowing you to navigate easily between pages by providing
29
IDEAL Pages
"first", "previous", "next", and "last" controls. Also the entered search query is highlighted in context
within each of the returned documents.
Figure 13 Viewing Documents Related to a Particular Event
Figure 12 Viewing Documents related to a particular event
Figure 13 Document Details
30
IDEAL Pages
Figure 14 Search results and Pagination
4. Results and contributions
In this section the major achieved results and contributions is outlined:
We first studied the Events and what fields we need to index Events based on the dataset.
We then configured the SolrCloud with a collection and these fields in the Schema.xml file.
We built Hadoop's Map-Reduce function along with SolrCloud to index documents related to
the data that contains 60 events crawled from the web.
We were able to find a way to interface with the Solr server in which the indexed documents
reside through a PHP server application.
We were able to design a convenient user interface that allow users to browse the documents by
event category and event name as well as to search the document collection for a particular
keyword.
31
IDEAL Pages
5. Future works
This section outlines our thoughts of what is still required to be done for those who will continue on
and extend our project:
The first thing actually required to be done is to make use of the evolving cluster in the digital
libraries lab in VT for distributed processing. What we did here in this project was just a test case
on a single node, but for future extensions, the cluster consisting of 11 nodes should be utilized.
This may require some slight changes in the configurations.
Another important feature that may be added is to integrate the browsing service with the
searching service. The user should be allowed to browse documents by events information as
was described in the user manual, but also he should be able to perform keyword search on the
set of documents resulted from his browsing activity. On the other hand, the user should be
allowed to browse search results by events information returned from keyword search queries.
6. References
[1] http://lucene.apache.org/solr
[2] https://cwiki.apache.org/confluence/display/solr/SolrCloud
[3] http://www.cloudera.com/content/cloudera-content/cloudera-docs/Search/latest/Cloudera-SearchUser-Guide/csug_solrctl_ref.html
[4] http://www.cloudera.com/content/cloudera-content/cloudera-docs/Search/1.0.0/Cloudera-SearchInstallation-Guide/csig_admin_solr_with_solrctl.html
[5] http://www.solrtutorial.com/schema-xml.html
[6] http://hadoop.apache.org/docs/r1.2.1/hdfs_design.html
[7] http://hadoop.apache.org/docs/r0.19.0/hdfs_shell.html
[8] https://hadoop.apache.org/docs/r1.2.1/mapred_tutorial.html
[9] http://wiki.solarium-project.org/index.php/Main_Page
[10] Edward A. Fox, Kristine Hanaa et.al. "IDEAL pages NSF project proposal".
32
IDEAL Pages
7. Appendix
This section acts as a manual or a flyer to describe the major steps required by users to use the
interface in accessing the indexed documents.
1. Download and extract the zip file named "IDEAL_PAGES" from our project's collection on
VTechWorks. After extracting the zip file, you will find two folders, one single text file, one
single jar file, and one single zip file. One folder is named "app" contains the files of the web
Interface's source code, and the other named "vendor" which contains all the source files for
the Solarium library already configured and can be used out of the box to access the
documents already indexed on the "preston.dlib.vt.edu" server on the "Solr/Collection1"
instance. The file named "ideal_pages.sql" contains the SQL script required to create the
mysql database and the table containing the available events information required for the web
interface operation. The file name "Event_indexer.jar" is an executable file that can be used
from a terminal to index the documents on the Solr server using the Hadoop Map-Reduce
function. The zip file named "Indexer_eclipse_project" contains the Java source files
required to generate the "Event_indexer.jar" that can be opened directly from Eclipse
development environment for any modification.
2. Place the two IDEAL_PAGES folder along with its contained folders ("app" and "vendor")
together on your Apache server instance on your own machine.
3. Open the file named "ideal_pages.sql" and copy the code inside it. Open the interface of your
mysql server instance (If you phpmyadmin you can open it) and execute the code on your
own mysql server. This will create the database and the table automatically for you.
4. Inside the "app" folder you will find 4 files and a single folder: The first file named
"index.html" which is the main access point to our project containing the web user interface.
There is a file named "server.php" which acts as our server that accepts the user requests as
HTTP AJAX GET requests, communicate with Solr using Solarium and then return the
results. There is also a file named "ajax.js" which acts as our controller which packages the
user requests in a way that the server can understand. The last file named "style.css" contains
CSS code required for designing the appearance of the web interface. The only folder
available named "bootstrap" which contains Twitter's bootstrap library required by the web
interface to provide a good look and feel experience.
33
IDEAL Pages
5. To access the web interface, just open a browser and enter the following URL:
http://you_server_name/IDEAL_PAGES/app
34
IDEAL Pages