1
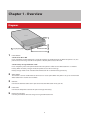
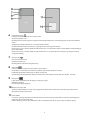
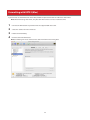
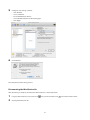
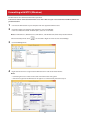
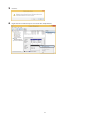
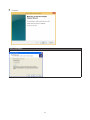
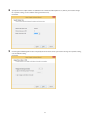
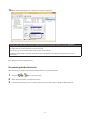
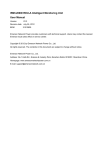
MiniStation Air
HDW-PDU3 Reference Guide
www.buffalotech.com
35020309-01
2014-04
Contents
Chapter 1 - Overview.......................................................4
Diagrams............................................................................................4
Recommended Usage.......................................................................7
Battery Handling Guidelines and Safety Precautions............................. 7
Computer Connection (USB Connection) Guidelines.............................. 8
Restrictions.................................................................................................. 9
Chapter 2 - Opening Settings...................................... 11
What is Settings?............................................................................ 11
Opening Settings........................................................................... 11
Windows....................................................................................................11
Mac.............................................................................................................12
Chapter 3 - Formatting................................................. 13
What is Formatting?....................................................................... 13
Windows....................................................................................................13
Mac.............................................................................................................13
Notes............................................................................................... 13
Formatting with FAT32 (Mac)........................................................ 14
Formatting with NTFS (Windows)................................................. 16
Chapter 4 - Wireless Connection to Router................. 22
Configuration Through a Mobile Device...................................... 22
Configuration Through a Computer............................................. 22
2
Chapter 5 - Multimedia................................................ 23
What is DLNA?................................................................................ 23
Play Files......................................................................................... 23
Notes............................................................................................... 24
Chapter 6 - Appendix................................................... 25
Specifications................................................................................. 25
Product Specifications..............................................................................25
USB Interface Specifications....................................................................26
Wireless Interface Specifications.............................................................26
Troubleshooting............................................................................. 27
Cannot connect to MiniStation Air though Wi-Fi settings have been
configured in my mobile device..............................................................27
“.qwifi”, “.twonky”, and “.lighttpd” folders have appeared on my
MiniStation Air..........................................................................................27
Thumbnails are not displayed properly..................................................27
Chapter 7 - Regulatory Compliance Information....... 28
3
Chapter 1 - Overview
Diagrams
1
Power Button
Switch Power On or Off
Press and hold the power button for 3 seconds to power on the MiniStation Air. When the power is on, the
power/access LED is lit green. When the power is off, the power/access LED is off.
Switch Battery Charger Mode On or Off
Press and quickly release the power button when the power is off to use the MiniStation Air as a mobile
battery. When in battery charger mode, the power/access LED is lit orange.
Battery charger mode is not available while MiniStation Air is communicating wirelessly.
2
3
4
5
AOSS Button
This button is used to enable AOSS to connect to an access point. When the power is on, press and hold the
AOSS button for 2 seconds to start AOSS.
USB Port
Connect the USB data cable to this port to connect the MiniStation Air to your PC.
Power Port
Connect the USB power cable to this port to charge the battery.
Battery Charger Port
Connect your mobile device to charge it using the MiniStation Air.
4
6
7
8
9
Power/Access LED
Indicates the power or hard drive access status.
On (Green): Power is on.
Blinking (Green): Accessing the hard drive when the MiniStation Air is connected to the PC with the USB data
cable.
On (Orange): The MiniStation Air is in mobile battery mode.
On (Red): The MiniStation Air battery is getting low. Please charge the battery.
Blinks once every 2 seconds (Red): The MiniStation Air is in sleep mode. Refer to “Sleep Mode” section below for
more information.
Blinks twice every 2 seconds (Red): The MiniStation Air is in sleep mode and its battery is getting low. Please
charge the battery.
Wireless LED
Indicates wireless status.
On (Blue): Power is on.
Blinking (Blue): Communicating wirelessly.
AOSS LED
Indicates AOSS connection status with the access point.
On (Amber): Successfully connected using AOSS. LED will turn off after 1 minute.
Double Blinks (Amber): Waiting for an AOSS security key.
Continuously Blinking (Amber): AOSS connection was not established. LED will turn off after 1 minute.
Battery LED
Lights when the MiniStation Air battery is being charged.
On (Red): Charging.
On (Green): Charge complete.
10Wireless Security Label
Shows the MiniStation Air’s SSID and encryption key. Refer to this label when connecting wirelessly to the
MiniStation Air for the first time.
11Reset Button
To reset all settings, hold down this button until the wireless LED turns off (about 3 seconds). Resetting does
not delete data on the hard drive.
Before resetting, connect the USB power cable to the MiniStation Air to ensure constant power supply.
5
Sleep Mode
The MiniStation Air has 2 types of sleep mode, as well as a “Do not sleep” option that is selected by default. You can
change sleep mode settings from Settings or the MiniStation Air2 app.
The list below shows each mode’s LED appearance and the procedure to return from sleep mode.
Type
LED
How to Return
eco
Blinks once or twice every 2 seconds (Red)*
Off
Press power button briefly.
Balanced
Blinks once or twice every 2 seconds (Red)*
On or blinking (Blue)
The MiniStation Air will return from sleep mode
automatically when it is accessed.
*When the battery is getting low, the LED will blink twice every 2 seconds.
6
Recommended Usage
Battery Handling Guidelines and Safety Precautions
This product includes an internal lithium-ion battery. Please follow the safety precautions below.
• If the battery pack is leaking fluid, do not come into contact with the fluid.
Battery fluid can cause burns. Also, if the fluid gets on your skin or clothes, immediately rinse the fluid off with
water, and seek medical attention. If the fluid gets in your eyes, it can lead to permanent loss of eyesight, so
immediately flush your eyes thoroughly with clean water and seek medical treatment.
• Never get the battery pack wet, or put it inside water or other liquids.
This can cause overheating, rupture, ignition, or a failure of the battery pack. If the battery pack gets wet,
immediately stop usage, and contact the Buffalo Support Center or your local dealer.
• Never disassemble or modify the battery pack.
This could cause the fluid in the battery pack to splash out, which can lead to permanent loss of eyesight if it gets
in your eyes, or can lead to overheating, rupture, or ignition of the battery.
• Charge the MiniStation Air periodically.
Charging the MiniStation Air can prevent loss of performance over time.
• When charging is complete, remove the USB power cable from the MiniStation Air.
• Do not expose the battery to heat or fire, or store in a hot place. Avoid exposure to direct sunlight.
• Do not drop the battery on hard surfaces or expose it to mechanical shock.
• Keep the battery out of the reach of children.
• If the battery is swallowed, seek medical advice immediately.
• Even when the MiniStation Air is turned off, standby mode consumes a small amount of power.
A fully charged battery will last about a week.
• The battery should be charged before use.
Always use the correct charger and refer to this manual for charging instructions.
• Do not leave the battery connected to the charger when not in use.
• After extended periods of storage, it may be necessary to charge and discharge the battery several times to
obtain maximum performance.
• The battery gives its best performance at normal room temperature (18–27°C, 65–80° F).
7
• If the MiniStation is charging while connected wirelessly, the internal temperature can exceed 45°C (113° F).
Charging will automatically stop if 45°C (113° F) is exceeded, and start again once temperature drops to a safe
level.
• Retain the original product documentation for future reference.
• Do not remove the MiniStation Air’s battery unless specifically instructed to by Buffalo.
• Do not discard this product with other household waste. Recycle the battery in accordance with local
regulations.
Computer Connection (USB Connection) Guidelines
• To avoid damage to data, follow these precautions:
Never configure the MiniStation Air as a destination for virtual memory.
Never do any of the following while data is being accessed.
• unplug the USB data cable
• turn off your computer
• put your computer into standby, hibernate, or sleep mode
• The MiniStation Air supports hot-plugging.
You can plug or unplug the USB data cable even if the MiniStation Air and your computer are on. However, never
unplug the USB data cable while data is being accessed, or your data may be lost or damaged.
• Don’t use the MiniSation Air as the boot drive for a computer.
• The MiniStation Air supports USB 3.0.
If it is connected to a USB 2.0 or USB 1.1 port, Windows may display a message that a high-speed USB device is
connected to a non high-speed USB device. Move the MiniStation Air to a USB 3.0 port for best performance, or
close the message and continue.
• You may hear some noise while the MiniStation Air is working, especially when it is booting or being accessed.
This is normal.
• If your Windows PC will not boot while the MiniStation Air is connected, connect the MiniStation Air after
booting your PC. To turn your PC on or off while the MiniStation Air is connected, refer to your computer’s
manual on changing the BIOS setting to only boot from an internal hard drive.
• When you are using Windows, keep the default NTFS format.
HFS+ is not supported. To use with Mac, reformat the MiniStation Air with FAT32. Note that the maximum size of
a file on a FAT32 hard drive is 4 GB.
• Some computers may display a “Delayed Write Failed” error when they return from an energy-saving state. If this
happens, unplug the MiniStation Air before putting your computer into the energy-saving mode.
8
Restrictions
Wireless Connection
• While the MiniStation Air is connected to a computer with the USB data cable, Wi-Fi is disabled.
Unplug the USB data cable before connecting wirelessly.
• Up to 8 devices can be connected wirelessly to the MiniStation Air.
• When the MiniStation Air is connected to the Internet through a wireless router (Internet mode), the wireless
throughput to and from your portable device drops to half.
With this configuration, only a single connected wireless device is recommended.
• Network addresses on the 192.168.14.xxx subnet are reserved for use by the MiniStation Air. When the
Ministation Air is connected to a wireless router, the IP address of the router should be on a different subnet
(anything besides 192.168.14.xxx). For example, 192.168.11.1 or 192.168.15.1 would work fine for the router.
• The MiniStation Air may not detect a wireless router if more than 20 are in the vicinity.
• When the MiniStation Air is connected to a wireless router by WPS, do not disable WPS in the router’s settings.
Doing so will disconnect the MiniStation Air.
• If “Disclose to Network” is enabled, you can access the MiniStation Air wirelessly through the access point instead
of directly connecting your mobile device.
It is highly recommended to disable this feature when the MiniStation Air is on a public network.
Enable this feature only when you want to share the data stored in the MiniStation Air.
Charging
• To charge the MiniStation Air, it is recommended that you use the supplied USB power cable and AC adapter to
connect the MiniStation Air to an outlet.
If the MiniStation Air is charging through a PC, the charge time will vary depending on the computer. Charge
times will slow significantly if the MiniStation Air is also in use at the time.
• If the MiniStation Air is charged while connected wirelessly, the battery LED may turn off and charging may not
be performed.
• If the MiniStation is charging while connected wirelessly, the internal temperature can exceed 45°C (113° F).
Charging will automatically stop if 45°C (113° F) is exceeded, and start again once temperature drops to a safe
level.
MiniStation Air2 (Application)
Picture Files
• Large file sizes may cause the slideshow to stall.
9
Music Files
• Use UTF-8 encoding when editing ID3 tags.
• Sorting by “Songs” in Music Player may cause system slowdown or file display errors if there is a large number of
music files. In such a case, sorting by “Artist” or “Album”, or using File Explorer, is recommended.
Video Files
• To play a video file, convert its bitrate or format to one compatible with your mobile device.
It is recommended to convert to a portable format (about 2 Mbps).
• If using Video Player and there is a large number of video files stored, system slowdown or file display errors may
occur.
• When sleep mode is enabled, caching will also be enabled.
With caching, when playing a video, it will be copied to your mobile device. After copying finishes, the
MiniStation Air enters sleep mode and playback switches from the original video to the copied video file in your
mobile device. Playback may be momentarily interrupted. To disable this feature, select “Do not sleep” under
sleep mode settings.
Caching will require the following conditions:
• The MiniStation Air2 app is used to play video files.
• Only one device is currently connected to the MiniStation Air (accessed by no other device).
• The available storage space in your mobile device is larger than the video file size.
• No other DLNA players installed in your mobile device is currently accessing the MiniStation Air.
Other Restrictions
• Do not shake or drop the MiniStation Air during boot. This could damage the hard drive.
10
Chapter 2 - Opening Settings
What is Settings?
Settings is the configuration GUI for the MiniStation Air. Settings is accessible from a browser window in your
computer.
The following browsers are supported. Accessing from other browsers may not display the Settings page properly.
Windows
Mac
Internet Explorer 10 or later
Google Chrome 31 or later
Firefox 25 or later
Google Chrome 31 or later
Safari 7.0 or later
Firefox 18 or later
Notes:
• Default iOS and Android browsers are not supported. Use the MiniStation Air2 app when accessing Settings
from a mobile device.
• Configure the browser size to larger than 800 x 600. Otherwise, the Settings page may not be displayed properly.
Opening Settings
Follow the procedure below to open Settings.
Note: Turn on the MiniStation Air and confirm the wireless LED is lit or blinking.
Windows
Windows 8.1, Windows RT 8.1, Windows 8, Windows RT
1
Move the cursor to the right top and click the settings icon
2
Click the network icon
3
Select the SSID of your MiniStation Air.
4
Enter the encryption key and click Next.
.
in the system tray.
Note: If a message about sharing (Ex: “Do you want to find PCs, devices, and content on this network, and
automatically connect to devices like printers and TVs?”) is displayed, click No.
5
Open a browser and enter 192.168.14.1 in the URL field.
11
Windows 7
1
Click the network icon
2
Select the SSID of your MiniStation Air.
3
Enter the encryption key and click OK.
4
Open a browser and enter 192.168.14.1 in the URL field.
in the system tray.
Windows Vista
1
Click the network icon
2
Click Connect to a network.
3
Select the SSID of your MiniStation Air.
in the system tray.
Note: If a message appears asking you to press the configuration button on your access point, click I want to
enter the network key or passphrase instead.
4
Enter the encryption key and click Connect.
Note: If the “Set Network Location” screen is displayed, select Cancel.
5
Open a browser and enter 192.168.14.1 in the URL field.
Windows XP
1
Click the network icon
2
Select the SSID of your MiniStation Air.
3
Enter the encryption key and click Connect.
4
Open a browser and enter 192.168.14.1 in the URL field.
in the system tray.
Mac
1
Click
2
Select the SSID of your MiniStation Air.
3
Enter the encryption key and click Connect.
4
Open a browser and enter 192.168.14.1 in the URL field.
in the menu bar.
12
Chapter 3 - Formatting
What is Formatting?
Formatting is a process that creates a file system, allowing a drive to be usable with your computer.
The MiniStation Air is formatted with NTFS by default.
Windows
Keep the default NTFS format.
Mac
The MiniStation Air is formatted with NTFS by default. For USB connection, reformat it with FAT32 as described in
this manual.
Notes:
• If the MiniStation Air is reformatted with HFS+, files on it will no longer be accessible from your mobile device. If you have already reformatted the MiniStation Air with a different partition, use the procedure in this
manual to reformat it with FAT32.
• For wireless connection, reformatting is not necessary. Refer to the quick setup guide for how to connect
your Mac to the MiniStation Air wirelessly.
Notes
• Never unplug, reset, or turn off the computer during the formatting process. This could result in damage to the
drive or other problems. Proper operation cannot be guaranteed if the format process is interrupted.
• Formatting will erase all data on the hard drive. Before formatting, back up any data. The user is responsible for
any data lost due to formatting of the hard drive.
Don’t format the wrong drive! Check the drive letter and partition name carefully.
13
Formatting with FAT32 (Mac)
If you want to use the MiniStation with a Mac, follow the procedure below to reformat it with FAT32.
Note: After formatting with FAT32, only files of 4 GB or smaller can be saved to the drive.
1
Connect the MiniStation to your Mac with the supplied USB data cable.
2
Select Go - Utilities from the menu bar.
3
Double-click Disk Utility.
4
Click the disk to be formatted.
Note: Formatting will erase all data on the disk. Don’t format the wrong disk!
14
5
6
Configure each setting as below.
• Click Partition.
• Select 1 Partition.
• Enter HDW-PDU3 for “Name”.
• Select MS-DOS (FAT) for the formatting type.
• Click Apply.
Click Partition.
This completes the formatting process.
Dismounting the MiniStation Air
After formatting is complete, dismount the MiniStation Air as described below.
1
Drag the MiniStation Air’s icon to the trash
2
Unplug the MiniStation Air.
. Or, click the dismount icon
15
in the sidebar of the Finder.
Formatting with NTFS (Windows)
The MiniStation Air is formatted with NTFS by default.
If the drive has been formatted with FAT32 to use with a Mac and you want to reformat with NTFS, follow the
procedure below.
1
2
Connect the MiniStation to your computer with the supplied USB data cable.
Click Start. Right-click Computer (My Computer) and select Manage.
If the “User Account Control” window opens, select Yes or Continue.
Note: For Windows 8.1, Windows RT 8.1, Windows 8, and Windows RT, follow the procedure below:
Switch to desktop mode. Click
on the taskbar. Right-click This PC and select Manage.
3
Click Disk Management.
4
Right-click the disk area assigned to the MiniStation Air and select Delete Volume.
Notes:
• Formatting will erase all data on the disk. Don’t format the wrong disk!
• If the disk assigned to the MiniStation Air appears as “Unallocated”, proceed to step 6.
16
5
Click Yes.
6
Right-click the unallocated space and select New Simple Volume.
17
7
Click Next.
If This Screen Opens
Select Primary partition and click Next.
18
8
9
Specify the size in Simple volume size (Partition size or Amount of disk space to use). Unless you need to change
to a specific setting, use the default setting (maximum size).
Click Next.
Click Assign the following drive letter and specify the drive letter. Unless you need to change to a specific setting,
use the default setting.
Click Next.
19
10Configure each setting as below.
(1) Select Format this volume with the following settings (Format this partition with the following settings).
(2) Select NTFS.
(3) Unless you need to change a specific setting, use the default settings.
(4) Enter HDW-PDU3 for “Volume label”.
(5) Click Next.
Note: Don’t select Perform a quick format.
11Click Finish. Formatting will begin.
20
12When the formatting process is complete, “Healthy” is displayed.
If the message “The request cannot be completed because the volume is open or in use” is displayed
The partition was created, but the format didn’t complete. Click OK to format the created partition as below.
(1) Right-click the created partition and select Format.
(2) If necessary, set the volume label and file system, then click OK.
If Perform a quick format is checked, the format will be completed much quicker.(3) Follow the on-screen
instructions.
This completes the formatting process.
Dismounting the MiniStation Air
After formatting is complete, dismount the MiniStation Air as described below.
1
Click the
2
When the menu opens, click the device name.
3
A message that indicates you can safely remove the device will appear. Unplug the MiniStation Air.
,
,or
icon in the system tray.
21
Chapter 4 - Wireless Connection to Router
To connect your MiniStation Air to a wireless router, follow the procedure below.
Configuration Through a Mobile Device
Follow the procedure below to connect the MiniStation Air to a wireless router using a mobile device.
1
Turn on your MiniStation Air and a wireless router.
2
Open the MiniStation Air2 app from your mobile device.
3
Tap Internet Connection.
4
Tap the SSID to set up the connection.
5
Enter the encryption key of the router.
Configuration Through a Computer
Follow the procedure below to connect the MiniStation Air to a wireless router using a computer.
1
2
Turn on your MiniStation Air and a wireless router.
Open Settings from your computer.
Note: Refer to chapter 2 on how to open Settings.
3
Click Internet Connection.
4
Click the SSID to set up the connection.
5
Enter the encryption key of the router.
Notes:
• As an alternative to the process above, you can set up the connection using AOSS instead.
• When you want to share the data stored in the MiniStation Air, enable “Disclose to Network” in “Internet Connection”. However, it is highly recommended to disable this feature when the MiniStation Air is on a public
network.
22
Chapter 5 - Multimedia
What is DLNA?
DLNA is a set of guidelines for sharing digital media. The MiniStation Air includes a DLNA server compliant with the
DLNA guidelines. Videos, pictures, and music saved on the MiniStation Air can be played back on DLNA-compatible
TVs, stereo equipment, game consoles, and other devices on the local network.
Play Files
To play back content from a DLNA-compatible device:
1
If you are using a computer, open Settings. If you are using a mobile device, open the MiniStation Air2 app.
Note: Refer to chapter 2 for how to open Settings.
2
Click or tap Internet Connection and enable “Disclose to Network”.
Note: Enabling this feature allows you to access the MiniStation Air wirelessly through the access point
instead of directly connecting your mobile device. It is highly recommended to disable this feature when the
MiniStation Air is on a public network.
3
Connect the DLNA-compatible device to the same network as the MiniStation Air and turn it on.
4
Select the MiniStation Air in the software of the DLNA-compatible device.
5
Select the content to be played back.
Note: Refer to the manual of your DLNA-compatible device for more details.
23
Notes
• Some DLNA-compatible devices may take longer to detect the MiniStation Air after connecting to the network.
• Playback of a high-bitrate video may be disrupted by the network environment or processing speed of your
DLNA-compatible device..
It is recommended to convert to a portable format (about 2 Mbps).
24
Chapter 6 - Appendix
Specifications
Product Specifications
For the most up-to-date information and products, go to www.buffalotech.com.
Factory Defaults
External Dimensions
(Excluding Protruding Parts)
Internal Battery
Input Voltage
Power Consumption
Full-Charge Time
Weight
Operating Environment
Storage Temperature
Compatible PCs (USB Connection)
Compatible Smartphones and Tablet
Devices (Wireless Connection)
Compatible OS
NTFS
145 × 84 × 18 mm; 5.61” × 3.31” × 0.71”
Internal lithium-ion battery (3020 mAh)
AC 100-240 V 50/60 Hz (when charged with an AC adapter)
DC 5 V ± 5 % (when charged from a computer)
~7W
approx. 4 hours*
approx. 265 g
5–35°C (41–95° F)
0–80%
0–40°C (32–104° F)
Windows with USB 3.0/2.0 ports
Mac (models with Intel Processor) with USB 3.0/2.0 ports
iPhone, iPad, iPod touch,
Android smartphones and tablet devices
Windows 8.1 (64-bit or 32-bit)
Windows RT 8.1
Windows 8 (64-bit or 32-bit)
Windows RT
PCs
Windows 7 (64-bit or 32-bit)
Windows Vista (64-bit or 32-bit)
Windows XP (32-bit)
OS X 10.6 or later
iOS 7.0 or later
iPhone/iPad/iPod touch
iOS 6.0 or later
Android 4.0 or later
Android Devices
Android 3.0 or later
Android 2.3 or later
*To charge the MiniStation Air, it is recommended that you use the supplied USB power cable and AC adapter to
connect the MiniStation Air to an outlet. Although it can be charged by connecting to a computer, charging may
take much longer.
25
USB Interface Specifications
Interface
Connector
Transfer speed
USB 3.0 (USB 2.0)
USB 3.0 Micro-B
USB 3.0 : ~5 Gbps*
USB 2.0 : ~480 Mbps*
*Connect the MiniStation Air to a USB 3.0 port for the best transfer speeds. The MiniStation Air will function when
connected to a USB 2.0/1.1 port, but data transfer will be much slower.
Wireless Interface Specifications
Standard compliance
Transmission method
Frequency range
Security
Access mode
IEEE802.11n
IEEE802.11g
IEEE802.11b
Direct Sequence Spread Spectrum (DSSS)
OFDM
2.4 GHz (1 ~ 11ch)
WPA2-PSK (AES/TKIP)
WPA-PSK (AES/TKIP)
WEP (128-bit or 64-bit)
Infrastructure mode
26
Troubleshooting
Cannot connect to MiniStation Air though Wi-Fi settings
have been configured in my mobile device
Delete the app from the memory as described below and restart the app.
iPhone/iPad/iPod touch: Press the home button twice and close the MiniStation Air2 app.
Android Device: Close the MiniStation Air2 app from the app management page in “Settings”. (For Android 4.0 or
later, close it from the background app list.)
“.qwifi”, “.twonky”, and “.lighttpd” folders have appeared on
my MiniStation Air
These folders are created automatically when data is transferred wirelessly and Wi-Fi is turned on. Do not delete
them as they manage thumbnails and database.
These folders cannot be seen from the MiniStation Air2 app. They only appear when connected by USB.
Thumbnails are not displayed properly
Connect the MiniStation Air to your computer by USB and delete the defective thumbnail files from the “.qwifi”
folder. They will be recreated automatically the next time the MiniStation Air turns on.
It takes about 2 seconds to build each thumbnail in the database. For example, if 43,200 files are transferred to the
MiniStation Air, it will take about a day to rebuild the thumbnail database.
When a large number of files are transferred, it is recommended that you disable sleep mode and leave the
MiniStation Air connected to power until all thumbnails have been created.
27
Chapter 7 - Regulatory Compliance
Information
The United States
FCC Statement
This equipment has been tested and found to comply with the limits for a Class B digital device, pursuant to Part
15 of the FCC Rules. These limits are designed to provide reasonable protection against harmful interference in a
residential installation. This equipment generates, uses and can radiate radio frequency energy and, if not installed
and used in accordance with the instructions, may cause harmful interference to radio communications. However,
there is no guarantee that interference will not occur in a particular installation. If this equipment does cause
harmful interference to radio or television reception, which can be determined by turning the equipment off and
on, the user is encouraged to try to correct the interference by one of the following measures:
• Reorient or relocate the receiving antenna.
• Increase the separation between the equipment and receiver.
• Connect the equipment into an outlet on a circuit different from that to which the receiver is connected.
• Consult the dealer or an experienced radio/TV technician for help.
Any changes or modifications not expressly approved by the party responsible for compliance could void the user’s
authority to operate this equipment.
This device complies with Part 15 of the FCC Rules. Operation is subject to the following two conditions: (1) This
device may not cause harmful interference, and (2) this device must accept any interference received, including
interference that may cause undesired operation.
Important Note - FCC Radiation Exposure Statement:
This equipment complies with FCC radiation exposure limits set forth for an uncontrolled environment. End-users
must follow the specific operating instructions for satisfying RF exposure compliance. This equipment should be
installed and operated with minimum distance 0.5cm between the radiator & your body.
This transmitter must not be co-located or operating in conjunction with any other antenna or transmitter.
Canada
IC Statement:
IC Déclaration:
This device complies with RSS-210 of the Industry Canada Rules. Operation is subject to the following two
conditions:
(1) This device may not cause harmful interference, and
(2) this device must accept any interference received, including interference that may cause undesired operation.
Ce dispositif est conforme à la norme CNR-210 d’Industrie Canada applicable aux appareils radio exempts de
licence. Son fonctionnement est sujet aux deux conditions suivantes:
(1) le dispositif ne doit pas produire de brouillage préjudiciable, et
28
(2) ce dispositif doit accepter tout brouillage reçu, y compris un brouillage susceptible de provoquer un
fonctionnement indésirable.
Important Note - IC Radiation Exposure Statement:
Note Importante - IC Déclaration d’exposition aux radiations:
This equipment complies with IC radiation exposure limits set forth for an uncontrolled environment. End-users
must follow the specific operating instructions for satisfying RF exposure compliance. This equipment should be
installed and operated with minimum distance 0.5 cm between the radiator and your body.
Cet équipement est conforme aux limites d’exposition aux rayonnements IC établies pour un environnement non
contrôlé. Les utilisateurs finaux doivent suivre les instructions de fonctionnement spécifiques pour respecter les
normes de conformité à l’exposition aux RF. Cet équipement doit être installé et utilisé avec un minimum de 0.5 cm
de distance entre la source de rayonnement et votre corps.
Europe
EU Declaration of Conformity
Česky [Czech]
Buffalo Inc. tímto prohlašuje, že tento HDW-PDU3 je ve shodě se základními požadavky a dalšími příslušnými
ustanoveními směrnice 1999/5/ES. Prohlášení o shodě naleznete na adrese www.buffalo-technology.com/
declaration-of-conformity.
Používejte pouze kabely a příslušenství dodané v balení. Nepoužívejte jiné příslušenství ani kabely, pokud není v
dokumentaci výslovně uvedeno jinak.
Dansk [Danish]
Undertegnede Buffalo Inc. erklærer herved, at følgende udstyr HDW-PDU3 overholder de væsentlige krav og øvrige
relevante krav i direktiv 1999/5/EF. Overensstemmelseserklæringen kan konsulteres på www.buffalo-technology.
com/declaration-of-conformity.
Der må kun bruges de kabler og det tilbehør der er inkluderet i pakken. Der må ikke bruges andet tilbehør eller
kabler, medmindre det er udtrykkeligt beskrevet i dokumentationen.
Deutsch [German]
Hiermit erklärt Buffalo Inc. dass sich das Gerät HDW-PDU3 in Übereinstimmung mit den grundlegenden
Anforderungen und den übrigen einschlägigen Bestimmungen der Richtlinie 1999/5/EG befindet. Die
Konformitätserklärung ist unter www.buffalo-technology.com/declaration-of-conformity einsehbar.
Verwenden Sie ausschließlich die Kabel und Zubehörteile, die im Lieferumfang enthalten sind. Andere Zubehörteile
oder Kabel dürfen nur dann verwendet werden, wenn dies in der Dokumentation ausdrücklich vorgeschrieben ist.
Eesti [Estonian]
Käesolevaga kinnitab Buffalo Inc. seadme HDW-PDU3 vastavust direktiivi 1999/5/EÜ põhinõuetele ja nimetatud
direktiivist tulenevatele teistele asjakohastele sätetele. Vastavusdeklaratsiooni leiate aadressilt www.buffalotechnology.com/declaration-of-conformity.
Kasutage ainult pakendis kaasas olevaid kaableid ja tarvikuid. Ärge kasutage muid tarvikuid ega kaableid, kui
dokumentides pole seda spetsiaalselt ette nähtud.
English
Buffalo Inc. hereby declares that this HDW-PDU3 is in compliance with the essential requirements and other relevant
provisions of Directive 1999/5/EC. The declaration of conformity may be consulted at www.buffalo-technology.com/
29
declaration-of-conformity.
Only use the cables and accessories that are included in the package. Don’t use other accessories or cables unless
specifically instructed to in the documentation.
Español [Spanish]
Por medio de la presente Buffalo Inc. declara que el HDW-PDU3 cumple con los requisitos esenciales y cualesquiera
otras disposiciones aplicables o exigibles de la Directiva 1999/5/CE. Puede consultar la declaración de conformidad
en www.buffalo-technology.com/declaration-of-conformity.
Utilice únicamente los cables y accesorios incluidos en el paquete. No utilice otros accesorios ni cables a menos que
así se indique en la documentación.
Ελληνική [Greek]
ΜΕ ΤΗΝ ΠΑΡΟΥΣΑ Buffalo Inc. ΔΗΛΩΝΕΙ ΟΤΙ HDW-PDU3 ΣΥΜΜΟΡΦΩΝΕΤΑΙ ΠΡΟΣ ΤΙΣ ΟΥΣΙΩΔΕΙΣ ΑΠΑΙΤΗΣΕΙΣ ΚΑΙ
ΤΙΣ ΛΟΙΠΕΣ ΣΧΕΤΙΚΕΣ ΔΙΑΤΑΞΕΙΣ ΤΗΣ ΟΔΗΓΙΑΣ 1999/5/ΕΚ. Η δήλωση συμμόρφωσης υπάρχει στην ηλεκτρονική
διεύθυνση www.buffalo-technology.com/declaration-of-conformity.
Να χρησιμοποιείτε αποκλειστικά τα καλώδια και τα εξαρτήματα που περιέχονται στη συσκευασία. Μη
χρησιμοποιείτε άλλα εξαρτήματα ή καλώδια, εκτός εάν δίνεται σαφώς τέτοια οδηγία στην τεκμηρίωση.
Français [French]
Par la présente Buffalo Inc. déclare que l’appareil HDW-PDU3 est conforme aux exigences essentielles et aux autres
dispositions pertinentes de la directive 1999/5/CE. La déclaration de conformité est disponible à l’adresse : www.
buffalo-technology.com/declaration-of-conformity.
Utilisez uniquement les câbles et accessoires inclus dans ce package. N’utilisez aucun autre accessoire ou câble sauf
instruction spécifique de la documentation.
Italiano [Italian]
Con la presente Buffalo Inc. dichiara che questo HDW-PDU3 è conforme ai requisiti essenziali ed alle altre
disposizioni pertinenti stabilite dalla direttiva 1999/5/CE. La dichiarazione di conformità può essere consultata
all’indirizzo www.buffalo-technology.com/declaration-of-conformity.
Utilizzare esclusivamente i cavi e gli accessori inclusi nell’imballaggio. Non utilizzare altri accessori o cavi a meno
che non sia specificamente indicato nella documentazione.
Latviski [Latvian]
Ar šo Buffalo Inc. deklarē, ka HDW-PDU3 atbilst Direktīvas 1999/5/EK būtiskajām prasībām un citiem ar to
saistītajiem noteikumiem. Paziņojumu par atbilstību var skatīt vietnē www.buffalo-technology.com/declaration-ofconformity.
Izmantojiet tikai komplektā iekļautos vadus un piederumus. Neizmantojiet citus piederumus vai vadus, ja vien
dokumentācijā nav norādīts citādi.
Lietuvių [Lithuanian]
Šiuo Buffalo Inc. deklaruoja, kad šis HDW-PDU3 atitinka esminius reikalavimus ir kitas 1999/5/EB Direktyvos
nuostatas. Atitikties deklaraciją galima rasti šiuo adresu: www.buffalo-technology.com/declaration-of-conformity.
Naudokite tik pakuotėje pateiktus laidus ir priedus. Nenaudokite jokių kitų priedų ar laidų, nebent instrukcijose
nurodyta kitaip.
Nederlands [Dutch]
Hierbij verklaart Buffalo Inc. dat het toestel HDW-PDU3 in overeenstemming is met de essentiële eisen en de andere
relevante bepalingen van richtlijn 1999/5/EG. De conformiteitsverklaring kan worden geraadpleegd op www.
buffalo-technology.com/declaration-of-conformity.
Gebruik alleen de kabels en toebehoren die zich in de verpakking bevinden. Gebruik geen ander toebehoren of
30
kabels tenzij dit uitdrukkelijk in de handleiding wordt aangegeven.
Malti [Maltese]
Hawnhekk, Buffalo Inc. , jiddikjara li dan HDW-PDU3 jikkonforma mal-ħtiġijiet essenzjali u ma provvedimenti
oħrajn relevanti li hemm fid-Dirrettiva 1999/5/EC. Tista’ tikkonsulta d-dikjarazzjoni tal-konformità fuq www.buffalotechnology.com/declaration-of-conformity.
Uża biss dawk il-kejbils u l-aċċessorji li huma inklużi fil-pakkett. Tuża l-ebda aċċessorju jew kejbil ieħor sakemm ma
jkunx hemm struzzjonijiet speċifiċi għal dan fid-dokumentazzjoni.
Magyar [Hungarian]
Alulírott, Buffalo Inc. nyilatkozom, hogy a HDW-PDU3 megfelel a vonatkozó alapvetõ követelményeknek és az
1999/5/EC irányelv egyéb elõírásainak. A megfelelőségi nyilatkozatot a www.buffalo-technology.com/declarationof-conformity címen olvashatja el.
Csak a csomagban található kábeleket és tartozékokat használja. Csak abban az esetben használjon másféle kábelt
vagy tartozékot, ha erre a dokumentumból kifejezett utasítást kap.
Polski [Polish]
Niniejszym Buffalo Inc. oświadcza, że HDW-PDU3 jest zgodny z zasadniczymi wymogami oraz pozostałymi
stosownymi postanowieniami Dyrektywy 1999/5/EC. Deklarację zgodności można znaleźć pod adresem www.
buffalo-technology.com/declaration-of-conformity.
Należy używać wyłącznie kabli i akcesoriów dołączonych do opakowania. Nie należy używać innych akcesoriów lub
kabli, chyba że ich użycie jest wskazane w dokumentacji.
Português [Portuguese]
Buffalo Inc. declara que este HDW-PDU3 está conforme com os requisitos essenciais e outras disposições da
Directiva 1999/5/CE. A declaração de conformidade poderá ser consultada em www.buffalo-technology.com/
declaration-of-conformity.
Utilizar apenas cabos e acessórios incluídos na embalagem. Não utilizar outros acessórios ou cabos, salvo se
especificamente indicado na documentação.
Slovensko [Slovenian]
Buffalo Inc. izjavlja, da je ta HDW-PDU3 v skladu z bistvenimi zahtevami in ostalimi relevantnimi določili direktive
1999/5/ES. Izjava o skladnosti je na voljo na www.buffalo-technology.com/declaration-of-conformity.
Uporabljajte samo priložene kable in dodatno opremo. Ne uporabljajte druge dodatne opreme ali kablov, če ni
drugače določeno v dokumentaciji.
Slovensky [Slovak]
Buffalo Inc. týmto vyhlasuje, že HDW-PDU3 spĺňa základné požiadavky a všetky príslušné ustanovenia Smernice
1999/5/ES. Vyhlásenie o zhode nájdete na adrese www.buffalo-technology.com/declaration-of-conformity.
Používajte iba káble a príslušenstvo dodané v balení. Nepoužívajte iné príslušenstvo ani káble, ak nie je v
dokumentácii výslovne uvedené inak.
Suomi [Finnish]
Buffalo Inc. vakuuttaa täten että HDW-PDU3 tyyppinen laite on direktiivin 1999/5/EY oleellisten vaatimusten ja sitä
koskevien direktiivin muiden ehtojen mukainen. Vaatimustenmukaisuusvakuutusta voi katsella sivustolla www.
buffalo-technology.com/declaration-of-conformity.
Käytä ainoastaan pakkauksen mukana toimitettuja kaapeleita ja varusteita. Älä käytä muita varusteita tai kaapeleita
ellei näin ole erityisesti ohjeistettu asiakirjoissa.
31
Svensk [Swedish]
Härmed intygar Buffalo Inc. att denna HDW-PDU3 står I överensstämmelse med de väsentliga egenskapskrav och
övriga relevanta bestämmelser som framgår av direktiv 1999/5/EG. Deklarationen om överensstämmelse kan läsas
på www.buffalo-technology.com/declaration-of-conformity.
Använd bara kablar och tillbehör som ingår i förpackningen. Använd inte andra tillbehör eller kablar om du inte får
uttryckliga instruktioner om det i dokumentationen.
AC adapter
JP, US
EU
Asian Power Devices Inc. WA-10K05FU
Asian Power Devices Inc. WA-10K05R, APD3-EU, APD3-UK
Others
根據 NCC低功率電波輻射性電機管制辦法:
第十二條:
經型式認證合格之低功率射頻電機,非經許可,公司、商號或使用者均不得擅自變更頻率、加大功率或變更原
設計之特性及功能。
第十四條:
低功率射頻電機之使用不得影響飛航安全及干擾合法通信;經發現有干擾現象時,應立即停用,並改善至無干
擾時方得繼續使用。前項合法通信,指依電信法規定作業之無線電通信。低功率射頻電機須忍受合法通信或工
業、科學及醫療用電波輻射性電機設備之干擾。
電磁波暴露量 MPE 標準值 1mW/cm2 ,送測產品實測值為:0.00615 mW/cm2
32