1
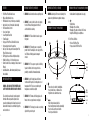
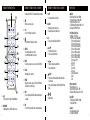
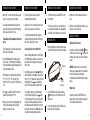
™
WIRELESS DOCKING SPEAKER
INSTRUCTION MANUAL
Model: OVD268
JMA North America LLC
Mahwah, New Jersey 07495
Phone : 800-474-2147
Email : [email protected]
Web: www.honeywellelectricalaccessories.com
© 2013 AirTek Int’l Corp. Ltd. All rights reserved.
The Honeywell Trademark is used under license from
Honeywell International Inc.
Honeywell International Inc. makes no representations
or warranties with respect to this product.
This product is manufactured by Airtek Int’l Corp. Ltd.
TABLE OF CONTENTS
SECTION
TABLE OF CONTENTS
PAGE
FEATURES......................................................................................................................................................................
IMPORTANT SAFETY NOTES...........................................................................................................................................
OVERVIEW OF THE OVALE™ DOCKING SPEAKER..............................................................................................................
OVERVIEW OF THE REMOTE CONTROL...........................................................................................................................
SPECIFICATIONS............................................................................................................................................................
SET UP
• Connect Power.........................................................................................................................................................
• Power On/ Standby Mode.........................................................................................................................................
• Setting the Clock Time using the Auto-Sync Clock Feature.......................................................................................
• Setting the Clock Time using the Remote Control.....................................................................................................
• Setting the Clock Time on the Docking Speaker.......................................................................................................
• Sleep Timer..............................................................................................................................................................
• LED Display Brightness.............................................................................................................................................
PLAY..............................................................................................................................................................................
iPod/ iPhone/ iPad DOCK AUDIO SOURCE........................................................................................................................
WIRELESS BLUETOOTH® AUDIO SOURCE........................................................................................................................
FM RADIO AUDIO SOURCE
• Radio Reception.......................................................................................................................................................
• Programming Radio Stations Automatically...............................................................................................................
• Programming Radio Stations Manually on the Remote Control..................................................................................
• Programming Radio Stations Manually on the Docking Speaker...............................................................................
• Selecting & Listening to a Preset Radio Station.........................................................................................................
AUX IN AUDIO SOURCE...................................................................................................................................................
SPEAKER & SOUND PROFILES........................................................................................................................................
2
4
4
5
6
7
8
8
8
9
9
10
10
11
11
12
SECTION
PAGE
ALARM CLOCK
• Setting Up the Alarm Clock Using the Remote Control................................................................................................
• Setting Up the Alarm Clock on the Docking Speaker..................................................................................................
• Deactivating the Set Alarm Clock...............................................................................................................................
• Setting Up a Music Playlist Alarm...............................................................................................................................
• Gentle Wake..............................................................................................................................................................
• Alarm Snooze Mode/ Alarm Stop Mode .....................................................................................................................
REPLACING THE REMOTE CONTROL BATTERY................................................................................................................
BATTERY PRECAUTIONS.................................................................................................................................................
TROUBLESHOOTING.......................................................................................................................................................
16
17
17
17
18
18
19
19
20
13
13
13
14
14
15
15
3
FEATURES
•
•
•
•
•
•
•
•
•
•
•
•
•
•
•
iPod/ iPhone/ iPad Dock Audio Source
Wireless Bluetooth Audio Source
FM Radio Audio Source (20 station presets available)
Aux In Audio Source (3.5mm Audio Cable included)
Full Featured Remote Control
Stereo Sound System
2-Level Dynamic Bass Boost
5 Band Equalizer
Charges your iPod/ iPhone/ iPad while it is docked
Charge and play music at the same time
Auto-Sync Clock: Auto-syncs the time with your iPod/
iPhone/ iPad when docked
LED Display Screen with 4-level brightness settings
Digital Clock Display – 12/ 24 hour display screen
Alarm Clock with choice of waking up to music, buzzer or
FM radio
Gentle Wake Alarm – Alarm volume gradually increases
when activated
1. WARNING: Read all instructions before using this product.
IMPORTANT SAFETY NOTES
6. WARNING: Store the Docking Speaker, the Remote
Control and all of the parts at room temperature or cool
temperatures. DO NOT store in a room with very hot
temperatures, or under direct sunlight.
WARNING--READ AND SAVE THESE OPERATING AND
SAFETY INSTRUCTIONS BEFORE USING THIS PRODUCT.
These instructions are intended to provide important
information. When using electrical products, basic
precautions should always be followed to reduce risk of
hazards which include, but are not limited to injury, fire,
and electrical shock.
4
IMPORTANT SAFETY NOTES (CONTINUED)
IMPORTANT SAFETY NOTES (CONTINUED)
2. WARNING: To reduce the risk of electric shock, unplug
the Ovale™ Wireless Docking Speaker from the AC
electrical outlet before cleaning.
OVERVIEW OF THE OVALE™ DOCKING SPEAKER (CONTINUED)
9. WARNING: Listening to LOUD sounds or listening to this
speaker at very high volumes may impair or damage
hearing.
OVERVIEW OF THE OVALE DOCKING SPEAKER
™
3. WARNING: DO NOT allow children to handle or operate
this product.
B
D
C
4. WARNING: DO NOT attempt to power or operate this
product if the AC Power Adapter, cords or any part of the
Ovale™ Wireless Docking Speaker is damaged or
corroded.
• Activate Alarm Clock (during alarm clock set up).
C.
• Adjust volume.
• Manually set the clock time.
• Manually set the alarm clock time in “ALA” mode.
• Adjust the LED Display Screen brightness.
D. iPod/ iPhone/ iPad Dock
• Dock an iPod/ iPhone/ iPad.
• Charge a docked iPod/ iPhone/ iPad.
5. WARNING: DO NOT store, power or operate the Docking
Speaker, the Remote Control or any parts in close
proximity to combustible or flammable materials.
7. WARNING: DO NOT immerse the Docking Speaker, the
Remote Control or any parts in water or any liquid.
8. WARNING: DO NOT insert any pins, needles or any foreign
objects into the product or parts.
LED
Display
Screen
A
A.
B.
• Turn on the unit or switch to Standby Mode.
• Select an Audio Source or Menu selection.
• Stop Alarm or enter Alarm Snooze mode.
Radio
Antenna
DC Jack
FM
ANTENNA
• Skip to the previous/next audio file.
• Search and program radio stations automatically.
• Select or auto-search for a radio station.
• Select a preset radio station.
DC IN 12V
AUX IN
Aux In
Jack
5
OVERVIEW OF THE REMOTE CONTROL
OVERVIEW OF THE REMOTE CONTROL (CONTINUED)
A
B
C
C.
E
D
F
G
H
P
O
Q
I
J
M
K
L
N
• Mute or silence all sounds.
M. ALARM
• Manually set up the Alarm Clock.
• Activate/ deactivate the Alarm Clock.
• Select Bluetooth® Audio Source Mode.
N. EQ
• Select a preferred Digital Sound Profile.
F. AUX/FM
• Select Aux In Audio Source Mode.
• Select FM Radio Audio Source Mode.
O. ▲ and ▼
• Up/ Down Menu selection.
• Select a preset Radio Station.
G. MENU
• Select the previous menu screen on your iPod/ iPhone/
P.
/
• Skip to the previous/next Audio File.
• Select a Radio Station.
Q.
/ PAIR
• Play or Pause in iPod and Wireless Bluetooth® Audio
Source Modes.
• Press and hold to quickly enter the Bluetooth® Pairing
Mode.
H. CLOCK
• Manually set the clock time.
I. REPEAT
• Repeat the current song on your iPhone/ iPod/ iPad (in
iPod Audio Source Mode only).
• Turn on the unit or switch to Standby Mode.
J. PROG
• Search and program FM radio stations automatically or
manually.
B. DIM/SNOOZE
• Adjust brightness of the LED Display Screen.
K. DBB
• Turn on/ off Dynamic Bass Boost sound enhancement.
R
A.
6
L. SLEEP
• Set and activate the Sleep Timer.
D. iPod
• Select “iPod” Audio Source Mode.
E.
OVERVIEW OF THE REMOTE CONTROL (CONTINUED)
• Activate the “SNOOZE” function when Alarm is activated.
R.
• Adjust volume.
SPECIFICATIONS
Amplifier:
• Rated Output Power: 2x10W RMS
• Frequency Response: 20Hz-20KHz
• Signal to Noise Ratio: >65dB
• Total Harmonic Distortion (at 1kHz): <10%
• Aux Input: 0.5V RMS 10K ohm
iPod/ iPhone/ iPad Dock:
• Input Type: 30 Pin Dock
• iPod/ iPhone/ iPad Compatibility:
– iPod touch (4th generation)
– iPod touch (3rd generation)
– iPod touch (2nd generation)
– iPod nano (6th generation)
– iPod nano (5th generation)
– iPod nano (4th generation)
– iPod nano (3rd generation)
– iPod classic (2009)
– iPhone 4S
– iPhone 4
– iPhone 3GS
– iPhone 3G
– iPad (3rd generation)
– iPad 2
– iPad
Wireless Bluetooth:
• Bluetooth Version: 2.1
• Bluetooth Profiles: A2DP + EDR
• Bluetooth Wireless Range: 10m or 30Ft
Tuner (FM):
• Tuning Range: 87.5MHz -108MHz
• Tuning Grid: 50kHz
Speakers:
• Speaker Impedance: 6ohm
• Sensitivity: >82dB/m/W
7
SPECIFICATIONS (CONTINUED)
SET UP (CONTINUED)
General Specifications:
• AC Power Adapter:
– Model: HK-AX-120A200-CP
– Input: 100-240V~50/60Hz 0.8A
– Output: 12V 2.0A
• Operating Power Consumption: <32W
• Standby Power Consumption: <1W
• Dimensions: Main Unit (WxHxD)
298 x 114 x 98mm/ 11.73" x 4.49" x 3.86"
• Weight: Main Unit: 1.25Kg/ 2.75Lbs
With Packing: 1.8Kg/ 3.9Lbs
Power On/ Standby Mode
1. Press the
Button to switch ON the Ovale™ Wireless
Docking Speaker. The speaker and the LED Display
Screen will automatically switch to the last selected Audio
Source Mode.
2. Press and hold the
Button for about 2 seconds to
switch the speaker “OFF” to Standby Mode. In Standby
Mode, the entire unit switches off and only the clock time
will appear on the LED Display Screen.
SET UP
Connect Power
30 Pin Dock
Cover
SET UP (CONTINUED)
3. The LED Display Screen will glow to indicate power has
been connected correctly.
AC Power Adapter
(Plug into AC Electrical Outlet)
IMPORTANT: Unplug the AC Power Adapter to completely
switch off the speaker and Clock Display Screen. All Clock
and Alarm Clock settings will be forgotten and must be
reset upon reconnecting the power to the speaker.
Setting the Clock Time
AC Electrical Outlet
AC Power Adapter
(Plug into DC Jack)
1. Connect the AC Power Adapter Cable into the DC Jack on
the back of the Ovale™ Wireless Docking Speaker.
2. Plug the AC Power Adapter into an available AC Electrical
Outlet.
8
PM
Indicator
Light
12 Hour Display
24 Hour Display
Setting the Clock Time using the Auto-Sync Clock
Feature
LED Display
Screen:
Clock Time
Not Set
1. Make sure the Docking Speaker is in Standby Mode and
the clock time has not yet been set.
2. Lift the 30 Pin Dock Cover and gently place the iPod/
iPhone/ iPad onto the 30 Pin Dock Connector. Insert the
iPad Stand behind the 30 Pin Dock Connector when
docking an iPad.
IMPORTANT: You must remove any external iPod/ iPhone/
iPad case before docking the device onto the Docking
Speaker.
3. Dock your iPod/ iPhone/ iPad onto the the Docking
Speaker and wait for about 10 seconds.
4. The time on the LED Display Screen will automatically
match the time on your iPod/ iPhone/ iPad.
IMPORTANT: Since the clock synchronizes with the time
on your iPod/ iPhone/ iPad, you should make sure the time
on your device is correct before setting up the time using
the Auto-Sync Clock feature.
IMPORTANT: After you have performed the auto-sync
procedure the first time, the Docking Speaker will not
auto-sync the time with other devices that are docked
later. The time can only be changed manually using the
main unit or Remote Control, or you can unplug and
re-plug the power adapter to cancel the previous
auto-synchronized time and repeat the Auto-Sync Clock
set up steps above.
SET UP (CONTINUED)
Setting the Clock Time using the Remote Control
1. Make sure the Docking Speaker is in Standby Mode, or
switch to Standby Mode by pressing and holding the
Button for 2 seconds until the Display Screen shows the
clock time.
2. Press and hold the CLOCK Button on the Remote Control
for about 2 seconds, until you see “24H” or “12H”
blinking on the LED Display Screen.
3. Press the ▲ and ▼ Button on the Remote Control to
select a 12 or 24 Hour display format. Press the CLOCK
Button to confirm.
4. Press the ▲ and ▼ Button again to select the Hour time
setting. The Hour digits will blink while you select the
correct Hour digit. Press the CLOCK Button to confirm.
5. When the Hour digit has been set, press the ▲ and ▼
Button again to select the Minute setting. The Minute
digits will blink while you select the correct Minute digit.
Press the CLOCK Button to confirm.
Setting the Clock Time on the Docking Speaker
1. Make sure the Docking Speaker is in Standby Mode, or
switch to Standby Mode by pressing and holding the
Button for 2 seconds until the Display Screen shows the
clock time.
9
SET UP (CONTINUED)
2. Press and hold the Button on the Docking Speaker for
about 2 seconds, until you see “24H” or “12H” blinking
on the LED Display Screen.
3. Press the Button to select a 12 or 24 Hour display
format. Press the Button to confirm.
4. Press the Button repeatedly to select the hour time
setting. The Hour digits will blink while you select the
correct Hour digit. Press the Button to confirm.
5. When the Hour digit has been set, press the Button
again to select the Minute setting. The Minute digits will
blink while you select the correct Minute digit. Press the
Button to confirm.
Sleep Timer
SET UP (CONTINUED)
PLAY
the Docking Speaker will automatically switch to Standby
Mode after that set period of time has elapsed.
Press the
Modes:
IMPORTANT: After the Docking Speaker switches to
Standby Mode, the Sleep Timer is deactivated. It must be
reset each time you want to activate a Sleep Timer.
• “iPod” - iPod/ iPhone/ iPad Dock
• “bt” - Wireless Bluetooth
• “87.5” - FM Radio
• “AUX” - Aux In
IMPORTANT: If you wish to deactivate a set Sleep Timer,
press the SLEEP Button on the Remote Control again to
select S- 00 which means no time period has been set for
the Sleep Timer.
iPod/ iPhone/ iPad DOCK AUDIO SOURCE
1. Make sure the Docking Speaker is switched to Standby
Mode.
2. Press the
level.
1. The Docking Speaker can switch to Standby Mode
automatically after a set period of time.
10
2. Press the SLEEP Button repeatedly on the Remote Control
to select a period of time before the Docking Speaker
switches to Standby Mode. Choose from 90, 60, 30,15 or
00 minutes. After choosing the Sleep Mode time period,
or
Button to select the desired brightness
To set the brightness level using the Remote Control,
press the DIM Button repeatedly until you reach the
desired brightness.
IMPORTANT: You must remove any external iPod/ iPhone/
iPad case before docking the device onto the Docking
Speaker.
Button repeatedly until you see “iPod”
2. Press the
displayed on the LED Display Screen.
3. The connected iPod/ iPhone/ iPad plays automatically, or
press the
Button on your device, or on the Remote
Control to play music.
Play from an iPod/ iPhone/ iPad.
4. To pause/ resume play, press
LED Display Brightness
There are 4 different brightness levels to choose from. To
set the brightness level using the Docking Speaker:
iPod/ iPhone/ iPad DOCK AUDIO SOURCE (CONTINUED)
Button to select one of four Audio Source
30 Pin
Dock
Cover
30 Pin
Dock
Connector
iPad Stand
Insert here
(Only when
docking an iPad)
1. Lift the 30 Pin Dock Cover and gently place the iPod/
iPhone/ iPad onto the 30 Pin Dock Connector. Insert the
iPad Stand behind the 30 Pin Dock Connector when
docking an iPad.
5. To skip a track, press
/
.
.
Charging an iPod/ iPhone/ iPad
When the speaker is connected to power, the docked
iPod/ iPhone/ iPad begins to charge and continues to
charge until the iPod/ iPhone/ iPad is disconnected from
the speaker.
Repeating the Current Song
You can choose to repeat the current song being played in
the iPod/ iPhone/ iPad Dock Audio Source Mode by
pressing the REPEAT Button on the Remote Control. “REP”
will display on the LED Display Screen for 2 seconds when
the REPEAT function is first activated. Press again to
deactivate the REPEAT function so that the next song can
be played.
11
WIRELESS BLUETOOTH AUDIO SOURCE
WIRELESS BLUETOOTH AUDIO SOURCE (CONTINUED)
Play wirelessly from a Bluetooth device.
Flashing Light
4. Disconnect your Bluetooth device from the “Ovale
Speaker” when you want to pair with a new device.
FM RADIO AUDIO SOURCE (CONTINUED)
FM RADIO AUDIO SOURCE (CONTINUED)
Radio Reception
FM
ANTENNA
FM RADIO AUDIO SOURCE
Play FM Radio Stations.
Bluetooth not paired
1. Go to the Bluetooth Audio Source Mode by pressing the
Button on the Docking Speaker or the Button on
the Remote Control until you see
on the LED Display
Screen. The
Button will flash while the Docking
Speaker is trying to pair with a Bluetooth device.
2. Go to the Bluetooth settings on your smartphone, tablet,
computer or other Bluetooth device. Search and connect
to “Ovale Speaker”.
3. The
Button will stop flashing when your Bluetooth
device has been paired successfully.
12
DC IN 12V
AUX IN
DC IN 12V
AUX IN
The PROG Button on the Remote Control is also used to
manually preset your favorite FM radio stations in the FM
Radio Audio Source Mode. You can program up to 20
preset radio stations.
Only FM Radio Stations can be received on this Docking
Speaker. Sometimes the radio reception can be unclear.
For optimal radio reception, adjust and extend the Radio
Antenna located on the back side of the Docking Speaker.
Steady Light
Bluetooth paired
Radio Antenna
FM
ANTENNA
Programming Radio Stations Manually on the Remote
Control
1. Go to the FM Radio Audio Source Mode by pressing the
Button until you see a radio station number (for
example “87.5”) on the LED Display Screen.
/
2. In this mode, press the
Button on the Remote
Control to search and choose an FM Radio Station to listen
/
to. Press the
Button on the Docking Speaker for
2 seconds or more to activate the auto-search mode to
automatically search for the next available radio station.
/
After auto-search finds a station, pressing
will
terminate auto-search mode and allow you to search for
radio stations manually.
IMPORTANT: It is recommended to position the Radio
Antenna away from other radio receiving devices that can
cause interference with radio reception, such as a TV, VCR
or other radio players.
Programming Radio Stations Automatically
1. Press and hold the PROG Button located on the Remote
Control for more than 2 seconds. “AUTO” will display on
the LED Display Screen.
2. The Docking Speaker will automatically search for
available radio stations and program them in the order of
waveband reception strength.
3. The first programmed radio station will broadcast
automatically upon completion of auto-programming.
/
1. Press the
Button on the Remote Control to select
the FM radio station that you wish to preset in a Preset
Program.
2. Press the PROG Button on the Remote Control once. The
LED Display Screen will display a number from “P01”,
“P02” to “P20”. “P01” represents “Preset Program 1”
and “P02” represents “Preset Program 2” and so on.
3. Press the ▲ and ▼ Button on the Remote Control to
select the Preset Program number where you want to
preset the chosen radio station (from P01 to P20).
4. When you have reached the Preset Program, press the
PROG Button once. This will automatically program the
radio station in the chosen Preset Program.
13
FM RADIO AUDIO SOURCE (CONTINUED)
5. Repeat Steps 1 to 4 for any other radio stations you want
to preset. You can preset up to 20 radio stations.
5. The Preset Program has now been set and will
automatically play that radio station.
6. To overwrite a programmed radio station, simply store
another radio station in the particular Preset Program you
wish to replace, using Steps 1 to 4 above.
6. Repeat Steps 1 to 4 for any other radio stations you want
to preset. You can preset up to 20 radio stations.
Programming Radio Stations Manually on the Docking
Speaker
You can program up to 20 preset radio stations using the
buttons on the Docking Speaker.
/
Button on the Docking Speaker for
1. Press the
about 2 seconds. “SrCH” will display on the LED Display
Screen and the Docking Speaker will automatically search
for the next available radio station.
2. The LED Display Screen will then display a number from
“P01”, “P02” to “P20”. “P01” represents “Preset
Program 1” and “P02” represents “Preset Program 2” and
so on.
3. Press the or Button to select the Preset Program
number that you want (from P01 to P20).
4. When you have chosen the Preset Program number, wait
for the Preset Program number to blink on the LED
Display Screen for about 3 seconds.
14
FM RADIO AUDIO SOURCE (CONTINUED)
7. To overwrite a programmed radio station, simply store
another radio station in the particular Preset Program you
wish to replace, using Steps 1 to 4 above.
Selecting & Listening to a Preset Radio Station
After successfully presetting a number of Preset Programs
in the FM Radio Audio Source Mode, you can select your
preset stations on the Docking Speaker or by using the
Remote Control:
/
Button once
1. On the Docking Speaker, press the
and the LED Display Screen will display a Preset Program
from “P01” to “P20” (usually the last used Preset Program
/
will display first). Press
repeatedly until you
reach the Preset Program number you want to listen to*.
* If at any time you wish to select a radio station that is
/
not a Preset Program, simply press the
Button
on the Docking Speaker for 2 seconds or more to activate
the auto-search function to automatically search for the
next available radio station. After landing on the first auto
/
searched radio station, press the
Button again
to revert back to manually selecting radio stations.
AUX IN AUDIO SOURCE (CONTINUED)
FM RADIO AUDIO SOURCE (CONTINUED)
2. On the Remote Control, press the ▲ or ▼ to select the
Preset Program**.
** If at any time you wish to select a radio station that is
/
not a preset program, simply press the
Button
on the Remote Control to manually select a radio station.
AUX IN AUDIO SOURCE
Play from an MP3 player or another external audio device
using the AUX IN Jack and 3.5mm Audio Cable (included).
Aux In Jack
Plug into
Audio Device
1. Go to the AUX IN Audio Source Mode by pressing the
Button until you see “AUX” displayed on the LED
Display Screen.
2. Connect the 3.5mm Audio Cable into the AUX IN Jack on
the back-side of the Docking Speaker.
3. Plug the other end of the 3.5mm Audio Cable into your
device.
4. Play the device by following the Play instructions on your
audio device or device user manual.
SPEAKER & SOUND PROFILES
Adjusting the Volume of Sounds
In any Audio Source Mode, press the
or
Button
on the Remote Control or press the or Button on the
Docking Speaker to reduce or increase the volume of the
speaker.
WARNING: Listening to music or sounds at very high
volume levels can damage hearing. It is recommended to
listen to the Docking Speaker at moderate and
comfortable volume levels that will not impair or damage
hearing.
Muting Sounds
At any time you may press the MUTE Button on the
Remote Control to silence all sounds being played in any
of the four Audio Source Modes above.
15
SPEAKER & SOUND PROFILES (CONTINUED)
SPEAKER & SOUND PROFILES (CONTINUED)
Digital Sound Profile
enhance the bass sounds of the speaker. Press the DBB
Button on the Remote Control to switch on Dynamic Bass
Boost. The LED Display Screen will display “dbb1” when
DBB is activated. Press DBB on the Remote Control again
to switch off DBB. The LED Display Screen will display
“dbb0” when DBB has been switched off.
Press the EQ Button on the Remote Control to select the
digital sound equalizer profile you prefer. Press repeatedly
until you reach the desired profile. Choose from 5
equalizer profiles:
1. FLAT
2. POP
3. ROCK (“ROC”)
4. JAZZ
5. CLASSIC (“CLAS”)
Dynamic Bass Boost Sound Enhancement
ALARM CLOCK
Setting Up the Alarm Clock Using the Remote Control
PM
Indicator
Light
Alarm
Indicator
Light
To set the Alarm Clock make sure that the Docking
Speaker is in Standby Mode.
DBB on
1. Press and hold the ALARM Button on the Remote Control
for about 2 seconds to enter the Alarm Setting Mode.
2. Press the ▲ and ▼ Button to select the alarm type:
• TUN (to wake to your selected FM Radio Station)
• iPod (to wake to your iPod/ iPhone/ iPad music)
• Buzz (to wake to a buzzer sound)
Press the ALARM Button to confirm the alarm type.
DBB off
The Dynamic Bass Boost (DBB) Button allows you to
16
3. Press the ▲ and ▼ Button to select the volume of the
alarm. Press the ALARM Button to confirm the volume
setting.
ALARM CLOCK (CONTINUED)
ALARM CLOCK (CONTINUED)
4. Press the ▲ and ▼ Button to select the Hour time setting
for the Alarm. Press the ALARM Button to confirm the Hour
setting.
6. Repeat Step 5 to set the Minute time setting.
5. Repeat Step 4 to set the Minute time setting.
8. To activate this set Alarm from the Docking Speaker,
/
press the
Button during the Alarm set up at
anytime during Step 2 to Step 5. The Alarm Indicator Light
on the LED Display Screen will turn ON to indicate the
Alarm is activated. To activate the Alarm using the Remote
Control, simply press the ALARM Button on the Remote
Control once until you see the Alarm Indicator Light switch
ON.
6. Alarm is now set up.
7. Press the ALARM Button once to activate the set alarm.
The Alarm Indicator Light on the LED Display Screen will
turn ON to indicate the Alarm is activated.
Setting Up the Alarm Clock on the Docking Speaker
1. Press the
Button on the Docking Speaker repeatedly
until the LED Display Screen displays “ALA” (Alarm).
2. Press the
Button to enter the Alarm Setting Mode.
3. Press the Button on the Docking Speaker to select the
alarm type:
• TUN (to wake to your selected FM Radio Station)
• iPod (to wake to your iPod/ iPhone/ iPad music)
• Buzz (to wake to a buzzer sound)
Press the Button to confirm the alarm type.
4. Press the
Press the
Button to select the volume of the alarm.
Button to confirm the volume setting.
5. Press the Button to select the Hour time setting for the
Alarm. Press the Button to confirm the Hour setting.
7. Alarm is now set up.
Deactivating the Set Alarm Clock
Press the ALARM Button on the Remote Control to
deactivate the alarm at any time. The Alarm Indicator
Light will switch off to indicate that the Alarm has been
deactivated and will NOT switch ON again until you press
the ALARM Button again. You can also deactivate the
/
Alarm by pressing the
Button on the Docking
Speaker during the Alarm Set Up.
Setting Up a Music Playlist Alarm
If you have chosen the iPod alarm type to wake up to
songs from a selected play list, you need to:
17
ALARM CLOCK (CONTINUED)
1. Create a new playlist titled “Ovale Alarm” on your music
device and copy the song tracks that you wish to set as
your alarm music to that playlist.
ALARM CLOCK (CONTINUED)
2. Before going to sleep (or before the alarm activates at the
set alarm time), make sure that the last played song from
your iPod/ iPhone/ iPad was from the “Ovale Alarm”
playlist.
IMPORTANT: If the iPod alarm type was selected for the
alarm, but no iPod/ iPhone/ iPad is docked onto the
Docking Speaker , the Buzzer alarm type will
automatically activate by default at the set alarm time.
Gentle Wake
Each alarm type is set to activate with Gentle Wake.
Gentle Wake means each alarm will gradually increase in
volume for a more pleasant awakening.
• If you have selected the TUN (FM Radio) or iPod (iPod/
iPhone/ iPad playlist) alarm types, the radio/ music
alarm volume will gradually increase in a few seconds of
alarm activation.
• If you have selected the Buzzer alarm type, the buzzer
beep sound will increase in speed and volume after
2~3 seconds.
18
REPLACING THE REMOTE CONTROL BATTERY
REPLACING THE REMOTE CONTROL BATTERY (CONTINUED)
Alarm Snooze Mode/ Alarm Stop Mode
3. Replace
with a new
CR2025
Button Cell
Battery
Battery
Door
When the alarm is activated, you can press the
Button
on the Docking Speaker or the “SNOOZE” Button on the
Remote Control at any time to activate the Snooze Mode.
In Snooze Mode, the alarm will switch off temporarily for
about 9 minutes. After 9 minutes, the alarm will reactivate
again.
To stop the alarm for the current alarm session, press the
Button for over 3 seconds. This will switch off the
alarm until 24 hours later, or until the next set alarm time.
IMPORTANT: The alarm stops but the alarm settings
remain so the alarm will reactivate after 24 hours, or until
the next set alarm time. You must deactivate the Alarm by
pressing the ALARM Button on the Remote Control to
switch off the Alarm Indicator Light on the LED Display
Screen. This will completely deactivate the alarm, and
stop the alarm from reactivating every 24 hours.
1. Lock/ Hinge:
Push Right
2. Slide Out
The Remote Control is powered by 1 x CR2025 Button Cell
Battery. When the power has been used up in the Remote
Control Battery, you may replace the battery by following
these instructions:
1. Locate the Battery Door located on the Remote Control.
2. There is a Lock/ Hinge mechanism on the Battery Door to
secure it from opening while using the Remote Control. To
open the Battery Door, use one finger to push the Hinge
toward the middle.
3. While pushing this Hinge, use your finger from the other
hand to slide the Battery Door out of the Remote Control
body.
5. Remove the old battery and replace with a new CR2025
battery. Make sure to insert the battery with the correct
polarity by observing the polarity instructions on the
Remote Control.
6. When the new battery has been inserted correctly into the
Battery Tray, slide the Battery Door back into the Remote
Control body until it is locked back into place.
BATTERY PRECAUTIONS
WARNING: If there is a leakage from the CR2025 battery,
remove the battery from the device and properly dispose.
Immediately wash any exposed body surfaces, clothing, or
furniture with soap and water. If contact with eyes or
mouth occurs, flush with clean water immediately and
seek immediate medical assistance.
WARNING: Do not use a different type or size of battery
other than a CR2025 battery.
WARNING: Do not heat or disassemble the battery. Never
throw the battery in fire or water.
WARNING: Never recharge the CR2025 battery.
4. The Battery Door should slide out easily to expose the
the Battery Tray holding the CR2025 battery.
19
TROUBLESHOOTING
TROUBLESHOOTING (CONTINUED)
TROUBLESHOOTING (CONTINUED)
WARNING: To keep the warranty valid, never repair this
product or any parts yourself. If you experience any
problems with the product, first check these troubleshooting instructions before contacting our customer service
centers. If the problem persists, follow the warranty
instructions in the Service and Warranty manual for
customer service options.
• Some songs sound better with higher bass, some with
higher treble. Adjust the Digital Sound Profile settings or
switch on/ off the Dynamic Bass Boost to enhance
sound quality for different types of songs.
Wireless Bluetooth - pairing problems
Ovale™ Docking Speaker does not turn on
• Ensure that the AC power adapter has been connected
properly.
• Ensure that there is power from the AC electrical outlet.
Ovale Docking Speaker - no sound, or poor sound
quality
™
• Adjust the volume on the Docking Speaker.
• Adjust the volume of your iPod/ iPhone/ iPad, Bluetooth
device or the external audio device that is connected to
the Docking Speaker.
• Make sure that the Docking Speaker is set to the correct
Audio Source matching the device that you want to play.
For example, make sure the Audio Source is set to
“iPod” when you are trying to play music from your
iPod/ iPhone/ iPad device.
20
• The quality of the song file (for example, an MP3 song
file) can vary from different sources. Poor quality song
files can result in unclear sounds or unwanted noise that
will be heard when played on this speaker. It is
recommended to remove/ delete poor quality song files
from your playlist and to try to play songs from a trusted
source such as iTunes.
• If you cannot see “Ovale Speaker” listed in your
Bluetooth device list when trying to pair with the
Docking Speaker, check that your device’s Bluetooth
function is switched on. Also check that the Docking
Speaker is in the Bluetooth Audio Source Mode. Restart
the Docking Speaker to restart the Bluetooth pairing
mode if needed.
• Radio reception depends greatly on the quality of radio
reception within the room where the Docking Speaker is
located. In the FM Radio Audio Source Mode, adjust the
position of the Radio Antenna, or move the position of
the Docking Speaker to a place with better radio
reception.
• If the Bluetooth device cannot pair with the Docking
Speaker, your Bluetooth device may not support the
A2DP Bluetooth profiles of this Docking Speaker device.
If your device is not equipped with the right Bluetooth
profile, you can still play music from your device by
using the docking connector in the “iPod” Audio Source
Mode (for iPod/ iPhone/ iPad devices only) or by
connecting to the 3.5mm Audio Cable (included) in the
“AUX” Audio Source Mode.
Wireless Bluetooth - poor sound quality
The Alarm does not activate when programmed
• Sounds may become distorted or broken up if the
Bluetooth device is out of range of the Docking Speaker.
Move your Bluetooth device within 30-33 feet (10m) of
the Docking Speaker for clear wireless Bluetooth sound
reception.
• Check that the alarm time was set correctly to AM or PM
and matching the correct AM or PM setting of the clock.
• Check to make sure that the Alarm Indicator Light is ON
after you set the alarm. The alarm will only activate at
the set time if the Alarm Indicator Light is switched ON.
21
FCC STATEMENT:
This equipment has been tested and found to comply with
the limits for a class B digital device, pursuant to Part 15
of the FCC Rules. These limits are designed to provide
reasonable protection against harmful interference in a
residential installation. This equipment generates, uses,
and can radiate radio frequency energy and, if not
installed and used in accordance with the instructions,
may cause harmful interference to radio communications.
However, there is no guarantee that interference will not
occur in a particular installation. If this equipment does
cause harmful interference to radio or television reception,
which can be determined by turning the equipment off
and on, the user is encouraged to try to correct the
interference by one or more of the following measures:
• Reorient or relocate the receiving antenna.
• Increase the separation between the equipment and
receiver.
• Connect the equipment into an outlet on a circuit
different from that to which the receiver is connected.
• Consult the dealer or an experienced radio/ TV
technician for help.
RF WARNING STATEMENT:
The device has been evaluated to meet general RF
22
exposure requirement. The device can be used in portable
exposure condition without restriction.
FCC NOTICE:
This device complies with Part 15 of the FCC Rules.
Operation is subject to the following two conditions:
1. This device may not cause harmful interference, and
2. This device must accept any interference received,
including interference that may cause undesired
operation.
FCC CAUTION:
• Any changes or modifications not expressly approved by
the party responsible for compliance could void the
user's authority to operate this equipment.
iPod, iPhone and iPad not included.
iPad, iPad mini, iPhone, iPod, iPod nano, iPod touch are
trademarks of Apple Inc., registered in the U.S. and other
countries.
The Bluetooth word mark and logo are registered
trademarks owned by Bluetooth SIG, Inc. and any use of
such marks by JMA North America LLC is under license.
Other trademarks and trade names are those of their
respective owners.
“Made for iPod,” “Made for iPhone,” and “Made for iPad”
mean that an electronic accessory has been designed to
connect specifically to iPod, iPhone, or iPad, respectively,
and has been certified by the developer to meet Apple
performance standards. Apple is not responsible for the
operation of this device or its compliance with safety and
regulatory standards. Please note that the use of this
accessory with iPod, iPhone, or iPad may affect wireless
performance.
• This device and its antenna(s) must not be co-located or
operating in conjunction with any other antenna or
transmitter.
FCC ID: SG4-W123456
To locate the FCC numbers, please look on the underside
of the Ovale™ Wireless Docking Speaker.
Please only use with the power supply adapter provided.
Ovale™ Wireless Docking Speaker AC Power Adapter
model number HK-AX-120A200-CP.
23