1
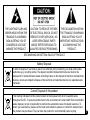
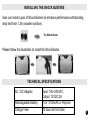
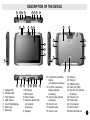
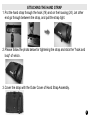
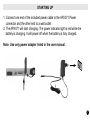
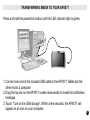
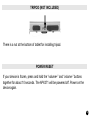
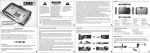
APX071 User Manual
KEM-ML32708-02A
IMPORTANT:
1) Use only with the adaptor supplied by Giant.
Model No.: HK-AX-120A200-US.
2) Plug the adapter to a nearby, easily accessible socket outlet.
WARNING:
TO PREVENT FIRE OR ELECTRICAL SHOCK HAZARD, DO NOT
EXPOSE THIS PROCUCT TO RAIN OR MOISTURE
1
THE LIGHTING FLASH AND
ARROW HEAD WITHIN THE
TRIANGLE IS A WARNING
SIGN ALERTING YOU OF
“DANGEROUS VOLTAGE”
INSINDE THE PRODUCT.
CAUTION: TO REDUCE THE RISK
OF ELECTRICAL SHOCK, DO NOT
REMOVE COVER (OR BACK). NO
USER SERVICEABLE PARTS
INSIDE. REFER SERVICING TO
QUALIFIED SERVICE PERSONNEL.
THE EXCLAMATION WITHIN
THE TRIANGLE IS WARNING
SIGN ALERTING YOU OF
IMPORTANT INSTRUCTIONS
ACCOMPANYING THE
PRODUCT.
SEE MARKING ON BOTTOM / BACK OF PRODUCT.
Battery Disposal
In order to dispose of your device, take it to a collection point provided by your local public waste
authorities (e.g. recycling centre). The adjacent symbol indicates that this device must not be
disposed of in normal domestic waste! According to laws on the disposal of electronic and electrical
devices, owners are obliged to dispose of old electronic and electrical devices in a separate waste
container.
Correct Disposal of this product
This marking indicates that this product should not be disposed with other household waste
throughout the EU. To prevent possible harm to the environment or human health from uncontrolled
waste disposal, recycle it responsibly to promote the sustainable reuse of material resources. To
return your used device, please use the return and collection systems or contact the retailer where
the product was purchased. They can take this product for environmentally safe recycling.
2
WATERPROOF
The APX071 is designed for waterproof product. For the best protection your
tablet, you must tightly close all the rubber covers (Earphone, SD card, IO/DC)
and insert the grips.
Note:
1. Dry the device thoroughly with a clean and dry cloth in the case of the device
getting wet.
2. The tablet’s performance will be affected if the waterproof covers are not
closed properly. Manufacturer will not be responsible for any corresponding
liability.
3
INSTALLING THE SHOCK BUSTERS
User can install a pair of Shock Busters to enhance performance withstanding
drop test from 1.2m (wooden surface).
The Shock Buster
Please follow the illustration to install the Shock Buster.
TECHNICAL SPECIFICATIONS
AC / DC Adapter
Rechargeable Battery
Charge Time
Input: 100~240VAC;
Output: 12VDC 2A
7.4V 3100mAh Li-Polymer
12 hours for first time
4
DESCRIPTION OF THE DEVICE
15
16 17
1
18
2
19 20 16
3
4
15
9
5
6
10
11
11
12
12
11
21
11
7
8
22
14
23
1.
2.
3.
4.
5.
6.
7.
Charge LED
Indicator LED
Front Camera
Light Sensor
Touch Panel/Display
Return key
Menu key
24
28
27 26
25 24
8. Home key
9. NFC sensor
10. Rear Camera
11. Screws to attach Grip
(for optional
accessory)
12. Speaker
23
13. Contact for secondary
battery
(for optional accessory)
14. Lock for a secondary
battery (optional
accessory)
15. Grip lock (for optional
accessory)
16. Hole for cord
17. Earphone jack
18. Power / Lock
13
19. Volume –
20. Volume +
21. USB port (left)
22. USB port (right)
23. Grip lock (for optional
accessory)
24. Hole for cord
25. Power input
26. I/O connecter
27. Nut for tripod
28. Micro SD card slot
5
ATTACHING THE HAND STRAP
1. Put the hand strap through the hook (16) and on the housing (24). Let other
end go through between the strap, and pull the strap tight.
2. Please follow the photo below for tightening the strap and stick the "hook and
loop" of velcro.
3. Cover the strap with the Outer Cover of Hand Strap Assembly.
6
STARTING UP
1. Connect one end of the included power cable to the APX071 Power
connector and the other end to a wall outlet.
2. The APX071 will start charging. The power indicator light is red while the
battery is charging. It will power off when the battery is fully charged.
Note: Use only power adapter listed in the user manual.
7
POWER ON
Press and hold the power for about 2 seconds to power on the unit.
INSTALLING NEW APPS
You can download the apps from Opera Mobile Store. This online library of free
and purchasable applications has thousands of useful applications (Media
player, games, etc.) to download and use.
1. With the APX071 connected to the Internet, tap on the Opera Mobile Store
icon.
2. Search for your interested apps to download.
Open the downloaded files (*.APK) and following the indication to install Apps.
8
TRANSFERRING MEDIA TO YOUR APX071
Press and hold the power/lock button until the LED indicator light is green.
USB
1. Connect one end of the included USB cable to the APX071 Tablet and the
other end to a computer.
2. Drag the top bar on the APX071 screen downwards to reveal the notification
message.
3. Touch “Turn on the USB storage”. Within a few seconds, the APX071 will
appear as an icon on your computer.
9
4. You can transfer your media files to the APX071 by copy/pasting them into
the respective folders using Windows® Explorer (or the Finder on a Mac®).
5. Once all your file transfers are finished, close Windows® Explorer and any
other program that may have read or written to the APX071. Click on the
‘safely remove’ icon in the system tray, next to the clock. You can now unplug
the USB cable.
USB HOST
Please read the panels 21 and 22 to obtain information regarding the two
Type-A USB sockets for the USB accessory.
10
NFC
It can be read the information of IC card (Resident card etc.). The antenna of
NFC is at the left of rear camera. You must place the IC card in the area pointed
by the arrow in the diagram above. When the tablet identifies the IC card, the
application (e.g. Tags) will pop out and shows the information in the card. Other
APPs can also be installed for reading NFC data.
Activate/Deactivate NFC function:
1. Press “Menu” button.
2. Select “Settings”.
3. Select “Wireless & networks”.
4. Activate/Deactivate NFC function.
11
TRIPOD (NOT INCLUDED)
There is a nut at the bottom of tablet for installing tripod.
POWER RESET
If your device is frozen, press and hold the “volume+” and “volume-” buttons
together for about 10 seconds. The APX071 will be powered off. Power on the
device again.
12