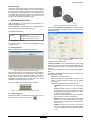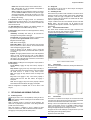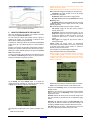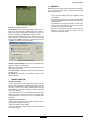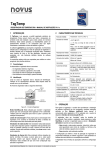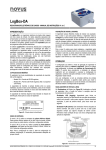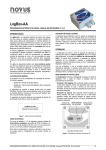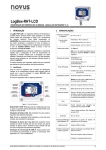
1
Penguin Logger
TEMPERATURE AND RELATIVE HUMIDITY LOGGER - OPERATING MANUAL V1.2x
1
PRESENTATION
The Penguin is a stand alone data logger for temperature and relative
humidity. The sensors are built in and the data is stored in local
memory, from where it can be transferred to a computer or Palm top
for visualization and analysis in the form of tables or graphics.
The Logchart-II software is provided with the Penguin and is intended
for configuring the logger parameters (start/stop, interval between
readings, etc), and is also the tool for analysis of the logged data. The
data can also be exported to other applications like spread sheets.
1.1 Unpacking
The Penguin set consists of:
- the logger itself;
- a CD with the Logchart-II software and USB driver;
- The IR interface, when ordered.
1.2 Identification
The label located on the back cover identifies the Penguin model.
T stands for temperature only, whereas RHT refers to the model for
temperature and relative humidity combined.
2
SPECIFICATIONS
Inputs
Temperature: –40°C to 80°C
Relative Humidity: 0 a 100%
Accuracy
For the RHT model, refer to Figure 1.
For the T model, assume
± 1 ºC @ 25ºC max.
± 2 ºC max over the full measuring range.
Figure 1- Penguin RHT accuracy
3
OPERATION
The Penguin requires the LogChart-II (or LogChart for Pam) software
in order to be used. Refer to section 5 (LOGCHART– II SOFTWARE)
for the instructions on software installation.
The communication between the PC and the Penguin is taken care by
the IR-Link-II optical interface, IrDA like.
Designed to save battery energy, the Penguin is in sleep mode most of
the time, keeping its communication interface disable. In order to
communicate, the user is required to wake up the Penguin by pressing
the START button as shown in Figure 2 (it is necessary to press hard,
as the START button was design such as not to allow unintentional
commands).
SENSORS
STATUS LED
START BUTTON
Note: offset correction for the inputs are obtained
by means of the OFFSET parameter available in
the LogChart-II and LogChart for Palm softwares.
Memory capacity
16k loggings for the Penguin T
32k loggings for the Penguin RHT
Minimum interval
between readings
Penguin T: 1 second
Penguin RHT: 5 seconds
Power
Internal 3,6V lithium battery (1/2 AA)
Estimated autonomy
Over 2000 days (5 years), based on one data
offload per day. Battery life is depreciated with
very frequent data offloads.
Working temperature
–40°C to 80°C
Enclosure
Polycarbonate
Water tightness
Compatible with IP65.
Dimensions
45x60x20 mm
Data upload time
Proportional to the size of the stored data.
Typically 40 seconds per 16k loggings.
Penguin -> computer
Interface with computer
Optical, IR (infra-red)
Figure 2 – Penguin front cover
Following the wake up, the Penguin will wait 30 seconds for a
command to establish a valid communication with the interface.
During this time, the STATUS LED will blink according to the current
logger operating status:
1- Blinks once every four seconds: stand-by (logging is not active,
no alarm have been identified in the data).
2- Double blink every four seconds: logging is active, no alarms have
been identified.
3- Three blinks every four seconds: logging is stopped, but alarm
situations have been detected while the logging was active.
4- Four blinks: logging is active, alarm(s) situation(s) were
encountered.
After 30 seconds without communication, the Penguin goes back to
sleep mode.
The logger operating mode is configured in the LogChart-II software
(or LogChart for Palm). The new configuration is transferred to the
Penguin (using the IR-Link-II) which will start a new data record based
on the parameters chosen.
Old records will not be available for retrieval once a new configuration
is entered into the Penguin.
NOVUS PRODUTOS ELETRÔNICOS LTDA. – WEBSITE: www.novus.com.br - FONES: RS: (51) 3323-3600 SP: (11) 3675-0366 PR: (41) 372-8476
Registrador PINGÜIM
Resetting the logger
The Penguin can be reset by keeping pressed the START button for
10 seconds. The STATUS led will light up for 1 second, acknowledging
the reset. Following a reset, the Penguin will go to the stand-by state; if
it was logging data, it will interrupt the process. The configuration is not
lost, and the logging will resume according to the configuration stored
in the logger. The data remains intact and can be read any time
(provided a new configuration has not been loaded)
4
INTERFACE INSTALLATION
Model IR-LINK3/RS232 – this is an adaptor for IR that makes use of
the RS232 COMM port of the PC.
Model IR-LINK3/USB – converts USB to IR. A dedicated Windows
driver is required and is provided in the installation CD.
LOGCHART II SOFTWARE
Ambiente de operação
do software
Figure 5 – Wand and Penguin communication setup
A screen named Parameters Configuration is presented, showing
general information about the logger and fields for configuration of the
logger operating mode.
Software Configurador, para Windows 95, 98,
NT, 2000 e XP.
Menus em português, inglês ou espanhol.
Configura, lê e apresenta dados na tela.
4.1 Installing the LogChart II
To install the LogChart II, execute the LC_II_Setup.exe program
provided in the CD.
4.2 Running LogChart II
The LogChart opening screen is shown below in Figure 3.
Figure 6 – Configuration screen
Figure 3 – Openning screen of the LogChart II software
The LogChart II requires a communication port to talk to the Penguin.
Clicking on the menu Port, all free communication ports available in
the computer will be listed, including the USB port if the driver is
installed. Select one and connect the corresponding wand (IRLINK3/RS232 or IR-LINK3/USB) to it. The chosen port will be
remembered next times the LogChart II is initiated.
Once a port is selected, the icons shown below are enabled.
Figure 4 – Icons enabled when the communication port is valid.
4.3 Logger Configuration
With the communication wand installed and pointed to the Logger (1m
maximum distance) as shown in Figure 5, click on
1- Title: Instrument or process name.
2- General Information: shows logger identification (model, serial
number, firmware version, memory size) and status (internal clock with
date and time, PC date and time, current number of reading stored in
memory)..
This information is updated every second once the communication is
active.
3- Channel 1 and Channel 2: show the fields for configuring input
operating features, as follows:
Tag: Defines a name for the channel.
Type: Temperature input always enable in channel 1; For
channel 2 (relative humidity), the logging may be disabled
(option none)
Value: Defines the way the values are to be assumed:
Instantaneous: The instant value read at the logging
time.
Average: arithmetic average of 10 consecutive samples
equally spaced over the logging interval. The minimum
logging interval for this option to be enabled is 50s, based
on 5s minimum sampling interval.
NOTE: The average is implemented only for the Penguin
RHT. The Penguin T does not have this option.
Minimum: The value to be recorded in memory is the
minimum value of 10 consecutive readings in the logging
interval. The minimum logging interval for this option to be
enabled is 50s.
Maximum: The value to be recorded is the maximum
value of 10 consecutive readings in the logging interval.
The minimum logging interval for this option to be enabled
is 50s.
NOVUS PRODUTOS ELETRÔNICOS LTDA. – WEBSITE: www.novus.com.br - FONES: RS: (51) 3323-3600 SP: (11) 3675-0366 PR: (41) 372-8476
Registrador PINGÜIM
Offset: Allows fine offset corrections on the measured value.
Unit: Selects either ºC or ºF for indication of temperature in
channel 1. Channel 2 is fixed in %.
Alarm: Available only for the temperature channel. The routines
for alarms LOW and HIGH are executed every time the logger
samples the temperature, informing the occurrence of an alarm
by a blinking code in the front cover LED (see section 3 for the
blinking code meaning).
4- Acquisitions: Defines the logging interval. For instantaneous
measurements, the minimum interval is 1s for the T model and 5s for
the RHT model. When average, minimum or maximum is selected, the
minimum interval is 50s.
The Daily Repetition allows loggings to be repeated everyday, for
example, recording data from 8 AM to 5 PM day after day.
5- Start Logging: Allows selection of 5 distinct approaches for starting
the acquisitions:
Immediately: immediately after clicking on the OK button for
sending the new configuration to the logger.
Stat with Palm: The acquisitions are started by a command send
by a PDA with the LogChart PalmOS software installed.
Day: Date to start the logging.
Hour: time to start the logging
With START Button: start or stop acquisitions when the Start
button is pressed for at least 2 seconds. The front LED will blink
twice indicating the logging has started.
NOTE: the Penguin must be awaked in order to accept the
command. The logger wakes up when the Start button is pressed
momentarily.
Setpoint: The logging initiates when the value of the temperature
reading is lower or higher than the LOW or HIGH Setpoints
respectively. The LOW and HIGH Setpoint values are entered in
the Channel 1 box, taking the place of the alarms, whose functions
are disabled in this operating mode.
6- Stop Logging: The Penguin can be configured to stop acquisition in
the following ways:
At Full Memory: logging will stop when memory capacity is
reached.
Wrap around: Logging never stops. The Penguin will keep on
recording the readings and when the memory is full it will overwrite
the oldest record in a circular or wrap around manner.
After: The logging will stop after the number of readings here
defined.
Day: Date for the loggings to stop. If the memory capacity is
reached earlier than the date here defined, the logging is
interrupted.
5.2 Saving data
The offloaded data can be saved for future analysis accessing the
menu “File Save” of “File Save as”.
5.3 Visualizing the data
Three windows are provided for data visualization. The records can be
analyzed in the form of Chart or Table. A third window, called General
Information, shows the logger configuration and identification. See
Figure 7 for details. The same windows are created when the data is
read from a previously saved file.
A region of interest in the data can be selected (see item 5.3.3 Chart
Window, below). The Chart window can be printed and the
corresponding data exported as text files to other applications, such as
spread sheets.
5.3.1
General Information window
This window shows information about the logger configuration and
about the data that has been transferred. Penguin identification and
acquisition details are presented, as seen in Figure 7.
Figure 7 –General Information Window
5.3.2
Table window
Here the data is presented in a table format, showing the date/time and
the records values.
Hour: Time for logging to stop. If the memory capacity is reached
earlier than the time here defined, the logging is interrupted.
When the configuration is completed, click on “OK” to send it to the
Penguin.
5
OFFLOADING AND VIEWING THE DATA
5.1 Transfering records
Transferring the data to a PC is accomplished by clicking on the icon
in the LogChart II software. The Penguin must be awaked and the
IR wand pointed to it.
While in offloading process, a progress bar will be displayed. The
offload time is proportional to the amount of data being transferred
(number of records in memory).
When data transfer is completed, a sound is emitted and three
windows are created: Chart, Table and General Information windows.
The logging is not stop during the data offload process.
Figure 8 – Acquisition table window
5.3.3
Chart window
The Chart is a convenient tool for analysis. As one moves the mouse
in the chart area, the time and the value of the records of each channel
are shown in the field located in the bottom of the window.
Zooming in and out are implemented. They are available in the menu
“View” or in the tool bar as icons. It is possible to select an area by
clicking and dragging the mouse, creating this way a zoom region,
starting at the upper left position of the region of interest.
The graphs can be moved vertically by moving the mouse up or down
while keeping the mouse right button pressed.
Figure 9 shows the chart window.
NOVUS PRODUTOS ELETRÔNICOS LTDA. – WEBSITE: www.novus.com.br - FONES: RS: (51) 3323-3600 SP: (11) 3675-0366 PR: (41) 372-8476
Registrador PINGÜIM
Figure 9 – Graphical view of the data.
6
USING THE PENGUIN WITH THE PALM TOP
Most of the functionality of the LogChart II is available for the PDA
Palm running the LogChart PalmOS software.
The user needs the softwares Palm Desktop and the LogChart II
installed in his machine. It is recommended to execute the Palm
HotSync before installing the LogChart PalmOS.
In the Windows, execute (from the HD, CD or diskette) the LCP_Setup
installer. Press “OK”. The software will guide you over the installation
process.
Executing a new HotSync will install the LogChart PalmOs software in
the Palm. The LogChart icon wills the added to the Palm home screen.
Starting the LogChart PalmOS application will display the Recorded
Data screen on the Palm.
In order to communicate, wake up the Penguin, point the Palm to it and
tap on Search. The Monitoring screen (Figure 10) will be presented,
showing current Penguin configuration and status.
Sensor: Defines the sensor. In this model, the sensor is predefined and cannot be changed.
Limits: Shows sensor limits. Changes are not allowed in this field.
Start : Defines the strategy for the logging start. The options are:
Immediately: The logging will start as soon as the Penguin
receives the new configuration.
By date/time: defines date and time for logging to start.
By <Start> button: When taping the Start Now button on the
Monitoring screen.
By Setpoint value: The logging initiates when the value of the
temperature reading is lower or higher than the LOW or HIGH
Setpoints respectively.
Stop: Defines the possible ways the acquisition is stopped:
Full memory: logging will stop when memory capacity is
reached (16K records).
By date/time): Date and time when the logging is to stop.
Wrap aroud: Logging never stops. The Penguin will keep on
recording the readings and when the memory is full it will
overwrite the oldest record in a circular or wrap around
manner
After loggins: The logging will stop after the number of
readings here defined.
Interval: Defines the logging interval. For instantaneous
measurements, the minimum interval is 1s for the T model and 5s
for the RHT model. When average, minimum or maximum is
selected, the minimum interval is 50s.
The configuration is sent when tapping the Apply button.
There are still three other buttons, described bellow:
Alarms: Available only for the temperature channel. The routines
for alarms LOW and HIGH are executed every time the logger
samples the temperature, informing the occurrence of an alarm by
a blinking code in the front cover LED (see section 3 for the
blinking code meaning).
Figure 10 – Monitoring screen
Tap on Settings. The screen Settings (Figure 11) is opened and
contains the required parameters for configuring the logger. Tapping
on Apply will send the new configuration to the Penguin.
Figura 14 – Tela Alarm Setting do Palm
Clocks: Shows the current date and time in the Palm and in the PC.
Offset: Allows fine offset corrections on the measured value.
Going back to the Monitoring screen, four other buttons perform the
following functions:
Search: It is used every time a new communication session is desired.
When a logger is found, the Monitoring screen is opened and the
logger status is shown.
Download: Performs the transfer of the data from the Penguin to the
Palm. The download may be partial and does not interrupt the logging
process.
Data Base: The application switches to the Recorded Data screen,
listing all the files that were created in the downloads. Selecting a file
and tapping on Details, relevant information about the file is shown.
Figure 11 –Settings screen
These parameters are analogous to the LogChart II parameters. They
are:
Title: name of the process.
View Data: tapping on this button, a table with the time and value of
the records is generated and presented in the Palm screen.
NOVUS PRODUTOS ELETRÔNICOS LTDA. – WEBSITE: www.novus.com.br - FONES: RS: (51) 3323-3600 SP: (11) 3675-0366 PR: (41) 372-8476
Registrador PINGÜIM
8
WARRANTY
NOVUS Electronics provides the original purchaser of this instrument a
one (1) year warranty against defects in material and workmanship
under the following terms:
•
•
•
Figura 15 - Tela Recorded Data do Palm
More Info: shows logger identification.
Synchronization: Data synchronization between Palm and PC is
taken care by the conduit that is installed together with LogChart for
PalmOS. The conduit is responsible for converting the data stored in
the Palm to a file format compatible with the LogChart II software.
NOTE: the HotSync Manager must be active. With the mouse on the
HotSync Manager (in the Windows task bar), click the mouse right
button and select Custom. Select Novus LogChart Conduit and click
on Change. The following window will be opened:
•
The one year warranty begins on the day of shipment as stated
on the sales bill.
During the warranty period all costs of material and labor will be
free of charge provided that the instrument does not show any
evidence of misuse.
For maintenance, return the instrument with a copy of the sales
bill to our factory. All transportation and insurance costs should
be covered by the owner of the equipment.
Should any sign of electrical or mechanical shock, abuse, bad
handling or misuse be evident the warranty voids and
maintenance costs will be charged.
Figure 16 –LogChart Conduit options
Handheld overwrites Desktop: the data read from the Penguin with
LogChart for PalmOS is saved in the PC.
Save at: the user specifies a default directory where the data is to be
saved in the HotSync process.
Leave Data on Palm: if selected, the files with the logging in the Palm
will not be erased.
Do nothing: the logged data is not transferred to the PC in the
HotSync procedure.
7
TROUBLE SHOOTING
The LED does not blink:
- When in sleep mode (not communicating with the Palm or PC, the
front cover LED will not blink to save battery charge. When active, the
LED blink is made intentionally weak for the same reason, and occurs
once every 4 seconds. Also, in highly illuminated ambient, the LED
becomes inefficient. So, make sure the Penguin is awake and that the
LED is in fact not blinking.
- Check if the battery is not worn out. Resetting the logger (holding the
START button pressed for more than 10 seconds) will cause the LED
to flash intensively for 1 second. If it fails to do so, the battery needs
replacement.
Communication is not possible
- Make sure the communication port is properly selected and that no
other application is sharing the same port.
- Check if the IR beam is free of obstacles.
- Check if the wand cable is well connected to the PC port and that the
port is working properly.
NOVUS PRODUTOS ELETRÔNICOS LTDA. – WEBSITE: www.novus.com.br - FONES: RS: (51) 3323-3600 SP: (11) 3675-0366 PR: (41) 372-8476