1
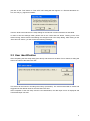
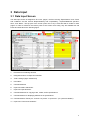
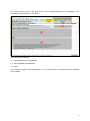
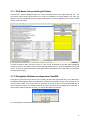
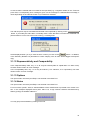
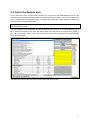
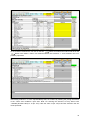
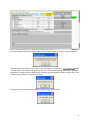
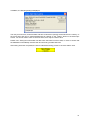
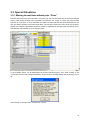
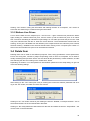
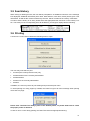
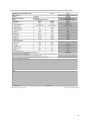
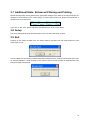
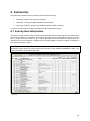
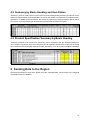
International Comparison Program [02.03] ICP 2011: MACHINERY AND EQUIPMENT SURVEY DATA TOOL USER MANUAL Global Office 4th Regional Coordinators Meeting April 20-21, 2011 Washington DC Contents 1 PRELIMINARY REMARKS 1 2 INSTALLATION 1 2.1 Technical Requirements 1 2.2 First Start and Setup 1 2.3 User identification 3 3 DATA INPUT 4 3.1 Data Input Screen 3.1.1 Pull-down List containing all Items 3.1.2 Navigation Buttons next/previous Item/BH 3.1.3 “Filter” Settings 3.1.4 Item Status 3.1.5 Command Buttons for Saving, Checking, Printing etc. 3.1.6 Input Area “Make and Model” 3.1.7 Input Area “Specifications” 3.1.8 Command Buttons for Copying Make, Model, and/or Specifications 3.1.9 Highlighting of Technical Parameters which are different 3.1.10 Displaying Item Pictures 3.1.11 Terms and Conditions 3.1.12 Representativity and Comparability 3.1.13 Options 3.1.14 Notes 4 6 6 7 7 8 8 8 8 8 9 9 10 10 10 3.2 11 Input of a Sample Item 3.3 Special Situations 3.3.1 Moving to next Item without prior “Save” 3.3.2 Bottom Line Prices 15 15 16 3.4 Delete Item 16 3.5 Item History 17 3.6 Printing 17 3.7 Additional Hints: Enhanced Filtering and Printing 19 3.8 Setup 19 3.9 Exit 19 4 SUMMARIES 20 4.1 Item-by-Item Information 20 4.2 Summary by Basic Heading and Item Status 21 4.3 Product Specification Summary by Basic Heading 21 5 SENDING DATA TO THE REGION 21 i 1 Preliminary Remarks For the Machinery and Equipment Survey (World Bank, International Comparison Program 2011), an Excel tool – the Data Tool – will be used to make item specifications and record pricing information on Equipment Goods. The major goal of this tool is to provide an easy and reliable method for recording the data. This user manual is intended to show how to use the Data Tool. 2 Installation 2.1 Technical Requirements The Data Tool requires MS Office 97 or newer, installed on a PC running Windows NT/2000/XP or newer. Depending on the national version of the operating system and of the MS Office version, some messages may differ from the ones in this manual. This manual was created on a PC with Office 2000. In order to use the Data Tool, it is absolutely mandatory that VBA macros are enabled. You may need to change the safety level in your Excel version to allow for enabling macros. 2.2 First Start and Setup Please copy the Excel file data_tool.xls you have received and the subdirectories containing the item images to a separate folder, then open the file data_tool.xls there by double-clicking on it. Depending on your safety settings in Excel, a dialog may be displayed which asks whether or not to enable macros. Please always enable macros for the Data Tool, otherwise it will not run properly. In case you do not get a dialog and macros are disabled automatically, please change the Excel safety level appropriately (see 2.1). After the first program start, the setup dialog of the Data Tool will automatically open up: The first thing to do is to select the appropriate country. Please select the appropriate country from the pull-down list that appears when you click on the down arrow next to the “Reporting country” input box. At present, this list contains the following entries: 1 CM (Cameroon) KE (Kenya) ZA (South Africa) AR (Argentina) BZ (Brazil) CO (Colombia) AU (Australia) CN (China) IN (India) XX (other countries) For this user manual, CM (Cameroon) is used. In case your country is not included in the list, please select XX (other countries). Next, the standard for the technical specifications has to be selected (either “Imperial” or “Metric”). To do this, please just click on “Imperial” or “Metric”. In case you want to protect items against deletion, you may specify an item deletion password. If this is left empty, you will just be asked if you really want to delete an item when you select “Delete item” in the main input area; otherwise, you will be prompted for the password. We propose to leave the item deletion password empty. In the top right part of the dialog, you find seven checkboxes (one for each basic heading (BH)). By default, all these checkboxes are “checked”, indicating that you can save data for all BH. In case you want to divide the input work among several persons, you can just copy the (still empty) Data Tool Excel file several times (under different names) and then activate each BH in exactly one of the files. Please note: Merging the files can not be done by the data tool user; it will be done later during the analysis of the Data Tool files. In the input fields “Text for the YES button” and “Text for the NO button”, please enter the text appearing on those buttons in the operating system installed on your PC. If you are not sure about the texts, 2 just click on the “Test” button. A “Test YES / NO”-dialog will then appear. In a German Windows version, this may e.g. appear as follows: Thus the texts to be entered in the setup dialog for the German version should be JA and NEIN. In order to save the settings made, please click on the “Save and exit” button. Clicking on the “Exit without saving” button results in discarding the changes made in the setup dialog. After clicking on the “Save and exit” button, you will receive the following message: 2.3 User identification After completing the first setup dialog (see above) and whenever the Data Tool is started, a dialog will ask for the name of the Data Tool user: This name will be used for recording item history (see below). The name entered will be saved and suggested as the default value for the next Data Tool start. After completion of the first setup and the user identification, the data input screen is displayed and normal data input can start. 3 3 Data Input 3.1 Data Input Screen The data input screen is designed to fit on two “pages”, the first covering “Specifications” and “Terms and conditions” and the second “Representativity and comparability”, “Options/additional specifications”, and “Notes”. The top part of the screen (rows one to six) is fixed and will be visible on both pages. In order to reference the various parts of the screen more easily, they are labelled with red boxes and white text in the following figure. 1: Pull-down list containing all items 2: Navigation buttons next/previous item/BH 3: “Filter” settings (eight checkboxes) 4: Item status 5: Command buttons 6: Input area “Make and Model” 7: Input area “Specifications” 8: Command buttons for copying make, model, and/or specifications 9: Command button for displaying differences in specifications 10: Command button “Show pict.” and info “no picture” or “picture av.” (for “picture available”) 11: Input area “Terms and conditions” 4 The second (bottom) part of the input screen covers “Representativity and comparability”, “Options/additional specifications”, and “Notes”: There are three input areas: 12: Representativity and comparability 13: Options/additional specifications 14: Notes In the following chapters, the areas labelled 1 to 14 in the two parts of the input screen are described in more detail. 5 3.1.1 Pull-down List containing all Items From this list – which is displayed when you click on the down arrow on the right hand side of it - you can directly select an item (even when it is in a BH not activated in the setup dialog). The entry displayed in the box corresponds to the currently selected item. The items appearing in the list are sorted by BH, product and item. In order to select an item, move the cursor to it (the cursor is followed by the dark blue highlighting line) and click on it. The Data Tool then copies the appropriate texts etc. from the database to the input screen. In case you selected an item in a BH which was not activated in the setup dialog, you will get a corresponding warning. 3.1.2 Navigation Buttons next/previous Item/BH Using the long pull-down list involves a lot of scrolling to select the appropriate item. As an alternative, the additional navigation buttons for selecting the next/previous item/BH may be used. Clicking on one of them lets the Data Tool move forward or backward in the list of items until an appropriate item is found. During this search, the settings made in the “filter” area (see next paragraph) are respected. In case no item matching the filter is found, you will get the following message: As a consequence, the last selected item will be displayed. 6 3.1.3 “Filter” Settings In order to allow for easier navigation, “filter” checkboxes have been included: By default, all eight checkboxes are “checked”. This filter is used during item navigation as well as for printouts. Filtering is available for the following: Item status: priced / unspecified / incomplete / deleted Importance: important / not important Comparability: identical / equivalent To change the filter, just click on corresponding text or checkbox. Please note that the “hot spot” of the cursor hand used is not the “tip of the index finger”, but a little bit below it. If you click with the tip of the cursor hand index finger on the bottom line of the “Priced” checkbox, the status of the “Incomplete” checkbox will change (sorry, we can’t do anything about this). 3.1.4 Item Status The item status is displayed in the yellow area. There are four options as follows: Priced The item is (formally) correctly priced and saved. Unspecified These are items for which no information has been saved or which have been priced, but deleted afterwards (with throwing away the entered information). Deleted This indicates an item, for which information has been saved and which has been deleted afterwards. During the deletion process, the user decided to just mark the item as “deleted”, but keep all entered information. Incomplete The item has been saved with some information being (formally) wrong or incomplete. The advantage of having the option to save incomplete or wrong information is that you may have started entering data for an item and then notice some missing information. Instead of erasing the already entered information and re-entering it later, you can just save the available information and come back to the item later. Here using the filter comes in: In order to find such an item later, de-select all checkboxes except “Incomplete” and then click on the “Next item” button. The Data Tool will then find the next item with status “Incomplete”. Each possible status is additionally signalled by the appropriate colour: PRICED, UNSPECIFIED, DELETED, INCOMPLETE. 7 3.1.5 Command Buttons for Saving, Checking, Printing etc. The command buttons in this area are intended for Saving the information entered for the currently selected item Checking the information entered for the currently selected item Starting the printing dialog Exiting the Data Tool Deleting the currently selected item Displaying the “history” of the currently selected item Starting the setup dialog 3.1.6 Input Area “Make and Model” After having selected the appropriate item, data input normally starts in the input area for make and model. In case the proposed make and model are ok, you may click on the <- Copy button on the right hand side of the input field instead of entering the text yourself. Please note that the make and model have to be entered for all priced items (as well as the technical specifications). 3.1.7 Input Area “Specifications” In this area, the specifications of the priced have to be entered. Please note that if data are given in the “Metric” or “Imperial” columns, the corresponding specification input field (column E) has to be filled in, too. 3.1.8 Command Buttons for Copying Make, Model, and/or Specifications In cases where the priced product/item is identical or nearly identical to the proposed one, all or at least most of the technical parameters as well as the make and model should be identical to the entries in the “Metric” or “Imperial” column or in the range C8:C9 (proposed make and model). To facilitate input, there are Copy -> buttons in the “Imperial” and “Metric” columns. In order to copy all parameters from the “Imperial” or “Metric” column, click on the appropriate one. Please note: This also causes the item to be marked as 1 (for “Identical”) in the “Representativity and comparability” input area. To just copy single parameters, click on the <- Copy button on the right hand side of the input field. Please note: Depending on what you specified in the setup dialog, either the metric or the imperial parameters will be copied. 3.1.9 Highlighting of Technical Parameters which are different Upon display of an item in the input sheet, the technical specifications of that item which are different to both texts/values given in the “Imperial” and “Metric” columns will be highlighted by a yellow cell background. This can not be done continuously, but can be asked for by clicking on the “Show diff.” button to the right of the “National” column. 8 3.1.10 Displaying Item Pictures In case the content of field F6 is otherwise the content of field F6 is , a picture for the currently selected item is available, (f.e. for all generic items with make “unspecified”). In case there is a picture available, a click on the button separate window, like in the example shown below. The picture window may be closed by clicking on the causes the display of the picture in a in the top right corner of the image window. 3.1.11 Terms and Conditions In this area, the information determining the “Total unit price net of deductible taxes and discount” have to be entered. The following rules apply: Order quantity any text or number, no checks are applied Currency Only the local currency is valid, all other values may be entered, but result in an error message when trying to save the item (and the item will be flagged as “incomplete”) Unit price any positive number Installation costs any non-negative number (please specify 0 instead of none) Delivery costs any non-negative number (please specify 0 instead of none) Discount either a non-negative number (giving the discount percentage) or a negative number (indicating the discount in units of local currency, e.g. –1300000 for a discount of 1300000 XAF (in our example)). Non-deductible taxes any non-negative number (please specify 0 instead of none) Total unit price net of deductible taxes and discount any positive number 9 In case a value is entered that is not valid for the input field (e.g. a negative number in the “Total unit price” field, a corresponding error message is given. As the message is a standard Excel message, it varies depending on the national version of your MS Excel software. Compute price -> The total unit price may be calculated and entered in the input field by clicking on the button. If you modify this value later or manually enter a value that does not match the calculated one (with a tolerance of one unit of the local currency), a message like will be displayed when you try to save the item or when you click on the button . In addition, in the Summary Results List (described in a later chapter), such an item will be flagged correspondingly. 3.1.12 Representativity and Comparability In the “Representativity” field, only “Y” or “N” may be entered (either in capital letter or in lower case). All other values result in an error message. In the comparability field, only 1 or 2 may be entered. (1 for “identical”, 2 for “equivalent”). All other values result in an error message. 3.1.13 Options The input made in this area (A37:E43) is not checked in the Data Tool. 3.1.14 Notes The input made in this area (A45:E54) is not checked in the Data Tool. For most of the “specific” items, a website address of the manufacturer is provided in the “Notes” section. In the example displayed below (item 150111.10, a high tension hacksaw manufactured by Stanley (USA)), the website address is You may jump to that website by clicking on the link. 10 3.2 Input of a Sample Item Let us assume we want to specify item 150121.03, a Ford Transit 260 SWB Medium Roof van. We found the exactly identical product, and it is an important item in the market. The price we found for the van is 13 million XAF, the discount is 10% (=1.3 million XAF), there are neither installation costs nor or delivery costs or non-deductible taxes. These are just assumptions for the sample input; for more detailed information on pricing items please refer to the briefing notes. There are different ways of selecting the item, but knowing it is in BH 6 of 7 and assuming we are in BH 1, clicking two times on the “Prev. BH” button takes us to the beginning of BH 6 (BH 7+“Next” = BH 1, BH 1+“Previous” = BH 7). Then click on the down arrow on the right hand side of the pull-down list to get the following: Now move the cursor to the entry for the Ford Transit 260 van and click: 11 As we found an identical item, we click on the two <- Copy buttons for make and model as well as on the Copy -> button in the “Metric” column. As mentioned before, this causes a “1” to be entered in the comparability input field. After having entered a “Y” in the representativity field, we continue by entering the pricing information in the “Terms and conditions” input area. Note: For entering the discount, we may either enter -1300000 (absolute value) or 10 (for 10%). Here the value 10 (for 10%) has been entered in the discount input field: 12 We check whether everything is ok by clicking on the “Check” button. We get the following response: Compute price -> After closing the message box by a click on the “OK” button, we click on the button to let the Data Tool calculate the “Total unit price net of deductible taxes and discounts”. The calculated value (11700000 XAF) is automatically entered in the appropriate input field. Another click on the “Check” button produces the following message: Now we can save the entered information by clicking on the “Save” button. 13 In addition, the following dialog is displayed: The text you enter here, as well as date and time of this action (saving) will be stored in the “history” of the priced item and can be retrieved afterwards by clicking on the “History” button in the data input screen. You do not need to enter a comment here, but it may be useful to do it. Please note: Saving item information will also save the Data Tool file to disk, in order to ensure that the database is immediately saved to disk and avoid any possible data loss. After saving has been completed, the item is indicated as being “priced” in the “item status” area: 14 3.3 Special Situations 3.3.1 Moving to next Item without prior “Save” Now we assume that we have selected a new item (e.g. the next item after the van from the example above). After having entered some information for this item, we “forget” to check and save the item and click on “next item”. In such a situation, the Data Tool notes that the last saved information for the item and what is present in the input sheet differ. The tool then reduces the zoom factor (to be able to display the complete specification sheet for the item), highlights all changed cells with yellow colour, and asks the user whether or not to save the data: In the example shown, not all parameters have been entered properly. Thus, after clicking on the “Yes” button (to save the entered information), we get an error message listing what is missing or invalid: After clicking on the OK button, we have two choices: 15 Clicking “Yes” results in saving the information and marking the item as “incomplete”, “No” moves on to the item we wanted to go to without saving the information. 3.3.2 Bottom Line Prices Let us use the data from the sample input – the Ford van – again. Assumed we phoned the dealer again, asking for a better bottom line price, and he comes up with a bottom line price of 10 million XAF. Instead of calculating an odd discount percentage, we can either just enter this price in the “Total unit price” field and save the item or enter the correct discount. The first alternative would result in a warning, as the price calculated from the different price component does not match the price entered, whereas entering –3000000 in the discount field and then clicking on the “Compute price” button results in the correct bottom line price to be calculated and entered. 3.4 Delete Item Deleting items can be used for two different purposes: First, having specified the correct parameters, but for the wrong item, second to (maybe temporarily) mark an item as incomplete, as we want to modify something later (because we are not sure about all the parameters). In both situations, we start with selecting the item and clicking on the “Delete item” button. Depending on whether or not we specified an item deletion password in the setup dialog, we get one of the two following dialogs: or After clicking on the “Yes” button (first case) or entering the correct item deletion password and clicking on the “OK” button, the Data Tool offers two choices: Clicking on the “Yes” button results in just marking the item as “Deleted”, but keeps the data – this is what should be done in the second situation described. Clicking on “No” really deletes the data entered for this item and marks the item as “Unspecified” – the correct action in the first situation. 16 3.5 Item History When saving or deleting an item, the user will be prompted for an additional comment. In the message box displayed, additional information (item name, data and time, user name, action) will be given. This information, as well as the comment entered by the user, will be recorded in the “History” worksheet. In order to list the history of an item, please select the appropriate item and click on the “History” button. The history for the corresponding item will be filtered, you will get a display like the following: 3.6 Printing A click on the “Print” button causes the following menu to open: The user may now select to print this item (the currently selected one) only all filtered items for the currently selected BH all filtered items all items for the currently selected BH all items. In addition, the user may select to print nothing and just exit the print menu. To avoid printing too many pages by mistake, the Data Tool gives an extra message when printing more than one page: Please note: The Data Tool always prints to the default printer, so please make sure to select the proper printer in advance! In case an error occurs during printing, the Data Tool issues an appropriate warning. 17 The printout is done with one item per page, additional information is given in the page footer. 18 3.7 Additional Hints: Enhanced Filtering and Printing Special printing tasks can be performed by appropriate settings of the filters in the input sheet and selecting the correct buttons in the “Print” dialog. In order to print priced only, please check all boxes in the filter area as shown below: Then click on the “Print” button and select “All filtered items” in the “Print” dialog. 3.8 Setup The setup dialog has already been described in the “First start and setup” chapter. 3.9 Exit Clicking on exit closes the Data Tool. For safety reasons, the Data Tool first asks whether the user really wants to exit: Then the Data Tool checks for unsaved information specified for the currently selected item (see chapter “Special situations”. When clicking on the “Cancel” button, the exit process is stopped and the following message is displayed: 19 4 Summaries The Data Tool provides three summaries of the information entered. “Summary_results”: item-by-item information “Summary”: summary by Basic Heading and item status “Summary_products”: product specification summary by Basic Heading In order to access these summaries, just select the appropriate Excel sheet. 4.1 Item-by-Item Information “Summary_results” provides a list of all items with information which of them were priced, whether they are priced as identical or equivalent, and whether the Data Tool user specified the item to be important. In cases where the “Total unit price net of deductible taxes and discounts” entered does not match the price which would be calculated from the pricing details, the item is marked accordingly in the “price inconsistent” column. “Summay_results” is not updated automatically. In order to update this summary, please select the “Summary_results” sheet, go to the top left corner and click on the “CREATE SUMMARY” button. The Data Tool will then create the following list: ... continued 20 4.2 Summary by Basic Heading and Item Status “Summary” gives the total number of items priced per BH (distinguishing between the various combinations of representativity and comparability) as well as the number of unspecified, incomplete and deleted items. In addition to this information, the number of products (not items!) priced per BH as well as the number of priced products per BH that were both important and identical is given. 4.3 Product Specification Summary by Basic Heading “Summary_Products” is an extract from “Summary” plus a comparison with the “Recommended minimum number” of products which are to be priced as both important and identical. At the time of writing this manual the “Recommended minimum number” was set to “1” for all countries and Basic Headings. 5 Sending Data to the Region After having finished the input work, please send the completed data_tool.xls file(s) to the Regional coordination team for validation. 21