1
User Manual
3 January 2014
User Manual
G4
Contents
1
Introduction................................................................................................................................... 4
2
Common Functions ...................................................................................................................... 5
2.1
Layout and Terminology ..................................................................................................... 5
2.2
Creating New Items ............................................................................................................. 5
2.3
Data Validation ..................................................................................................................... 6
2.4
Editors .................................................................................................................................... 6
2.5
Saving ..................................................................................................................................... 6
2.6
Context menu sample (Candidate) .................................................................................... 7
2.7
View Types ............................................................................................................................ 7
2.7.1
3
2.7.1.1
Filtering ...................................................................................................................... 8
2.7.1.2
Grouping.................................................................................................................... 8
2.7.1.3
Column Chooser ....................................................................................................... 9
2.7.2
Detail View .................................................................................................................... 9
2.7.3
List View with Detail View ....................................................................................... 10
Module Marketing and Sales .................................................................................................... 11
3.1
4
List View ........................................................................................................................ 7
Client .................................................................................................................................... 11
3.1.1
How to Create a New Company (new client) ........................................................ 11
3.1.2
Basics ............................................................................................................................ 11
3.1.3
Contacts........................................................................................................................ 11
3.1.4
Placed candidates ....................................................................................................... 12
3.1.5
Documents ................................................................................................................... 12
3.1.6
Projects ......................................................................................................................... 12
3.1.7
Positions ....................................................................................................................... 12
3.1.8
Invoices ........................................................................................................................ 12
3.1.9
Audit Trail ................................................................................................................... 13
3.2
Contacts................................................................................................................................ 13
3.3
Opportunity......................................................................................................................... 14
3.4
Products ............................................................................................................................... 15
Module Projects .......................................................................................................................... 15
4.1
Projects ................................................................................................................................. 15
Trinso Czech s.r.o.
1 / 40
Last review: 3.1.2014
User Manual
G4
5
4.2
Tasks ..................................................................................................................................... 16
4.3
Workers ................................................................................................................................ 16
4.4
Time Sheets.......................................................................................................................... 17
4.5
Costs ..................................................................................................................................... 18
4.6
Overview ............................................................................................................................. 19
Module Recruitment .................................................................................................................. 20
5.1
How to Create a New Position ......................................................................................... 20
5.1.1
Basics ............................................................................................................................ 20
5.1.2
Candidate..................................................................................................................... 21
5.1.3
Recruitment ................................................................................................................. 21
5.1.4
Skills ............................................................................................................................. 21
5.1.5
Languages .................................................................................................................... 21
5.1.6
Advertising .................................................................................................................. 21
5.1.7
Description .................................................................................................................. 22
5.1.8
Documents ................................................................................................................... 22
5.1.9
Audit Trail ................................................................................................................... 22
5.2
How to Create a New Candidate ..................................................................................... 23
5.2.1
Basics ............................................................................................................................ 23
5.2.2
Candidate detail.......................................................................................................... 24
5.2.3
Candidate Profile ........................................................................................................ 24
5.2.4
History and References .............................................................................................. 26
5.2.5
Candidate interview ................................................................................................... 26
5.2.6
Recruitment ................................................................................................................. 27
5.2.7
Documents ................................................................................................................... 27
5.2.8
Security......................................................................................................................... 27
5.2.9
History.......................................................................................................................... 28
5.2.10
Audit Trial ................................................................................................................... 28
5.3
Recruitments ....................................................................................................................... 28
5.3.1
About Recruitment ..................................................................................................... 28
5.3.2
How to Start a New Recruitment Process ............................................................... 29
5.3.3
Recruitment details .................................................................................................... 29
5.3.4
Recruitment States ...................................................................................................... 30
Trinso Czech s.r.o.
2 / 40
Last review: 3.1.2014
User Manual
G4
6
5.4
Full text Search in Documents .......................................................................................... 31
5.5
Filter editor .......................................................................................................................... 31
5.5.1
Case 1 (search for active positions) .......................................................................... 31
5.5.2
Case 2. – Find Language Czech and Rating 5 ........................................................ 33
Module Invoicing ....................................................................................................................... 33
6.1
7
Module Email .............................................................................................................................. 34
7.1
8
9
Details................................................................................................................................... 33
Details................................................................................................................................... 34
Administration ............................................................................................................................ 35
8.1
Keywords ............................................................................................................................. 35
8.2
Email Templates ................................................................................................................. 35
8.3
Settings ................................................................................................................................. 36
8.4
Users ..................................................................................................................................... 36
8.5
Key Performance Indicators (KPI) ................................................................................... 36
8.6
Reports ................................................................................................................................. 38
8.7
User roles ............................................................................................................................. 38
8.7.1
Administrator.............................................................................................................. 39
8.7.2
Employee ..................................................................................................................... 39
8.7.3
Worker.......................................................................................................................... 39
8.7.4
Candidate..................................................................................................................... 39
8.7.5
Contact ......................................................................................................................... 39
Tools ............................................................................................................................................. 40
9.1
Calendar ............................................................................................................................... 40
Trinso Czech s.r.o.
3 / 40
Last review: 3.1.2014
User Manual
G4
1
Introduction
G4, the tool you are about to start using, is an Information System designed to improve and
automate your company’s recruitment processes, project management and other useful
processes. It will allow your organization to share candidate information, create projects,
assign workers to them and a lot more. G4 will also reduce the amount of paper you will
require for your work.
G4 allows you to follow the recruitment process from the candidate’s side and from the
client’s side. This means that changes made in a client’s process that are related to a
candidate will also show up in the candidate’s profile.
Project management allows creating various projects, adding tasks and assigning workers to
them. Workers then can fill in work hours and additional costs. Based on these data it is
possible to create billing plans and invoices.
History
G4 has been in continuous development since the beginning of year 2011. The main idea was
to create a complex scalable solution to fulfill various demands of recruitment companies,
HR departments and other companies using project management tools. You are currently
working with the latest version of G4. It’s based on .NET technology (the application was
developed mainly in C#) and a full grown SQL database which is currently the newest
technology available.
Trinso Czech s.r.o.
4 / 40
Last review: 3.1.2014
User Manual
G4
2
Common Functions
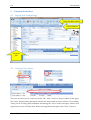
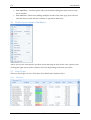
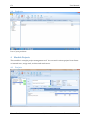
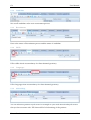
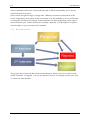
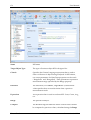
2.1 Layout and Terminology
Office like ribbon controll
Opened windows
Tabs
Navigation
pane
2.2 Creating New Items
There are several ways to create new items. The “New” button is always visible on the upper
left corner. Simply hitting the button creates new item based on active window. For example
when you are working with candidates and hitting the “New” button an empty window will
appear where you can fill in data. When choosing the bottom part of the “New” button a
Trinso Czech s.r.o.
5 / 40
Last review: 3.1.2014
User Manual
G4
drop down menu will appear with creatable items like Position, Client, Worker, etc.
When adding collections like phone numbers a small “New” icon is visible in taskbar at the
top. By clicking this button a new window pops up with data entry. It is also possible to add
new collection member by clicking the new empty row in the list. Note that this row can be
hidden or placed at the bottom of the list.
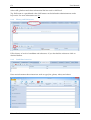
2.3 Data Validation
Any field marked is a required field. It is not possible to save data without filling those
fields.
2.4 Editors
Fields can be changed by appropriate editor. Whenever you see a field with an arrow
pointing downwards it’s a drop down menu that allows you to make a selection from a list.
In this case you can select a date or a language.
2.5 Saving
There are three options when saving data.
•
Save – Use this option when editing data and want to keep window opened.
Trinso Czech s.r.o.
6 / 40
Last review: 3.1.2014
User Manual
G4
•
Save and Close – Use this option when you finished editing data and wants to close
active window
•
Save and New – Ideal when adding multiple records of the same type. Just with one
click the data is saved and new window is opened for data entry.
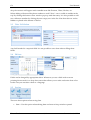
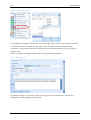
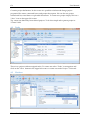
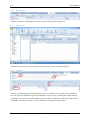
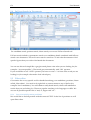
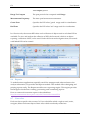
2.6 Context menu sample (Candidate)
Above you can see what options you have when selecting an item (in this case a person) and
clicking the right mouse button. Options will vary depending on the item you select.
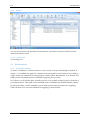
2.7 View Types
There are three types of view of the data: List, Detail and Combined View
2.7.1
List View
Trinso Czech s.r.o.
7 / 40
Last review: 3.1.2014
User Manual
G4
Provides simple, Excel like look of data. There are several useful operations which are
described below.
2.7.1.1
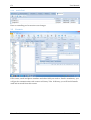
Filtering
By selecting an item (in this case a status) in the drop down menu you can filter the list to
display data that is only related to that item. In this example we are looking at all the
candidates that are currently in a recruitment process. By choosing a status from the drop
down we narrow down the candidates to those related to the recruitment process with the
given status.
2.7.1.2
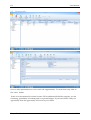
Grouping
Another way to filter data is to click on a column header (“Title”, “Start date”, “Status”) in
the drop down menu (click once and hold) and to drag it into the blue bar above. Items
(candidates) will then be grouped according to the header (notice the “Status” header in the
blue bar).
Trinso Czech s.r.o.
8 / 40
Last review: 3.1.2014
User Manual
G4
2.7.1.3
Column Chooser
It is possible to customize column list. To do this right click on the column header and click
on Column Chooser. A small window opens with available columns. Drag and drop
columns to customization window to hide them or from customization window to grid to
display data.
Tip: It is possible to change column order by drag and drop operation.
2.7.2
Detail View
By double clicking on a list view item you open given records detail view. Detail view
enables full window editing of the record.
Trinso Czech s.r.o.
9 / 40
Last review: 3.1.2014
User Manual
G4
The layout of the view is fully customizable by user. Just left click on an empty area of the
view and select Customize Layout. By drag and drop operation it is possible to create custom
detail view. You can find more information here:
http://documentation.devexpress.com/#WindowsForms/CustomDocument2307
2.7.3
List View with Detail View
List view visible at left with detail view on the right. By selecting rows in the list the
corresponding detail view is displayed on the right.
Trinso Czech s.r.o.
10 / 40
Last review: 3.1.2014
User Manual
G4
3
Module Marketing and Sales
3.1 Client
3.1.1
How to Create a New Company (new client)
To get started working with a client you have to create one. You can do this by clicking on
the arrow below the “New” icon and selecting “Client” from the drop down menu. After
clicking an empty page will appear where you can fill in information. Enter the name and
save data.
3.1.2
Basics
As you can see you’ve created a client now. You will need to fill in the missing relevant
information including the company’s legal status, the client’s reach, addresses, etc.
3.1.3
Contacts
Trinso Czech s.r.o.
11 / 40
Last review: 3.1.2014
User Manual
G4
Add contact persons by clicking on “New” button in taskbar. Fill in name, email and phone
numbers. Email is mandatory, you will get the communication with contact in History Tabs
of contact.
3.1.4
Placed candidates
If you have already in recruitment process an accepted candidate, you will see it in placed
candidate Tabs.
3.1.5
Documents
It is possible to add numerous documents to Client’s profile. For example scanned contracts,
etc. Attach file by clicking on the clip sign or by drag and drop operation. Select document
type from list and save Client.
3.1.6
Projects
Here you can define Projects. More about project in: 4 Module Projects
3.1.7
Positions
List of positions filtered by given Client. You can add new position by clicking the “New”
icon in the upper left corner of position list.
3.1.8
Invoices
Invoice list issued to Client. More about Invoices in: Module Invoice
Trinso Czech s.r.o.
12 / 40
Last review: 3.1.2014
User Manual
G4
3.1.9
Audit Trail
Here is controlling tool to monitor user changes.
3.2 Contacts
Fill in name, email and phone numbers and other field you wish to. Email is mandatory, you
will get the communication with contact in History Tabs. In History you will find all emails
send and received from this contact.
Trinso Czech s.r.o.
13 / 40
Last review: 3.1.2014
User Manual
G4
3.3 Opportunity
Gives a sales representative a tool to track sale opportunities. To create new entry click on
the “New” button.
Status is set automatically to initial contact. Fill in additional fields like company you are
contacting, probability for making deal or expected budget. If you have DEAL with your
opportunity than the opportunity will occur in your clients.
Trinso Czech s.r.o.
14 / 40
Last review: 3.1.2014
User Manual
G4
3.4 Products
List of your products.
4
Module Projects
This module is a simple project management tool. You can track various project from clients
or internal ones, assign task, workers and much more.
4.1 Projects
Trinso Czech s.r.o.
15 / 40
Last review: 3.1.2014
User Manual
G4
Contains project definitions. In this screen it is possible to define and change project
properties like status, estimated hours and project description. We can also see project
related task list, time sheets or uploaded documents. To create new project simply click on a
“New” icon in the upper left corner.
Tip: create tree hierarchy from related projects. To do this simple select parent project in
“Parent” field
4.2 Tasks
There is no project without assigned tasks. To create one select “Tasks” in navigation and
click on the “New” button in the upper left corner or create one under Project – Tasks tab.
4.3 Workers
Trinso Czech s.r.o.
16 / 40
Last review: 3.1.2014
User Manual
G4
Add workers to project by creating them under “Workers”. Just click on the “New” button
and fill in relevant information.
To assign a worker to a project go to Projects, select project and switch to “Assigned
Workers” tab. Now hit the plus sign and select worker. To remove worker from this list
simply select the worker and use the minus sign.
4.4 Time Sheets
To track time spent on projects and tasks use Time Sheets. To create new time sheet just
select the “New” icon when on Time Sheets view. Select worker, project and task (optional),
fill in hours and a short description. The approval status is set to “Entered”. You can use this
status to approve time sheet entries entered by workers.
Note that only approved projects can be selected in time sheets.
Trinso Czech s.r.o.
17 / 40
Last review: 3.1.2014
User Manual
G4
4.5 Costs
Some projects may include additional expenses like phone calls, travel, etc. You can track
those issues in Costs. Create new cost item, fill in worker, project, amount exl. VAT, VAT,
currency and a short description. Optionally it is possible to attach scanned recipe or other
document.
Approval state is set to “Entered” A manager can use this state to approve or reject expenses.
Trinso Czech s.r.o.
18 / 40
Last review: 3.1.2014
User Manual
G4
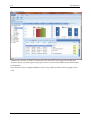
4.6 Overview
Dashboard overview is used to visualize data for active user. The logged on worker gets
overview about own hours spent on projects, hours for the actual month or time sheet entries
at the bottom.
Note that this is just a sample dashboard view. It is possible to define various graphs, list to
view.
Trinso Czech s.r.o.
19 / 40
Last review: 3.1.2014
User Manual
G4
5
Module Recruitment
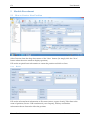
5.1 How to Create a New Position
Select Position from the drop down menu of the “New” button. (Or simply click the “New”
button when the active window displays position)
Fill out the required basic information to create the position and click on Save.
5.1.1
Basics
Fill out the relevant basic information as ID, status (active, urgent, closed), Title client is the
name of position, Owner – HR consultant in your company, Industry and further
information about client who offers the position.
Trinso Czech s.r.o.
20 / 40
Last review: 3.1.2014
User Manual
G4
5.1.2
Candidate
We see all candidates who are in recruitment process.
5.1.3
Recruitment
Here is the status of Recruitment process and the name of candidate.
5.1.4
Skills
Fill in skills which are mandatory for client demand (position).
5.1.5
Languages
Fill in languages that are mandatory for client demand (position).
5.1.6
Advertising
You can advertise position on job server for example on your web site and other job servers
that you have contract with. Fill Start and End of advertising of the position.
Trinso Czech s.r.o.
21 / 40
Last review: 3.1.2014
User Manual
G4
5.1.7
Description
Fill Responsibilities, Offer, Qualifications, and other information for the position.
5.1.8
Documents
Attached document you wish to, for example description from client.
5.1.9
Audit Trail
Trinso Czech s.r.o.
22 / 40
Last review: 3.1.2014
User Manual
G4
5.2 How to Create a New Candidate
To create new candidates just click on the new user in the top left corner of your screen when
candidate list is displayed. When working in other window than candidate just click the
bottom part of the “New” button to display list of creatable items. Choose User.
Fill out the relevant candidate data like name, address or contact email (is mandatory). Then
click “Save”.
5.2.1
Basics
Trinso Czech s.r.o.
23 / 40
Last review: 3.1.2014
User Manual
G4
Now that you’ve created the candidate profile start by filling out his/ her details. Fill out
information regarding the person’s title, date of birth, photo, email address, phone etc.
You can add as many phone numbers as you can. Simply click on the new button marked on
the picture above to add new number.
Tip: It is possible to add new number using “New Row line”. Just click on a new row under
Number and start typing.
Field Consent is used for Validity on Consent on personal Data of client, it is a date from
when you can work with client sensitive data.
5.2.2
Candidate detail
Fill in information such as salary information, specification (location client wish to work),
Field (wished area of work) and characteristics (strengths, weaknesses).
5.2.3
Candidate Profile
Fill in Education and Skills and Languages in Candidate profile.
Trinso Czech s.r.o.
24 / 40
Last review: 3.1.2014
User Manual
G4
Schools
Fill in school name and other information about school, you can chose from Czechs school,
but you can put other and type name of International University.
Tip: School name is a string value. You can type anything or create list of schools in
administration under keywords. For more information see: 8.1
Skills
Trinso Czech s.r.o.
25 / 40
Last review: 3.1.2014
User Manual
G4
Select skill, platform and other information like last used or skill level.
Tip: Skill name is a predefined value. Skill names can be defined in administration under
keywords. For more information see: 8.1
5.2.4
History and References
Fill in history of work of candidate and references. If you checked the references click on
checked button.
5.2.5
Candidate interview
Here are information about interview such as type (live, phone, video) and others.
Trinso Czech s.r.o.
26 / 40
Last review: 3.1.2014
User Manual
G4
5.2.6
Recruitment
Add new skills by clicking the new button or choosing the first empty row.
5.2.7
Documents
Attached document you wish to, please do not forget to save it and than open it.
5.2.8
Security
Security contains Roles (automatically goes user to candidate, if you open new candidate).
You can give the candidate right (role candidate active) to enter, edit his/her detail data on
web page. User name is an email address, password you will create with reset password for
candidate. You have to check - Is active and then can candidate edit profile.
Trinso Czech s.r.o.
27 / 40
Last review: 3.1.2014
User Manual
G4
5.2.9
History
You can see in history tab all email communication with client and action which has been
made with client account.
5.2.10
Audit Trial
Controlling tool
5.3 Recruitments
5.3.1
About Recruitment
To link a Candidate to a Position and vice versa a many-to-many relationship is needed. In
simple – a Candidate can apply for a numerous position and for one Position it is possible to
assign numerous candidates. For this purpose a table called “Recruitment” was created. This
table contains information about Candidates applying for a position.
In G4 there is an Excel like table with all processes. It is possible to filter/group by Position or
recruitment Status. This table is also available under Candidate and Position details, filtered
by the given object. Under candidate you can find positions the given person is applying.
Under Position you can find candidate list applying to that Position.
Trinso Czech s.r.o.
28 / 40
Last review: 3.1.2014
User Manual
G4
5.3.2
How to Start a New Recruitment Process
To create a new recruitment process just click on the new icon in the top left corner of your
screen when Recruitment list is displayed. When working in other window than Recruitment
just click the bottom part of the “New” button to display list of creatable items. Choose
Recruitment.
5.3.3
Recruitment details
Trinso Czech s.r.o.
29 / 40
Last review: 3.1.2014
User Manual
G4
Select Candidate and Position. Status and Start date is filled automatically, first is always
status Potential for position.
Status can be changed through “Change State” (Ribbon) or buttons on the bottom of the
screen. Depending on the phase of the recruitment cycle the candidate is in you will be able
to change his/ her status accordingly. Status attributes can differ depending on the stage of
the recruitment cycle. Certain statuses (for example “Rejected”) will prompt G4 to open an
email template so you can inform the Candidate.
5.3.4
Recruitment States
The picture above shows the Recruitment State Machine. When a process is started a state
called “Potential” is assigned. You can also edit this Process, for example to enter new state
To contact in State Machine.
Trinso Czech s.r.o.
30 / 40
Last review: 3.1.2014
User Manual
G4
5.4 Full text Search in Documents
For candidate search, position search, client search you can use Full text Search tool.
Full text search includes a parametric search over candidates details combined with full-text
search over documents. This tool is most used to search in CV and other documents to find
specific figures that you wish to find inside the documents.
You can use this tool simple like a google search please write what you are looking for (for
example: “Account payable”). The search goes automatically with “OR” operator.
If you would like to use “AND” operator you have to write “+” in front of the word you are
looking for (for example +alexander +lead +developer).
5.5 Filter editor
G4 contains also a very specific tool for detailed searching your candidates, positions, clients
called „filter editor“. You need to do right click on context menu on any of the list (for
example: list of candidates). You will obtain a really detail search, which will minimalize
results that you are looking for. The most popular searching is for languages or skills. We
can use all possible operator like a “and, or, begin with” etc…
5.5.1
Case 1 (search for active positions)
We would like to find all position with the status ACTIVE. In the list of positions we will
open filter editor.
Trinso Czech s.r.o.
31 / 40
Last review: 3.1.2014
User Manual
G4
We will filter Status.Name in filter editor and use operator „begins with“ a. You got the list
of all positions with status Active.
Trinso Czech s.r.o.
32 / 40
Last review: 3.1.2014
User Manual
G4
5.5.2
Case 2. – Find Language Czech and Rating 5
We will open a list of candidates and then „filter editor“. You have to choose Languages (not
Language) and then Language Name, for search use again „begins with“ c (czech).
And (plus) Rating Name begins with 5.
6
Module Invoicing
6.1 Details
Trinso Czech s.r.o.
33 / 40
Last review: 3.1.2014
User Manual
G4
Invoicing module contains Billing Plan, Invoice (list of all invoice established for your
clients), Bank Accounts (list of bank accounts information of your clients) and Bank Account
Line can be connected direct to your bank institution, so you can have view of all bank
transfers directly in you G4.
7
Module Email
7.1 Details
G4 contains a simple email client. It allows checking email accounts using pop3 protocol.
To configure this account use please in Security Emails Account. Please fill in mailbox
configuration.
Under Inbox is a list of received mails. In the ribbon you can find basic mail functions like
Reply, Forward, etc.
Support
Trinso Czech s.r.o.
34 / 40
Last review: 3.1.2014
User Manual
G4
8
Administration
8.1 Keywords
Contains list of configurable enumerations used in various drop down fields. E.g. language
ratings, school list, etc. It has a strict structure, which means the main categories have to
remain intact. To create new keyword select desired category and hit the “New” button.
Make sure the Parent field displays the desired category. Fill the name and hit “Save”
Tip: Hit “Save and New” if you want to create more keywords in the same category.
8.2 Email Templates
When sending emails to Candidate a template is used. Here you can add or modify these
templates. Target field defines if the template mends to be used in recruitment or when
sending direct mail to candidate. Type defines the step of recruitment process. E.g. when
sending candidate to 1st interview a different template is used when sending him/her to 2nd
interview or rejecting him/her.
The following special fields can be used in templates:
Trinso Czech s.r.o.
35 / 40
Last review: 3.1.2014
User Manual
G4
<%this.Candidate.LastName%>
Candidates last name
<%this.Position.TitleClient%>
Title of the position
<%this.Position.Client.Name%>
Clients name owning position
<%CurrentUser.FullName%>
Current users full name
<%this.Position.Client.Address1%>
Clients address
<%this.Position.HiringManager.FullName%> Hiring managers full name
8.3 Settings
8.4 Users
All users who are using application.
8.5 Key Performance Indicators (KPI)
Key Performance Indicators (KPI) are quantitative measurements of dynamic business
processes. For instance, important performance indicators for a developer team are the
number of active bugs in their product, etc. For better visualization, KPI value ranges can be
split into a "green zone" (everything is OK), "yellow zone" (warning), and "red zone" (things
are problematic). When KPI are based on a time range, it can be useful to compare values of
different periods (for instance, the current month against the previous one).
Trinso Czech s.r.o.
36 / 40
Last review: 3.1.2014
User Manual
G4
Name
KPI name
Target Object Type
The type of business object KPI is designed for.
Criteria
Specifies the Criteria Language expression that is used to
filter a collection of objects being analyzed. In KPI criteria,
two extra parameters for DateTime properties can be used –
“RangeStart” and “RangeEnd”. These parameters represent a
measurement range specified by the Range property.
Direction
The Direction { LowIsBetter, HighIsBetter } enumeration
value specifies how to treat deviation from a previous
measurement result.
Expression
An expression that is used to evaluate KPI - Sum, Count, Avg,
etc.
Range
The period to analyze.
Compare
The Boolean flag that indicates if KPI current values should
be compared to previous values, calculated using the Range
Trinso Czech s.r.o.
37 / 40
Last review: 3.1.2014
User Manual
G4
To Compare period.
Range To Compare
The past period to be compared with Range.
Measurement Frequency
The time span between measurements.
Green Zone
Specifies the KPI value "green" range used for visualization.
Red Zone
Specifies the KPI value "red" range used for visualization.
In a Preview tab, the current KPI value and a collection of objects used to calculate KPI are
available. To view and analyze the collection of KPI, the Scorecard, which is an object
exposing a collection of KPI, can be used. Under the Scorecard navigation item, Scorecards
with linked KPI can be created.
8.6 Reports
To make business applications especially useful for managers and other end-users who
analyze information, G4 provides the Reports module. This module allows designing and
printing reports easily. The Reports module uses a reporting engine. This engine provides
the Designer which allows creating, previewing and customizing reports.
How to create and customize reports is described here:
http://documentation.devexpress.com/#Xaf/CustomDocument2734
8.7 User roles
Each user has a specific role to enter G4. User roles differ which a right to read, write,
navigate, delete and create objects. Basic roles which are already created are:
Trinso Czech s.r.o.
38 / 40
Last review: 3.1.2014
User Manual
G4
8.7.1
Administrator
8.7.2
Employee
8.7.3
Worker
8.7.4
Candidate
8.7.5
Contact
Trinso Czech s.r.o.
39 / 40
Last review: 3.1.2014
User Manual
G4
9
Tools
9.1 Calendar
G4 contains an Outlook like calendar feature.
To create new event simple click on the “New” icon on the upper left corner and fill in
relevant information.
Trinso Czech s.r.o.
40 / 40
Last review: 3.1.2014