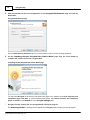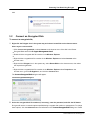
1
R-CRYPTO
User's Manual
(C) Copyright 2007-2009
R-tools Technology Inc.
© 2007-2009 R-tools Technology, Inc.
All rights reserved.
No part of this User's Manual may be copied, altered, or transferred to, any other media
without written, explicit consent from R-tools Technology, Inc.
All brand or product names appearing herein are trademarks or registered trademarks of
their respective holders.
R-tools Technology, Inc. has developed this User's Manual to the best of its knowledge,
but does not guarantee that the program will fulfill all the desires of the user.
No warranty is made in regard to specifications or features.
R-tools Technology, Inc. retains the right to make alterations to the content of this
Manual without the obligation to inform third parties.
Contents
I
Table of Contents
1
I Introduction to R-Crypto
1 R-Crypto
...................................................................................................................................
Features
1
2 System...................................................................................................................................
Requirements
2
3 R-Crypto
...................................................................................................................................
Limitations
2
4 Trial Version
...................................................................................................................................
Limitations
3
5 Contact...................................................................................................................................
Information and Technical Support
3
II R-Crypto Management Panel
4
III Protecting Your Data Using R-Crypto
5
1 Create ...................................................................................................................................
a New Encrypted Disk
5
2 Connect
...................................................................................................................................
an Encrypted Disk
11
3 Disconnect
...................................................................................................................................
a Connected Encrypted Disk
13
14
IV Managing Encrypted Disks
1 Change
...................................................................................................................................
Disk Connect Options
14
2 Change
...................................................................................................................................
Disk Disconnect Options
15
3 Change
...................................................................................................................................
Disk Password
17
4 Change
...................................................................................................................................
Disk Size
18
5 Re-encrypt
...................................................................................................................................
an Encrypted Disk
19
6 Wipe an
...................................................................................................................................
Encrypted Disk
23
7 Remove
...................................................................................................................................
an Encrypted Disk from Recent Encrypted Disks
23
V Configure Auto-connected Encrypted Disks
25
VI R-Crypto System Tray Icon
27
VII R-Crypto Settings
28
1 General
...................................................................................................................................
Options
28
2 Encryption
...................................................................................................................................
Options
30
3 Disconnect
...................................................................................................................................
Options
31
33
VIII Command-line Utility
35
IX Security Issues
1 Best Security
...................................................................................................................................
Practices
35
2 Cryptographic
...................................................................................................................................
and Hash Algorithms
35
© 2007-2009 R-Tools Technology, Inc.
II
R-Crypto Help
Index
© 2007-2009 R-Tools Technology, Inc.
37
Introduction to R-Crypto
I
1
Introduction to R-Crypto
R-Crypto is an easy-to-use disk encryption software that protects your confidential information and personal data
on a desktop, notebook, or a removable data storage device against unauthorized access.
To protect the data R-Crypto creates encrypted virtual disks (virtual data storage devices). These disks provide
real time data encryption and decryption which are fully transparent to the user, it means that the data is being
encrypted just before it is being written to the disk and is being decrypted right after it is being read from the disk
without the need of user intervention. All data (such as file and folder names, and content of all files) stored on
such disks is constantly encrypted. The access to data on the virtual encrypted disk is impossible unless the
user provides a correct password. At the same time, all file and disk operations for connected virtual encrypted
disks are performed the same way as for standard disks.
All data of the encrypted virtual disk is stored together with the disk meta-data in a single file-container. That
means that a virtual encrypted disk is actually an ordinary file that can be stored on any data storage device, like
a hard drive, USB-disk, CD, DVD, or a network resource, and can be easily transferred to another computer or
backed up.
R-Crypto encrypts the data on virtual disks using the cryptographic infrastructure of the Microsoft Windows
operating system. This infrastructure allows the users to use various installable cryptographic service providers,
including those that are already pre-installed. For example, Microsoft AES Cryptographic Provider is one of the
pre-installed cryptographic service providers in Windows XP and Vista that implements the modern and most
secure encryption algorithm Advanced Encryption Standard (AES) with key length of 128, 192, and 256 bits.
Such approach allows the users to select themselves the cryptographic sub-system that satisfies their
requirements. It also reduces limitations on the use of R-Crypto in companies that require certification for such
products to meet certain governmental or corporate standards.
1.1
R-Crypto Features
Simple and easy-to-use interface:
·
·
·
·
·
·
R-Crypto Management Panel providing access for the user to all actions of the system;
Wizard guiding the users through the creation of encrypted disks;
List of the most frequently connected encrypted disks (can be disabled);
Configurable list of auto-connected encrypted disks;
Change the size of the encrypted disk easily;
Access to encrypted disk control actions outside the R-Crypto Management Panel directly from the
Windows shell (for example, connect/disconnect);
· Special icon for connected encrypted disks in the Windows shell (can be disabled);
· Access to most R-Crypto actions from the Windows system tray.
Reliable data protection and encryption:
· Users can use various cryptographic service providers, both pre-installed in the Windows operating system
and available from the third parties;
· Disk free space encryption (can be disabled);
· Wizard guiding the users through the disks re-encryption;
· Ability to connect an encrypted disk in the read-only mode;
· Configurable hot keys to disconnect either all connected encrypted disks, or each disk separately;
· Automatic disconnection of all connected encrypted disk upon user's logoff;
· Ability to automatically disconnect the encrypted disks upon screensaver startup, entering the hibernation
mode, or computer lockup;
· Ability to automatically disconnect the encrypted disks upon encrypted disk file-container storage media is
© 2007-2009 R-Tools Technology, Inc.
R-Crypto Help
2
removed from the system. New feature in R-Crypto 1.4!
· Ability to automatically disconnect the encrypted disks upon exceeding an encrypted disk inactivity period. Inactivity
period is a period of time when the connected encrypted disk is not being used, that is it is a period of time when no
data is being read from the disk or being written to the disk. New feature in R-Crypto 1.4!
· Ability to enforce the disconnection of locked encrypted disks upon automatic disconnection;
· File-containers of the connected encrypted disks are protected against re-writing and deletion;
· Wipe encrypted disks for secure deletion.
Using over network:
· Ability to create and connect encrypted disks' file-containers located on any accessible network location;
· Connecting an encrypted disk emulating a "local disk" to provide access for remote users (required for
Windows XP and later versions);
· Automatic saving and restoring of the encrypted disk network sharing options. New feature in R-Crypto 1.4!
Advanced usage:
· Ability to connect the encrypted disk to an empty NTFS folder (e.g. C:\path-to-empty-NTFS-folder\);
· Support for system disk utilities (check disk, defragmentation, etc.);
· Command-line utility to manage encrypted disks' connections.
1.2
System Requirements
Hardware
· Minimum 10 MB of free disk space to install the program
· Enough disk space for encrypted disks file-containers
Software
Operating system:
·
·
·
·
·
·
Windows 7 Beta (32 and 64 bit versions) New in R-Crypto 1.3!
Windows Server 2008 (32 and 64 bit versions)
Windows Vista (32 and 64 bit versions)
Windows Server 2003
Windows XP (32 and 64 bit versions)
Windows 2000
Browser:
· Internet Explorer 6.0 or higher
You also need administrative privileges to install R-Crypto on your computer.
1.3
R-Crypto Limitations
· No limitations on the number of created file-containers for the encrypted disks and the places where they
reside. File-containers may be stored on any media supported by your computer, including devices with
removable storage and network drives.
· The size of file-containers for encrypted disks is limited only by its own file system and the file system of the
storage location where they are to reside. NTFS: no limitations, FAT32: up to 4 GB, FAT16: up to 2 GB.
· The minimum size of the file-container cannot be less than 64 kB.
· The number of simultaneously connected encrypted disks is unlimited if you choose to connect encrypted
disks to empty NTFS folders. Still the number of encrypted disks simultaneously connected to separate drive
letters cannot exceed the number of drive letters available in your system.
© 2007-2009 R-Tools Technology, Inc.
Introduction to R-Crypto
1.4
3
Trial Version Limitations
Please note that you will have R-Crypto running in the trial mode until you register it with a valid license key. The
trial period lasts for 30 days during which there are no limitations in R-Crypto operation. When the trial period
expires, R-Crypto will still give you access to your data stored on the encrypted disks but with the read-only
access. That is, you will be able to read your data on already created encrypted disks, but will not be able to
modify them, to store new data on those disks, or create new encrypted disks. As soon as the license key is
entered, all limitations will be removed.
If you do not have the license key, you may obtain it by purchasing R-Crypto.
1.5
Contact Information and Technical Support
To obtain the latest version of R-Crypto, go to:
Product Site: http://www.data-security-software.com
Sales Department: [email protected]
R-Crypto Technical Support Team is available 24 hours a day, seven days a week, and has an average response
time less than 4 hours.
Tech. Support: [email protected]
Send your support request to: http://www.r-tt.com/SupportRequest.shtml
© 2007-2009 R-Tools Technology, Inc.
4
II
R-Crypto Help
R-Crypto Management Panel
You may perform most actions from R-Crypto Management Panel.
You may activate R-Crypto Management Panel:
· By double-clicking the R-Crypto system tray icon;
· By right-clicking the R-Crypto system tray icon and selecting R-Crypto Panel on the shortcut menu;
· From the Start menu by clicking R-Crypto in the R-Crypto menu group.
You may configure R-Crypto to automatically activate R-Crypto Management Panel at each computer startup.
Select Run R-Crypto Management Panel at system startup option on the General tab of the R-Crypto
Settings panel.
© 2007-2009 R-Tools Technology, Inc.
Protecting Your Data Using R-Crypto
III
5
Protecting Your Data Using R-Crypto
To store your confidential data safely and securely using R-Crypto, you need:
·
Create an encrypted disk.
You may create as many encrypted disks as you need and place them anywhere you need. Once the disks are
created, you need to place your confidential data on those encrypted disks. To do this:
·
Connect an encrypted disk.
You may connect as many disks as you need. You may access the connected encrypted disks as they were
regular disks in your system. Transfer your confidential data on those disks. Then you are through with the work
with your confidential data, your need to prevent access to your confidential data. To do this,
·
Disconnect a connected encrypted disk.
3.1
Create a New Encrypted Disk
To create a new encrypted disk,
1
Double-click the R-Crypto icon in the system tray to show R-Crypto Management Panel and click
Run new encrypted disk creation wizard task on it.
Other ways to create an encrypted disk:
· Right-click the R-Crypto icon in the system tray and select Create New Disk on the shortcut menu.
or
· In the Windows Explorer, go a place where are you going to store the file container for the encrypted disk,
right-click there, select New, and select R-Crypto file container on the shortcut menu.
The New Encrypted Disk Creation Wizard will appear.
Welcome to the Encrypted Disk Creation Wizard page
Click the Next button to continue.
You may make R-Crypto not to show the first and the last pages in the wizards. Clear Show Welcome and
© 2007-2009 R-Tools Technology, Inc.
6
R-Crypto Help
Completion pages next time. To resume showing these pages, select Show welcome and completion
pages in wizards on the General tab of the R-Crypto Settings panel.
© 2007-2009 R-Tools Technology, Inc.
Protecting Your Data Using R-Crypto
2
7
Specify the name and location of a file-container for the new encrypted disk and size of the new
encrypted disk on the General Encrypted Disk Information page and click the Next button.
General Encrypted Disk Information page
General Encrypted Disk Information options:
3
Container
name
Specify the name of the file-container. That should be only the file name without a drive
letter and path.
Container
location
Specify the path to the file-container. You may enter the location directly, select a
location, or select <Browse> to browse to the required place.
Disk size
Specify the size of the new encrypted disk. You may also use the slider to select the size
of the new encrypted disk. If needed, you may change the disk size later.
Select the encryption settings for the new encrypted disk on the Encryption Setting page and click
the Next button.
Encryption Settings page
© 2007-2009 R-Tools Technology, Inc.
8
R-Crypto Help
You may select the settings either from a predefined set, or select them separately on the Encryption
Settings dialog box.
To reach the Encryption Settings dialog box select Custom settings or click the Custom button.
Click the Default button to make the encryption settings as they specified on the the Encryption tab of the
R-Crypto Settings panel.
The Selected encryption settings field briefly describes the settings you have selected. Please note that
you need to select Best compatible if you plan to use the new encrypted disk on Windows 2000. You may
learn more about the encryption and hash algorithms on the Cryptographic and Hash Algorithms topic.
© 2007-2009 R-Tools Technology, Inc.
Protecting Your Data Using R-Crypto
4
9
Select the default connection point (drive letter or empty NTFS folder), file system, creation and
default connect options for the new encrypted disk on the Encrypted Disk Options page and click
the Next button.
Encrypted Disk Options page
Encrypted Disk options:
Connect to
Select the drive letter under which the connected encrypted disk will be visible to
your system. Select <Auto> to let R-Crypto select the drive letter itself. You may
also select any empty NTFS folder as a disk connection point by clicking
<Browse...>. This option can be modified later on the General tab of the encrypted
disk Properties panel.
Show only
available drive
letter
If this check box is selected, let R-Crypto shows only drive letters available for the
connection. It is impossible to connect an encrypted disk using the letter that is
occupied by another device in the system.
File system
Select a file system for the new encrypted disk. You may also select None to leave
the disk unformatted to formate it later using standard Windows utilities.
Encrypt empty
space of the disk
while creation
Select this check box if your want R-Crypto to encrypt the empty space in the
disk's file container. This option increases time necessary to create a disk but also
increases security as it conceals the size of the encrypted disk' s file-container
occupied by actual data.
Automatically
connect this disk
after creation
Select this check box if you want to have this disk automatically connected upon
creation.
Emulate fixed disk
Select this checkbox if you want your system see the new disk as a fixed one. This
option is only used while connecting the disk and doesn't affect the disk creation
process in any way. This option can be modified later on the General tab of the
encrypted disk Properties panel.
Select Emulate fixed disk only if you plan to share the new disk on Windows XP or later Windows versions.
© 2007-2009 R-Tools Technology, Inc.
10
5
R-Crypto Help
Enter the password for the new encrypted disk on the Encrypted Disk Password page and click the
Next button.
Encrypted Disk Password page
Go to the Best Security Practices topic for more information on how to choose a strong password.
6
On the Completing the New Encrypted Disk Creation Wizard page Click the Finish button to
complete the creation of the new encrypted disk.
Completing the New Encrypted Disk Creation Wizard page
You may make R-Crypto not to show the first and the last pages in the wizards. Clear Show Welcome and
Completion pages next time. To resume showing these pages, select Show welcome and completion
pages in wizards on the General tab of the R-Crypto Settings panel.
*
R-Crypto will start creating the new encrypted disk showing its progress.
The New encrypted disk... message box will appear when R-Crypto finishes creating the new encrypted
© 2007-2009 R-Tools Technology, Inc.
Protecting Your Data Using R-Crypto
11
disk.
3.2
Connect an Encrypted Disk
To connect an encrypted disk,
1
Right click the R-Crypto icon in the system tray and select Connect Disk on the shortcut menu.
Other ways to connect a disk:
· Click Connect encrypted disk or select Connect on the shortcut menu of the disk in the Recent
Encrypted Disks area of the R-Crypto Management Panel
or
· Double-click the encrypted disk file-container in the Windows Explorer
or
· Right-click the encrypted disk file-container in the Windows Explorer and select Connect on the
shortcut menu
or
· Right-click the R-Crypto icon in the system tray, select Recent Disks on the shortcut menu, then select
the required encrypted disk
or
· Right-click the encrypted disk's file-container in the Windows Explorer select Properties on the
shortcut menu, go to the R-Crypto tab, and click the Connect button.
The Connect Encrypted Disk dialog box will appear.
Connect Encrypted Disk dialog box
2
Select the encrypted disk file-container (if necessary), enter the password, and click the OK button.
R-Crypto will use the connection options specified during encrypted disk creation or management. To change
these options, click the Advanced button and edit them on the Connect Encrypted Disk dialog box. Please
© 2007-2009 R-Tools Technology, Inc.
R-Crypto Help
12
note that these changes will affect only the current connection of the encrypted disk. To learn how to make
permanent changes in encrypted disk options, go to the Managing Encrypted Disks chapter for details.
Connect Encrypted Disk dialog box
Connect Encrypted Disk options:
Location
Shows the location of the file-container of the encrypted disk.
Password
Enter the password for this encrypted disk.
Open drive after
connect
Select this check box to make R-Crypto immediately open the disk in Windows
Explorer after connection.
Advanced Options:
Use advanced options to override the default connect options specified on the
General tab of the encrypted disk Properties panel.
Connect to
Select the drive letter under which the connected encrypted disk will be visible to
your system. Select <Auto> to let R-Crypto select the drive letter itself. Note
that R-Crypto shows only drive letters currently available for the connection. It is
impossible to connect an encrypted disk using the letter that is occupied by
another device in the system. Instead of selecting a drive letter you may also
select any empty NTFS folder as a disk connection point by clicking <Browse...>.
Connect the disk as Select this check box if you want to connect the encrypted disk as a read-only
write protected
device. You will be able to read data from the disk but not to write anything to it.
Emulate fixed disk
*
Select this checkbox if you want that your system sees the disk as a fixed one.
Use this option only if you plan to share this disk on Windows XP or later
Windows versions.
R-Crypto will connect the selected encrypted disk and it will appear in My Computer.
If the Show notifications in system tray option is selected on the General tab of the R-Crypto Settings
panel, R-Crypto will show the "The encrypted disk <DiskName> is successfully connected as Removable Disk
(<DiskLetter>:)." message in the balloon ToolTip appearing at the R-Crypto icon in the system tray. If the
Emulate fixed disk option is selected, R-Crypto will show it as "Local Disk (<DiskLetter>:)" in this
message.
© 2007-2009 R-Tools Technology, Inc.
Protecting Your Data Using R-Crypto
13
You may access your data on this encrypted disk as it was on a conventional disk in your system.
3.3
Disconnect a Connected Encrypted Disk
To disconnect a connected encrypted disk,
-
Right-click the R-Crypto icon in the system tray, select Disconnect on the shortcut menu, then select
the required connected encrypted disk in the list.
Other ways to disconnect a connected encrypted disk:
· Click the connected encrypted disk on R-Crypto Management Panel and select Disconnect on the
shortcut menu
or
· Right-click the connected encrypted disk or the corresponding file-container in the Windows Explorer
and select Disconnect Disk on the shortcut menu
or
· Right-click the connected encrypted disk or the corresponding file-container in the Windows Explorer,
select Properties on the shortcut menu, go to the R-Crypto tab, and click the Disconnect button
or
· Press the shortcut keys specified on the Disconnect tab of the encrypted disk properties panel.
*
R-Crypto will disconnect the selected encrypted disk and it will disappear in My Computer.
If the Show notifications in system tray option is selected on the General tab of the R-Crypto Settings
panel, R-Crypto will show the "The encrypted disk <DiskName> is successfully disconnected." message in the
balloon ToolTip appearing at the R-Crypto icon in the system tray.
To disconnect all connected encrypted disks,
-
Right-click the R-Crypto icon in the system tray, and select Disconnect All Disks on the shortcut
menu.
Other ways to disconnect all connected encrypted disks:
· Click Disconnect all connected encrypted disks or Disconnect All Disks on R-Crypto Management
Panel
or
· Press the shortcut keys specified on the Disconnect tab of the R-Crypto Settings panel.
*
R-Crypto will disconnect all connected encrypted disks and they will disappear in My Computer.
If the Show notifications in system tray option is selected on the General tab of the R-Crypto Settings
panel, R-Crypto will show the "All encrypted disks are successfully disconnected." message in the balloon
ToolTip appearing at the R-Crypto icon in the system tray.
© 2007-2009 R-Tools Technology, Inc.
14
IV
R-Crypto Help
Managing Encrypted Disks
You may perform all encrypted disk management operations on the disk's Properties panel.
To access the encrypted disk Properties panel,
-
Right-click the encrypted disk's file-container in Windows Explorer and select Disk Properties
Other ways to access the encrypted disk Properties panel:
· Right-click the encrypted disk's file-container in the Windows Explorer and select Disk Properties on
the shortcut menu
or
· Right-click the encrypted disk's file-container in the Windows Explorer, select Properties on the
shortcut menu, go to the R-Crypto tab, and click the Advanced button
or
· Click the encrypted disk in Recent Encrypted Disks on the R-Crypto Management Panel and select
Properties on the shortcut menu.
If the encrypted disk is connected
· Right-click the encrypted disk in the Windows Explorer and select Disk Properties on the shortcut
menu
or
· Right-click the encrypted disk in the Windows Explorer, select Properties on the shortcut menu, go to
the R-Crypto tab, and click the Advanced button
or
· Click the connected encrypted disk on R-Crypto Management Panel and select Properties on the
shortcut menu.
Then you may perform the following operations:
· Change disk default drive letter and other connection options;
· Change disk disconnect options;
· Change disk password;
· Change disk size;
· Re-encrypt an encrypted disk. Note, that you may also use Re-encrypt Wizard to select a new
encryption and hash algorithms for your encrypted disk;
· Wipe an encrypted disk;
· Remove an encrypted disk from Recent Encrypted Disks.
4.1
Change Disk Connect Options
You may change the encrypted disk's default drive letter and other connect options on the General tab of the
encrypted disk Properties panel.
© 2007-2009 R-Tools Technology, Inc.
Managing Encrypted Disks
15
General tab
Encrypted disk default connect options:
Connect to
Select a default connection point for the encrypted disk which will be used when connecting
your disk to the system. You may select a drive letter from the list of available drive letters or
you may select an empty NTFS folder as a connection point for the encrypted disk by click
ing <Browse...>. Select <Auto> to let R-Crypto automatically choose the drive letter every
time you connect the encrypted disk to the system.
Connect this
disk as write
protected
Select this check box if you want to connect the encrypted disk as a read-only device. You
will be able to read data from the disk but not to write anything to it.
Emulate fixed
disk
Select this checkbox if you want that your system sees the disk as a fixed one. Select
Emulate fixed disk only if you plan to share the encrypted disk on Windows XP or later
Windows versions.
4.2
Change Disk Disconnect Options
You may change encrypted disk disconnect options on the Disconnect tab of the encrypted disk Properties
panel.
© 2007-2009 R-Tools Technology, Inc.
16
R-Crypto Help
Disconnect tab
Encrypted Disk disconnect options:
Use computer
default automatically
disconnect settings
Select this check box if you want R-Crypto to use default disconnect options.
Use force-disconnect
for automatically
disconnect the disk
Select this check box if you want R-Crypto to force-disconnect this encrypted disk. In
this case, R-Crypto will not wait for other applications to finish their operations with
the encrypted disk. Reduces disconnect time but risk appears to lose data being
written to the encrypted disk when the disconnection occurs.
Automatically
disconnect cases
Select the cases when R-Crypto will automatically disconnect the connected
encrypted disk. R-Crypto will always disconnect disks upon user logoff.
Computer lock
Select this check box to make R-Crypto automatically disconnect the encrypted disk
upon computer lock.
Hibernate
Select this check box to make R-Crypto automatically disconnect the encrypted disk
upon your computer going hibernate.
Screen saver
running
Select this check box to make R-Crypto automatically disconnect the encrypted disk
when a screen saver starts.
Disconnect shortcut
key
Select a shortcut key to disconnect the connected encrypted disk.
© 2007-2009 R-Tools Technology, Inc.
Managing Encrypted Disks
4.3
17
Change Disk Password
To change encrypted disk password,
1
Click the Change Password button on the General tab of the encrypted disk Properties panel.
General tab
Or click the connected encrypted disk or the disk from Recent Encrypted Disks on R-Crypto
Management Panel and select Change Password on the shortcut menu.
2
Enter the old and new passwords on the Encrypted Disk Password dialog box.
Encrypted Disk Password dialog box
*
R-Crypto will change the encrypted disk password and the The password is successfully changed
message will appear.
© 2007-2009 R-Tools Technology, Inc.
R-Crypto Help
18
4.4
Change Disk Size
To change encrypted disk size,
1
Click the Resize Now button on the Tools tab of the encrypted disk Properties panel.
Tools tab
Or click the connected encrypted disk or the disk from Recent Encrypted Disks on R-Crypto
Management Panel and select Resize on the shortcut menu.
The Resize Encrypted Disk dialog box will appear.
© 2007-2009 R-Tools Technology, Inc.
Managing Encrypted Disks
2
19
Enter the new disk size on the Resize Encrypted Disk dialog box
Resize Encrypted Disk dialog box
If the disk is not connected, the Encrypted Disk Password dialog box will appear. Enter the disk password
and click the OK button.
*
R-Crypto will start changing the disk size showing its progress.
The The Encrypted disk ... is successfully resized message box will appear when R-Crypto finishes
creating the new encrypted disk.
4.5
Re-encrypt an Encrypted Disk
R-Crypto provides a special Re-Encrypt Disk Wizard to perform an encrypted disk re-encryption operation. It is
recommended to re-encrypt your disk from time to time to enhance the security of your data. You may also use
this Wizard to change encryption and hash algorithms for your encrypted disk.
© 2007-2009 R-Tools Technology, Inc.
20
R-Crypto Help
To Re-encrypt an encrypted disk,
1
Click the Re-Encrypt Now button on the Tools tab of the encrypted disk Properties panel.
Tools tab
Or click the connected encrypted disk or the disk from Recent Encrypted Disks on R-Crypto
Management Panel and select Re-Encrypt on the shortcut menu.
The Re-Encrypt Disk Wizard will appear.
Welcome to the Re-Encrypt Disk Wizard page
Click the Next button to continue.
You may make R-Crypto not to show the first and the last pages in the wizards. Clear Show Welcome and
Completion pages next time. To resume showing these pages, select Show welcome and completion
© 2007-2009 R-Tools Technology, Inc.
Managing Encrypted Disks
21
pages in wizards on the General tab of the R-Crypto Settings panel.
2
Select new encryption settings for the disk on the Encryption Setting page and click the Next
button.
Encryption Settings page
You may select the settings either from a predefined set, or select them separately on the Encryption
Settings dialog box. To reach the Encryption Settings dialog box select Custom settings or click the
Custom button.
Click the Default button to make the settings as they specified on the the Encryption tab of the R-Crypto
Settings panel. Click the Reset button to return the encryption settings to the previous ones.
The Selected encryption settings field briefly describes the settings you have selected. Please note that
you need to select Best compatible if you plan to use the encrypted disk on Windows 2000. You may learn
more about the encryption and hash algorithms on the Cryptographic and Hash Algorithms topic.
© 2007-2009 R-Tools Technology, Inc.
22
3
R-Crypto Help
Enter a new password for the disk being re-encrypted on the Encrypted Disk Password page and
click the Next button.
Encrypted Disk Password page
You need to enter a really new password, the old one will not be accepted. Go to the Best Security
Practices topic for more information on how to choose a strong password.
4
On the Completing the Re-Encrypt Disk Wizard page click the Finish button to complete the reencryption of the encrypted disk.
Completing the Re-Encrypt Disk Wizard page
You may make R-Crypto not to show the first and the last pages in the wizards. Clear Show Welcome and
Completion pages next time. To resume showing these pages, select Show welcome and completion
pages in wizards on the General tab of the R-Crypto Settings panel.
© 2007-2009 R-Tools Technology, Inc.
Managing Encrypted Disks
*
23
R-Crypto will start re-encrypting the encrypted disk showing its progress.
The The encrypted disk ... is sucessfully re-encrypted message box will appear when R-Crypto finishes
re-encrypting the disk.
4.6
Wipe an Encrypted Disk
Be aware: Once an encrypted disk is wiped, all its data is completely destroyed, and you will not be
able to recover it. The file-container will become unusable even if it is restored by any undelete
software. You cannot undo this operation!
To wipe an encrypted disk and delete its file-container,
-
Click the connected encrypted disk or the disk from Recent Encrypted Disks on R-Crypto
Management Panel and select Wipe on the shortcut menu.
Other ways to wipe an encrypted disk:
· Right-click the connected encrypted disk in the Windows Explorer and select Wipe Disk on the
shortcut menu
or
· Right-click the encrypted disk file-container in the Windows Explorer and select Wipe Disk on the
shortcut menu.
The warning message will appear. Click Yes on it.
*
R-Crypto will disconnect the encrypted disk, render the disk file-container unusable pattern and
delete the file-container from the host's file system.
4.7
Remove an Encrypted Disk from Recent Encrypted Disks
To see the Recent Encrypted Disks list, you need to enable Store and show recent encrypted disks list option
on the General tab of the R-Crypto Settings panel.
© 2007-2009 R-Tools Technology, Inc.
24
R-Crypto Help
To remove a specific encrypted disk from the Recent Encrypted Disks list,
-
Click the encrypted disk from Recent Encrypted Disks on R-Crypto Management Panel, and select
Remove from Recent List on the shortcut menu.
*
R-Crypto will remove the encrypted disk from the Recent Encrypted Disks list.
To remove all encrypted disks from the Recent Encrypted Disks list,
-
Click the Clear List shortcut on the Recent Encrypted Disks panel on R-Crypto Management Panel
or right-click the R-Crypto icon in the system tray, select Recent Disks on the shortcut menu and then
click Clear List.
*
R-Crypto will remove all encrypted disks from the Recent Encrypted Disks list.
© 2007-2009 R-Tools Technology, Inc.
Configure Auto-connected Encrypted Disks
V
25
Configure Auto-connected Encrypted Disks
R-Crypto allows the user to create a list of encrypted disks, that will be automatically connected at system
startup. This automates and makes easier the process of connecting frequently used encrypted disks.
Note, that you must enable R-Crypto to run at system startup on the General tab of the R-Crypto Settings
panel in order to automatically connect encrypted disks specified in the auto-connected encrypted disks list at
system startup.
You may configure auto-connected encrypted disks list on the Auto-connected Encrypted Disks dialog box.
Auto-connected Encrypted Disks
You may activate Auto-connected Encrypted Disks dialog box from R-Crypto Management Panel by
clicking the Configure auto-connected encrypted disks task.
To add an encrypted disk to the list,
-
Click the Add button in the Auto-connected Encrypted Disks dialog box, select a desired disk's filecontainer in the appeared Open dialog box and click Open.
Other ways to add an encrypted disk to the auto-connected disks list:
· Right-click on the empty area of the list of encrypted disks in the Auto-connected Encrypted Disks
dialog box and select Add... on the shortcut menu
or
· Switch the dialog focus to the list of encrypted disks an press the Insert key.
© 2007-2009 R-Tools Technology, Inc.
26
*
R-Crypto Help
A newly added encrypted disk will appear in the list.
To remove an encrypted disk from the list,
-
Select an encrypted disk you wish to remove from the auto-connected disks list and click the
Remove button.
Other ways to remove an encrypted disk from the auto-connected disks list:
· Right-click on the desired encrypted disk in the list and select Remove on the shortcut menu
or
· Select the desired encrypted disk in the list and press the Delete key.
*
The desired encrypted disk will be removed from the list.
To change the properties of an encrypted disk in the list,
-
Select an encrypted disk in the auto-connected disks list and click the Properties button.
Other ways to change the properies of the encrypted disk:
· Double click on the desired encrypted disk in the list
or
· Right-click on the desired encrypted disk in the list and select Properties on the shortcut menu
or
· Select the desired encrypted disk in the list and press the Alt+Enter keys.
*
The desired encrypted disk's Properties panel will appear.
© 2007-2009 R-Tools Technology, Inc.
R-Crypto System Tray Icon
VI
27
R-Crypto System Tray Icon
R-Crypto places a special icon in the system tray to provide users with easy and quick access to common RCrypto actions. You can activate a tray icon menu shown below by right-clicking the R-Crypto System Tray Icon
.
R-Crypto system tray icon menu
R-Crypto system tray icon menu actions:
R-Crypto
Panel
Activates R-Crypto Management Panel. You also may perform this action by doubleclicking on the R-Crypto System Tray Icon.
Create New
Disk
Runs New Encrypted Disk Creation Wizard.
Connect Disk
Activates Connect Encrypted Disk dialog box.
Disconnect
sub-menu
This sub-menu contains all currently connected encrypted disks. By clicking on one of them
it will be disconnected. If no currently connected encrypted disks this sub-menu will be
disabled. Dragging the cursor over the encrypted disk in this sub-menu shows the path to its
file-container.
Disconnect All
Disks
By clicking on this item R-Crypto will disconnect all currently connected encrypted disks
and they will disappear in My Computer. If no currently connected encrypted disks this
menu item will be disabled.
Recent Disks
sub-menu
This sub-menu contains a clickable list of recently connected encrypted disks (if enabled).
Click on the menu item representing a recent encrypted disk to display a Connect
Encrypted Disk dialog box and connect a recent disk.
Settings
Activates R-Crypto Settings dialog box.
Help
Display R-Crypto help.
About
Display product information, version number, copyright and license status.
Register
Activates R-Crypto product registration dialog box.
Exit
By clicking on this item R-Crypto will disconnect all currently connected encrypted disks
and exit.
© 2007-2009 R-Tools Technology, Inc.
28
VII
R-Crypto Help
R-Crypto Settings
You may change default R-Crypto options on the R-Crypto Settings panel.
You may activate R-Crypto Settings panel:
· By right-clicking the R-Crypto icon in the system tray and selecting Settings on the shortcut menu;
· From the R-Crypto Management Panel;
· From the Control Panel by clicking R-Crypto icon.
7.1
General Options
You may set general options on the General tab of the R-Crypto Settings panel.
© 2007-2009 R-Tools Technology, Inc.
R-Crypto Settings
29
General tab
General R-Crypto options:
© 2007-2009 R-Tools Technology, Inc.
30
R-Crypto Help
Run R-Crypto at system
startup
Select this option to have R-Crypto running at each system startup. You will not
have to start it manually.
Run R-Crypto
Management Panel at
system startup
Select this option to have R-Crypto Management Panel running at each system
startup.
Show icon in system
tray
Select this option if you want to see the R-Crypto system tray icon.
Show notifications in
system tray
Select this option if you want to have the R-Crypto show the notifications of
completed operations appeared in balloon ToolTips appearing at the R-Crypto
system tray icon.
Show welcome and
completion pages in
wizards
Select this option if you want to see the welcome and completion pages in RCrypto wizards.
Store and show recent
encrypted disks list
Select this option if you want R-Crypto to store the list of recently connected
encrypted disks. This list will appear in the R-Crypto system tray icon shortcut
menu and in the R-Crypto Management Panel. This option allows you to find
the necessary encrypted disks easier, but reveals it to anyone who has access to
your computer.
Windows Shell
integration:
Use R-Crypto icon for
connected encrypted
disks
Select this option if you want to see connected encrypted disks marked with the
R-Crypto icon rather than the icon of the standard disk icon in My Computer.
Use cascaded shortcut
menu items
Select this option if you want to place all R-Crypto shortcut menu items in the
Windows Explorer for the connected encrypted disk or the encrypted disk filecontainer into the R-Crypto submenu.
Show 'Disk Properties'
shortcut menu item
Select this option if you want to have Disk Properties on the connected
encrypted disk or encrypted disk file-container shortcut menu item in the
Windows Explorer.
Show 'Disconnect Disk'
shortcut menu item
Select this option if you want to have Disconnect Disk on the connected
encrypted disk or encrypted disk file-container shortcut menu item in the
Windows Explorer.
Show 'Wipe Disk'
shortcut menu item
Select this option if you want to have Wipe Disk on the connected encrypted disk
or encrypted disk file-container shortcut menu item in the Windows Explorer.
Show 'Create New'
shortcut menu item
Select this option if you want to have R-Crypto file-container shortcut menu item
in the New submenu in the Windows Explorer File menu.
7.2
Encryption Options
You may set default encryption options on the Encryption tab of the R-Crypto Settings panel.
© 2007-2009 R-Tools Technology, Inc.
R-Crypto Settings
31
Encryption tab
You may select the settings either from a predefined set, or select them separately on the Encryption Settings
dialog box.
To reach the Encryption Settings dialog box select Custom settings or click the Custom button.
The Selected encryption settings field briefly describes the settings you have selected. Please note that you
need to select Best compatible if you plan to use the new encrypted disk on Windows 2000. You may learn
more about the encryption and hash algorithms on the Cryptographic and Hash Settings topic.
Select Allow to configure encryption options while creating a new disk to be able to set the encryption
options for the new encrypted disk on the New Encrypted Disk Creation Wizard.
7.3
Disconnect Options
You may set default disconnect options on the Disconnect tab of the R-Crypto Settings panel. These options
are used for all connected encrypted disks excluding those disks for which individual disconnect options are set.
© 2007-2009 R-Tools Technology, Inc.
32
R-Crypto Help
Disconnect tab
Default disconnect options:
Use force-disconnect
for automatically
disconnect all
encrypted disks
Select this check box if you want R-Crypto to force-disconnect all connected
encrypted disks. In this case, R-Crypto will not wait for other applications to finish
their operations with the encrypted disks. Reduces disconnect time but risk appears
to lose data being written to the encrypted disk when the disconnection occurs.
Automatically
disconnect cases
Select the cases when R-Crypto will automatically disconnect all connected
encrypted disk. R-Crypto will always disconnect disks upon user logoff.
Computer lock
Select this check box to make R-Crypto automatically disconnect all connected
encrypted disks upon computer lock.
Hibernate
Select this check box to make R-Crypto automatically disconnect all connected
encrypted disks upon your computer going to hibernate.
Screen saver running
Select this check box to make R-Crypto automatically disconnect all connected
encrypted disks when a screen saver starts.
Encrypted disk filecontainer storage
media is removed
Select this check box to make R-Crypto automatically disconnect all connected
encrypted disks upon encrypted disk file-container storage media is removed from the
system.
After period of
encrypted disk
inactivity
Select this check box to make R-Crypto automatically disconnect connected
encrypted disk upon exceeding an encrypted disk inactivity period. Inactivity period is
a period of time when the connected encrypted disk is not being used, that is it is a
period of time when no data is being read from the disk or being written to the disk.
Disconnect shortcut
key
Select a shortcut key to disconnect all connected encrypted disk.
© 2007-2009 R-Tools Technology, Inc.
Command-line Utility
VIII
33
Command-line Utility
R-Crypto provides a command-line utility for advanced managing of the encrypted disks' connections. This
command-line utility is intended to be used in batch files.
Connect an encrypted disk
To connect the desired file-container to the system run the following command:
EdiskCmd.exe connect [<connect options>] <file-container path>
Valid connect command options:
-password=PW
D or -p=PWD
Specifies the file-container password as PWD.
--readonly or ro
Use this option to connect the encrypted disk as write protected.
--connectpoint=CP or cp=CP
Specifies the encrypted disk connection point as CP. CP can be a drive letter, e.g.
"S:", or a path to an empty NTFS folder.
--fixed or -fd
Use this option to connect the encrypted disk emulating a fixed disk.
Examples:
EdiskCmd.exe connect C:\MyEncryptedDisk.edsk
EdiskCmd.exe connect --connect-point=R: --password=secret C:\MyEncryptedDisk.edsk
Disconnect an encrypted disk
To disconnect the desired encrypted disk from the system run the following command:
EdiskCmd.exe disconnect [<disconnect options>] <file-container path or disk connection point>
Valid disconnect command options:
--force or -f
Force encrypted disk disconnection even if there are any opened handles to the disk.
Examples:
EdiskCmd.exe disconnect S:
EdiskCmd.exe disconnect C:\MyEncryptedDisk.edsk
Disconnect all encrypted disks
To disconnect all connected encrypted disks from the system run the following command:
EdiskCmd.exe disconnectall [<disconnectall options>]
© 2007-2009 R-Tools Technology, Inc.
R-Crypto Help
34
Valid disconnectall command options:
--force or -f
Force encrypted disk disconnection even if there are any opened handles to the disk.
Examples:
EdiskCmd.exe disconnectall --force
© 2007-2009 R-Tools Technology, Inc.
Security Issues
IX
35
Security Issues
Best security practices
Cryptographic and Hash Algorithms
9.1
Best Security Practices
It is recommended to follow these simple rules to enhance the security of your data protected by R-Crypto:
Select a strong password
· Select a password, or even better, a pass phrase sufficiently long. 8 characters at least.
· Do not select simple words or numbers, like your date of birth. Include capitalized letters, digits, and other
characters.
Maintain your encrypted disks
· Change password regularly.
· Re-encrypt your disks periodically.
· Use Wipe an Encrypted Disk function to delete the desired encrypted disk instead of simple deletion.
Other security practices
· Remember your passwords. Do not write them on paper.
9.2
Cryptographic and Hash Algorithms
R-Crypto uses separate Cryptographic Service Providers (CSP's) to perform all its data encryption, data hashing
and encryption keys generation operations. Those cryptographic service providers may be either those already
built into the Windows operating system (like Microsoft Strong Cryptographic Provider and Microsoft Enhanced
RSA and AES Cryptographic Provider built into Windows XP), or obtained separately and installed by the user
itself. That ensures that only known and reliable implementations of cryptography are used.
R-Crypto supports the following cryptographic providers and their respective algorithms that are pre-installed in the
Windows operating system by default:
Windows 2000/XP/2003/Vista/Server 2008/Windows 7
Cryptographic providers: Microsoft Enhanced Cryptographic Provider and Microsoft Strong Cryptographic
Provider
Hash algorithms:
Encryption algorithms:
· Secure Hash Algorithm (SHA-1)
· RSA Data Security's (RC2, RC4)
· Message Digest (MD2, MD4, MD5)
· Data Encryption Standard (DES)
· Two Key Triple DES
· Three Key Triple DES
Windows XP/2003/Vista/Server 2008/Windows 7 only
Cryptographic provider: Microsoft Enhanced RSA and AES Cryptographic Provider
© 2007-2009 R-Tools Technology, Inc.
36
R-Crypto Help
Hash algorithms:
Encryption algorithms:
· Secure Hash Algorithm (SHA-1, SHA-256*, SHA384*, SHA-512*)
· RSA Data Security's (RC2, RC4)
* SHA-256,-384,-512 are available on Windows starting
from Windows Vista only.
· Data Encryption Standard (DES)
· Message Digest (MD2, MD4, MD5)
· Two Key Triple DES
· Three Key Triple DES
· Advanced Encryption Standard (AES) - 128,
192 and 256 bit key lengths
© 2007-2009 R-Tools Technology, Inc.
Index
Index
-AAllow to configure encryption options while creating a
new disk
30
-BButtons
Change Password 17
Default 19
Re-Encrypt Now 19
Reset
19
Resize Now 18
-CChange Disk Encryption Settings
19
Change Disk Password 17
Change Disk Size 18
Connect an Encrypted Disk
11
Connect Encrypted Disk options
Connect the disk as write protected
11
Drive letter 11
Emulate fixed disk
11
Location 11
Open drive after connect 11
Password 11
Show only available drive letters 11
Contact Information 3
Control Panel
R-Crypto 28
-DDelete an Encrypted Disk
23
Dialog boxes
Connect Encrypted Disk
11
Encrypted Disk Password
17
Resize Encrypted Disk
18
Disconnect a Connected Encrypted Disk
13
Disconnect Options
31
Disconnection options
Automatically disconnect cases:
15
37
Computer lock
15
Disconnect shortcut key
15
Hibernate 15
Screen saver running 15
Use computer default automatically disconnect
settings
15
Use force-disconnect for automatically disconnect
the disk
15
Disk Properties panel 14
Disk Properties tabs
Disconnect
15
General 14, 17
Tools 18, 19
-EEncrypted Disk options
Automatically connect this disk after creation
5
Drive letter 5
Emulate fixed disk
5
Encrypt empty space of the disk while creating
5
File system
5
Show only available drive letter 5
Encryption Options
30
-GGeneral Encrypted Disk Information options
Container location 5
Container name 5
Disk size
5
General options 28
Connect this disk as write protected
14
Drive letter 14
Emulate fixed disk
14
Run R-Crypto at system startup
28
Run R-Crypto Management Panel at system
startup
28
Show 'Create New' shortcut menu item 28
Show 'Disconnect Disk' shortcut menu item
28
Show 'Disk Properties' shortcut menu item
28
Show icon in system tray
28
Show icons in shortcut menu
28
Show notifications in system tray
28
Show welcome and completion pages in wizards
28
Store and show recent encrypted disks list
28
© 2007-2009 R-Tools Technology, Inc.
38
R-Crypto Help
General options 28
Use R-Crypto icon for connected encrypted disks
28
Used cascaded shortcut menu items
28
Windows Shell integration 28
-IIntroduction to R-Crypto
1
-MManaging Encrypted Disks
14
Messages
New encrypted disk...
5
The encrypted disk ... is sucessfully re-encrypted
19
The password is successfully changed
17
-NNew Encrypted Disk Creation Wizard
Completing the New Encrypted Disk Creation
Wizard
5
Encrypted Disk Options
5
Encrypted Disk Password
5
Encryption Settings
5
General Encrypted Disk Information 5
Welcome to the Encrypted Disk Creation Wizard
5
5
-RR-Crypto Features 1
R-Crypto file-container 5
R-Crypto Limitations
2
R-Crypto Management Panel 4
R-Crypto Settings
28
R-Crypto Settings panel 28
R-Crypto Settings tabs
Automatically disconnect cases:
Computer lock
31
Disconnect
31
© 2007-2009 R-Tools Technology, Inc.
-SSecurity Issues
35
Shortcut menu
Connect 11
Connect Disk
11
Create New Disk 5
Delete 23
Disconnect All Disks
13
Disconnect Disk
13
Remove from Recent List 23
Settings
28
-T-
-PProtecting Your Data Using R-Crypto
Disconnect all disks shortcut key
31
Disconnection options
31
Encryption
30
General 28
Hibernate 31
Screen saver running 31
Use force-disconnect for automatically disconnect
the disk
31
Re-Encrypt Disk Wizard
Completing the Re-Encrypt Disk Wizard page
19
Encrypted Disk Password page
19
Encryption Settings page
19
Welcome to the Re-Encrypt Disk Wizard page
19
Remove an Encrypted Disk from Recent Encryted
Disks
23
31
Technical Support 3
trial mode
3
trial period 3
Trial Version Limitations
3