1
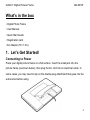
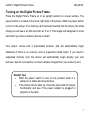
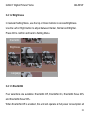
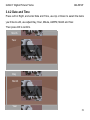
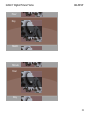
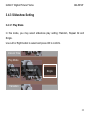
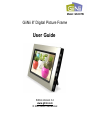
Model: GN-801W GiiNii 8” Digital Picture Frame User Guide Edition Version 3.4 www.giinii.com © 2008 GiiNii International GiiNii 8” Digital Picture Frame GN-801W Table Of Content What’s in the box..............................................................................6 1. Let’s Get Started!..........................................................................6 Connecting to Power .................................................................................................... 6 Turning on the Digital Picture Frame .......................................................................... 7 2. Buttons …………………………………………………………………8 Buttons and Menu Operation ....................................................................................... 8 Inserting a memory card or USB Flash Drive .............................................................. 9 3. Menu Options ............................................................................. 11 Slideshow .................................................................................................................... 11 Button functions in slideshow ..................................................................................... 13 Main Menu ................................................................................................................. 13 3.1 Clock..................................................................................................................... 14 3.2 Photo .................................................................................................................... 15 3.3 Calendar ............................................................................................................... 23 3.4 Setting ................................................................................................................... 24 3.4.1 General Setting .................................................................................................. 25 2 GiiNii 8” Digital Picture Frame GN-801W 3.4.2 Date and Time.................................................................................................... 29 3.4.3 Slideshow Setting ............................................................................................... 32 3.4.4 Information ........................................................................................................ 34 4. Technical specification ..............................................................35 Replacement Parts ...................................................................................................... 35 5. Frequently Asked Questions .....................................................36 6. Regulation & Compliance ..........................................................37 7. GiiNii 90-Day Limited Warranty .................................................38 3 GiiNii 8” Digital Picture Frame GN-801W Dear Customer: Thank you for bringing the GiiNii digital photo frame into your home. Now you will be able to view your growing digital picture library and share great memories with friends and your family. To get the most out of your new GiiNii product, please read through this entire Owner’s Manual. Chapter 1: Let’s Get Started! Chapter 2: Buttons. Chapter 3: Menu Options. Also, please check out our video tutorials on HOW TO START and HOW TO PROGRAM your new player at www.giinii.com under PRODUCTS and scroll down to TUTORIALS. For 24/7 GiiNii Customer Service, please call: 1-866-909-3550. Sincerely, The GiiNii Team 4 GiiNii 8” Digital Picture Frame GN-801W Key features Auto-Rotation – automatically rotate your picture display according to Digital Photo Frame orientation 8”AW 480x220 widescreen TFT LCD 7 select buttons + 1 power switch Support of multi format memory cards: SD/SDHC/MMC/MS/ xD/MS Duo/MMC+ through a 6-in-1 card socket Supports USB 2.0 drive Selectable transition effects for pictures Multiple Language Selection available for Menu Display in English / Français / Nederlands / Español / Deutsch / Português / Italiano TM EnerGiiNii provides three intelligent ways of power consumption management. When EnerGiiNii On is enabled, this unit will automatically operate at low power consumption during nighttime (21:00PM~7:00AM), and will automatically resume normal during daytime (7:00AM ~21:00PM) Preinstalled demo photos 5 GiiNii 8” Digital Picture Frame GN-801W What’s in the box • Digital Photo Frame • User Manual • Quick Start Guide • Registration card • AC Adaptor (5V /1.5 A) 1. Let’s Get Started! Connecting to Power Place your digital picture frame on a flat surface. Insert the small jack into the picture frame (as shown below), then plug the AC cord into an electrical outlet. In some cases, you may need to slip on the double-plug attachment that goes into the wall socket before using. 6 GiiNii 8” Digital Picture Frame GN-801W Turning on the Digital Picture Frame Place the Digital Picture Frame on in an upright position on a level surface. The power button is located at the lower right side of the player. Slide the power button to turn on the player. If no memory card has been inserted into the device, the initial image you will see is an SD card with an X on it. This image will disappear in a few seconds if you have a memory device to insert. Your player comes with 3 preinstalled pictures, and will automatically begin slideshow if there is no memory card or supported media found. If you insert a supported memory card, the device will automatically begin playing your own pictures. See the next section on how to display images from your memory card. Helpful Tips Slide the power switch to turn on the product while it is placed on a stable and level surface. If the device cannot start up, check the wall outlet for proper functionality and see if the power adaptor is plugged in properly in the back. 7 GiiNii 8” Digital Picture Frame GN-801W 2. Buttons Buttons and Menu Operation The buttons used for operating your device are located on the sides. The buttons can be used to drive all functions of the on-screen menu. The G Button is used to navigate between modes and time. Once the player is powered on, press any button on the right side to bring up the Menu (See Chapter 4: Main Menu). The options in the Menu are: Photo, Setting, Clock and Calendar. Right Left OK Up Down Exit G Power 8 GiiNii 8” Digital Picture Frame GN-801W Button Function description Power Power on/Power off G button Go to slideshow mode / Navigate between slideshow and clock Exit Return to previous menu Left Previous item Right Next item Up Previous menu item Down Next menu item OK Validate process / Enter submenu Inserting a memory card or USB Flash Drive Your player is equipped with pre-loaded photos. The pre-loaded photos will automatically start playing when there is no memory card detected. To play your own content, insert a memory card containing photos. 9 GiiNii 8” Digital Picture Frame Memory Card GN-801W USB Drive Helpful Tips This device supports following memory cards: SD,SDHC, MMC, MS, xD, MMC+ and MS Duo can be played with an adaptor (not provided). You may also use a USB Flash Drive in this device. The player gives priority to memory cards in the 6-in-1 before a USB drive. Remove inserted memory card to play from a USB drive For further information on supported memory card types and file formats, please refer the Technical Specifications. 10 GiiNii 8” Digital Picture Frame GN-801W 3. Menu Options Slideshow In this mode, press the Up or Down or OK buttons to access the Photo menu; press the Left or Right buttons to select previous or next photo; press the G-Button to show Clock and press it again to return to the slideshow. Slideshow---Photo View Press Up or Down or OK 11 GiiNii 8” Digital Picture Frame GN-801W Clock Photo Photo View--Slideshow Press G button Setting Slideshow---Clock Press G button 12 GiiNii 8” Digital Picture Frame GN-801W Button functions in slideshow Button Function G-Button Select between Slideshow and Clock Left Show the previous photo OK, Up, Down Access Photo View Right Show the next photo Main Menu In Slideshow, press OK to access Photo Slideshow Slideshow Mode Transit to show thumbnail Thumbnail Photo (browse thumbnail photos) Press Up or Down to select other function settings Main Menu Main mode (Calendar, Clock, Photo, Setting) Press G-Button to play slideshow 13 GiiNii 8” Digital Picture Frame GN-801W 3.1 Clock In the main menu, use the Up or Down button to select Clock. When in slideshow, press the G-button to access Clock. Press OK, Up, Down to show Clock menu, then press Left and Right buttons to select the clock style: A (Analog Clock) and D (Digital Clock); Use the Up and Down buttons to select other functions. Illustration Description Type: A. Analog Clock Week and Date 14 GiiNii 8” Digital Picture Frame GN-801W Type: D. Digital Clock Month and Date 3.2 Photo 1. In the Main Menu, use the Up and Down buttons to select Photo. Then select the photo source contained in your memory card. SD/SDHC/MMC/MMC+/MMC, MS, MS Duo, XD Card and USB Flash Drive are supported. 2. When the Photo menu is selected, photos are displayed in thumbnail. If there is no card inserted, demo pictures will be shown. You can only browse three photos at one time. The one in center is the selected photo. 3. Press OK and use the Up and Down buttons to edit the selected photos. 15 GiiNii 8” Digital Picture Frame GN-801W Clock Photo Setting Button Function G-Button Slideshow → Clock Up Access Clock Left Select the left photo Play/OK Slideshow → Photo Menu (Thumbnail) Right Select the right photo Down Access Setting 16 GiiNii 8” Digital Picture Frame GN-801W 3.2.1 Color Effects 1. In the Photo Menu, use the Up and Down buttons to select Color Effects. 2. Use the Left and Right buttons to select between Normal, Black and White, Sepia. 3. Press OK to confirm the selection and back to the Thumbnail Mode. Color Effects Contrast 3.2.2 Contrast 1. In the Photo Menu, use the Up and Down buttons to select Contrast. 2. Use the Left and Right buttons to select between Contrast, Contrast+1, Contrast+2, Contrast-1 and Contrast-2. 17 GiiNii 8” Digital Picture Frame GN-801W 3. Press OK to confirm the selection and back to the Thumbnail Mode. Color Effects Contrast Brightness 3.2.3 Brightness 1. In the Photo Menu, use the Up and Down buttons to select Brightness. 2. Use the Left and Right buttons to select the brightness. 3. Press OK to confirm the selection and back to the Thumbnail Mode. 18 GiiNii 8” Digital Picture Frame GN-801W Contrast Brightness Delete 3.2.4 Delete 1. In the Photo Menu, use the Up and Down buttons to select Delete. 2. Use the Left and Right buttons to select Yes or No (Default). Brightness Delete No Yes Rotate 19 GiiNii 8” Digital Picture Frame GN-801W 3. Select Yes and press OK to Delete; otherwise, select No and press OK to return to the thumbnail photos. Brightness Delete Press "OK" key No to delete file Rotate 3.2.5 Rotate Manual Rotate in menu mode 1. In the Photo Menu, use the Up and Down buttons to select Rotate. 2. Use the Left and Right buttons to select between Landscape and Portrait 3. Press OK to confirm the selection and back to the Thumbnail Mode. Delete 20 GiiNii 8” Digital Picture Frame GN-801W Rotate Ratio Auto Rotate During Slideshow Using the Auto Rotation function for Landscape or Portrait mode You can use your GiiNii picture frame in either landscape or in portrait. The GiiNii picture frame automatically changes how the pictures are displayed. First in a landscape mode when placed sideways; or portrait mode by rotating the digital photo frame counterclockwise. But, for portrait mode, it should be wall-mounted. Note: The auto rotation feature displays pictures in a landscape or portrait view. It does not re-orient pictures that were taken sideways 21 GiiNii 8” Digital Picture Frame GN-801W 3.2.6 Ratio 1. In the Photo Menu, use the Up and Down buttons to select Ratio. 2. Use the Left and Right buttons to select Full Screen (Default) or Actual Size. 3. Press OK to confirm the selection and back to the Thumbnail Mode. Rotate Ratio Full Screen Actual Size 22 GiiNii 8” Digital Picture Frame GN-801W 3.3 Calendar Calendar Clock 23 GiiNii 8” Digital Picture Frame GN-801W 1. In menu mode, press Up to show Calendar in thumbnail. 2. Press OK to browse the calendar in full screen mode. And press OK again to return to thumbnail. 3. Press Left or Right to review previous or next in thumbnail or full screen. 4. To edit Calendar, please come to Setting – Date and Time for details. 3.4 Setting In the Main Menu, use the Down button to select Setting and press OK to access General Setting Menu. Use the Left and Right buttons to select other options: Date and Time, Slideshow Setting, General Setting and Information. Default value will be highlighted in red color in the setting. Photo Setting Slideshow Setting General Setting Information 24 GiiNii 8” Digital Picture Frame GN-801W 3.4.1 General Setting 3.4.1.1 Language In General Setting Menu, use the Up or Down buttons to enter Language Menu. Use Left or Right buttons to select language: English / Français / Nederlands / Español / Deutsch / Português / Italiano Press OK to confirm. Brightness Language English Français Setting Reset 25 GiiNii 8” Digital Picture Frame GN-801W 3.4.1.2 Brightness In General Setting Menu, use the Up or Down buttons to access Brightness. Use the Left or Right button to adjust between Darker, Normal and Brighter. Press OK to confirm and back to Setting Menu. EnerGiiNii Brightness Darker Darker Normal Brighter Setting Language 3.4.1.3 EnerGiiNii Four selections are available: EnerGiiNii Off, EnerGiiNii On, EnerGiiNii Save 20% and EnerGiiNii Save 50%. When EnerGiiNii Off is enabled, this unit will operate at full power consumption all 26 GiiNii 8” Digital Picture Frame GN-801W the time. When EnerGiiNii On is enabled, this unit will automatically operate at low power consumption during nighttime (21:00PM~7:00AM), and will automatically resume normal during daytime (7:00AM ~21:00PM); When you select EnerGiiNii Save 20% or EnerGiiNii Save 50%, it will automatically operate at that power consumption and save the percent power accordingly. Use the Left or Right button to select and press OK to confirm. EnerGiiNii EnerGiiNii Off Darker EnerGiiNii On EnerGiiNii Save 50% Setting Language 3.4.1.4 Reset Use the Left or Right button to select Yes or No. 27 GiiNii 8” Digital Picture Frame GN-801W Language Reset No Yes Select Yes, press OK to reset; otherwise, select No and press OK to return to the Setting menu. Language Reset No Press "OK" key to reset 28 GiiNii 8” Digital Picture Frame GN-801W 3.4.2 Date and Time Press Left or Right, and enter Date and Time, use Up or Down to select the items you’d like to edit, use adjust Day, Hour, Minute, AM/PM, Month and Year. Then press OK to confirm. Month Year 1970 Day Month 1 Year 29 GiiNii 8” Digital Picture Frame GN-801W Hour Day 3 Month Minute Hour 12 Day 30 GiiNii 8” Digital Picture Frame GN-801W AM/PM Minute 14 Hour AM/PM AM PM Minute 31 GiiNii 8” Digital Picture Frame GN-801W 3.4.3 Slideshow Setting 3.4.3.1 Play Mode In this mode, you may select slideshow play setting: Random, Repeat All and Single. Use Left or Right button to select and press OK to confirm. Interval Time Play Mode Random Repeat All Single Transition 32 GiiNii 8” Digital Picture Frame GN-801W 3.4.3.2 Transition In this mode, you may adjust the slideshow transition effects: Random, 3D Circle, 3D Float, Shutter, Boxing Shutter, Insert, Leave, News, Plug Sign, Flabellate, Fade and Shrink. Use the Left or Right button to select and press OK to confirm. Play Mode Transition Random 3D Circle 3.4.3.3 Interval Time In this mode, you may select the slideshow interval time: 3 Seconds (Default), 10 Seconds, 30 Seconds, and 1 Minute. Use the Left or Right button to make selection and press OK to confirm. 33 GiiNii 8” Digital Picture Frame GN-801W Interval Time 3 Seconds 10 Seconds Play Mode 3.4.4 Information Information will show current firmware version. If you have inserted a memory card, memory total and memory free will be calculated for you to know under version. Information Ver:GN8AW1018 34 GiiNii 8” Digital Picture Frame GN-801W 4. Technical specification LCD Display Shell Material Buttons Supported Cards Photo Format Interface Analog Ratio 16:9 Resolution 480X220 300(min.) Brightness (cd/㎡) Contrast 400(min.) Viewing Angle 50°/50°/15°/35°(min.) (L/R/T/B) ABS Select Buttons x 7, Power Button x 1 SD, SDHC, MMC, MMC+, MS, MS Duo and xD JPG, TIFF, GIF Important Notice Specifications may change without notice due to product improvements or upgrades. Replacement Parts If you need a replacement part for your GiiNii Digital Photo Frame, call us at 1-866-909-3550 or write to us at: [email protected]. 35 GiiNii 8” Digital Picture Frame GN-801W 5. Frequently Asked Questions This product has been set to its standard mode of operations before shipping. If you encounter any problems while using the Digital Photo Frame, please refer to the following table for problems and solutions. Problem Solution 1. Make sure the resolution and color of Photos are displayed fine on a PC. 2. Keep the player away from any interference, e.g. induction cooker, hair dryer, magnetized and unshielded speakers, etc. 1. Backup the contents and then format the memory card with a computer. 2. After formatting the card, copy the backup files to the memory card again. 3. If the problem still persists, try a new memory card or a different brand of memory card. 1. Check if the file types in the memory card matches the list of supported file types in the Technical Specifications. 2. Check the memory card using the steps proposed for the “Unable to read memory card” problem. Picture is fuzzy or unstable “Card Error!” message shown “Invisible!” message shown 36 GiiNii 8” Digital Picture Frame GN-801W 1 Hold the power button down for 2 seconds. 2. Make sure the power adapter is connected properly on the device and at the electrical wall socket. power on 3. Unplug the power adapter from the device, wait 5 seconds, plug the adapter back in and press the power button. Nothing happens 1 This device supports following memory cards: SD, SDHC, MMC, MMC+, MS, MS Duo and xD. when I insert a 2 Make sure that the photos are in a support format. Please refer to the “product Specifications” section for supported file formats. Device will not Memory Card 6. Regulation & Compliance This equipment has been tested and found to comply with the limits for a Class B digital device, pursuant to Part 15 of the FCC Rules. These limits are designed to provide reasonable protection against harmful interference in a residential installation. This equipment can generate radio frequency energy and, if not installed and used in accordance with the instructions, may cause interference to radio communications. However, there is no guarantee that interference will not occur in a particular installation. If this equipment does cause harmful interference to radio or television 37 GiiNii 8” Digital Picture Frame GN-801W reception, which can be determined by turning the equipment off and on, the user is encouraged to try to correct the interference by one of the following measures: -Reorient or relocate the receiving antenna. -Increase the separation between the equipment and receiver. -Connect the equipment into an outlet on a circuit different from that to which the receiver is connected. -Consult the dealer or an experienced radio/TV technician for help. 7. GiiNii 90-Day Limited Warranty Please read this Limited Warranty carefully. The limited warranty set forth below is given by GiiNii, the maker of your new Digital Photo Frame, when purchased in the United States of America through an authorized retailer and used for non-commercial purposes. We warranty this product against manufacturing and material defects for a period of (90) days from the date of purchase. Do not return your product to the retailer for warranty claims. (1) Please maintain the Warranty Statement in a safe place along with your dated sales receipt. Please retain the original box in the event you need to make a 38 GiiNii 8” Digital Picture Frame GN-801W warranty claim. Returning your product for a warranty claim in best done in the original box or an alternative package that ensure its safe return to GiiNii. Please contact our Customer Service team about the appropriate return-shipping package. (2) GiiNii Customer Service and Technical Support: 1-866-909-3550. Or, on line at: www.GiiNii.com (3) Parts and Labor Coverage. During the first 90 days of ownership, GiiNii will repair or replace the product, at its option, at no charge if the product is found to be defective due to material or manufacturing defects. GiiNii will provide a new product of similar or greater value at its discretion. Or, provide new or rebuilt replacement parts at its sole discretion. Replacement or repair of one part of the product does not constitute replacement or repair of other parts of the product. The customer bears the responsibility to ship the product back to GiiNiii, at their cost. Pending review of the product, that shipping cost will be refunded to the customer. To make a warranty claim, you must first contact Customer Service and receive a Return Authorization Code. No repairs or replacements can be made without a Return Authorization Code. After the first 90 days of ownership, repair costs are the responsibility of the owner. (4) Excluded Items Not Covered by the Warranty: A. Cosmetic damage or damages due to accident, misuse, abuse or negligence; 39 GiiNii 8” Digital Picture Frame GN-801W B. Commercial use of the product; C. Damage due to improper operation, improper maintenance, improper power supply; D. Customer inability to read, understand the provided instructions on how to properly use the product; E. Modifications of any part of the product in any way; F. Damage resulting from unauthorized attempted repair of the product; G. Damage resulting from acts of nature or God. (5) To make a Warranty Claim please have the following items: A. Your original dated proof of purchase from an authorized retailer in the United States; B. Your original package that your product was sold in. Your warranty claim will not be honored without the original purchase receipt. If you do not have the original package, please consult with our Customer Service team to determine the best way to return your product to us. GiiNii cannot be responsible for damages incurred during return shipping; insurance is highly recommended. C. Please provide written statement (typed or printed in block letters) that describes why your product is defective. On this document, you will need to include the Return Authorization Code provided by Customer Service, as well 40 GiiNii 8” Digital Picture Frame GN-801W as your Name, return address, and a daytime phone number. Return shipments to GiiNii should be insured and sent via Registered Mail with proof of delivery. (6) Warranty Disclaimers GiiNii and its parent company, affiliates or subsidiaries shall not be liable for any incidental or consequential damages for breach of any expressed or implied warranty on this product. Except to the extent prohibited by applicable law, any implied warranty of merchantability or fitness for a particular purpose on this product is limited in duration to the duration of this warranty. Application of this warranty may vary by state; this warranty gives you specific legal rights and you may have others based on the state you live in. 41 GiiNii 8” Digital Picture Frame GN-801W Warning Changes or modifications to this unit not expressly approved by GiiNii voids this warranty and may result in personal injury and/or property. www.giinii.com © 2008 GiiNii International Printed in China 42