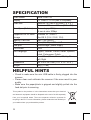
1
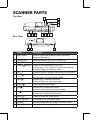
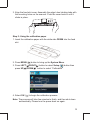
GiiNii NuLife 2.4-inch LCD “Full Size” Photo Scanner User Manual • Before operating this product, carefully read and follow the instructions. • Please retain this user manual for future reference. CONTENTS SAFETY INFORMATION................................................3 PACKAGE CONTENT....................................................4 SCANNER PARTS..........................................................5 PRODUCT SETUP..........................................................6 - Connecting to Power...................................................................6 - Inserting a SD/MMC Card.............................................................7 - Turning on the Scanner.................................................................7 SCAN AND PLAYBACK.................................................8 - Scanner Setting...............................................................................8 - Using the Photo Protective Sleeve....................................................9 - Scanning Images.............................................................................9 - Playing back and Scanned Images...............................................10 - Zoom.........................................................................................11 - Playback Setting.............................................................................12 TRANSFERRING THE SCANNED IMAGES TO PC.....13 - Disconnecting the Scanner from PC...............................................13 CLEANING AND CALIBRATING THE SCANNER.......14 SPECIFICATION..........................................................16 HELPFUL HINTS.........................................................16 GiiNii 90 DAY LIMITED WARRANTY............................17 2 SAFETY INFORMATION • • • • • • • Retain this User Manual for future reference. Read the safety and operating instructions carefully before using the product. All warnings on the product and in the operating instructions should be observed. Do not place this product under direct sunlight or near heat sources, such as in a closed car under sunlight or near a stove. The outer casing of this product may become deformed and the sophisticated sensors inside may become damaged due to excessive heat. Do not use this product near water, in the rain or allow any liquid to get inside this product. Water and moisture may cause short-circuit to the electronic components and lead to malfunctions. Do not use this product near strong electromagnetic sources, such as a microwave oven. The electromagnetic interference may cause this product to malfunction. Do not insert objects other than compatible memory cards into the memory card slots of this product. The metal contacts inside the slots can be damaged by foreign objects. Do not use an unknown power adapter other than the one supplied. Connecting this product to an unknown power adapter is very dangerous and may lead to fire or explosion. 3 Thank you for purchasing this GiiNii NuLife 2.4-inch LCD “Full Size” Photo Scanner. With this new standalone scan-and-view technology, scanning is easy! There is no software installation or PC needed. You can preview the scanned images instantaneously on the 2.4” display screen, and store them directly into a MMC or SD memory card. It makes your scanning experience easier and enjoyable. You can also transfer the scanned images to your PC via mini USB port. Please follow the following instructions, on page 13, for more details. B PACKAGE CONTENT Scanner mini USB Cable Power Adapter Cleaning Stick Quick Guide User Manual Cleaning Paper Photo Protective Sleeve CALIBRATION PAPER, A620 82-329-00071 ᢣүഡማા-U)!ࠔ࡙;1/31/4nn !ሯёתVWᏘ* ፎ٩ྣჴނຊϪ! LൂՅӑ!ڇ2!86ጕа! Insert this card with the WHITE side down to the scanner. ᇛℸवⱑ㡆䴶ᳱϟᦦܹᥗᦣ఼ Insérez cette carte dans le scanner en orientant la face BLANCHE vers le bas. ᇚℸवⱑ㡆䴶ᳱϟᦦܹᠿᦣҾ Schieben Sie diese Karte mit der WEISSEN Seite nach unten in den Scanner. ࠞ࠼ߩⵣ㕙(ぎⱑ䴶)ࠍਅߦะߌߡᧄޔߩᝌญ ߦ᳓ᐔߦࠇߊߛߐޕ Калибровочная карта Insert this card with the WHITE side down to the scanner. ᇛℸवⱑ㡆䴶ᳱϟᦦܹᥗᦣ఼ Insérez cette carte dans le scanner en orientant la face BLANCHE vers le bas. ᇚℸवⱑ㡆䴶ᳱϟᦦܹᠿᦣҾ Schieben Sie diese Karte mit der WEISSEN Seite nach unten in den Scanner. ࠞ࠼ߩⵣ㕙(ぎⱑ䴶)ࠍਅߦะߌߡᧄޔߩᝌญ ߦ᳓ᐔߦࠇߊߛߐޕ Вставьте данную карту в сканер БЕЛОЙ стороной вниз. Калибровочная карта Вставьте данную карту в сканер БЕЛОЙ стороной вниз. Inisira este cartão com o lado BRANCO voltado para baixo. Cartão de calibragem Inserte esta e tarjeta en el escáner con la cara BLANCA hacia abajo. 섥ꩾꐩ넩껹ꅍꌱ뽚뼍陁뼍꾡넩렩麑ꌱ걙롅骽꾅 高냱겢겑꿙 ﺑﻄﺎﻗﺔ ﺍﻟﻤﻌﺎﻳﺮﺓ 섥ꩾꐩ넩껹ꅍꌱ뽚뼍陁뼍꾡넩렩麑ꌱ걙롅骽꾅 高냱겢겑꿙 ﺠﻬﻬﻬﺎ ًﺠ ﻷﺑﻴﺾ ﻣﻣﺘﺘﺘﺠ ﻄﺎﻗﺔ ﺑﺤﻴﺚ ﻳﻜﻮﻥ ﺍﻟﺠﺎﻧﺐ ﺍ ﻴ ﺃﺩﺧﻞ ﻩﺬﻩ ﺍﻟﺒﻄﺎ .ﺳﺤﺔ ﺍﻟﻀﻮﺋﻴﺔ ﻷﺳﻔﻞ ﺗﺠﺎﻩ ﺍﻟﻤﺎ ﺔ 82-329-00070 Inisira este cartão com o lado BRANCO voltado para baixo. Cartão de calibragem Inserte esta tarjeta en el escáner con la cara BLANCA hacia abajo. ﺑﻄﺎﻗﺔ ﺍﻟﻤﻌﺎﻳﺮﺓ ﺃﺩﺧﻞ ﻩﺬﻩ ﺍﻟﺒﻄﺎﻗﺔ ﺑﺤﻴﺚ ﻳﻜﻮﻥ ﺍﻟﺠﺎﻧﺐ ﺍﻷﺑﻴﺾ ﻣﺘﺠًﻬﺎ .ﻷﺳﻔﻞ ﺗﺠﺎﻩ ﺍﻟﻤﺎﺳﺤﺔ ﺍﻟﻀﻮﺋﻴﺔ 82-329-00071 Calibration Paper 4 SCANNER PARTS Top View 8 9 10 11 1 2 3 4 5 6 7 Rear View 12 13 14 Names 1 Paper guide 2 3 4 5 6 7 8 Descriptions • Used to guide the material to be scanned to improve alignment. Feeding slot • Feeds the paper or photo for scanning. 2.4” LCD screen • Views the scanned images. Power( )/Menu • Press to turn the power to on or off. • Long press for 3~5 seconds to turn off the scanner. • Press to display the setting menu. • Press to make or confirm selections in the menus. OK( OK ) Down( ) • Moves down to select the option below. • Moves down in the thumbnail mode. Right( ) • Moves right to select the option. • Moves to the next scanned image. • Zoom the scanned image. Zoom( ) MENU 9 Left( ) 10 Up( ) 11 Scan( SCAN ) 12 Mini USB port 13 SD/MMC 14 DC-IN 5V jack • Moves left to select the option . • Moves to the previous scanned image. • Moves up to select the option above. • Moves up in the thumbnail mode. • Press to enter the Scan mode. • Connects to PC to transfer files. • Accepts these memory cards: SD/SDHC/MMC. • Connects to the supplied AC power adapter. 5 PRODUCT SETUP Connecting to Power Using AC adapter Connect one end to the scanner’s DC IN jack, and the other to wall socket. To DC IN 5V To wall socket Using mini USB cable as a power source 1. Connect the mini USB connector to the scanner, and the other 2 regular USB connectors to laptop or PC. mini USB cable (supplied) 2. Press Power ( MENU Laptop ) button to bring up the USB Mode menu. USB Mode USB Power Mass Storage Please insert a SD/MMC card! 3. Press UP( )/DOWN( ) button to select USB Power, then press OK( OK ) button. 6 Inserting a SD/MMC Card Insert your SD or MMC card into the card slot with the gold contacts facing up. Rear View Turning on the Scanner Press Power ( MENU ) button to turn on the scanner. MENU 7 SCAN AND PLAYBACK Scanner Setting 1. Press MENU( ) button to enter the scanner setting menu. 2. Press LEFT( )/RIGHT( ) button to MENU select Scan ( ) or Setup ( ) . 3. Press UP( )/DOWN( ) button to select an option from the submenus. Note: Press MENU( ) button repeatedly to go to the upper level, or exit the Scan menu. MENU Menus Scan( Sub-menus ) Color Mode( Descriptions Selects a scan mode: Gray( ), Color( ). ) ) This function provides a color optimization mechanism which will achieve the best color match possible based on the actual color content of the image. Note 1: Scanning will take longer than normal with this setting. Please be patient and wait until the process is finished. Note 2: This setting is set to its default of “OFF” after the scanner is restarted. Color Optimum( Setup( ) Language( Format( English, German, French, Italian, Spanish, Dutch, Portuguese, Polish. ) ) Calibration( Deletes all the data stored in the SD/MMC card. Factory Default( 8 Select “OK” to calibrate the scanner. Note: Refer to page 14 for detailed procedures. ) ) Restores the scanner settings to the default settings. Using the Photo Protective Sleeve It is recommended to use the supplied photo protective sleeve for photo scanning. Please place the photo inside the protective sleeve. Make sure the sealed end goes first into the feed slot for scanning. Note: Do not use the sleeve for laminated photos. Scanning Images Note: “Please insert a SD/MMC card”. A reminder message will appear if you did not insert a SD or MMC card to the scanner. 1. Insert the photo, or document facing DOWN into the feed slot, adjust the paper guide against the edges of the photo if necessary. Note: To avoid the paper jams, align the photo, or document against the right side of the feed slot if it is smaller than A4 size. Paper guide Photo facing down 9 2. Press Scan ( ) button, the photo or document will be rolled through and scanned. Note: Wait until scanning is complete. 3. The scanned image will appear on the screen and saved onto the inserted memory card. Note 1: By default the folder \DCIM\100NVtim will be created in the inserted memory card. All scanned images will be saved in the 100NVTIM folder. When the counter reaches 9999 it will be automatically generated another new folder in a sequential order. Note 2: When the memory card is full, a “Memory Full” warning will appear. SCAN Note 3: When scanning images with a dark background , the scanner may not be able to detect the images, or may crop the images in an undesirable way. Memory Full Illustration: Note 2 Playing back the Scanned Images Note: The scanner will enter the playback mode after scans, or press OK ( OK ) button. 1. Press LEFT( )/RIGHT( ) button to browse forward or backward the scanned images at a full screen. 2. Press OK( OK ) button to enter the thumbnail mode from the browse mode. All scanned images stored in the SD/MMC card will be displayed in the thumbnail mode. 1/15 10 3. Press LEFT( )/RIGHT( ) button repeatedly to move to the previous or the next page. 4. Press UP( )/DOWN( )/LEFT( )/RIGHT( ) button to select an image, and then press OK( OK ) button to view the image in full screen. Zoom 1. Press ZOOM( ) button to zoom in an image. Each time of the button is pressed, the image will be enlarged in the sequence of x2, x3, x4, and x5. 2. Press UP( )/DOWN( )/LEFT( )/RIGHT( ) button to move the pointer to view the zoom-in image at the pointed area. Note: This function only works in the Zoom-in view. + 2 11 Playback Setting 1. Press MENU( ) button to enter the playback setting menu. 2. Press LEFT( )/RIGHT( ) button to select Playback ( ) or Setup ( ) . 3. Press UP( )/DOWN( ) button to select an option from the submenus. Note: Press MENU( ) button repeatedly to go to the upper level, or exit the Playback menu. MENU Delete Rotate MENU Menus Sub-menus Playback( Setup( ) Descriptions ) Delete( ) Delete the scanned image(s): One( ), All( ). Rotate( ) Rotate the scanned image(s): ), 180 Normal ( ), 90 degree( degree ( ), or 270 degree ( ). Note: The orientation of the scanned images remain unchanged when transferring images to PC, although they have been rotated with this setting. Language( Format( English, German, French, Italian, Spanish, Dutch, Portuguese, Polish. ) Deletes all the data stored in the SD/MMC card. ) Calibration( ) Factory Default ( ) 12 Select “OK” to calibrate the scanner. Note: Refer to page 14 for detailed procedures. Restores the playback settings to the default settings. TRANSFERRING THE SCANNED IMAGES TO PC ATTENTION: To get proper connection with your PC and the unit, please turn the power off before making the connection. 1. Connect the mini USB connector to the scanner, and the master connector to PC. Master connector mini USB Cable (supplied) 2. Press Power ( MENU ) button to bring up the USB Mode menu. USB Mode USB Power Mass Storage 3. Press UP( )/DOWN( ) button to select Mass Storage, then press OK( OK ) button. 4. Once the connection is established, a “Removable Disk” window will appear on the PC. 5. Enter the Removable Disk in the PC and use the drag and drop method to copy files between the Scanner and the PC. Note: The Removable Disk on the PC shows the files stored in the SD/MMC card which is connected to the scanner. Disconnecting the Scanner from PC 1. Double click the Safely Remove Hardware icon on the task bar in Windows. 2. Select the USB Mass Storage Device, then click OK to disconnect the scanner from the PC. Note: Remove the mini USB cable from the scanner when you have finished file transfers. 13 CLEANING AND CALIBRATING THE SCANNER • To get high image quality and good recognition results, please perform step 1, 2, 3 in that order prior to use if necessary. • Make sure the cleaning and calibration paper, and cleaning stick are clean without any dust before use. • Do not use any solvent to clean the sensor. Step 1: Using the cleaning paper Insert the supplied cleaning paper into the feed slot of the scanner, then press SCAN( ) button to rolled through and scanned. SCAN Front side Cleaning paper Step 2: Using the cleaning stick 1. Put your thumbs in the feed slot and pull the feed slot cover upwards to remove it from the scanner. 2. Insert the thin end of the cleaning stick into the slot of the scanner at the rear side. Move the stick from one side to the other slightly a few times, then remove it. Rear side Cleanning stick Note: Do not insert the cleaning stick into the feed slot at the front side of the scanner as this may damage the internal component. 14 3. Align the feed slot cover. Assembly the edge’s two latching tabs with the mounting holes on the scanner. Push the cover back in until it clicks in place. Step 3: Using the calibration paper 1. Insert the calibration paper with the white side DOWN into the feed slot. 2. Press MENU( MENU ) button to bring up the System Menu. 3. Press LEFT( )/RIGHT( ) button to select Setup ( ) button then press UP( )/DOWN( ) button to select “Calibration”. 4. Select OK ( OK ) to begin the calibration process. Note: The process will take few minutes to finish, and then shut down automatically. Please turn the power back on again. 15 SPECIFICATION Scan Sensor Display Scan Size Scan Speed(A4 size) Supported OS for Mass storage Memory Card Slot I/O USB port File Format OSD language Buttons Dimensions Weight Linear Color CIS 2.4” Color TFT LCD (480 x 234 pixels) Minimum: 38.1mm x 50.8mm (1.5” x 2”) Maximum: 216mm x 356mm (8.5” x 11”) 10 sec at gray 300dpi 15 sec at color 300dpi Windows XP / Vista / 7 Mac OS X (10.4 / 10.5 / 10.6) MMC / SD (SDHC) DC-in (5V, 2A) / USB mini-B mass storage / power supply JPEG English, German, French, Italian, Spanish, Dutch, Portuguese, Polish. Power/Menu, Scan, Zoom, OK, Up, Down, Left, Right 300 x 86 x 56.2 mm (11.8” x 3.4” x 2.2”) 520g (1.1lbs) HELPFUL HINTS • Check to make sure the mini USB cable is firmly plugged into the scanner. • Please clean and calibrate the scanner if the scan result is poor quality. • Make sure the paper/photo is gripped and slightly pulled into the feed slot prior to scanning. This symbol on the product or in the instructions means that your electrical and electronic equipment should be disposed at the end of its life separately from your household waste. There are separate collection systems for recycling in the EU. For more information, please contact the local authority or your retailer where you purchased the product. 16 GiiNii 90 DAY LIMITED WARRANTY WARRANTY COVERAGE: This warranty obligation is limited to the terms set forth below. WHO IS COVERED: This product is warranted to the original purchaser or the person receiving the product as a gift against defects in materials and workmanship as based on the date of original purchase (“Warranty Period”) from an Authorized Dealer. The original sales receipt showing the product name and the purchase date from an authorized retailer is considered such proof. WHAT IS COVERED: This warranty covers new products if a defect in material or workmanship occurs and a valid claim is received within the Warranty Period. At its option, the company will either (1) repair the product at no charge, using new or refurbished replacement parts, or (2) exchange the product with a product that is new or which has been manufactured from new, or serviceable used parts and is at least functionally equivalent or most comparable to the original product in current inventory, or (3) refund the original purchase price of the product. The Company warrants replacement products or parts provided under this warranty against defects in materials and workmanship from the date of the replacement or repair for the remaining portion of the original product’s warranty. When a product or part is exchanged, any replacement item becomes your property and the replaced item becomes the company’s property. When a refund is given, your product becomes the company’s property. Replacement product can only be sent if all warranty requirements are met. Failure to follow all requirements can result in delay. WHAT IS NOT COVERED – EXCLUSIONS AND LIMITATIONS: This Limited Warranty applies only to the new products that can be identified by the trademark, trade name, or logo affixed to it. This Limited Warranty does not apply to any non-GiiNii hardware product 17 or any software, even if packaged or sold with the product. NonGiiNii hardware manufacturers, suppliers, or publishers may provide a separate warranty for their own products packaged with the bundled product. The Company is not liable for any damage to or loss of any programs, data, or other information stored on any media contained within the product, or any non-GiiNii product or part not covered by this warranty. Recovery or reinstallation of programs, data or other information is not covered under this Limited Warranty. This warranty does not apply (a) to damage caused by accident, abuse, misuse, neglect, misapplication, or non-GiiNii product, (b) to damage caused by service performed by anyone other than an Authorized Service Location, (c) to a product or a part that has been modified without written permission, or (d) if any serial number has been removed or defaced, or (e) to a product, accessories or consumables sold “AS IS” without warranty of any kind by including refurbished GiiNii products sold “As IS” by some retailers. THIS LIMITED WARRANTY DOES NOT COVER: • Shipping charges to return defective product. • Labor charges for installation or setup of the product, adjustment of customer controls on the product, and installation or repair of any part outside of the product. • Product repair and/or part replacement because of improper installation or maintenance, connections to improper voltage supply, power line surge, lighting damage, retained images or screen markings resulting from viewing fixed stationary content for extended periods, product cosmetic appearance items due to normal wear and tear, unauthorized repair or other cause not within the control of the company. • Damage or claims for products not being available for use, or for lost data or lost software. • Damage from mishandled shipments or transit accidents when returning product. • A product that requires modification or adaptation to enable it to operate in any country other than the country for which it was designed, manufactured, approved and/or authorized, or repair of products damaged by these modifications. 18 • A product used for commercial or institutional purposes (including but not limited to rental purposes). • Product lost in shipment and no signature verification receipt can be provided. • Failure to operate per Owner’s Manual. TO OBTAIN ASSISTANCE Send an email to [email protected]. For technical support call toll free: 1-866-909-3550 R E PA I R O R R E P L A C E M E N T A S P R O V I D E D U N D E R T H I S WARRANTY IS THE EXCLUSIVE REMEDY FOR THE CONSUMER. G i i N i i S H A L L N O T B E L I A B L E F O R A N Y I N C I D E N TA L O R CONSEQUENTIAL DAMAGES FOR BREACH OF ANY EXPRESS OR IMPLIED WARRANTY ON THIS PRODUCT. EXCEPT TO THE EXTENT PROHIBITED BY APPLICABLE LAW, ANY IMPLIED WA R R A N T Y O R M E R C H A N TA B I L I T Y O R F I T N E S S F O R A PARTICULAR PURPOSE ON THIS PRODUCT IS LIMITED IN DURATION TO THE DURATION OF THIS WARRANTY. Some states do not allow the exclusions or limitations of incidental or consequential damages, or allow limitations on how long an implied warranty lasts, so the above limitations or exclusions may not apply to you. This warranty gives you specific legal rights. You may have other rights which may vary from state/province to state/province. 19 GiiNii International Product Registration P.O. Box 1689 Pleasanton, CA 94566 ©2010 GiiNii International 82-329-00110 20