1
4
Revox Joy S37 Audio Server
Page 0
Contents
Contents .......................................... 1 Welcome ......................................... 3 Operating the menu ........................... 18 System ................................................. 18 Display settings .................................. 20 Audio settings ..................................... 21 Setup................................................ 3 Network settings ................................ 21 Scope of delivery ................................. 3 Music settings .................................... 22 Safety..................................................... 4 Managing media sources ................. 22 Installation ............................................ 4 Auto Start - Disc ................................. 23 Safety measures .................................. 4 Storage location for audio CDs ........ 24 First contact .......................................... 6 Recording audio CDs ......................... 24 Unit front panel............................... 8 Extended settings ............................... 24 Unit rear panel................................ 9 System information ....................... 25 Remote control ............................. 11 Basic operation .................................. 11 Changing the batteries ...................... 11 Function display through LEDs ......... 12 Function buttons in general .............. 12 Advice on settings.............................. 26 Music archive .............................. 27 Building up the media library ............ 27 Recording a CD ................................... 27 Automatic recording ..................... 27 TV function buttons............................ 13 Manual recording .......................... 27 Movies archive function buttons ..... 13 Record view ................................... 28 Music archive function buttons ....... 13 Cancel recording ........................... 29 Pictures archive function buttons.... 14 Importing files ..................................... 29 Controlling TV devices....................... 14 Browsing for music ............................ 31 Remote control overview .................. 15 Views ................................................... 31 Home menu ................................... 16 View - Artist with album ............... 31 Standby mode ..................................... 16 Changing the view......................... 32 Settings ........................................... 16 View - Artist .................................... 32 Help .................................................. 16 View - Albums ................................ 32 General settings ........................... 18 View - Genre .................................. 33 Revox Joy S37 Audio Server
View - Composers ......................... 33 Page 1
View - "Recently added" ................33 Abbreviations & terminology ..... 52 View - Playlist .................................33 Service .......................................... 53 View - Folders .................................34 Online support .................................... 53 View - File system ..........................34 Factory settings .................................. 53 Music selection ..............................35 Online update ..................................... 53 Text search .....................................35 Warranty ............................................. 54 Search function searching ...........36 Environmental protection.................. 54 Creating playlists ............................... 36 Packaging ........................................... 54 Playing music ..................................... 38 Disposal ............................................... 54 Play modes ......................................39 Wireless keyboard ...................... 55 Standard play mode.......................40 Keyboard commands ......................... 55 Playlist play mode ..........................40 Installation .......................................... 56 Play menu ........................................40 Manual synchronisation ...............56 General functions ........................ 42 Status LEDs .....................................57 General control .................................. 42 Operating modes ............................57 Volume control ................................... 42 Mouse function ..............................57 Selecting entries ................................ 42 Dual-function keys .........................57 Editing entries .................................... 43 TV programming .......................... 58 Deleting entries .................................. 45 Programming by model number ....... 58 Searching for entries......................... 45 Search with manufacturer number .... 58 Inserting a disc................................... 46 Automatic search............................... 59 Ejecting a disc .................................... 46 Reading out the code ........................ 60 Exporting files ..................................... 47 Reset .................................................... 60 Refresh an archive ............................ 48 Manufacturer code list (overview) .. 65 Help...................................................... 49 Audio streaming ................................. 49 General information .................... 50 Gracenote EULA .......................... 66 Gracenote Service ............................. 67 File access .......................................... 50 Data backup copies ........................... 50 Revox Joy S37 Audio Server
Page 2
Revox Audio Server
Welcome
Thank you for choosing to purchase a
Revox Audio Server. The Revox S37
Audio Server gives you simple and clear
access to your music and rips your audio
CDs automatically onto a storage
medium.
All data can be found and displayed
quickly using a comprehensive GUI with a
uniform operating concept.
The operation of the complete system is
simple and quick to learn, because
irrespective of the functional level, the
system can be controlled through just 7
buttons. The many buttons on the remote
control don't contradict this promise. They
are there to help the proficient user call
up the most important functions even
more quickly.
The Operating Manual has been put
together in such a way that the
description of the individual functions
(sources) is done in individual chapters. At
the end of the manual you will find the
"General Functions" chapter, which
contains basic operating information that
applies to all areas of the S37.
Revox hopes that you have a lot of fun and
of course a lot of entertainment, as you
use your Revox Audio Server.
Please pay particular attention to the
advice given in this Operating Manual
about safety, installation and also about
making backups of your valuable music,
movies and most importantly your
pictures.
Revox Joy S37 Audio Server
Introduction
We reserve the right to make
modifications and changes to the Revox
Audio Server, which could result in
changes to operating processes.
Setup
Please check the unit and accessories
after unpacking, to ensure that
everything is there and that there are no
signs of transit damage. Read the
Operating Manual through carefully
before starting to use the unit. Keep the
manual for later reference. The
Operating Manual is also installed on the
S37 itself and can be read in PDF format.
A unit that shows signs of mechanical
damage or which has had liquid in it
should not be connected to the mains
supply.
Only use the mains cable supplied. The
unit’s power supply and connection
values (mains voltage, frequency) must
be checked before connecting it to the
mains. Fuses used in the device must
comply with the factory definitions in the
“Technical Data” section.
Scope of delivery
Revox Audio Server
S37 remote control
incl. two type CR2025 batteries
Operating Manual on CD ROM
Power cable
HDMI cable
Optical audio cable for TOS Link
Analogue audio cable, 3.5 mm jack
plug on RCA
External power supply
Page 3
Revox Audio Server
Safety
Please take note of the labels on the
back of the unit:
In order to avoid the risk of an electric
shock, do not remove any covers.
Maintenance and repairs should only be
carried out by qualified experts.
There can be dangerous laser and
electromagnetic emissions if the unit is
opened.
Installation
Please follow the instructions in the
Operating Manual supplied.
Do not position the unit close to strong
heat sources or in direct sunlight.
If installing in a cabinet or closed
shelves, allow at least 5 cm of free
space around the unit, so that the air
can circulate freely and that there is no
build up of heat. Do not cover the fan
and openings at the back of the unit
and ensure that there is sufficient
circulation of fresh air.
Introduction
mains power supply caused by
lightning strikes can damage the unit.
There must be easy access to the
power plug so that the unit can be
unplugged at any time.
Lay the power cable such that it
cannot be damaged. The power cable
should not have kinks or be laid over
sharp edges. It should not be walked
on or be exposed to any chemicals.
The last point is valid for the whole
unit. A power cable with damaged
insulation can lead to electric shocks
and represents a fire hazard.
Never pull on the cable when plugging
the unit in or out. Always hold the plug.
Take note of and follow the safety
advice on the following pages.
Safety measures
Read and take note of the following
safety advice for your own safety and to
avoid unnecessary damage to your
equipment. Please keep this safety
advice in a safe place for future
reference.
Avoid locating the unit in a position
which:
The power plug should be removed
from the socket during longer periods
of non-use, for instance during an
absence.
- is exposed to direct sunlight
- is directly next to a source of heat
- has poor ventilation
- has a dusty atmosphere
- is unstable
- has high humidity
Unplug the unit from the mains during
storms. Voltage peaks through the
The guarantee only covers the intended
usage of the unit.
This unit conforms to protection class 1.
Revox Joy S37 Audio Server
Page 4
Revox Audio Server
High build-ups of dust and humidity
cause creepage current in the unit that
can cause a risk of shocks when
touching the unit or lead to a fire.
If you have moved the unit from a cold to
a warm environment, leave it switched
off for about two hours because of a
possible build up of condensation
dampness.
You should always switch your S37 off
before connecting or disconnecting
other devices or speakers.
Protect your unit from:
-
Damp, dripping water, splash water and
steam.
Impacts and mechanical loads
Magnetic and electrical fields
Cold, heat, direct sunlight and severe
changes of temperature
Dust
Accesses made to the inside of the
device
Do not stand any articles with open
flames, e.g. lit candles on the unit.
Please note
In order to exclude the risk of an electric
shock, never remove the covers. Only
have any repair work carried out by a
Revox specialist dealer or by the Revox
Service department.
Volume
Loud music can cause hearing damage.
Avoid extremes of volume, particularly
over longer periods of time and
especially if you are wearing
headphones.
Revox Joy S37 Audio Server
Introduction
Supervision
Do not allow children to handle the unit
without supervision. Do not allow
children in close proximity to the unit. Do
not operate the S37 without supervision.
Unplug the device from the mains if it is
not going to be used over a longer period
of time.
Cleaning
The unit should be cleaned using just a
damp, soft and clean cloth without any
abrasive cleaning agents.
Regulations pertaining to the unit
In EU and EEC countries, Revox offers a
guarantee on units bought in the EU,
over and above the statutory rights of
guarantee claims against the seller. The
guarantee covers material and labour
during the period of the guarantee,
which is defined by the Revox Sales
Partners in the individual countries that
make up the EU.
In all countries, the guarantee services
offered by the Revox Sales Agent are over
and above the statutory regulations. They
are only valid in the country of purchase.
Proof of purchase from an authorised
Revox Partner must be produced to
make a claim on the guarantee.
The guarantee is made null and void in
the case of incorrect intervention
measures
or
non-professionally
executed repairs.
This also applies particularly to the
Revox Audio System if the actual
functional level has been circumvented
Page 5
Revox Audio Server
and settings in the operating system or in
the basic system configuration have
been modified. Loading any further
software of any type also causes an
immediate loss of rights under the
guarantee.
First contact
Various connections have to be made
before setting up your S37 for the first
time.
In order to ensure an optimum
configuration of the system, it is
important that all components such as
the monitor, keyboard and mouse are
connected when first starting it up.
Video transfer
The best picture quality for the transfer
of the Revox Audio Server GUI to your
picture display device is offered through
the HDMI connection. This supports a
resolution of up to 1920 x 1080 (Full HD),
assuming that your picture display
device also supports this resolution.
The S37 also has a VGA output. In
comparison to the HDMI, the VGA has a
reduced resolution.
It is only possible to operate one video
output concurrently at the S37. The
parallel operation of video outputs is
expressly not supported.
The HDMI is HDCP-compatible.
The factory-set resolution of the S37 is
1024 x 768. With this setting, practically
all picture display devices available on
the market can be used with the S37 in
Revox Joy S37 Audio Server
Introduction
such a way that a picture will be
displayed. You can set the optimum
resolution
in
the
S37
under
Settings/Display.
If the S37 stops displaying pictures, you
can press the Home button S on the
remote control for 10 seconds and then
press the "1" button on the remote
control to switch back to the 1024 x 768
resolution.
We recommend that the TV is turned on
when starting up the S37 for the first
time.
Audio transfer
You can set up the audio connection
between the S37 and your audio
amplifier in three different ways. These
have to be selected in the S37 Settings
menu in the Audio section.
You have the options
•
•
•
Analogue
Digital optical
HDMI
These days, many AV Receivers already
have an HDMI input that can also
evaluate the digital audio signals on the
HDMI interface. Often however, the
HDMI cable is fed directly to a picture
display device or the AV receiver doesn't
have an HDMI interface. In this case,
you should use the optical digital output
on the S37. If you have just got a straight
stereo amplifier, connect the analogue
front output on the S37 with your
amplifier.
Page 6
Revox Audio Server
Introduction
Internet
There is an RJ45 LAN connection on the
rear of the S37. Connect this socket to
your IT network with a network cable.
Revox recommends always connecting
the S37 to the network using a LAN
because, as a rule, this type of
connection is more reliable than a
WLAN connection and also has a
broader bandwidth.
Power supply
Only use the power cable supplied with
the unit to connect your S37 to the mains
supply.
Remote control
The remote control supplied with the S37
is designed for simple and fast operation
of the Revox Audio Server.
Wireless keyboard
Optionally, the S37 can also be operated
using a wireless keyboard. You can
connect the Revox wireless keyboard
using a USB receiver plugged into one of
the USB sockets on the rear of the unit.
Revox Joy S37 Audio Server
Page 7
Revox Audio Server
Introduction
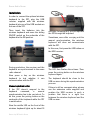
Unit front panel
As you approach the glass front panel,
the button illumination is switched on
when you are about 1 cm away from the
panel, in order to identify their position
on what appears ostensibly to be just a
black (white) glass panel.
Power touch key
The S37 is switched on and off with a
short press on the
key.
The S37 takes about 20 seconds to boot
up and the display of the Music
Selection Menu indicates that it is ready
for operation. Do not press any button on
the remote control or any connected
wireless keyboard during the boot-up
procedure.
The
and
buttons light up
when the unit is ready. The labelling for
the front USB connection is also
illuminated.
Disc touch key
Front USB connection
The front USB connection allows you to
connect a USB data stick, in order either
to transfer data from the stick to the S37
or vice versa.
DVD/CD Feed slot
The S37 has a high-quality DVD drive
with slot-loader function, i.e. it pulls the
disk in automatically as soon as more
than 2/3 of the disc has been inserted
into the feed slot.
Standby LED display
A blue LED indicates that the Revox
Audio Server is in standby mode. This
display goes out as soon as the S37 is
started through the Power button.
If the S37 goes into standby mode, the
display buttons continue to light up for a
short time, in order to be able to switch
the unit back on again quickly.
A short tap on the
button will
cause any CD/DVD in the drive to be
ejected.
If you insert a medium that is not
compatible to the S37´s drive (e.g. a
BluRay), it can happen that you cannot
eject the medium, as it is not recognized
by the system.
In this case, you can activate the
emergency eject function by pressing
and holding the
button for about 4
seconds.
Revox Joy S37 Audio Server
Page 8
Revox Audio Server
Introduction
Unit rear panel
There are a lot of connections on the
rear panel of the Revox Audio Server,
which are described in the following.
Power supply
You will find a socket on the left hand
side where the external power supply
unit is connected.
You should only use the power supply
unit supplied by Revox. Using an
incorrect power supply unit can lead to
damage to the audio server.
Technical data
Power
Connector
Inner Connector
Outer Connector
Current
8-19 V DC
ID 2,5 mm
OD 5,5 mm
8-19 V DC
GND
max. 8A
Recommended
12V; 5,5 A
2-way USB 2.0
Connection for 2 x USB 2.0 devices
LAN RJ45 connection
This connection allows a one gigabit
connection to a LAN network.
Status of the LEDs
ACT/Link LED
Off
– No connection
Orange – Connected
Flashing – Data traffic
Speed LED
Off
Orange
Green
– 10 MBit/s
– 100 MBit/s
– 1 GBit/s
VGA output
Audio/Video/Network
Connections to picture display devices,
audio amplifier and the IT network are
made through the rear panel.
The sockets are described from left to
right:
Revox Joy S37 Audio Server
Connect your picture display device to
the S37 VGA output if it doesn't support
the HDMI Standard digital formats.
2-way USB 2.0
These yellow USB connections support
the USB 2.0 standard with a high current
for USB drives or for charging
smartphones.
Page 9
Revox Audio Server
Introduction
HDMI Video output
Connect the Revox Audio Server to a
picture display device through the HDMI
output. This connection supports the
HDCP protocol and is compatible with
the HDMI 1.3a standard.
Audio formats up to 24 bit/98 kHz are
supported.
Analogue audio output
You can connect an analogue stereo
audio signal to your amplifier through the
green stereo jack plug output.
The analogue audio output supports
sampling rates of 44.1 kHz / 48 kHz / 96
kHz and 192 kHz.
Microphone connection
The S37 microphone connection is not
currently supported.
Optical audio output
The digital optical output is located to
the far right hand side. Assuming that
your amplifier has a suitable audio input,
you can also connect the audio server to
your amplifier through this connection.
The digital audio output supports
sampling rates of 44.1 kHz / 48 kHz / 96
kHz and 192 kHz with a resolution of 16
bit, 20 bit and 24 bit.
Note:
With
optical
sockets,
Revox
recommends selecting a maximum of 96
kHz.
Revox Joy S37 Audio Server
Page 10
Revox Audio Server
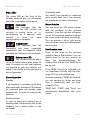
Remote control
The RC M117 Remote Control was
designed specially to meet the
requirements of the Revox Entertainment
System and the Revox Audio Server.
Remote control
positions shown in red. Insert the new
batteries making sure that the polarity is
correct. Both batteries should always be
exchanged at the same time.
Basic operation
The complete control of the S37 can be
carried out using the Arrow buttons 6 ,
5 , 8 and 7 , the G button, the
Back button 1 and the Menu button
A.
All further buttons are just there to
provide fast and intuitive operating
convenience.
As well as operating the individual
functional areas of the Revox Audio
Server, the remote control can also be
adapted to many different televisions
through an integrated database, so that
the basic functions - on/off, video input
selection or TV volume control - can also
be carried out for many televisions
available on the market.
The code table for the most commonly
used models and brands is included in
the Appendix to this Operating Manual.
Rear view: RC M117 Remote control
Replacement batteries: 2 x CR2025 / 3V
Disposal of the batteries
The batteries initially supplied
with the remote control do not
contain
any
harmful
substances such as cadmium, lead or
mercury. Discharged batteries may not
be disposed of with the normal
household rubbish. You can dispose of
old batteries free of charge at
corresponding collection points found in
many shops. You will also find a
container for old batteries at your
specialist dealer.
Changing the batteries
If the batteries in the remote control get
weaker, as indicated by a shorter
operational range, they can be replaced
easily. To do this, remove the battery
compartment cover on the back of the
remote control and ease the batteries
out using the tip of ballpoint pen at the
Revox Joy S37 Audio Server
Page 11
Revox Audio Server
Function display through LEDs
S37 Mode:
The LED behind the Power button lights up
red when operating the S37's functional
areas.
TV Mode
In TV mode, the remote control's IR code is
switched, in order to enable a television to
be controlled. The LED flashes green to
confirm that the switch has been made.
Remote control
Revox Entertainment System / Revox
Audio Server source that is currently
being controlled. Please note that the
following descriptions do not apply if the
remote control is in TV mode.
These include the Power button M,
which toggles between the S37's
operational state and its standby mode.
Using the Eject button, m, a disc in the
CD drive or also a USB storage medium
is ejected and can be removed from the
S37.
Pressing the Home button S returns
you simply and quickly from all menu
levels to the Home menu.
The LED lights up as long as a button is
pressed and/or when an IR code is sent.
The exception to this is the remote
control programming mode.
Following a uniform principle, you can
operate the system from all areas of the
M117/S37 with the Arrow buttons 7,
8, 6, 5, the G button, the Back
button 1 and the Menu button A .
The Select button R selects entries
from the archives. The Delete button 4
deletes individual entries or multiple
entries previously selected with the
Select button.
Currently, the Mode button does not
have any function with the S37.
You can control the M117/S37 volume
across all sources with the Volume
buttons C, j and s .
Function buttons in general
There are several buttons on the remote
control that function irrespective of the
Revox Joy S37 Audio Server
Page 12
Revox Audio Server
The direct selection buttons facilitate
fast access to the different functional
areas of the M117. For the S37 Audio
Server only the Music archive button is
required.
X
V
N
B
r
i
p
Remote control
T Stop Timeshift/recording
E D 30 second skip
f e Zoom
TV
Movies archive function buttons
Movies archive
For Revox M117 only.
Radio
In addition to the general applications,
the following buttons are available
within the Movies archive:
Music archive
Pictures archive
Internet
DVD playback
TV function buttons
For Revox M117 only.
The following buttons are also available
within the TV application:
0 Audio format switching
U Picture format switching
l Display of the Timeline EPG
W Display of Teletext
K Picture-in-picture mode
c Last channel
h Additional information
I H Programme change
O Start recording
L Play
J Activate Timeshift
Revox Joy S37 Audio Server
0 Audio format switching
U Picture format switching
h Detail information
L Play
J Pause
T Stop
E D Skip to the next movie in a play
list
f e Fast forward/Fast reverse
Music archive function buttons
In addition to the general applications,
the following buttons are available
within the music archive:
h
L
J
T
O
Detail information
Play
Pause
Stop
Start recording a CD
Page 13
Revox Audio Server
ED
Skip to the
a play list
Remote control
next
track
in
f e Fast forward/Fast reverse
I H Move entry within a list
Pictures archive function buttons
For Revox M117 only.
In addition to the general applications,
the following buttons are available
within the pictures archive:
h Detail information
L Play
J Pause
T Stop
E D Skip to next picture
f e Rotate picture
I H Zoom picture
Controlling TV devices
You can switch the function mode of the
remote control using the Function button
t in order to allow you to operate a
television.
You will find details of how to program
for your personal television in the TV
programming chapter.
Revox Joy S37 Audio Server
Page 14
Revox Audio Server
Remote control
Remote control overview
Revox Joy S37 Audio Server
Page 15
Revox Audio Server
Home menu
All the functions of the Revox Audio
Server are controlled from the music
archive.
Home menu
Alternatively, you can return to the Home
menu with the Back button 1.
Depending on your current position
within the menu structure, you may have
to press the Back 1 button several
times.
Standby mode
In order to change the archive type, you
can move to the far left using the 7
control button and activate the Select
menu.
You can select between different views
in the Select menu:
•
•
•
•
•
•
•
•
•
Artist
Album Artist
Albums
Genre
Composer
Recently added
Playlists
Folder
File manager
Using the Home button S, you can jump
directly back to the Home menu from
practically any menu and then make
another selection.
If a function in the Revox Audio Server
should lead to an inconsistency, the
application jumps back to the Home
menu and reinitialises itself.
Revox Joy S37 Audio Server
As long as it has power applied through
the external power supply unit, the
Revox Audio Server is always
operationally ready so that network
players, e.g. the Revox Joy Network
Receiver, can access the audio server
quickly. A blue status LED indicates that
the Revox Audio Server Entertainment
System is in standby mode. The S37 can
be booted up from standby or put into
standby using the Power button M.
Settings
The Revox Audio Server is configured
through the Settings menu. You access
the Settings menu using the Menu
button A.
Many important parameters such as the
television resolution or the audio output
formats are defined here. You will find
further information about this extensive
topic in the "Settings" chapter.
Help
You can display the S37 Operating
Manual in PDF format on the S37 through
the "Help" option. The Help function is
context-sensitive so that it opens at the
Page 16
Revox Audio Server
Home menu
place relevant to the position where you
called the function from.
You navigate through the Operating
Manual using the arrow buttons and
return to the previous menu with the 1
Back button.
Revox Joy S37 Audio Server
Page 17
Revox Audio Server
General settings
General settings
System
The basic configuration of the Revox
Entertainment System is done through
the Settings menu. As a rule, these
settings only have to be made once.
In System settings, you can define the
system language, the date and time, a
screen saver, a switch-off timer and the
settings for the front display panel and
any data backup you may want to make.
You can branch directly to the System
settings from the Main menu and from
the archive menus. Tap on the Menu
button A and then select the menu item
"Settings" from the available options.
The Revox Entertainment System offers
the following entries in the basic
configuration:
•
•
•
•
•
System
Display
Audio
Network
Music
Operating the menu
You navigate to the desired entry with
the arrow buttons. The currently
selected entry is highlighted by a blue
border. A selection is confirmed with the
G button so that an entry can be made
using arrow buttons or a keyboard. A
text entry can only be made if there is a
cursor flashing in the blue-highlighted
field. When the input is complete, this is
confirmed by pressing the G button
again. You can leave the menu level at
any time with the Back button 1.
Revox Joy S37 Audio Server
Currently, German, English, Russian and
Hungarian are available as system
languages. Most of the language fields
are displayed immediately in the chosen
language. Some system fields are only
updated after a restart.
If you want to make a change, highlight
the Language area and confirm your
selection with the G button. Select
your choice of language with the 5, 6
arrow buttons and confirm this with the
G button. You return to the selection
column with the 7 arrow button.
The Country setting helps to find the best
possible album meta data, as many
albums from bigger artists are produced
in different versions, sometimes even
with different tracks and covers.
You can set up your S37 in terms of the
keyboard requirements through the
keyboard selection option.
You can set the date and time through
the next menu item. These are
essentially fetched over the Internet. If
the S37 does not happen to be
connected to the Internet, you can enter
the time manually. Highlight the
corresponding checkbox with the arrow
buttons, confirm your choice with the G
button and modify the entry with the
Page 18
Revox Audio Server
arrow buttons or the number keypad F
on the remote control. When the input is
complete, confirm your setting with the
G button.
Through the "Screen saver" option, you
can define whether and after what
timeout a screen saver should be
activated to protect your television from
the burn-in effect. The time selection
defines the timeout after the last button
operation or the last mouse click until
the screen saver should be started. The
screen saver is cancelled again
immediately by pressing on a button. The
screen saver is not activated while a
movie is being shown or during a
television programme.
Using the switch-off timer, you can
define when the Revox Audio Server
should automatically be switched to
hibernation. "Never" means that the S37
is always operational except when it is
manually switched off. The switch-off
time defines the period of time during
which no activities are carried out.
Activities are:
• Music playback
• Any button action, any remote
control action and any mouse click
• Audio or video
Revox Joy S37 Audio Server
General settings
In exceptional cases, the switch-off
timer can nevertheless be active during
long recordings.
Before the unit is actually switched off,
an information window is displayed for
an appropriate length of time. If a button
is pressed while this information window
is displayed, the switch-off timer is
cancelled and the system continues to
run.
The Front display option in the general
settings allows you to define the light
strength of the front buttons and the
sensitivity of the proximity sensor.
The Brightness entry controls the
brightness of the buttons and the USB
icons on the front panel. Using the "Auto
dim" menu item, the front lighting can be
set so that the button lighting is dimmed,
in order, for example, to prevent
unwanted light sources impacting on
home cinema presentations.
The S37 has a proximity sensor. As you
approach the unit, the operating element
backlighting is activated, even without
touching the panel. The "Sensitivity"
setting allows you to set the sensitivity of
the proximity sensor's reaction level.
The Data backup option is a very
important menu. You can back up the
data on your S37 Audio Server onto a
connected NAS or USB drive through
this option.
The data backup is activated by
checking the box and giving the S37 the
backup path.
Page 19
Revox Audio Server
The S37 carries out a daily backup if it is
active at the set time. Backups are made
incrementally. This means that only
changes made since the last backup are
saved.
Changes made over a period of 30 days
can be restored.
The last menu item under System
Settings allows you to define a switchon and a switch-off timepoint for the S37.
The S37 is powered up at the defined
switch-on timepoint and powered down
again at the switch-off timepoint. If the
S37 is active at the switch-off timepoint,
e.g. playing music or copying, the S37 is
not powered down and this process is
then carried out at the defined timepoint
on the following day.
This option gives you energy savings.
But also, powering the device down,
reinitialises the internal memory and
ensures a stable overall behaviour, in
comparison to continuous operation,
even though the S37 has been designed
to operate on a continuous basis.
General settings
immediately, particularly if the picture
display device was not switched on
when booting the S37 up during the
initial commissioning or if a new cable is
plugged in while the unit is in operation.
In this case, we recommend restarting
the S37. While booting up, it can happen
that the S37 carries out a restart itself, in
order to store the new display
parameters permanently. Do not
interrupt this process until the start-up
screen is displayed permanently.
You define the required picture output
resolution through the Picture resolution
menu item. We recommend using the
setting for the native resolution of the
television or projector. The scaling is
then carried out in the Revox Audio
Server and the best possible picture
quality can be ensured. The factory
setting is 1024 x 768 as this setting is
supported by most televisions. In this
way, the user interface display on most
picture display devices doesn't fill the
entire screen at the factory setting.
You configure the matching up of the
Revox Audio Server with your picture
display device, which as a rule, is a
television or a projector. Normally there
is only one option available under video
output. If several options are available,
you should select the one that matches
your hardware connection.
Pressing the Home button S for 10
seconds and then pressing "1" switches
the resolution back to 1024 x 768, even
without any screen display. This
emergency switching option was
implemented in order to ensure that a
display could be restored, if a resolution
had been selected that the connected
picture display device did not support.
The switching process takes a few
seconds.
It can happen that a new video
connection
is
not
recognised
You can set the output frequency to
meet the requirements of your television,
Display settings
Revox Joy S37 Audio Server
Page 20
Revox Audio Server
through the "Refresh rate" menu item.
You should only set the parameter if
there are display problems with picture
reproduction at a specific frequency.
Normally, this parameter is set
automatically between the picture
display device and the S37.
Audio settings
You match the audio output of your S37
with your amplifier through the Audio
setting menu. The S37 offers three audio
output options: analogue, digital optical
or HDMI. Make sure that the entry made
through this menu item matches the
actual cabling.
The factory setting for the audio
resolution sampling rates are 44.1 kHz
and 48 kHz. If your amplifier supports
higher sampling rates, you can also
select 96 kHz and 192 kHz. These settings
only affect the audio outputs on the S37
itself. The audio stream sampling rates
are not affected.
General settings
the amplifier, as with most of the other
sources.
Network settings
You connect the Revox Audio Server
into an IT network through this menu
item. You define the designation that is
used to identify the Revox Audio Server
in the network through the Device name
input. The factory setting for this
parameter is S37 followed by the serial
number, e.g. S37-12345. This ensures
that the name is not duplicated in the
network. You can also define the
Workgroup from your IT network in the
Device name area. The predefined
setting is "Workgroup". We recommend
that the S37 should operate in the same
Workgroup as the other devices in your
network. This significantly increases the
speed when identifying and searching
for other network components.
The volume control for the audio output
can be fixed through Volume control.
First, select a suitable volume while the
S37 is in play mode. We recommend
setting the S37 volume to the maximum
level, in order to achieve the best sound
quality.
Through the IP Address/DHCP selection,
you define whether the S37 should get
its IP address by DHCP from your router
(Revox recommends using this setting)
or whether you want to assign a static IP
address. If necessary, please refer to
your System Administrator on this point.
You can also read out the S37's IP
address in this menu. Using this address,
you can access the S37's data levels
from external computers. You will find
further information about this topic in the
"File access" chapter.
Then fix the volume in the Settings menu.
From this point then, the volume control
is no longer done at the S37 but through
An UPnP server is installed on the S37.
As the factory setting, this UPnP server
is activated but can be deactivated if
Please also note the limitations of the
different audio outputs in the "Unit rear
panel" chapter.
Revox Joy S37 Audio Server
Page 21
Revox Audio Server
required, if you only want to use the
audio server over the integrated audio
output. If you want the S37 to be visible
to other devices in the network, the
UPnP server should be activated by
setting the appropriate parameter.
Advice for customers who use a Revox
Multimedia module: The "UPnP-AV
Server" option must be activated so that
the S37 is recognised by the Joy network
receivers or the Multimedia module. If
the UPnP server is activated, S37 music
can be played in each room of a Revox
Multiroom
System
through
the
Multimedia module or the Joy products.
General settings
available data, you create a playlist or a
picture album. The next time the playlist
is called however, the laptop may be "on
tour" and cannot make its content
available to the S37.
For this reason, Revox recommends that
ideally, you should create a central
archive for all your data on a NAS
storage medium that is always available
to the S37.
Under Settings, navigate to the Media
source entry and highlight the option
"Add new source".
Music settings
Within the music settings you can define
the ripping parameter as well as the
location of additional network storages.
In the menu “Music sources” you can
add any NAS or USB storages. Added
content will be visible in the S37´s
database even if the data itself are not
on the local hard disc.
Enter an individual name for the source
in the next dialogue window and enter
the folder path. Alternatively, you can
search for the folder in your network
using the Search function.
Managing media sources
Please note that while it is possible to
integrate as much external storage
media as you want, you should give
some thought as to how sensible it is to
integrate mobile storage devices that
may have very dynamic contents.
Example:
You connect a laptop to the network and
make the audio, video and/or picture
content available to the S37. Using the
Revox Joy S37 Audio Server
If you take the "Search" route, the
following window shows you the options.
If your data is to be found on the
network, highlight the Network option as
shown below and confirm your choice
Page 22
Revox Audio Server
with the OK button on your remote
control.
General settings
Through the Settings, you can define
what else the S37 should do when a CD
is inserted. You can choose from the
following options:
Now search step-by-step for the desired
folder, using the arrow buttons and the
G button.
Once you have selected the folder, you
can enter the Username and Password
to enable the folder to be shared.
Then press the "Save" button.
Following this, the new name is available
to you in the media source selection.
Auto Start - Disc
A further comfort function was
implemented in Version 1.5 of the S37
Audio Server software, in respect of
inserting a CD.
Revox Joy S37 Audio Server
No action - With this selection, the CD is
read in but no further automatic function
is carried out. You can then decide later
whether the CD should be copied or
played.
Copy disc - With this selection, which is
also the factory-setting, the CD is
automatically copied after being
inserted. You can then define under
Audio CDs which audio format and
which process should be used for the
copying.
Play disc - Sometimes, even though you
have the comfort of a large data archive,
you just want to play an audio CD and
simply use the CD player function. This
can be controlled manually, or, if you
want to do this on a regular basis
automatically after inserting a CD, you
should activate this function.
Select action - After inserting a CD, a
selection menu appears on the graphic
user interface where you can select
from the three options mentioned above.
Page 23
Revox Audio Server
Storage location for audio CDs
Taking local copyright regulations into
account, you can copy music with the
S37 and store it onto internal or external
discs. You will find details about the
copying process in the "Recording a CD"
chapter.
The user is exclusively responsible for
complying with the regional copyright
legislation.
If you want to copy music onto an
external storage medium, you first have
to create the path under Music sources.
When you have done this, this memory
location then appears in the list and can
be selected accordingly.
General settings
ejected from the drive
recording is complete.
once
the
You can select from various recording
options including quality and bitrate.
Here you have to find the best solution
for yourself as a compromise between
audio quality and memory usage.
The factory setting of MP3 and a Bitrate
of 320 kbps gives you a format that is
widely used and that is supported by
many playback devices, both mobile and
stationary.
The FLAC and WAV formats can also be
set.
In this way, the music database can be
expanded essentially to any size.
Recording audio CDs
You define how a recording should be
done in the "Copying audio CDs" menu
item.
If you select "Copy CDs automatically", a
CD is copied to a defined storage
location automatically when it is inserted
into the CD drive, without any further
confirmation being required.
If the "Automatically eject CD" option is
activated, the CD is automatically
Revox Joy S37 Audio Server
Please note that with FLAC and MP3, the
Revox metadata is written into the music
file. With WAV, this is not possible
because of the file format.
As a result of this, the MP3 and FLAC
files can be written onto other storage
media without any restrictions. With
WAV files, you have the maximum audio
quality but when playing them on other
devices, you may have a restriction in
terms of the metadata.
Extended settings
Press the Menu button A on the
settings pages again in order to get to
the extended settings.
Page 24
Revox Audio Server
General settings
•
•
•
•
•
•
•
Total capacity of the S37
Used storage space
Free storage space
Number of audio tracks
Product name
Product serial number
Current software version of the
Revox Audio Server.
With Import/export settings, you can
store individual settings to an external
storage medium and then import them
again if required.
The menu gives you the option to make a
manual search for updates for your S37.
You will receive a notification from
Revox through the user interface in the
case of a firmware update. If you don't
want to carry out the update at that
point, you will have to start it later
manually.
In rare cases, it is sometimes necessary
to set up the media library again if one of
the added sources is missing or in the
case of larger deletion processes. You
can start the setup process under the
option "Set up media library again". This
can take several minutes, depending on
the size of the database. Please wait
until your albums are displayed on the
user interface again.
System information
The System information menu item offers
an overview of certain basic information
such as:
Revox Joy S37 Audio Server
You return to the previous menu with the
1 button.
You can also return the S37 to its factory
settings in the menu.
You can also call this function with the
remote control if the S37 has been so
incorrectly configured that it is no longer
possible to display anything onscreen.
To do this, press and hold the Home
button S on the remote control for 10
seconds, followed by the "0" button from
the number keypad.
The system does not create any
confirmation window as it may not be
possible to display this if the screen
configuration were wrong.
Page 25
Revox Audio Server
General settings
Your data is not lost by resetting to
factory settings. However, the defined
network connections are lost with the
result that to start with, any data on
external storage media is not visible
following the reset.
Advice on settings
After changes are made to the settings,
they are normally effective immediately.
However, they are only stored
permanently following a correctly
executed shutdown.
If the S37 is separated from the mains
through the power switch or if it has to
be shut down following a system
conflict, it can happen that the changes
have to be made again.
Revox Joy S37 Audio Server
Page 26
Revox Audio Server
Music archive
The Revox Audio Server administers
your music collection through the Music
archive. Music can be selected with just
a few button presses and using a clear
operating structure.
It is not visible for the user whether the
music is stored on the S37's local disc or
on other storage media in the network.
You simply navigate the music archive
and the Revox Audio Server plays the
music through one of the audio outputs
or serves as a UPnP Server.
Building up the media library
You can integrate music into the Revox
Audio Server media library by recording
from a CD, by importing from an external
storage medium and by establishing
links. When you record from a CD or
when you import from an external
storage medium, the data is stored on
the S37's local drive. When you establish
links, the data is located on an "added
music source".
Recording a CD
You can copy audio CDs onto the S37's
hard disc with the Revox Audio Server.
Please note that the S37 offers
comprehensive options for creating a
recording of audio CDs but the final
responsibility for complying with the
copyright requirements rests with you as
customer. Normally, audio CDs are
subject to a Copyright that controls what
Revox Joy S37 Audio Server
Music archive
types of copies can be created and for
what purpose.
Automatic recording
In order to facilitate recording on the S37
without the TV having to be switched on,
Revox offers an automatic recording
function that you can activate under
Settings / Music. You will find details
about this in the "Copying audio CDs"
chapter.
Using this setting, the CD is recorded
automatically in the background and at
the same time, the data is converted into
the desired audio format.
If the CD has already been recorded, it is
ejected again.
Manual recording
A manual recording offers the advantage
that some of the processes can be
influenced. For this it is required to
connect the S37 to the TV to make use of
the GUI.
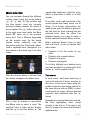
To start a manual recording, insert a CD
into the S37's CD drive and wait until the
dialogue window opens (deactivate the
automatic recording in the settings).
If you want to record the CD, select the
second option and confirm your choice
Page 27
Revox Audio Server
with the G button. You can close the
dialogue window without carrying out
any further action or if you just want to
listen to the CD briefly, you can play the
CD through once without recording it.
Please note that with the play "Audio CD"
option, the music can only be played
through the local audio output. In this
case, an audio stream is not available.
Music archive
you will find in the chapter “Edit
metadata”.
The processing of the individual tracks is
shown in the display while recording.
Tracks that have already been
processed are identified as "Imported".
The progress bar relates to the track that
is currently "being processed".
Once all tracks have been recorded, the
CD is ejected, if the automatic eject
option is activated under Settings and
the system switches to the "Import audio
CD" screen. From here, you can record
further CDs or return to the Archive view
by pressing the Back button 1.
Record view
Once you have chosen to record to the
hard disc, a screen opens where all the
tracks on the CD are marked for
recording.
You can switch between the Recording
menu and other menus at any time as
the recording process doesn't have to
happen in the foreground.
You can exclude each track individually
from the recording by marking the title
with the blue border and then
deselecting it with the select button R.
If you press the select button R again,
the track is selected for recording again.
If you press and hold the select button
R for a longer time, you can
select/deselect all tracks.
Press the record button O to start the
recording of the selected tracks.
At this level you have the opportunity to
manually change the metadata of the
track or even the entire album. Details
Revox Joy S37 Audio Server
If you wish to return to the Recording
view, you can press the record button
O on the remote control or alternatively,
you can navigate back there through the
Import audio CD option in the
Import/Export menu.
If a recording is possible or is running,
the record button is shown in the lower
status bar.
Page 28
Revox Audio Server
Cancel recording
You can end the recording process at
any point. To do this, press the Stop
button T. If you cancel the recording
manually, you also have to eject the CD
manually by pressing the Eject button
m.
Importing files
Music archive
In the next step, you can choose
between importing an audio CD or
importing tracks.
By selecting the audio CD option, a CD is
recorded (see also the "Recording a CD"
chapter). Selecting the track option on
the other hand, allows one or more files
to be copied from another storage
medium onto the S37.
As well as the classic ripping function,
the S37 Audio Server also offers the
option of importing available music files
onto the local hard disc.
You can call a further menu from the
Play, Record or Browse views using the
Menu button A.
Within the menu, you will find the option
"Import/Export". Select this option.
Select a storage medium and navigate to
the folder or the track that you want to
import.
Highlight your selection with the blue
border or in the case of multiple
selections from different folders, mark
the folder/files using the select button
R.
The import process can be started by
pressing the Record button O.
Revox Joy S37 Audio Server
Page 29
Revox Audio Server
Music archive
The progress of the import process is
shown on screen. You can stop the
import process at any stage by pressing
the Stop button T.
When the import process is completed,
the imported files can be found in the
audio server's music library.
Semi-automatic import from USB
If you connect a USB storage medium to
the S37, the following screen opens after
a short time.
Select an option and confirm your
choice with the OK button G.
All further steps can be carried out, as
described on the previous page.
Revox Joy S37 Audio Server
Page 30
Revox Audio Server
Music archive
Browsing for music
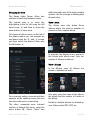
View - Artist with album
After the Joy Audio Server starts up, you
will see one of nine possible views
where you can search for music.
The default view is the Artist with album
view. In this view, the artists are shown
in alphabetical order. For each artist,
there is information about how many
albums and tracks they have stored in
the music archive. These albums can be
albums which only contain tracks from
the artist in question or they can be
albums, which contain at least one track
by the artist in question, as with
compilation albums for example.
If the device starts up with the factory
setting, the "Artist with album" view is
shown.
Views
Music can be searched for and
administered in the music archive
through seven different views.
A scroll bar at the right side helps to
estimate the scope of the archive.
An Album/Artist entry
following information:
offers
the
These are:
•
•
•
•
•
•
•
•
•
Artist view
Artist with album view
Album view
Genre view
Composer View
"Recently added" view
Playlist view
Folder view
File system view
Revox Joy S37 Audio Server
•
•
•
•
The name of the artist
The number of albums
The number of tracks by the artist
Cover - If there are several albums by
the artist available, a "slide show" of
the covers of the available albums is
shown in the blue border.
Page 31
Revox Audio Server
Changing the view
The Revox Audio Server offers two
methods of switching between views.
The easiest way is to move the
highlighting to the far left using the left
hand arrow 7 and then to press the
same button 7 once more.
Music archive
within the menu one of the eight possible
options - the file manager is missing with
this selection.
View - Artist
The Artists view only shows those
albums where the artist in question is
present on the complete album.
This opens a fold-out menu on the left of
the display where you can navigate up
and down using the 5 and 6 arrows
and then select the desired view with
the OK button G.
In principle, the display is very similar to
the Artists with album view. Only the
number of albums is reduced.
View - Albums
In the Albums view, all albums are
shown in alphabetical order.
Your selected setting is stored and then
appears as the opening screen the next
time the audio server is started up.
The other, somewhat more involved
method is through the menu, using the
menu button A. Select “View” and
Revox Joy S37 Audio Server
One entry gives the name of the album,
the artists and the number of tracks on
the album.
Double or multiple albums are divided up
over folders called CD1, CD2, etc.
Page 32
Revox Audio Server
Essentially, a display is always
dependent on how the album's metadata
is set up and administered.
View - Genre
The Genre view offers you the possibility
of searching based on a particular type
of music.
Music archive
But the Revox Audio Server also offers
this option because this search criterion
is very important for lovers of classical
music.
View - "Recently added"
You have bought a new CD and added it
to the Music archive. Now you would
like to find this CD quickly. Select the
"Recently added" view and there you will
find all music that has been added in the
last 30 days.
Within the archive, you can highlight all
titles using the navigation buttons and
then play them.
You see the following information in the
display:
• Genre designation
• The number of albums
• The number of tracks on all the
albums
The cover of the first album within the
genre is used as the Genre cover. Of
course, a slide show of all the covers
from this genre is also shown, when the
genre is highlighted.
View - Composers
This view is identical to the previous
views except that the composers are
shown in alphabetical order as the
display criterion.
The recording date is included in the last
column, in order to provide an even
better overview.
View - Playlist
This view shows you all your individual
playlists that you can create quickly and
simply from the various views.
Unfortunately, composer data is
incomplete in all available databases
and is not maintained consistently.
Revox Joy S37 Audio Server
Page 33
Revox Audio Server
Music archive
View - File system
In the File system view, you can see all
possible paths that are available through
the Revox Audio Server, including
connected USB and network storage.
You see the following information in the
display:
The display is done using the same
structure as how the data is stored on
the hard discs.
• The name you assigned to the playlist
• The number of tracks in the playlist
• A slide show of the available covers
runs in the marked play list.
If music albums are not available
because for example, the external
storage medium is not connected or not
switched on, the content is identified
correspondingly by a cross contained
within a circle.
Within the File system view, you can very
easily highlight and then copy, delete or
move files and folders. You will find
further information about this topic in the
"File manager" chapter.
These pieces are simply skipped during
play.
View - Folders
The folders view shows the music
sources that have been set up under
Settings / Music. The basis for the
navigation here is the folder structure,
not the list structures as arranged by the
UPnP server.
You can also see where the files are
physically stored in this view.
Revox Joy S37 Audio Server
Page 34
Revox Audio Server
Music selection
You can navigate through the different
archive views using the arrow buttons
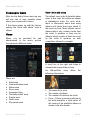
6, 5, 8 and 7. The scrollbar and
the blue border round the currently
selected artist(s) visualise the status of
the navigation. The G button takes you
to the next menu level while the Back
button 1 takes you to the previous
menu level. This is different depending
on the archive view. As the whole
system works uniformly, only the
navigation within the "Artist with album"
view is explained here. Navigation to a
track works in the same way in all other
views.
Music archive
system then switches to the Play view,
which is described in detail in a later
chapter.
A scrollbar on the right hand side of the
screen shows how many tracks are to
follow. If no further interventions are
made by the user, the album is played to
the end, track for track, starting from the
selected track. Once the album has
finished playing, you have to make a
further selection from the Music archive.
Music playback doesn't have to start
from one track. It can be started from
other levels:
• Playback of all the tracks of one
artist
• Playback of a complete album
• Playback of a genre
• Playback of a playlist
To do this, highlight your desired entry
and start playback by pressing the Play
button L on the remote control.
Then the desired album is selected and
the display changes to the Album view.
The 5 and 6 buttons are used within
the Album view to select a track. The
selected track is then started directly
with the G or the Play button L. The
Revox Joy S37 Audio Server
Text search
In most cases, text-based searching is
very quick and easy in larger archives. In
this case, a text can be input using the
number keypad on the remote control (in
the same way as with an SMS), or more
conveniently by using a Revox wireless
keyboard and confirmed with the G
button
Depending on the text that was entered,
the blue highlighting either jumps
directly to the text or if the text is not
found, it jumps to the entry that follows it
alphabetically.
Page 35
Revox Audio Server
Music archive
Creating playlists
You can create an unlimited number of
playlists from music tracks in the Music
archive on the Revox Joy Audio Server.
You can give individual names to the
playlists and then later choose one of
them to listen to through the Playlist
view.
Individual letters, the start of words or
complete words can be entered. The
search criterion is always based on the
start of the character string.
Search function searching
You can search for part of a word in the
menu using an extended search
function. By entering "summer" for
example, all tracks that contain the word
"summer" will be displayed, irrespective
of where in the title the word appears.
You will find details of this search
method in the "Searching for entries"
chapter.
Then all tracks within the playlist are
played one after the other.
Please note that the playlists themselves
do not contain music. They just point to
individual musical tracks. It only makes
sense to include tracks in a playlist that
are either on the S37's hard disc or are
on other storage media that are
permanently connected to the S37. Using
music from a mobile device like a laptop
for example, which is only connected to
the network from time to time, means
that the playlists don't play cleanly.
You can select music from any archive
for inclusion in a playlist. You can
include individual titles, complete albums
or all the tracks from an artist into a
playlist. To start with, highlight your
selection(s) using the arrow buttons and
then confirm your selection(s) with the
Select button R. The selections are
now shown in the display with a small
tick next to them.
You will find details about the selection
process in the "Selecting entries"
chapter.
The selections can now be applied to a
playlist. To do this, press the Menu
Revox Joy S37 Audio Server
Page 36
Revox Audio Server
Music archive
button A on the remote control or
elsewhere in the system.
After this is done, you call your playlist
directly from the Playlist view and start
playback.
Highlight the second entry in this menu
"Add to playlist" in the usual way. This
opens a further window that displays the
basic entry "New playlist" along with all
existing playlists.
In order to sort the playlist according to
your personal requirements, switch to
the Playlist view and call a playlist.
Through this view, you can then move a
highlighted entry (blue border) with the
H and I buttons.
This process is even more convenient if
you start it from the Play view because
here, the fact that the cover is shown in
front of the track, gives you an even
better overview.
This dialogue window offers you the
choice of adding the selections to an
existing playlist or creating a new
playlist. No more entries are needed if
adding to an existing playlist.
If you want to create a new playlist, a
dialogue window opens where you can
define the name of your playlist.
Revox Joy S37 Audio Server
Page 37
Revox Audio Server
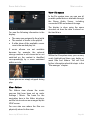
Playing music
All the actions described here cause
music to be played through one of the
audio server's three audio outputs,
analogue, optical or HDMI. If you want to
carry out playback over UPnP, please
read the "Audio streaming" chapter.
After you have selected music from one
of the archives and started playback
with the Play button L, you can then
start searching around in your archive
for other music.
You can always switch to the "Currently
playing" view while music is being
played. To do this press the Menu button
A and then, by using the navigation
buttons and the G button, select the
option "Play" and then "Currently playing"
from the next level. Alternatively, you
can switch to the "Currently playing"
display using the Music button B on
the remote control or with a mouse click
on the "Currently playing" icon in the
view.
In order to differentiate between the
navigation level and the play level, the
picture of the album is shown on the left
in the Navigation view and on the right in
the Play view. The display title also helps
you to orientate yourself quickly.
Revox Joy S37 Audio Server
Music archive
This screen shows you a progress bar
relating to the current track and you can
carry out control commands in the album
with the following buttons
L
T
E
D
f
e
7
8
Play / Pause
Stop
Previous track
Next track
Fast reverse
Fast forward
5 second reverse skip
5 second forward skip
The S37 audio output level can be
controlled using the Volume buttons s,
j or C on the remote control.
Essentially, the volume can be controlled
through the S37 or through the amplifier,
e.g. Revox Joy S119.
Additional information can be found in
the chapter “audio settings”.
From the standpoint of audio quality, the
best way is to control the volume
through the amplifier and not through the
S37.
You can send further commands to your
Audio Server through the GUI. You are
already aware of the functions from the
preceding chapters:
S
Back to the Main menu =
Carousel selection
A
Opens the Menu level
Page 38
Revox Audio Server
R
h
Highlighting an entry
Information about a track
Music archive
selection has been made, the icon in the
Play view is shown in the corresponding
colour.
The Repeat and Shuffle functions can be
called directly from the Play view with a
mouse click.
Clicking on this icon starts the
Repeat function.
If the Repeat function is
active, the icon turns blue.
Clicking again activates the
Repeat function on an
individual title.
The Shuffle function can also be
activated with the remote control in the
same way.
The Shuffle function is
activated through this icon.
If the Shuffle function is
active, the icon turns blue.
Using the remote control, you can
activate and control these functions
through the Menu A. Press the Menu
button while playback is active and then
select Repeat or Shuffle from the menu.
The tick indicates that the Shuffle
function is active.
Play modes
With the track that is currently being
played, the S37 differentiates between
two basic options.
There are three options in the Repeat
menu. The currently active option is
shown by a white tick. As soon as the
Revox Joy S37 Audio Server
Playing a track that was started from an
archive with the Play button L and
playing tracks that were started from a
selection, in combination with the Play
button L.
The first method causes the selected
piece to be played immediately. The
Page 39
Revox Audio Server
Music archive
second method adds it to the end of a
playlist where all previously selected
pieces are played through first (jukebox).
The selected tracks are added to the end
of the playlist with the Play button L or
the G button.
Standard play mode
Alternatively, you can select the "Play as
next" option through the Menu button A
and "Play". In this way, the selected
tracks are added to the playlist after the
track that is currently playing.
If you select a track from an archive, the
entire album is shown in the current
playlist and the album is played
sequentially, starting from the track you
selected. Once the end of the CD is
reached, playback stops. This is the
usual process when playing a CD.
Playlist play mode
Alternatively, you can select tracks from
an album with the Select button R and
then start playback. In this way, a playlist
is created. This can be extended through
further entries. If Standard play mode is
executed while a playlist is being played,
the system asks whether the playlist
should be stopped, in order to ensure
that the current list is not accidentally
overwritten.
The "Play as last" option appends the
selected title(s) to the end of the playlist.
Through this Play view, you can then
move a highlighted entry (blue border)
with the H and I buttons, in order to
create a customised play sequence.
This process is even more convenient if
you start it from the Play view because
here, the fact that the cover is shown in
front of the track, gives you an even
better overview.
Play menu
You can add tracks to a current playlist
in a number of ways.
Further options are available through the
Play menu selection:
Essentially, one or more tracks must be
selected with the Select button R. If
you are using a keyboard, the selection
is made with the Space bar.
Revox Joy S37 Audio Server
Page 40
Revox Audio Server
Music archive
• The "Eject disc" option causes the
currently inserted CD/DVD to be
ejected from the drive. This function
can also be started from the unit
front panel or from the remote
control with the Eject button m.
• Switch to the “Currently playing”
view. This view shows you all the
tracks from the current playlist. You
can also switch directly to this view
from the Music navigation menu with
the Music button B.
• The "Play" option causes the system
to start playing the currently selected
track(s). You can execute this
selection from the remote control
with the Play button L. The track
that is being currently played is
stopped and the new selection is
played.
• The "Play as next" selection causes
the currently selected track(s) to be
inserted after the track that is
currently playing.
• The "Play as last" selection causes
the currently selected track(s) to be
inserted at the end of the playlist.
This is what would happen with the
music choice with a classical
jukebox.
• The "Play disc" option causes the
medium that is currently in the drive
to be played. Please note that in this
case, the Music archive is quit if
there is a DVD in the drive.
Revox Joy S37 Audio Server
Page 41
Revox Audio Server
General functions
This chapter contains some function
descriptions that were not included in
the general part, in order to improve
readability.
General control
Within the S37 you can control all the
functions using the 6, 5, 8 and 7
buttons, the G button, the Back button
1 and the Menu button A. These
controls are the same across all the
archives.
Normally, the currently highlighted entry
has a blue border around it. Further
functions
principally
affect
the
highlighted entry.
You are frequently confronted with
dialogue windows where a decision has
to be made.
Within such a window, you can move the
highlighting with the arrow buttons and
then confirm your selection with the G
button.
Volume control
The volume can be controlled in various
ways. In many cases, the most
convenient solution is to control the
volume through the audio amplifier. If
you decide to go with this method, you
should always set the S37 volume
controller to 100%, in order to get the
best sound quality.
Revox Joy S37 Audio Server
General functions
Another method is to control the volume
in the S37. The Volume buttons s, j
on the remote control adjust the level of
the S37's audio outputs.
Using the Mute button C, the audio
output can be silenced with a single
button-press. Pressing the mute button
again reactivates the S37's audio output
at the previously set volume level.
Pressing one of the Volume buttons s,
j themselves also reactivates the
audio output.
Selecting entries
In the Revox Audio Server, multiple
entries from an archive can be selected
with the Select button R.
Highlight the desired entries with the
arrow buttons and then press the Select
button R.
Press and hold the Select button R for
about 2 seconds to highlight all the
entries in a folder. In the same way, you
can remove the highlighting from all
selections by pressing and holding the
Select button R for about 2 seconds
again.
This function can also be activated
through the Menu A and the "Select
all/Cancel selection" option.
The number of highlighted (selected)
elements and their total size are shown
for information purposes in a status
display.
Page 42
Revox Audio Server
A white tick in the view indicates that
this folder or music track is selected. A
grey tick under album indicates that
some tracks from the album are
selected, but not all of them.
As long as at least one entry is
highlighted, any subsequent actions are
executed on it/them. This can be
functions such as adding to a play list or
also deleting a selection. Please note
that in this way, it is very easy to select
the complete archive and then to delete
it all with the next step, with only one
confirmation dialogue.
Editing entries
The metadata of the different music
pieces can be edited from the
Information window. To do this, highlight
the entry in question in one of the
archives and press the Information
button h on the remote control.
General functions
To edit an entry mark the corresponding
field with the arrow buttons (blue frame)
and confirm with the G button. The text
can now be changed through the
number pad on the remote control or
through the wireless keyboard, to meet
the new requirements. Confirm the
changes with the G button. You can
then go on to change further fields if
necessary.
After all the desired entries have been
modified, the changes have to be applied
with the "Save" button. Selecting
"Cancel" discards all changes.
Changing several entries
It is often the case that several entries in
one album need to be changed at the
same time. The Revox Audio Server also
has a solution for this eventuality.
Navigate to the album so that all tracks
are visible.
Within the information windows you will
find all the metadata for an album or a
track.
Revox Joy S37 Audio Server
Page 43
Revox Audio Server
Now mark all entries by pressing and
holding the Select button R until a
white tick appears in front of all the
titles. Then press the Information button
h, in order to switch to the Information
window.
All entries that you make and save here
affect all marked tracks. Music track and
track number have been left out
deliberately, as a "multiple amendment"
makes no sense here.
If there are different entries about the
marked music tracks in one field, this
field is marked with <keep>.
General functions
Ideally, the resolution should be not
lower than 300 x 300 and not higher than
500 x 500 pixels.
In the UPnP area, higher resolutions
result in significantly longer loading
times. Lower resolutions often look
pixelated or fuzzy on large displays.
Copy the scanned image of the cover
onto a USB stick. When naming the file,
Revox recommends either using an
easily recognisable name or following
the standard of naming the file as
Folder.jpg.
With the USB stick now plugged into the
S37, you can mark the cover in the
Information window and start the search
for the cover file with the G button.
The entries are not changed after saving
and remain in their original state.
If this entry is overwritten, all marked
tracks are modified with the new entry.
Cover modification
While text changes can be done easily
through the keypad, modifying the cover
is somewhat more involved.
Not all CDs will supply a cover if one is
requested. There can be many reasons,
including for example, that the cover is
copyrighted.
If you nevertheless want to add a cover
in order to find your music more quickly,
the S37 also offers a solution in this
case.
Scan the cover in or search for it
through Google Images, for example.
Revox Joy S37 Audio Server
Work step by step through the following
windows to get to your folder with the
file.
Page 44
Revox Audio Server
Mark the desired file and using G, apply
it to the Information window's select
window.
Then save the changes made.
Modification track by track
If you want to make track by track
changes to an album, mark the first entry
and then call the Information window
using the Information button h.
Make the desired changes. You can
scroll through the album with the
Continue and Back buttons.
General functions
You can also select several entries
across different folders. Highlight the
entry or the folder and then press the
Select button R. After all the desired
entries and/or folders have been
highlighted, you can remove the
corresponding selections with the
Delete button 4. Again, the delete
process has to be confirmed.
Please note that it is not just the entry in
the database that is deleted but also the
file(s), irrespective of whether they are
on the local hard disc or on an external
storage medium.
Please also note that there is no Recycle
bin function on the S37, which means
that once the deletion is carried out, the
data cannot be restored.
Save all your changes at the end.
Searching for entries
Deleting entries
In the case of extensive archives, a
movie, music track or picture cannot
always be found quickly and easily.
If you want to delete an entry from your
database, you first have to select it
through one of the views. Then press the
Delete button 4 on the remote control
and the element highlighted with the
blue border or the highlighted folder is
deleted. A dialogue window first opens
where you have to confirm your intention
to delete, in order to prevent accidental
deletions.
In the menu that can be called from the
Movies, Music and Pictures archives,
the Revox Entertainment System offers a
simple but effective search function
through the "Search" menu item.
When the Search function is selected,
the view changes to show a list
containing all the contents from the
corresponding archive. You can navigate
Revox Joy S37 Audio Server
Page 45
Revox Audio Server
in this list with the arrow buttons. A more
efficient option however, is to make a
text input through the keyboard or the
number pad on the remote control
When you confirm your search text with
the G button, the system carries out a
full text search and then displays a list of
all those entries that contain the entered
text.
This means that if you were to enter
"Love" as the search text, the system
would return the titles "Love is all around
me" and also "All you need is love", for
example.
If the list is too long, a second search
could be started.
The search function works identically
across the three archives but the search
is carried out in different fields.
Music archive:
•
•
•
•
General functions
•
•
•
Genre
Composer
Year
The use of these search fields means for
example, that if you search on "Super
Trouper", the system will find not only the
track with that name but also the album
"Super Trouper" by Abba and the other
tracks on the album.
The search can be cancelled with the
Back button 1.
Inserting a disc
Audio-CDs can be inserted into the S37
drive through the slot on the front of the
unit. You should insert the disc carefully
until about 2/3 of the disc are in the slot
and then the drive pulls the disc in the
rest of the way.
If you feel any resistance when you
insert the disc, you should check out the
cause straight away. Perhaps there may
already be a CD or a DVD in the drive.
Ejecting a disc
A CD or DVD can be ejected from the
S37's drive by pressing the Eject button
m on the remote control, the Disc
button on the front of the unit or through
the "Eject disc" option in the "Play" menu.
To eject a USB drive, mark the drive for
example in the file manager.
Artist
Album artist
Album
Title
Revox Joy S37 Audio Server
Page 46
Revox Audio Server
General functions
Exporting files
The Revox Audio Server also offers a
corresponding function for exporting
data from all three archives to external
storage media.
Now you can eject the USB drive by
selecting the “Menu” and selecting
there the option „Eject”.
If there are multiple storages connected
to the S37, you will first get a list of those
sources, so that you only eject the
desired source.
If a USB source has been selected, the
S37 will confirm as soon as you can
remove the USB device from the server.
Revox Joy S37 Audio Server
Select the desired data in one of the
archives with the Select button R. The
number of files and the data quantity is
also displayed here.
The Archive menu can be called with the
Menu button A in the corresponding
archive (Movies, Music or Picture).
Within the menu, you will find the option
"Import/Export". Select this option. With
the next selection, you find video files,
audio files or pictures to export,
depending on the archive.
The target storage medium is selected in
the next window.
Page 47
Revox Audio Server
General functions
If required, you can create a new folder
on the storage medium with the "New
Folder" button.
The export can run in the background at
any time or it can also be stopped with
the Stop button T.
You can name this new folder according
to your individual requirements.
Refresh an archive
The Revox Audio Server always needs a
certain amount of time to refresh archive
views.
If a newly recorded programme is not
visible or if you cannot see the data
following a larger import, you can
accelerate the updating process by
triggering it manually.
Now highlight the new folder and then
confirm your choice and start the export
process by pressing the G button.
The data is now exported to the new
storage location.
The progress of the export is shown
through a progress bar.
Revox Joy S37 Audio Server
To do this, select the "Refresh" option
through the Menu button A in one of
the archives.
Updating is now done in the background.
In the case of large data quantities, for
example after the first time you connect
to your NAS, this update can take some
time. A progress bar in the bottom right
Page 48
Revox Audio Server
General functions
corner of the display shows you how far
the process has got.
Help
One of the options that you will find in
many menus is "Help".
If you select this option, the Revox
Entertainment System Operating Manual
opens as a PDF file.
You navigate within the PDF document
using the arrow buttons. The Back
button 1 returns you to the page that
you called the Help function from.
Audio streaming
The Revox Audio Server can also
operate as a UPnP server, as was
already mentioned in Settings.
If the UPnP Server function is activated,
media renderers like the Revox Joy
Network receiver or the Revox
Multimedia Module can access the data
that is administered in the S37.
A further strength of the audio server is
the simple combination of several audio
archives into the one device. In this way,
once the archives have been
incorporated, all available music pieces
are accessible through the UPnP service
that is integrated in the S37.
You can find further details about this in
the UPnP Renderer and UPnP Control
Points User manuals, e.g. Revox iOS App
S232 or Revox Android App S235.
Revox Joy S37 Audio Server
Page 49
Revox Audio Server
General information
This
chapter
contains
general
information and advice that should make
operating your S37 easier, together with
help relating to the safe handling of your
valuable data.
File access
There are several reasons why you may
want to access the Revox Entertainment
System file structure directly.
Depending on the configuration of the
Revox Audio Server and your network,
the system's archive data is either
visible or hidden.
Essentially, you can always reach the
S37's audio and video data through its IP
address. You can read this out through
Settings - Network - IP address.
Now enter the IP address of your S37,
preceded by two backslashes "\" into a
file explorer application.
General information
lower case and these parameters
cannot be changed.
Following this, the S37 archive "User
Share" opens. In this folder, you will find
the entries:
•
•
•
Music
Pictures
Video
You will find your data that is stored on
the S37's local hard disc within these
folders. As it is an audio server, you will
correspondingly find only your data in
the Music folder.
You can copy your data from here onto
other media or also copy data from other
media to here in exactly the same way
as you do with your computer.
Please note that formats that the S37
cannot process are copied but are not
shown in the user interface.
If entries are deleted at this level, they
cannot be restored. If the folders listed
above are deleted, this can restrict the
function of the S37.
If these folders have been deleted
without the approval of Revox, you will
be charged for any work required by
remote maintenance to recreate them,
even during the warranty period.
For example
Data backup copies
\\192.168.178.35
The storage medium used in the Revox
Entertainment System is a hard disc.
Large quantities of data can be stored on
this hard disc. A lot of this data will be
very important to you and in the event of
Now a window opens on your computer
where you have to enter a Username
and Password. Please use "revox" for
both of these inputs. It must be written in
Revox Joy S37 Audio Server
Page 50
Revox Audio Server
General information
a hardware defect with the hard disc
may be irretrievably lost.
For this reason we recommend that you
make regular backups of the S37's "User
Share" folder, in order to have your data
available to you again if the S37's hard
disc should fail.
In this respect, you should think
particularly about your personal pictures
and also about any data that you have
bought online and where you do not
have an original in the classical sense of
the word, like with an audio CD, for
example.
Also within the warranty period, Revox
can offer a warranty on the hardware
but not on the data.
Therefore, you should make regular
backups of the data that you value.
If you have very extensive archives, your
specialist dealer can also give you
advice on the subject of external data
storage in the shape of NAS drives.
Revox Joy S37 Audio Server
Page 51
Revox Audio Server
Abbreviations & terminology
GUI
Graphical User Interface describes the
onscreen
dialogue
that
allows
interaction between the user and the
system.
HDMI
High Definition Multimedia Interface has
been developed for the fully digitalised
transmission of audio and video data.
The newest HDMI standard also allows
data transmission.
Abbreviations & terminology
USB
Various components and devices
communicate and exchange data with a
computer over the Universal Serial Bus.
WLAN
A Wireless Local Area Network is a
network that connects computers and
devices in a limited geographical area
without using cables. In some countries,
the designation WiFi is also used.
LAN
A Local Area Network is a network that
connects computers and devices in a
limited geographical area using cables.
NAS
NAS is the abbreviation for Network
Attached Storage and means that it is a
storage medium, usually hard discs, that
can be accessed over the network.
OSD
OSD stands for On Screen Display and
designates an element of a user
interface that is displayed on the screen.
URL
URL stands for Uniform Resource
Locator. URLs identify and localise a
resource that can be accessed by
devices in computer networks.
Revox Joy S37 Audio Server
Page 52
Revox Audio Server
Service
If you should experience problems
operating the S37 that you can't solve by
reference to the Operating Manual, your
first point of contact is always your
specialist dealer.
Online support
If the problem cannot be resolved with
the Operating Manual or with the help of
the specialist dealer, Revox also offers
online support for the Revox Audio
Server.
You should use this function before
taking the step of returning the unit to
the Revox Customer Service department.
Please note that this service is only freeof-charge if it falls under the terms of the
warranty. If the problem is caused by
incorrect configuration, an unauthorised
access to the operating system or by
other actions for which Revox is not
responsible, the customer service costs
will be billed.
Factory settings
In some cases, it can help to resolve a
situation by resetting the Revox Audio
Server to its factory settings. To do this
press and hold the Home button S on
your remote control for 10 seconds,
followed by pressing the "0" on the
number pad.
Service
There is no dialogue window where you
have to confirm that you really want to
carry out the reset because firstly a long
operation time (10 seconds), was
selected to avoid the chance that it
might be done accidentally and
secondly, depending on the problem,
there may not be any display available.
Your data is not affected by this action.
Online update
Revox will offer software updates for the
S37 at irregular intervals. Revox makes
these updates available over the
Internet.
If an update is available, the S37 will
inform you of this fact at start up,
assuming that the S37 is connected to
the Internet. You can then decide
whether you want to download this
update or not.
An online update can also be manually
started through the Menu button A. In
this case, follow the onscreen
instructions.
Under no circumstances should the S37
be separated from the mains power
supply during an update.
Please note that this action resets all the
settings you may have made.
Revox Joy S37 Audio Server
Page 53
Revox Audio Server
Service
Warranty
Disposal
Warranty covers a period of 24 months
from the date of purchase.
The EU Directive 2002/96/EC governs the
correct return, handling and recycling of
used electronic devices. For this reason,
used electronic devices must be
disposed of separately. This device
should not be disposed of with normal
domestic waste. You can take your used
device free-of-charge to recognised
disposal points. You can get further
information about the return of such
devices from your local authority, also in
non-EU countries.
Your specialist dealer is your first
contact if you need service help. If he is
unable to assist you, send your device,
carriage free, without accessories to
your national Sales Office.
Please supply a complete description of
the fault together with your address.
Environmental protection
You can make a significant
contribution to protecting our
environment
by
recycling,
material recovery or other forms of
reutilisation of old equipment.
Please enquire at your nearest municipal
recycling point.
Please note that empty batteries from
the remote control should not end up in
domestic waste but should be disposed
of correctly at designated battery
collection points.
Packaging
We recommend keeping the original box
and packaging material so that if
required, the device can be transported
safely.
Any damage in transit caused by using
insufficient packaging is not covered
under the terms of the warranty.
Revox Joy S37 Audio Server
Page 54
Revox Audio Server
Wireless keyboard
As well as the remote control, the
optional Revox wireless keyboard can
also be used to operate your Revox
Audio Server.
Your specialist dealer can order the
keyboard from Revox for you, under the
Part number 1.554.096.00.
The wireless keyboard is always helpful
if larger amounts of text have to be
entered or when mouse control is
necessary, as for example with the
Internet browser.
To a large extent, you can replace the
Revox remote control by the wireless
keyboard and operate the S37 with the
keyboard entirely.
Keyboard commands
The following table gives you the
corresponding keyboard commands:
RC
Keyboard
8
G
A
1
F
I
H
R
4
h
0
Arrow buttons
Enter/Return
CTRL + M
CTRL + Back
Number pad input
Page +
Page -
Wireless keyboard
RC
Keyboard
U
L
J
T
O
E
D
f
e
s
j
C
S
X
N
V
B
r
i
l
p
W
K
c
m
CTRL + SHIFT + V
CTRL + P
CTRL + SHIFT + P
CTRL + S
CTRL + R
CTRL + Arrow left
STRG + Arrow right
CTRL + F
CTRL + B
CTRL + + (Plus)
CTRL + - (Minus)
CTRL + . (Full stop)
CTRL + F1
CTRL + F2
CTRL + F3
CTRL + F4
CTRL + F5
CTRL + F6
CTRL + F7
CTRL + F8
CTRL + F9
CTRL + T
CTRL + ALT + P
CTRL + L
CTRL + E
CTRL + Spacebar
CTRL + Delete
CTRL + I
CTRL + SHIFT + A
Revox Joy S37 Audio Server
Page 55
Revox Audio Server
Wireless keyboard
Installation
In order to connect the optional wireless
keyboard to the S37, plug the USB
receiver supplied with the wireless
keyboard into one of the USB sockets on
the rear of the S37.
Then insert the batteries into the
wireless keyboard and move the sliding
ON/OFF switch on the underside of the
keyboard to the ON position.
seconds. Following this, you can operate
the S37 through the keyboard.
Sometimes, even after carrying out this
manual synchronisation, the wireless
keyboard still does not communicate
with the S37.
In this case, first press the LED button on
the USB receiver.
During production, the receiver and the
keyboard are synchronised to the same
radio channel.
Now press a key on the wireless
keyboard to test whether it can
communication with the S37.
Manual synchronisation
If the S37 doesn't respond to the
keyboard
command,
a
manual
synchronisation has to be carried out. To
do this, press the pairing button on the
underside of the keyboard while the S37
is switched on.
The LED then flashes three times. Then
press the pairing button on the wireless
keyboard again.
The keyboard should be close to the
USB receiver during this synchronisation
process.
If there is still no communication, please
use the extension cable supplied and
position the USB receiver in such a
position that there is a sight line
between the wireless keyboard and the
USB receiver.
Now the middle LED on the front of the
wireless keyboard lights up for about 10
Revox Joy S37 Audio Server
Page 56
Revox Audio Server
Wireless keyboard
Status LEDs
Connection mode
The status LED on the front of the
wireless keyboard give you information
about the current state of the device.
The switch from standby to readiness
state usually takes just a few seconds
but sometimes can take a little longer.
Pairing LED
This indicates that the
keyboard and the USB receiver are
currently in pairing mode, i.e. resynchronising on a common "radio
channel".
It
goes
out
once
synchronisation is complete.
Mouse function
Transmit LED
This indicates that the
information has been transmitted
successfully from the keyboard, while
operating the keyboard or the touchpad.
Battery status LED
This indicates that the power
left in the batteries has fallen below 2.4
volts. It remains on until new batteries
are inserted or until the batteries are
empty. It only lights up if the keyboard is
not in sleep mode.
Operating modes
Standby
If no keyboard or touchpad inputs have
been made after a timeout of 30 minutes,
the keyboard goes into standby mode
automatically, in order to conserve the
batteries.
You can move the S37 mouse pointer
with the touchpad on the wireless
keyboard. To do this, just slide a fingertip
across the movement-sensitive field and
the mouse pointer will move accordingly.
You can execute a left or right mouse
click using the respective buttons below
the touchpad.
Dual-function keys
Some of the keys on the wireless
keyboard have a dual-function. You can
identify them by the blue printing on
them. You activate/deactivate the
number block with the blue "NUM" key in
the top row.
If the "NUM" function is activated, you
can deactivate it briefly with the blueprinted "Fn" key in the bottom row.
In normal operation ("NUM" deactivated),
you can operate the arrow and page
keys in combination with the blueprinted "Fn" key.
"NUM lock", "CAPS" and "Scroll" are
automatically deactivated after each
restart.
Readiness state
In order to bring the keyboard out of
standby mode, just press any key on the
keyboard (not a mouse button or the
touchpad).
Revox Joy S37 Audio Server
Page 57
Revox Audio Server
Remote control – TV programming
TV programming
Programming by model number
• Press the F and OK buttons on the
remote control for at least 3 seconds,
until the green LED flashes twice.
• Select and enter a 3 digit TV code from
the code list that corresponds to your
television brand.
• The green LED flashes twice to confirm
the code input.
• If an invalid 3 digit code has been
entered, the LED lights up for 3
seconds to indicate an error and the
remote control returns to the original
mode.
• If your television doesn't react or
reacts
incorrectly,
repeat
the
programming and enter the next 3 digit
code from the list.
• If none of the defined codes controls
your television, use the automatic code
search option. See Automatic search.
If no button is pressed for 10 seconds
during programming, the remote control
automatically returns to the original
mode.
Revox Joy S37 Audio Server
Search with manufacturer number
• Switch your television on.
• Press the F and OK buttons on the
remote control for at least 3 seconds,
until the green LED flashes twice.
• Enter the code 0 0 3. The green LED
flashes twice to confirm the input.
• Enter the three digit manufacturer
number from the manufacturer list. The
LED flashes twice to confirm the input.
• Press and hold the Power button until
the television switches itself off.
• Then release the button immediately
and press the OK button, in order to
save the selected television code.
The LED lights up every 1.5 seconds
while the code search is being made.
• If a 3 digit code is not recognised, the
green LED lights up for 3 seconds and
the remote control is reset to the
normal state (error display).
• If your television brand (manufacturer)
is not in the code list, indicated by the
remote control flashing 5 times at the
end of the list, use the automatic
search function.
Page 58
Revox Audio Server
Remote control – TV programming
Automatic search
• Switch your television on.
• Press the F and OK buttons on the
remote control for at least 3 seconds,
until the LED flashes twice.
• Enter the code 0 0 1. The green LED
flashes twice to confirm the input.
The remote control flashes 5 times at the
end of the list.
If no button is pressed for 10 seconds
during programming, the remote control
automatically returns to the original
mode.
• Press and hold the Power button until
the television switches itself off. (This
can take up to 15 minutes)
• Once it has switched off, release the
Power button immediately and press
the OK button, in order to save the
selected television code.
• The green LED lights up every 1.5
seconds while the search is being
made.
If the Power button is not released in
time after the television switches off, the
television has to be switched back on
manually.
The last 5 codes can be called again
with the z navigation button. You can
return to search mode with the y
navigation button.
• Once the correct code has been found,
this has to be confirmed with the OK
button.
• After searching is completed, the
remote control returns to its original
status.
Revox Joy S37 Audio Server
Page 59
Revox Audio Server
Remote control – TV programming
Reading out the code
Reset
To read out an already programmed
remote control (code):
Press the F and OK buttons on the
remote control for at least 3 seconds,
until the LED flashes twice.
• Press the F and OK buttons on the
remote control for at least 3 seconds,
until the LED flashes twice.
• Enter the code 0 0 2. The green LED
flashes twice to confirm the input.
• The 1 button has to be pressed to
search for the first digit in the
programmed code. The LED starts to
flash, e.g. with the code 3 5 6, it
flashes three times.
• The 2 button has to be pressed to
search for the second digit in the
programmed code. The LED starts to
flash, e.g. with the code 3 5 6, it
flashes five times.
• The 3 button has to be pressed to
search for the third digit in the
programmed code. The LED starts to
flash, e.g. with the code 3 5 6, it
flashes six times.
Enter the code 0 0 0.
The green LED flashes twice to confirm
the input.
The remote control is now reset to its
original state.
The television mode now has no function
(no code is programmed).
If the digit has the value 0, the LED
doesn't flash.
If no button is pressed for 10 seconds
during programming, the remote control
automatically returns to the original
mode.
Revox Joy S37 Audio Server
Page 60
Revox Audio Server
Remote control – TV programming
TV codes (sorted by manufacturer)
B
Bang & Olufsen 439 568 586
C
Continental Ed.
818 831
Hitachi Fujian
673
Humax
162 715 716 717 718 719
720 747 753
I
159 818 822 831
ITT
D
Daewoo
155 158 163 165 166 167
168 169 170 171 222 439
442 466 468 526
J
JVC
F
Fujitsu
240 272 563 781 784 804
814
Fujitsu General
272 814
Fujitsu Siemens 500
152
269
439
626
155
272
450
702
159
290
456
793
213 220 246
294 363 437
508 509 526
804
Graetz
413 432 435 493
Grundig
154
246
258
270
369
439
494
159
247
259
339
370
450
498
242
249
262
360
414
465
534
243
250
264
362
430
469
567
244
251
266
364
437
470
734
245
255
267
365
438
481
764
H
Hitachi
169
361
439
470
653
677
683
689
695
701
707
171
382
455
474
671
678
684
690
696
702
708
197
387
456
475
672
679
685
691
697
703
769
Revox Joy S37 Audio Server
211
413
461
492
673
680
686
692
698
704
788
258
432
466
493
675
681
687
693
699
705
794
312
435
468
641
676
682
688
694
700
706
804
200 201 202 203 204 205
206 207 208 209 286 439
635 783
L
Lenco
155 156 158 173 294 439
486 799
LG
465
529
621
628
Loewe
210 229 312 428 429 437
439 446 447 476 482 519
583 588
Luxor
155 284 363 368 382 384
387 390 392 393 398 413
432 435 475 523 539 783
804
G
Goldstar
195 197 251 310 360 382
387 395 635 641 734 783
794 818
492
532
622
630
493
603
623
631
508 509 526
618 619 620
625 626 627
666
M
Marantz
361 431 437 439 491
Matsui
155
286
413
635
737
Medion
382 383 413 432 435 437
468 492 507 508 509 510
543 661 763 780 781 784
159
310
432
636
217
341
435
639
246
343
526
659
247
344
563
731
250
345
604
734
Page 61
Revox Audio Server
Remote control – TV programming
TV codes (sorted by manufacturer)
Metz
246
254
400
492
247
257
401
526
248
258
402
582
251
259
413
583
252
261
432
587
253
399
435
589
433
441
480
550
804
155 176 177 178 179 180
181 246 259 310 437 439
466 470 583 413 432 435
499
NEC
155 290 310 347 610 750
751 752 753
Nokia
146
294
388
395
583
Nordmende
155
368
389
396
635
284
382
390
397
641
285
384
391
398
783
286
386
392
439
790
290
387
393
450
195 312 313 345 437 450
818 820 822 825 827 828
831
O
Orion
147
314
413
442
560
817
155
341
432
445
604
182
342
435
449
734
183
344
437
450
735
294
345
438
481
737
310
353
439
514
764
142
215
322
490
688
146
246
363
516
711
147
286
413
526
735
155
288
437
530
788
210
310
439
540
804
213
312
456
635
824
Panasonic
149
229
235
254
150
230
236
258
225 226 227 228
Philips
258 272 312 407 408 410
411 412 415 417 420 421
422 423 424 425 426 431
Others
438
462
489
562
439
469
526
648
440
470
549
702
312 351 352 354 355 437
439 449 573 574 575 577
578 579 580 581 831
Quelle
150
247
272
284
377
413
438
526
604
780
N
Naim
437
450
484
552
831
Pioneer
590 593 781
Mitsubishi
434
443
481
551
818
155
251
274
310
387
427
439
552
641
789
202
258
279
360
390
431
446
553
648
798
220
259
280
363
392
432
449
560
653
814
229
269
281
365
395
435
450
562
734
828
246
270
282
367
398
437
476
565
735
834
R
Revox
365 437 439 476 781
Roadstar
147 155 268 294 341 413
427 432 435 438 439 449
450 465 508 509 538
Runco
290
S
Saba
210 247 312 313 372 405
508 799 816 818 820 822
827 828 829 830 831
Samsung
155
290
319
327
333
437
526
804
Sansui
155 290 294 310 437 439
P
156
294
321
328
334
439
530
160
298
322
329
335
459
540
161
316
323
330
363
511
712
213
317
324
331
415
512
788
269
318
325
332
419
513
789
231 232 233 234
237 238 239 246
259 437 439 788
Revox Joy S37 Audio Server
Page 62
Revox Audio Server
Remote control – TV programming
TV codes (sorted by manufacturer)
Sanyo
Schneider
155
361
508
634
640
798
213
413
528
635
641
804
269
432
547
636
642
271
435
583
637
659
274
492
632
638
788
310
493
633
639
797
147
294
415
447
469
502
155
361
432
449
470
507
220
362
435
450
471
508
271
377
437
455
472
509
272
406
438
465
481
510
286
413
439
468
485
517
Telefunken
221
395
501
821
831
Tevion
413 432 435 468 508 509
528 547 611 661 749 753
763 780
Thomson
172
360
405
823
216
372
471
826
246
373
803
827
274
374
818
828
280
375
820
831
312
376
822
834
Toshiba
169
317
432
635
652
759
246
338
435
641
653
247
340
437
643
657
249
341
439
646
658
250
365
508
648
659
290
413
509
650
758
526 527 528 531 535 536
544 547 780
SEG
Sharp
Siemens
147 155 213 221 294 362
409 413 427 432 435 436
492 493 565 780 797 799
185 186 187 188 189 190
191 192 193 194 195 196
197 198 199 437 439 653
689 794
Sony
413
501
527
596
455
507
528
644
472
510
529
649
492 493
517 525
535 546
665
279 310 311 437 438 439
552 553 554 555 556 557
558 560 561 562 564 565
566
Tatung
159
439
539
804
Technica
290 413 432 435 492 493
507 510 779
Technics
439
312
418
816
825
313
439
818
826
373
500
820
828
Uher
272 361 365 439 476 560
799 814
Universum
155
266
294
427
439
780
221
268
310
432
450
814
246
269
360
435
469
251
274
383
436
496
258
280
395
437
526
259
284
413
438
562
W
Watson
147 155 282 413 427 432
435 439 450 508 509 780
Whirlpool
372 373 470
Y
Yamaha
T
281
405
814
823
U
246 247 250 251 258 259
266 279 282 437 439 448
470 490 528 547 811
Silva Schneider 155
500
526
547
280
404
781
822
834
648 650 674 686
211 310 326 424 437
449 475 517 524 528
541 547 584 707 788
805
Revox Joy S37 Audio Server
Page 63
Revox Audio Server
Remote control – TV programming
Code table information
This code table only includes a small
extract for the most commonly used
models and brands.
The complete list can be downloaded
free-of-charge from the Download area
of the Revox web site www.revox.de.
Television models that can be
intelligently controlled through the
Re:connect products M200 and M203 are
shown bold, and in italics in the tables.
Revox Joy S37 Audio Server
Page 64
Revox Audio Server
Remote control – TV programming
Manufacturer code list (overview)
Aiwa
113
Akai
200
Bang & Olufsen
131
Blaupunkt
171
Braun
101
Conrac
144
Continental Edison
134
Fujitsu
144
Fujitsu General
164
Goldstar
184
Graetz
166
Grundig
219
Hitachi
225
Humax
150
ITT
195
JVC
162
LG
185
Loewe
163
Marantz
141
Medion
188
Metz
203
Mitsubishi
167
Mitsubishi
194
Motorola
164
NEC
151
Neckermann
201
Nokia
207
Nordmende
182
Orion
212
Revox Joy S37 Audio Server
OTHER_BRANDS
226
Others
211
Otto Versand
220
Panasonic
191
Philips
222
Pioneer
173
Quelle
224
Revox
157
Saba
182
Sagem
119
Samsung
221
Sansui
193
Sanyo
214
Schneider
223
Sharp
179
Siemens
209
Silva Schneider
189
Sony
177
Technisat
157
Telefunken
202
Tevion
188
Thomson
192
Toshiba
213
Universum
215
Watson
175
Whirlpool
120
Yamaha
127
Page 65
Revox Audio Server
Gracenote EULA
Gracenote
This application or device contains
software from Gracenote, Inc. of
Emeryville, California (“Gracenote”). The
software from Gracenote (the “Gracenote
Software”) enables this application to
perform disc and/or file identification and
obtain
music-related
information,
including name, artist, track, and title
information (“Gracenote Data”) from
online servers or embedded databases
(collectively, “Gracenote Servers”) and to
perform other functions. You may use
Gracenote Data only by means of the
intended End-User functions of this
application or device.
You agree that your non-exclusive license
to use the Gracenote Data, the Gracenote
Software, and Gracenote Servers will
terminate if you violate these restrictions.
If your license terminates, you agree to
cease any and all use of the Gracenote
Data, the Gracenote Software, and
Gracenote Servers. Gracenote reserves
all rights in Gracenote Data, the
Gracenote Software, and the Gracenote
Servers, including all ownership rights.
Under no circumstances will Gracenote
become liable for any payment to you for
any information that you provide. You
agree that Gracenote may enforce its
rights under this Agreement against you
directly in its own name.
This application or device may contain
content belonging to Gracenote’s
providers. If so, all of the restrictions set
forth herein with respect to Gracenote
Data shall also apply to such content and
such content providers shall be entitled to
all of the benefits and protections set
forth herein that are available to
Gracenote.
The Gracenote service uses a unique
identifier to track queries for statistical
purposes. The purpose of a randomly
assigned numeric identifier is to allow the
Gracenote service to count queries
without knowing anything about who you
are. For more information, see the web
page for the Gracenote Privacy Policy for
the Gracenote service.
You agree that you will use Gracenote
Data, the Gracenote Software, and
Gracenote Servers for your own personal,
non-commercial use only. You agree not
to assign, copy, transfer or transmit the
Gracenote Software or any Gracenote
Data to any third party. YOU AGREE NOT
TO USE OR EXPLOIT GRACENOTE DATA,
THE GRACENOTE SOFTWARE, OR
GRACENOTE SERVERS, EXCEPT AS
EXPRESSLY PERMITTED HEREIN.
The Gracenote Software and each item
of Gracenote Data are licensed to you
AS IS.
Gracenote makes no
representations or warranties, express
or implied, regarding the accuracy of any
Gracenote Data from the Gracenote
Servers. Gracenote reserves the right to
delete data from the Gracenote Servers
or to change data categories for any
cause that Gracenote deems sufficient.
No warranty is made that the Gracenote
Revox Joy S37 Audio Server
Page 66
Revox Audio Server
Software or Gracenote Servers are
error-free or that functioning of
Gracenote Software or Gracenote
Servers will be uninterrupted. Gracenote
is not obligated to provide you with new,
enhanced or additional data types or
categories that Gracenote may provide
in the future, and is free to discontinue
its services at any time.
GRACENOTE
DISCLAIMS
ALL
WARRANTIES EXPRESS OR IMPLIED,
INCLUDING, BUT NOT LIMITED TO,
IMPLIED
WARRANTIES
OF
MERCHANTABILITY, FITNESS FOR A
PARTICULAR PURPOSE, TITLE, AND
NON-INFRINGEMENT.
GRACENOTE
DOES NOT WARRANT THE RESULTS
THAT WILL BE OBTAINED BY YOUR USE
OF THE GRACENOTE SOFTWARE OR ANY
GRACENOTE SERVER. IN NO CASE WILL
GRACENOTE BE LIABLE FOR ANY
CONSEQUENTIAL
OR
INCIDENTAL
DAMAGES OR FOR ANY LOST PROFITS
OR LOST REVENUES. © 2000 – present.
Gracenote, Inc. All Rights Reserved.
Gracenote
Music related data from Gracenote, Inc.,
copyright © 2000 to present Gracenote.
Gracenote Software, copyright © 2000 to
present Gracenote. One or more patents
owned by Gracenote may apply to this
product and service. See the Gracenote
website for a non-exhaustive list of
applicable
Gracenote
patents.
Gracenote, CDDB, MusicID, the
Gracenote logo and logotype, and the
“Powered by Gracenote” logo are either
registered trademarks or trademarks of
Gracenote in the United States and/or
other countries.
Gracenote Service
Music recognition technology and
related data are provided by Gracenote.
Gracenote is the industry standard in
music recognition technology and
related content delivery.
For more
information visit www.gracenote.com.
Revox Joy S37 Audio Server
Page 67
Revox Audio Server
Gracenote
Revox Joy S37 Audio Server
Page 68
M100 basis Operation Manual / Part no.: 10.30.3200