1
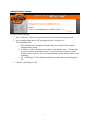
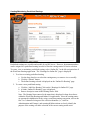
Online EA Routing
Online EA User Manual
Table of Contents Routing, Delegating and Email Notification .................................................................................. 1
Work Item Routing ..................................................................................................................... 1
Delegate .................................................................................................................................. 2
Adding/Deleting a Delegate.................................................................................................... 3
Email Notifications ................................................................................................................. 6
Predefine Routings .................................................................................................................. 7
Creating/Maintaining Predefined Routings ............................................................................ 8
Online EA General Routing Description and Process .................................................................. 10
Assigning an Approval Routing............................................................................................ 11
Approval Routing Options .................................................................................................... 12
Routing, Delegating and Email Notification Routing in the Online EA application consists of two separate but closely related functions. The
Work Item Routing application, which is accessible from the “Routing Application” links in the
left navigation bar of the Online EA application, is used to create predefined routings, assign and
remove delegates, and control email notifications. The routing function within the Online EA
application is used to establish the routing for each EA, as well as providing the actual approval
processing, and generates the specific email notifications.
Work Item Routing
To access the Work Item Routing application, the user will need to enter his/her Okey login and
password. Below are screen prints of the login page and the home page for the Work Item
Routing application.
1
Delegate
Approvers and form originators can assign delegates to perform certain activities in the absence
of the principal approver or originator.
•
Originator Delegate – The role of an originator delegate is fairly limited. When a person
creates an EA form, s/he does it based on his/her own authority, not authority delegated
from another person. The only function a delegate of an originator can perform is to
complete an EA that was previously started and saved by another person. This includes
such items as assigning the approval routing, adding attachments and submitting the form
to the approval routing. The name of the person starting the EA is recorded as the first
entry in the approval routing. If a delegate submits the form to the approval routing, the
submitter will be recorded as “by:” delegate name below the person that started the form.
•
Approver Delegate – An approver delegate is authorized to perform the approval function
in the absence of the principal approver. It is up to the approver to clearly define to
his/her delegate(s) the scope of their authority and when they may exercise that authority.
If a delegate performs the approval function, the delegate will be listed as “by:” delegate
name below the listed approver’s name.
HRS VBS Access Required: For a person to operate as a delegate of another person, the
delegate must have appropriate HRS department VBS access to perform as a delegate in the
absence of the principal approver.
Delegate Time Periods: All delegates are assigned for specific time periods at the time a
delegate is entered. Once entered, a delegate entry cannot be modified, but it can be deleted. To
assign the same person to a new delegate time period, a new delegate entry is created. A
permanent delegate can be created by using an end date of 12/31/2099 for the delegate time
period.
Multiple Delegates Allowed: Multiple delegates may be defined. Authority for the different
delegates to approve specific types of EA forms can be procedurally determined or under what
circumstances the different delegates are authorized to act; however, the OLEA application will
not enforce a hierarchy or circumstances of delegation. If a delegate is defined, the OLEA
application considers the delegate to be appropriately authorized to act.
Only Approve a Form Once: Regardless of whether a person is acting in the role of a principal
approver or a delegate, a person can approve a form only once.
2
Adding/Deleting a Delegate
To add or delete a delegate:
1. Select “Delegate” in the left navigation bar in the Work Item Routing application.
2. Any existing delegate entries will be displayed in the “Delegates For
[email protected]”.
a. Each delegate entry is displayed with the begin and end date of the assigned
delegation time period.
b. A “Remove” link is displayed to the right of each delegate entry. Click this link
to remove (delete) the delegation entry. It is not necessary to remove expired
delegate entries; however, you may want to do that to make delegate entries easier
to manage.
c. An “Add Delegate” link is displayed in the lower right corner after the delegate
list.
3. Click the “Add Delegate” link.
3
4. The “Add Delegates for Online EA” page is displayed. The page is divided into two
sections.
a. “Current Delegates” shows the list of existing delegate entries for the Online EA.
A “Delete” radio button is available after each entry.
i. A “Delete” button is available in the lower right corner of the “Current
Delegates” box.
1. To delete a delegate, click the “Delete” radio button to the right of
the delegate entry you want to remove,
2. then click the “Delete” button.
b. “Add Delegates” provides the method to search for and add delegates
i. Search Fields:.
1. First Name – Searches both the HRS First Name and the O-Key
Preferred Name entered by individuals. This field will search on
as much of the first name as you enter. A full name is not
required.
2. Last Name – Searches both the HRS Last Name and the O-Key
Professional Name entered by individuals. This field will search
on as much of the last name as you enter. A full last name is not
required.
3. Email – Searches for the full email address. A correctly entered,
complete email address is required.
4. You can search on the first name, last name, first name and last
name, or use only the email address. If an email address is entered
4
along with either of the other fields, the email search will override
the name searches.
ii. Once you have entered the search criteria in the applicable search fields,
click the “Search” button.
iii. The names returned by the search are limited to those individuals with
HRS access.
iv. Select the Name to add as a delegate by:
1. Clicking the radio button in front of the name
2. Click the “Add” button at the bottom of the “Add Delegates” box.
3. If the correct person is not returned in the search results, click the
“New Search” button and enter new selection criteria in the
applicable name fields and search again.
v. Enter the dates the delegation is to be effective by using the pop-up
calendar provided or entering the dates in an MM/DD/YYYY format.
1. Begin Date – the date the delegation is to start.
2. End Date – the date the delegation is to end. A ‘permanent’
delegate can be assigned by assigning an end date far enough into
the future it won’t expire. For example, enter an end date such as
12/31/2099.
3. Click “Add Dates”
4. The selected delegate will be added to the “Current Delegates” list
at the top of the page.
5. Select the “Home” link or “Delegates Home” link in the left navigation bar to return to
the applicable page in the Work Item Routing application.
Delegate Entries Cannot Be Modified. Existing delegate entries cannot be modified. Existing
delegate entries can be deleted and new delegate entries can be added. That is how delegate
entries are maintained.
5
Email Notifications
Email Notifications are used to advise Online EA users certain actions have occurred as well as
notify and/or remind approvers a form is awaiting his/her approval.
•
Approver Notification –
o A single initial notification is sent to each approver and his/her delegate each
week day at 10:00 AM, 1:00 PM and 3:00 PM for any EAs awaiting approval at
that time and an initial notification has not been sent.
o A single reminder notification is sent each week day morning at 6:00 AM to each
approver and his/her delegate if any EA forms are awaiting approval.
o The principal approver can turn off this email notification.
o An approver’s delegate(s) cannot turn off email notification.
o From: ONLINE EAFORMS [[email protected]]
Subject: EA Form(s) Reminder Notification
Text: This is a reminder notification that there are EA forms awaiting action by
you. <link to the Online EA application>.
•
Department Approver Notification –
o Whenever an EA form is created in the OLEA, the department head for each of
the departments on the EA, if more than one is included, is added in the
“Departmental Approver” box on the Assign Routing page of the EA. The
originator can then add the individual(s) listed in the “Departmental Approver”
box as formal approvers, or not, depending on unit procedures. Any departmental
approver not included as a formal approver in the EA routing will receive an
email notification the EA was prepared.
o An individual email notification is sent at the time the EA is submitted to
approval routing.
o Department approvers cannot turn this notification off.
6
o From: ONLINE EAFORMS [[email protected]]
Subject: ONLINE EAFORMS
Text: An EA form has been created for Employee Name in your department and
you were not included as the department head approver. <link to the specific EA
form>.
•
Cancelation Notification to an Originator –
o Whenever an EA is canceled by an approver or later processor, the originator is
sent an email notification the EA was canceled.
o From: ONLINE EAFORMS [[email protected]]
Subject: Canceled EA Form(s) Notification
Text: This is a notification that an EA form you created has been canceled. <link
to the specific EA form>.
Predefine Routings
The Online EA provides the opportunity to predefine a routing(s) that can then be attached to an
EA form. Attaching a predefined routing to an online EA is in addition to being able to add
individual approvers on the EA Assign Routing page, also known as ad hoc routing assignment.
The actual routing assigned to an EA can be ad hoc routing, predefined routing, or a combination
of ad hoc and predefined routing, even using multiple predefined routings. The method used to
assign routing to an EA and whether or not predefined routings will be used is up to the
discretion of the person(s) vested with the responsibility to make that decision within each
administrative unit.
7
Creating/Maintaining Predefined Routings
Predefined routings are viewable and useable by an OLEA user. However, department numbers
can be assigned to a predefined routing in order to filter the routing entries for easier selection.
To create, view or maintain a predefined routing, select “Online EA” in the left navigation bar of
the Work Item Routing application. The “Routings for Online EA” page is displayed.
1. To select an existing predefined routing
a. Use the drop down box to select the routing name you want to view or modify.
b. Click the “Submit” button
c. The defined routing selected is displayed on the “Online EA Routing” page.
2. To create a new predefined routing.
a. Click the “Add New Routing” link on the “Routings for Online EA” page.
b. A blank “Online EA Routing” page is displayed.
c. Enter a descriptive name in the Routing Name: field.
Note: The Routing Name entered is the name that is displayed in drop down boxes
within the Work Item Routing and Online EA applications. Since the routing names
are presented in alphabetical order, using a consistent naming convention, such as the
first 2 or 3 characters being used for a division identifier (i.e., A&F for
Administration and Finance), and meaningful abbreviations to clearly identify the
purpose of the routing will make selection of the correct routing much easier.
8
d. Use the “Add Routing Members” box entries to select and add members to the
“Current Routing Members” list.
i. See “Adding/Deleting a Delegate” for a description on how the Search
function works.
3. Organizing the “Current Routing Members” list.
a. Individuals can be deleted from the “Current Routing Members” list.
i. Click the checkbox to the right of the individual’s name to be deleted
ii. Click the “Delete” button in the lower right corner of the “Current Routing
Members” box
b. Entries in the “Current Routing Members” list can be re-ordered.
i. The #1 entry is the first approver the form is sent to based on the routing
list.
ii. The entry with the highest number is the last approver the form is sent to
based on the routing list.
iii. A predefined routing is added to the actual EA form routing in the order
defined by the predefined routing. Routing entries on the EA form cannot
be re-ordered.
4. Save your routing changes by clicking the “Save” button on the Online EA Routing page.
a. To cancel any changes you’ve made and return to the Work Item Routing home
page, click the “Cancel” button
9
Online EA General Routing Description and Process The routing for each EA is individually assigned using the Assign Routing page for an EA.
Predefined routings can be added to the EA; however, once added that routing is specific to that
EA. Subsequent changes to the predefined routing definition do not impact any EA that has
previously used that predefined routing.
The complete approval routing must be assigned to the EA form before the originator, or a
delegate for the originator, can submit the form to routing. Once submitted, the routing, as well
as the contents of the form, cannot be modified.
Exercise Action Only Once. The OLEA, as part of internal control, is set up to limit a user to
being able to exercise an action only once per form. In other words, a person will not be allowed
to originate or approve a form on their own authority and then approve the form again as a
delegate of another approver.
All EA forms created within the OLEA application will use the Approval and Process routing as
defined below. Besides providing a path for documents to take for approval and processing, the
OLEA routing will also show which routing stops have been completed and what routing stops
remain. Also, the routing will show which user exercised the approval or return options and
whether the form was routed to and processed by the indicated route person or a delegate.
The OLEA routing consists of three routing stages that takes the OLEA document from the
originator through approvals and processing to its terminal destination in the HR imaging
system. The three routing stages are:
•
Approval Routing: The step-by-step routing a form takes from the originator through
the various offices/departments/administrative areas in sequence to receive approvals and
notifications. Typically, this will only go through the college or division head. This
routing is added to the document from either a predefined routing or by ad hoc addition
by the originator or both. An example of an approval routing for a new faculty member
could be department originator, department head, and dean.
•
Process Routing: Process routing is automatically generated based on rules defined
within the OLEA application. The routing takes the document from the Approval
Routing, once the approval routing is completed satisfactorily, through central
administration processing to Payroll Services for final approval and its final destination in
the HR imaging system. An example of a process routing for the same new faculty as
above would start after the college dean had approved the form. The next step would be
to Academic Affairs, then HRPS for assigning a CWID and entering the employee and
his/her demographic information into HRS. The EA would then be automatically routed
to PS and finally to Imaging.
•
Correction Reroute: Correction rerouting is a routing stage that will not normally be
used but is available to Payroll Services staff, if needed. The intent is if a document
reaches PS and for whatever reason it missed a central administration stop, Payroll
Services could initiate the Correction Reroute by making the applicable entries in the
form routing to route the document back through the missed steps and then to Payroll
Services and the imaging system.
10
Functionally, whenever a Correction routing is entered, it will take over from the Process
Routing at whatever point the Process routing was interrupted.
The final two steps of the Correction Routing will always be (automatically entered) PS and then
Imaging.
Alteration of document after origination: Once an EA is created, downstream approvers and
processors have an opportunity to make notes and/or comments in a provided Notes field. Other
than that, however, the original document cannot be modified.
Assigning an Approval Routing
The originator is automatically added as the first entry in the approval routing. If a person other
than the originator submits the form to its approval routing, the person that submitted the form is
recorded as the originator’s delegate by being included as a “by:” entry below the originator.
The OLEA requires at least one additional approver be added to the approver list by the form
originator.
The individual defined as the department head within the AIRS department hierarchy for each
position’s department on the EA is listed as a Departmental Approver on the Assign Routing
page of the EA. This person can be added as an approver, or not, as determined by local
procedures. Any person listed as a Departmental Approver and not included on the approval
routing will receive an email notification that an EA has been prepared for a person in his/her
department.
Even though the OLEA only requires one additional approver, it is the responsibility of the form
originator to follow department / division / college procedures to include the required approvers
on each EA.
There are three methods that can be used by the form originator to assign approval routing.
An administrative unit can set up predefined routes using the Routing Application and give each
route a unique, descriptive name such as Faculty Routing, Staff Routing, Student Routing, etc.
Using this method, an administrative unit can set up routes in advance to be used for various
types of EAs or situations.
The form originator can also set up approval routing on an ad hoc basis by adding individual
approvers on each EA as defined by local procedures. A Search application is provided on the
Assign Routing page of the EA form to more easily locate and add approvers.
Finally, an originator can add a combination of predefined route(s) and ad hoc addition of
approvers.
Which method departments and/or administrative units choose to assign approval routing to an
EA form will depend on local requirements and procedures.
HRS Department VBS controls access. As with all areas of the Online EA application, the
HRS Department VBS controls access to an EA for an approver. Before a person can be added
to the EA Approval Routing, that person must already have access to all of the departments
included on the EA form. For a predefined routing to be added as an approval routing, all of the
members listed in the predefined routing must already have access to all of the departments
included on the EA form.
11
Approval Routing Options
Originator: The approval routing starts with the form originator. The originator has three
options.
Approve – The form originator has completed his/her review of the EA, routing and adding any
attachments has been completed, and the form is ready to be submitted to the next person in the
approval routing.
Hold – The form is not ready to be submitted to the next person in the approval routing. The
purpose of this action is to document the ‘Hold’ status by the person selecting this action.
Cancel Action – Cancels the EA form. Record of the form is maintained in the OLEA
application; however, the form cannot be restarted.
The selected action is processed when the ‘Submit’ button is clicked and the user is returned to
his/her My EA Forms page.
Approvers: Each approver, or his/her delegate, in the approval routing also has three options.
Approve – The approver has completed his/her review of the EA, agrees with its content, and the
form is ready to be submitted to the next person in the approval routing or to the process routing
if this is the last approver.
Hold – The form is not ready to be submitted to the next person in the approval routing. The
purpose of this action is to document the ‘Hold’ status by the person selecting this action. This
can be an important distinction for an approver or delegate that has reviewed the form and is
either unsure it should be processed or wants to review additional information before making a
final determination. By placing the form on ‘Hold’, the approver or other delegates are put on
notice that somebody has reviewed the form and is not ready for it to go forward.
Cancel Action – Notify Originator – Cancels the EA form. An email notification is sent to the
form originator that the form has been returned. Record of the form is maintained in the OLEA
application; however, the form cannot be restarted.
The selected action is processed when the ‘Submit’ button is clicked and the user is returned to
his/her My EA Forms page.
Notes: The originator and each approver has his/her individual “Notes” textbox. This textbox is
provided for the convenience of the person to add comments or other notes that may be useful to
any downstream reviewer. Any approver or processor that returns an EA form to an originator
should include an explanation in the ‘Notes’ textbox.
12