1
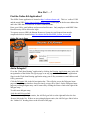
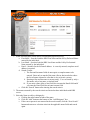
How Do I . . .?
Online EA User Manual
Table of Contents How Do I . . .? ................................................................................................................................. 1 Find the Online EA Application? ............................................................................................... 1 Online EA Log In Page ........................................................................................................... 1 Add a Delegate? .......................................................................................................................... 1 Create a Transfer EA? ................................................................................................................. 3 Use “Update,” “New,” and “End” on an Update EA? ................................................................ 3 Move an Employee to a Different Position Number? ................................................................. 4 Move a Position and Assigned Employee to a New Department? ............................................. 5 Create an Overload Assignment for Faculty in the Same Department? ..................................... 5 Create an Adjunct Faculty Assignment for an Existing Employee in a Different Department? 5 How Do I . . .?
Find the Online EA Application?
The OLEA Forms application is located at http://eaforms.okstate.edu/. This is a ‘redirect’ URL
and the actual URL (https://app.it.okstate.edu/ea_forms/) will display in the browser address bar
and is the URL that is included in all email communications.
Enter your O-Key email address and password and hit enter. Only employees with HRS Value
Based Security will be allowed to login.
To request access to HRS, the Human Resources System Access Request form must be
completed which is located at http://hr.okstate.edu/docfiles/HRS_System_Access.pdf.
Online EA Log In Page
Add a Delegate?
Go to the “Work Item Routing” application by clicking the Routing Application entry in the left
navigation bar of the Online EA sign in page or on any page within the Online EA application.
Sign in to the Work Item Routing application using your O-Key username or email address and
O-Key password.
Click the Delegates link in the left navigation bar. This will take you to the Delegates home
page and any delegates that have been previously set up will be listed. On the Delegates home
page any existing delegate entry can be removed by clicking the Remove link to the right of the
delegate entry.
To add a new delegate entry,
click the Add Delegate link.
If there are existing delegate entries, the Add Delegate link is to the right and below the last
Remove link in the list. If there are no existing delegate entries, the Add Delegate link is below
the “Online EA” heading closer to the left side of the page.
1
1. In the Add Delegates section search for and add delegates based on
a. First Name – Searches both the HRS First Name and the O-Key Preferred Name
entered by the individual.
b. Last Name – Searches both the HRS Last Name and the O-Key Professional
Name entered by the individual.
c. Email – Searches for the full email address. A correctly entered, complete email
address is required.
d. Search Criteria:
i. The first and last name fields do not require a complete name to be
entered. Enter only as much of the name (first or last) needed to reduce
the list of names returned to a list that is easy to locate a person.
ii. Entering a first and last name is not necessary. You can search by only a
first name, only a last name, or include both.
iii. If you enter a name (first or last) field, do not enter the Email field and if
you enter the Email field, do not enter a name field.
e. Click the “Search” button after entering the search criteria.
2. The names returned by the search criteria are limited to those individuals with HRS
access.
3. Select the Name to add as a delegate by:
a. Clicking the radio button in front of the name
b. Click the “Add” button at the bottom of the “Add Delegates” box.
c. If the correct person is not returned in the search results, click the “New Search”
button and enter new selection criteria in the applicable name fields and search
again.
2
4. Enter the dates the delegation is to be effective by using the pop-up calendar provided or
entering the dates in an MM/DD/YYYY format.
a. Begin Date – the date the delegation is to start.
b. End Date – the date the delegation is to end. A ‘permanent’ delegate can be assigned
by assigning an end date far enough into the future it won’t expire. For example,
enter an end date such as 12/31/2099.
c. Click “Add Dates”
d. The selected delegate will be added to the “Current Delegates” list at the top of the
page.
Create a Transfer EA?
Transfer EAs are not used in the Online EA application. Instead, the hiring department will
create a “Hire” EA and the department the employee is leaving will process an “Update” EA
using the “End” option to end the employee’s assignment with the current department.
Use “Update,” “New,” and “End” on an Update EA?
For some people, thinking of “Update” of the “Update New End” options as “Replace” may
help them understand the process better.
The following questions can help you determine which option to use to create a new assignment.
1. Is the assignment in the “Assignments Selected for Updates:” to stay active after the new
assignment’s begin date?
If the answer is Yes, use “New”.
2. Is the assignment in the “Assignments Selected for Updates:” to stay as it is and it is only
being used as a template to create a new assignment?
If the answer is Yes, use “New”.
3. Is the assignment in the “Assignments Selected for Updates:” being replaced with another
assignment in the same position number?
If the answer is No and the assignment needs to be ended, use “End”.
4. Is the assignment in the “Assignments Selected for Updates:” being replaced by a new
assignment in the same position AND the position is still in the same department?
If the answer is Yes, use “Update”. Typical reasons for this type of transaction are pay
rate changes, FTE changes, title changes, employee status changes, etc.
5. Is the assignment in the “Assignments Selected for Updates:” being replaced by a new
assignment in the same position but the position has been transferred to another
department?
If the answer is Yes, use “End” to end the listed assignment and then click the “Add New
Position” link on Update Summary page to add the new assignment in the new position.
3
Move an Employee to a Different Position Number?
There are two things to consider when creating an assignment in a new position number for an
employee.
1. Is the new position in the same department as the old position number?
• If the new position number is in a department different than the current position
number, you have to consider the access of the individuals approving the EA.
• Do they each have access to both (or all) departments on the form?
• If not, you will need to separate the “End” and “Hire” actions (possibly ending the old
assignment and adding the new position number(s) and assignment(s) in the new
department) on different EAs to facilitate document approval.
• If the current and new positions are in the same department, this is not a concern.
2. Will the current position assignment end before the new position assignment begins?
• If the current position’s assignment ends before the new position’s assignment begins,
which is normal, this will impact the Action Date used to create the EA.
• The Online EA application will not allow you to input a date earlier than the declared
Action Date.
• To move an employee to a new position number, you
o input a date to “End” the current assignment and
o input a date to begin the “New” assignment.
• The earlier of these two dates is the date the current assignment ends and is the
Action Date to use on the form.
• If the current assignment continues after the new position begins, the Action Date can
be the date the new position begins.
To move an employee to a different position number within the same department where the
current position’s assignment ends the day before the new position’s assignment begins, use the
following ideas.
1. Action Date – use the date the current position’s assignment ends.
2. Select Employee’s Positions page – select the position number(s) whose assignments will
be ended before the new position’s assignments begin. Also, select any other position
numbers whose assignments you are not changing but want listed on the EA.
3. Click ‘Next’ button – do not click the “Add New Position*” button.
4. Select Assignments page – select the specific assignments that you will be ending.
5. Click “Update Employee” button.
6. Update Summary page – select the “End” option for each assignment to be ended and
enter the applicable end date on the Modify Assignment page. This date cannot be earlier
than the entered Action Date. Click ‘Next’.
7. End all applicable assignments before proceeding to add the new position.
8. Click the “Add New Position” link on the Update Summary page to add the new position.
This link (colored orange) is located immediately above the Proposed Assignments
heading on the left side of the body of the page.
9. Enter the new position information on the Enter Position Information page and new
assignment(s) information on the Enter Assignment Information page. Repeat adding
assignments as needed and complete the remaining steps of creating the EA form.
4
Move a Position and Assigned Employee to a New Department?
This process is identical to moving an employee to a new position (see previous example) except
first you must follow established procedures to re-assign the position number in HRS from the
current department to the new department (contact your HR Partner if you need assistance).
Verify on HRS screen 061 that the position has been assigned to the new department.
A key consideration when dealing with two or more departments on an EA is the departmental
access for approvers. If all required approvers (required by unit procedures) do not have access
to all departments on the EA, the required approvers cannot be added to the form. If this occurs,
the EA will need to be segregated by approver department access on multiple EA forms as
necessary.
While it may seem odd to go through ending of the current assignments then the “Add New
Position” link on the Update Summary page and enter the same position number (but the new
department number) on the Enter Position Information page, this process is necessary to get the
employee assignments moved from the current department to the new department.
If multiple employees are assigned to a position being moved to a new department, an EA for
each employee must be prepared to move the respective assignments to the new department.
Create an Overload Assignment for Faculty in the Same Department?
Create an Update EA for the faculty member with the Action Date being the start of the new
overload assignment. (NOTE: The Action Date may be the first of the fiscal year, first of the
academic year, or the first of the applicable semester depending on unit procedures. One
function of the Action Date is to select assignments active on or after Action Date.)
On the Select Employee’s Positions page, select all positions whose assignments are to be
included on the EA.
Click the ‘Next’ button – do not click the ‘Add New Position*’ button.
On the Select Employee’s Assignments page, select all assignments that are to be included as
‘current’ assignments. These assignments don’t have to actually be changed. Unit procedures
may specify which assignments should be selected. You will need to select at least one
assignment to proceed beyond this page.
On the Update Summary page, click the “Add New Position” link. This link (colored orange) is
located immediately above the Proposed Assignments heading on the left side of the body of the
page.
Enter the applicable data on the Enter Position Information and Enter Assignment Information
pages. Complete the rest of the EA as you normally would.
Create an Adjunct Faculty Assignment for an Existing Employee in a
Different Department?
The difference between this type of EA and the previous steps (Create an Overload
Assignment...) is the Adjunct Faculty assignment is not in the same department as the
5
employee’s regular assignment. If all departments are within the departmental access of the EA
creator and all approvers, it is acceptable to follow the same steps to create an overload
assignment.
Create a “Hire” EA for the employee that will receive the Adjunct Faculty assignment. The
Online EA application will determine the employee is not a new hire and redirect you to the
Update side of the application.
Any existing positions for the employee will be listed on the Select Employee’s Positions page;
however, you will very likely not be able to select them as they are outside of your departmental
access.
Click the ‘Add New Position*’ button on the Select Employee’s Positions page.
Enter the applicable data on the Enter Position Information and Enter Assignment Information
pages. Complete the rest of the EA as you normally would.
6