1
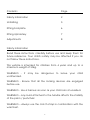
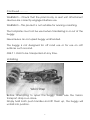
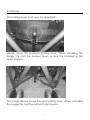
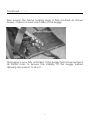
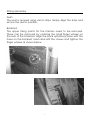
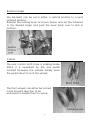
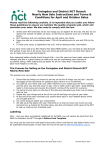
Model 1185
Shuttle Buggy
Please ensure the manual is read and understood before using the buggy.
Keep these instructions for future reference.
Contents
Page
Safety Information
2
Unfolding
3
Fitting Footplate
6
Fitting Upholstery
7
Adjustments
8
Safety Information
Read these instructions carefully before use and keep them for
future reference. Your child’s safety may be affected if you do
not follow these instructions.
This vehicle is intended for children from 4 years and up to a
maximum weight of 50kg.
WARNING - It may be dangerous to leave your child
unattended.
WARNING - Ensure that all the locking devices are engaged
before use.
WARNING - Use a harness as soon as your child can sit unaided.
WARNING – Any load attached to the handle affects the stability
of the pram / pushchair.
WARNING – Always use the crotch strap in combination with the
waist belt.
2
Continued………..
WARNING – Check that the pram body or seat unit attachment
devices are correctly engaged before use.
WARNING – This product is not suitable for running or skating.
The footplates must not be used when transferring in or out of the
buggy.
Never leave an occupied buggy unattended.
The buggy is not designed for off road use or for use on soft
surfaces such as sand.
ONLY 1 child to be transported at any time.
Unfolding
Before attempting to open the buggy make sure the Velcro
transport strap is un-done.
Simply hold both push handles and lift them up, the buggy will
unfold into position.
3
Continued………..
The locking levers must now be operated:-
Above shows the backrest locking lever. When unfolding the
buggy this must be pushed down to lock the backrest in the
open position.
The image above shows the seat locking lever. When unfolding
the buggy this must be pushed fully forward.
4
Continued………..
Also ensure the frame locking lever is fully located as shown
below – there is a lever each side of the buggy.
The buggy is now fully unfolded. If the buggy feels loose recheck
all frame locks to ensure the stability of the buggy before
allowing any person to sit in it.
5
Fitting the Footplates
Insert the footrest stem tube into the receiving tube and tighten
with the allen key provided as shown below.
If the footrest needs to be adjusted the bolt needs to slackened,
adjusted and then re-tightened before use.
Note – the footplate must be ‘swung away’ before fording the
buggy for transportation purposes.
Simply lift the footrest and swing away to the outside of the
buggy as shown above.
6
Fitting Upholstery
Seat:The seat is secured using velcro strips. Simply align the strips and
secure the seat in position.
Backrest:The upper fixing points for the harness need to be removed.
These can be removed by undoing the small finger wheels on
the rear of the backrest. Align the back upholstery holes with the
holes on the backrest mesh and refit the screws and tighten the
finger wheels as shown below.
7
Backrest Angle
The backrest can be set in either a vertical position to a semi
reclined position.
Release the locking lever as shown below and set the backrest
to the desired angle and push the lever back over to lock in
position.
Castors
The rear castors both have a parking brake
fitted. It is operated by the red pedal
located between the wheels. Simply press
the pedal down to lock the wheels
The front wheels can either be locked
in the forward direction or be
unlocked to enable them to swivel.
8
WARRANTY TERMS AND CONDITIONS
Standard Terms
This is to certify that your ROMA MEDICAL product is guaranteed
for a period of one year from the date of purchase. The warranty
is not transferable.
The manufacturer will not accept liability for damage caused by
any misuse, unauthorised alterations or non-observance of the
instructions set out in this user manual.
The guarantee excludes parts, which have been subjected to
natural wear and tear during this period (Tyres and plastic parts)
Model No:……………………………
Serial No:…………………………….
Purchase Date:……………………..