1
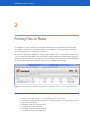
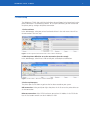
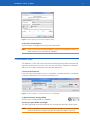
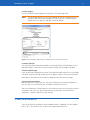
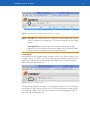
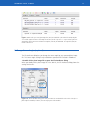
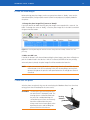
COLORBURST 5 USER MANUAL · ColorBurst RIP · Queue Series · Mac OS X ColorBurst® CTP RIP Tutorial DIRECT TO PLATE © 2002-2011 CSE, Inc. 1 COLORBURST® CTP RIP · Tutorial © and ™ 1993-2011 Compatible Systems Engineering, Inc. All rights reserved. Compatible Systems Engineering, Inc. (CSE) reserves the right to change the information in this document without prior notice. The software described in this document is furnished under a license agreement. The software may be used or copied only in accordance with the terms of the agreement. No part of this manual may be reproduced or transmitted in any form or by any means, electronic or mechanical, including photocopying, recording or information storage and retrieval systems, for any purpose other than the purchaser’s personal use, without the express written permission of CSE. ColorBurst is a registered trademark of CSE, Inc. PostScript and Photoshop are registered trademarks of Adobe Systems Incorporated in the United States and/or other countries. EPSON, EPSON Stylus, and MicroWeave are registered trademarks of Seiko Epson Corporation (SEC), registered in the U.S. and other countries. PANTONE® and other Pantone, Inc. trademarks are the property of Pantone, Inc. © Pantone, Inc., 2001. Pantone, Inc. is the copyright owner of color data and/or software which are licensed to Compatible Systems Engineering, Inc. to distribute for use only in combination with ColorBurst. PANTONE Color Data and/or Software shall not be copied onto another disk or into memory unless as part of the execution of ColorBurst. PANTONE® Colors displayed in the software application or in the user documentation may not match PANTONE-identified standards. Consult current PANTONE Color Publications for accurate color. All other trademarks are the property of their respective owners and are hereby acknowledged. 2 COLORBURST® CTP RIP · Tutorial 1 Getting Started The ColorBurst® CTP RIP is a PostScript® Language Level 3 compatible Raster Image Processor (RIP). It produces separated halftoned plate images from composite and pre-separated files, as well as CMYK color composite proofs. ColorBurst supports RGB, CMYK, and Grayscale TIFF and JPEG file formats, as well as PS, EPS, and PDF files. A Hot Folder is included for printing across networks, and ColorBurst can be printed to directly from your favorite applications. Minimum Requirements Before installing ColorBurst, make sure your computer meets the following requirements. Operating System Windows® XP, Windows Vista®, or Windows 7 required (32-bit and 64-bit compatible) CPU Dual-core 2.6 GHz CPU or faster recommended DVD-ROM or DVD±RW Drive DVD drive required to install from ColorBurst DVD RAM 3 GB RAM minimum Disk Space 20 GB hard disk recommended Monitor 1280x1024 minimum resolution required Printer Connection 100 MB Ethernet or USB 2.0 connection required 3 COLORBURST® CTP RIP · Tutorial ColorBurst Installation To install and run ColorBurst, you will need the installer DVD and your ColorBurst dongle. 1. Check the OS version. Make sure that your computer is running Windows XP, Windows Vista, or Windows 7. 2. Insert the ColorBurst dongle. Plug the supplied ColorBurst dongle into any available USB port or USB hub. Figure 1.1. The ColorBurst dongle. NOTE The ColorBurst dongle is a USB security key. It must be plugged in to launch ColorBurst, and it must stay plugged in while running ColorBurst. Please be careful not to lose your dongle. The dongle is your ColorBurst license and cannot be replaced without purchasing a new license. 3. Launch the ColorBurst installer. From the ColorBurst installer DVD, double-click the ColorBurst Installer icon to install ColorBurst. When the installation starts, follow the instructions on your screen. The Aladdin HASP driver installation automatically begins after ColorBurst installation is complete. Windows XP: At the end of the installation process, a dialog with the message “Digital Signature Not Found” appears. Click “Yes” to continue the installation. 4. Install Printer Utilities as necessary for your print workflow. If you plan to print files to your RIP server machine from a Mac, from another PC, or from applications on the RIP server machine (such as Adobe® Illustrator or InDesign), select the appropriate Windows and Mac options to install the required components. 5. Install additional printer support. Click Print-for-Pay Profiles to install additional ColorBurst environments and ICC profiles. Click a printer model to install environments for that printer. 6. Launch the ColorBurst RIP. After installation is complete, launch ColorBurst from the desktop shortcut. ColorBurst is installed in your C: drive unless you specify otherwise. Figure 1.2. The ColorBurst shortcut on the desktop. 7. Register ColorBurst. Register your copy of ColorBurst (an internet connection is required). If you click Register Later, the registration window will pop up every few hours until registration is completed. 4 COLORBURST® CTP RIP · Tutorial 8. Select your printer model. In the ColorBurst menu, select your printer model under the Printer menu (the first blue menu item). The menu label will change to show the printer model you selected. 9. Edit the printer connection. In the same Printer menu, select Edit to open the Edit Print Definitions dialog. The first three options do not change—you only need to change 4) Select a printer port. USB Connection: Select your printer model from the list to select the printer driver for your printer. Click Ok to save the new settings. Ethernet Connection: Select TCP/IP and type in the IP address for your printer. Click the Test button to make sure the IP address is valid. Click Ok to save the new settings. 10. Quit ColorBurst. After setting your printer connection, please exit ColorBurst to create an initial settings (ini) file, and then relaunch ColorBurst. ColorBurst Utilities The following utilities are installed as part of the initial ColorBurst installation. Many of them are also available on the ColorBurst web site, www.colorburstrip.com. SpectralVision Pro SpectralVision Pro is provided with ColorBurst to create Linearization files and custom ICC Profiles used with print-for-pay environments. For more information, please refer to the SpectralVision Pro documentation found in the ColorBurst\Profiling Tools & Docs folder. Expressway Server This program publishes a Bonjour ColorBurst printer that can be printed to from a Mac computer. It is installed during ColorBurst installation. ColorBurst Print Drivers The print drivers are required when printing to ColorBurst over a network. Setup instructions are available in the ColorBurst\Documentation folder. Dongle Installer This program installs the dongle driver. It is installed during ColorBurst installation. Dongle Updater This program can be used to update your dongle remotely in the event of an upgrade purchase. 5 COLORBURST® CTP RIP · Tutorial 2 Printing Files to Plates The ColorBurst CTP RIP is primarily used to process composite or pre-separated files into separated plate images. These files are printed directly onto metal or polyester inkjet-compatible material to be used as printing plates on a traditional printing press. When a file is separated in ColorBurst, a separate plate image file (TIFF) is created for each color found in the file (CMYK and spot colors). Each plate image is output-independent, allowing plate image files to be reprinted with different screen angles, or for use on another press with different plate dimensions. All files are processed and printed from the Job List in the ColorBurst Job Manager. Figure 2.1. Files are processed into separated plate images (TIFFs) and printed from the Job List in the ColorBurst Job Manager. Overview: Printing to plates 1. Printer Setup: select a printer, set printer connection (one time setup) 2. Environment Setup: select an environment, set plate size/margins, save ENV (one time setup) 3. Add a File to the Job List 4. Build plate image files (separated TIFFs) 5. Change screen angles (optional) 6. Print plate images on metal or polyester 7. Cure plates in heat press or plate oven 6 COLORBURST® CTP RIP · Tutorial 1. Printer Setup The ColorBurst CTP RIP ships with Print Definitions for each Epson Stylus Pro printer, but the printer connection is set to None by default. To use a print definition, you will need to edit the printer port by setting a valid printer connection. 1. Select a Printer In the Job Manager, select your printer listed under Printer in the main menu. You will set the connection in the next step. Figure 2.2. Select a printer from the Printer menu in the ColorBurst Job Manager. 2. Edit the printer definition to set the connection (one time setup) In the Job Manager, select Printer > Edit to edit your selected printer connection. Figure 2.3. Select Printer > Edit in the ColorBurst Job Manager. 3. Select a printer port The printer port list will show any printer that has been created on your system. USB connection: Select your Epson Stylus Pro printer in the list to use the printer driver to set the connection. Ethernet connection: Select TCP/IP and enter your printer’s IP Address in the TCP/IP tab. Use the Test button to make sure the IP Address is valid. 7 COLORBURST® CTP RIP · Tutorial Figure 2.4. Select a printer port in the Edit Print Definition dialog. 4. Save your Print Definition Click OK to close the dialog and save your printer connection. NOTE If this is the first time launching ColorBurst, please exit the program to create an initial settings (ini) file, and relaunch ColorBurst. 2. Environment Setup The ColorBurst CTP RIP ships with environments containing settings optimized for printing separations at different line screens. In this step, you will select a Separations environment and save a new custom environment with your plate dimensions. 1. Select an Environment In the menu bar, click Environment menu > Separations - Halftone and select a Separations environment based on the line screen you want to print at. Figure 2.5. Select a Separations - Halftone environment in the Job Manager. 2. Open the Printer Settings dialog Click the Printer Settings button in the toolbar. 3. Enter your plate Width and Height The Width and Height entered should match the exact physical dimensions of your plates. NOTE When using polyester roll material, the printer may add 1/8” before cutting. Do a test print to check the length of the plate and adjust the Height if necessary. 8 COLORBURST® CTP RIP · Tutorial 4. Enter margins Enter the height of the plate gripper on your press in the Top margin field. NOTE The Top Margin begins after the space allowed for Job Titles (approximately 3/8” by default; Job Titles can be changed in the Job Titles tab). The non-printable margins are 0.125” top, left, and right, and 0.56” bottom. Figure 2.6. Enter the Width, Height, Margins, and Media Type in the General Printer Settings. 4. Center print job The Center print jobs horizontally checkbox is selected by default, which disables the Left and Right margins. If you select Center print jobs vertically, the Top margin is ignored. 5. Select a Media Type If you are printing to roll polyester material, select Roll fed media and make sure Cut Media is selected. If you are printing to aluminum or cut polyester plates, select Sheet fed media. When you are finished, click OK to close the dialog and save your Printer Settings. 6. Save your Environment Now that you have set your plate size, save your environment by selecting Environment > Save As. Type in a new name for your environment and click OK to save. Your new environment will now appear in the Environment menu as the currently selected environment. For future use, your environment can be selected in the Environment > Separations - Halftone under the LPI you selected. 3. Add a file to the Job List There are several ways to add files to the ColorBurst Job List. ColorBurst CTP RIP supports PDF, PS, EPS, TIFF, and JPEG files, as well as pre-separated Postscript files. 9 COLORBURST® CTP RIP · Tutorial Open The File > Open menu item (or Open button in the toolbar) opens a standard Windows Open dialog to allow you to open image files for processing. Drag and drop An easy way to get files into the Job List is to drag files from a folder into the ColorBurst Job List. You may drag files from any local disk or network. Drop files into the ColorBurst Spooler folder Another option is to use the ColorBurst Spooler folder (ColorBurst\Spooler) to place files in the Job List. ColorBurst scans the Spooler folder for files and places them immediately into the Job List for printing. NOTE The Spooler is a drop folder only—never remove files directly from the Hot Folder. To delete files, highlight them in the Job List and click the Delete button in the Job Manager toolbar. Print from applications Files can also be added to the Job List by printing to ColorBurst from applications, such as Adobe Illustrator or InDesign. The Print dialog in any application can be used to send files to ColorBurst locally or across a network. ColorBurst Expressway Server is included to publish a Bonjour printer for easy printing to ColorBurst. When printing from applications, all files are sent to ColorBurst as PostScript files, regardless of the type of file printed. To set up printing from applications, refer to the documentation in the ColorBurst\ Documentation folder. 4. Build Plate Images To create separated plate images, the files in the Job list must have a “Ready” or “Ready Priority” status and the RIP On button must be selected in the Job list bar. The Receive on Hold checkbox is selected in the Job list bar by default. This gives all files in the Job list a status of “On hold” so any necessary changes can be made in File Attributes. 1. Change file status to “Ready” Select your file in the Job List and click the green Activate button in the Job Manager toolbar to change the status to “Ready.” To change the status to “Ready - Priority” and move the file to the top of the Job list, click the green Print Now button instead. (Files can be changed back to “On hold” status by clicking the yellow Hold button, or deleted by clicking the red “X” delete button.) 10 COLORBURST® CTP RIP · Tutorial Figure 2.7. Activate your file to change the status from “On hold” to “Ready.” NOTES Too wide: If the width of your file is larger than the Media Width, you will get a Status in the Job List of “Job too wide.” The file will be ignored until you scale or rotate it. Scaling/Rotation: To scale or rotate a file before building the plate images, double-click the file to open the File Attributes dialog. The File Attributes dialog also has a Preview button to preview the file before printing. 2. Click RIP On When you click RIP On, ColorBurst begins to process the file at the top of the Job List with a “Ready - Priority” or “Ready” status. During processing, the ColorBurst status bar at the bottom of the Job Manager window changes to a progress bar. The Messages window shows information about processing. Figure 2.8. Click RIP On to start processing. After processing is complete, the original file is moved to the Done List and new separated plate image files (TIFFs) appear in the Job List. A TIFF file is created for each color found in the original job (CMYK + spots). Each plate is named with a job number followed by the plate color and the original file name. 11 COLORBURST® CTP RIP · Tutorial Figure 2.9. After a file is processed, plate image files (TIFFs) are named with a job number followed by the plate color and the original file name. In the example shown above, the file “Spot Test - K + 2 Spots and Tints.pdf” was separated into Black, Pantone 267 and Pantone 484 plates, with the job number 001. The original file (PDF) was moved to the Done list. 5. Change Screen Angles (optional) The File Attributes dialog lets you change the screen angle for any separated plate image file. This Screen angle setting is only available on separated TIFFs created in ColorBurst. 1. Double-click a plate image file to open the File Attributes dialog When you double-click a plate image file in the Job List, the File Attributes dialog shows the settings for that file. Figure 2.10. The File Attributes dialog opens when you double-click an individual file in the Job list. If the job is a plate image file created by ColorBurst, the Screen angle option will be available. 12 COLORBURST® CTP RIP · Tutorial 13 6. Print the Plate Images Before printing your plate images, make sure your printer shows a “Ready” status on the front control panel, and your plate material (aluminum or polyester) is properly loaded in the printer. 1. Change the plate image file(s) status to “Ready” If you have Receive on Hold selected, your plate images were created with a status of “On Hold.” To change the status to “Ready,” select the plate image files in the Job List and click the green Activate button. Figure 2.11. Select the plate image files and click Activate to change the status to Ready. Click RIP On to start processing. 2. Make sure RIP is on If the RIP On button is still selected from making the plate images, your plates will begin to print in the order listed in the Job List. If RIP Off is selected, click RIP On to start printing. After each plate is printed, the plate image file will be moved to the Done List. NOTE If you want to cancel a job while it is processing, select the file and click the red Cancel button. If the file was printing at the time of cancellation, you may have to cancel the job on the printer’s front panel before the file will go to a status of Cancelled. 7. Heat-cure the plates After the plates are printed, they must be cured using the ColorBurst Plate Press (or a heat curing system that will accomplish the same results). CAUTION! The heat press gets extremely hot and can cause burns if improperly used. The heating element is located underneath the press lid—avoided touching this surface during use! Plates are extremely hot when removed from the press. Always wear heat resistant gloves when operating the press and handling hot plates to minimize risk of burns. heating element COLORBURST® CTP RIP · Tutorial 1. Turn on ColorBurst Plate Press Press the red power button to turn the heat press on. As the unit heats up, the top number on the front display will show the current temperature of the press. The bottom number, which is set to 360, shows the time for the timer in seconds (360 seconds = 6 minutes). The press is ready when the temperature reaches 300 degrees. NOTE You can check the set temperature by clicking the SET button. If the temperature is not set to 300, use the up/down arrows to change the temperature. If you need to adjust the timer, use the left arrow to change the timer to 360. 2. Place Teflon sheet on press The press ships with a Teflon sheet. Arrange the Teflon sheet loosely over the base pad so that it covers the entire surface and hangs over the front. This sheet will keep the pad clean and make it easier for you to slide your plate out of the press when it is done. 3. Cover the Teflon sheet with paper Place a piece of press stock on top of the Teflon sheet to keep it clean. Select a sheet of paper that is the same size as the plate or larger. 4. Place your plate on the paper Place the plate, printed side down, on top of the press stock. Make sure the plate is lined up on top of the paper so that it does not come in contact with the Teflon sheet. 5. Close the press Lower the lid of the press to begin heating the plate. The timer will begin counting down from 360 to 0. NOTE The top half of the press contains the heating element, and must make contact with back of the plate. The lid should require some pressure to click the lid into the closed position. If the lid is not tight enough, adjust the knob on top of the press to make sure the plate will cure properly. 6. Remove plates when timer goes off The press will chime when the timer reaches zero. Carefully open the lid. Wearing heat resistant gloves, carefully grab the front of the Teflon sheet to slide the plate out of the press. Set the plate aside to cool. Once the plate is completely cooled, it is ready to punch and use on press. 14