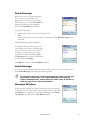
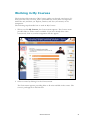
1
User Manual
Version 2.42
©2010 Edusoft Ltd.
Edusoft Ltd.
http://www.edusoftlearning.com
COPYRIGHT NOTICE
This document and all related materials are copyrighted. All rights are reserved. No part of these materials
may be reproduced, photocopied, transmitted or translated into any other computer or foreign language
without the express prior permission of Edusoft Ltd. All requests for permission must be submitted in
writing.
©2010 Edusoft Ltd.
©2010 Edusoft Ltd.
Content
Chapter 1 Welcome to English Discoveries Online ..............................................................1
Document Conventions ...........................................................................................................................1
Logging In...................................................................................................................................................2
Home Page .................................................................................................................................................3
My Courses Section..............................................................................................................................5
Community Section..............................................................................................................................6
My Profile Section ................................................................................................................................7
Support Section.....................................................................................................................................9
Log Out................................................................................................................................................10
Self-Registration..................................................................................................................................11
MP3 Downloads .................................................................................................................................12
Study Planner ......................................................................................................................................12
Dictionary ............................................................................................................................................16
You! Who? ...........................................................................................................................................17
My Progress .........................................................................................................................................21
Grammar Book ...................................................................................................................................22
Downloads...........................................................................................................................................23
Exiting English Discoveries Online .....................................................................................................24
Chapter 2 Starting My Courses............................................................................................25
Working in My Courses..........................................................................................................................26
Components in My Courses .............................................................................................................28
Viewing Your Learning Progress .....................................................................................................28
Taking the Placement Test.....................................................................................................................29
Working Through the Placement Test............................................................................................30
Placement Test Results ......................................................................................................................31
My Progress Reports ...............................................................................................................................33
My Progress – Unit Report ...............................................................................................................33
My Progress – Component Report..................................................................................................34
Chapter 3 Working in the Listening Component ................................................................37
Accessing the Listening Component ....................................................................................................37
Listening – Explore Mode ................................................................................................................38
Listening – Practice Mode.................................................................................................................40
©2010 Edusoft Ltd.
Listening – Test Mode.......................................................................................................................41
Chapter 4 Working in the Reading Component..................................................................43
Accessing the Reading Component ......................................................................................................43
Reading – Explore Mode ..................................................................................................................44
Reading – Practice Mode...................................................................................................................45
Reading – Test Mode.........................................................................................................................46
Chapter 5 Working in the Speaking Component ................................................................49
Accessing the Speaking Component.....................................................................................................49
Speaking – Explore Mode.................................................................................................................50
Speaking – Practice 1Mode...............................................................................................................51
Speaking – Practice 2 Mode..............................................................................................................52
Chapter 6 Working in the Grammar Component................................................................55
Accessing the Grammar Component ...................................................................................................55
Grammar – Explore Mode ...............................................................................................................56
Grammar – Practice Mode................................................................................................................56
Grammar – Test Mode......................................................................................................................57
Chapter 7 Exercise Types....................................................................................................59
Multiple Choice Questions – Whole ....................................................................................................59
Multiple Choice Questions – Segment.................................................................................................60
Fill in the Blanks – Whole ......................................................................................................................61
Fill in the Blanks – Segment ..................................................................................................................62
Cloze – Whole..........................................................................................................................................63
Cloze – Segments.....................................................................................................................................65
Classification.............................................................................................................................................66
Matching....................................................................................................................................................67
Mark the True...........................................................................................................................................68
Sequencing Sentences .............................................................................................................................69
Sequencing Images ..................................................................................................................................70
Chapter 8 Working in the Community Site .........................................................................71
Forums ......................................................................................................................................................72
Community Discussion Forum ........................................................................................................73
Class Discussion Forum ....................................................................................................................73
©2010 Edusoft Ltd.
Magazine ...................................................................................................................................................76
Browsing the Magazine......................................................................................................................76
Article’s Full Page...............................................................................................................................78
Web Pals....................................................................................................................................................81
Inbox ....................................................................................................................................................81
InSite..........................................................................................................................................................89
Recommend a Site..............................................................................................................................90
Archive .................................................................................................................................................91
WordZone ................................................................................................................................................92
Talking Idioms .........................................................................................................................................93
Idioms Archive....................................................................................................................................94
Chapter 9 Support................................................................................................................97
Contact Your Teacher.............................................................................................................................97
Inbox ....................................................................................................................................................97
Sent Items ..........................................................................................................................................101
©2010 Edusoft Ltd.
©2010 Edusoft Ltd.
Chapter 1
Welcome to
English Discoveries Online
Welcome to English Discoveries Online, an online program that creates a rich,
interactive environment in which to learn and practice all aspects of English.
English Discoveries Online consists of nine courses divided into four levels: First
Discoveries, Basic, Intermediate, and Advanced. A placement test determines your
current level of English and recommends at what course level to start.
English language Listening, Reading, Speaking, and Grammar are extensively learned,
practiced, and tested. You work at your own pace, with all the tools necessary for
successful independent learning. Opportunities for review and evaluation are given at
every stage, and detailed record of your progress is kept.
In addition, the English Discoveries Online community site offers a wide variety
of links and activities to further enrich your language learning and internet literacy
skills: word games, vocabulary development, idioms, site reviews, and
communication with other learners on the Web.
Document Conventions
The following conventions are used in this manual.
Table 1-1: Manual Conventions
Convention
Description
Bold font
Used for links, keyboard strokes, and highlighted
bulleted items.
Bold italic font
English Discoveries Online always appears in bold,
italic font.
Italic font
All cross-references are italicized.
Note. A note indicates important information that
you should review before continuing.
©2008 Edusoft Ltd.
©2010 Edusoft Ltd.
1
Logging In
To log in to English Discoveries Online, you will need a user name and password.
Your teacher or English Discoveries Online distributor will supply you with this
information.
For installation instructions, refer to the English Discoveries
Online Installation Guide.
To log in to English Discoveries Online:
1. Launch your browser.
2. Type the URL in the address field and press Enter.
The English Discoveries Online home page appears. The Members Login area
appears in the right side.
3. Enter your user name in the User Name field.
4. Enter your password in the Password field.
©2010 Edusoft Ltd.
2
If you forget your password, click Forgot Your Password?. A
window appears with instructions for obtaining your
password.
5. Click
.
You are now logged in to English Discoveries Online.
Home Page
When you enter the English Discoveries Online URL in your Internet browser,
English Discoveries Online opens to the home page. If you are on any other page
within the application, click Home in the top bar to access English Discoveries
Online’s home page.
©2010 Edusoft Ltd.
3
The home page consists of the following sections:
y A top bar containing links to:
y
Home – the English Discoveries Online home page.
y
My Courses – the English learning course to which you have been assigned.
y
Community – the English Discoveries community site, containing regularly
updated English-enrichment content.
y
My Profile – your user details and preferences.
y
Support – tools to help you contact your teacher.
y
Teacher’s Corner – this link is only available after you log in if you are a
teacher.
y
Log Out – to end your English Discoveries Online learning session.
y On the right side, when you first open the English Discoveries Online site, the
login area appears.
y The work area with changing content, including links to:
y
MP3 Downloads – allows download of sound files in MP3 format.
y
Demo – a short animated presentation about English Discoveries Online.
y
y
y
Guided Tour – overview and explanation about English Discoveries
Online.
Self –Registration/ My Courses – an access button for self-registration.
After login the button changes to My Courses button .
Placement Test – determine at which level you should begin your English
Discoveries Online course. Refer to Taking the Placement Test in Chapter 2:
Starting My Courses for more information.
y
Study Planner – a tool that enables you to plan studies and check your
progress.
y
Community menu – access Web Pals, WordZone, Talking Idioms, or InSite
in the Community Site. Refer to Chapter 8: Working in the Community Site for
more information.
y The bottom right side containing links to:
y
Dictionary – an online bilingual dictionary.
y
You! Who? – a real-time communication tool providing instant messaging
and chat with other online users of English Discoveries Online.
©2010 Edusoft Ltd.
4
y
Grammar Book – all of the grammar points organized according to topics.
y
Help – context-sensitive Help screens. Link to Help section.
y
My Progress – detailed reports of your learning progress.
y
Downloads – download software necessary for optimal operation.
Each of the various sections is described below.
My Courses Section
To access your English learning program, either click My Courses in the top bar or
by clicking on My Courses button to the work area on the home page.
You can select from the following:
y Start working by clicking one of the courses. For more information, refer to
Chapter 2: Starting My Courses.
y Click Placement Test to determine your level of English, and at which course
level to start. For more information on the Placement Test, refer to Placement Test
in Chapter 2: Starting My Courses.
y Click the link My Last Assignment to go straight to the last assignment you
worked on when you were in the course. (This option is only available if you
have already done some course work.)
©2010 Edusoft Ltd.
5
Community Section
Click Community in the top bar to access the English Discoveries Online
Community site.
The English Discoveries Online Community site provides you with access to
enrichment activities and a worldwide community of language learners. Refer to
Chapter 8: Working in the Community Site for more information.
©2010 Edusoft Ltd.
6
My Profile Section
Click My Profile in the top bar to view your user details and set your preferences.
The following personal details are shown:
y User Name
y First Name
y Last Name
y Email Address
y Country
y Date of Birth
y Community Site
y Support Language
y Degree of Native Language Support Level:
y
No Support – All support is in English only.
©2010 Edusoft Ltd.
7
y
Low support – Help, Dictionary, Grammar Explanations and See Translation
appear in Native Language.
y
Full Support – All support is in Native Language.
To change your user details, type or select information from the drop-down
lists and click
.
You can set the following:
y Indicate whether you wish to be informed of new features. A features update is
sent by email.
y Change your password. If you select this option, a window pops up, requesting
that you enter your old password, your new one, and your new one once more
for confirmation.
y Change your Web Pals profile. For more information on Web Pals, refer to Web
Pals in Chapter 8: Working in the Community Site.
©2010 Edusoft Ltd.
8
Support Section
Click Support in the top bar to access the tools you need to contact your teacher.
You can select from the following:
y Inbox – where you can read, reply to, and delete messages from your teacher.
y Write – where you can write messages to your teacher.
y
Sent Items – where you can view and delete messages that you have sent to
your teacher.
Refer to Chapter 9: Support for more information.
©2010 Edusoft Ltd.
9
Log Out
Click Log Out when you want to end your English Discoveries Online learning
session.
The Log Out window will open, asking you if you are sure that you want to log out.
Click Yes to log out of English Discoveries Online and end your learning session.
If you do not want to log out of English Discoveries Online you can close the Log
Out window by:
y
Clicking on Cancel.
y
Clicking on
y
Clicking on X.
.
If you are working on a shared computer it is advisable to log
out before you log in. This will clear the previous user’s
information that may have forgotten to log out.
©2010 Edusoft Ltd.
10
Self-Registration
A learner interested in studying English with English Discoveries Online has the
option of completing a quick self-registration process and assigning him/herself a
username and password.
To do this, click the self-registration icon
situated in the left part
of the page. A pop-up registration window will appear on the screen.
Fill in the fields and click Register. In case you already have your user name and
password, and you selected this option accidentally, click I am already a member
and the window will close.
©2010 Edusoft Ltd.
11
MP3 Downloads
The MP3 downloads are a collection of all the sound files in the English
Discoveries Online components for downloading and listening to when learners are
not connected to the Internet. The files are arranged according to the different
courses. Learners are granted access to the sound files according to the courses they
are assigned to.
Study Planner
The Study Planner is a tool that enables you to plan a course of study in English
Discoveries Online with respect to time required and time available for study. You
can also check your progress and adjust your schedule based on system
recommendations.
Study Plan
Your Study Plan is based on the courses that have been assigned to you and your
progress in them.
Draft Study Plan
Draft Study Plans are based on your personal progress but they do not have to be
based on courses assigned to you. This allows you to build and evaluate hypothetical
study models.
Draft plans follow the same steps that are set out for Study Plans but they cannot be
saved.
©2010 Edusoft Ltd.
12
The Plan Calculator
The Plan Calculator is used to calculate a study plan. It can calculate any one of the
following four variables based on the input of the other three variables:
y
Target Level – The English Discoveries Online course level that you
need to reach.
y
Hours per Week – The time needed per week to complete the planned
studies.
y
Start Date – The latest recommended date for commencement of study in
order to comfortably complete the planned studies.
y
End Date – The date by which studies should be completed.
To create a Study Plan:
1. Click Create New Plan to open the first screen of the Study Planner where you
will be asked to select your starting level for your study plan.
2. Click the radio button next to the level that you wish to begin studying at.
Click Next to display the Plan Calculator.
©2010 Edusoft Ltd.
13
3. Choose the parameter you want to calculate and fill in the other three parameters.
Click the calendar icon - and use the active calendar items (1,2,3… <, >,
Today) to fill in the date information.
4. Click Calculate to calculate the required parameter.
You can change any or all of the parameters and click this button to recalculate
the study plan from the same Starting Level.
If you want to clear and recalculate all parameters at the same Starting Level,
click Clear and repeat steps 3 and 4.
If you want to change the Starting Level, click << Back and repeat
steps 2 through 4.
5. When you have finished calculating the study plan click Next >>. The
completed Study Plan will appear.
©2010 Edusoft Ltd.
14
If you want to go back to the Plan Calculator, click << Back.
If you want to recalculate a new study plan, click New and repeat
steps 2 through 5.
If the Study Plan is acceptable, click Save to save it.
©2010 Edusoft Ltd.
15
Dictionary
The Dictionary in the side bar provides access to the online dictionary.
To use the dictionary:
1. Type the word you’d like to look up in the dictionary field or
right click on a word in the program.
2. Click GO.
The dictionary window appears.
In the dictionary window you can:
y Enter a word to look up.
y Select the languages in which you wish to enter words and view their translation.
For example, select English/French if you wish to enter words in English and
view their translation in French. Select French/English if you wish to enter
words in French and view their translation in English.
In the Results section of the dictionary window you can:
y Click the speaker button
to hear how the word is pronounced.
y View the word’s part of speech.
y View a translation of the word.
y View the definition(s) of the word.
y View other forms of the word.
y View an example illustrating how the word is used.
©2010 Edusoft Ltd.
16
You! Who?
Click You! Who? in the right side bar for real-time communication with other
English Discoveries Online online users.
The running text “Now Online” tells you how many users are currently online.
When the speech bubble icon appears as a flashing envelope, it means
that somebody has sent you a message.
Click the envelope to open You! Who? and read the message.
Click the drop-down arrow to select either:
y See All Users – displaying a list of all users
currently online.
Users with
Web Pals.
next to their names are your
y See Web Pals – displaying a list of all your Web Pals
currently online. For more information about Web Pals,
refer to Web Pals in Chapter 8: Working in the Community
Site.
Check the box next to Sound On to turn the sound on. Uncheck the box to turn the
sound off.
Click
for online You! Who? help instructions.
If you are working on another feature in the site and don’t want to see the You!
Who? window, minimize it by clicking , or click to close the You! Who?
window.
If you close You! Who?, your name will not be listed for other
viewers to see. We recommend you close You! Who? when you
work on My Courses.
To communicate with someone, click the name of the person in
the list. A menu opens with the following communication
options: Read Message, Send Message, See History, User Info,
Invite to Chat, Decline Chat.
©2010 Edusoft Ltd.
17
Read Message
When you receive an instant message
from someone, an envelope icon
appears next to his or her name and if
the sound is on, you hear You! Who?. A
flashing envelope icon also appears
above the You! Who? text window.
To open the message:
y Double-click either one of the envelope icons.
OR
Click the name next to the envelope icon and then select Read Message from
the menu.
The Read Message window appears.
In the Read Message window, you see
the message, who sent it, and what time
it was sent. If you have received other
messages from this person, you can
page between them by clicking Next
and Previous. If you want to write back
to the sender, click Reply.
Click Back to return to the You! Who? window.
Send Message
To send an instant message, click the name of the person you want to write to and
select Send Message. The message window appears.
As the name suggests, instant messages are short, usually not
more than a line or two. For longer messages and more indepth communication, select Invite To Chat. Refer to Invite To
Chat on page 19 for more information.
Message Window
In the message window, the name of the person you are writing
to appears in the To field. Type your message in the text box and
click Send. If you decide not to send the message, click Cancel.
Click Back to go back to the You! Who? window.
©2010 Edusoft Ltd.
18
See History
To see all the messages received from someone, click their name and then click See
History. You can page between the messages using Next and Previous. Click
Reply to write a message back to them.
Click Back to go back to the You! Who? window.
User Info
To see more information about a user whose name appears in the You! Who?
window, click his/her name and then click User Info in the menu that appears. A
window will appear with the following information about the user:
y User Name
y Last Name
y First Name
y Country
y Institution
Invite To Chat
You can invite someone to a chat session through You! Who? Click a name and then
select Invite To Chat from the menu. The person will send you an “Accept” or
“Decline” message. If your invitation is accepted, a chat window will appear.
The invitation process may take a few minutes. Read the
messages on the bottom bar of the You! Who? window to
follow the steps in the process.
When someone sends you an invitation to chat, the chat icon
appears next to the name. Click the name and choose
Accept Invitation or Decline Invitation, or double-click the
chat icon and read the invitation message. Click Accept if you
want to chat. Wait a few seconds and the chat window will
appear. If you don’t want to chat, click Back, click the name of
the person inviting you to chat, and select Decline Chat. The
next to
person who sent you the invitation to chat will see
your name.
©2010 Edusoft Ltd.
19
Accept Chat Window
In the chat window you can communicate in-depth with a partner. Your partner’s
name appears in the window.
Type your message in the lower window. Click Send when you finish. Your text now
appears in the upper window next to your name. Your partner’s text also appears in
the upper window. Use the scroll bar to move up and down the chat page if you
want to read earlier parts of the conversation.
When your partner leaves the chat, a message appears in the upper window that says
he/she has left the chat. If you leave the chat, your partner receives the message and
knows not to continue writing.
If you want to add your partner to your web pals list, click Add Pal.
For online instructions and information about Chat, click Help.
Help
Click Help in the side folder to access the context-sensitive Help screens. A Help
window pops up, providing instructions and explanations for the window you are
currently in.
©2010 Edusoft Ltd.
20
My Progress
Click My Progress in the side bar to view your progress to date. The My Progress
window appears with the Unit Report folder selected.
The My Progress window contains two folders:
y The Unit Report folder reports your progress in each unit.
y The Component Report folder reports your progress for each component to be
mastered.
y The expanded progress menu of the Unit Report is displayed with three boxes
to the right of each component. Each box is an indicator of completion of an
activity within a component – i.e., Explore, Practice and Test. The boxes get
filled as the component’s activities are completed.
y For more information about the My Progress reports, refer to My Progress in
Chapter 2: Starting My Courses.
©2010 Edusoft Ltd.
21
Grammar Book
The Grammar book includes all the grammar points covered in English
Discoveries Online, arranged by subjects. Students of First Discoveries, Basic 1, 2
and 3 have access to an abridged version of the Grammar Book, covering only those
points dealt with at the Basic Levels. Each Grammar point includes a short animated
illustration and explanation of the grammar rule. Click on one of the subjects in the
list, a sub menu will open. Click on one of the sub topics from the list. A popup
menu will appear. Click on the lesson you want to open.
A window appears displaying an illustration with a play button
underneath. Click
to hear and display an animated example of the grammar point or structure.
©2010 Edusoft Ltd.
22
To explore the grammar point:
1. Click See Explanation to learn about the grammar point. If there is more than
one page, click the page numbers at the bottom to browse the pages.
2. Click See Text to view the script.
Downloads
When English Discoveries Online detects that your system is lacking some of the
components necessary for optimal operation, a pop-up window automatically
appears, informing you which software you should download. Follow the on-screen
instructions.
If you want to preload all the necessary components, click Downloads
from the side bar, and follow the on-screen instructions.
©2010 Edusoft Ltd.
23
Exiting English Discoveries Online
You can exit English Discoveries Online by clicking and closing your browser.
It is, however, strongly recommended that you follow the Log Out procedure as
described on pages 1-11 of this chapter.
We hope that you have a rewarding and successful experience in learning English
with English Discoveries Online!
The English Discoveries Online Team
©2010 Edusoft Ltd.
24
Chapter 2
Starting My Courses
To access the English learning courses, click My Courses in the top bar of the main
English Discoveries Online window.
You can choose from the following options:
y Start working by clicking one of the courses. For detailed explanations and
instructions on working in My Courses, refer to Working in My Courses on pages
26-28.
y Click Placement Test to find out your level of English and which courses you
should take. If you are a first-time student in English Discoveries Online, it is
highly recommended that you take the Placement Test before starting the
courses. For more information on the Placement Test, refer to Taking the
Placement Test on page 29.
©2008 Edusoft Ltd.
©2010 Edusoft Ltd.
25
Working in My Courses
The logical tree-like structure of My Courses guides you through your lessons. To
work, you first select a Course, then a Unit within the course, then a Component
within the unit, and then you Explore, Practice, and Test your mastery of the
component.
The following steps describe how to work in My Courses:
1. When you click My Courses, the Courses menu appears. The Courses menu
provides links to all the courses available. If you have already done some
coursework, a link to your last assignment will also appear.
2. Select a course by clicking it in the Courses menu.
The Units menu appears, providing links to all units available in the course. The
course’s path appears in the Path bar.
©2010 Edusoft Ltd.
26
3. Select a unit by clicking it in the Units menu.
The Components menu appears, displaying the components in the unit.
4. Select a component. It is recommended to follow the components in the order in
which they appear.
A specific assignment appears. For a full explanation on how to work inside each
component area, refer to Chapters 3-6.
To go up a level in the tree structure, click
or click
the name of the previous menu in the left side bar or Path bar.
©2010 Edusoft Ltd.
27
Components in My Courses
There are four components available in My Courses:
y Listening – provides you with the opportunity to listen to spoken English in a
variety of voices and accents and practice and test your listening skills. For more
information, refer to Chapter 3: Working in the Listening Component.
y Reading – provides you with the opportunity to read and analyze different types
of texts, practice reading comprehension, and test your reading comprehension
skills. For more information, refer to Chapter 4: Working in the Reading Component.
y Speaking – provides you with the opportunity to speak English, as well as taking
part in a dialogue. For more information, refer to Chapter 5: Working in the
Speaking Component.
y Grammar – provides you with the opportunity to learn various grammar rules,
practice their usage, and test your grammar abilities. For more information, refer
to Chapter 6: Working in the Grammar Component.
Viewing Your Learning Progress
There are two ways you can view your progress in the courses:
y A quick indication of your progress is provided by the squares appearing to the
right of each item in the My Courses menus:
- An empty square indicates a course/unit/component not worked on.
- A half-full square indicates a worked on but not completed
course/unit/component.
- A full square indicates a completed course/unit/component.
A complete progress report is provided in the My Progress reports. For more
information, refer to My Progress Reports on page 33.
©2010 Edusoft Ltd.
28
Taking the Placement Test
The adaptive Placement Test is designed to place you at the appropriate level for
using the English Discoveries Online program.
The test adapts itself automatically according to the student’s ability to successfully
answer questions of increasing difficulty.
To determine your current level of English, and at what level to start your
coursework, go to the home page and click
Placement Test. The introductory
screen of the Placement Test will appear.
To start the Placement Test, click Start Test.
©2010 Edusoft Ltd.
29
Working Through the Placement Test
The Placement Test consists of three sections: a Reading section, a Listening section,
and a Grammar section.
You will begin by answering simple questions and proceeding to
the more difficult ones. If you consistently fail to answer a
couple of questions correctly, the test will automatically end.
y In the Reading section:
1. Read the text.
2. Follow the instructions on how to answer the questions: drag answers to
their correct place, select the correct answer from multiple-choice
possibilities, mark true/false, etc. For more information about the various
types of questions, refer to Chapter 7: Exercise Types.
y In the Listening section:
1. Click Play
to hear the script. The script may be a radio show, voice mail
message, or video clip.
2. If a video clip is being featured, specify how to view it in the Select
Bandwidth drop-down box. Select the option that best fits your system:
Modem, ISDN, ADSL, LAN.
If your school administrator made a default selection, you will
only be able to choose a bandwidth from the available options.
3. Follow the instructions on how to answer the questions: drag answers to
their correct place, select the correct answer from multiple-choice
possibilities, mark true/false, etc. For more information about the various
types of questions, refer to Chapter 7: Exercise Types.
y In the Grammar section:
1. Follow the instructions on how to answer the questions: drag answers to
their correct place, select the correct answer from multiple-choice
possibilities, mark true/false, etc. For more information about the various
types of questions, refer to Chapter 7: Exercise Types.
©2010 Edusoft Ltd.
30
Placement Test Results
Immediately after completing the last question, the test results screen will appear.
Your performance in Reading, Listening, and Grammar is displayed in block graph
format.
©2010 Edusoft Ltd.
31
Placement Level
An overall placement level for your English Discoveries Online course appears
above the graph along with a correlation to the TOEFL (paper and computer-based)
standard tests.
Under the graph, your placement levels for reading, listening, and grammar are
displayed. The scores will only appear for students who have the See scores option
enabled.
Viewing a Course Description
If you want to read a description of the recommended course, click Click here in the
following area of the screen:
A course description will appear.
Click
to close the course description window.
Exiting the Placement Test
Click Exit Test to exit the Placement Test and return to English Discoveries
Online.
You can click Do the test again if you wish to take the
Placement Test again.
©2010 Edusoft Ltd.
32
My Progress Reports
My Progress Reports is only available if you have already done
some coursework.
Click My Progress in the side bar to view your progress. The My Progress window
appears with the Unit Report folder selected. The My Progress window contains two
folders:
y The Unit Report folder reports your progress in each unit.
y The Component Report folder reports your progress in each component to be
mastered.
My Progress – Unit Report
Click Unit Report in the My Progress window to view your progress in each unit.
In the My Progress – Unit Report you can do the following:
y Select the course level – to view your progress in a particular course level, select
the course level in the drop-down box on the top right of the screen.
y View progress within units – click to the left of a unit to view your progress
in the various components included in that unit. The changes to , and a subtree appears showing a breakdown of your progress in the unit, for each
component.
©2008 Edusoft Ltd.
©2010 Edusoft Ltd.
33
The My Progress – Unit Report section provides the following information for the
selected course level:
y Unit – the units included in this course level. If you opened a unit’s sub-tree, the
unit’s components are also displayed.
y Completion – the extent to which you completed learning a unit or component.
Progress is displayed with three boxes to the right of each component. Each box
is an indicator of completion of an activity within a component – i.e., Explore,
Practice, and Test. The boxes get filled as the component’s activities are
completed.
y Test Score – your test score for the unit or component.
y Comments – comments that English Discoveries Online may have on your
progress.
My Progress – Component Report
Click Component Report in the My Progress window to view your progress in each
component.
In the My Progress – Component Report you can do the following:
y Select the course level – to view your progress in a particular course level, select
the course level in the drop-down box on the top right of the screen.
y View progress within components – click to the left of a component to
view your progress in that component, per unit. The changes to , and a subtree appears showing a breakdown of your progress in the component, per unit.
©2010 Edusoft Ltd.
34
The My Progress – Component Report provides the following information for the
selected course level:
y Component – the components taught in this course level. If you opened a
component’s sub-tree, the units teaching that component are also shown.
y Completion – the extent to which you completed learning a unit or component.
Each box is an indicator of completion of an activity within a component – i.e.,
Explore, Practice, and Test. The boxes get filled as the component’s activities
are completed.
y Test Score – your test score for the unit or component.
y Comments – comments that English Discoveries Online may have on your
progress.
©2010 Edusoft Ltd.
35
©2010 Edusoft Ltd.
36
Chapter 3
Working in the
Listening Component
The Listening component provides you with the opportunity to listen to spoken
English in a variety of media, and practice and test your listening skills.
Accessing the Listening Component
To access the Listening component, click the arrow to the left of the Listening
section.
Three activity modes appear:
y Explore
y Practice
y Test
Click one of the modes.
Each of the modes is explained below. Although you can choose any activity mode, it
is recommended that you first Explore, then Practice, and finally Test yourself.
©2008 Edusoft Ltd.
©2010 Edusoft Ltd.
37
Listening – Explore Mode
Click Explore to open the Explore window. A window appears displaying a Play
button. A video clip may also appear.
Click
to hear the dialogue in a radio show, voice mail message, TV show, etc. For
a TV show, watch the video clip while listening to the dialogue.
You can then select from the following options:
y See Script – to see the text of the script as you hear it. The sentence being
played is highlighted to help you follow the script. Click the arrows to the right of
the script box if you want to move between sections of dialogue on your own.
y Hear Part – to hear individual sentences. This option is enabled when See
Script is selected. Click a sentence you wish to hear, and then click Hear Part.
y See Translation – to view a translation of selected sentences in your native
language. This option is enabled when See Script is selected. Click a sentence
you wish to have translated, and then click See Translation.
y Record Yourself – to record yourself saying sections of the dialogue. This
option is enabled when See Script is selected.
©2010 Edusoft Ltd.
38
To record and playback using the Record Yourself feature:
1. Click a sentence you wish to read out loud and then click Record Yourself.
2. In the recording panel that displays, click
to hear the sentence.
3. Click
to record yourself reading the sentence. When the word SPEAK
appears, talk slowly and clearly into the microphone. The red light indicates that
your microphone is working properly. If there is no red light, check the
microphone connection.
After speaking, wait for feedback. This will appear as a written instruction in the
lower part of the recording console.
You can also view the bar
accuracy of your recording.
of the recording panel to evaluate the
4. Click
to hear the recording.
Each attempt is stored with the evaluation bar to the right of the consul. Click to
hear the attempt again.
y See Text – to see the entire script. This option is only available if a video clip is
being shown.
y See Full Screen – to view a full screen if one of the following bandwidths are
selected: ISDN, ADSL, or LAN. Click ESC to restore the screen to its previous
size.
y Select Bandwidth – to specify how to view a video clip. This option is only
available if a video clip is being shown. Select the option that best fits your
system:
©2010 Edusoft Ltd.
39
y
Slide show – modem
y
Modem – video
y
ISDN – video
y
ADSL – video
y
LAN – video
If a default selection was made by your school administrator,
you will only be able to choose a bandwidth from the available
options.
Listening – Practice Mode
Click Practice to open the Practice window. Use the Practice window to exercise
your listening comprehension skills.
If there is more than one practice page, click the page numbers to browse the pages.
In each practice page, follow the instructions on how to complete the exercise: listen
to the script, drag answers to their correct place, select the correct answer from
multiple choice possibilities, mark true/false, etc. For information about the various
exercise types, refer to Chapter 7: Exercise Types.
©2010 Edusoft Ltd.
40
To help you complete a practice page, you can select from the following options:
y Check Answer – to view which of your answers are correct and which are not.
English Discoveries Online places a next to correct answers and an next
to incorrect answers. Click Check Answer again to clear the incorrect answers
and try to answer the questions that were incorrect.
y Clear – to erase all the answers you entered. Now you can re-enter answers.
Listening – Test Mode
Click Test to open the Test window. You are presented with a short test on the
script you have just listened to and practiced. After you submit the test, English
Discoveries Online checks your answers and reports the results.
Click Start Test. The Test window appears and displays the first of several test
questions.
Follow the instructions for answering questions. Read each question carefully and
answer it. If you wish, you can click
to listen to the passage again. If you don’t
know the answer to a question, you can skip it and come back to it later. Click on the
page numbers to move among the test questions.
After checking your answers, click Submit Test.
©2010 Edusoft Ltd.
41
Viewing Test Results
English Discoveries Online checks your test and displays your test score.
Possible test scores are:
y 100% – Excellent!
y 85-99% – Very Good!
y 75-84% – Good!
y 60-74% – Try to improve your score!
y 0-59% – Try the test again!
You can click a question to see your answer, the correct answer, and the source text.
©2010 Edusoft Ltd.
42
Chapter 4
Working in the
Reading Component
The Reading component provides you with the opportunity to read and access
information from different types of texts, reinforce and practice reading
comprehension, and test your reading comprehension skills.
Accessing the Reading Component
To access the Reading component, click the arrow to the left of the Reading section.
Three activity modes appear:
y Explore
y Practice
y Test
Click one of the activity modes.
Each of the modes is explained below. Although you can choose any activity mode, it
is recommended that you first Explore, then Practice, and finally Test yourself.
©2008 Edusoft Ltd.
©2010 Edusoft Ltd.
43
Reading – Explore Mode
Click Explore to open the Explore window. A text selection appears; it may be any
type of text, including a story, postcard, article, report, letter, advertisement, notice,
etc.
If the text is more than one page long, click the page numbers at the bottom to
browse the pages.
It is recommended to first read the text and then select from the following options:
y Hear All – to hear the text read aloud. Each sentence is highlighted as it is being
read.
y Hear Part – to hear an individual sentence. Click the sentence you want to hear.
y See Translation – to view a translation of selected sentences in your native
language. Click the sentence you want to see translated.
y Main Idea – to view the main idea. The sentences containing the main idea are
highlighted. If there is more than one text page, browse the pages to view all
highlighted sentences.
y Keywords – to view the keywords of the text. The key words are highlighted. If
there is more than one text page, browse the pages to view all keywords.
Click a keyword for further information. A
window pops up, allowing you to hear how
the word is pronounced and read a
sentence illustrating how the word is used.
©2010 Edusoft Ltd.
44
y Reference Words – to view reference words in the text. For example: John, he,
his are highlighted in yellow, while Alison, she, her are highlighted in green. If
there is more than one text page, browse the pages to view all reference words.
y Print – to print the text. A print window pops up, allowing you to print the
whole text or selected pages.
Reading – Practice Mode
Click Practice to open the Practice window. Use the Practice window to exercise
your reading comprehension skills.
If there is more than one practice page, click the page numbers to browse the pages.
In each practice page, follow the instructions explaining how to complete the
exercise: drag answers to their correct place, select the correct answer from multiplechoice possibilities, mark true/false, etc. For information about the various exercise
types, refer to Chapter 7: Exercise Types.
To help you complete a practice page, you can select any of the following:
y Check Answer – to view which of your answers are correct. English
Discoveries Online places a next to correct answers and an next to
incorrect answers. Click Check Answer again to clear the incorrect answers and
try to answer the questions that were incorrect.
y Clear – to erase all the answers you entered. Now you can re-enter the answers.
y See Text – to view the source text. A window pops up displaying the source
text.
©2010 Edusoft Ltd.
45
Reading – Test Mode
Click Test to open the Test window. You are presented with a short test on the text
you have just read and practiced. After you submit the test, English Discoveries
Online will check your answers and report the results.
Click Start Test. The Test window displays the first of several test questions.
Follow the instructions on how to answer questions. Read each question carefully
and answer it. If you wish, you can click See Text to view the source text. If you
don’t know the answer to a question, you can skip it and come back to it later. Use
the page number buttons to move among the test questions.
After checking your answers, click Submit Test.
©2010 Edusoft Ltd.
46
Viewing Test Results
English Discoveries Online checks the test you submitted and displays your test
score.
Possible test scores are:
y 100% – Excellent!
y 85-99% – Very Good!
y 75-84% – Good!
y 60-74% – Try to improve your score!
y 0-59% – Try the test again!
You can click a question to see your answer, the correct answer, and the source text.
©2010 Edusoft Ltd.
47
©2010 Edusoft Ltd.
48
Chapter 5
Working in the
Speaking Component
The Speaking component provides you with the opportunity to speak English, and
actually take part in a dialogue.
Accessing the Speaking Component
To access the Speaking component, click the arrow to the left of the Speaking
section.
The following activity modes appear:
y Explore
y Practice 1
y Practice 2
A Speaking unit may have more than one Practice section. For
details about Practice 2, refer to Speaking – Practice 2 .
Click one of the activity modes.
Each of the activity modes is explained below. Although you can choose any mode, it
is recommended that you first Explore, then Practice 1. In units with more than one
Practice section, choose Practice 2 after completing Practice.
©2008 Edusoft Ltd.
©2010 Edusoft Ltd.
49
Speaking – Explore Mode
Click Explore to open the Explore window. A window appears displaying the first
frame of a cartoon clip.
Click
to play the animated cartoon and hear the dialogue. You can then select any
of the following:
y See Script – to see the captions of the dialogue. The sentence being read is
highlighted. Click the arrows to the right of the script box if you want to move
between sections of the dialogue.
y Hear Part – to hear individual sections of the dialogue. This option is enabled
when See Script is selected. Click a sentence you wish to hear, and then click
Hear Part.
y See Translation – to view a translation of selected sentences in your native
language. This option is enabled when See Script is selected. Click a sentence
you wish to have translated, and then click See Translation.
y Record Yourself – to record yourself saying sections of the dialogue. This
option is enabled when See Script is selected. To record yourself:
1. Click a sentence you wish to read out loud, and then click Record Yourself.
2. In the recording panel that appears, click
©2010 Edusoft Ltd.
to hear the sentence.
50
3. When the word SPEAK appears, click
to record yourself reading the
sentence. Talk directly into the microphone, slowly and clearly. The red light
indicates that your microphone is working properly. If there is no red light,
check the microphone connection.
4. Refer to the bar to the right of the recording panel to see the percentage
accuracy of your recording.
5. Click
to hear your recording.
y See Text – to see the entire script.
Speaking – Practice 1Mode
Click Practice 1 to open the Practice window. Use the Practice window to exercise
your speaking skills.
If the Speech Recognition program is not installed on your
computer, you will receive a message. Follow the on-screen
instructions to download it.
Follow the instructions in the Instructions Panel. They will guide you through the
following steps.
1. Select a speaker by clicking the arrow
you want to practice.
closest to the speaker whose dialogue
The first section of dialogue appears in the Script Box. An indicator appears to
the left of the sentence you should speak.
©2010 Edusoft Ltd.
51
2. Click
to begin. When it is your turn to speak, the SPEAK prompt appears.
The red light indicates that your microphone is working correctly. If there is no
red light, check the microphone connection.
3. Speak into the microphone, slowly and clearly.
y
y
If your pronunciation is accepted by English Discoveries Online, the
continuation of the dialogue will appear. Repeat steps 2 and 3 until you reach
the end of the dialogue.
If your pronunciation is not accepted by English Discoveries Online, try
again and repeat steps 2 and 3. If you still don’t succeed, and want to
proceed, click
to move on to the next part of the dialogue.
4. When you reach the end of the dialogue, you can:
y
Click
to hear yourself taking part in the dialogue.
y
Click
to erase your recording and start again.
Speaking – Practice 2 Mode
Click Practice 2 to open the Practice 2 window. Use the Practice 2 window to
exercise your speaking skills.
Follow the instructions in the Instructions Panel. They will guide you through the
following steps:
1.
Click
Box.
to begin. The animated figure says a sentence in the Animated Script
©2010 Edusoft Ltd.
52
2.
When it is your turn to speak, the SPEAK prompt appears. Click next to the
sentence in the script box you want to read out loud. The red light shows that
your microphone is working properly. If there is no red light, check the
microphone connection.
3.
Speak into the microphone, slowly and clearly.
y
y
If your pronunciation is accepted by English Discoveries Online, the
continuation of the dialogue appears. Repeat steps 1 through 3 until you
reach the end of the dialogue.
If your pronunciation is not accepted by English Discoveries Online, Try
again by repeating steps 1 through 3. If you still don’t succeed, and want to
proceed, click
to move on to the next part of the dialogue.
4. When you reach the end of the dialogue, you can:
y
Click
to hear yourself taking part in the dialogue.
y
Click
to erase your recording and start again.
©2010 Edusoft Ltd.
53
©2010 Edusoft Ltd.
54
Chapter 6
Working in the
Grammar Component
The Grammar component provides you with the opportunity to learn grammar
points, practice their usage, and test your grammar abilities.
Accessing the Grammar Component
To access the Grammar component, click the arrow to the left of a Grammar
section.
A unit may have more than one Grammar section.
Three activity modes appear:
y Explore
y Practice
y Test
Click one of the activity modes.
Each of the modes is explained below. Although you can choose any mode, it is
recommended that you first Explore, then Practice, and finally Test yourself.
©2008 Edusoft Ltd.
©2010 Edusoft Ltd.
55
Grammar – Explore Mode
Click Explore to open the Explore window. An illustration appears with a play
button
underneath. Click to hear and display an animated example of the
grammar point or structure.
To explore the grammar component:
1. Click See Explanation to learn about the grammar point. If there is more than
one page, click the page numbers at the bottom to browse the pages.
2. Click See Text to view the script.
Grammar – Practice Mode
Click Practice to open the Practice window. Use the Practice window to exercise
your grammar skills.
If there is more than one practice page, click the page numbers to browse the pages.
©2010 Edusoft Ltd.
56
In each practice page, follow the instructions on how to complete the exercise: drag
answers to their correct place, select the correct answer from multiple-choice
possibilities, mark true/false, etc. For information about the various exercise types,
refer to Chapter 7: Exercise Types.
To help you complete a practice page, select any of the following:
y Check Answer – to view which of your answers are correct and which are not.
English Discoveries Online places a next to correct answers and a next to
incorrect answers. Click Check Answer again to clear the incorrect answers and
try to answer the questions that were incorrect.
y Clear – to erase all the answers you entered. Now you can re-enter the answers.
y See Explanation – to view an explanation of the grammar point. A window
pops up with an explanation.
Grammar – Test Mode
Click Test to open the Test window. You are presented with a short test on the
grammar point you have just learned and practiced. After you submit the test,
English Discoveries Online will check your answers and report the results.
Click Start Test. The Test window appears and displays the first of several test
questions.
Follow the instructions on how to answer questions. Read each question carefully
and answer it. If you wish, you can click See Explanation to view the explanation of
the grammar point. If you don’t know the answer to a question, you can skip it and
come back to it later. Click the page numbers to move among the test questions.
After checking your answers, click Submit Test.
©2010 Edusoft Ltd.
57
Viewing Test Results
English Discoveries Online checks the test you submitted and displays your test
score.
Possible test scores are:
y 100% – Excellent!
y 85-99% – Very Good!
y 75-84% – Good!
y 60-74% – Try to improve your score!
y 0-59% – Try the test again!
You can click a question to see your answer, the correct answer, and the source text.
©2010 Edusoft Ltd.
58
Chapter 7
Exercise Types
This chapter lists the various exercise types; instructions for completing the exercise;
in which component and mode the exercise can be found; and an example of the
exercise.
Multiple Choice Questions – Whole
In these exercises, access and review the source material (audio or text), and then
answer the questions. Read each question and click the box next to the correct
answer. To change an answer, click a different box. If there is more than one correct
answer, it is specified in the instructions.
Component
Reading
Mode
Practice
Test
Example
©2008 Edusoft Ltd.
©2010 Edusoft Ltd.
59
Component
Listening
Mode
Practice
Test
Example
Multiple Choice Questions – Segment
In these exercises, listen to the relevant segment of the passage by clicking the yellow
arrow next to the question, and then click the box next to the correct answer. To
change an answer, click a different box. To hear the whole script, click under the
audio device.
Component
Listening
Mode
Practice
Example
©2010 Edusoft Ltd.
60
Fill in the Blanks – Whole
In these exercises, access and review the source material (audio or text), and then
complete the sentences. To complete a sentence, click the down arrow in the blank.
A drop-down list appears with a choice of words to complete the sentence. Click the
word that best completes the sentence. To change an answer, click the down arrow
again and select a different word.
Component
Reading
Mode
Practice
Test
Example
Component
Listening
Mode
Practice
Test
Example
©2010 Edusoft Ltd.
61
Component
Grammar
Mode
Practice
Test
Example
Fill in the Blanks – Segment
In these exercises, listen to the relevant segment of the passage by clicking the yellow
arrow next to the sentence. To hear the whole script, click under the audio device.
To complete the sentences, click the down arrow in the blank. A drop-down list
appears with a choice of words to complete the sentence. Click the word that best
completes the sentence. To change an answer, click the down arrow again and select
a different word.
Component
Listening
Mode
Practice
Example
©2010 Edusoft Ltd.
62
Cloze – Whole
In these exercises, access and review the source material (audio or text), and then
complete the sentences. Where there are blanks, click a word from the section below
the exercises that best completes the sentence. Then, drag and drop it in the blank.
To move the word to a different blank, click the word again, and drag and drop it in
the correct place. To return it to the section below the exercises, click the word again,
and drag and drop it in that section.
Component
Reading
Mode
Practice
Test
Example
©2010 Edusoft Ltd.
63
Component
Listening
Mode
Practice
Test
Example
Component
Grammar
Mode
Practice
Test
Example
©2010 Edusoft Ltd.
64
Cloze – Segments
In these exercises, listen to the relevant segment of the passage by clicking the yellow
arrow next to the sentence, and then complete the sentences. To hear the whole
script, click under the audio device. Where there are blanks, click the word from
the section below the exercises that best completes the sentence. Drag and drop it in
the blank. To move the word to a different blank, click the word again, and drag and
drop it in the correct place. To return it to the section below the exercises, click the
word again, and drag and drop it in that section.
Component
Listening
Mode
Practice
Example
©2010 Edusoft Ltd.
65
Classification
In these exercises, access and review the source material (audio or text), and then
complete the table using the words available in the section under the table. Use the
up and down arrows ( ,
) to scroll through the available words. To move a
word into the table, click the word, and drag and drop it in the appropriate cell in the
table. To move a word to a different cell, click the word again, and drag and drop it
in a different cell. To return the word to the section under the table, click the word,
and drag and drop it in that section.
Component
Reading
Mode
Practice
Example
Component
Listening
Mode
Practice
Example
©2010 Edusoft Ltd.
66
Matching
In these exercises, access and review the source material (audio or text), and then
complete the table. For each row, complete the table using the words available in the
section under the table. Use the up and down arrows ( ,
) to scroll through the
available words. To move a word into the table, click the word, and drag and drop it
in the appropriate cell in the table. To move a word to a different cell, click the word
again, and drag and drop it in a different cell. To return the word to the section
under the table, click the word, and drag and drop it in that section.
Component
Reading
Mode
Practice
Example
Component
Listening
Mode
Practice
Example
©2010 Edusoft Ltd.
67
Mark the True
In these exercises, access and review the source material (audio or text), and then
complete the table. Click the boxes next to the sentences that are true. When you
click the box, an indication ( ) appears in the box. To unselect the sentence, click
the box again.
When you submit your exercise, and it is corrected, you will see an x next to false
sentences that you marked as true, and true sentences that you did not select.
Component
Reading
Mode
Practice
Example
Component
Listening
Mode
Practice
Example
©2010 Edusoft Ltd.
68
Sequencing Sentences
In these exercises, access and review the source material (audio or text), and then
place the sentences in the correct order according to the source material. To move a
sentence, click the sentence, and drag and drop it above or below another sentence.
Component
Reading
Mode
Practice
Example
Component
Listening
Mode
Practice
Example
©2010 Edusoft Ltd.
69
Sequencing Images
In these exercises, access and review the source material (audio or text), and then
place the images in the correct order according to the source material. To move an
image, click the image, and drag and drop it in the right place.
Component
Reading
Mode
Practice
Example
©2010 Edusoft Ltd.
70
Chapter 8
Working in the Community Site
The English Discoveries Community site enables you to communicate with other
English Discoveries Online users, develops your Internet literacy skills, and offers
language enrichment activities. To access the Community site, click Community in
the top bar of the main English Discoveries Online window.
You can select from the following options:
y Forums – join the many discussions that are being held in the forums, initiated
and moderated by Edusoft or teachers.
y Magazine – read regularly updated articles on a wide range of topics.
y Web Pals – contact learners from all over the world and write to them in
English.
y InSite – view tips on how to access interesting Internet sites and read short
descriptions about them.
©2008 Edusoft Ltd.
©2010 Edusoft Ltd.
71
y WordZone – a vocabulary game. Guess the hidden word by using the clue and
guessing the letters in the word.
y Talking Idioms – learn the meaning of idiomatic expressions.
Forums
The Discussion Time forums enable you to exchange information and opinions
with other learners in the global community.
There are two kinds of forums:
y Community Discussion Forum
y Class Discussion Forum
©2010 Edusoft Ltd.
72
Community Discussion Forum
The Community Discussion forum is moderated by Edusoft and enables you to
communicate with the global English Discoveries Online community. In this
forum, you can ask questions, express personal opinions and share experiences with
fellow learners from all over the world.
Class Discussion Forum
The Class Discussion forum is created and moderated by the teacher and enables
you to communicate with fellow learners in their institutions.
Once you have entered the forum and chosen a topic of interest, a screen similar to
the one below appears.
You can choose from the following options:
y Read messages
y Reply to an existing message
y Add a new message
Read Messages
On the first page of the forum (Community Discussion forum or Class
Discussion forum), you will see a list of messages which the learners posted for
discussion. Each message is structured in the following way:
©2010 Edusoft Ltd.
73
y
The title of the message appears on the left side.
y
The learner’s user name appears in the center.
y
The date when the message was posted appears on the right side.
In order to read a message, click the
button located on the left side of each
message line and the message will open.
Reply to a Message
To reply to a message:
1. Once you opened the message, as described above, click the
located in the lower right-hand corner of the message box.
option
2. A message window will pop up and you can start writing a message.
3. You can attach .gif, .jpg, .doc, .xls, .ppt, .txt, and .rtf files to the post.
4. When you finish writing the message, click Send to post the message.
Dictionary
The message window contains a built-in dictionary, which you can use to check your
spelling and translate unknown words.
y
Click Dictionary and the dictionary window will appear to the right of the
message window. Enter a word or phrase and click GO to translate or define
it. You can either choose a bilingual dictionary or an English one.
©2010 Edusoft Ltd.
74
Add a New Message
In addition, you can create a new message and post it to the forum for discussion.
To add a new message:
1. Click Add New Message.
2. A message window will pop up.
3. Write the title of your message in the Title line.
4. Start writing your message. When you finish, click Send to post the message to
the forum.
Search in Forum
In the Community Discussion and Class Discussion forums, there is a Search
option, which will help you find messages containing the topics you are searching.
y
Enter the keyword in the search line and press
y
The search results will appear as a list of messages containing the keyword.
©2010 Edusoft Ltd.
.
75
Forum FAQ
If you have questions regarding the use of the Discussion Time forums, you can
first look for the answers in the forums’ FAQ, where the main terms and rules of the
forums are explained. It is also highly recommended to read the FAQ prior to
entering the forums’ discussions.
To open the FAQ page:
1. Click the Frequently Asked Questions link (shown in the picture above).
2. The forums’ FAQ window will pop up. Read the FAQ carefully.
Magazine
Discoveries Magazine is regularly updated and includes articles on a broad range of
topics, such as Science & Technology, Business, Environment, etc. All articles appear
at three levels of difficulty: Basic, Intermediate, and Advanced - enabling you to read
the same article at a level suitable to you.
Browsing the Magazine
To open the magazine, click the Magazine bar or go to the Magazine area of the
Community Site. The Magazine home page appears.
©2010 Edusoft Ltd.
76
The Magazine home page consists of several sections:
y Main article
y Abstracts of other new articles
y Drop-down menu with three levels of difficulty
y Archive of previous issues
y List of available article topics
Main Article
The Main Article is the first article published in the current Magazine issue. The
Magazine main page contains the article’s title and pre-reading questions, followed by
the article’s introductory text.
To continue reading the Main Article, click
will appear on the screen.
©2010 Edusoft Ltd.
. The full text of the article
77
Other New Articles
Under the Main Article, there is a section containing a number of other new article
abstracts. To read an article, click the article’s link.
Level
Choose the level of difficulty for the current article you are about to read. There are
three levels of difficulty:
y
Basic
y
Intermediate
y
Advanced
Archive
The archive gives you access to articles from previous issues. The issues are ordered
according to months. Each issue includes articles on a number of topics.
List of Topics
To view articles on a relevant topic:
1. Click a topic you are interested in. A list of all articles relevant to the topic will
appear.
The articles are arranged so that the most recent one will
appear first.
2. Once you have decided which article you would like to read, click
The full article will appear.
.
Article’s Full Page
When the full article opens, select from the Level drop-down menu the difficulty
level for the article you are about to read.
When the difficulty level is set, start reading the article. If you feel that the text is too
difficult, you can choose a lower level of difficulty.
In addition to the article text there are two kinds of activities:
y
Pre-reading questions
y
Post-reading questions
©2010 Edusoft Ltd.
78
There are three features:
y
Glossary
y
Related Links
y
Link to the Archive
The Issue details above the article’s title remind you which
Issue of the Magazine you are currently browsing.
To see other articles on the topic, click the topic link located
under the article’s title.
Pre-Reading Questions
Pre-reading questions appear before the article’s text and they introduce the topic
of the article. They provoke curiosity and are designed to help you become familiar
with the topic.
©2010 Edusoft Ltd.
79
Teachers can use the pre-reading questions as a warm-up activity prior to reading the
article.
Post-Reading Questions
Once you have read the article, go to the Questions section located under the
Archive link on the right side of the page.
Post-reading questions are designed to help you understand the article. Each
question has a number of possible answers from which to choose.
To answer the post-reading questions:
y Read the questions carefully and look at suggested answers.
y Once you decided which answer is correct, click the
answer.
button to mark the
y You can check if your answer is correct by clicking
y You can find out the correct answer by clicking
y Click
.
.
to clear the answer.
y Click the next question number or
to proceed to the next question.
Glossary
To the right of the selected article there is a Glossary feature, which displays the new
vocabulary used in the current article. Once you click it, all new words are
highlighted in the article text.
Clicking any highlighted word in the text opens a Glossary window containing a
definition of the word.
Related Links
Each article in the English Discoveries Magazine contains a Related Links
feature, which allows you to learn more about the topic discussed in the article by
referring you to authentic websites.
To read more about the topic in other websites:
1. Click
under the Glossary. You will go to the Related Links text
box located at the bottom of the page.
2. Click one of the links. A Disclaimer window will pop up.
©2010 Edusoft Ltd.
80
3. Read the Disclaimer and click OK to go to the external website.
Link to the Archive
The Archive link, which appears underneath the Related Links icon, takes you to
articles that were published in previous issues. In the Archive page, a list of previous
issues on one topic appear according to date. To see other topics in the archive,
select other available article topics.
To return to the Magazine’s main page, click the Current Issue
tab located above the Discoveries Magazine logo. To return
back to the Archive, click the Archive tab.
Web Pals
Web Pals is an internal email system that identifies all registered English
Discoveries Online users, and sends messages from them and delivers messages to
them through the Web Pals mail service.
You do not need to have your own email address or know the
email address of your web pal to use Web Pals.
Click Web Pals in the Community page to access the email services of the English
Discoveries Online community.
Inbox
Click Inbox in Web Pal’s top bar to view a list of the mail messages you have
received. The Inbox lists the name of the person who sent you mail, the subject of
©2010 Edusoft Ltd.
81
the message, and the date you received the message. An envelope icon next to the
name indicates that the mail message is new.
From the Inbox, you can do the following:
y Read a mail message
y Write a mail message
y Delete a mail message
Reading a Mail Message
To read a mail message, click a name in the inbox. The Read Message window
appears.
©2010 Edusoft Ltd.
82
The From area contains the name of the person who sent the mail message, the
Subject area tells you what the mail message is about, and the Message area contains
the text of the mail message.
From the Read Message window, you can:
y Reply – send a mail message back to the sender.
y Save Pal – save the sender as a web pal.
y Dictionary – open the English Discoveries Online dictionary. For more
information about how to use the dictionary, refer to Dictionary in
Chapter 1: Welcome to English Discoveries Online.
Writing a Mail Message
To write and send a mail message, check the box in the inbox next to the name of
the person to whom you want to write and click Write. The Write Message window
appears.
If you want to write the same message to more than one
person, check the box next to the multiple names in the inbox
list and click Write.
Type the subject of your message in the Subject area. Type your message in the
Message area. You may use the dictionary for help. Click Send to send the mail
message.
Deleting a Mail Message
To delete a mail message, click the box next to the name (or names) of the person
who wrote the message, and click Delete.
©2010 Edusoft Ltd.
83
Pals
Click Pals in Web Pal’s top bar to view your list of web pals. The Pals window lists
the following information about your web pals: name, gender, and country of origin.
Profile
Click Profile to see your web pal’s profile. The Pal Profile window appears with your
web pal’s age, gender, country, and list of hobbies.
©2010 Edusoft Ltd.
84
Mail
Click Mail to see a history of the messages you sent or received from your web pal.
The Pal History window appears with the name of the sender, subject of each mail
message, and the date the mail message was sent.
From the Pal History window, you can:
y View a previous message by clicking the name of the person to whom the mail
message is associated.
y Click Reply to send a mail message back to your web pal.
y Click Dictionary to open the English Discoveries Online dictionary. For more
information about how to use the dictionary, refer to Dictionary in
Chapter 1: Welcome to English Discoveries Online.
Write
To write and send a mail message, check the box next to the name of the person to
whom you want to write from your web pal list and click Write. For more
information about how to write and send a message, refer to Writing a Mail Message
on page 83.
Delete
To delete a mail message, click the box next to the name (or names) of the person in
the inbox whose message you want to delete and click Delete.
©2010 Edusoft Ltd.
85
Search Pals
Click Search Pals in Web Pal’s top bar to search for web pals to write to. The
Search Pals page appears.
You can search for web pals according to a number of categories; at the same time,
you can enter and update your profile.
The Search Menu has a drop-down list that gives you the following search options:
y Search For New Pals
y Search By Name
Search for New Pals
This search mode is automatically selected for you and you can use it to find pals that
share common interests with you.
Fill in the following sections:
y General section – select the age, gender, and country of the web pals you are
looking for.
y Hobbies section – click the box next to the hobbies you would like your web
pals to have. To unselect a box, click it again.
y More about myself section – type personal information that you want to share
with others.
Click Search in the Search Pals bar to initiate the search for web pals.
©2010 Edusoft Ltd.
86
Search By Name
Use this search if you know the user’s first name, last name, user name, or institution.
The following window appears:
Try to fill in as much information as possible about the user you are looking for.
Click Search in the Search Pals bar to initiate the search for a web pal.
If this is the first time you are accessing Web Pals, fill in your
details in the My Profile window and click Submit.
Search Results
The Search Result window lists the names, ages, genders, and countries of the web
pals found in the Web Pals search. Click the numbers in the page navigation to view
pages containing additional lists of web pals. Click More to view your web pal’s
profile.
©2010 Edusoft Ltd.
87
In the Search Result window, you can do the following:
y Write – write and send a message to a web pal. Check the box next to the name
of the person in the web pal list to whom you want to write, and click Write. If
you want to write the same message to more than one web pal, click the names
of all the pals to whom you want to write.
y Add Pal – select the names of the people you want as web pals and click Add
Pal. The names you selected will be added to your web pals list.
y New Search – to initiate a new web pal search with different details, click New
Search.
Update My Profile
To update your profile, click Update My Profile. My profile window appears. Make
any changes you want and click Submit.
Sent Items
Click Sent Items in Web Pal’s top bar to see a list of the mail messages you have
sent. The Sent Items list contains the names of the people to whom you’ve sent mail
messages, the subject of the mail messages, and the date the mail messages were sent.
In the Sent Items window, you can do the following:
y To read a mail message you’ve sent, click the name of the person to whom you
sent the message. The Read Message window appears with the text of the mail
message.
y To delete a mail message from the Sent Items list, check the box next to the mail
message you want to delete and click Delete.
©2010 Edusoft Ltd.
88
InSite
InSite provides recommendations of interesting Internet sites. Each recommendation
includes a short description of the site and tips on how to use the site.
Click InSite in the Community page. The Current Review page appears.
The Current Review page contains the following information:
y Site Name – the name of the Internet site.
y Recommended By – the name of the person who recommended the site.
y Site Review – a review of the site.
y Tips – tips on how to use the site.
y Date – the date this InSite review appeared.
y Archive – click Archive to read previous InSite reviews.
y Level – select your reading level so that you have access to reviews of Internet
sites that are appropriate for your level.
y Link to Site – click the link to go to the Internet site.
©2010 Edusoft Ltd.
89
If you click a link to a site, you won’t leave the English
Discoveries Online site. A new Internet Explorer window will
open in which the recommended site will be loaded.
y Opinion Poll – after visiting a site, select the sentence that best describes how
you feel about the site, and click Submit. The Opinion Poll window will pop up.
y Recommend a Site – recommend an Internet site that you like and think that
others will enjoy.
Recommend a Site
To recommend an Internet site to others, click Recommend in the Current Review
page of the InSite window. The Recommend a Site window appears.
©2010 Edusoft Ltd.
90
Fill in the form as follows:
y Recommended by – fill in your name.
y No. I don’t give you permission to publish my name.
Yes. You have my permission to publish my name. – click the button next to
the sentence you want to select.
y Select country – select your country from the drop-down list.
y Address of Site – type the address (URL) of the site you are recommending.
y What is the site about – type a short description of the site.
y Comments – type anything else you wish to add.
y Submit – click Submit to send your recommendation to English Discoveries
Online.
Archive
The Archive section contains previous InSite reviews. Select your reading level so
that you have access to reviews of Internet sites appropriate for your level. For each
review, the following appears: the Internet site link, subtitle, and date the review first
appeared on InSite. As you move your cursor over the name of the Internet site, the
graphics change to reflect the Internet site.
Click the Internet site link to read the review. The Internet site review appears. It is
similar to the Current Review page with the addition of the archive menu pager.
©2010 Edusoft Ltd.
91
In the archive menu pager, you can do the following:
y Back to Archive – click to go to the Past Reviews menu.
y Previous – click to go to the previous InSite review in the archive.
y Next – click to go to the next InSite review in the archive.
y Level – choose your reading level so that you have access to reviews of Internet
sites appropriate for your level.
Click Current Review to go to the latest InSite review.
WordZone
WordZone is a vocabulary game. You have to guess the hidden word by using the
clue that appears on screen. You have six chances to guess the word.
Click WordZone in the Community site menu page. The WordZone page appears.
Choose your level of play. A game appears that is appropriate for your level. Each
dash represents a letter in the hidden word. Use the clue (either a picture or a
sentence) to try to guess what the word is.
©2010 Edusoft Ltd.
92
Click a letter in the alphabet, or click a dash and type the letter. If the letter you chose
is correct, it will appear in all the places it appears in the word. Any letter you have
already chosen appears in the alphabet in a lighter color and you can’t choose it
again.
If you choose a correct letter, the graphic dances and you get points. Your points
appear in the score box. If the speaker is on (
), you will hear a congratulatory
noise. To turn off the speaker, click
. To turn on the speaker, click
.
If you chose the wrong letter, you lose one of your six chances. This is indicated by
the graphic above the clue. For example, in the above game, the letter "l" was an
incorrect choice, so one of the birds hangs upside down from the branch instead of
sitting on it. Now you only have five more chances left.
Click New Game to end the current game and start again. If you start a new game
without finishing the current game, you lose all the points you accumulated in the
current game.
Click Top Ten to see the names and scores of the top ten WordZone players. If you
get enough points, you too will be listed in the top ten!
Talking Idioms
An idiom is a special kind of expression. The meaning of an idiom is not the same as
the meaning of the words in the idiom. In Talking Idioms, you can learn lots of
idioms. You hear them, learn their meaning, see them used in an animated comic,
and then practice them by recording yourself saying them.
Click Talking Idioms in the Community page. The Talking Idioms page appears.
©2010 Edusoft Ltd.
93
The Talking Idiom page consists of the following:
y Idiom – in the above example, see red is the idiom being taught.
y
Click
to hear the idiom.
y Record the Idiom – enables you to record yourself saying the idiom.
y
Click
to record the idiom.
y Explanation – describes what the idiom means.
y Example – an example of the idiom used in a sentence.
y Comic – listen and see how the idiom is used in an everyday situation. Use the
control panel to play the recording of the comic.
y
Click
to play the recording.
y
Click
to stop the recording.
y
measures how much of the recording you’ve heard.
y Level – choose your reading level to learn idioms appropriate for your level.
Click Archive to view the Idioms Archive.
Idioms Archive
The Idioms Archive contains the idioms that have previously appeared in the Talking
Idioms section of this site.
©2010 Edusoft Ltd.
94
The Idioms Archive page contains the following features:
y Using the page navigation, click a page number, or click the arrows to move
backwards or forwards between archive screens.
y Select your reading level to view idioms that are appropriate for your level.
y The date the idiom first appeared in Talking Idioms.
y Click
to hear the idiom.
y Move your cursor over the idioms to view its comic.
y Click the idiom to learn more about it. The idiom’s page appears.
In the archive menu pager, you can do the following:
y Back to Archive – click to go to the Idiom Archive menu.
y Back – click to go to the previous idiom in the archive.
y Next – click to go to the next idiom in the archive.
y Level – choose your reading level to display idioms appropriate for your level.
©2010 Edusoft Ltd.
95
©2010 Edusoft Ltd.
96
Chapter 9
Support
The English Discoveries Online Support Section contains tools that allow you to
communicate with your teacher. You can send messages to, and receive messages
from, your teacher. To access the Support section, click SUPPORT in the top bar of
the main English Discoveries Online window. This opens the Contact Your
Teacher screen.
Contact Your Teacher
You can select from the following:
y Inbox – where you can read, reply to, and delete messages from your teacher.
y Write – where you can write to your teacher.
y Sent Items – where you can view and delete messages that you have sent to your
teacher.
Inbox
Click Inbox in Contact Your Teacher’s top bar to view a list of the mail messages
you have received from your teacher. The Inbox lists the name of the teacher who
sent you mail, the subject of the message, and the date you received the message. An
envelope icon next to the name indicates that the mail message is new.
©2008 Edusoft Ltd.
©2010 Edusoft Ltd.
97
From the Inbox, you can do the following:
y Read a mail message
y Reply to a mail message
y Delete a mail message
Reading a Mail Message
To read a mail message, click a name in the inbox. The Read Message window
appears.
The From area contains the name of the teacher who sent the mail message, the
Subject area tells you what the mail message is about, and the Message area contains
the text of the mail message.
From the Read Message window, you can:
y Reply – send a mail message back to the sender of this mail message.
y Dictionary – open the English Discoveries Online dictionary. For more
information about how to use the dictionary, refer to Dictionary in
Chapter 1: Welcome to English Discoveries Online.
y Click X to close the Read Message window.
©2010 Edusoft Ltd.
98
Replying to a Mail Message
You may want to send a reply to a mail message that your teacher has sent you.
To reply to a mail message:
1. Click Reply.
A Write window opens with the teacher’s name filled in, ready for you to begin
typing your reply. If you want to change the subject of the message, click in the
Subject area and type in a new subject.
2. Move the cursor to the blank area
and type your reply.
3. Click Send. The message is sent and the Write window closes.
Deleting a Mail Message
You may not want to keep all the mail messages you have received in your Inbox.
To delete a mail message:
1. Select the message or messages that you want to delete by clicking the box next
to the teacher’s name in the From column.
A checkmark appears in the box next to the selected teacher’s name.
©2010 Edusoft Ltd.
99
2. Click Delete. The selected message is deleted.
3. Click X to close the Read Message window.
Write
Click Write in Contact Your Teacher’s top bar to view a list of teachers to whom
you can send mail messages.
To write and send a mail message:
1. Click the box next to the name of the teacher in the list to whom you want to
write, and click Write.
If you want to write the same message to more than one
teacher, check the box next to each of the names in the
teacher list to whom you want to write and click Write.
The Write window appears with the names of the teachers who will receive the
message in the To area.
©2010 Edusoft Ltd.
100
2. Type the subject of your message in the Subject area.
3. Type your message in the Message area.
The message window contains a word processor toolbar,
which enables you to easily change the fonts and their size,
make the words bold, italicized and underlined, change the
font’s color and add any color to the background of your
message, etc. You may also use the dictionary for spelling and
translation help. You can also attach files to be sent to the
teacher
4. Click Send to send the mail message.
The Write window closes automatically.
Sent Items
Click Sent Items in Contact Your Teacher’s top bar to see a list of the mail messages
you have sent. The Sent Items list contains the names of the teachers to whom
you’ve sent mail messages, the subject of the mail messages, and the date the mail
messages were sent.
In the Sent Items window, you can do the following:
y View a mail message you’ve sent.
y Delete a mail message from the Sent Items list.
y Use the dictionary to check the meanings or spelling of words in sent messages.
©2010 Edusoft Ltd.
101
Viewing a Sent Message
To view a sent message:
1. Click the name of the teacher to whom the message was sent.
The View Message window appears with the text of the mail message.
2. Click X to close the View Message window.
Deleting a Sent Message
To delete a sent message:
1. Check the box next to the mail message or messages you want to delete.
2. Click Delete. The selected message is deleted.
©2010 Edusoft Ltd.
102