1
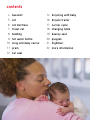
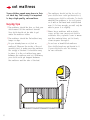
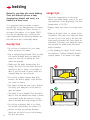
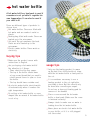
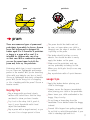
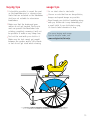
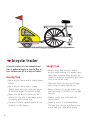
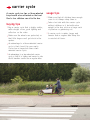
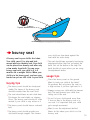
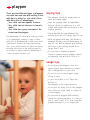
safe baby products
choosing the right
baby gear
why is this brochure
important for you to read?
Why is this brochure important for you
to read?
Every day, hundreds of children end up
at the doctor’s or even the hospital
because of an accident in or around the
home. Obviously, all parents-to-be want
to avoid this. And we’re here to help.
This brochure helps you choose safe
products for your child.
Take this brochure with you
In this brochure, we provide practical tips
on buying and using each product. Take
it with you to the shop, so that you know
what to look for when considering your
options. And read through it again when
you start using the products, so that you’ll
know you’re using them safely.
VeiligheidNL
VeiligheidNL has been a safety expert
for more than 30 years. You can take
advantage of our expertise when preparing
for the arrival of your baby. As your
child grows and develops, you can also
trust VeiligheidNL to provide you with a
wealth of information on safe playing,
sleeping, bathing, bicycling, playing
sports and much more. After all, you want
your child to develop in a safe, loving
and secure environment! Have a look at
www.veiligheid.nl/kinderen.
This brochure is part 1 of the ‘Growing Up
Safely’ series. The other 4 brochures
in this series that you will receive from
the Kraamzorg post-natal care service
or the consultatiebureau health centre are:
• Sleep Tight (0-2 years)
• Good Start (0-6 months)
• Playful Exploring (6-12 months)
• Fun on the Go (1-4 years)
contents
4 bassinet
14 bicycling with baby
5 cot
16 bicycle trailer
6 cot mattress
17 carrier cycle
7 travel cot
18 changing table
8 bedding
19 bouncy seat
9 hot water bottle
20 playpen
10 sling and baby carrier
21 highchair
11 pram
22 more information
12 car seat
3
bassinet
A bassinet is intended for children up to
the age of around 6 months. A bassinet
is smaller than a cot, so that it fits
more easily next to your own bed or in
the living room. Incidentally, it is not
necessary to use a bassinet; you can
also have your baby sleep in a cot from
day one.
buying tips
• The bassinet should be at least 27.5 cm
deep.
• The bassinet should have a maximum
length of 90 cm.
• The bottom of the bassinet should let air
pass through it.
• The bottom should be flat and sturdy
and fit snugly against the sides of the
bassinet. There should not be any holes
(cutouts) or trim where a small hand or
foot can get trapped.
• Air should be able to pass through
the sides of the bassinet. The openings
should be no more than 6.5 cm wide
or long.
• The bassinet bedding should fit tightly
and securely. Important: your child can
suffocate if soft, padded bedding or
pillows are in the bassinet.
• The bassinet should not have any sharp
edges or points. Is the bassinet made of
wicker or rattan? Examine it closely.
• The bottom of the bassinet should be
sturdy. The bassinet should not move if
an older child pulls on it.
4
usage tips
• Place the bassinet on a flat surface.
• Make sure that your child cannot reach
the canopy and remove it once your child
becomes more active.
• Do not let other children near the
bassinet unattended.
• Switch to a child’s bed once your child
can roll over on his own.
top of the cot should be 55 cm or more.
Is the cot in the highest position? Then
this distance should be 20 cm or more.
• The cot should not have any sharp
edges. There should be no splinters or
protruding screws.
• There should be no buttons or other
objects on the top of the cot. Your child
can get stuck on these.
usage tips
• Do not place the cot too close to a
cot
You child can sleep in a cot from birth.
Prefer to have your baby sleep in a
bassinet first? No problem. But children
grow quickly and become more and more
active, so it is advisable to switch to
a cot once your baby is between 3 and
6 months old.
buying tips
• The cot should be between 90 and
heater or radiator. Do not place the cot
too close to an open window or curtains
either. Blind and curtain cords are also
dangerous.
• Do not put any pillows or stuffed animals
in the cot. And do not use a bumper
against the walls of the cot.
• Never strap your child into a bed.
Your child may roll over and suffocate.
• Adjust the bottom of the bed to the
middle position once your child can
roll over.
• Adjust the bottom of the bed to the
lowest position once your child can sit up.
140 cm long.
• The sides of the cot should allow air to
pass through. Many cots have bars for
this purpose. The distance between the
bars should be between 4.5 and 6.5 cm.
The bars should run vertically to the
bottom of the cot.
• You should be able to raise or lower
the bottom of the cot. Is the cot in
the lowest position? Then the distance
between the top of the mattress and the
5
cot mattress
Young children spend many hours in their
cot each day. That is why it is important
to buy a high-quality, safe mattress.
buying tips
• The mattress should be firm, so that your
child cannot lift the mattress himself.
Your child should not be able to get
under the mattress either.
• The mattress should be flat without any
lumps or dips.
• Do you already have a cot, but no
mattress? Measure the inside of the cot
carefully first, to make sure the mattress
fits snugly in the bed. It should be easy
to place it in the cot without any gaps
between the mattress and cot. Otherwise,
your child could get trapped between
the mattress and the side of the bed.
6
• The mattress should not be too soft or
your child’s face could get buried in it,
causing your child to suffocate. To check
whether the mattress is too soft, press
on it with a flat hand and outstretched
arm. If it’s firm enough, you will only be
able to press it in slightly.
• Never buy a mattress with a plastic
cover, as this can cause your child to
suffocate. Also, a plastic cover is warm
and this material does not let fresh,
clean air pass through it.
• Do not use a bead-filled mattress.
Your child’s head can get buried in it.
If your child rolls onto his tummy,
he can suffocate.
travel cot
A travel cot is also referred to as a
portable crib. It can be folded up, making
it convenient for taking on holiday or
when your child is spending the night
away from home.
to press two spots or use considerable
force to fold it. This way, only an adult is
able to fold the travel cot.
• There should not be any sharp objects on
the travel cot.
• There should not be any V-shaped
buying tips
• Your child should not be able to climb
or fall out of the cot. The sides should
therefore be at least 55 cm high.
Measure from the top of the mattress.
• The fabric on the sides of the travel cot
should have holes, so that air can pass
through. These holes should be no larger
than 7 mm. You can test whether the
holes are too large by sticking a regular
pencil through them. If the pencil is just
able to pass through, the holes are not
too big and your child will not be able
to get his fingers stuck in them.
• The fabric should be tightly adhered to
the frame. If the fabric is too loose, both
your child and the cot can tip over.
• The bottom of the travel cot should not sag.
• This means that the cot cannot
accidentally fold up. It is safe if you need
openings in the cot. Your child could get
stuck in these.
• The mattress should not be too soft or
too thin. Otherwise your child could get
under it.
usage tips
• Always check whether the travel cot is
folded out completely.
• Check that all fasteners are secure.
• Never place an extra mattress in the
travel cot, not even if it is designed for
use in a travel cot. Your child could get
trapped between the mattress and the
flexible side of the bed.
• Do not use a travel cot as an everyday
cot, since the mattress is usually too
thin and air cannot pass through the
bottom. Use a regular cot (crib) at home
with a thick mattress.
7
bedding
Naturally, your baby also needs bedding.
There are different options: a baby
sleeping bag, blanket and sheet, or a
blanket in a duvet cover.
It is important that your baby is warm
enough. But if your baby becomes too warm,
this can be dangerous. That’s because it
increases the chance of cot death (SIDS).
You can tell whether your child has the
right temperature by checking whether his
feet and neck feel comfortably warm.
buying tips
• Do not buy a comforter for your baby.
These are much too warm.
• Buy a sleeping bag instead. Then you will
not need a blanket and your baby will
never run the risk of getting his face
under the blanket.
• Make sure the baby sleeping bag fits
snugly. The holes for the arms and neck
should not be too large. If your baby is
able to get his head or arms inside the
sleeping bag, he can suffocate.
• Do not buy a baby sleeping bag with
buttons, but with a zipper, since buttons
can come off easily.
• The zipper should zip from top to bottom.
This way, your baby will not be able to
open the zipper.
• Still want to use a blanket? You should be
able to tuck the blanket and sheet or duvet
cover firmly under the mattress. So they
need to be wide and long enough for this.
• Do not buy a blanket that is too thick.
The thicker the blanket, the hotter it is.
• And do not buy any pillows because
8
these are not safe for your child during
the first two years.
usage tips
• Check the temperature in the room
where your baby sleeps (even if it’s your
own bedroom in the beginning). The best
temperature is 16-18°C.
• Always make sure there is enough fresh
air.
• Make up the bed short, as shown in the
illustration. This way, your baby will have
his feet close to the end of the bed. The
sheet and/or blanket will then reach his
shoulders. This way, your baby will never
end up with his head under the sheet
and/or blanket.
• Is the bedding too large? Fold it under
the mattress. Folding a blanket double
usually makes it too warm for a baby.
hot water bottle
A hot water bottle or heat pack is used if
a newborn is not yet able to regulate his
own temperature. It can also be used if
your child is ill.
There are different types of products to
choose from:
• Hot water bottles. These are filled with
hot water and are made of metal or
plastic.
• Heating bag filled with seeds. These are
heated up in the microwave.
• Gel pack. The gel maintains the heat.
These are also heated up in the
microwave.
• Electric water bottles. These work on
electricity.
buying tips
• Make sure the product comes with
instructions in English.
• Are you buying a hot water bottle?
Pay attention to 3 things:
• There should not be any seams.
• The top of the bottle should have
a long screw thread that you need to
rotate several times to open or close
the bottle.
• The top should have a rubber seal.
• An electric water bottle should switch
off automatically when it reaches the
right temperature.
• Do not buy a hot water bottle or cover
shaped like an animal. A hot water bottle
is not a toy.
usage tips
• Only use the heating product to warm
up the bed. Your child should not sleep
with the hot water bottle or heat pack in
the cot.
• It is sometimes necessary to use a
heating product in the cot right after
your baby is born. But this should only
be done after consulting an expert.
Do not use a cherry pit heating pad for
reasons of fire hazard.
• Place a cover around the hot water
bottle or heat pack. Make sure the cover
is fastened securely!
• Always check to make sure no water is
leaking from the hot water bottle.
• Never place an electric hot water bottle
in your child’s cot if it is still plugged
into the socket.
9
sling and baby carrier
You can carry your baby in a sling or
baby carrier. There are various types from
which to choose. Some slings need to
be tied completely yourself. With a little
practice, you will discover all kinds of
ways you can carry your child in it. Other
slings are pre-shaped and you simply
place your child in it. With a baby carrier,
your child is carried in an upright position.
buying tips
• Make sure your child has enough support
for his back and head. A young child
cannot keep his head upright for very long.
• It is advisable not to buy a sling or baby
carrier in which your baby is carried
horizontally. Because of the shape of the
carrier, it covers part of your baby’s face
and your child lies with his back curved,
making it more difficult to breathe.
• The sling or baby carrier should be made
of soft fabric. There should not be any
sharp corners or edges.
• Try on the different models in the shop,
preferably with your baby in it, so that you
can feel whether the sling or baby carrier
is comfortable for you and your child.
usage tips
• Always fasten the sling or baby carrier
securely.
sling
• Make sure your child can breathe freely
at all times. Never carry your child under
a closed jacket.
• Make sure your child is placed in the
carrier securely. The baby carrier is in
the right position if you can kiss your
child on his head.
• Do not carry your child in a sling or
carrier when cooking, in the car, on a
motorcycle, on a bicycle or when playing
sports.
• Important: Always hold on to your child
when bending forward.
baby carrier
10
pram
pushchair
pram
There are numerous types of prams and
pushchairs from which to choose. A pram
has a flat bottom and is designed for
babies aged 0 to 6-9 months. A pushchair
or buggy is a pram with a seat. It is
intended for children who can sit up
on their own. With a combination pram,
you use the same frame for both the
pram and, later on, the pushchair.
Determine which type is most convenient
for you. There are lightweight and heavier
prams in the market. Will you be travelling
often with your baby by car, bus or train?
Choose a lightweight and easily collapsible
pram. Will you be doing lots of shopping
or lots of walking with the pram? Choose a
heavier model.
• The pram should be stable and not
tip over, not even when your child is
hanging over the edge or another child
is pulling on the pram.
• The brake should lock two or more
wheels. You should be able to easily
apply the brakes on the pram.
• Make sure the pushchair seat can
recline, preferably including lie-flat.
When your child gets tired, he can nap
in comfort.
• Buy a pushchair with a 5-point harness.
usage tips
• Apply the brakes before placing your
child in the buggy.
buying tips
• Always secure the harness immediately
• Buy a buggy with good and clearly
• Never leave your child unattended in the
written user instructions. Ask the shop
assistant to show you how it works.
after placing your child in the pushchair.
buggy. Stay close by.
• Try it out in the shop: fold it, push it,
• Do not hang a heavy bag from the
• Buy a pram with a large bassinet, so you
• Prevent little fingers from getting trapped.
turn it, cross thresholds with it and
adjust the handlebar.
can use it for a longer period of time.
handlebar. Use a basket under the buggy
instead.
Do not fold or unfold the pushchair if your
child is standing right next to it.
11
car seat
Travelling by car with your child?
According to the law, this may only
be done using an approved car seat.
There are different types available:
rear-facing infant car seats, child car
seats and booster seats. Want to know
which seat is most suitable for your
child? Follow the selection guide at
www.veiligheid.nl/autostoeltjes.
buying tips
• Always buy an approved car seat.
An approved car seat bears a label of
approval. This label is found on the back
of the seat. The sticker is usually orange
and states ECE/R44 or i-Size.
• With the new i-Size car seats, the seat
must be appropriate for your child’s height.
• With car seats to which the ECE safety
standard applies, the seat must be
appropriate for your child’s weight.
Choose the seat that lets your child
travel in a rear-facing position for as
long as possible. This is the safest
position.
• Check to make sure the seat fits in your
car. An i-Size seat requires an ‘i-Size
ready’ seat in the car and an ISOFIX seat
requires ISOFIX attachment points.
• Age is often used as the standard when
buying a seat, but keep in mind that
children of the same age can have
different weights and heights.
• Bring your car when buying a car seat
and check to make sure the seat can be
installed correctly in the front and back
seat of the car. Have the shop assistant
show you how to install it.
• It is preferable not to buy a used car
seat. The car in which the seat was used
may have been involved in an accident,
making the car seat no longer safe.
12
usage tips
• Make sure the car seat is fastened
securely. Check the user manual to
make sure the seat is installed correctly.
Not sure? Ask an expert for advice, such
as from the shop where you purchased
the car seat.
• If possible, always install the car seat
on the back seat of the car.
• Need to use the front seat? Always make
sure the air bag is switched off when
your child is travelling in a rear-facing
car seat (infant car seat or i-Size).
Is your child facing forward? Slide the
passenger seat as far back as possible.
• Fasten the safety belt tightly. Is your
child wearing a thick coat? Remove the
coat first. In the event of a collision,
a bulky coat will compress, making the
harness very loose! If it’s cold, place
a blanket on top of your child after
fastening the harnesses.
• If your baby is very small, use a special
car seat reducer.
• Do not let your child spend longer than
2 hours a day in an infant car seat or
bouncy seat. It is important that your
child does not get cramped up and is
able to move.
13
bicycling with baby
Want to take your baby for a bike ride?
There are several options:
• In an infant car seat or baby safety
seat securely installed in a bicycle
trailer or carrier cycle. It is advisable
to place the car seat in a rear-facing
position.
• In an infant car seat attached to the
bicycle using a special frame.
• Can your child sit from a crawling
position without any help? Then your
child can ride in a bicycle seat.
tips
• It is preferable that the saddle of the
bike is not too high. This lets you easily
put your feet on the ground. Make sure
the brakes are working properly and do
not ride too fast.
14
• Make sure the car seat or baby safety
seat is secured properly. Special
mounting sets are available for use in
a bicycle trailer/carrier cycle.
• Always secure your baby in his seat with
the harnesses.
• Keep a close eye on your child. Make
sure he is comfortable and try to avoid
wobbling and jolts.
• Strong wobbling can often be prevented
by adding extra weight to the trailer/
carrier (another child, groceries or a bag
of sand).
• Don’t take very long trips to start with.
Important: Never ride a bicycle with
your baby in a sling. Your child is not
sufficiently protected in the event of a fall
or collision.
buying tips
usage tips
• It should be possible to mount the seat
• Go on short rides to start with.
• Choose a route that has as few potholes,
on the handlebar post or steering stem.
Seats that are mounted on the handlebar
itself are not suitable for aluminium
handlebars.
• Make sure that the brake and gear
cables do not get tangled. The bicycle
seat can prevent the handlebar from
rotating completely, meaning it will not
be possible to make a very sharp turn.
• Test out the seat with your child in it.
Make sure his feet cannot get caught
between the spokes and/or little hands
or feet do not get stuck while steering.
bumps and speed bumps as possible.
• Even though your child isn’t pedalling along
with you, a bike ride is very exhausting for
a small child. If your child starts crying,
it’s time to take a break or to stop.
For more buying and usage
tips for bicycle seats, see
www.veiligheid.nl/fietszitje.
15
bicycle trailer
A bicycle trailer is a two-wheeled cart
that is pulled along by a bicycle. One or
two children can sit in a bicycle trailer.
buying tips
• Buy a bicycle trailer with a sturdy plastic
bottom.
• Buy a bicycle trailer that is highly
visible: good rear light, reflective strips
on the side, bright colours and a flag.
• Make sure the bicycle trailer can be
• Keep in mind that a bicycle with a
bicycle trailer behind it is heavier and
wider than a regular bike. You will be
unable to brake as quickly and will need
more room on the road.
• Take wide turns. You are much longer
with a bicycle trailer behind you.
• Before starting off, always make sure
that the trailer is attached to your bike
securely.
attached to the bike in two ways: using
a coupling and a safety clip.
• Always secure your child with the
• The bicycle trailer spokes should be out
• Attach a mirror to your handlebars.
of reach of little fingers.
16
usage tips
harness belt.
This way you can see both the bicycle
trailer and your child while riding.
carrier cycle
A carrier cycle is a two or three-wheeled
bicycle with a box attached on the front.
One to four children can sit in the box.
usage tips
buying tips
• Take a test ride with the carrier cycle
• Buy a carrier cycle that is highly visible,
with a bright colour, good lighting and
reflectors on the sides.
• Make sure the wheels are protected, so
that little fingers can’t get stuck in the
spokes.
• Make sure that all children have enough
room to sit. Always strap them in.
without children in it, but with extra
weight in the box, such as a large sack
of potatoes or gardening soil.
• A carrier cycle is wider, longer and
heavier than a regular bike. Keep this
in mind at all times.
• An advantage to a three-wheeled carrier
cycle is that it won’t tip over easily.
It also has a larger box than a twowheeled carrier cycle.
• An advantage to a two-wheeled carrier
cycle is that it is lighter and easier to ride.
And it handles curves like a regular bike.
17
changing table
A dresser or changing table is used to
wash and dress your child and to store
cleaning and washing products. It is one
of the most frequently used pieces of
furniture in a baby room and can often be
used for years on end.
buying tips
• Buy a changing table with a raised edge
on the side and back. This will prevent
the changing pad from sliding off.
• The changing table should not have any
sharp edges or corners.
• The changing table is sturdy, even when
the doors or drawers are open.
• The drawers should have a stop.
This prevents them from falling out
accidentally.
• It is nice if you are able to place your
feet under the changing table. This lets
you get as close as possible to your child.
• Can the top be folded down? Make sure
it cannot fall down by itself.
18
usage tips
• Never leave your child unattended
on the changing table and always
keep a hand on your baby in order to
respond immediately to any unexpected
movements. If you need to do something
else, place your child in his cot.
• Use a changing pad with raised edges.
• Organise everything practically. Keep
products you use often within easy
reach. Lay out everything you will need
beforehand.
• Do not place the changing table too
close to a heater or radiator. Blind and
curtain cords are also dangerous.
5-point harness belt
bouncy seat
A bouncy seat is your child’s first chair.
Your child can sit, lie, play and look
around while in a bouncy seat. Your child
can be placed in a bouncy seat after only
a few weeks from birth. You can use a
bouncy seat until your child is 6 to 9
months old or weighs 9 kilos. When your
child is in his bouncy seat, you have your
hands free yet are still close to your child.
your child can lean back against the
seat with his entire body.
• The seat should have a properly functioning
adjustment button. that lets you adjust the
back. Test out the button in the shop. The
back should not move unless you are using
the adjustment button.
usage tips
• Place the bouncy seat on the ground.
buying tips
• The bouncy seat should be sturdy and
stable. The frame of the bouncy seat
should be wider than the seat itself.
• The seat should have an anti-skid base.
This keeps the seat stable on slippery
floors. The bouncy seat should not slide
around if your child is very active in it.
• The bouncy seat should have a restraint
belt.
• The bouncy seat should provide your
child with enough support. This means
Want to feed your child at the table?
No problem. But only place the seat on
a high surface if you are right next to it.
• Always secure your child with the harness
belt. This well prevent your child from
falling out of the seat.
• Do not let your child spend more than
2 hours a day in the bouncy seat or a
car seat. It is important that your child
gets enough movement.
• Want to use the adjustment button?
Never do this when your child is in the
bouncy seat.
19
playpen
There are two different types of playpens:
one with bars and one with netting. A box
with bars is better for your child. A box
with bars offers 3 advantages:
• Your child can lean against the bars.
• Your child can use the bars to learn to
stand.
• Your child has a good overview of the
room from the playpen.
The advantage of a box with netting is that
it is lightweight, making it easy to take
with you. A disadvantage is that your child
cannot pull himself up using the netting.
Also, your child cannot see the room easily
because the holes in the netting need to
be small for safety reasons (maximum of
7 mm, as with a travel cot).
buying tips
• The playpen should be sturdy and not
have any sharp edges.
• Does the playpen have an adjustable
bottom? Check to make sure it is still
stable and sturdy with the bottom in the
highest position.
• Check whether the gap between the
bottom and side is no larger than 0.5 cm.
• With a playpen with bars, the distance
between the bars should be between 4.5
and 6.5 cm. With a playpen with netting,
the holes in the netting should be no
larger than 7 mm.
• Do you have a foldable playpen?
Check to make sure the playpen cannot
accidentally fold with your child in it.
usage tips
• Do not place the playpen close to a
heater, plant, open window or curtains.
This is dangerous for your child.
• Do not tie toys to the playpen using
string or rope.
• Is your child able to sit? Place the
bottom of
the playpen in the lowest position.
• Do not put too many toys in the playpen.
Your child can stack them to climb out
of the playpen.
• Do you have a playpen with netting?
Check the netting regularly. Is it torn or
has it come loose? If so, stop using the
playpen because it is no longer safe.
20
highchair
If your child is able to sit up on his own,
use a highchair. A highchair lets your child
sit at a table and eat with the family.
buying tips
• The highchair should be sturdy and
stable. Push against all sides of the
chair. The chair should not tip over.
• The highchair should have a safety
harness. The belt should at least have
a crotch and hip strap, and preferably
also shoulder straps. This well prevent
your child from climbing or sliding out of
the seat.
• Is there no safety harness in the highchair?
Buy a separate harness. The user manual
will provide instructions on how to attach
the harness to the highchair.
• Make sure that a folding highchair has
extra safety features. It should not be
able to fold accidentally.
usage tips
• Always secure your child with the harness
belt. This well prevent your child from
standing in the seat or climbing out of it.
• Is the highchair still a little too big for
your child? Use a seat reducer. This will
provide your child with enough support.
• Never leave your child alone in the
highchair, not even when secured in the
harness belt.
• Make sure your child cannot push his
feet against the table. This could cause
both your child and the highchair to fall
over backwards.
21
more information
For all info on Growing Up Safely, visit www.veiligheid.nl, both now and in
the future as your child grows and develops. You can also download the
Growing Up Safely app for a quick check as to whether your home is ready
for you to bring home your baby.
This brochure is part 1 of the ‘Growing Up Safely’ series. Afterwards, you will
receive the following 4 brochures from the Kraamzorg post-natal care service
or consultatiebureau health centre:
0–6 months
sleep safely
safe start
a good
start
sleep
tight
Sleep Tight
(0–2 years)
Good Start
(0-6 months)
1-4 years
safety on the go
fun on
the go
safe exploring
6–12 months
the world
at large
Playful Exploring
(6-12 months)
22
Fun on the Go
(1-4 years)
© VeiligheidNL
This publication was prepared with
the greatest possible care. VeiligheidNL
assumes no liability for any inaccuracies.
Amsterdam, February 2015