1
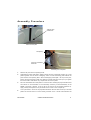
OUTDOOR PROTECTION DOME
for the MAC
Version 970826-MA
Assembly Procedure
Triangle notch
points down
Reinforcement plate
L-shaped lip
Leave top and bottom
holes free
Assembling the side plates
1.
Remove the parts from the packing boxes.
2.
Assemble the plastic side plates. Stand 2 plates with the L-shaped lip pointing up. Fit the
plates together with the ends overlapping. Place a metal reinforcing plate behind the
joints with the notch pointing down. Start 6 self-tapping screws (M4 x 10 mm) in each joint,
leaving the top and bottom holes free. Make sure these holes are lined up as you tighten
the screws. MAC 1200 Dome only: Repeat with the other 2 plates.
3.
Place an assembled set of side plates on a level surface. Sealing the polycarbonate dome
with silicone is recommended, but not absolutely necessary if total disassembly of the
DOME is required. If sealing, cut 20 to 25 mm off the end of the sealant applicator tip.
Apply a heavy bead (about 7 mm) of sealant in the corner of the L-shaped lip.
4.
Line up the holes in the rim of the polycarbonate dome with the holes at the top of the side
plates and set the dome on. Place rubber grommets at the 4 screw holes between the
PN 510942
Outdoor Protection Dome
2
dome and the side plates. Insert screws (M4 x 20 mm). From inside, put a washer and
thumb nut on the screws and hand tighten. If the nuts are hard to start behind the reinforcing plates, the washers may be omitted.
5.
MAC 1200 Dome only: Place the assembled dome and side on the other side section.
Rotate the upper section so that the reinforcing plates are offset 1/4 turn from the reinforcing plates in the lower section. Insert M4 x 20 mm screws in the 4 holes. Place a washer
and hex nut on each screw and tighten.
6.
There are two ways to lead the power and control cables into the bottom of the base:
through the square hole or the smaller slot. For temporary installations, use the square
hole for easier access. The slot may provide a more secure cable lead for permanent
installation. If the slot is used, remove a side plate from the base assembly in order to
pass the power and control cables through the slot. Feed the control cable up through the
peanut-shaped ventilation hole to the top of the base section.
7.
Reach inside the base and plug the power cable into the male power connector. This connector feeds power to the cooling fan as well as the socket on the base.
8.
Mount the base in position. The DOME may be secured through 4 holes in the base. Make
sure that the air vents are not obstructed and that air can circulate in and out. Do not
locate the DOME in low spots where water can collect.
9.
Install the plug on the MAC power cable. (See user manual for details.) Plug the power
cable into the base.
10.
Place the MAC on the base. Make sure the base ventilation holes are not blocked. MAC
500/600 Dome only: Align the base of the MAC with the raised mounting plate. Lock the
MAC to the base by inserting the quarter-turn fasteners into the MAC base and turning
them a full quarter turn clockwise.
11.
Remove the 4 screws - located every 90 degrees around the top - from the base. Place
the upper section on the base. Rotate the upper section until the joints are offset 1/4 turn
from the joints in the base. Replace the 4 screws and tighten.
Safety Precautions
•
Do not place the DOME where water can build up.
•
Always stand the DOME vertically with the clear plastic dome on top. The DOME is
not designed to be used in any other position.
•
Make sure the base air vents are not blocked.
•
Do not paint or cover the DOME, or in any way block the light path.
•
Always connect the DOME to mains power as specified on the serial number label.
•
Use only undamaged cables rated for outdoor use.
•
Do not disassemble the base. There are no user-serviceable parts inside.
PN 510942
Outdoor Protection Dome
3
Specifications
•
•
•
•
•
•
•
IP Rating:............................................................................................... IP 44
MAC 1200 Dome Power and Current: ............... 160 W, 0.7 A at 230 V/50 Hz
MAC 500/600 Dome Power and Current: .......... 105 W, 0.5 A at 230 V/50 Hz
AC Voltage and Frequency: ..................................................230 V, 50-60 Hz
Diameter: ........................................................................................... 825 mm
MAC 1200 Dome Height:................................................................. 1380 mm
MAC 500/600 Dome Height: ............................................................ 1020 mm
PN 510942
Outdoor Protection Dome
4