1
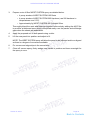
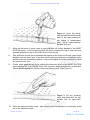
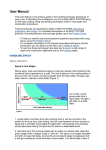
SPECIFICATION FOR
CARAVAN REPAIR
BONDING ALUMINIUM PANELS USING
WEST SYSTEM EPOXY
Remove any mouldings, window rubbers etc., which will interfere with the bonding of the
new panel and then repair the original caravan panel as detailed below in section (a).
(A) Repairing dents, gouges and gashes in the panel
1.
Abrade the damaged area with 80 grit paper, remove dust and contamination and wipe
the area with a volatile solvent such as WEST SYSTEM 850 Cleaning Solvent.
2.
Thoroughly mix an appropriate quantity of WEST SYSTEM 105 Resin and 205
Hardener and with a brush or roller, apply a priming coat of epoxy to the prepared
surface to “wet out” the damaged area.
3.
Mix a new batch of WEST SYSTEM epoxy and add 407 filler until a non-sagging
peanut butter consistency is achieved.
4.
Apply this filled mix to the primed damaged area as soon as possible using a broad
blade putty knife or a similar tool. Hold the putty knife at a low angle to leave the
mixture smooth and slightly higher than the surrounding surface. Remove any excess
epoxy before it cures.
NOTE: If a period greater than 12 hours has elapsed since the application of the first
coat of epoxy, wash and abrade the primed surface before applying the filler mix.
5.
Allow the fairing compound to cure thoroughly - ideally 24 hours.
(B) Bonding the new panel into position
1.
Cut the new panel to size and ensure that any lines/ribs match precisely when in close
contact with the caravan.
2.
Dust and contamination must be removed from the new panel which is then cleaned
with a volatile solvent such as WEST SYSTEM 850 Cleaning Solvent. The caravan
panel which has been faired is sanded with 120-150 grit paper to the required contour
and the surrounding aluminium which is to be covered with the new panel is abraded
with 80 grit paper. Again remove dust and contamination before wiping with a volatile
solvent.
NOTE: It is essential that the two panels are clean because any small particles of dirt
or grit trapped between the aluminium sheets will “print through” as raised defects on
the outside panel.
Version A 05/04
© Copyright 2006.
Page 33
Back to Contents
SPECIFICATION FOR CARAVAN REPAIR
3.
Prepare a mix of filled WEST SYSTEM epoxy as detailed below:
• 4 pump strokes of WEST SYSTEM 105 Resin
• 4 pump strokes of WEST SYSTEM 205 Hardener (use 206 hardener in
temperatures over 21ºC).
• Approximately 6g WEST SYSTEM 406 Colloidal Silica.
Thoroughly blend the resin and hardener together before slowly adding the 406 Filler
to produce a thickened epoxy which will spread easily over the panels and will bridge
gaps when the sheets are assembled.
4.
Apply the prepared mix to both panels using a roller.
5.
Lift the new panel into position and adjust to fit.
NOTE: The WEST SYSTEM epoxy will allow the panel to be adjusted and/or re-aligned
as there is a degree of movement available.
6.
Fix corners and edge strips in the normal way.
7.
Clean off excess epoxy, firmly wedge new panels in position and leave overnight for
the epoxy to cure.
Version A 05/04
Page 34
Back to Contents
SPECIFICATION FOR CARAVAN REPAIR
FLOOR DELAMINATION
The majority of caravan floors are produced using a foam sandwich construction technique
and a typical cross section of a floor is shown in the diagram below:1.
Areas of delamination normally occur around areas of high usage. Firstly, lift the carpet
in the damaged area and mark out the extent of the floor requiring repair. Any bottom
plywood joints must be taped to avoid glue loss.
2.
Mark out a grid pattern on the floor as shown below:-
3.
Drill 5mm diameter holes several centimetres apart in the delaminated zone. Spacing
of the holes will depend on the extent of the repair. Drill through the top ply and foam
core but do not drill through the bottom ply. (See figure 1)
Figure 1. Drill a pattern of
5mm holes approx 25mm
apart
4.
Using a vacuum cleaner clean the dust from the surrounding area and ensure the
loose foam crumb is removed from the holes.
5.
Mix the resin and hardener as under:• 4 pumps of WEST SYSTEM 105 Resin
• 4 pumps of WEST SYSTEM 205 Hardener
• (Use 206 Hardener in temperatures over 21ºC).
• Blend the two components thoroughly in the container.
6.
Inject or pour the mix into each hole so that it becomes half filled. If there is bottom
delamination, the epoxy will flow between the bottom ply and the foam. Allowing the
epoxy to drain into this gap will “wet out” the two substrates and exerting pressure to
the underside of the ply will bring the two materials together. Continue to support the
underside of the composite with pieces of timber and leave this assembly overnight
thereby allowing the resin to cure and the ply to rebond to the foam. (See figure 2)
Version A 05/04
Page 35
Back to Contents
SPECIFICATION FOR CARAVAN REPAIR
Figure 2. Inject the epoxy
mixture under the skin through
each of the holes starting in
the centre of delaminated
area. Fill all voids between
the skin and core.
7.
Allow the first pour of epoxy resin to cure and then mix further batches of the WEST
SYSTEM epoxy. Continue pouring until the epoxy reaches the top of each hole and
spreads between the top of the foam surface and the ply.
8.
With sufficient excess epoxy between the topside of the foam and the ply, place large
weights over the whole area of the floor which has been repaired to spread the epoxy
and bring the two substrates together. Leave the weights in position overnight to allow
the epoxy to fully cure.
9.
Finally, make good the top ply by infilling the holes with a mix of the WEST SYSTEM
epoxy adding 407 Low Density Filler until a peanut butter consistency is achieved.
Screed this thickened mix into the holes and allow to cure. (See Figure 3)
Figure 3. Fill any remaing
voids and holes and fair the
surface with an epoxy/407
mix.
10. When the epoxy has fully cured - eight hours at room temperature or overnight - sand
fair to the desired contour.
Version A 05/04
Page 36
Back to Contents
SPECIFICATION FOR CARAVAN REPAIR
BONDING INTERIOR WALL BOARDS
1.
Remove damp or damaged wall board from caravan, exposing the polystyrene foam
sheet. Gently brush the foam to remove dirt and loose crumb. (See Figure 4)
Figure 4. Remove damp or
damaged wall board
2.
Cut new wall board to size and abrade the surface which is to be bonded with 80 grit
paper. Ensure the new panel is a good fit before mixing the epoxy.
3.
Thoroughly mix the WEST SYSTEM epoxy - 2 pumps of resin and 2 pumps of hardener
and, using an 800B roller, apply this mix to the wall board and the polystyrene foam to
“wet-out” these substrates.
4.
Prepare another mix - 4 pumps of resin and 4 pumps of hardener - and slowly add
approximately 6g of WEST SYSTEM 406 Colloidal Silica to obtain a peanut butter
consistency i.e. thick enough to bridge any gaps between the mating surfaces. Apply
an even coat of the thickened blend to the wall board sufficient to produce squeeze out
when the surfaces are joined together with the force equivalent to a firm hand grip.
NOTE: If the surface of the wall board to be bonded is quite small, add the filler to the
epoxy remaining in the batch that was initially used for the “wetting out”. Mix enough
resin/hardener for both steps. Add the filler after the surface is wet out and allow for a
shorter working life of the mix.
5.
Bring the two surfaces together. Pin, screw or clamp the board in position and
immediately clean off excess epoxy with WEST SYSTEM 855 Cleaning Solution.
Remove uncured epoxy from the skin with 820 barrier cream.
6.
Allow to resin to cure overnight before removing the restraints.
Version A 05/04
Page 37
Back to Contents
SPECIFICATION FOR CARAVAN REPAIR
ADVANTAGES OF WEST SYSTEM EPOXY
1. Solvent free epoxy system.
2. Accurate and convenient dispensing of resin and hardener using
WEST SYSTEM 301 Dispensing Pumps.
3. Easy mixing and application.
4. Cost effective - the addition of a filler to the mixed epoxy produces
a product with a multitude of uses, i.e. no reason to stock other
adhesives.
5. Reduced labour costs - application is easier than with competitive
products.
6. Plastic mixing containers can be cleaned when the epoxy has cured
and reused.
7. When repairing panels, the only disposable product is the roller
cover.
8. Before cure any excess epoxy cleans easily from areas around the
repair.
9. Better finish on panel repair work.
Please refer to the WEST SYSTEM User Manual and Product Catalogue for further information.
Version A 05/04
Page 38
Back to Contents