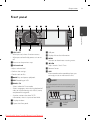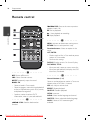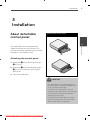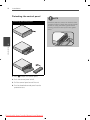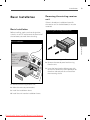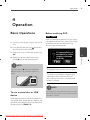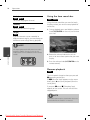
1
ENGLISH MAGYAR Čeština SIOVENČINA POLSKI SRPSKI LDF900UR P/NO : MFL63284953 Downloaded from Caradio-Manual.com Manuals ROMÂNÃ MODEL HRVATSKI Please read this manual carefully before operating your set and retain it for future reference. МАКЕДОНСКИ CAR DVD Receiver БЪЛГАРСКИ OWNER’S MANUAL 2 1 Safety Information Safety Information 1 Safety Information To reduce the risk of electric shock, do not remove the cover or back of this product. There are no user-serviceable parts inside. Refer servicing to qualified service personnel. CAUTION RISK OF ELECTRIC SHOCK DO NOT OPEN CAUTION: TO REDUCE THE RISK OF ELECTRIC SHOCK DO NOT REMOVE COVER (OR BACK) NO USER-SERVICEABLE PARTS INSIDE REFER SERVICING TO QUALIFIED SERVICE PERSONNEL. This lightning flash with arrowhead symbol within an equilateral triangle is intended to alert the user to the presence of uninsulated dangerous voltage within the product’s enclosure that may be of sufficient magnitude to constitute a risk of electric shock to persons. The exclamation point within an equilateral triangle is intended to alert the user to the presence of important operating and maintenance (servicing) instructions in the literature accompanying the product. Always operate the vehicle in a safe manner. Do not become distracted by the vehicle while driving, and always be fully aware of all driving condition. Do not change settings, or any functions. Pull over in a safe and legal manner before attempting such operations. Do not use for many hours at extremely low or high temperature. (-10 °C to 60 °C) Downloaded from Caradio-Manual.com Manuals To reduce the risk of fire or electric shock, do not expose this product to dripping or splashing water, rain, or moisture. The temperature of unit’s outside can be extremely high, please use the unit after proper installation in your vehicle. 8 cm This unit cannot play 8cm disc (use 12cm disc only). While driving, keep the sound volume at a proper level. Do not drop it and avoid heavy impacts at anytime. The driver must not watch the monitor while driving. If the driver watches the monitor while driving, it may lead to carelessness and cause an accident. This unit is for vehicles with a 12volt battery and negative grounding. Before installing it in a recreational vehicle, lorry or bus, check the battery voltage. To avoid shorts in the electrical system, be sure to disconnect the E battery cable before beginning the installation. Safety Information CAUTION: This product employs a Laser System. To ensure proper use of this product, please read this owner’s manual carefully and retain it for future reference. Shall the unit require maintenance, contact an authorized service centre. To prevent direct exposure to laser beam, do not try to open the enclosure. Visible laser radiation when open. DO NOT STARE INTO BEAM. For ensuring safe driving • To avoid the risk of accident and the potential violation of applicable laws, this unit is not for use with a video screen that is visible to the driver. • This unit detects whether your car’s parking brake is engaged or not, and prevents you from watching a DVD,VCD, PHOTO or movie file on the display connected to FRONT VIDEO OUTPUT while driving. When you attempt to watch a DVD,VCD, PHOTO or movie file the screen will turn black. When you park your car in a safe place and apply the parking brake, the picture appears on the screen. Disposal of your old appliance “This device is equipped with a portable battery or accumulator. Safe way to remove the battery or the battery from the equipment: Remove the old battery or battery pack, follow the steps in reverse order than the assembly. To prevent contamination of the environment and bring on possible threat to human and animal health, the old battery or the battery put it in the appropriate container at designated collection points. Do not dispose of batteries or battery together with other waste. It is recommended that you use local, free reimbursement systems batteries and accumulators.” The battery shall not be exposed to excessive heat such as sunshine, fire or the like. You have to set the disc format option to [Mastered] in order to make the discs compatible with the LG players when formatting rewritable discs. When setting the option to Live File System, you cannot use it on LG players. (Mastered/Live File System : Disc format system for Windows Vista) 1. When this crossed-out wheeled bin symbol is attached to a product it means the product is covered by the European Directive 2002/96/EC. 2. All electrical and electronic products shall be disposed of separately from the municipal waste stream via designated collection facilities appointed by the government or the local authorities. 3. The correct disposal of your old appliance will help prevent potential negative consequences for the environment and human health. 4. For more detailed information about disposal of your old appliance, please contact your city office, waste disposal service or the shop where you purchased the product. LG Electronics hereby declares that this/ these product(s) is/are in compliance with the essential requirements and other relevant provisions of Directive 2006/28/EC (ANNEX I , 3.2.9), 72/245/EEC, and 2006/95/EC. European representative : LG Electronics Service Europe B.V. Veluwezoom 15, 1327 AE Almere, The Netherlands (Tel : +31-(0)36-547-8888) Downloaded from Caradio-Manual.com Manuals 1 Safety Information Use of controls, adjustments or the performance of procedures other than those specified herein may result in hazardous radiation exposure. 3 4 Contents Contents 3 Installation 11 11 12 1 Safety Information 2 Safety Information 13 About detachable control panel Attaching the control panel Detaching the control panel Basic Installation 13 Basic Installation 13 Removing the existing receiver unit 14 ISO-DIN Installation 2 14 Remote Control Battery Installation Preparation 15 Connection 6 Introduction 9 Front panel 10 Remote control Downloaded from Caradio-Manual.com Manuals 15 Connecting to a car 16 Connecting to optional equipment 17 Adjusting the general settings 17 The buttons for setting MENU 17 MENU item overview 18 XDSS+/EQ 18 Sound 19 Display 19 Light 20 Setup Contents 4 5 Operation Maintenance 21 Basic Operations 29 Notes on Discs 22 Other Operations 29 Handling the Unit 22 To display file information 22 To slow down the playing speed 6 22 To play frame-by-frame Troubleshooting 23 Quick search 23 Using the Func menu 24 Using the time search bar 24 Resume playback 7 25 Viewing a photo Appendix 25 26 26 26 27 27 28 30 5 1 2 Troubleshooting 3 Listening to the radio Storing desired frequencies manually Listening to a preset station 31 Area Code List 32 Specifications 33 Trademarks and Licences 4 Adjusting Tuner settings Enjoying music or movie by connecting an external device 5 Preventing radical changes in volume as switching sources Recording to USB from Disc or FM tuner 6 7 Downloaded from Caradio-Manual.com Manuals 6 Preparation 2 Preparation Preparation Introduction Reseting the unit About the 1. Press to open the control panel. Refer to the page 12 for detaching the control panel. 2 Symbol Display “ ” may appear on your monitor display during operation and indicates that the function explained in this owner’s manual is not available on that disc. Symbol Used in this Manual DVD DVD-Video, DVD±R/RW in Video mode or VR mode and finalized ACD Audio CDs MOVIE Video files MUSIC Audio files PHOTO Photo files Downloaded from Caradio-Manual.com Manuals You can reset the unit when it does not operate properly. 2. Prick the reset hole with a sharp object. Preparation Playable USB device Requirement File compatibility • Do not extract the USB device during operation (play, etc.). • Sampling frequency : within 8 kHz to 48 kHz (MP3), below 48 kHz (WMA) • An USB device which requires additional programme installation when you have connected it to a computer, is not supported. • Bit rate : within 8 kbps to 320 kbps (MP3), below 320 kbps (WMA) • File extensions: “.mp3”, “.wma”, “.wav”, “.ogg”, “.aac(less than 16 kHz)” • USB device: USB device that support USB 1.1 and USB 2.0 Full Speed. • Maximum files : Under 3000. • CD-ROM file format : ISO9660/ JOLIET. • Movie, music and photo files can be played. For details of operations on each file, refer to relevant pages. • We recommend that you use Easy-CD Creator, which creates an ISO 9660 file system. • Regular back up is recommended to prevent data loss. • If you use a USB extension cable, USB HUB, USB Multi-reader, or external HDD, the USB device may not be recognized. • When you connect a partitioned USB device into the unit, only the first partition is recognized on it. • Audio files Max pixel in width : 4000 x 4000 pixel. • Maximum files : Under 3000. • Some discs may not operate due to a different recording format or the condition of disc. Some USB device may not work with this unit. • File extensions: “.jpg”, “.jpeg”, “.png”, “.gif”, “.tiff ”, “.bmp” • Digital camera and mobile phone are not supported. • CD-ROM file format : ISO9660/ JOLIET. • USB Port of the unit cannot be connected to PC. The unit cannot be used as a storage device. Video files • Available resolution size: 720 x 576 (W x H) pixels • Frame rate: 30 FPS • Playable codec format: “MPEG1”, “MPEG2”, “MPEG4”, “MP4V3S”, “3IVX” “MSVC”, “3IV0”, “3IV1”, “3IV2”. • This player supports only 1 warp point of Global Motion Compensation (GMC). 2 Preparation Photo files • Downloaded from Caradio-Manual.com Manuals 7 8 Preparation Playable Discs DVD-VIDEO (12 cm disc) Discs such as movies that can be purchased or rented. DVD-R (12 cm disc) DVD-RW (12 cm disc) 2 Preparation DVD+R (12 cm disc). Supports the double layer disc also. DVD+RW (12 cm disc) Audio CD: Music CDs or CD-R/CDRW in music CD format that can be purchased. Some DVD±RW/DVD±R or CD-RW/CD-R cannot be played on this unit due to the recording quality or physical condition of the disc, or the characteristics of the recording device and authoring software. Regional Codes This unit has a regional code printed on the top of the unit. This unit can play only DVD discs labeled same as the top of the unit or “ALL”. Downloaded from Caradio-Manual.com Manuals Copyrights It is forbidden by law to copy, broadcast, show, broadcast via cable, play in public, or rent copyrighted material without permission. This product features the copy protection function developed by Rovi. Copy protection signals are recorded on some discs. When recording and playing the pictures of these discs picture noise will appear. This product incorporates copyright protection technology that is protected by U.S. patents and other intellectual property rights. Use of this copyright protection technology must be authorized by Rovi, and is intended for home and other limited viewing uses only unless otherwise authorized by Rovi. Reverse engineering or disassembly is prohibited. CONSUMERS SHOULD NOTE THAT NOT ALL HIGH DEFINITION TELEVISION SETS ARE FULLY COMPATIBLE WITH THIS PRODUCT AND MAY CAUSE ARTIFACTS TO BE DISPLAYED IN THE PICTURE. IN CASE OF 525 OR 625 PROGRESSIVE SCAN PICTURE PROBLEMS, IT IS RECOMMENDED THAT THE USER SWITCH THE CONNECTION TO THE ‘STANDARD DEFINITION’ OUTPUT. IF THERE ARE QUESTIONS REGARDING OUR TV SET COMPATIBILITY WITH THIS MODEL 525p AND 625p UNIT, PLEASE CONTACT OUR CUSTOMER SERVICE CENTER. The making of unauthorized copies of copy-protected material, including computer programmes, files, broadcasts and sound recordings, may be an infringement of copyrights and constitute a criminal offense. This equipment should not be used for such purposes. Be responsible Respect copyrights Preparation 9 Front panel 2 Preparation a SRC/• OFF • When pressed, selects function sources. • When pressed and held, powers unit on or off. b Returns to the previous step. i USB port j Displays file or disc information. k MENU Activates or deactivates a setting menu. c Volume knob l b[-/+[B Skip / Search / Seek / Tune • Adjusts volume level. m Remote Sensor • Confirms the settings. n AUX If connected to other portable player, you can enjoy music or movie on the unit. • Checks tracks or files. d NX Plays and pauses playback. e REC Recording to USB f BAND/• TA • Selects a band in Tuner mode. • Selects a category menu during playback of a disc or USB containing with music, movie, and photo files together. • Searches stations that have TA/TP information, when it is pressed and held. NOTE For video playback from an external device, you should connect it with a 3.5 mm (4-pole) jack as below. g Display window h Opens the front panel. Downloaded from Caradio-Manual.com Manuals a Audio L c GND b Audio R d Video 10 Preparation Remote control ./> SKIP: Goes to the next or previous chapter / track / file. X : Pauses playback. N : Starts playback or recording. 2 Preparation x: Stops playback. • • • • • • • • • c• • • • • • • • • MENU: Activates or deactivates setting menu. RETURN: Returns to the previous step. Direction buttons: Selects an option in the menu. LIST/ ENTER : • Checks tracks or files in Disc mode or preset stations in Tuner mode. • Confirms the settings. DISPLAY: Displays or exits On-Screen Display. DISC MENU/• TITLE: • • • • • • • • • a • • • • • • • • OFF: Powers off the unit. SRC: Selects function sources. MUTE: Temporarily stops the sound. BAND/• TA : • When pressed, it accesses menus on a disc. • When pressed and held, it displays the DVD title menu, if available. • • • • • • • • • d • • • • • • • • Numeric buttons (1 - 6) Selects a numbered preset station in Tuner or a chapter when a DVD disc is inserted. • Selects a band in Tuner mode. VOL. +/- : Adjusts volume level. • Selects a category menu during playback of a disc or USB containing with music, movie, and photo files together. REPEAT : Repeat playback Searches stations that have TA/TP information, when it is pressed and held. INTRO: Intro scan • • • • • • • • • • b• • • • • • • • • m/M SCAN: Searches backward or forward. Downloaded from Caradio-Manual.com Manuals SHUFFLE : Random playback AUDIO: Selects audio language or channel. SUBTITLE: Selects a desired subtitle language. ANGLE: Selects a DVD camera angle if available. Installation 11 3 Installation About detachable control panel Attaching the control panel 3 Installation You should attach the control panel after unpacking the box to use the receiver unit. And you can detach it according to your needs and keep it in the protective case. B A Attaching the control panel 1. Attach part A of the control panel to part B of the unit. D C 2. Attach part C of the control panel to part D of the unit while pushing the control panel to left. 3. Close the control panel. CAUTION • The control buttons may not work properly if the control panel is not attached properly. If this occurs, gently press the display. • Do not leave the control panel in any area exposed to high temperatures or direct sunlight. • Do not drop the control panel or otherwise subject it to strong impact. • Do not allow such volatile agents as benzine, thinner, or insecticides to come into contact with the surface of the control panel. Downloaded from Caradio-Manual.com Manuals 12 Installation Detaching the control panel NOTE Detaching the control panel 3 Installation 1. Press to open the control panel. 2. Push the control panel to left. 3. Pull the control panel out of the unit. 4. Put the detached control panel into the protective case. Downloaded from Caradio-Manual.com Manuals Periodically wipe the contacts on the back of the control panel with a cotton swap moistened with alcohol. For safety, turn off the ignition before cleaning, and remove the key from the ignition switch. Installation Basic Installation 13 Removing the existing receiver unit If there is already an installation sleeve for the receiver unit in the dashboard, it must be removed. Basic Installation Removing the existing receiver unit Before installing, make sure that the ignitionswitch is set to OFF and remove the terminal of the car battery to avoid short-circuiting. Basic Installation 3 Installation Bend the claws according to the thickness of the dashboard. 1. Remove the rear support from the unit. 2. Remove the control panel and trim ring from the unit. 3. Insert the lever into the hole on one side of the unit. Perform the same operation on the other side and pull the unit out from the mounting sleeve. 1. Remove the existing receiver unit. 2. Make the necessary connections. 3. Install the installation sleeve. 4. Install the unit into the installation sleeve. Downloaded from Caradio-Manual.com Manuals 14 Installation ISO-DIN Installation Remote Control Battery Installation ISO-DIN Installation Battery Installation 1 4 3 3 5 2 Installation 1. Slide the unit into the ISO-DIN frame. 2. Fit screws removed from the old unit. 3. Slide the unit and frame into the dash opening. 4. Install the dash panel or adapter plate. (According to models, this step may not be needed.) 1. Pull out the battery holder with a sharp product like a ball point pen. 2. Put the battery with the battery holder. and correctly on 3. Push the battery holder back into its original position. 5. Install the control panel to the unit. NOTE • Use only one CR2025 (3 V) lithium battery. • Remove the battery if the remote control is not used for a long period of time. • Do not leave the product in a hot or humid place. • Do not handle the battery with metallic tools. • Do not store the battery with metallic materials. Downloaded from Caradio-Manual.com Manuals Installation 15 Connection Connecting to a car Before installing, make sure that the ignition-switch is set to OFF and remove the terminal of the car battery to avoid short-circuiting. Connection 1 3 A1 Power Antenna (Blue) A2 Dimmer (Pink) A3 To Ignition (Red) A4 To Battery (+) (Yellow) A5 Ground(-) (Black) A6 Remote On (Blue/White) A7 Phone Mute (Orange) A8 Hand Brake (Sky blue) Downloaded from Caradio-Manual.com Manuals Control Relay B 1 Violet/ Black Stripe: Rear Right B 2 Violet: Rear Right + B 3 Gray/ Black Stripe: Front Right B 4 Gray: Front Right + B 5 Green/ Black Stripe: Rear Left B 6 Green: Rear Left + B 7 White/ Black Stripe: Front Left B 8 White: Front Left + Installation Power Antenna 16 Installation Connecting to optional equipment You can connect optional equipment to the corresponding terminals of the unit. Connection 2 Auxiliary devices (Car TV, monitor, etc.) Amplifier (Optional) 3 Installation Rear view camara Rear signal from rear view camera Wired remote input (Optional) No. Terminal Position 1 Video IN Rear view cameras 2 Audio out Rear left speaker or Subwoofer left (Optional) 3 Audio out Rear right speaker or Subwoofer right (Optional) 4 Video out Auxiliary devices (Car TV, monitor, etc.) 5 Audio out Front left speaker 6 Audio out Front right speaker 7 Wired remote input Hard-wired control adapter (Not supplied) 8 Rear signal from rear view camera Rear view camera Downloaded from Caradio-Manual.com Manuals Installation Adjusting the general settings You can change the settings of the unit by pressing MENU. MENU item overview XDSS+ /EQ OFF XDSS+ Pop Classic Rock Jazz Vocal Salsa Samba Reggae Russy User EQ 1 User EQ 2 Balance/Fader Sound The buttons for setting MENU User EQ 1/2 Auto-EQ DRC Remote control Press MENU MENU Operation Language TV Aspect Activates or deactivates a setting menu. Rotate volume knob U/u • Moves to other menu items. I/i • Adjusts the setting level. Press volume knob LIST/ ENTER • Confirms the selected menu or the set level. • Selects or sets the menu option, only when just 3 menu options exist. B.L.E Display Album Art TV System Code Page Brightness Light Contrast DVD Audio Lang DVD Subtitle Lang RETURN • When it is pressed, you can move to the previous step. • When it is pressed and held, you can return to the playback status. DVD Menu Lang Setup Lock REC Bit Rate Beep Clock Downloaded from Caradio-Manual.com Manuals 3 Installation Subwoofer Main unit 17 18 Installation XDSS+/EQ The function helps you to enjoy sound more plentifully. The indicator lights up in the following order. OFF t XDSS+ t Pop t Classic t Rock t Jazz t Vocal t Salsa t Samba t Reggae t Russy t User EQ 1 t User EQ 2 t .. 5. Adjust the fader (front/ rear speaker) level by using the volume knob (U or u on the remote control). Sound Balance/ Fader 3 You can adjust left/right/ front/rear speaker output. Installation 1. Press MENU. 2. Select [Sound] and press the volume knob (LIST/ENTER on the remote control). 3. Select [Balance/Fader] and press the volume knob (LIST/ENTER on the remote control). 4. Adjust the balance (left/ right speaker) level by using the volume knob (U or u on the remote control). And press the volume knob (LIST/ENTER on the remote control). Subwoofer Subwoofer level Adjusts the subwoofer output. Subwoofer Frequency Adjusts the subwoofer frequency . User EQ 1/2 You can adjust Bass, Middle, or Treble levels by rotating the volume knob on the unit or pressing I or i on the remote control. Auto-EQ It realizes the sound equalizer that is the most similar to the genre of which is included in the ID3 tag of song files. Auto-EQ operates only in the music file supported with genre in the device. And press the volume knob (LIST/ENTER on the remote control). DRC(Dynamic Range Control) Makes the sound clear when the volume is turned down (Dolby Digital only). Set to [ON] for this effect. Downloaded from Caradio-Manual.com Manuals Installation Display Language Selects a language for the Setup menu and on- screen display. TV Aspect Select a TV aspect ratio option according to your monitor type. 19 [Full Screen] Displays both title texts and album art images of ID3 tag in full screen. TV System You should select an appropriate system mode for your monitor system among NTSC, PAL, or Auto. Code Page [4:3 Letter Box] Select when a standard 4:3 monitor is connected. Displays theatrical images with masking bars above and below the picture. [4:3 Pan Scan] Select when a standard 4:3 monitor is connected. Displays pictures cropped to fill your monitor screen. Both sides of the picture are cut off. If the CD TEXT, ID3 TAG, or movie file’s subtitle is not displayed properly, you can change the code page to view it properly. 1. Select an appropriate code page by using the volume knob (U or u on the remote control). 2. Press the volume knob (LIST/ENTER on the remote control) repeatedly until the text is displayed properly and then press it. Light Brightness B.L.E (Black Level Enhancement) Adjusts the brightness level of the display window for Daylight or Nighttime. Enhances the black level only when you set your monitor to NTSC. Contrast Album Art Adjusts the contrast level of the display window for Daylight or Nighttime. When listening to music files, you can select the display view by pressing DISPLAY. Then, if you set Album Art view, you can adjust the view to your reference. [Text] Displays only the texts of ID3 tag or CD text. [Thumbnail] Displays both texts and album art images of ID3 tag. Downloaded from Caradio-Manual.com Manuals NOTE According to the dimmer status of a car, the unit recognizes Daylight or Nighttime. 3 Installation [16:9] Select when a 16:9 wide monitor is connected. The 4:3 picture is adjusted horizontally (in a linear proportion) to fill the entire screen. 20 Installation Setup DVD Audio / DVD Subtitle / DVD Menu Language Select the language you prefer for the audio track (disc audio), subtitles, and the disc menu during DVD playback. Original Refers to the original language in which the disc was recorded. 3 Lock Installation Password You can change password. When you use the unit first, input the default password of 0000. 1. Input a current password and press the volume knob (LIST/ENTER on the remote control). 2. Input a new password and press the volume knob (LIST/ENTER on the remote control). 3. Enter the password again and press the volume knob (LIST/ENTER on the remote control) to verify. Area Code Enter the code of the area whose standards were used to rate the DVD video disc, based on the list on page 31. Rating Blocks playback of rated DVD based on their content. (Not all discs are rated.) [Rating 1-8] Rating one (1) has the most restrictions and rating eight (8) is the least restrictive. Downloaded from Caradio-Manual.com Manuals REC Bit Rate You can set the quality of the recorded file among 96 Kbps, 128 Kbps, or 192 Kbps. Beep 2nd The beep is generated when a key is pressed for longer than 2 seconds. All The beep is generated when any key is pressed. OFF The beep is deactivated. Clock Only when you set CT to OFF on the Func menu of Tuner mode, you can adjust it. Time format You can adjust the time system between 12 Hours and 24 Hours systems. Clock Setting Set the hour and then the minute by using the volume knob (U or u on the remote control). After setting each one, press the volume knob (U or u on the remote control) to confirm it. NOTE If you set the Time Format to 12 Hours , you should set one between AM and PM first. Operation 21 4 Operation Basic Operations Before watching DVD DVD MOVIE 1. Turn the unit on by pressing any key on the unit. 2. Insert the disc after pressing or connect the USB device to the USB port. When you attempt to watch a DVD, the screen is displayed as below. Then, select [Yes] or [No] by rotating the volume knob or pressing I or i on the remote control. 3. Select the Disc or USB function by pressing SRC. 4 Operation 4. Rotate the volume knob on the unit or press VOL.+/- on the remote control. NOTE Make sure to press Z after opening front pressing theon the to release a disc. Refer to the picture as panel front panel to release a disc. Refer to the picture below. as below. [Yes] The playback starts without any restriction. [No] The screen is turned black 5 seconds after selecting the item. However, when you press any key, the screen is turned on and off after 5 seconds. NOTE To use a mixed disc or USB device When playing a disc or USB device containing with audio, video, and photo files together, you can select a file category which you would like to play by pressing BAND/• TA. Downloaded from Caradio-Manual.com Manuals Even though you select [No], if you connect a hand brake line to the unit, the screen is not turned black even after 5 seconds. 22 Operation To pause playback Other Operations Press NX (X on the remote control) during playback. Press NX (B on the remote control) to resume playback. To display file information To scan forward or backward • On the unit Press and hold b[- or +[B repeatedly during playback to play fast forward or fast reverse with various playback speeds. • On the remote control Press m or M repeatedly during playback to play fast forward or fast reverse with various playback speeds. If you want to display a currently playing file/ disc during playback, press (DISPLAY on the remote control). NOTE For music files, press (DISPLAY on the remote control) repeatedly during playback, you can set the display background with File name, ID3 TAG, or Clock time. 4 Operation To skip to the next/previous chapter/track/file During playback, press b[- or +[B (. or > on the remote control) to go to the next chapter/track/file or to return to the beginning of the current chapter/track/file. Press b[- (. on the remote control) twice briefly to step back to the previous chapter/ track/file. Turning off the sound temporarily 1. Press MUTE to mute your unit. 2. To cancel, press any key. Downloaded from Caradio-Manual.com Manuals To slow down the playing speed While the playback is paused, press M repeatedly to play various speeds of slow motion for movie files. To play frame-by-frame Press X while movie playback. Press X repeatedly to play Frame-by-Frame playback. Operation Quick search 1. Press the volume knob (LIST/ENTER on the remote control) to check files. 23 NOTE • If no button is pressed for 10 seconds, the onscreen display disappears. • A title number cannot be selected on some discs. • Available items may differ depending on discs or titles. Using the Func menu 2. Press (RETURN on the remote control) to check folders. By adjusting the Func menus, you can enjoy files/track/chapters in a way you want. 3. Select a desired folder by using the volume knob (U/u/I/i on the remote control). 1. Press MENU. 4. Press the volume knob (LIST/ENTER on the remote control). 6. Press the volume knob on the unit (LIST/ ENTER on the remote control) to start playback. For a DVD disc, you can search according to the items below. When you select Title Search or Chpter Search, you can select a desired chapter or title by using the volume knob (U or u on the remote control) after the step 1. 3. Select a desired item by using the volume knob (U or u on the remote control). 4. Press the volume knob (LIST/ENTER on the remote control) repeatedly to adjust items. (RETURN on the remote control) 5. Press to return to the previous menu. [Repeat] DVD MOVIE MUSIC PHOTO Sets repeat playback according to File, Folder, Track, Title or Chapter. [Shuffle] MUSIC Sets random playback according to Files, Folders, or Tracks. During random playback, even if you press b[-(. on the remote control) , you won’t go back to the previous track. [Intro Scan] MUSIC The first 10 seconds of each tracks/files on the disc or in the current selected folder are played. Downloaded from Caradio-Manual.com Manuals 4 Operation 5. Select a desired file/ track by using the volume knob (U or u on the remote control). 2. Select Func and press the volume knob (LIST/ENTER on the remote control). 24 Operation [Audio] DVD MOVIE Sets audio language or channel. [Subtitle] DVD MOVIE Sets a desired subtitle language. [Angle] DVD If the disc contains scenes recorded at different camera angles, you can change to a different camera angle during playback. Using the time search bar DVD MOVIE Using the time search bar, you can find easily the point where you want to start playback of movie files. 1. During playback, press and hold the volume knob (LIST/ENTER on the unit) until the bar turns red. NOTE 4 For adjusting Repeat, Shuffle, Intro Scan, Audio language, Subtitle, or Angle menu, you can simply use the short-cut buttons on the remote control. Operation 2. Rotate the volume knob on the unit or press I or i to select a point that you want to play. 3. Press the volume knob (LIST/ENTER on the remote control). Resume playback DVD The unit records the point where you pressed x depending on the disc. If “Xx (Resume Stop)” appears on the screen briefly, press B to resume playback (from the scene point). If you press x twice, “x”(Complete Stop) appears on the screen. The unit will clear the stopped point. NOTE The resume point may be cleared when the unit is turned off or the inserted disc is released. Downloaded from Caradio-Manual.com Manuals Operation Viewing a photo Adjusting the speed of slide show 1. Press the volume knob (LIST/ENTER on the remote control) to check files. You can set the slide show speed on the Func menu. 2. Press (RETURN on the remote control) to check folders. 3. Select a desired folder by using the volume knob (U or u on the remote control). 4. Press the volume knob (LIST/ENTER on the remote control). 5. Select a desired file by using the volume knob (U or u on the remote control). 6. Press the volume knob (LIST/ENTER on the remote control) to view a photo. 25 1. Press MENU. 2. Select Func and press the volume knob (LIST/ENTER on the remote control). 3. Select Slide Show by using the volume knob (U or u on the remote control). 4. Press the volume knob (LIST/ENTER on the remote control) repeatedly to set the speed among Slow, Normal, or Fast. Listening to the radio To skip to the next/previous photo NOTE If you want to go to the first file of a previous or next folder, press U or u on the remote control. To rotate a photo Press m or M on the remote control to rotate a photo clockwise or counter-clockwise. Viewing photo files as a slide show 1. Press NX (B on the remote control) to start slide show. 2. Press NX (X on the remote control) during slide show to pause a slide show. Downloaded from Caradio-Manual.com Manuals 1. Select Tuner by pressing SRC. 4 2. Select a band by pressing BAND/• TA. Operation While viewing a photo, press b[- or +[B (I or i on the remote control) to go to the previous or next photo. 3. For manual search, press and hold b[-/+[B on the unit or I or i on the remote control until “Manual“ is displayed. Then press it repeatedly to select a desired frequency. For auto search, press b[-/+[B on the unit or I or i on the remote control until “Search” is displayed. 4. Rotate the volume knob on the unit or press VOL.+/- on the remote control. 26 Operation Storing desired frequencies manually Adjusting Tuner settings 1. Press BAND/• TA to select a desired band you want to store. 2. Select Func and press the volume knob (LIST/ENTER on the remote control). 2. Press and hold b[-/+[B on the unit or I or i on the remote control and then press it repeatedly to select a desired frequency. 3. Select a desired item by using the volume knob (U or u on the remote control). 3. Select a desired preset number . • On the unit Press the volume knob and rotate it. Then, press it again to store. • On the remote control Press and hold one of preset buttons among 1-6 on the remote control until the beep sound is heard. 4 4. Repeat steps 1-3 to preset other stations. Operation NOTE ayb palck.When a station is stored on the preset numbers on which another station of the same band has already been preset, the previously preset station is automatically erased. Listening to a preset station 1. Press BAND/• TA to select a desired band. 2. Press the volume knob on the unit or LIST/ ENTER on the remote control. 3. Rotate the volume knob on the unit or press I or i on the remote control to select a preset station. 4. Press the volume knob (LIST/ENTER on the remote control). Or Press BAND/• TA and then the desired preset button among 1-6 on the remote control. Downloaded from Caradio-Manual.com Manuals 1. Press MENU. 4. Press the volume knob (LIST/ENTER on the remote control) repeatedly to adjust items. (RETURN on the remote control) 5. Press to return to the previous menu. Auto Store The six strongest broadcasting frequencies will be stored under preset button 1-6 in the order of their signal strength. To cancel, press BAND/• TA or SRC. Preset scan Each preset station of each band is displayed in blue. To cancel, press BAND/• TA or SRC. Sensitivity In an area in which signal reception is weak, it helps the tuner to search more stations. You can set the signal reception sensitivity differently according to areas. [Local] In areas with good signal strength [Normal] In areas with good normal strength [Dx] In areas with bad signal strength PTY (Program type) It searches the radio stations by program types of FM tuner. AF(Alternative frequency) When the reception quality drops and you set AF to ON, the tuner automatically changes to another station in the network, broadcasting a better reception quality. Operation REG (Region) [ON] The unit switches to another station, within the same network, broadcasting the same program when the receiving signals from the current station become weak. [OFF] The unit switches to another station, within the same network when the receiving signals from the current station become weak. (In this mode, the program may differ from the one currently received one.) PI (Programme Identification) [Sound] When the frequency of a tuned station switches to an AF(Alternative frequency) with an unidentified PI, it keeps the sound. [Mute] When the frequency of a tuned station switches to an AF with an unidentified PI, it mutes the sound until the PI is identified. CT (Clock Time) You can use the RDS CT information to update the time. When RDS CT information is not received and then you set CT to OFF, you can adjust the time by yourself. Refer to the page 20 for setting the clock. Downloaded from Caradio-Manual.com Manuals Enjoying music or movie by connecting an external device You can enjoy music or movie files of an external device by connecting it to the unit. 1. Connect an external device to the AUX jack with line input cable. 2. Select AUX by pressing SRC. 3. Play the connected Auxiliary Equipment. 4. Rotate the volume knob on the unit or press VOL.+/- on the remote control. Preventing radical changes in volume as switching sources You can adjust the volume level of each source to prevent radical changes in volume by adjusting AUX Input Gain. 1. Press MENU. 2. Press the volume knob (LIST/ENTER on the remote control) repeatedly to select AUX Input Gain from -6 dB to +6 dB. (RETURN on the remote control) 3. Press to return to the previous menu. 4 Operation TA(Traffic Announcement) [Alarm] When the tuned station has no TP information for 5 seconds, a double beep sound is output. [Seek] When the tuned station does not receive TP information for 5 seconds, the receiver retunes to the next station that has the TP information. 27 28 Operation Recording to USB from Disc or FM tuner (RETURN on the remote 5. Press REC or control) again to stop. NOTE 1. Open the USB cover and connect it to the unit. 2. Select Disc or FM tuner. • When USB memory is full, “Not Enough Memory” displays and stops recording. 3. Start playback. • For tuner recording, the broadcastings are recorded by 20 moments on a file name. 4. On FM tuner mode, press REC to start recording. On CD playback mode, press REC then the menu items are displayed as below; Track 4 • Do not remove the USB device during recording, or an incomplete file may be made and not deleted on PC. You can record a desired track. Operation 1. Press the volume knob (LIST/ENTER on the remote control). 2. By rotating the volume knob (LIST/ENTER on the remote control) to select a desired track. 3. Press the volume knob (LIST/ENTER on the remote control). All You can record all of the tracks. Remaining You can record from the selected track and all of the remaining tracks. 1. Select [Remaining] by using the volume knob (U or u on the remote control). 2. Press the volume knob (LIST/ENTER on the remote control). 3. By rotating the volume knob (LIST/ENTER on the remote control) to select a desired track. 4. Press the volume knob (LIST/ENTER on the remote control). Downloaded from Caradio-Manual.com Manuals • If the USB is removed, the front panel gets open, or the unit is turned off during recording, the recording stops. • If recoring is abruptly stopped, just the file name is saved in a corresponding folder with no recording data. Maintenance 29 5 Maintenance Notes on Discs Handling the Unit Handling Discs When shipping the unit Please save the original shipping carton and packing materials. If you need to ship the unit, for maximum protection, re-pack the unit as it was originally packed at the factory. Never stick paper or tape on the disc. Storing Discs Cleaning Discs • Do not use volatile liquids such as insecticide spray near the unit. • Wiping with strong pressure may damage the surface. • Do not leave rubber or plastic products in contact with the unit for a long period of time. Cleaning the unit To clean the player, use a soft, dry cloth. If the surfaces are extremely dirty, use a soft cloth lightly moistened with a mild detergent solution. Do not use strong solvents such as alcohol, benzine, or thinner, as these might damage the surface of the unit. Do not use strong solvents such as alcohol, benzine, thinner, commercially available cleaners, or anti-static spray intended for older vinyl records. Downloaded from Caradio-Manual.com Manuals Maintaining the Unit The unit is a high-tech, precision device. If the optical pick-up lens and disc drive parts are dirty or worn, the picture quality could be diminished. For details, please contact your nearest authorized service centre. 5 Maintenance After playing, store the disc in its case. Do not expose the disc to direct sunlight or sources of heat and never leave it in a parked car exposed to direct sunlight. Keeping the exterior surfaces clean 30 Troubleshooting 6 Troubleshooting Symptoms Solution The power does not turned on./ The unit doesn’t operate. • Confirm once more that all connections are correct. • Rectify the problem that caused the fuse to blow, and then replace it. Be very sure to install the correct fuse with the same rate. • Turn the unit off and then on again. There is no sound or the sound is distorted. 6 Troubleshooting • The unit is in scan, slow motion, or pause mode. • The sound volume is low. • Connect the cables correctly. (page 15) There’s audio skipping. • Secure this unit firmly. The unit does not start playback. • Insert a playable disc. (Check the disc type, colour system, and regional code.) • Place the disc with the playback side down. • Clean the disc. • Cancel the rating function or change the rating level. Radio stations cannot be tuned in properly. • Tune to stations manually. • Preset some stations. The remote control does not work properly. • The remote control is not pointed at the remote sensor of the unit. • The remote control is too far from the unit. • There is an obstacle in the path of the remote control and the unit. • Load a new battery. Downloaded from Caradio-Manual.com Manuals Appendix 31 7 Appendix Area Code List Choose an area code from this list. Area Code Area Code Area Code Area Code Afghanistan AF Fiji FJ Monaco MC Singapore SG Argentina AR Finland FI Mongolia MN Slovak Republic SK Australia AU France FR Morocco MA Slovenia Austria AT Germany DE Nepal NP South Africa ZA Belgium BE Great Britain GB Netherlands NL South Korea KR Bhutan BT Greece Bolivia BO Greenland GR Netherlands GL Antilles Brazil BR Hong Kong Cambodia KH Hungary Canada CA India Chile CL Indonesia China CN Israel CO Italy Congo CG Jamaica Costa Rica CR Japan Croatia HR Kenya Czech Republic CZ Kuwait Denmark DK Libya Ecuador EC Luxembourg Egypt EG Malaysia El Salvador SV Maldives Ethiopia ET Mexico IN Norway ID Oman IL Pakistan IT Panama JM Paraguay JP Philippines KE Poland KW Portugal LY Romania LU Russian Federation MY Saudi Arabia MV Senegal MX Downloaded from Caradio-Manual.com Manuals ES AN Sri Lanka NZ Sweden LK NG Switzerland NO Taiwan CH SE TW OM Thailand PK Turkey TH PA Uganda PY Ukraine UG PH United States PL Uruguay TR UA US UY PT Uzbekistan RO Vietnam UZ Zimbabwe ZW RU SA SN Appendix Colombia HK New Zealand HU Nigeria Spain SI VN 7 32 Appendix Specifications AUX General Output Power: 53 W x 4 CH (Max.) Power Source: DC 12 V Speaker impedance: Ground System: 4Ω Negative Frequency Response: 20 Hz to 20 kHz S/N Ratio: 85 dB Distortion: 0.1 % Channel Separation (1 kHz): 55 dB Max Input Level (1 kHz): Dimensions (W x H x D): 2V 178 x 50 x 169 mm (Without Control Panel) Net Weight (Approx.): 1.42 kg USB TUNER Version FM Tunning Range: 87.5 to 107.9 or 87.5 to 108 MHz USB 1.1 or USB 2.0 Full Speed Bus Power Supply (USB) DC 5V 500 mA AM Tunning Range: 520 to 1720 or 522 to 1620 kHz Line OUT Frequency Response: CD Appendix Frequency Response: 20 Hz to 20 kHz S/N Ratio: 85 dB Distortion: 0.1 % Channel Separation (1 kHz): 55 dB Output Voltage: Downloaded from Caradio-Manual.com Manuals 2 V (Max.) Subwoofer(OPTIONAL) Frequency Response: 7 20 Hz to 20 kHz Output Voltage: 20 Hz to 120 Hz 2 V (Max.) Appendix 33 Trademarks and Licences Manufactured under licence from Dolby Laboratories. “Dolby” and the double-D symbol are trademarks of Dolby Laboratories. “DVD Logo” is a trademark of DVD Format/Logo Licensing Corporation. Appendix 7 Downloaded from Caradio-Manual.com Manuals Downloaded from Caradio-Manual.com Manuals