1
Table of Contents
Welcome!
List of Items in the Z-Drive R4 Full Height Box
List of Items in the Z-Drive R4 Half Height Box
System Requirements
Supported Operating Systems
Microsoft Windows
Linux
Hardware Requirements
Z-Drive R4 Minimum Hardware Requirements
Z-Drive R4 Recommended Hardware Requirements
Switching the Bracket for Z-Drive R4 Half Height
Hardware Installation
Software Requirements
Download the Latest Driver (Optional)
Download the Latest Firmware Update Tool (Optional)
Certifications
Extending the Life of the Z-Drive R4
Disable Defragmentation
Under Windows Operating Systems
Usage 1: Installation as a Boot Device
Installing Windows on Z-Drive R4
Setting the Z-Drive R4 as a Boot Device
Usage 2: Installation as a Storage Drive
Installing the Windows Driver to Use the Z-Drive R4 as a Storage Drive
Re-installing the Windows Driver
Removing the Windows Driver
Formatting Z-Drive R4 in Windows
Update Z-Drive R4 in Windows
Update Windows Driver
Update Firmware in Windows
Under Linux Operating Systems
Installing the Linux Driver to Use the Z-Drive R4 as a Storage Drive
Removing the Linux Driver
Formatting Z-Drive R4 in Linux
VMware Driver Installation
Appendix
Formatting Z-Drive From The Linux Command Line
-1-
2
2
2
2
2
2
2
3
3
3
3
5
5
5
5
6
6
6
10
10
10
13
13
13
17
18
20
21
21
21
21
21
22
22
27
28
28
Welcome!
At OCZ we have one primary goal, and that is to ensure every customer is 100% satisfied. If you have any
questions during or after the installation process, please contact our industry-leading field sales
engineering team who offer direct support for enterprise level products, including the Z-Drive R4:
Phone:
Online:
1-408-440-3403
http://www.oczenterprise.com/contactsupport.html
The following instructions are a general guideline for installation and should act as a
complement to the system’s user manual.
List of Items in the Z-Drive R4 Full Height Box
· Z-Drive R4 FH (Full Height) x8 PCIe 2.0 card in full height bracket
· Z-Drive R4 Driver/User Guide CD
List of Items in the Z-Drive R4 Half Height Box
· Z-Drive R4 HH (Half Height) x8 PCIe 2.0 card in half height bracket
· Z-Drive R4 Driver/User Guide CD
· Full height bracket
System Requirements
Supported Operating Systems
Z-Drive R4 supports both Windows 32-bit and 64-bit, and x86 architecture. Please update to the latest
OS Service Pack/Release. Please see the OCZ Enterprise website for any updated operating systems
support.
Microsoft Windows
· Windows Server 2003
· Windows 7
Linux
·
·
·
·
· Windows Server 2008
· Windows Server 2008 R2
Red Hat Enterprise Linux 6.2/6.1 64-bit · SUSE Linux Enterprise Server 11 SP1 32-bit/64-bit
Oracle Enterprise Linux 5.4 64-bit
· Oracle Enterprise Linux 6.1 64-bit
CentOS 6.2/6.0/5.8/5.7 64-bit
· Ubuntu Server 12.04/11.10/10.10 64-bit
Ubuntu Desktop 11.10/10.10 64-bit
-2-
Cooling Requirements
The Z-Drive R4’s controller requires that the server system is cooled at 100 Linear Feet Per Minute
(LFPM). Please ensure proper airflow for normal operations of Z-Drive R4.
Hardware Requirements
Z-Drive R4 Minimum Hardware Requirements
· One PCIe Gen1 x8 slot.
· A system capable of accompanying a half height, half length PCIe card for Z-Drive R4 HH.
OR
A system capable of accompanying a full height, 3/4 length PCIe card for Z-Drive R4 FH.
· Minimum system memory as required by the operating system.
NOTE: For optimal performance, please follow “Z-Drive R4 Recommended Hardware
Requirements”.
Z-Drive R4 Recommended Hardware Requirements
· One PCIe Gen2 x8 or x16 slot.
Switching the Bracket for Z-Drive R4 Half Height
The Z-Drive R4 comes installed with the half height bracket. This bracket must be switched to the full
height bracket (included) to be properly installed on the full height systems. The full height bracket is
the only item required for this change.
1. Remove the 2 screws attaching the half height bracket to the Z-Drive R4
-3-
2. Slide the half height bracket off the Z-Drive R4
3. Slide the full height bracket on
4. Secure the full height bracket by screwing the 2 screws back into the bracket
-4-
Hardware Installation
1. Locate an available x8 or x16 PCI-Express slot (preferably Gen 2 for best performance) and carefully
seat the drive into the slot.
2. The Z-Drive R4 HH comes in a half height form, so users with full height systems must first switch to
the half height bracket. Please follow the section “Switching the Bracket for Z-Drive R4 Half Height”.
3. Make certain that the drive board seats firmly into the slot. Screw the top of the board bracket into
the system to ensure it remains in place.
Warning! With some operating systems, the Z-Drive R4 SSD offers the option to utilize the
drive as either a primary boot drive for the operating system or as a storage device. Users
should choose one of the following usages below.
Warning! Electrostatic Discharge (ESD) can permanently damage the Z-Drive R4 SSD. Please
make sure to be properly grounded before handling the Z-Drive R4 SSD.
Software Requirements
Download the Latest Driver (Optional)
NOTE: The Z-Drive R4 box comes with a CD that includes the Driver for Z-Drive R4. For the
latest driver, the user should download it from the OCZ Enterprise website.
1. The latest drivers for the Z-Drive R4 are available online at
http://www.oczenterprise.com/drivers.html.
Download the Latest Firmware Update Tool (Optional)
NOTE: The Z-Drive R4 box comes with a CD that includes the firmware update tools (Windows
and Linux) for Z-Drive R4. For the latest tool, user should download it from the OCZ
Enterprise website.
1. The newest firmware tools for the Z-Drive R4 are available online at
http://www.oczenterprise.com/updates.html.
-5-
Certifications
OCZ Enterprise Z-Drive R4 PCI Express (PCIe) SSD series works with industry leading hypervisor solutions
including VMware (ESX) and Microsoft (Hyper V). In addition, Z-Drive R4 has gone through a detailed
validation process with VMware, meeting their specific integration and interoperability standards to
achieve VMware Ready™ status.
Extending the Life of the Z-Drive R4
Disable Defragmentation
Solid state disks do not require defragmentation, as it is a process typically meant for HDDs; unlike
traditional hard drives, SSDs do not gain performance improvements from defragmentation but instead
it produces unnecessary writes to the drive, shortening the lifespan of the Z-Drive R4. Since SSDs are
based on flash technology, they must also be maintained differently. Please follow the instructions
below to check and disable the Disk Defragmentation Scheduler in Windows 7 (other versions of
Windows should be similar).
Note: Defragmentation is unnecessary on the Z-Drive R4.
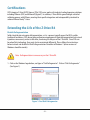
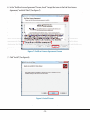
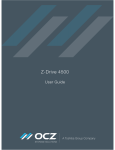
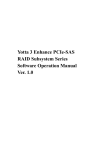
1. Click on the Windows logo button, and type in “Disk Defragmenter”. Click on “Disk Defragmenter”
(See Figure 1).
Figure 1: Find Disk Defragmenter
-6-
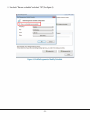
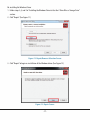
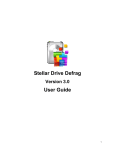
2. Under the “Disk Defragmenter” window, check if defragmentation is scheduled. Click on “Configure
Schedule…” (See Figure 2).
Figure 2: Disk Defragmenter Window with Scheduled Defragmentation
-7-
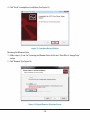
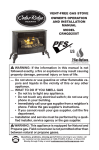
3. Un-check “Run on a schedule” and select “OK” (See Figure 3).
Figure 3: Disk Defragmenter Modify Schedule
-8-
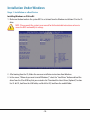
4. The “Disk Defragmenter” window should look like this:
Figure 4: Disk Defragment Window with no Defragmentation Scheduled
-9-
Installation Under Windows
Usage 1: Installation as a Boot Device
Installing Windows on Z-Drive R4
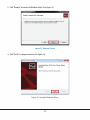
1. Make sure the boot order in the system BIOS is set to boot from the Windows installation CD in the CD
drive.
NOTE: Please consult the system’s user manual for further detailed instructions on how to
access the BIOS and modify its settings.
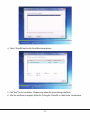
2. After booting from the CD, follow the onscreen installation instructions from Windows.
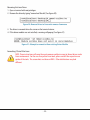
3. In the screen, “Where do you want to install Windows?,” select the “Load Driver” button and load the
driver from the CD or USB key that you created in the “Download the Latest Driver (Optional)” section.
For 32-bit OS, load from the i386 folder, and for 64-bit OS, load from the amd64 folder.
- 10 -
4. Select Z-Drive R4 from the list of available storage devices.
5. Click “Next” to start installation. Windows may reboot the system during installation.
6. After the installation is complete, follow the “Setting the Z-Drive R4 as a Boot Device” section below.
- 11 -
Windows Server 2003: Bootable Driver Installation Procedure
Requirements:
The following lists the requirements to build a Windows Server 2003 bootable driver floppy disk:
· A blank writable 1.44MB floppy disk
· A Windows PC with an internal floppy disk drive or an external USB drive; the system BIOS must
support USB devices.
· The Windows Server 2003 platform requires an internal floppy disk drive or an external USB drive;
the system BIOS must support USB devices.
Procedure To Create The Bootable Driver Floppy Disk:
1. Download the latest Z-Drive R4 Windows driver package from www.oczenterprise.com/drivers onto to
a PC with a floppy disk drive.
2. Unzip the contents of the Z-Drive R4 driver package on the PC.
3. Insert the blank floppy disk.
4. Format the 1.44MB floppy disk with the FAT32 file system.
5. Open the folder on the PC where the Z-Drive R4 driver package is located.
6. Copy the “ocz10xx” file to the root of the floppy disk (“A:\ocz10xx”).
7. Copy the “amd64” folder and contents to the root of the floppy disk (“A:\amd64\..”).
8. Copy the “txtsetup.oem” file to the “amd64” driver folder on the floppy disk.
9. Copy the “i386” folder and contents to the root of the floppy disk (“A:\i386\..”).
10. Copy the “txtsetup.oem” file to the “i386” driver folder on the floppy disk.
Floppy Layout:
ocz10xx
i386\ocz10xx.sys
i386\ocz10xx.inf
i386\ocz10xx.cat
i386\txtsetup.oem
amd64\ocz10xx.sys
amd64\ocz10xx.inf
amd64\ocz10xx.cat
amd64\txtsetup.oem
- 12 -
Bootable Driver Installation Procedure:
1. Power off the PC. Insert the OCZ Z-Drive R4 PCI Express SSD into an available PCI Express x8 slot.
2. Power up the PC.
3. Insert the Windows Server 2003 CD into the CD/DVD-ROM drive.
4. When prompted, press the F6 key for third party SCSI or driver installation at the beginning of text
mode installation. Press the ‘S' key when setup asks if you want to specify an additional device.
5. Insert the OCZ Z-Drive R4 bootable driver floppy disk. Press 'Enter'. From the menu presented next,
select the OCZ Z-Drive R4 driver in the list and press the 'Enter' key.
6. Press 'Enter' key when prompted to continue on with text mode setup.
7. Follow the Windows 2003 setup instructions to partition and install the operating system.
8. Setup will copy files from the Windows Server 2003 CD to the OCZ Z-Drive R4 partition.
9. Restart the PC. After restarting, the setup process will resume to finish the Windows Server 2003
installation.
Setting the Z-Drive R4 as a Boot Device
1. To set the Z-Drive R4 as a boot device, the user must first change the boot order in the motherboard
BIOS.
NOTE: Please consult the system’s user manual for further detailed instructions on how to
access the BIOS and modify its settings.
2. Change the Z-Drive R4 to the primary boot device.
3. Save the settings and exit the BIOS.
4. The Z-Drive R4 should now be the boot device.
Usage 2: Installation as a Storage Drive
Installing the Windows Driver to Use the Z-Drive R4 as a Storage Drive
The Z-Drive R4 can become a storage drive in a computer with an existing Windows installation.
1. Follow the “Hardware Installation” section to install the card into the computer.
2. Turn on the computer and boot to Windows.
3. Insert the CD/USB key prepared in the “Download the Latest Driver” section into the computer CD
drive or USB slot.
- 13 -
4. Open up the CD/USB
key and go Update
to the driver
Run Setup by double-clicking (See Figure 5).
Toolfolder.
(Optional)
Download
Latest Firmware
ive R4
R4 box
box comes
come
co
mess with
me
with a CD
CD that
that includes
inc
nclu
lude
lu
dess the
de
the firmware
firmw
fir
mwar
mw
a update tools (Windows
NOTE: The Z-Drive
- riivvee RR4.
4 For the latest tool,
4.
too user should downloadd it from the OCZ website.
and Linux) for Z-D
Z-Drive
toools for
for tth
fo
he ZZZ-Drive
Drive R4 are available online at
Dr
1. The newest firmware tools
the
http://www.oczenterprise.com/support.html.
http://www.oczenterprrise.co
com
co
m//ssuupp
ppoorrtt..ht
h ml.
Extending the Life of the
the Z-Drive
ZZ--Dr
Driv
Driv
ive R4
ive
R4
Defragmentation
Disable Defragmentatio
on
for5:HDDs.
SSDs are based on flash technology, they
Defragmentation is a process typically meant
Figure
DriverSince
Folder
must also be maintained differently. SSDs, unlike traditional hard drives, do not gain performance
improvements
from
produces
unnecessary
writes
to the drive,
5.
The “Welcome
to defragmentation.
the OCZ 10xx DriverDefragmentation
Setup Wizard” screen
should
pop up. Click
on “Next”
(See Figure
shortening
the
lifespan
of
the
Z-Drive
R4.
Please
follow
the
instructions
below
to
check
and disable the
6).
Disk Defragmentation
ion
on Scheduler
Sch
ched
eduller
er in
in Windows
Wiind
W
ndow
ows
ow
ws 7 (Other
(Oth
(O
ther
th
er versions
ver
ersisision
onss of
on
of Windows
Windo
inndo
dows should
sho
hould
uulld be
be similar).
s
eeffra
raggm
ragm
meennta
tatititiion
on iiss unn
on
uunnecessary
un
nnecess
sssa y on the
ssar
hee Z-Drive R4.
Note: DDefragmentation
1. Click on the Windows
logo
nddow
ows
w log
loggoo bbutton,
utto
utto
ut
tonn,, aand
nd type
nd
typ
tyyppe in
in “Disk
“Di
Disskk Defragmenter”.
Di
Defra
Deeffra
raggm
menter”.
eenntteer”
r . Click
Clilick
ck oonn “Diskk Defragmenter”
(See Figure 1).
Figure 6: Driver Welcome Screen
Figure 1: Find Disk Defragmenter
- 14 -
6. In the “End
License
Agreement”
Screen,
“I accept the terms in the End User License
Update
Toolcheck
(Optional)
Download
theUser
Latest
Firmware
Agreement,” and click “Next” (See Figure 7).
NOTE: The Z-Drive R4 box comes with a CD that includes the firmware update tools (Windows
uxx)) for
for
or ZZ-Drive
-DDririve
rive
ve RR4.
4. Fo
4.
Forr th
the
he la
late
latest
ate
test
st ttool
st
ooll, uuser
oo
serr should
se
shhou
shou
ould
ld download
ld
dow
wnl
nload
nloa
ooaad itit from
frroom the OCZ website.
and Linux)
tool,
firm
mw
war
a e tools
tool
to
olss for
ol
for th
thee ZZZ-Drive
Driv
Dr
ivee R4 aare
iv
r aavailable
re
vailililab
va
able
ab
le online
onl
nlin
inee at
in
a
1. The newest firmware
http://www.oczenterprise.com/support.html.
http://www.oczzzeenter
erprise.com/suppor
er
/ oorrtt..hhttm
mll.l.
Extending the Life
Lifffee of the
the Z-Drive
Z--DDrriv
ive R4
R4
Defragmentation
Disable Defragme
entat
ation
Defragmentation iss a process
proocceessss typically
typic
yyppiccaalllly
llyy meant
meeaanntt for
foorr HDDs.
HDDDDss.. Since
SSiinncce SSDs
SSSSDDss are
are
re based
bas
ased
ed onn flash
fl shh technology,
fla
t
they
must also be maintained
aaiinedd differently.
ddiiffe
fferreent
ntllyy. SSSDs,
SSDDss,, unlike
unnlliikke traditional
ttrraaddiittio
ionnaal hard
hhaard
rd drives,
drriivveess,, do
do not
noot gain
g inn performance
ga
p
improvements from
m defragmentation.
defraaggme
mennttaattiioonn.. Defragmentation
DDeeffrraaggme
ment
ntaattiioon produces
prod
pr
oduces unnecessary writes
writees to the drive,
shortening the lifespan
span off th
the
he ZZ-Drive
-DDrive
i RR4.
4 Please
4.
Plea
Pl
lease
easee follow
ea
fol
olllllooow
w th
he in
nst
stru
stru
ruct
ctiio
ct
ions
ions
ns bbelow
elow
el
low ttoo ch
ccheck
hec
ec and disable the
the
instructions
Disk Defragmentation
iooonn Scheduler
Sch
ched
edul
ed
uler
ul
er in
in Windows
Wind
Wi
ndow
nd
owss 7 (Other
ow
( th
(O
ther
er versions
ver
ersisision
onss off Windows
on
Win
indo
ind
dows should
dows
sho
houl
uldd bee similar).
ul
s
Figure is7:unnecessary
End User License
on theAgreement
Z-Drive R4. Screen
Note: Defragmentation
7. Click
Click “Install”
(See Figure
1.
on the Windows
logo8).button, and type in “Disk Defragmenter”. Click on “Disk Defragmenter”
(See Figure 1).
Figure 8: Install Screen
Figure 1: Find Disk Defragmenter
- 15 -
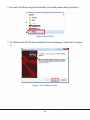
8. The next screen should show the installation process (See Figure 9).
Figure 9: Installation Progress Bar
9. Click “Finish” to complete installation (See Figure 10).
Figure 10: Complete Installation
10. Follow “Formatting Z-Drive R4 in Windows” section to start using the Z-Drive R4.
- 16 -
Re-installing the Windows Driver
1. Follow steps 3, 4, and 5 in “Installing the Windows Driver to Use the Z-Drive R4 as a Storage Drive”
section.
2. Click “Repair” (See Figure 11).
Figure 11: Repair/Remove Selection Screen
3. Click “Repair” to begin re-installation of the Windows driver (See Figure 12).
Figure 12: Repair Screen
- 17 -
4. Click “Finish” to complete re-installation (See Figure 13).
Figure 13: Complete Re-installation
dows Driver
Removing the Windows
1. Follow steps 3, 4, and 5 in “Installing the Windows Driver to Use the Z-Drive R4 as a Storage Drive”
section.
2. Click “Remove” (See Figure 14).
Figure 14: Repair/Remove Selection Screen
- 18 -
3. Click “Remove” to remove the Windows driver (See Figure 15).
Figure 15: Remove Screen
4. Click “Finish” to complete removal (See Figure 16).
Figure 16: Complete Remove Driver
- 19 -
Formatting Z-Drive R4 in Windows
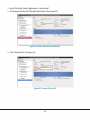
1. Click on the Windows Start button, right click “Computer” and select “Manage” (See Figure 17).
Figure 17: Select Manage Option
ment” window, select “Storage” and click on “Disk Man
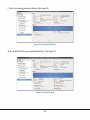
2. In “Computer Management”
Management” on the left
itialize Disk” window to load and click “OK” (See Figur
menu. Wait for the “Initialize
Figure 18).
Drive R4 is already initialized, then this step can be sk
NOTE: If the Z-Drive
skipped.
Figure 18: Disk Management Window
3. After the disks initialize, right click on the graphical bar representing the unallocated disks and select
“New Simple Volume” to format the drive.
4. Follow the onscreen instructions to finish formatting the drive.
- 20 -
Update Z-Drive R4 in Windows
Update Windows Driver
1. Follow “Download the Latest Driver (Optional)” section to download the latest driver.
2. Double click on setup.exe to install the new updated driver. Follow the instructions on the screen
Update Firmware in Windows
1. Please refer to the Firmware Update Guide for Windows to update Z-Drive R4 Firmware.
NOTE: OCZ Toolbox must run in “administrator” mode.
Under Linux
Installing the Linux Driver to Use the Z-Drive R4 as a Storage Drive
The Z-Drive R4 can be used as a storage device in a computer with an existing Linux installation.
1. Follow the “Hardware Installation” section to install the Z-Drive into the computer.
2. Turn on the computer and boot Linux.
3. Insert the enclosed Driver CD or the CD/USB key prepared in the “Download the Latest Driver
(Optional)” section into the computer CD drive or USB slot.
4. Copy ocz10XX.ko in the Linux folder to a location on the Linux host.
5. Open a terminal with root privileges.
6. Go to the location where ocz10XX.ko was copied to.
7. Load the driver by typing “insmod ocz10XX.ko” (See Figure 19).
Figure 19: Load Driver in Linux with insmod Command
8. The driver is installed when the cursor on the terminal returns.
9. Follow the “Formatting Z-Drive R4 in Linux” section to start using the Z-Drive R4.
- 21 -
Removing the Linux Driver
1. Open a terminal with root privileges.
2. Remove the driver by typing “rmmod ocz10xx.ko” (See Figure 20).
Figure 20: Remove Driver in Linux with rmmod Command
river is removed when the cursor on the terminal returns.
3. The driver
4. If the driver module was not installed, a warning will pop up (See Figure 21).
Figure 21: Attempt to rmmod on Non-existing Driver Module
Formatting Z-Drive R4 in Linux
NOTE: These instructions will cover the most common and basic usage to format drives under
Linux environment. For the use of any other Linux tools, please consult the respective user
guides of the tools. The screenshots are taken on RHEL. Other distributions may look
different.
- 22 -
1. Open “Disk Utility” under “Applications->System Tools”.
2. On left panel, find the OCZ-ZDrive R4 and click on it (See Figure 22).
Figure 22: Find Z-Drive R4 in Disk Utility
mat Drive” (See Figure 23).
3. Click “Format
Figure 23: Format Z-Drive R4
- 23 -
4. Pick “Master Boot Record” Click “Format” (See Figure 24).
Figure 24: Pick Master Boot Record Scheme
mat” when the warning prompt is posted (See Figure 25).
5. Click “Format”
Figure 25: Confirm Format
6. Wait until the format is complete.
- 24 -
7. Click “Create Partition” (See Figure 26).
Figure 26: Create Partition
te” (See Figure 27).
8. Click “Create”
Figure 27: Confirm Create
- 25 -
9. Wait until creating partition is finished (See Figure 28).
Figure 28: Creating Partition
10. The final Disk Utility screen should look like this: (See Figure 29).
Figure 29: Finish Format
- 26 -
VMware Driver Installation
Install OCZ Z Drive R4 driver on existing ESXi 5.0 host using esxcli
An existing ESXi 5.0 host can install the OCZ Z-Drive R4 driver from a VIB file. The VIB file is copied to the
ESXi 5.0 host using the datastore browser, and installed using esxcli in the ESXi Shell.
Note: This requires remote ESXi network connectivity using vSphere client.
To install the OCZ Z-Drive R4 driver:
1. Download and extract the latest drivers for Z-Drive R4 from
http://www.oczenterprise.com/drivers.html
2.
3.
4.
5.
6.
Log in to the ESXi host using vSphere client with administrator privileges, such as root.
Using Datastore Browser, upload the scsi-ocz[version].VIB file to an ESXi host’s datastore.
Enter the host into maintenance mode.
Log in as root to the ESXi console through SSH.
Run this command to install driver from the VIB file (requires absolute path):
esxcli software vib install -v <full path to VIB>
For example:
esxcli software vib install –v /vmfs/volumes/datastore/scsi-ocz10xx-0.9.1-1OEM.500.0.0.472560.x86_64.vib
7. Reboot the ESXi host.
8. Exit maintenance mode.
- 27 -
Appendix
Formatting Z-Drive From The Linux Command Line
Follow these steps to prepare a Z-Drive for use under Linux using line-mode commands
Fdisk and parted can both be used to partition a drive. If a drive is larger than 2TB parted must be used.
Since most Z-Drives are larger than 2TB the examples that follow show the use of parted.
Use parted to display a new out-of-the box uninitialized drive
[root@x8dah oczeng]# parted /dev/sdc print
Error: /dev/sdc: unrecognised disk label
[root@x8dah oczeng]#
Use parted to put a gpt label on the drive
[root@x8dah oczeng]#
[root@x8dah oczeng]# parted /dev/sdc mklabel gpt
Information: You may need to update /etc/fstab.
[root@x8dah oczeng]#
USE parted to print drive information and prove the gpt label was applied. Parted now shows a 1.6TB
Z-Drive
[root@x8dah oczeng]#
[root@x8dah oczeng]# parted /dev/sdc print
Model: ATA OCZ Z-DRIVE R4 R (scsi)
Disk /dev/sdc: 1600GB
Sector size (logical/physical): 512B/4096B
Partition Table: gpt
Number Start End Size File system Name Flags
[root@x8dah oczeng]#
- 28 -
Use parted to put a partition on the drive. In this case a single partition using all capacity is used.
[root@x8dah oczeng]#
[root@x8dah oczeng]# parted /dev/sdc mkpart 1 ext2 0 1.6T
Information: You may need to update /etc/fstab.
[root@x8dah oczeng]#
Use parted to display drive information and verify the partition was created
[root@x8dah oczeng]#
[root@x8dah oczeng]# parted /dev/sdc print
Model: ATA OCZ Z-DRIVE R4 R (scsi)
Disk /dev/sdc: 1600GB
Sector size (logical/physical): 512B/4096B
Partition Table: gpt
Number Start End Size File system Name Flags
1 17.4kB 1600GB 1600GB
1
[root@x8dah oczeng]#
Use mkfs to put a file system on the partition
[root@x8dah oczeng]#
[root@x8dah oczeng]# mkfs -t ext4 /dev/sdc1
mke2fs 1.41.12 (17-May-2010)
Filesystem label=
OS type: Linux
Block size=4096 (log=2)
Fragment size=4096 (log=2)
Stride=1 blocks, Stripe width=0 blocks
97681408 inodes, 390721910 blocks
19536095 blocks (5.00%) reserved for the super user
First data block=0
Maximum filesystem blocks=4294967296
11924 block groups
32768 blocks per group, 32768 fragments per group
8192 inodes per group
Superblock backups stored on blocks:
32768, 98304, 163840, 229376, 294912, 819200, 884736, 1605632, 2654208,
4096000, 7962624, 11239424, 20480000, 23887872, 71663616, 78675968,
- 29 -
102400000, 214990848
Writing inode tables: done
Creating journal (32768 blocks): done
Writing superblocks and filesystem accounting information: done
This filesystem will be automatically checked every 30 mounts or
180 days, whichever comes first. Use tune2fs -c or -i to override.
[root@x8dah oczeng]#
Use parted to print drive information and verify the file system was created correctly
[root@x8dah oczeng]#
[root@x8dah oczeng]# parted /dev/sdc print
Model: ATA OCZ Z-DRIVE R4 R (scsi)
Disk /dev/sdc: 1600GB
Sector size (logical/physical): 512B/4096B
Partition Table: gpt
Number Start End Size File system Name Flags
1 17.4kB 1600GB 1600GB ext4 1
[root@x8dah oczeng]#
Create a mount point
[root@x8dah oczeng]#
[root@x8dah oczeng]# mkdir /mnt/ocz
[root@x8dah oczeng]#
Mount the file system to the mount point
[root@x8dah oczeng]#
[root@x8dah oczeng]# mount /dev/sdb1 /mnt/ocz
mount: you must specify the filesystem type
[root@x8dah oczeng]# mount /dev/sdc1 /mnt/ocz
[root@x8dah oczeng]#
- 30 -
Use the mount command to verify the Z-Drive file system is mounted
[root@x8dah oczeng]#
[root@x8dah oczeng]# mount
/dev/mapper/vg_x8dah-lv_root on / type ext4 (rw)
proc on /proc type proc (rw)
sysfs on /sys type sysfs (rw)
devpts on /dev/pts type devpts (rw,gid=5,mode=620)
tmpfs on /dev/shm type tmpfs (rw,rootcontext="system_u:object_r:tmpfs_t:s0")
/dev/sda1 on /boot type ext4 (rw)
/dev/mapper/vg_x8dah-lv_home on /home type ext4 (rw)
none on /proc/sys/fs/binfmt_misc type binfmt_misc (rw)
/tmp on /tmp type none (rw,bind)
/var/tmp on /var/tmp type none (rw,bind)
/home on /home type none (rw,bind)
sunrpc on /var/lib/nfs/rpc_pipefs type rpc_pipefs (rw)
192.168.96.25:/mnt/volume1 on /mnt/toaster type nfs (rw,addr=192.168.96.25)
/dev/sdc1 on /mnt/ocz type ext4 (rw)
[root@x8dah oczeng]#
[root@x8dah oczeng]#
[root@x8dah oczeng]#
[root@x8dah oczeng]# df -h
Filesystem
Size Used Avail Use% Mounted on
/dev/mapper/vg_x8dah-lv_root
24G 7.3G 16G 33% /
tmpfs
1.9G 500K 1.9G 1% /dev/shm
/dev/sda1
485M 64M 396M 14% /boot
/dev/mapper/vg_x8dah-lv_home
21G 848M 19G 5% /home
192.168.96.25:/mnt/volume1
290G 88G 202G 31% /mnt/toaster
/dev/sdc1
1.5T 198M 1.4T 1% /mnt/ocz
[root@x8dah oczeng]#
The Z-Drive is now ready to use.
- 31 -
LIMITED WARRANTY
OCZ Technology products epitomize the new vanguard of quality standards as part of our commitment
to customers. All OCZ Technology Group ("OCZ") products are warranted and tested to be free of defects
in material and workmanship and conform to published specifications. Should your OCZ product fail
within the warranty period (under normal use in the recommended environment) due to improper
workmanship or materials, OCZ will repair the product or replace it with a comparable or better unit.
This warranty is subject to the conditions and limitations set forth herein.
DURATION OF WARRANTY
The OCZ Z-Drive R4 is covered by this warranty for 3 years from the date-of-purchase. Proof-of-purchase
including the date-of-purchase is required to collect on the warranty. OCZ will inspect the product and
decide whether to repair or replace it. OCZ reserves the right to provide a functional equivalent product,
or a refurbished replacement product.
LIMITATIONS
This warranty does not apply to product failure caused by accidents, abuse, mishandling, improper
installation, alteration, acts of nature, improper usage, or problems with electrical power. In addition,
opening or tampering with the product casing, or any physical damage, abuse, or alteration to the
product's surface, including all warranty or quality stickers, product serial or electronic numbers, will
also void the product warranty. OCZ is not responsible for recovering any data lost due to the failure of a
flash memory device. OCZ products must be used with devices that conform to the recommended
industry standards. OCZ will not be liable for damages resulting from a third party device that causes the
OCZ product to fail. OCZ shall in no event be liable for any consequential, indirect, or incidental damages,
lost profits, lost business investments, lost goodwill, or interference with business relationships as a
result of lost data. OCZ is also not responsible for damage or failure of any third-party equipment, even if
OCZ has been advised of the possibility. This limitation does not apply to the extent making it illegal or
unenforceable under applicable law.
- 32 -