1
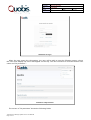
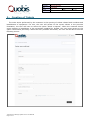
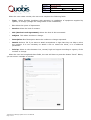
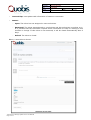
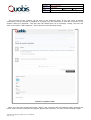
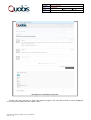
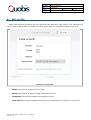
Document:
Technical Document
Title:
User Manual
Version
0.1
Author
Eduardo Alonso
Date:
30/10/13
User Manual
ZenDesk Quobis
This document belongs Quobis and it is confidential
Page 1 of 14
Document:
Technical Document
Title:
User Manual
Version
0.1
Author
Eduardo Alonso
Date:
30/10/13
Content index
1.-Introduction.....................................................................................................................3
2.-Access to Helpdesk platform..............................................................................................3
3.-Creation of Tickets............................................................................................................6
4.-Management of tickets......................................................................................................8
5.-Search tickets................................................................................................................12
6.-Edit profile.....................................................................................................................13
7.-Tickets by email.............................................................................................................14
Illustrations index
Illustration 1: Web Portal.......................................................................................................3
Illustration 2: Login..............................................................................................................4
Illustration 3: My activities.....................................................................................................4
Illustration 4: My activities.....................................................................................................5
Illustration 5: Creation of ticket..............................................................................................6
Illustration 6: Test Ticket.......................................................................................................7
Illustration 7: Creation of ticket..............................................................................................8
Illustration 8: Test ticket.......................................................................................................9
Illustration 9: Update of ticket..............................................................................................10
Illustration 10: Conversation of the ticket..............................................................................11
Illustration 11: Search of tickets ..........................................................................................12
Illustration 12: Edit profile...................................................................................................13
Versions
Version
Name
Description
Date
0.1
Eduardo Alonso Gil
Author
30/10/13
This document belongs Quobis and it is confidential
Page 2 of 14
Document:
Technical Document
Title:
User Manual
Version
0.1
Author
Eduardo Alonso
Date:
30/10/13
1.- Introduction
This document aims to help user for handling the support system of Quobis Networks company.
This user guide doesn't try to be a reference manual to ask all the possible options deeply, this
manual is a fast guide for using this platform, its focus is explaining the more common tasks.
Our support platform is a software via web where the user will be able to manage incidents and
breakdowns of equipment quickly and intuitively.
2.- Access to Helpdesk platform
The access to Helpdesk platform is very easy. The user will have to open a browser and enter
the following address:
http://support.quobis.com/hc/es
When the user access to the previous page, the user will be able to see help forums. The user
can also login pressing the button “Login in”. The user will be able to ask user and password:
Illustration 1: Web Portal
If the user press the button “Login In”, the user will be able to access to the following screen
where the user will enter the access credential:
This document belongs Quobis and it is confidential
Page 3 of 14
Document:
Technical Document
Title:
User Manual
Version
0.1
Author
Eduardo Alonso
Date:
30/10/13
Illustration 2: Login
When the user enter this information, the user will be able to see the following screen, where
the user must display the menu that appear on the top. The user will have to click the buttons user
name and “My activities”:
Illustration 3: My activities
The screen of “My activities” shows the following fields:
This document belongs Quobis and it is confidential
Page 4 of 14
Document:
Technical Document
Title:
User Manual
Version
0.1
Author
Eduardo Alonso
Illustration 4: My activities
•
Filter requests: paragraph 6.
•
My requests: paragraph 4.
•
Send requests: paragraph 3.
•
Requests with copy: paragraph 3.
This document belongs Quobis and it is confidential
Page 5 of 14
Date:
30/10/13
Document:
Technical Document
Title:
User Manual
Version
0.1
Author
Eduardo Alonso
Date:
30/10/13
3.- Creation of Tickets
The main action performed by the customer is the opening of tickets related with incidents and
breakdowns of equipment. For this, the user will access to the screen shown in the previous
illustration, the user will have to select the option “Send a request”. When the customer detect
some incident or breakdown in the equipment supplied by Quobis, the user must access to the
option commented previously. When the user performs this action, the user will be able to see the
following screen:
Illustration 5: Creation of ticket
This document belongs Quobis and it is confidential
Page 6 of 14
Document:
Technical Document
Title:
User Manual
Version
0.1
Author
Eduardo Alonso
Date:
30/10/13
When the user create a ticket, the user must complete the following fields:
•
Type: Select Incident (problems with operation or installation of equipment supplied by
Quobis) or Change (change the configuration of the installation).
•
To: Select the queue of department.
•
Service: Select the kind of contract.
•
SLA (Service Level Agreement): Select the kind of SLA contracted.
•
Subject: Title about incident or change.
•
Description: Brief description about the incident or change requested.
•
Attach: Select a file if you want to attach screenshots or logs that they can help to solve
the incident. It is not necessary to attach a file to create the ticket, it is a additional
parameter.
•
Priority: Select a value between low, normal, high and urgent according to urgency of the
incident or change.
When the user had completed these fields, the user will have to press the button ”Send”. Below,
you can see an example of a ticket:
Illustration 6: Test Ticket
This document belongs Quobis and it is confidential
Page 7 of 14
Document:
Technical Document
Title:
User Manual
Version
0.1
Author
Eduardo Alonso
Date:
30/10/13
When the ticket had been created, the user will see the following screen:
Illustration 7: Creation of ticket
4.- Management of tickets
The user will have to press “My requests” to see the evolution about the ticket in the main page.
When the user had pressed over this link, the customer will be able to filter the incidents between
the following status: any, open, answered and solved: the option any shows the list of tickets with
any status, the option open shows the list of tickets not solved and not answered and the option
solved shows the list of tickets that had been solved. In the following example, the customer has
created a ticket that hadn't been solved, the user will be able to see it in All and Open. The default
screen that appears after the creation of a ticket is Open status (illustration 7). The user also will
be able to filter the tickets by text included in the description or subject field. The user also can
filter by technician assigned.
The fields displayed for each ticket in My Tickets are:
•
Number of ticket: number of the ticket.
•
Subject: title of the ticket.
This document belongs Quobis and it is confidential
Page 8 of 14
Document:
Technical Document
Title:
User Manual
Version
0.1
Author
Eduardo Alonso
Date:
•
Last activity: Last update with information of status or comments.
•
Status:
30/10/13
◦
Open: The ticket has not assigned to none technician.
◦
Answered: The ticket was assigned to a technician and this technician is working on it.
It is possible that the technician requests some information to keep on working in this
incident or change. If this ticket is not answered, it will be closed automatically after 3
days.
◦
Solved: The ticket is closed.
Below, a test ticket is shown:
Illustration 8: Test ticket
This document belongs Quobis and it is confidential
Page 9 of 14
Document:
Technical Document
Title:
User Manual
Version
0.1
Author
Eduardo Alonso
Date:
30/10/13
The evolution of the incident can be seen in the following page. If the user want to attach
information, add a comment or respond to an agent, the user will have to write the comment in the
window “Add your response”. The user also can attach files if it is necessary. Finally, the user will
click in the button “Add response”. This is shown in the following image:
Illustration 9: Update of ticket
When the user has clicked the button “Send”, the comment will be displayed when opening the
ticket, where all the comments will appear (agent and customer), as seen in the following image:
This document belongs Quobis and it is confidential
Page 10 of 14
Document:
Technical Document
Title:
User Manual
Version
0.1
Author
Eduardo Alonso
Date:
30/10/13
Illustration 10: Conversation of the ticket
Finally, the user will have to click user name to logout. The user will be able to see a displayed
on the top of the page with the option “Exit”.
This document belongs Quobis and it is confidential
Page 11 of 14
Document:
Technical Document
Title:
User Manual
Version
0.1
Author
Eduardo Alonso
Date:
30/10/13
5.- Search tickets
This tool is used to search a ticket easyly. The user will have to introduce the text of ticked that
it is necessary to search.
Illustration 11: Search of tickets
This document belongs Quobis and it is confidential
Page 12 of 14
Document:
Technical Document
Title:
User Manual
Version
0.1
Author
Eduardo Alonso
Date:
30/10/13
6.- Edit profile
Some basic preferences about the user profile will be selected in this section. The customer can
use the option “Edit profile” to modify the name, the avatar, the telephone and the time zone:
Illustration 12: Edit profile
•
Name: this field let change the user name.
•
Avatar: this option let add an image that identify to user.
•
Telephone: this field let change the telephone of user.
•
Time zone: this option let adapt the time zone to create and solve tickets for each user.
This document belongs Quobis and it is confidential
Page 13 of 14
Document:
Technical Document
Title:
User Manual
Version
0.1
Author
Eduardo Alonso
Date:
30/10/13
7.- Tickets by email
The second method used for opening tickets is performed using the email. The customer will
have to send an email to the following email address: [email protected]
When the customer send an email to the email address indicated, a ticket will be created
automatically. This ticket will be assigned to a technician. If this user is not exist in our platform,
two alternatives will occur:
•
The email of the customer is not accepted by the support platform, so the ticket will be
deleted and any technician won't process this request.
•
The user will receive via email the instructions to create the user in our platform. So, the
user will be able to create a ticket with information about the incident or change.
This document belongs Quobis and it is confidential
Page 14 of 14