1
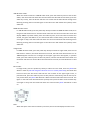
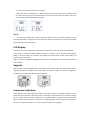
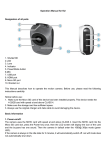
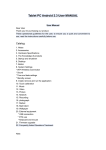
W6 User Manual Designation of all Parts 1
2
3
4
5
8
9
6
7
10
11
1. LCD 2. Shutter/OK 3. Power/Mode Button 4. HDMI Port 5. Lens 6. Indicator 7. Speaker 8. USB Port 9. Reset 10. Micro SD Port 11. Support Nut This Manual has introduced how to safely operate the sports DV. Before use, please read carefully the following instructions: Notice before use: 1. Make sure the Micro SD card for this DV has been installed correctly. This DV needs 4‐32GB card with speed at and above CLASS4. 2. Make sure the memory card has sufficient space. 3. Be sure to use the original charger and data cable so as to avoid damaging this DV. WIFI Battery Burst SD card Mode Mode Icon of WIFI signals Capacity of battery Single ; Or burst No flickering when no SD card 720P 60 video 1080P 30 video I. Mobile Phone Mode Switch‐on: Before use, insert Class 4 SDHC card or above into the Micro SD card slot, press the Power key once to switch the device on, then the LDC will be on, the buzzer will have one sound, the blue LED will be on. In such time, the WIFI is not activated, the WIFI on the LCD does not flicker. If the video key is held for 3s, the WIFI will be activated, then the cyan LED will flicker. In such time, with the mobile phone, you may search WIFI hot spot. After the mobile phone is connected successfully with the camera WIFI, the cyan LED will stop flickering but keep solid on (green LED and blue LED both are on to create cyan LED). When the WIFI mode of the camera is activated, please operate to connect the mobile phone and the camera with the following steps: 1. Install the AP software into the mobile phone; make sure ismartDV.APK is exclusive to Android mobile phones. Scan the two‐dimension code on the package of the mobile phone to download the software from the website and install it. 2. Activate mobile phone WIFI. 3. From the available wireless networks, find the equipment name of the camera: W6. 4. The default WIFI password of the camera is “1234567890”. After this password is entered correctly, the mobile phone and the camera will have point‐to‐point connection with the camera. After the connection succeeds, the cyan LED of the camera will become solid on. 5. Open the iSmart DV software having been downloaded from the website. As a result, you may see the viewing window of the camera and control the image and video functions of the camera from the mobile phone screen; in addition, you may download images and videos from the internal memory of the camera to the internal memory of the mobile phone and then have relevant operations. 6. After the WIFI is activated, hold the video key to inactivate it. Note: The camera and the mobile phone have the 1‐to‐1 relation. After the camera has been connected to one mobile phone, it cannot be connected to any other mobile phone. To connect any other mobile phone, please disconnect the previous one. This supports the mobile phone above Android2.3. Switch‐off: In any state, hold the power key for 3s to switch off the camera. In standby, if the mobile phone is idle for more than 3 minutes, it will switch off automatically. If the WIFI is activated, the automatic switch‐off function will be disabled. II. Camera Mode: When the mobile phone is being connected to the camera, hold the video key of the camera for 3s to inactivate the WIFI and disconnect from the mobile phone. In such case, the cyan LED will be off, the buzzer will have two sounds and the LCD screen will have the WIFI icon flickering. In case of displaying 720P, the camera will enter the 720P 60 default mode and the blue LED will be solid on. Press the power key once to switch to 1080P 30 mode, then the green LED will be solid on; press the power key once again to switch to the image mode, then the red LED will be solid on; press the power key once again to switch to burst mode, then the yellow LED will be solid on. Operate the camera in cycle. 720P 60 video mode: When the camera enters the 720P 60 video mode, press the video key once to start to take videos, then the buzzer will have two sounds and the blue LED will start to flicker; press the video key to stop, then the buzzer will have one sound and the blue LED will change from flickering to being solid on and the figure on the LCD screen will indicate the quantity of the video files. 1080P 30 video mode: In 720P 60 video mode, press the power key shortly to switch to 1080P 30 video mode, then the green LED will be solid on and the buzzer will have one sound and the LCD screen will display 1080P. In preview mode, press the video key once, then the buzzer will have two sounds, the green LED will be on, the camera will start to take videos; press the video key once again to stop, then the buzzer will have one sound and the blue LED will change from flickering to being solid on and the figure on the LCD screen will indicate the quantity of the video files. Image mode: In 1080P 30 video mode, press the power key shortly to switch to single mode, then the red LED will be in solid on, the buzzer will have one sound, the LCD screen will have the icon of 1080P disappear and the icon of image on the upper right corner will appear; in preview mode, press the video key once to take one picture, then the red LED will have a flicker and the buzzer will have one sound. When the camera does not work, the red LED will be in solid on. Burst mode: In image mode, press the power key shortly to switch to burst mode, then the yellow LED will be in solid on (red LED and green LED both are on to create yellow LED), the buzzer will have one sound, the LCD screen will have the icon of burst on the upper right corner; in preview mode, press the video key once to take pictures continuously, with 2s interval; for one picture taken, the yellow LED will have a flicker and the buzzer will have one sound. The figure on the LCD screen will indicate the quantity of the pictures taken. Press the video key once again to stop, then the buzzer will have one sound and the yellow LED will be in solid on. Note: When the space of the internal memory card is full, the screen will display the word “FUL”. Format the internal memory card as follows: When the camera is switched on, if Micro SD card is inserted into the camera, hold the video key and press the power key continuously for 4 times, then the screen will display “FAT” and then the Micro SD card will been formatted. Note: To connect the mobile phone again, hold the video key for 3s to activate the WIFI, then the cyan LED will flicker, the WIFI icon on the LCD screen will be activated; then press the first mobile phone mode for further operation. LCD Display: If no Micro SD card is inserted, after the camera is switched on, the icon of SD card will flicker. If the camera is switched on after the Micro SD card is inserted in, the icon of SD card will appear stably on the LCD screen. In DV mode, the display on the LCD screen of the camera will be as shown in Figure (1) below. If Micro SD card is plugged/unplugged after the camera is switched on, the camera will switch off automatically. Upgrade: After the Micro SD with upgrade file is inserted into the card slot, press the power key to start to upgrade FW with the display on the LCD screen as shown in Figure (2). After the upgrade is completed, the camera will switch off automatically. Figure (1) Figure (2) Low‐power Indication: When the battery has low capacity, the battery icon will be empty, the red LED will flicker and the buzzer will have continuous and short “beep”. The display on the LCD screen is as shown in Figure (3), or in image mode, as shown in Figure (4). If the battery keeps in low capacity, the camera will switch off after the buzzer has one sound. In recording process, the video file will be kept until the moment before the power is off. Generally, such video can be replayed. Figure (3) Figure (4) PC Connection Mode: When a PC is connected with USB, the display will be as shown in Figure (5) and you may enter two modes: if card is inserted into the camera, MSDC mode; if not, PC_CAMERA mode. After entering the mobile disc, you may access or move the pictures and videos in the camera to PC. In such case, the battery is charged concurrently with 200mA current. In charging, the icon of charging will flicker continuously and the red LED of charging will be on. When the battery is fully charged, the icon of charging will be full and keep still, the red LED of charging will be off. When this camera is charged with USB, the charging current with the camera off is about 450mA. When the camera is on without taking videos, the charging current will be about 200mA. When it starts to take videos, the charging will cease. Figure (5) HDMI Connection Mode: When the camera is connected to TV with HDMI, the display will be as shown in Figure (6). After this camera is connected to HDMI, it will automatically enter the playback mode. The default mode is video. In such case, press the mode key shortly once to enter the previous video, the video key to the next video; hold the video key to play the selected video and press this key shortly to stop; hold the mode key for 3s to enter image mode. In such mode, press the mode key shortly once to show the previous picture, the video key to show the next picture; hold the mode key for 3s to switch to video mode. You cannot press the mode key to switch off the camera unless you disconnect the HDMI from TV. When the camera is connected with TV, you cannot directly press the mode key to switch off the camera. Figure (6) Date/Time Setup: When WIFI is connected, if RTC is detected to have been off power, APP will automatically synchronize to be mobile phone date/time. Status Indications of Buzzer and LED Switch on 1 “beep” Key tone 1 “beep” WIFI activated WIFI icon on, cyan LED flickering; after the connection with mobile phone, cyan LED solid on. 720P 60 video mode Blue LED flickering (if WIFI activated, cyan LED and green LED flickering alternately). 1080P 30 video mode Green LED flickering (if WIFI activated, cyan LED and green LED flickering alternately). Single Red LED flickering once and 1 “beep” for one picture Burst 2s interval, yellow LED flickering once and 1 “beep” WIFI inactivated WIFI icon flickering Low capacity, icon of battery Red LED flickering, continuous and short “beep”. empty (Note: Green LED and blue LED both are on to create cyan LED; and red LED and green LED both are on to create yellow LED). Product Specifications: Items Specifications Video resolution 1080P @ 30 frames/s, 720P @60 frames/s Video format H.264 MOV Audio Single track supported Image form JPEG Image resolution 2.0Megapixels Internal memory N/A Inbuilt memory Expandable to 32GB Sensor 2 Megapixels sensor Lens 130° Lens depth of field 0.4m~infinite USB USB2.0 Battery 3.7V, lithium WIFI YES