1
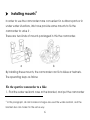
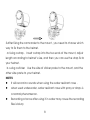
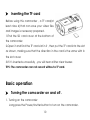
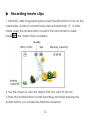
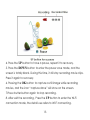
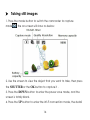
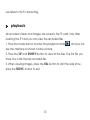
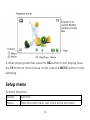
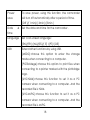
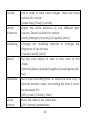
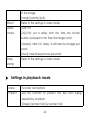
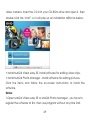
S10W User Manual Settings in playback mode.................................................................. 22 Connections............................................................................................................ 24 Connecting to a computer................................................................. 24 Connecting the HDTV........................................................................... 25 Wi-Fi Connecting.................................................................................... 26 Using the PC camera function........................................................... 28 Installing software.................................................................................................. 28 Installing the Software........................................................................... 28 Specification........................................................................................................... 30 2 Knowing the camcorder Part names1 1.USB jack 2.Start/Stop/Power/Shutter button 3.Busy indicator light 4.Speaker 5.Microphone 6. OK button 7.Up/Wi-Fi button 8.Mode button 9.Menu button 10.Down button 11.LCD screen 12.Lens 13.TF card slot 1 All images and illustrations given in this manual are for explanation purpose and may differ slightly from the actual product. 4 14.HDMI jack 15.Reset 16.Bracket 17.Tripod slot 18.Water resistant case Part 16 and part 18 are protectors for the camcorder, it not only can keep your sportive clean, but also can protect your sport camcorder from some damages, and because of the tripod slot , it’s convenient fix to a bike or a helmet, the detail refers to the following pages. 5 Installing mounts2 In order to use the camcorder more convenient in outdoor sports or in under water situations, We have provide some mounts to fix the camcorder to solve it . There are two kinds of mounts packaged in this the camcorder. a b By installing these mounts, the camcorder can fix to bikes or helmets. The operating steps as follow: Fix the sportive camcorder to a bike 1. Find the water resistant case or the bracket, and put the camcorder 2 In this paragraph, all camcorders in images are used the water resistant, and the bracket also can make it in the same way. 6 into it, then lock it . 2. Find the mount a , open the round of the mount (1) , and put the rubber pad(2) into it, then use the screw to fix them roughly. 3. Fix the metal screw of the mount to the tripod slot of the camcorder respectively. 4. Fix them to handlebars of the bike, and adjust the screws to make the camcorder more steady and convenient. Fix the sportive camcorder to a helmet 1. The same way to wear the water resistant case for your camcorder. 2. Find the mount b , then you can fix the metal screw of the mount to the tripod slot of the camcorder. 7 3:After fixing the camcorder to the mount , you need to choose which way to fix them to the helmet. a: Using a strap. Insert a strap into the two ends of the mount, adjust length according to helmet’s size, and then you can use the strap fix to your helmet. b :using a sticker Use the side of sticker paste to the mount, and the other side paste to your helmet. NOTES: It will record no sounds when using the water resistant case . when used underwater, water resistant case with spray or drops is a normal phenomenon. Recording at once after using it in water may cause the recording files is blurry. 8 Preparing before using Charging the camcorder The camcorder has an internal lithium-ion battery, please charge it for the first time use. 1.Turn off the camcorder. 2.Connect the USB cable to the power adapter, and then plug the power adapter into a power outlet. 3. Open the USB cover at the side of the camcorder, and find the USB jack in it . 4. Connect the other side of the USB cable to the USB jack of the camcorder . 5. During charging , the busy indicator light turns red, once the battery is fully charged , the busy indicator light will turn off . 6. It’s normal that the camcorder will become warm after extend using. 7. Don’t use the power adapter output current is below 1A. 8. Over heat of the camcorder, please turn it off. 9 Inserting the TF card Before using this camcorder , a TF card(at least class 4) that can save your video files and images is necessary prepared . 1.Find the SD card cover at the bottom of the camcorder. 2.Open it and find the TF card slot in it , then put the TF card into the slot as shown, making sure that the direction in the card is the same with in the slot cover. 3.If it’s inserted successfully , you will hear a litter clear buzzer. TIPS: The camcorder can not record without a TF card. Basic operation Turning the camcorder on and off . 1. Turning on the camcorder Long press the Power/shutter button to turn on the camcorder . 10 2. Turning off the camcorder Long press the power/shutter button again to turn off the camcorder. Normally, the busy indicator light always keep blue after turning on the camcorder, but when turning on and turning off the camcorder and other movement, the busy indicator light will flash. Switching the mode The camcorder has three type of modes:video mode, capture mode, playback mode. After turning on the camcorder , press the shutter button to end it ,then press the mode button to switch between these modes. Video mode Recording movie clips Capture mode Taking still images Playback mode Viewing the recorded files 11 Recording movie clips 1. Normally, after long pressing the power/shutter button to turn on the camcorder, it starts to record movie clips automatically . If in other mode ,press the mode button to switch the camcorder to video mode , the screen shows as below: 2. Use the screen to view the object that you want to record. 3. Press the shutter button to start recording, and after pressing the shutter button ,you will see the interface as below: 12 4. Press the UP button to have a pause, repeat it to recovery. 5. Press the DOWN button to enter the power save mode, and the screen is totally black. During this time, it still stay recording movie clips. Press it again to recovery. 6. Pressing the OK button to capture a still image while recording movies, and the icon “capture done” will show on the screen. 7.Press shutter button again to stop recording . 8. After exit the recording , Press the UP button to enter the Wi-Fi connection mode, the detail use refers to Wi-Fi connecting. 13 Taking still images 1. Press the mode button to switch the camcorder to capture mode , the on-screen will show as below: 2. Use the screen to view the object that you want to take, then press the SHUTTER or the OK button to capture it . 3. Press the DOWN button to enter the power save mode, and the screen is totally black. 4. Press the UP button to enter the Wi-Fi connection mode, the detail 14 use refers to Wi-Fi connecting. playback All recorded videos and images are saved in the TF card, only after inserting the TF card you can view the recorded files . 1. Press the mode button to enter the playback mode , and you will see the interface as shown in blow picture. 2. Press the UP and DOWN button to view all the files. The first file you have saw is the the last recorded file. 3. When viewing images, press the OK button to start the slide show, press the MENU button to exit. 15 4. When playing video files, press the OK button to start playing, press the UP button to have a pause, at last, press the MENU button to stop replaying . Setup menu Function of buttons. Button Function Menu Enter the main menu, exit, back to the last menu 16 Up/down View all the setting options Mode switch between all the submenu options OK Enter the submenu , Ensure the settings Settings for the camcorder Press the menu button in any mode, then press the mode button to switch into the setup menu . Menu Function and options Sounds Set all the sounds for the camcorder . Shutter : [on]/[off] Start up: [1]/ [2] /[3]/[None] Beep : [on]/[ off ] Volume :[0 ]/[1]/[ 2]/[ 3] Backlight Set the backlight : [On]/[Off] Power Light Frequency should be setted depending on frequency your region: [50Hz]/[60Hz] 17 Power To save power, using this function ,the camcorder save will turn off automatically after a period of time. [Off ]/[1 min]/[ 3min ]/[5min ] Date & Set the date and time for the camcorder . time Language Set a on-screen language: [EN]/[FR ]/[NL]/[ES]/[ IT] /[PT]/[ DE] USB Extend other functions by using USB. [MSDC]:choose this option to enter the storage mode when connecting to a computer. [PICTbridege]:choose this option to print files when connecting to a printer marked with the pictbridge logo. [UVCH264]:choose this function to set it as a PC camera when connecting to a computer. And the recorded file is H264. [UVCMJPG]:choose this function to set it as a PC camera when connecting to a computer. And the recorded file is MJPG. 18 Format Delete all date including protected files. It is advised to download important files to a computer before formatting. [Yes]/[ No] Reset all.. To reset the entire menu and button operation settings to initial default. [Yes]/[ No] Settings in video mode Menu Function and options Movie size Changing the video resolution for the recording. Select small movie size to record longer time. There are four options: [1920*1080(@30fph)]/[1280*720(@60fph)]/[1280*720( @30fph)] Format Choose a format of the video: [AVI]/[MOV] Video Select a lower image quality to decrease the image 19 quality size in order to take more images. There are three options for choice: [Super fine]/[ fine]/[ normal] White Adjust the white balance to suit different light balance sources. There five items for option: [auto]/[daylight]/[cloudy]/[tungsten]/[fluor] Metering Change the metering method to change the brightness of the picture. [Center]/[Multi]/[Spot] Effect Set the color effect to add a color tone to the video: [Normal]/[b&w]/[sepia]/[negative]/[red]/[green]/[b lue] Seamless Set a loop recording time, so when the time is up, it will start another video, and during this time, it won’t be powered off : [Off ]/[1Min]/[ 3min]/[ 5min] Date Show the date in the video files : stamp [Off ]/[date]/[date&time] 20 Settings in capture mode Menu Function and options Resolution [2560*1920]/[2048*1536]/[1600*1200]/[1280*960]/[64 0*480] Quality Refer to the settings in video mode Metering Refer to the settings in video mode White Refer to the settings in video mode balance ISO The ISO menu allows you to set the level of sensitivity that your camera has to light in the surrounding environment. [Auto]/[50]/[100]/[200]/[400]/[800] Exposure Set the exposure value manually to compensate for unusual lighting conditions : [-2.0]/[-1.7]/[-1.3]/[-1]/[-0.7]/[-0.3]/[0.0]/[0.3]/[0.7] /[1.0] /[1.3]/[1.7]/[2.0] Sharpness The sharpness level shows up in the edges of objects 21 in the image. [Hard]/[normal]/[soft] Effect Refer to the settings in video mode Driver [Off]: off mode [2s]/[10s]: set a delay from the time the shutter button is pressed to the time the image is shot. [double]: after 10s’ delay, it will take two images per shoot. [burst]: take three pictures per shoot Date Refer to the settings in video mode stamp Settings in playback mode Menu Function and options Protect Use this function to protect the files from being deleted by accident. [Single]/[ protect all ]/[un protect all] 22 Delete Choose to delete files: [Single]/[ all ] Slide Only show automatically. for all the images to show together Start: start playing the slide show Interval : [1 up to 10sec] Transition: [1]/[2] /[3] /[4 ]/[5 ]/[mix] Repeat :[Yes]/[ No] Photo Set the color effect to add a color tone to the image: effect [B&W] /[Sepia] /[Negative] /[Red] /[Green]/[ Blue] Rotate Rotate this photo ? [Rotate]/[Save]/[Back] Voice Add a background music for the current file: memo [Add]/[Delete] 23 Connections Connecting to a computer There are two ways to download files from the camcorder's internal memory or memory card to a computer: By inserting the memory card into a card reader By connecting the camera to a computer using the supplied USB cable. Using a Card Reader 1: Eject the memory card from the camcorder and insert it into a card reader. 2:connect the card reader to the computer. 3: Open [My Computer] or [Windows Explorer] and double-click the removable disk icon that represents the memory card. 3: Copy images from the card into a directory of your choice on the computer’s hard disk. Using a USB Cable 1: Connect the supplied USB cable to the computer's USB port and turn the camcorder on. 24 2: After the camcorder turning on, the screen will turn bright, and you will see a USB icon on the screen. 3: Open [My Computer] or [Windows Explorer]. A"Removable Disk" appears in the drive list. Double-click the "Removable Disk" icon to view its contents. Files stored on the camera are located in the folder named "DCIM". 4: Copy the files that you want to your computer. Connecting the HDTV 1. Connect the camcorder to HDTV by attached HDMI-cable. 2. Turn on HDTV and switch to HDMI-mode. 3. Turn on the camcorder. 4. After connecting correctly, the screen of the camcorder will darken, but we can see the objects shows on the screen of the HDTV, moreover, we can still use it to record videos, images, and set menus, just the screen is the HDTV. 25 Wi-Fi Connecting You can use your cellphone/tablet PC in Android or IOS system to control the camcorder through the Wi-Fi function. Installing 1. Make sure you have installed the software“iSmart DV” in your cellphone or tablet PC(Androids can download from the Play Store , while the IOS downloads from the APP Store). 2. Turn the camcorder on and exit the video recording, then press the UP button to enter the Wi-Fi connecting mode ,and it shows the “Waiting For Wi-Fi Connecting” on the screen. 2. Open the Wi-Fi named “ISHARE_000***”(***is the sequence of the camcorder)” and connect it in your cellphone/ tablet PC. The primary password is “12345678” 3. After building up the Wi-Fi connection successfully, a icon” Wi-Fi Connection Ready...!” is shown on the screen of the camcorder. 4. Run the “i Smart DV” . So you can see the objects viewing by your camcorder is shown on your cellphone or tablet PC. And at this time you can control it by your cellphone or tablet PC. 26 Start : - Touch the two icon[ ][ ] to switch between video mode and capture mode. - Touch the icon to start recording a movie clip, touch it again to stop recording. And touch the icon to take a still photo. Settings: (It may be different depending on your software version) Touch the icon you want to set, including self-timer, resolution, white balance. - Self-timer. set a delay from the time the shutter icon is touched to the time the image is shot. [Off]/[2s]/[10s] - Photo resolution: [5M]/[3M]/[2M]/[1M]/[VGA] - Video resolution: [FHD 1080p@30fps]/[HD 720P@60fps]/[HD 720P@30fps] - White balance:Auto/Daylight/Cloudy/Fluorescent/Incandescent And we can touch the icon to set more options. Continues shooting, white balance, frequency, format camera, and version informations. - Continues shooting: it will take several photos per shoot as you set. [Off ]/[3 photos]/[5 photos] /[10 photos] 27 5. During using, neigh press the UP button of the camcorder nor exit the “iSmart DV”in your cellphone/tablet PC can exit the connections. Using the PC camera function 1. Turn on the camcorder. . 2. Set the USB option in setup menu to [UVCH264] or [UVCMJPG] . 3. Connect the camcorder to a computer by the USB cable. Then there is an icon“PCCAM” will shown on the screen of the camcorder. 4. Open [my computer] and open the file named " USB video tool", then you can use it as a PC camera. After setting the USB, please do not turn off the camcorder, or you will not make it . Installing software Installing the Software The bundled software CD has the drivers and software that come with 28 video camera. Insert the CD into your CD-ROM drive and open it, then double click the “start”, so it will pop up an installation MENU as below: • Install MAGIX Video easy SE- Install software for editing video clips. • Install MAGIX Photo Manager - Install software for editing pictures. Click the items and follow the on-screen instructions to install the software. Notes: 1.Open MAGIX Video easy SE or MAGIX Photo Manager , you have to register the software at first, then use program without any time limit. 29 2. Don’t forget to choose the Quick Time Player during installing MAGIX Video easy SE. 3. MAGIX Video easy SE and MAGIX Photo Manager 10 are only supported in Windows XP, Vista, Windows 7, Windows 8 platforms. Specification Sensor 5.0 Mega Pixel CMOS Sensor Operation modes Video record, Capture record, Playback mode Shutter Electronic LCD screen 1.5" TFT Screen Storage TF card (up to 32G) Resolution Video:[1920*1080@30fps]/[[HD 720P@60fps]] /[HD 720P@30fps] Image:[2560*1920]/[2048*1536]/[1600*1200]/ [1280*960]/[640*480] Continue shoot 3 Frames per shoot ISO Auto/50/100/200/400/800 Exposure -2EV~ +2EV 30 White balance Auto/Daylight/Cloudy/Tungsten/Fluor H File format Image:JPG Video:MOV Battery Lithium-ion battery Speaker Build in Microphone Build in Dimension 82*47.2*27.1(mm) Weight About 75 g 31


![[VC120-2] [MENARDS] User Guide [FINAL] 20100618](http://vs1.manualzilla.com/store/data/005701495_1-e41e7e0d778d2f045f29de9890ac0ae7-150x150.png)