1
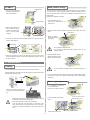
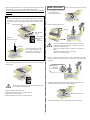
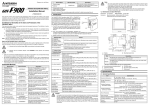
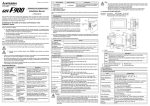
2. Structure OME0826013B Optical Fiber Cleaver Top clamp lever Clamp cover FC-6 Operation Manual Single fiber adapter AP-FC-6M Anvil IMPORTANT SAFETY PRECAUTIONS This product has been designed and manufactured to assure personal safety. Fiber holder receptacle Improper use can result in bodily injury and serious damage to the fiber cleaver. Please read and observe all warnings instructions given in this operation manual. Clamp Off-cut collector CU-FC6 Warning Clamp Caution 1. Do not disassemble or lubricate any parts of the cleaver. Doing so could cause serious damage to the cleaver. 2. The FC-6 is a precision tool. Do not impact the cleaver by hitting or dropping it. Doing so may cause personal injury and loss of cleaving performance. Blade carriage 3. Glass fiber fragments are extremely sharp. Handle with care. Wear safety Blade glasses at all times during cleaving operation for protection from glass fibers. 4. Dispose of glass fiber fragments properly. Off-cut bin < Fiber cleaver FC-6M(-C)/6S(-C) > 5. The blade of the cleaver is extremely sharp. Do not touch it with bare hands. 6. Do not impact the top clamp lever. Doing so could cause damage to the cleaver and loss of cleaving performance. Groove for 0.9mm fiber 7. If the cleaver is damaged or a problem occurs, please contact our maintenance service center. Groove for 0.25mm fiber < Single fiber adapter AP-FC-6M > 1. General 3. Operating procedures Specification Cladding Diameter Fiber Count Coating Diameter Cleave length Dimensions Weight FC-6S(-C) FC-6M / FC-6M-C 125μm Single fiber (0.25 & 0.9mm) Up to 12-fiber ribbon 10mm FC-6M: 63(W)x76(D)x63(H)mm FC-6M-C: 100(W)x81(D)x63(H)mm FC-6M: Approx. 380g FC-6M-C: Approx. 420g Top clamp lever 1: Open the top clamp lever and the lid of the single fiber adapter. The blade carriage should be in the forward position. Lid of single fiber adapter FC-6S / FC-6S-C Cladding Diameter Fiber Count Coating Diameter 125μm Blade carriage Single fiber (0.25 & 0.9mm) 9~16mm (0.25mm) 10~16mm (0.9mm) FC-6S: 63(W)x76(D)x63(H)mm FC-6S-C: 100(W)x81(D)x63(H)mm FC-6S: Approx. 380g FC-6S-C: Approx. 420g Cleave length Dimensions Weight 2: Lower the fiber straight into the correct V-groove with the end of the fiber coating (e.g. if the cleave length is 16mm) at the 16mm mark on the ruler. Standard package Optical Fiber Cleaver FC-6 Carrying case Operation Manual 3: Close the lid of the single fiber FC-6M FC-6M-C FC-6S 1 pc 1 pc 1 pc 1 pc 1 pc 1 pc 1 pc 1 pc 1 pc 1 pc 1 pc 1 pc adapter. FC-6S-C 4: Lower the top clamp lever. Slide the blade carriage to the rear of the cleaver. The fiber will be cleaved. Optional accessories / Consumables FC-6M FC-6M-C Single fiber adapter: AP-FC-6M Fiber off-cut collector: CU-FC6 Replacement blade: FCP-20BL FC-6S Bare fiber 5: Open the top clamp lever. Then open the lid of the FC-6S-C single fiber adapter and lift the newly cleaved fiber. Lift Fiber off-cut collector: CU-FC6 Replacement blade: FCP-20BL the off-cut and dispose it properly. (The FC-6S-C automatically collects an off-cut in the off-cut collector.) 1 Fiber coating Cleave length FC-6M(-C) Blade position change Top clamp lever 1: Open the top clamp lever. As the number of the cleave’s increases, a symptom that fiber cannot be cleaved The blade carriage should be or cracks will occur. If such symptom continues to appear, the blade position is in the forward position. worn out. Rotate the blade according to the following procedures and use a new blade position. [Reference] 1,000 fibers per position 1: Loosen the blade setscrew. Note that the blade setscrew is a Blade carriage slotted screw. 2: Place the fiber holder in the cleaver. Place the edge of 2: Rotate the blade to the next position by pressing its side or edge with a cotton the fiber holder against the swab. edge of the fiber holder Cotton swab receptacle. Rotate the blade in the direction indicated by the arrow. 3: Lower the top clamp lever. Slide the blade carriage to the rear of the cleaver. The fiber will be cleaved. ▪ Do not rotate the blade with hands. ▪ Do not rotate the blade with metallic tweezers. Doing so may Caution damage the blade. 3: Tighten the blade setscrew. 4: Open the top clamp lever. Remove the fiber holder from the cleaver. Lift the [Reference] Optimum torque: Approx. 0.98N·m (10kgf·cm) off-cut and dispose it properly. (The FC-6M-C automatically collects an off-cut in the off-cut collector.) 4. Maintenance Cleaning ▪ Do not over-tighten the blade setscrew. The screw will get worn To keep excellent cleaving quality, cleaning must be performed after use. Caution out. Clean the blade edge, the rubber pad of the clamp and the anvil with a cotton swab moistened with isopropyl alcohol. 4: Try and cleave the fiber. Make visual check of the fiber end face with the splicer. If the fiber end face is poor, adjust the blade height. (Refer to “Blade height adjustment”.) Cotton swab Blade height adjustment (0: For FC-6S(M)-C, remove the off-cut collector first.) 1: Loosen the 2 cross head screws. Clean the fiber holder receptacle and the grooves of the single fiber adapter, too. 2: Loosen the blade height locking ▪ Dust on the blade edge or the clamp might cause loss of cleaving Put a Hex driver (US) or Allen key (UK) here. screw. performance or poor quality of fiber end face. ▪ Do not clean them with any other kind of chemicals. Caution ▪ If the top clamp lever is closed leaving an off-cut fiber on the clamp, the rubber pad of the clamp will have a trace of the fiber, causing loss of cleaving performance or poor quality of fiber end face. Blade height locking screw 2 Blade height adjustment screw Blade replacement 3: Place a mechanical pencil lead or a light stick on the clamps. Slide the blade carriage back and forth and turn the blade height adjustment screw. (0: For FC-6S(M)-C, remove the The point where the lead barely touches the edge of the blade is a reference off-cut collector first.) point (0μm). 1: Unscrew the blade setscrew. Tips ▪ To make the blade higher, turn the blade height adjustment screw clockwise. ▪ To make the blade lower, turn the blade height adjustment screw anti-clockwise. (Turn the screw while pushing the blade down with a cotton swab.) 2: Remove the blade with tweezers. Mechanical pencil lead Tweezers Slide the blade carriage. Blade height adjustment screw (with scale) [Reference] 1 mark on scale = Approx. 10μm ▪ The edge of a blade is manufactured precisely. If the edge is hit against metallic objects, it will crack, resulting in poor cleaving Cotton swab Caution To make the blade lower, turn the performance. Handle with care. ▪ When using metallic tweezers, be careful not to damage the blade height adjustment screw blade. anti-clockwise, while pushing the ▪ Do not touch the blade with hands. Use gloves. blade down with a cotton swab. ▪ Dispose of the old blade properly. 3: Insert a new blade in the cleaver so that “1” of the number sticker is in the top position. The hole of the blade should be aligned with the hole of the blade receptacle. 4: Turn the blade height adjustment screw clockwise by more 4 to 6 marks from the reference point. Enlarged view “1” should be in the top position. 4: Tighten the blade setscrew completely, while pressing the side of the blade. [Reference] Optimum torque: Approx. 0.98N·m (10kgf·cm) ▪ Do not make the blade too high. Doing so will damage the anvil Caution and increases the chipped fiber ends. 5: Tighten the blade height locking screw. [Reference] Optimum torque: Approx. 0.59N·m (6kgf·cm) Press the side of the blade. 6: Tighten the 2 cross head screws. [Reference] Optimum torque: Approx. 0.98N·m (10kgf·cm) 5: Adjust the blade height, referring to “Blade height adjustment” at page 2. 3 Troubleshooting 3: Ensure that the lever pin and hook fit the cleaver properly. <Top view> Good Poor cleave angle Lip Crack If the cleaving problem occurs, the followings are possible causes. (A) The fiber is placed obliquely in the cleaver. 4: Align the screw holes on the cleaver with the screw holes on the off-cut Make sure that the fiber is placed straight in the cleaver. (B) collector. The blade height is too high. Adjust the blade height. (C) Dust or dirt remains on the clamp. Clean the clamp. (D) Dust or dirt remains on the blade Clean the blade. (E) Dust or dirt remains on the fiber. Remove the fiber coating and clean the bare fiber again. If the problem still persists, please contact our maintenance service center. 5: Tighten the 2 setscrews. 5. Fiber off-cut collector Installing off-cut collector 1: Open the top clamp lever fully. Enlarged view 2: Put the lever pin into the pin hole of the cleaver and fit the hook into the cleaver. 6: Completed. Lever pin Front Hook Emptying off-cut collector < Fiber off-cut collector CU-FC6 > 1: Remove the off-cut bin from the Put the lever pin into the pin hole off-cut collector and dispose of of the cleaver. the off-cuts in a proper way. Clip the hook from underneath the cleaver main body, as shown in the figure below. Tokyo (JAPAN) Sumitomo Electric Industries, Ltd. (Global Business Dept.) <Rear view> 3-9-1, Shibaura, Minato-ku, Tokyo 108-8539 JAPAN Tel: +81 (0)3 6722 3246 http://www.sei.co.jp North Carolina (U.S.A) Sumitomo Electric Lightwave Corp. 78 Alexander Drive, P.O. Box 13445, Research Triangle park, NC27709 U.S.A Tel: +1 919 541 8100 http://www.sumitomoelectric.com London (U.K) Sumitomo Electric Europe Ltd. Hong Kong Sumitomo Electric Asia, Ltd. Bangkok (Thailand) Sumitomo Electric (Thailand) Limited Tel: +852 2576 0080 Tel: +66 (0)2 260 7231 to 5 Beijing (China) SUMIDEN ASIA (SHENZHEN) Co., Ltd. (Beijing Branch) Singapore Sumitomo Electric Interconnect Products (Singapore) Pte Ltd. Tel: +86 10 6590 8196 Tel: +65 6261 3388 Shanghai (China) SUMIDEN ASIA (SHENZHEN) Co., Ltd. (Shanghai Branch) New Delhi (India) Sumitomo Electric Industries, Ltd. New Delhi Liason Office Tel: +86 21 6235 1036 Tel: +91 120 434 7701/7702 Guangzhou (China) SUMIDEN ASIA (SHENZHEN) Co., Ltd. (Guangzhou Branch) Philippines Sumitomo Electric Industries (Philippines) Incorporated Tel: +86 20 3877 2808 Tel: +63 2 811 2755/2756 220 Centennial Park, Centennial Avenue, Elstree, Herts, WD6 3SL, U.K. Tel: +44 (0)20 8953 8118 http://www.sumielectric.com Enlarged view (c) 2008 SUMITOMO ELECTRIC INDUSTRIES, LTD. 4 Off-cut bin