1
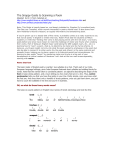
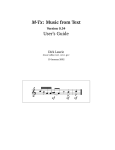
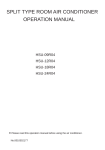
User Manual
ROCS Show|Ready User Manual
© 2015 - Right On Cue Services. All Rights Reserved
Jonathan Pace, David McDougal, Dave McDougal Jr., Jameson McDougal, Andrew Pulley, Jeremy Showgren,
Frank Davis, Chris Hales, John Schmidt, Woody Thrower
Documentation written by Andrew Pulley.
ROCS Show|Ready Build 1.2.5-build-42 REV A
Right On Cue Services
4626 N 300 W - Suite 180
801-960-1111
[email protected]
10 9 8 7 6 5 4 3 2 1
Show|Ready User Manual |iii
Contents
1
Downloading your Licensed Show
1
Upon Starting the Program . . . . . . . . . . . . . . . . . . . . . . . . . . 1
Cast Authorization. . . . . . . . . . . . . . . . . . . . . . . . . . . . . 1
Director Authorization . . . . . . . . . . . . . . . . . . . . . . . . . . . 1
2
Introduction to Show|Ready
2
The Interface - Main Window. . . . . . . . . . . . . . . . . . . . . . . . . 2
Transport. . . . . . . . . . . . . . . . . . . . . . . . . . . . . . . . . 3
Temporary Editing. . . . . . . . . . . . . . . . . . . . . . . . . . . . . 4
Song List . . . . . . . . . . . . . . . . . . . . . . . . . . . . . . . . . 4
Timeline. . . . . . . . . . . . . . . . . . . . . . . . . . . . . . . . . 5
Marker List. . . . . . . . . . . . . . . . . . . . . . . . . . . . . . . . 6
Mixer. . . . . . . . . . . . . . . . . . . . . . . . . . . . . . . . . . 6
Change Log . . . . . . . . . . . . . . . . . . . . . . . . . . . . . . . 7
The Interface - Score View. . . . . . . . . . . . . . . . . . . . . . . . . . . 8
3
Navigation and Editing
9
Navigation. . . . . . . . . . . . . . . . . . . . . . . . . . . . . . . . . . 9
Go to Bar. . . . . . . . . . . . . . . . . . . . . . . . . . . . . . . . . 9
Pre Roll. . . . . . . . . . . . . . . . . . . . . . . . . . . . . . . . . 9
Escape Vamps and Caesuras, and Jump with Fermatas. . . . . . . . . . . . . 9
Editing. . . . . . . . . . . . . . . . . . . . . . . . . . . . . . . . . . . 10
Timeline Selection. . . . . . . . . . . . . . . . . . . . . . . . . . . . 10
Making Cuts and Adding Fermatas . . . . . . . . . . . . . . . . . . . . . 10
Vamps, Repeats, Transpositions, Markers, and Click Resolution. . . . . . . . 11
Sending changes to the cast. . . . . . . . . . . . . . . . . . . . . . . . 11
Returning to Previous Change Logs. . . . . . . . . . . . . . . . . . . . 11
iv | Table of Contents
High-Resolution Editing. . . . . . . . . . . . . . . . . . . . . . . . . 11
4
Keyboard Shortcuts
12
Mac. . . . . . . . . . . . . . . . . . . . . . . . . . . . . . . . . . . . 12
Windows. . . . . . . . . . . . . . . . . . . . . . . . . . . . . . . . . . 12
5
Frequently Asked Questions
13
Show|Ready User Manual | 1
1
Downloading your Licensed Show
Thank you for using Show|Ready. We’ve worked
tirelessly for the past several years developing the
technology you are using today, and taken even more
time creating and perfecting the music Right On Cue
Services is renowned for world-wide.
the dialog box labeled, “Cast Member Authorization
Code,” and click, “Activate Show.” The show will then
begin to download and open to the main window.
This manual will serve as a guide to help you get the
most out of your Show|Ready subscription.
Upon Starting the Program
The first time you launch Show|Ready, you’ll be
prompted to enter in one or two license codes: The
Cast Code, and the Director Code. If you are a cast
member, you only need to enter the Cast Code. If
you are the Director, you will need to enter both the
Cast Code and the Director Code to unlock the editing features.
Cast Authorization
Before you can activate either license, you need to
agree to the ROCS Software Agreement. You can
click the link to view the agreement. Once you have
read the agreement, click the “I agree” check box.
If you have been in direct contact with ROCS, you
should have received an e-mail containing the cast
code. Otherwise, your ROCS liason should have forwarded the above-mentioned e-mail to you containing the cast code.
Once you have received this email in one form or
another, simply copy and paste the cast code into
Director Authorization
If you are a director or producer , you will have
received another e-mail specifically for you. Please
enter this code in the “Director Authorization Code”
dialog box, in addition to the cast code mentioned
above. Your show will download and open to the main
window, but will also include all director editing tools.
2
| Right On Cue Services
2
Introduction to Show|Ready
The Interface - Main Window
Below is a screenshot of Show|Ready’s main interface, including director features. Each section is labeled.
Please refer to the corresponding section in this document for more information.
Transport
Information Window
Temporary Editing
Song List
Change Log
Marker List
Mixer
Show|Ready User Manual | 3
Transport
The transport section controls playback of the music. Although fairly self-explanatory, please make note of the
listed behaviors, as they are different from a traditional audio player.
{ - Previous Song - Previous song in the Song List.
5 - Previous Marker -Previous marker in the Marker List
6 - Next Marker - Next marker in the Marker List
} - Next Song - Next song in the Song List
3 - Stop - Stops playback and returns to the beginning of the Timeline
1 - Play - Plays back Timeline.
2 - Pause - Pauses playback of the music within the Timeline
] - Escape Event - Resumes playback when Timeline enters into a Vamp, Repeat, Caesura, or a Jump
Main Window - This is the default selected tab when Show|Ready opens
Score - This opens the score view in place of the main window
Information Window
The information window contains several pieces of information about your current point in the song. The
information included on this screen consists of the song number, song name, marker number, marker name,
measure, beat, key, tempo, meter, transposition, tempo scale, and vamps. Measures have been marked in
Show|Ready to match exactly how they were written in the score.
4
| Right On Cue Services
Temporary Editing
This section contains temporary editing features designed to aide in the rehearsal process. Edits can be made
by either the director or cast members, by clicking and dragging the slider to the left or the right. To undo any
edit, simply alt+click (windows) or option+click (mac), or drag the slider you wish to return to default.
*NOTE - Edits made in the Temporary Editing section are not saved. Any edits you wish to permanently commit must be made in the Timeline as
a Director.
Song List
The song list displays the name and number of each
song as it was written in the score. The selected song
is the one that is currently loaded for playback. In
between the song number and song name are arrows,
check marks, and X’s. These are part of the Attacca
function.
Attacca functions can be changed by both cast members and directors for rehearsal purposes, but only the
director can save those changes into his show.
In use, when a song plays to completion, it automatically loads the next song available for playback.
Changing the symbol will change the behavior of
which song loads next, or if playback begins automatically.
Each symbol works in the following manner:
z - Song Loads Normally
S - Automatic Playback of Next Song
x - Song is Skipped
Show|Ready User Manual | 5
Timeline
The Timeline contains a current time indicator during
playback, a visual representation of every edit made to
a show, and for directors, it contains all tools necessary to make edits to a show.
The following describes each section of the Timeline and
their visual representations:
♦♦
Bars:Beats - Each bar is represented by a line,
and is numbered at various locations depending
on your zoom level. When zoomed in, beats also
become visible with their own lines.
♦♦
Key - Displays the original key of each section of
a song as well as any director edits made, displayed
as a purple bar over the top of that section.
♦♦
Tempo - Displays the original tempos within the
song, as well as any edits made, displayed as a blue
bar over the top of that section.
♦♦
Meter - Displays the current meter of the song
and also displays any director edits to click resolution, displayed as a turquoise bar over the top of
that section.
♦♦
Markers - Displays original score markers, as
well as director created markers. Markers usually
contain rehearsal locations, but also may contain
tempo descriptions, actor’s cues, director comments, etc.
♦♦
Edits - Displays original edits within the score as
well as director edits. Included within these edits
are Fermatas, Cuts, Vamps, Repeats, and Caesuras.
♦♦
+/- - These buttons allow you to zoom in or out
on the Timeline for higher resolution editing, or
an overview of the whole song.
♦♦
| - Current Time Indicator - This cyan bar moves
across the Timeline during playback. Playback
location can be set by clicking anywhere on the
Timeline.
6
| Right On Cue Services
Marker List
Markers for the current song loaded are found on
both the Timeline and within this list. Each marker
includes a marker number, name, and bar|beat location. The highlighted marker indicates which section
you are within song playback. You can navigate to
various parts of the song by clicking on a specific
marker within the list.
Mixer
The Mixer contains all instrument and vocal parts for
the song currently loaded into playback. Other parts
typically included are Piano, Bass, and Drums.
Each part is represented by a single “channel strip,”
or functions that affect only that instrument and are
labeled at the top.
Cast members can make mixer modifications. Mix
edits aren’t saved. Mix modifications are reset any
time you change to a different song.
The two global functions available for the Mixer are
“Mute/Un-mute vocals,” and “Reset,” which resets
any changes made to the mixer.
Pan and Volume changes can individually reset by
pressing alt+click (windows) or option+click (mac)
on the slider.
Here is a description of each available modification:
♦♦
M - Mute - Mute/Un-Mute instrument/part.
♦♦
S - Solo - Solos only selected instruments/parts.
♦♦
Program - Allows you to change which instrument plays a part.
♦♦
Pan - Moves the instrument to the left or right
speaker.
♦♦
Volume - Changes volume of each instrument
Change Log
The Change Log is a list of each change made within
the loaded song. Each change is reflected both in the
change log and within the Timeline. Each individual change has several pieces of data, including
the change’s color code, the In point, Out point, Edit
Type, and the number of vamps and/or repeats, if
necessary.
The Change Log, also contains the Change Log
Version Number. Every time changes are made, then
saved and sent to the cast, a new version number is
generated incrementally, starting with Version 0.0.
If a new version has been created, two new buttons
will appear in the Change Log window. Those are the
“Unsent changes!” button and the “Unsaved changes!”
button.
Changes can be saved by pressing the “Unsaved
changes!” button, or by going to the top menu and
clicking Director>Save Log or Director>Save Log
As.
Changes can be sent by pressing the “Unsent Changes!” button, or by going to the top menu and clicking
Director>Upload Current Log.
Show|Ready User Manual | 7
8
| Right On Cue Services
The Interface - Score View
The Score View shows the score as the music plays back. It is accessed by clicking on the Score tab beneath
the Transport. As the music plays, the score automatically changes pages for you.
In addition to automatically changing the pages, you can navigate manually through the score. If you navigate
to a page, then press play, the music will play back from the beginning of that page. You can navigate simply by
pressing the Prev and Next Buttons
There are two view modes for the score: 1-up, and 2-up. 1 up only shows one page, but it is zoomed in to allow close reading of the score. 2-up shows two pages, and is great for high-resolution displays.
Show|Ready User Manual | 9
3
Navigation and Editing
In addition to the navigation options mentioned in
the previous section, Show|Ready has several other
highly useful navigation tools designed to enhance
your rehearsal experience. We’ll go over those tools in
addition to guiding you through step by step how to
edit your songs for your cast.
Navigation
As mentioned before, there are multiple ways to
navigate from song to song, and to various parts of
the loaded song. These options include the Transport
functions, keyboard shortcuts, Song List, Marker List,
Timeline, and Marker Lists.
Go to Bar
If you wish to quickly go to a
specific bar within a song, you
can use the Go to Bar function. This function is accessed
by clicking on the bar numbers
within the Information Window, or by pressing the ~
`
button on your keyboard.
This will bring up the “Enter bar number” window,
where you can enter any bar number as its written
within Show|Ready.
Examples: 4r2, 32, and 15b.
Pre Roll
In the Temporary Edit section, there is a check box to
turn on Pre Roll. For songs that start with little or no
warning, often it is nice to hear the tempo before the
song actually starts. Turning on Pre Roll will play 2
bars of click before playback of the song begins.
Escape Vamps and Caesuras, and Jump
with Fermatas
When music playback enters into a Vamp or reaches
a Caesura, the Escape Event button will illuminate,
and the music will either continue to play within the
selected area indefinitely, or pause until it is told to
move on. This can done by either clicking the Escape
Event button ], or by pressing the Right Arrow D on
your keyboard.
Fermatas are placed in music to allow the user to
move on following the singer, or they are added to
create “Jump on Cue’s.” When playback enters into a
section where a Fermata has been placed, the Escape
Event Button will illuminate. Again, this can done
by either clicking the Escape Event button ], or by
pressing the Right Arrow D on your keyboard. If no
input is made, the music will simply continue on as
normal.
10 | Right On Cue Services
Editing
Making Cuts and Adding Fermatas
There are a several temporary editing features available to the cast to aide in rehearsal (mentioned previously in Section 2) including Transpose, Tempo, and
Mixer changes.
More importantly for directors, however, is the
Timeline Editor, where one can make Cuts, Vamps,
Repeats, permanent tempo and key transpositions and
more. This section will guide you through the various
editing options available to you.
You can make edits one of two ways. The first is to
click on the edit you wish to make, select the bar and
beat for the beginning and end of the edit, make any
edit specific changes, and press okay.
The preferred method, however, uses a more visual
approach. We’ll discuss this method as well as go into
the specifics about each edit.
Timeline Selection
Several edits require both in and out points. Those
edits are Fermatas, Cuts, Vamps, Repeats, Tempo
Scale, Transposes, and Click Resolution. To select
an area for an edit, simply click and drag your cursor
from the bar you wish to have your edit start to the
bar you wish for your edit to finish. To select the
whole song, select any area on the Timeline, then
press alt+A (windows) or option+A (mac).
Cuts remove certain sections of music from playback,
if for instance you wish to remove a chorus or shorten
a transition. Fermatas allow an instant jump from
wherever the music is playing back to the end of the
Fermata. To make a Cut or add a Fermata, select an
area in the manner explained in the previous section.
Once you’ve selected an area to cut, simply press the
cut button. The Editor window will open with all
information necessary to properly make a cut. You
are also presented with an option to select all. Simply
press okay, and your cut will appear on the timeline
as a red bar. Adding a Fermata is performed in this
same manner, but will add a purple bar to the timeline
where the edit was made.
Vamps, Repeats, Transpositions,
Markers, and Click Resolution
Show|Ready User Manual |11
Undoing or Deleting Edits
If you wish to undo your most previous edit, you can
either click “Undo” beneath the Timeline, or you can
press ctrl+Z (windows) or command+Z (mac).
Any edit made can be deleted by either clicking the
edit within the Timeline or the Change Log and
pressing delete either on screen or on your keyboard.
Sending changes to the cast
As mentioned previously, it is possible to send all edits to the cast. Again, changes can be sent by pressing the “Unsent Changes!” button in the Change
Log area, or by going to the top menu and clicking
Director>Upload Current Log.
Most edits are self-explanatory or have been explained earlier. For the sake of review, we’ll mention
them again. Vamps allow indefinite repeats of a
section, Repeats allow a section to be played a certain
number of times, Transpositions change the key in
which the song is played. Markers allow the user to
make rehearsal notes or locations. Click Resolution
changes the subdivision of the metronome, aiding
in hearing the beat on slower or rubato sections of
music.
*Note: While it is possible to transpose an octave in either direction,
it is recommended to go no more than 6 semitones in either direction,
especially when using Show|Ready in conjunction with Stage|Tracks.
Beyond 6 semitones has an adverse reaction upon the musicality of the
recorded audio within Stage|Tracks.
Each of these edits are made in the same manner
as cuts. However, they all require additional pieces
of information chosen within the Editor window.
Vamps and Repeats require a number to dictate how
many Repeats or Vamps there should be. Transpositions require a semitone, or half step. Tempo changes
require a tempo scale addition or reduction. Click
Resolution changes require a note value input.Modifying Edits
Edits can be modified in one of two ways. The first is
to click and drag the edit on the Timeline. Second,
is to double click the edit on the Timeline or in the
Change Log and make changes within the Editor
window.
Returning to Previous Change Logs
Sometimes, it is necessary to load a previous version of edits created. To do so, simply click on
Director>View Past Logs, select the log you wish
to return to, and press Load Selected. You can then
continue making edits to be saved and sent to the
cast as you see fit.
High-Resolution Editing
In cases where quarter note edits aren’t precise
enough, you can make edits on the eighth or sixteenth note. To do this, first you must make an edit
to the click resolution in the area you wish to make a
precise edit. Increase the click to the resolution you
wish to edit, all the way down to the thirty-second
note.
Once you have made your click resolution edit, you
can now make a Timeline selection down to your
chosen resolution. Make your edit as normal.
12 | Right On Cue Services
4
Keyboard Shortcuts
Mac
Windows
spacebar Play/Pause music.
right arrow D Escape Event
spacebar
right arrow D
Play/Pause music.
Escape Event
command+A Select All (Timeline)
ctrl+A
Select All (Timeline)
command+S Save Log
ctrl+S
Save Log
shift+command+S Save Log As
command+Z Undo
shift+ctrl+S
ctrl+Z
Save Log As
Undo
+ Zoom In (Timeline)
+
Zoom In (Timeline)
- Zoom Out (Timeline)
-
Zoom Out (Timeline)
~ Go to Bar
`
~ Go to Bar
`
5
Show|Ready User Manual |13
Frequently Asked Questions
Below are a few of the most common problems users run into while using Show|Ready.
I am receiving an error: “Network connection encountered an error. Unable to establish connection. Please check your
network connection and try again.
Some clients see a network error when they try to activate Show|Ready at their location (some schools and
universities). What is happening is that the location’s firewall is blocking the download. The easiest solution is
to try to download Show|Ready from another location such as a home or a public WiFi access point (coffee
shop, etc.). If you are not able to move your computer to an alternate location to download Show|Ready,
please forward the following information to your IT personnel to configure the firewall to allow access to
Show|Ready’s servers.
♦♦
Make sure ports 80 and 5000 are open.
♦♦
Whitelist our IP Address: http://www.rightoncueservices.com - 50.112.107.0
♦♦
To confirm connectivity, perform the following commands via Command Prompt, Terminal or Bash:
♦♦
telnet 50.112.107.0 80
♦♦
telnet 50.112.107.0 5000
♦♦
ping rightoncueservices.com
I can’t find an option to completely turn off the click. Where is this located?
In order to comply with licensing company requests and ensure Show|Ready is used only for rehearsal, we are
required to leave the click on. The click can be made less noticeable, however, by turning up individual instruments within the mixer.
How many cast members and directors can use Show|Ready for our show?
By default, you will receive 100 Cast seats and 5 Director seats. If you have a larger cast, please contact us, so
we may make the necessary changes to your license. We recommend keeping the number of Director seats to a
minimum, as one Director’s edits can override another.
Right On Cue Services, 4626 N 300 E ¤ Provo, UT 84604 ¤ 801 960•1111, ¤ www.rightoncueservices.com