1
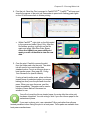
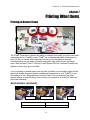
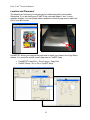
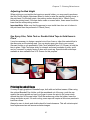
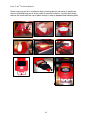
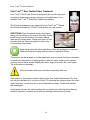
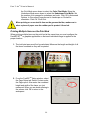
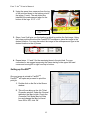
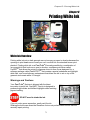
Chapter 6 –Printing White Ink Chapter 6 Printing White Ink White Ink Overview Printing white ink onto a dark garment was not an easy process to develop because the openings in print heads are so small y oucan’ tuset hi cki nkl i kestandard screen print ® plastisol. Printing white ink on a Fast T-Jet 3 is made possible by a combination of very special ink that took over a year to develop, a software print driver called FastRIPTM that allows the printer to dispense more ink than it was designed for, a software package called FastARTISTTM that creates a special underbase and highlight white files, and a revolutionary pretreatment that allows the ink to set on top of the garment and remain white. It is magic! Warnings and Cautions Your Fast T-Jet® 3 printer is shipped with the latest innovation in textile ink, FastINK3. This ink is designed to produce bright whites and brilliant highlights while resisting pigment settling. DO NOT need to shake the ink. If you do notice some separation, gently swirl the ink. Shaking the bottle can cause the formation of micro air pockets within the ink that will severely impair printing. 71 Fast T-Jet® 3 User ’ sManual Pretreatment Basics The pretreatment solution is a milky colored, odorless and nontoxic liquid. A chemical reaction between the pretreatment and the white ink causes the i nk’ spigments to stay on top of the garment and not be absorbed by the textile fibers. Because of these reactive chemicals, it is CRITICAL the print head does not touch a pretreated garment even one that has been dried! You should also have good ventilation in the area where you are applying the pretreatment. If possible, pretreat garments in another room entirely. You MUST NOT spray pretreatment near the printer. In fact, you should pretreat shirts in a separate room entirely to prevent any overspray from getting inside the Fast T-Jet® 3 . If using another room is not possible, a large cardboard box enclosure is a good substitute for applying pretreatment. Important Point! Your pr i nt erhasast andar d“ aut or es et ”chi poneachi nkcartridge. These chips count the number of drops of ink dispensed in order to warn you when the cartridge is empty. Normally, you should never run out of ink before the chi p“ t hi nks”youar eoutsince turning the printer ON or OFF resets the chip to read “ full.”However, when printing with white ink, it does not take much ink usage before the chip tells the printer it is “ out.”If this happens DURING a printing pass, the printer may stop printing and the red lights on one, or all three, of the white colors will be ON. If you turn the printer off during this process you will lose the job and r ui nashi r t .I fy ouneedt o“ r eset ”t hec hi psdur i ngapr i ntr un,pr esst heInk button once and release it. This pauses the routine and allows access to the print carriage. Unsnap and lift from its slot each cartridge with a red light and press it back into the carriage to reseat it You will hear a click when i t ’ sproperly seated. Even if only one white cartridge has a red light on, you may want to go ahead and reset all three white cartridges. After following this procedure, the cartridges and their chips are now reset. If you press the Ink button again, the printer should resume printing. Another option is to turn the printer OFF and back ON again between jobs so that the chips wi l lal waysr eadas“Ful l .” Currently we offer two types of Pretreatment, FastINKTM Textile Pretreatment and FastBRIGHTTM Textile Pretreatment. The FastINKTM Pretreatment is for use with dark color garments, allowing for extremely bright whites and vibrant colors that really pop. FastINK TM Pretreatment should only be used with medium to dark colored garments due to possible discoloration of light shirts when exposed to direct sunlight. 72 Chapter 6 –Printing White Ink FastBRIGHTTM Pretreatment is designed specifically for light colored garments. Using FastBRIGHTTM creates vibrant images with rich deep blacks and reds that will not discolor when exposed to direct sunlight. DO NOT mix the two pretreatments together or the result will be ruined shirts. Applying Pretreatment It is essential the pretreatment solution be applied evenly to ensure a great looking print (free from light and dark spots) on a black garment. You can use manual spray pumps, weed sprayers or any other method you feel comfortable with to apply a uniform coating of FastINK Pretreatment. However, we strongly suggest the use of a Control Spray Gun (commonly used to paint broad areas like a porch deck or furniture). Your Fast T-Jet® 3 kit includes a Wagner Control Spray Gun, but If you purchased your printer outside of the USA, your machine may NOT include the control sprayer. These guns are fairly inexpensive ($70USD at home improvement stores) and are not designed for high volume work, therefore you should keep an extra gun handy as backup. Cleaning the gun is simple and should be done on a regular basis to extend the life of your sprayer. Just fill up the storage bottle with water and run it through the gun as you would normally dispense any other solution. Proper Pretreatment Application is Critical! The two pretreatments (FastBRIGHTTM and FastINKTM Pretreatment) are specially formulated liquids that prevent white ink pigments from being absorbed by the fabric of a garment. When applying the pretreatment solution, do not saturate the garment! You don’ twantt heshi r tt o be soaking wet. Move the spray gun from side to side in even strokes. Light shirts only require a misting back and forth, but black and other dark colors will need a slightly heavier application. Don’ twor r y ,t he proper amount of pretreatment needed is something that you will get the hang of with repetition. Please note, if you miss a spot or apply the pretreatment in an uneven spray, it will be noticeable in the final print. 73 Fast T-Jet® 3 User ’ sManual Dry the pretreatment using a hair dryer, heat transfer press or conveyor dryer. When using a heat transfer press, use a non-silicone pretreatment paper (available from U.S. Screen) to protect the garment. If you use a silicone based paper, it will seal the pretreatment on the shirt surface and the white ink may not stick well enough. You may use a Quillon treated baking pan liner to dry the pretreatment. However, if the paper sticks to the pretreatment after you are done pretreating the shirt, you may have applied too much pretreatment or the heat press is set for too much pressure! St andar d“ but cherpaper ”or“br ownKr af tpaper ”canal sobeusedasa heat press protector when drying the pretreatment. Clamp the press down with medium pressure for 8 to 10 seconds when drying pretreatment at 330°F. Too much pretreatment may cause poor wash durability. When printing, ink will tend to cling to any loose fibers sticking up from the shirt. When using a white underbase, it is possible for these fibers to become saturated and show through any color that has been applied. This is why we recommend the use of a heat press with light pressure before the print to flatten to fibers properly. A conveyor dryer or similar method of drying the pretreatment will not flatten the fibers and may result in a lower quality print. Some users have reported slightly better wash durability if you spray the shirt with water BEFORE spraying it with pretreatment. Printing White Ink Reminder: If the printer has been unused for a few days, perform two or three head cleaning cycles to get the white ink moving. Even with regular use, you should get in the habit of lightly shaking the ink bottle to keep the pigments from settling. 1. When printing with white ink, it is very important you set up the file correctly in FastARTISTTM. Consult the FastARTISTTM User ’ sManual for detailed directions. When underbasing solid, spot-color type images, generally y ou’ l lprint solid white ink and then follow that print with the colors. Underbasing 74 Chapter 6 –Printing White Ink spot-color vector images is as simple as one click of the mouse in FastARTISTTM. If the image has white as part of the design, a second pass of white is made at the same time as the other colors. This second pass of white is called a Highlight and it boosts the brightness of the white. When printing photorealistic images you will need to run a special routine called the Underbase Wizard. This feature of FastARTISTTM will create a separate piece of artwork that FastRIPTM will use to print an underbase of white ink. When underbasing a photorealistic image, the underbase is NOT solid white but instead it is grayscale. Grayscale has light and dark areas that give the image dimensionality on a shirt. This is the art to printing bright and soft prints on dark shirts. You must tell FastRIPTM what Print Modes to use and choose a Print Mode for both the white ink and colors. Once you have made these selections, they can be used again f orot herj obs.Fordar kshi r t sy oucangetv er ygood“ scr eenpr i nt ” quality white if you select the 1440dpi Print Mode for the underbase. For the top colors of Cyan, Magenta, Yellow, Black and the highlight white, choose 360 or 720 dpi Print Modes. For medium colored shirts use the 720dpi Print Mode (faster than 1440 dpi) for the white ink underbase. In some cases, very light colored shirts may not even need a white underbase so images can print using just CMYK and highlight white to save printing time. Highlight white will print at the same time as the color pass. If possible, DO NOT mix print modes. You will notice that certain pr i ntmodescont ai na‘ HS”and“ HS( Bi -Di r ect i onal ) ”whi l et he standard print modes contain neither. DO NOT use standard print modes in conjunction with HS print modes. The result may lead to 75 Fast T-Jet® 3 User ’ sManual registration issues and ruined prints. Please note that this warning is not referring to print resolution i.e. 360, 720, or 1440 dpi. Print resolutions can be mixed and matched as needed. If you are not sure how different print modes work together, do a test print before doing a production run. Note: For more information on print modes, refer back to chapter 5 - A Word about Resolutions, Speed and Quality. 2. Pretreat the shirt and load it in the printer. DO NOT let the print head touch the pretreated shirt. If the pretreatment comes in contact with the white ink in the printing head, the head may become permanently clogged. Remember, it may take a few test shirts to get a feel for how much pretreatment to apply. 3. Set the number of passes needed in the Mode Select screen of the UI. When using the 1440dpi Print Mode for white ink followed by the 720dpi Print Mode for the CMYK colors and highlight, TWO passes are all that you will need. 76 Chapter 6 –Printing White Ink 4. Print the job. Send the Print command in FastARTISTTM. FastRIPTM will open and show the progress of the print job. Remember to press both flashing green lights on the UI at the same time to initiate printing. Within FastRIPTM, right click on the file loaded in the queue and select Spool Only. After the file finishes spooling, right click on the file again and select View Raw Data. If you chose the 1440dpi one pass white print mode you will not be able to view the raw data. 5. Cure the print. Carefully remove the shirt from the holder and cure the print. The white ink will need to be cured longer than standard colors. Cure in a conveyor dryer or heat transfer press. (See page 54- Curing Your Garments for specific details) If using a heat transfer press, place a silicone treated piece of parchment paper (a common baking pan liner) over the print and close the press. When you open the press, peel the paper immediately. The paper can be used a number of times before it becomes too wrinkled to use. You will only use the silicone treated paper for curing after the entire print has been completed. You risk ruining a shirt if you use silicone paper in the pretreatment phase. If you want a glossy print, use a standard Teflon pad rather than silicone treated parchment when curing the print in a heat press. Teflon pads are available from heat press manufacturers. 77 Fast T-Jet® 3 User ’ sManual Important Point! How to Create a Simple Underbase for Dark Shirts Fast ARTI ST’ sUnder baseWi z ar dhasf ouropt i onst oc hoos ef r om when creating an underbase: First option - Underbase/Highlight Wizard will manually take you through the underbase/highlight setup process. Second option –Heavy Underbase. This is a one click wonder button that will automatically complete the underbase process for you. Third option –Normal Underbase. This is a one click wonder button that will automatically complete the underbase process for you. Fourth option –Last Setting. This performs the underbasing process with the “ l astusedset t i ng”f r om t hemanualUnder bas e/ Hi ghl i ghtWi z ar d. Whenwor k i ngwi t ht hef i r stopt i on“ Under bas e/ Hi ghl i ghtWi z ar d, ”youmust manually set the parameters for the underbase process. Below we have listed the parameter settings that will help you get started. Underbase: white Underbase strength: 100 Light areas: 80-90 Dark Areas: 5 at the most - but more often 0 NO Clipping Path (if using two versions of artwork) Check Overlap Highlight Highlight: white Strength: 0 Regions: 100 most of the time (drop to around 80 for bold white text with a black outline) Light Areas: 0 Dark Areas: 0 For best results when printing gradient images with white ink, you should have two versions of the artwork. One version has a white background and the other has a black background. These two files can be created in Photoshop, Adobe Illustrator, CorelDRAW or even in FastARTISTTM. If you use another program, simply save or export the files as a JPG file at 150dpi resolution for the final print size. Import these files into FastARTISTTM. There is an excellent video tutorial on Underbasing with Two Versions of the Artwork on the T-Jet® Support page. 78 Chapter 6 –Printing White Ink Important Point! Problems with Underbase and Colors Lining Up. If you print the 1440dpi HS Print Mode for the white and the colors at 360dpi, there is a chance you might see white peeking around the colors. This is due to a technique called Micro-Weave that eliminates banding. It is almost impossible to have the underbase and top colors line up perfectly when mixing Print Mode resolutions. For the best results, keep the print resolutions the same or use 720dpi Print Mode for the colors on top of the 1440dpi White One-Pass Print Mode. Washing Directions For the longest lasting print, the shirt should be turned inside out, washed in COLD water and dried on delicate. If possible, include washing directions with the finished print. When you apply the pretreatment correctly and choose the correct Print Modes you should get very detailed bright prints like these! 79 Fast T-Jet® 3 User ’ sManual White Ink Troubleshooting Problem : White prints seem dull. Solution 1: You may not be applying enough pretreatment or not using the 1440 dpi print mode. Solution 2: The print head may be clogged. If you had bright white prints before and they now seem dull, you probably have clogged nozzles. Due to the nature of the white pigment, you may experience more head clogs than normal. These can easily be cleared by doing two or three head cleanings. Solution 3: The Highlight setting in FastARTISTTM may be wrong. You may actually be printing white ink ON TOP of the CMYK colors. Reload the image into FastARTISTTM and redo the Underbase/Highlight Wizard. Try either not applying a highlight or simply toning the highlight down. Solution 4: Dry ink may be causing the print head to not seal properly. Due to the nature of the white pigment, it will build up faster on the capping station and on the wiper blade. Dry white ink around the rim of the capping station will interfere with the printer pulling ink out of the cartridge during a head cleaning cycle. Use a sponge foam tipped swab and cleaning fluid or water to clean the following areas as shown below. Capping Station Print Head Check the Spit Tray on a Regular Basis The spit tray (as shown on right) may become very full depending on the amount of head cleanings that are performed. For replacement pads contact Technical Support. 80 Chapter 7 - Printing Other Items Chapter 7 Printing Other Items Printing on General Items The T-Jet® 3 can print on almost any fabric or material and usually youdon’ teven need a clamping device. FastINK for your T-Jet® 3 is a water-based textile ink designed to work not only on natural fabric materials, but also on non-textile items such as unfinished wood, mouse pads, golf balls, keyboards, light switch covers and much more. With the help of Fast T-Jet® Non-Textile Series Pre/Post Treatment FastINK will adhere to almost any type of surface. I fy ou’ r epr i nt i ngonsmaller items such as hats, golf balls or mouse pads, these can be placed on smaller Garment Holders available as accessories for your T-Jet® 3 or you can make your own. Spray adhesive or sticky Table Tack can be placed on these special holders to keep the items from moving. Just remember to ALWAYS check the print head clearance. Shirt Holders (available) Standard Youth / Infant Standard –13”x18”( 33x45. 7cm) Infant –6”x6”( 15x15c m) Youth –10”x12”( 25x30. 5c m) Sleeve –6”x18”( 15x45cm) 81 Sleeve Fast T-Jet® 3 User ’ sManual Location and Placement The hardest part of printing on odd size items is determining their print location. Remember, if you are facing your T-Jet® 3,t heout err i ghtedgei s“ z er o”i ny our graphics program. You can simply make a template or custom page size to match the size of your shirt holder. FastARTIST allows you to adjust the page size to match your items in the Page Setup window. You must also set the correct page size in FastRIP Setup. FastARTIST Page Size –Go to Layout > Page Size FastRIP Setup –Go to File > FastRIP Setup 82 Chapter 7 - Printing Other Items Adjusting the Bed Height When printing on non-textiles that require a special holder, you may need to purchase the Non-Textile Height Adjustment Board in order to raise the specialty holder closer to the print head. For the best prints, the printing surface should set to 1/8inch (3mm) below the printing head. If the item has a seam or excess fabric, these areas should be lower than the main printing surface. Important Note: Make sure that the garment or non-textile item does not sit closer to the print head than the preferred of 1/8inch (3mm). Use Spray Glue, Table Tack or Double-Sided Tape to Hold Items in Place It may be necessary to design a special cutout from foam or other thin material that is the same size as the printing area. You can simply spray glue this to your normal Garment Holder or use spreadable Table Tack (available from U.S. Screen) to hold the item in place. Table Tack stays sticky for dozens, and even hundreds of prints, and it canbe“ r enewed”bysi mpl ywi pi ngi tdownwi t hawetr ag.Special double-sided tape available is also available from U.S. Screen for this purpose. Printing Baseball Caps I t ’ seasy to apply graphics to baseball caps, both with and without seams. When using the optional Baseball Cap Holder, pull the sweatband out of the way, push the cap against the spring guides and use your finger to press the point in the crown down around the point on the cap holder. Stuff the excess cap under the holder, lower the clamp and make a print. I t ’ swor t hnot i ng,some caps will require a little more practice to load than others. Always be sure to check and double check for head clearance. This will minimize print head replacement as well as ensure better images. 83 Fast T-Jet® 3 User ’ sManual Since a cap may not fit in a conveyor dryer or heat press for ink curing, a simple hair dryer or industrial heat gun is all you need to cure the final print. You can also simply remove the holder with the cap in place and lay it under a standard heat transfer press. 84 Chapter 7 - Printing Other Items NON-TEXTILE PRINTING Required Items You should have the following in order to print on Non-Textiles. 1. Non-Textile Pretreatment 2. Non-Textile Post-Treatment 3. Fine Bristle Brush Optional materials may be required. 1. 2. 3. 4. Non-Textile Primer Treatment Holder for object (i.e. Golf Ball Holder) Non-Textile Height Adjustment Board Non-Textile Print Modes (Located on CD or online @ http://screenprinters.net/non-textile_home.php?) CAUTION: WEAR GLOVES WHEN APPLYING ANY PRIMER OR PRE/POST TREATMENT. USE WITH ADEQUATE VENTILATION. HANDLE WITH CARE AND PROTECT EYES WITH SAFETY GLASSES. BEFORE USING ANY PRODUCT, CONSULT THE MATERIAL DATA SAFETY SHEET (MSDS) THAT IS INCLUDED WITH THE PRODUCT OR AT WWW.SCREENPRINTERS.NET KEEP OUT OF REACH OF CHILDREN Getting Started Before printing, it will be necessary to determine if the surface intended for printing will allow the pretreatment to stick. Certain surfaces will allow you to apply the Non-Textile Pretreatment directly while others will require an application of Non-Textile Primer Treatment first. Generally, smooth surfaces such as light switches, keyboards and gloss tiles will require an application of Non-Textile Primer Treatment before the Non-Textile Pretreatment. To Test: Apply a very small amount of Non-Textile Pretreatment to the intended printing surface. If the pretreatment does not sick to the surface but instead runs off, then it will be necessary to use the Non-Textile Primer Treatment. If this is your first time using the Non-Textile Pretreatment, it is recommended pre-treating small quantities in the beginning to familiarize yourself with the process. 85 Fast T-Jet® 3 User ’ sManual Fast T-Jet®™ Non-Textile Primer Treatment Fast T-Jet®™ Non-Textile Primer is designed to be used on high gloss non-porous surfaces as a primer coat prior to the application of our standard Fast T-Jet®™ Br andNon-Textile Pretreatment. This Primer is designed as an undercoat for our Fast T-Jet®™ Br and Non-Textile Pretreatment. DO NOT print directly onto this product. DIRECTIONS: Dip a fine bristle brush in the Primer, wiping off any excess on the side of the bottle. Gently brush Primer over the surface of the item, making there are no uneven areas. Please note that it is very important that the Primer be applied in a thin even to ensure best print quality. sure layer Apply this product with a fine paint brush. After the application is complete, clean your brush thoroughly with hot water to remove all Primer. This product can be sprayed on, but the application may not be as smooth as necessary for good print reproduction. If applying with an airbrush, spray bottle or paint sprayer you may need to dilute solution slightly with water. Apply in smooth, thin, even layers. Two coats may be necessary. Clean all brushes with soap and water immediately after use. Allow primer to thoroughly dry before applying the Non-Textile Pretreatment. Dry time will vary but can take up to one hour or more. To speed up the drying process use a hair dryer, heat lamp, or heat gun set on a low temperature setting. Protect work surface with newspaper. A heat press can also be used by setting the non-textile item under the press heating element. However, be careful not to allow the heating element touch the item. 86 Chapter 7 - Printing Other Items Fast T-Jet®™ Non-Textile Pretreatment Fast T-Jet®™ Non-Textile Pretreatment is designed for use as an inkJet® ink receptive base coat when printing directly onto non-textile materials such as plastic, metal, and wood using your standard T-Jet® 3 Garment Printer and Fas t I NK™ Tex t i l ei nk.Fori ncr eas eddur abi l i t yoft hef i nal ® print, use our Fast T-Jet ™ Pos t -Treatment on top of the final print. Certain high gloss material may need to be prepared with our Non-Textile Primer Treatment BEFORE using the pretreatment. You do NOT need to change inks when using this product. DIRECTIONS: If working on smooth, glossy surfaces where good adhesion is important, apply the Fast T-Jet®™ NonTextile PRIMER before using this product. Primer Treatment must be thoroughly dry before applying this pretreatment. Dip the fine bristle brush in the pretreatment wiping off any excess on the side of the bottle. Gently brush pretreatment over the surface of the item, making sure there are no uneven areas. If Primer was applied, then Primer treated surface must be covered with pretreatment. Please note that it is very important that the pretreatment be applied in a thin even layer to ensure best print quality. Apply this product with a fine paint brush. After application is complete, clean brush thoroughly with hot water to remove all pretreatment. This product can be sprayed on but the application may not be as smooth as necessary for good print reproduction. If applying with an airbrush, spray bottle or paint sprayer you may need to dilute solution slightly with water. Apply in smooth, thin, even layers. Two coats may be necessary. Clean up brushes with soap and water immediately after use. Allow pretreatment to thoroughly dry before printing on it. Dry time will vary but can take up to one hour or more. To speed up the drying process use a hair dryer, heat lamp, or heat gun set on a low temperature setting. Protect work surface with newspaper. A heat press can also be used by simply setting the non-textile item under the press heating element. Be careful not to let the heating element touch the item. Since the pretreatment process can take some time to dry, it is recommended that you pre-treat as much of the production run as possible to avoid delays due to drying time (Do this only after becoming proficient with the Non-Textile Primer/Pretreatment). 87 Fast T-Jet® 3 User ’ sManual Setting up an Image for Print To set up an image for print, you must use a graphics application such as FastARTISTTM, Photoshop or CorelDRAW. Anyone of the three applications is capable of printing to FastRIPTM, but for this manual we are going to set up the image using FastARTISTTM. The steps in the other graphic applications will be very similar. Please consult your applications Owner ’ sManual if needed. 1. Set up the printing area in which you will be printing. To do this you will need a measuring tape to measure the width and height of the Non-Textile item. Now in FastARTISTTM select File > FastRIP Setup. 2. From the Setup window, select Page Setup Tab. In the Page Setup Tab, select Custom under the page option. Enter the height/width of the Non-textile item you measured. When you are done entering in the values, click OK to return to the workspace. 88 Chapter 7 - Printing Other Items 3. Select Layout > Page Size. In the Page Size window, enter the height/width of the Non-textile item you measured. When you are done entering in the values, click OK to return to the workspace. The non-textile item dimensions are now be represented by a black box located within the workspace. If this is not displayed, click View > Show Page Size to view black box. 4. Import the image you intend to print, positioning it where you like it on the item. For further FastARTISTTM help, please reference the user manual. 5. Once you are done setting up in FastARTISTTM, Photoshop or CorelDRAW, you will need to print to FastRIPTM. Printing to FastRIPTM - FastARTISTTM Click File > Print to FastRIP. Position the image, then click the printer icon located in the printer tool box to complete sending the image to FastRIPTM. Printing to FastRIPTM - Adobe Photoshop Go to the File menu and select Print with Preview. Click Page Setup. Click Printer. In the Page Setup menu select the Fast T-Jet® 3 printer. Click Properties. Click Advanced. Set the Page Size. Go the Printer Features section. Bring the Print Mode menu down to select the Color Print Mode. Bring the Underbase Mode menu down to select the Underbase Print Mode. Set the number of ink passes for underbase and color. Click OK in Advanced Options. In Document Properties set to Landscape or Portrait for orientation. Click OK. Click Print. Printing to FastRIPTM –CorelDRAW Go to File> Print. On the General tab select the Fast T-Jet® 3 printer. Click Properties. Click Advanced. Set the Page Size. Go the Printer Features section. Bring 89 Fast T-Jet® 3 User ’ sManual the Print Mode menu down to select the Color Print Mode. Bring the Underbase Mode menu down to select the Underbase Print Mode. Set the number of ink passes for underbase and color. Click OK in Advanced Options. In Document Properties set to Landscape or Portrait for orientation. Click OK. Click Print. When printing on a non-textile item on the garment holder, make sure to place a piece of paper over the rubber pad to protect it from ink. Printing Multiple Items on the Print Bed When printing multiple items on the print bed at the same time you must configure the FastARTISTTM or graphics application so that each individual image is applied in the proper location. 1. The total print area must first be calculated. Measure the length and height of all the items combined as they will be printed. 2. From the FastRIPTM Setup window, select the Page Setup tab. Select Custom under the Page option. Now enter the combined height and width of the items you just measured. When you are done entering in the values, click OK to return to the workspace. 90 Chapter 7 - Printing Other Items 3. Next select Layout > Page Size. In Page Size enter the height and width of the items you just measured. When you are done entering in the values, click OK to return to the workspace. The items’ collective dimensions will now be represented by a black box located within the workspace. If this is not displayed, click View > Show Page Size to view black box. Upper Lefthand Corner Now that the total print area has been set, you must now determine the location where each individual image is to be applied. 1. Measure the item that is closest to the upper left hand corner of the print bed. Measure from the left side of the print bed to the center point where the image will be located (X axis). 11/ 2” = 1.5” Upper Left-hand Corner 91 Fast T-Jet® 3 User ’ sManual 2. Using the same item, measure from the top of the print bed down to the bottom point of the image (Y axis). The red dotted line identifies the measurement taken for the bot t om oft hel ogo.21/ 2”= 2.5” Upper Left-hand Corner 3. Steps 1 and 2 will give you the location in which to position the first image. Using the rulers positioned around the FastARTIST workspace, place the image in the desired location. You may also select the image in the workspace and type in the desired location in the x/y boxes. 4. Repeat steps 1, 2 and 3 for the remaining items in the print bed. For your convenience, we suggest measuring the items starting in the upper left hand corner and moving left to right from top to bottom. Setting up FastRIPTM Once an image is printed to FastRIPTM, FastRIPTM will open and proceed to spool the print job. 1. Double click on the file in the Queue window. 2. This will now bring up the Job Ticket Properties window. Under the General tab select the Max Ink tab. Check the Overwrite Print Mode Max Ink Data box and change the Max Ink Level from 400 to 300, click OK. 92 Chapter 7 - Printing Other Items Positioning for Printing 1. Set the item in the upper left-hand corner of the print bed without a shirt board loaded in. Raise the bed and use the height adjustment bar to make sure it is at the proper height. (Consult Chapter 2 of this manual for more details.) For odd shaped items, create a holder or fixture to hold the items in place during printing. Print using the standard Photo Print Mode settings for white T-Shirts. Sample prints may be necessary to determine the correct Print Mode settings. Upper Left-hand Corner 2. Once all of these setup instructions have been completed, right-click on the job within FastRIPTM and select Print. Fast T-Jet®™ Br andNon-Textile Post-Treatment Fast T-Jet® Non-Textile Post-Treatment is a protective coating used for prints on non-textile surfaces. Use this product along with our other nontextile treatments such as Fast T-Jet® Non-Textile Pretreatment to achieve a long life for your prints while waterproofing and preventing the ink colors from fading due to UV exposure.. DIRECTIONS FOR USE: Shake can before each use. Spray onto non-textile, printed surfaces after drying has been completed. Apply a thin coat, 4 to 8 inches from surface. Use a swift motion to prevent over spray and unwanted buildup. If build up occurs, use lacquer thinner to reduce. A second coat may be applied after approximately two minutes of dry time. Let surface dry for 30 minutes to one hour. Let dry in a clean, dust free area to prevent debris from sticking to the surface. Clean valve after use. Turn can upside down and spray a short burst until cleared. If a nozzle is clogged or sprays inconsistently, check for coating in the opening. Scrape off with soft object and twist valve one half turn. Allow 24 hours cure time prior to placing coated graphics into service. 93 Fast T-Jet® 3 User ’ sManual Printing Golf Balls Before printing golf balls you must first install special print modes designed specifically for printing small prints found on items such as golf balls. Installing GOLF BALL Print Modes; 1. Locate the FastJet3.pmz file within the Non-Textile Print Modes Folder on the Non-Textile Printing CD or download from the following web address: http://screenprinters.net/non-textile_home.php? a. When downloading the print modes, open the downloaded zip file and save to your desktop. b. Double click on the zip file on your desktop, then drag and drop FastJet3.pmz file onto the desktop. 2. After locating the FastJet3.pmz file, open FastRIPTM. 3. From FastRIPTM select Printers > Manage Print Modes. 4. Use the drop down menu and select Fast T-Jet 3. 94 Chapter 7 - Printing Other Items 5. A list of print modes will be displayed and the icons located at the top of the window will become available. 6. Select Import Print Mode Package identified below. 7. Locate the CD folder Non-Textile Print Modes to access the FastTJet3.pmz file (or on the desktop if downloaded) and click Open. 8. A list of four print modes should appear below, Select all and then select Import. 95 Fast T-Jet® 3 User ’ sManual 9. There will be a new folder called Non-Textile Print Modes in the Print Mode Manager window. Expand the folder’ s contents by clicking on the black triangle to the left of the folder. Place a check in the box to the left of the folder and for all the listed print modes. 10. Select Import Selected Print Modes to Control Panel . This is represented by an icon of a blue clip board with a red check on it. 11. Close the window and you now have Non-Textile 1440 print modes for golf balls. Pre-Treating the Golf Balls For printing golf balls it is recommended you use the optional Golf Ball Holder, Fast T-Jet® Non-Textile Pretreatment and Fast T-Jet® Brand Non-Textile PostTreatment. Fast T-Jet® Non-Textile Primer is not necessary for golf ball printing. Ink adheres well enough to the ball’ s surface with just a pretreatment. 1. Load the golf balls into the holder and place the guard on top of the balls. The guard will protect any areas not being Pre-Treated from printing overspray. 96 Chapter 7 - Printing Other Items 2. Dip a fine bristle brush in the pretreatment, wiping off any excess on the side of the bottle. Gently brush pretreatment over the exposed golf ball surface making sure there are no uneven areas. 3. Allow pretreatment to thoroughly dry before printing on it. Dry time will vary but it can take up to one hour or more. To speed up the drying process use a hair dryer, heat lamp, or heat gun set on a low temperature setting. Loading Golf Ball Template (FastARTISTTM Only) 1. Go to File > Open and double click on Golf Ball Holder Template to open template. 2. Import the images or text you wish to print and place them inside of the lines. 3. Choose one of the following print modes: Non-Textile Photo 1440 Standard Non-Textile Photo 1440 Standard HS Non-Textile Cartoon 1440 Standard Non-Textile Cartoon 1440 Standard HS 4. Print to FastRIPTM. 97 Fast T-Jet® 3 User ’ sManual Golf Ball Holder Placement Position the Golf Ball Holder in the top-left corner of the print bed without a shirt board loaded in. Holder will be positioned from left to right within the print bed. Raise the bed and use the height adjustment bar to make sure it is at the right height (Consult Chapter 2 of this manual for more details.) Once all the previous setup instructions have been completed, right-click on the job within FastRIPTM and select Print. Upper Left-hand Corner Finish with Fast T-Jet® Brand Non-Textile Post-Treatment DIRECTIONS FOR USE: Shake can before each use. Spray onto non-textile, printed surfaces after drying has been completed. Apply a thin coat, 4 to 8 inches from surface. Use a swift motion to prevent over spray and unwanted buildup. If build up occurs, use lacquer thinner to reduce. A second coat may be applied after approximately two minutes of dry time. Let surface dry for 30 minutes to one hour. Let dry in a clean, dust free area to prevent debris from sticking to the surface. Non-Textile Printing Tips When brushing on any of the treatments, make sure it is placed on smoothly and evenly in thin layers. Having two brushes can make the job easier. Use one for the Non-Textile Primer Treatment and one for the Non-Textile Pretreatment. Cleaning the brushes when done with hot water and letting them dry will prevent them from drying out and ruining the bristles. When printing on Non-Textile items, use a piece of film that covers the whole item and print on the film to see if it aligns and prints correctly. ThePr i ntBedar eai s13”x22”onaT-Jet® 3. To maximize production you can line up multiple items next to each other and print more then one at a time. If you have a heat press under which you can place the items, do so without allowing the element to make contact with them. This will dry the items faster. 98