1
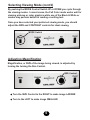
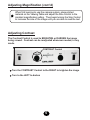
R
MSE-L22 User's Manual
Table of Contents
SECTION 1: Unpacking and Set-Up of System.................................. 2
SECTION 2: Features and Operating Instructions.............................4
Turning ON the System................................................................ 4
Selecting Viewing Mode...............................................................4
Adjusting Magnification............................................................... 5
Adjusting Brightness....................................................................6
Using the Viewing Table...............................................................7
SECTION 3: Service and Safety Information......................................8
FCC Information:
Explorer CCTV’s has been tested and found to comply with the limits for a Class B digital
device, pursuant to part 15 of the FCC Rules. These limits are designed to provide
reasonable protection against harmful interference when the equipment is operated in its
installation. This equipment generates, uses, and can radiate radio frequency energy
and, if not installed and used in accordance with the instruction manual, may cause
harmful interference to radio communications. If this equipment does cause harmful
interference, the user will be required to correct the interference.
hdm-1a
1
Section 1: Unpacking & Set-Up
1. Remove User’s Manual and power cord from top foam compartments
and remove the upper foam packaging.
!
IMPORTANT: DO NOT DISCARD packing carton and materials.
In the event service or return of the unit is required in the
future, the original packaging is REQUIRED to insure no
damage occurs in shipping.
Recommend 2-Person Lift
For Next Step
2. Next, firmly grab hold of each side of camera unit and lift unit out of
the foam packing in the bottom of the carton. Place Camera System
on sturdy desk or table where it will be used.
Avoid places near any heat source or direct sunlight. Position the
Camera unit on the desk surface to your preferred location. The
bottom of the unit is equipped with rubber pads to protect the table
surface and to prevent the unit from sliding.
3. Next, remove packaging from around the Camera and Monitor and
place packing materials back in the original carton. DO NOT
DISCARD PACKAGING MATERIALS (See Note Above).
4. Connect the AC Power Cord to the AC IN jack on the rear panel of the
camera. Plug the other end of the AC Power Cord into wall outlet or
surge protected power strip (not included).
(See Hook-Up Picture on next page)
2
Set-Up (cont’d)
Monitor
Power Cord
DVI Signal Cable
Power Cord (to Wall Outlet)
!
CAUTION: THE POWER SUPPLY CORD IS USED AS THE
MAIN DISCONNECT DEVICE. ENSURE THAT THE SOCKETOUTLET IS LOCATED NEAR THE EQUIPMENT AND IS
EASILY ACCESSIBLE
5. Next, connect the Monitor Power Cord to the AC OUT jack on the
rear panel of the camera. Note: the power supplied to the AC OUT
jack turns on & off with the camera power switch.
6. Finally, connect the monitor signal cable to the Monitor Jack on the
rear panel of the camera.
3
Section 2: Features & Instructions
Turning ON the System
Turn the unit ON using the Power Switch located on the right side of
control panel of the camera housing. The lighting should illuminate
the Viewing Table.
If the Lights do not illuminate and the screen does not
turn on, please check the power cord connections
described in the previous section.
POWER Switch
The screen should come on after a normal delay of several seconds.
If the screen does not turn ON after a few seconds, press the Monitor
Power button located in the lower right corner of the Monitor below
the screen. The Monitor settings are set at the recommended settings
so there is not need to adjust the monitor settings.
Place reading material or your hand under the camera to confirm the
video image displays on the monitor.
Selecting Viewing Mode
Located on the Camera Control Panel, the Mode Switch allows a choice
of Full Color viewing along with selected Black & White and Reversed
Black & White combinations for optimal viewing, based on your unique
vision needs.
4
Selecting Viewing Mode (cont’d)
By pushing the MODE Control Switch UP or DOWN you cycle through
the viewing modes. In most cases, the Full Color mode works well for
viewing pictures or color graphics while one of the Black & White or
modes may perform better for reading or writing text.
Once you have selected your preferred viewing mode, you should
adjust the SIZE and CONTRAST controls for ideal viewing.
MODE Switch
Adjusting Magnification
Magnification, or SIZE of the image being viewed, is adjusted by
turning the turning the Size Control.
SIZE Control
Turn the SIZE Control to the RIGHT to make image LARGER
Turn to the LEFT to make image SMALLER
5
Adjusting Magnification (cont’d)
When first learning to use the camera system, place printed
material on the Viewing Table and adjust the Size Control to the
smallest magnification setting. Then begin turning the Size Control
to increase the size of the image until you are able to read the text.
Adjusting Contrast
The Contrast Control is used to BRIGHTEN or DARKEN the image
being viewed. Contrast can be readjusted whenever needed, in any
mode.
CONTRAST Control
Turn the CONTRAST Control to the RIGHT to brighten the image
Turn to the LEFT to darken
6
Using the Viewing Table
The Viewing Table (sometimes referred to an X-Y Table) is mounted on
a slide mechanism allowing it to move under the camera left to right
and also front to back. This assists you in moving the material you are
viewing under the camera.
Depending on what is being viewed, sometimes users prefer that the
Viewing Table remain steady or locked. The Table is equipped with a
Brake Lever to Lock the movement of the table. The Lever is located
below the front edge of the table as shown.
Brake
(To Lock)
Moving the lever all the way to the RIGHT locks the table
Releasing the back to the CENTER position restores full table
movement front to back and side-to-side.
Additional Table Features Include:
1. Rear Alignment Edge on the table allows you to line up pages or
envelopes. This is especially useful for writing.
2. Non-glare wipeable table surface reduces eyestrain. Its dark color
and speckled pattern helps you to distinguish the edge of a white page.
7
Section 3: Safety & Service
Safety Information and Maintenance
1. ALWAYS put the Viewing Table in the LOCKED position (Brake Lever
to the far right) and use the hand holds in the base of the unit when
attempting to move the machine.
2. Place unit on a sturdy table away from any heat source. DO NOT
place your unit on an unstable table, cart, or stand. Doing so may allow
the unit to fall causing serious damage to the unit or bodily injury.
3. Use of a surge protected power strip is recommended to protect
your unit from power outages, etc.
4. Avoid putting your hands and fingers into any opening (touching the
camera lens or mirror in the camera housing could reduce image
quality).
5. Dust the screen as needed with a soft, dry cloth.
6. Making sure that the unit is powered OFF, use a slightly damp cloth
to clean the unit’s surfaces. Do NOT spray chemicals or cleaning
liquids directly on the unit.
Service Information
Your Unit CONTAINS NO USER SERVICEABLE PARTS. ALL SERVICE
MUST BE DONE BY THE FACTORY OR AN AUTHORIZED SERVICE
CENTER (where available).
In the event of malfunctions or questions, please contact us:
MagniSight, Inc.
Call (800) 753-4767, or (719)578-8893
8
Service Information (cont’d)
In the event Service is required, you may be asked to send the unit to
MagniSight’s main repair facility. The camera or system MUST BE
SHIPPED IN THE ORIGINAL PACKAGING to prevent damage. Please
call MagniSight for return information or to order packaging if needed.
NOTES
9