1
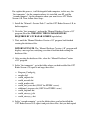
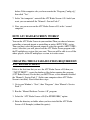
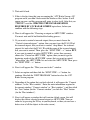
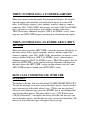
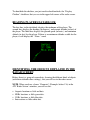
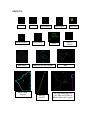
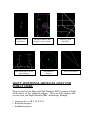
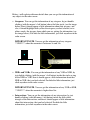
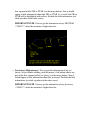
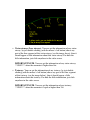
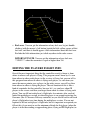
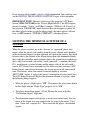
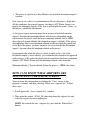
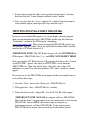
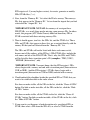
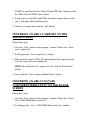
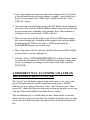
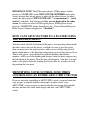
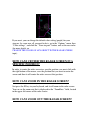
ATC RADAR SCREEN V5.0 (For FS2004/2002)
USER’S MANUAL
DESCRIPTION
ATC Radar Screen v5.0 is a program that will allow to control a toweredairport or an entire ARTCC/FIR's sector, during a FS multiplayer session. This
version has some new features: view jet and victor airways, view additional
airspaces (ONLY for FS2004 users), connect or host a FS2004/2002
multiplayer sessions, new SID/STARs window, view fuel areas (ONLY for
FS2004 users), edit the ATIS message of the selected towered-airport, change
the mouse’s pointer of the radar screen, etc. Doesnt requires any earlier
version. This version requires the Manuel’s Service Pack 3. Created by
Manuel Ambulo.
IMPORTANT NOTE: A towered-airport is an airport, that has control tower.
NEW FEATURES
♦
♦
♦
♦
♦
♦
♦
♦
♦
♦
Connect or host a FS2004/2002 multiplayer session.
View jet and victor airways.
View additional airspaces (ONLY for FS2004 users).
View fuel areas (ONLY for FS2004 users).
Edit ATIS message of the selected towered-airport. For then the players
can request it using this chat text command: “.atis, [Towered-Airport ID]”
(example: “.atis, KORD”).
Change the mouse’s pointer of the radar screen’s window.
You can assign a specific color for display SIDs and another different color
for display STARs.
New SID/STARs window.
Players can delete theirs flight plan using the “-fp” chat text command.
New way for getting information of the graphic objects in the radar screen.
TABLE OF CONTENT
1. INSTALLING THE ATC RADAR SCREEN PROGRAM
2. IF YOU HAVE YOUR FLIGHT SIMULATOR IN A COMPUTER AND YOU
WANT TO USE ATC RADAR SCREEN IN ANOTHER COMPUTER
3. HOW ATC RADAR SCREEN WORKS?
4. CREATING THE DATABASES FILES REQUIRED BY ATC RADAR SCREEN
5. RUNNING THE ATC RADAR SCREEN
6. WHEN CONTROLLING A TOWERED-AIRPORT
7. WHEN CONTROLLING AN ENTIRE ARTCC/FIR’S SECTOR
8. HOW CAN I COMMUNICATE WITH THE PLAYERS?
9. READING PLAYERS DATABLOCK
10. IDENTIFYING THE OBJECTS DISPLAYED IN THE RADAR SCREEN
11. ABOUT ADDITIONAL AIRSPACES (ONLY FOR FS2004’S USERS)
12. CHANGE THE COLOR OF ANY OBJECT IN THE RADAR SCREEN
13. HOW CAN I GET INFORMATION ABOUT THE OBJECTS THAT ARE
CURRENTLY DISPLAYED IN THE RADAR SCREEN?
14. EDITING THE PLAYERS FLIGHT INFO
15. SENDING AND RECEIVING PLAYERS FLIGHT INFO TO AND FROM
OTHER(S) ATC RADAR SCREEN’S CONTROLLER(S) IN THE SESSION
16. PLAYERS FLIGHT INFO LIST
17. GETTING THE MINIMUM ALTITUDE OF A PLAYER
18. HOW CAN I KNOW WHAT AIRPORTS ARE DISPLAYED IN THE RADAR
SCREEN?
19. VIEWING FSNAVIGATOR’S SIDs/STARs
20. CENTERING AN AREA’S AIRPORT ON THE RADAR SCREEN
21. CENTERING AN AREA’S NAVAID (VOR/NDB/INTERSECTION) ON THE
RADAR SCREEN
22. A DIFFERENT WAY, TO CENTER A PLAYER ON THE RADAR SCREEN’S
CENTER
23. HOW CAN I GIVE VECTORS TO A PLAYER USING THE RADAR SCREEN?
24. IDENTIFYING YOUR CONTROL ZONE WHEN CONTROLLING AN ENTIRE
ARTCC/FIR’S SECTOR
25. HOW CAN I CENTER THE RADAR SCREEN IN A SPECIFIC POSITION?
26. HOW CAN I ZOOM IN THE RADAR SCREEN?
27. HOW CAN I ZOOM OUT THE RADAR SCREEN?
28. HOW CAN I CENTER THE RADAR SCREEN BACK TO THE DEFAULT
POSITION?
29. CONTROLLING THE OBJECTS THAT CAN BE DISPLAYED IN THE RADAR
SCREEN
30. RADAR RINGS
31. RUNWAYS GUIDE LINES
32. TCAS SYSTEM
33. DISPLAY THE PLAYERS LIST WINDOW
34. REMOVE/KICK A PLAYER FROM THE SESSION
35. EDITING THE ATIS MESSAGE OF THE SELECTED TOWERED-AIRPORT
36. GETTING REAL-WORLD WEATHER
37. RECEIVING FLIGHT PLANS AND FLIGHT ROUTES DETAILS SENT BY
PLAYERS
38. CHANGING THE MOUSE’S POINTER DISPLAYED IN THE RADAR SCREEN
39. I WANT TO CHANGE THE CURRENT CONTROLLED TOWERED-AIRPORT OR
THE CURRENT CONTROLLED ARTCC/FIR’S SECTOR
40. HOW CAN I DELETE THE CURRENT DATABASES FILES AND CREATE
ANOTHERS NEW FILES?
41. HOW CAN I RESIZE THE RADAR SCREEN’S WINDOW?
42. HOW CAN I DISCONNECT FROM THE FS MULTIPLAYER SESSION AND
CLOSE THIS PROGRAM?
43. UNINSTALLING THE ATC RADAR SCREEN PROGRAM
44. KNOWN BUGS
45. NOTES BY THE AUTHOR
46. SPECIAL THANKS TO
47. MY PROGRAMS WEB SITE
48.RECOMMENDED DOWNLOADS
INSTALLING THE ATC RADAR SCREEN
PROGRAM
If you have installed a previous version of the Manuel’s Service Pack
(Manuel’s Service Pack 2), then you will need to uninstall it, in order to do
this, you have to go to your Window’s “Start”, “Settings”, then “Control
Panel”; now doble-click the “Add/Remove Programs” icon, and from the list,
select “Manuel's Service Pack 2”, then click the “Add/Remove...” button.
NOTE: If appears a message box (during the uninstall process of the previous
version of the Manuel’s Service Pack), telling you that if you want to remove
the shared files. I recommend you to click the “Remove None” button,
because there are maybe some programs using those shared files, that’s why it
is recommended to keep those shared files.
Or if you didnt had downloaded any Manuel’s Service Pack, before, then dont
worry, and continue the reading below.
If you dont have installed the “Manuel’s Service Pack 3”, then you will need
to go to the “Required Files” section of my programs homepage
(http://www.joenetwork.de/manuel), and download the “Manuel’s Service
Pack 3”, for then install it.
NOTE: Anothers websites, where you can download the “Manuel’s Service
Pack 3” are: www.flightsim.com and www.simviation.com
• If you have installed any previous version of ATC Radar Screen:
Uninstall the previous version of the ATC Radar Screen program, in order
to do this, you must go to your Window’s “Start”, “Settings”, then
“Control Panel”, now doble-click the “Add/Remove Programs” icon, and
uninstall or remove any previous version of the ATC Radar Screen
program, that you find in the list of programs (of the “Add/Remove
Programs Properties” window).
NOTE: If you didnt found any previous version the ATC Radar Screen
program, inside the list of programs (of the “Add/Remove Programs
Properties” window), then dont worry, and continue reading below.
Because, the ATC Radar Screen version 3.0, was published without an
installer and uninstaller programs, you will need to search in all your local
hard drives, in order to find that program. Now go to your Window’s
“Start”, “Find”, then “Files or folders”, and search for this file: “ATC
Radar Screen v30.exe” (within the quotes). If you found that file, then
delete the folder, where the “ATC Radar Screen v30.exe” file is located
(within all the files inside of that folder).
NOTE: If you didnt found the “ATC Radar Screen v30.exe” file, then dont
worry, and continue reading below.
Now, run the ATC Radar Screen v5.0 setup program, inside the
atcrds50.zip file.
• If you dont have installed any previous version of ATC Radar Screen:
Run the ATC Radar Screen v5.0 setup program, inside the atcrds50.zip
file.
IF YOU HAVE YOUR FLIGHT SIMULATOR IN A
COMPUTER AND YOU WANT TO USE ATC RADAR
SCREEN IN ANOTHER COMPUTER
For explain this process, i will distinguish both computers, in this way, the
“first computer”, for the computer where it is installed your FS, and the
“second computer”, for the computer where you want to use ATC Radar
Screen v5.0. Now, follow these steps:
1. Install the “Manuel’s Service Pack 3” and the ATC Radar Screen v5.0, in
both computers.
2. Go to the “first computer”, and run the “Manuel Database Creator v1.0”
program (Read the CREATING THE DATABASES FILES
REQUIRED BY ATC RADAR SCREEN topic below).
3. Wait, until the “Manuel Database Creator v1.0” program, had finished
creating the databases files.
IMPORTANT NOTE: The “Manuel Database Creator v1.0” program will
display a message box, notifying you when it had finished creating the
databases files.
4. After creating the databases files, close the “Manuel Database Creator
v1.0” program.
5. In the “first computer”, go to the folder where you had installed the ATC
Radar Screen v5.0, open it and copy these files:
•
•
•
•
•
•
•
•
•
•
Program_Config.cfg
magdec.bgl
world_airports.dat
world_navaids.dat
world_markers.dat
world_fuel_areas.dat (ONLY for FS2004’s users)
additional_airspaces.dat (ONLY for FS2004’s users)
world_fixpoints.dat
world_airways_j.dat
world_airways_v.dat
6. In the “second computer”, go to the folder where you had installed the
ATC Radar Screen v5.0, open it and paste those files, that you had copied
before. If the computer asks you for overwrite the “Program_Config.cfg”,
then click “Yes”.
7. In the “first computer”, uninstall the ATC Radar Screen v5.0. And if you
want, you can uninstall the “Manuel’s Service Pack 3”.
8. Now, you can use or run the ATC Radar Screen v5.0, in the “second
computer”.
HOW ATC RADAR SCREEN WORKS?
You run the ATC Radar Screen in your machine.Then you choose between:
controlling a towered-airport or controlling an entire ARTCC/FIR’s sector.
Then you must select the towered-airport or select the specific ARTCC/FIR’s
sector. After that, you will join or host the ATC Radar Screen program with
the FS multiplayer session, that you want. Then you will be able to see all the
others players, of the FS multiplayer session, in a radar screen.
CREATING THE DATABASES FILES REQUIRED BY
ATC RADAR SCREEN
If this is the first time that you use the ATC Radar Screen v5.0, then you
**MUST FIRST**, create the databases files before running this program
(ATC Radar Screen). For do that, you MUST have, at this moment, installed
the “Manuel’s Service Pack 3” (In the same computer where ATC Radar
Screen is installed). Now follow these steps:
1. Go to your Window’s “Start”, then “Programs”, then “Manuel’s Service
Pack 3”.
2. Run the “Manuel Database Creator v1.0” program.
3. Select the “ATC Radar Screen v5.0 (For FS2002/2004)” option.
4. Enter the directory or folder where you have installed the ATC Radar
Screen v5.0. Example (without the quotes):
“C:\Programs Files\ATC Radar Screen v5”
5. Click the “Ok” button, for continue.
6. Select your current Microsoft Flight Simulator’s version option.
7. Enter the directory or folder where you have installed your current
Microsoft Flight Simulator. Examples (without the quotes):
“C:\Program Files\Microsoft Games\FS2002”
or
“C:\Program Files\Microsoft Games\Flight Simulator 9”
8. Click the “Ok” button , for continue.
NOTE: If you have your Flight Simulator 2002/2004 running, then close
it, before creating the databases files.
9. Click the “Create Databases Files” button.
10. Wait, until the “Manuel Database Creator v1.0” program, had finished
creating the databases files.
IMPORTANT NOTE: The “Manuel Database Creator v1.0” program will
display a message box, notifying you when it had finished creating the
databases files.
11. After creating the databases files, close the “Manuel Database Creator
v1.0” program.
12. Now you can run the ATC Radar Screen v5.0 program (Read the
RUNNING THE ATC RADAR SCREEN topic below)
RUNNING THE ATC RADAR SCREEN
1- Run “ATC Radar Screen v50.exe”.
2- Wait until it load.
3- If this is the first time that you are running the “ATC Radar Screen v5.0”
program and if you didn’t had created the databases files, before. It will
appear an error, and this program will going to close itself. After that you
**MUST** read the CREATING THE DATABASES FILES
REQUIRED BY ATC RADAR SCREEN topic above, before you
continue with the following steps.
4- Then it will appear the “Choosing an airport or ARTCC/FIR” window.
You must wait until it had finished the loading process.
5- If you want to control a towered-airport, then you must choose the
“Control a towered airport.” option, then you must type the ICAO_ID of
the towered-airport, that you want to control, “drop-down” the toweredairports list and select the ICAO_ID with the name of the towered-airport,
that you want to control. Then, press the “NEXT STEP --->” button. BUT,
if you want to control an entire ARTCC/FIR’s sector, then you must
choose the “Control an ARTCC/FIR.” option, then you must type the
beginning words of the ARTCC/FIR’s name, that you want to control,
“drop-down” the ARTCC/FIRs list and select the ARTCC/FIR. Then, press
the “NEXT STEP --->” button.
6- Now it will appear the “What you want to do?” window.
7- Select one option and then click the “NEXT STEP --->” button, for
continue. Or click the “EXIT PROGRAM” button for close the ATC
Radar Screen program.
8- Depending of the option that you had selected, it will appear the “Connect
window”, or the “Host window”. Enter the main information required in
the current window (“Connect window” or “Host window”), and then click
the “Join” button (for the “Connect window”) or click the “Host” button
(for the “Host window”).
9- Now it will appear a window that will contain a black screen, that will
display the current selected towered-airport or ARTCC/FIR (You can
zoom in, by pressing the F5 key in your keyboard, so then you can have a
better view of all the objects in the radar screen).
WHEN CONTROLLING A TOWERED-AIRPORT
When you control a towered-airport, this program will display, the selected
towered-airport, and around the selected towered-airport, in a ratio of 90
miles, it will display: airports, gates, parkings, taxiways, runways, runways
guide lines, ILSs, VORs, NDBs, intersections, fuel areas (ONLY for FS2004’s
users), jet airways, victor airways, map outlines, markers, radar rings,
TRACON airspace, additional airspaces (ONLY for FS2004’s users), tower
airspaces and ARTCC/FIR airspace (covering that selected towered-airport).
WHEN CONTROLLING AN ENTIRE ARTCC/FIR’S
SECTOR
When you control an entire ARTCC/FIR’s sector this program will display, in
the radar screen, all the: airports locations, runways, runways guide lines,
taxiways, parkings, gates, ILSs, NDBs,VORs, intersections, jet airways, victor
airways, markers, fuel areas (ONLY for FS2004’s users), tower airspaces,
additional airspaces (ONLY for FS2004’s users), TRACON airspaces, that are
inside the ARTCC/FIR’s sector you had selected. And also it will display in
the radar screen, the ARTCC/FIR’s sector you had selected, and also, some
ARTCC/FIRs airspaces around your ARTCC/FIR’s sector.
HOW CAN I COMMUNICATE WITH THE
PLAYERS?
The chatbox is the one, that is beside of the PLAYERS FLIGHT INFO LIST.
To write the message you want to send to the others players, you just need to
write your message in the field, where it says, “[Write your message here]”.
After you wrote your message, press the “ENTER” key of your keyboard for
send it to the others players. The place where it says “[ATC Radar Screen
v5.0] By NetSaturn82”, will display the history of all the chat messages you
sent to the others players, and the chat messages you received from them. The
newests or lastest chat messages will appears always on top.
To show/hide the chatbox, you just need to check/uncheck, the “Display
Chatbox” checkbox, that you see in the upper-left corner of the radar screen.
READING PLAYERS DATABLOCK
The first line, in the datablock, displays the nickname of the player. The
second line, displays the heading (in degrees), and current altitude (in feet) of
the player. The third line, displays the ground speed (in knots), and minimum
altitude (in feet) for the player. If there is no minimum altitude avaible for the
player, it will display the “-None-“ word.
IDENTIFYING THE OBJECTS DISPLAYED IN THE
RADAR SCREEN
Below, there is a group of screenshots, showing the different kinds of objects
(with theirs default colors settings), that you will see in the radar screen.
NOTE: When you have a lower “Zoomrate” (Example: below 12x) in the
ATC Radar Screen’s window, you will see the:
•
•
•
•
Airports locations as little red dots.
NDBs locations as little green dots.
VORs locations as little blue dots.
Intersections as little white dots.
OBJECTS:
VOR
Middle marker
Radar rings
ARTCC/FIR
Airspace
NDB
Intersection
Outer marker
Inner marker
Player
TRACON or Tower airspace
Runway
with ILS
Fuel area
Airport’s
location
Map
The gray dashed lines are
some SIDs and STARs of
KMIA (Miami Intl’ airport)
Runway with
guide lines
The brown circles are the
gates/parkings.
The purple ARTCC/FR
airspace is your airspace.
An additional
airspace
Taxiways (with
theirs IDs).
Jet or Victor airway
ABOUT ADDITIONAL AIRSPACES (ONLY FOR
FS2004’S USERS)
The users that have the Microsoft Flight Simulator 2004 (A century of flight),
will be able to see the “additional airspaces”. These are all the airspaces that
you can see in your Flight Simulator 2004’s default map. Example:
• Airspaces class A, B, C, D, E, F, G
• Restricted airspaces
• Prohibited airspaces
•
•
•
•
•
Danger airspaces
Trainining airspaces
MOA (Militar operation Airspaces)
National park airspaces
And others.
CHANGE THE COLOR OF ANY OBJECT IN THE
RADAR SCREEN
If you want to change the color of the: VORs, NDBs, runways, airspaces, etc,
then you must go to the “Options” menu, then “Color settings”, then it will
appear the “Color settings” window. To change the color of an object, you
must click on it’s button, then it should appear the color box window, pick up
the new color, and click OK (in the color box window).
HOW CAN I GET INFORMATION ABOUT THE
OBJECTS THAT ARE CURRENTLY DISPLAYED IN
THE RADAR SCREEN?
In the radar screen, you can get information about the following objects:
runways, ILSs, NDBs, VORs, jet airways, victor airways, taxiways, fuel areas,
intersections, gates/parkings, airports locations, players, FSNav’s
SIDs/STARs and airspaces. To get the information of an object, you must:
1. Move the mouse pointer above the object
2. Now, double-click it (with the left button of the mouse).
As a result, it must appear a little information about that object. If it doesn’t
appear the little information about that object, then you must center the radar
screen in the object’s position for then try it again (follow the two steps
above).
After displaying the little text information, about that object, you will notice
that it doesnt hide or disappear automatly. So, for hide or disappear the little
text information, you must click (with the left button of the mouse) anywhere
in the radar screen.
Below, i will explain with more details how you can get the information of
any objects in the radar screen.
• Airspaces: You can get the information of any airspace, by just doubleclicking (with the mouse’s left button) above the blue circle (see the image
below) then it should appear a little information about that airspace, and
also, it should highlight with yellow the airspace you had selected, or in
others words, the airspace from which you are getting the information (see
the image below). For hide the little information, just click anywhere in the
radar screen.
IMPORTANT NOTE: You can get the information of any airspace
**ONLY** when the zoomrate is bettween 5x and 34x.
Blue circle.
• NDBs and VORs: You can get the information of any VOR or NDB, by
just double-clicking (with the mouse’s left button) inside the circle or ring
of the NDB or VOR, then it should appear a little information about that
NDB or VOR, that you had selected. For hide the little information, just
click anywhere in the radar screen.
IMPORTANT NOTE: You can get the information of any VOR or NDB,
**ONLY** when the zoomrate is higher than 16x.
• Intersections: You can get the information of any intersection, by just
double-clicking (with the mouse’s left button) inside the little white
triangle of the intersection, and then it should appear a little information
about that intersection, that you had selected. For hide the little
information, just click anywhere in the radar screen.
IMPORTANT NOTE: You can get the information of any intersection,
**ONLY** when the zoomrate is higher than 16x.
• Players: You can get the information of any player, by just double-clicking
(with the mouse’s left button) above the little bright-green circle (that
represents the player’s location), then it should appear a little information
about that player. For hide the little information, just click anywhere in the
radar screen.
IMPORTANT NOTE: You can get the information of any player at any
zoomrate.
• Runways and ILSs: You can get the information of any runway or ILS, by
just double-clicking (with the mouse’s left button) above any of the two
sides of the runway (at the starting or ending point of the runway), then it
should appear a little information about that runway’s side. For hide the
little information, just click anywhere in the radar screen.
IMPORTANT NOTE: You can get the information of any runway (within
or without ILS), **ONLY** when the zoomrate is higher than 24x.
• Gates/Parkings: You can get the information of any gate or parking, by
just double-clicking (with the mouse’s left button) above the brown circle,
and then it should appear a little information about that gate or parking. For
hide the little information, just click anywhere in the radar screen.
IMPORTANT NOTE: You can get the information of any gate/parking,
**ONLY** when the zoomrate is equal or higher than 35x.
• Airports locations: You can get the information of any airport’s location,
by just double-clicking (with the mouse’s left button) inside the little red
circle or ring, and then it should appear a little information about that
airport. For hide the little information, just click anywhere in the radar
screen.
IMPORTANT NOTE: You can get the information of any airport
location, **ONLY** when the zoomrate is higher than 24x.
• FSNav’s SIDs/STARs: You can get the information of any SID or STAR,
by just double-clicking (with the mouse’s left button) above any part of the
line segment of that SID or STAR (see the image below), then it should
appear a little information about that SID or STAR. As a result, that SID or
STAR will be highlighted with yellow. For hide the little information, just
click anywhere in the radar screen.
IMPORTANT NOTE: You can get the information of any SID/STAR
**ONLY** when the zoomrate is higher than 16x.
• Jet airways (High airways): You can get the information of any jet
airway, by just double-clicking (with the mouse’s left button) above any
part of the line segment of that jet airway (see the image below), then it
should appear a little information about that jet airway. For hide the little
information, just click anywhere in the radar screen.
IMPORTANT NOTE: You can get the information of any jet airway
**ONLY** when the zoomrate is higher than 16x.
• Victor airways (Low airways): You can get the information of any victor
airway, by just double-clicking (with the mouse’s left button) above any
part of the line segment of that victor airway (see the image above), then it
should appear a little information about that victor airway. For hide the
little information, just click anywhere in the radar screen.
IMPORTANT NOTE: You can get the information of any victor airway
**ONLY** when the zoomrate is higher than 16x.
• Taxiways: You can get the information of any taxiway, by just doubleclicking (with the mouse’s left button) above any part of the line segment
of that taxiway (see the image below), then it should appear a little
information about that taxiway. For hide the little information, just click
anywhere in the radar screen.
IMPORTANT NOTE: You can get the information of any taxiway,
**ONLY** when the zoomrate is equal or higher than 35x.
• Fuel areas: You can get the information of any fuel area, by just doubleclicking (with the mouse’s left button) inside the little yellow square of that
fuel area, and then it should appear a little information about that fuel area.
For hide the little information, just click anywhere in the radar screen.
IMPORTANT NOTE: You can get the information of any fuel area,
**ONLY** when the zoomrate is equal or higher than 35x.
EDITING THE PLAYERS FLIGHT INFO
One of the most important thing that the controllers needs to know is from
where to where each player is flying. This program cann’t know by it’s own
from where to where each player, in the session, is flying, but you can tell to
this program from where to where is flying each player, so, each time you
move the mouse pointer over a player, in the radar screen, you will see then
from where to where is flying the player. The real function of this is like a
kind of remainder for the controller, because let’s say you have about 20
players in the screen, and then you forgot from where to where is flying each
player. You can fill out each player’s flight info, few minutes after you had
joined the multiplayer session, or when the player is on ground requesting the
clearance (like a Clearance Delivery controller) or you can fill out or edit each
player’s flight info at any time during the multiplayer session. You are not
required to fill out each player’s flight info, but it is important or required you
fill out this, if you want to see the minimum altitude for that player (when the
player is in the descending or approaching phase, flying an IFR flight plan) or
when sending the flight information of the player to another ATC Radar
Screen’s user. For fill out or edit a player’s flight info, follow these steps:
1. Go to the “Players Flight Info List”, located in the lower part of the radar
screen (For more information, scroll down, for read the PLAYERS
FLIGHT INFO LIST topic).
2. Select and double-click the nickname or callsign of the player, from which
you want to fill out or edit his/her flight information.
3. Then, it will appears the “Player’s flight information” window.
NOTE: The only fields, that you can fill out or edit are: flight type, departure
airport, destination airport, cruise altitude and flight route.
4. Now you can fill out or edit that player’s flight info.
• Drop-down the flight type list, and select IFR or VFR.
• Write the departure airport’s ICAO_ID from where the player will
takeoff.
• Write the destination airport’s ICAO_ID where the player will land.
• Write the cruise altitude, that the player must maintain during the flight
(here you must write the cruise altitude in feet units, don’t use commas
“,”, decimal points “.”, or the Flight Level (FL) designation). You
cann’t write the cruise altitude in this way: 30,000 or FL300 or
30000.45. You can write the cruise altitude in this way: 30000.
Otherwhise, it will display an error.
• If you want, you can write the player’s flight route details, example:
“TUM (VOR), TABOGA (VOR), MADEN (Intersection)”. The “Flight
Route” field has a maximum length of “1300” characters.
5. If you want to send the current player’s flight information to another ATC
Radar Screen player in the session then check the “Send flight plan to
other(s) ATCRDS controller(s)” checkbox.
• Now, if you want to send the flight information to all the ATCRDS
controllers currently in the session, then check the “Send to all
ATCRDS controllers in the session” checkbox.
• But if you want to send the flight information to a specific ATCRDS
controller in the session, then uncheck the “Send to all ATCRDS
controllers in the session” checkbox and select the ATCRDS controller
(in the “Send to this ATCRDS controller:” list) to which you want to
send the current player’s flight information.
6. Now you must click the “Send/Save Changes” button for save the current
changes, and at same time, send the current player’s flight information to
the other(s) ATCRDS controller(s), in the session (If you have checked the
“Send flight plan to other(s) ATCRDS controller(s)” checkbox). if you
don’t want to save or send the current changes, then click the “Cancel”
button.
NOTE: After this the “Players Flight Info List” is updated, automatly (See
below the PLAYERS FLIGHT INFO LIST topic).
TIP: I recommend you, that when a player had landed at his/her destination
airport, clean his/her flight info, set the flight type to VFR and clear or leave
in blank all the fields (departure airport, destination airport, cruise altitude and
flight route), this is because the player had finished his/her flight plan.
SENDING AND RECEIVING PLAYERS FLIGHT
INFO TO AND FROM OTHER(S) ATC RADAR
SCREEN’S CONTROLLER(S) IN THE SESSION
The good part of sending and receiving players flight information, is that all
the ATC Radar Screen’s controllers in the same session, will know from
where to where is flying each player (or pilot) in the session. Example: in a
multiplayer session, there is an ATC Radar Screen’s controller, that is the
KORD ground; another ATC Radar Screen’s controller, that is the KORD
tower; and there are some players (or pilots) at the KORD’s gates or parkings.
Then each player will post his/her flightplans, and the KORD ground will fill
out each player’s flight info in the ATC Radar Screen program, then send
those flights info, to the others ATC Radar Screen’s controllers in the same
multiplayer session. So then when each player (or pilot) arrives to the active
runway, the KORD tower, will know to where each player (or pilot) will fly.
If there is another ATC Radar Screen’s controller, that is doing CHICAGO
center, then that controller will, also, know from where to where will fly those
players (or pilots), that are currently at the KORD’s gates or parkings.
IMPORTANT NOTE: The controllers having ATC Radar Screen v4.0 (or
any higher version) will be able to send and receive players flight info, in a
multiplayer session. Controllers having any previous version of ATC Radar
Screen, will not be able to send or receive players flight info.
• Sending players flight info to other(s) ATC Radar Screen’s players (or
controllers): To send the flight information of a player (or pilot) to another
ATC Radar Screen’s controller, connected in the same multiplayer session,
then follow these steps:
1. Go to the “Players Flight Info List”, located in the lower part of the
radar screen (For more information, scroll down, for read the
PLAYERS FLIGHT INFO LIST topic).
2. Select and double-click the nickname or callsign of the player.
3. Then, it will appears the “Player’s flight information” window.
4. If you want to modify the current selected player’s flight information,
you can do it. (Scroll up to see the EDITING THE PLAYERS FLIGHT
INFO topic).
5. If you want to send the current player’s flight information to another
ATC Radar Screen player in the session then check the “Send flight
plan to other(s) ATCRDS controller(s)” checkbox.
• Now, if you want to send the flight information to all the ATCRDS
controllers currently in the session, then check the “Send to all
ATCRDS controllers in the session” checkbox.
• But if you want to send the flight information to a specific ATCRDS
controller in the session, then uncheck the “Send to all ATCRDS
controllers in the session” checkbox and select the ATCRDS
controller (in the “Send to this ATCRDS controller:” list) to which
you want to send the current player’s flight information.
6. For send the current selected player’s flight information, to the other(s)
ATC Radar Screen’s controller(s), in the same session, then press the
“Send/Save Changes”, buttons. It will send the current selected player’s
flight information, it doesnt matter if you had made changes in it or not,
it will send the flight information.
NOTE: In some strange cases, the current selected player’s flight
information doesnt arrives to some of the others ATC Radar Screen’s
controllers, maybe because of the internet connection speed. In those
cases, repeat the steps for try it again.
• Receiving players flight info from other(s) ATC Radar Screen’s
players (or controllers): When a player’s flight info arrives you will see a
message box, telling you, what or which ATC Radar Screen’s controller
had sent it to you, and the nickname of the player, which had been
modified his/her flight information.
NOTE: If you dont want the ATC Radar Screen, notify you when a
player’s flight info arrives, then go to the menu “Options”, then “General
settings”, and uncheck the “Notify me, when updated or new players flight
info arrives from others ATC Radar Screen's controllers” option.
After receiving a player’s flight info, the ATC Radar Screen program will,
automatly, update the players flight info list (see the PLAYERS FLIGHT
INFO LIST topic below).
PLAYERS FLIGHT INFO LIST
The players flight info list, is a list that contains the flight information of each
player (or pilot) in the multiplayer session. This list is located in the lower part
of the radar screen (see the image below).
If you want to show/hide the players flight info list, then check/uncheck the
“Display players flight info list” option that is located in the lower-left corner.
If you want to edit or modify a player’s flight information, then scroll up, and
see the EDITING THE PLAYERS FLIGHT INFO topic, in this document.
IMPORTANT NOTE: The most of the cases, this program (ATC Radar
Screen) WILL NOT ADD in the “Players Flight Info List” the FSNavigator
players (example: “*fsnav”) or FSHost (example: *FSHost v3.0 (Server)) or
any player in “OBSERVER” mode, because they doesnt appear as pilots for
the others players in the session. In others words, the others players will not
have, at ANY moment, “VISUAL CONTACT” with those players.
GETTING THE MINIMUM ALTITUDE OF A
PLAYER
When the players or pilots are in the “descent” or “approach” phase, that
means, when the player is descending from the cruise altitude and is heading
to the destination airport, for then approach and land on the runway, they need
to know what is the altitude of the terrain below them (the minimum altitude),
that’s why the controllers needs to know what is the terrain below each player,
that’s why i had created a file called “world_terrain.db”, it contains the entire
FS’s world terrain, i created it from satellite images files of the real world’s
terrain. ATC Radar Screen read and uses this file every time you run it (ATC
Radar Screen), and it keeps in memory the terrain aspect inside your control
zone. That means, when you control a towered-airport or an entire
ARTCC/FIR’s sector, it will get the terrain’s information of your control area.
The ATC Radar Screen will display the minimum altitude of a player, when
the following things happens:
• When the player’s flight type is “IFR”. That means, the player must had in
his/her flight info the “Flight Type” property set in “IFR”.
• The player destination airport’s ICAO_ID must be wrote in his/her
“Destination Airport” flight info.
• The destination airport of the player is inside your control zone. You can
check if the airport is in your control zone, by going to the menu “View”
then “Show area’s airports list”. Then search for the player’s destination
airport.
• The player is equal or less than 90 miles out of his/her destination airport’s
location.
Now you can see, why it is recommended to fill out each player’s flight info.
All the conditions above must happens, for then it (ATC Radar Screen) can
display the minimum altitude, if not, then it will display the word “-None-“ in
that player’s datablock information.
As the player comes more and more closer or near to his/her destination
airport’s location, the minimum altitude will decrease (depending on the
terrain below the player) until the lowest minimum altitude, that is 2000ft
above the real ground altitude (the destination airport’s altitude). If the player
descend below this lowest minimum altitude he/she may find the ground and
crash. But if the player, go more and more far away from his/her destination
airport’s location, then the minimum altitude will increase.
I recommend, that when the player is about 16 miles or less, out of the
destination airport’s active runway, give to him/her the clearance for approach
to the runway, at this point, the player can descend below the lowest minimum
altitude. ATC Radar Screen gets the minimum altitude value from this:
Minimum altitude = Terrain altitude (below the player) + 2000ft (for safety).
HOW CAN I KNOW WHAT AIRPORTS ARE
DISPLAYED IN THE RADAR SCREEN?
You can know this information by clicking the “View” menu, in this
program’s window, and then selecting “Show area’s airports list”. Follow
these steps:
1. It will appear the “Area’s airports list” window.
2. Then write the airport’s ICAO_ID, then drop-down the airports list and
select the airport you were looking for.
NOTE: For refresh the area’s airports list, just click the “Refresh List”
button.
3. If you want to center the radar screen, on the selected airport’s location,
then just click the “Center Airport on Radar Screen” button.
4. Now, you can close the “Area’s airports list” window, but if you want to
select another airport, then repeat the steps from the step 2.
VIEWING FSNAVIGATOR’S SIDs/STARs
If you are a user of the FSNavigator v4.5 (or any higher version) program,
then you can download the lastest SIDs/STARs packet (zip file) from the
“Downloads” section of the FSNavigator’s homepage
(www.fsnavigator.com). Then extract or unzip the SIDs/STARs packet (zip
file) into the “SidStar” folder, that is located inside the folder where you had
installed the ATC Radar Screen v5.0.
*IMPORTANT NOTE: The ATC Radar Screen v5.0, will JUST READ the
FSNavigator’s SIDs/STARs files (*.ss), and WILL NOT MODIFY THEM.
Now, you run the ATC Radar Screen v5.0 program, then choose the “Control
an ARTCC/FIR.” option, and select an ARTCC/FIR’s sector from the
ARTCC/FIRs list. Then wait until it loads. After that, join or host a FS
multiplayer session. Now, the main window (ATC radar’s window), should
appear.
If you want to see the SIDs/STARs of an airport (inside your control zone or
area), follow these steps:
1. Go to the “View” menu, then “Show area’s SIDs/STARs list”.
2. Will appear the “Area’s SIDs/STARs list” window.
3. Write and select, in the “Airport ID:” list, the ICAO_ID of the airport.
*IMPORTANT NOTE: NOT ALL the airports will have SIDs/STARs.
There will be about 2 or more airports, in your control zone or area, having
SIDs/STARs. I mean, ONLY, the traffic-congested airports, or
international airports, will have SIDs/STARs. If you want to create
SIDs/STARs for an airport, then you will need to download and use
FSNavigator v4.5 (or any higher version), for create, generate or modify
SIDs/STARs files (*.ss).
4. Now, from the “Runway ID:” list select the ID of a runway. The runways
IDs, that appears in the “Runway ID:” list are from the airport that you had
selected in the “Airport ID:” list.
*IMPORTANT NOTE: NOT ALL the runways of an airport have
SID/STARs, as a result, there maybe missing some runways IDs. In others
words, this program (ATC Radar Screen) didnt had found any SID or
STAR associated with those missing runways IDs.
5. Then it should appear, two lists: the SIDs list, and the STARs list. Those
SIDs and STARs, that appear in those lists are associated directly with the
runway ID that you had selected from the “Runway ID:” list.
The SIDs and STARs will not be listed with theirs real names or ids,
because not all the authors, of the FSNav’s SIDs/STARs files, include the
real names and ids of the SIDs/STARs. That’s why, the SIDs and STARs
will be listed by theirs transition point’s ID (examples: “TBG (VOR)”,
“MUBAR (Intersection)”, etc).
*IMPORTANT NOTE: You must know, that the FSNavigator’s SIDs,
always begin with a runway and end with a transition point (Intersection or
VOR or NDB). And the FSNavigator’s STARs always begin with a
transition point (Intersection or VOR or NDB) and end with a runway.
6. Check/uncheck the checkbox beside the specified SID or STAR, that you
want to be visible/invisible in the radar screen.
For show or make visible, all the SIDs in the list, click the “Show all SIDs”
button. For hide or make invisible, all the SIDs in the list, click the “Hide
all SIDs” button
For show or make visible, all the STARs in the list, click the “Show all
STARs” button. For hide or make invisible, all the STARs in the list, click
the “Hide all STARs” button
7. If you want to see the name, id and description of a specificied SID, or
STAR, then select a SID from the SIDs list, or select a STAR from the
STARs list, and then click the “Show Selected SID's Info” button, or click
the “Show Selected STAR's Info” button.
8. If you want to see the SIDs and STARs of another airport, then go to the
step 3, and repeat all the following steps.
9. When you are done, then click the “OK” button.
CENTERING AN AREA’S AIRPORT ON THE
RADAR SCREEN
Follow these steps:
1. Go to the “View” menu, in this program’s window. Then select “Show
area’s airports list”.
2. It will appear the “Area’s airports list” window.
3. Then write the airport’s ICAO_ID, then drop-down the airports list and
select the airport you were looking for.
NOTE: For refresh the area’s airports list, just click the “Refresh List”
button.
4. Now, click the “Center Airport on Radar Screen” button.
CENTERING AN AREA’S NAVAID
(VOR/NDB/INTERSECTION) ON THE RADAR
SCREEN
Follow these steps:
1. Go to the “View” menu, in this program’s window. Then select “Show
area’s VORs/NDBs/Intersections list”.
2. It will appear the “Area’s VORs/NDBs/Intersections list” window.
3. Now, select which type of navaids you want to display in the list (list that
is located beside the navaids types options), example: i want to display in
the list, all my control zone’s VORs, then i should selected the “Area’s
VORs list” option.
4. After choosing one of the three options, the ATC Radar Screen, automatly,
will create a list of all the VORs or NDBs or intersections that are currently
in your control zone. According to the example, that i told you before, it
will display all my control zone’s VORs in the list.
5. Then you must write the ID of the navaid (VOR or NDB or intersection),
that you are looking for. According to the example, that i told you before,
im looking for the TUM navaid, that is a VOR located inside the
PANAMA FIR airspace (my control zone).
6. Then “drop-down” the list, and select the ID of the navaid (VOR or NDB
or intersection), you were looking for.
7. Click the “Center (VOR/NDB/INTERSECTION) on Radar Screen” button,
for center the selected navaid (VOR or NDB or intersection), on the radar
screen. According to the example, it will center on the radar screen the
TUM (VOR).
A DIFFERENT WAY, TO CENTER A PLAYER ON
THE RADAR SCREEN’S CENTER
The “typical” way for center a player on the radar screen is, by going to the
player’s location and click with the right button of the mouse. Another
different way is by, going to the menu “View”, then click and select “Show
players list”, then select the player you want to center on the radar screen, now
click the “Center Selected Player on Radar Screen” button.
This new different way, is usefull when you don’t know where is currently
located a pilot or player and you don’t have him/her inside the screen, or when
you are far away from that player and you need to reach his/her location very
fast.
IMPORTANT NOTE: The FSNavigator players, FSHost player and the
players in “OBSERVER” mode WILL NOT BE CENTERED in the radar
screen, because they doesnt appear as pilots for the others players. In others
words, the others players WILL NOT HAVE, **at any moment**, “visual
contact” with them. And also because they are not displayed in the radar
screen. So, when you select a FSNavigator player, FSHost player or any
player in “OBSERVER” mode, from the list, the “Center Selected Player on
Radar Screen” button will appear as **disabled**.
HOW CAN I GIVE VECTORS TO A PLAYER USING
THE RADAR SCREEN?
You must click, with the left button of the mouse, over any the position inside
the radar screen, but near the player, to which you want to give the vector,
then you must move the mouse pointer, while you are still pressing the left
button of the mouse, to the direction and position you want the player to fly to.
Then it will appear a green dashed line with the heading and distance
numbers. After you see the heading and distance, then you must stop pressing
the left button of the mouse. Then the line will disappear. After that, you must
notify to the player about the heading that he/she must fly, in order, to reach
the position that you want.
IDENTIFYING YOUR CONTROL ZONE WHEN
CONTROLLING AN ENTIRE ARTCC/FIR’S SECTOR
If you are currently controlling an ARTCC/FIR’s sector, you must know that
your airspace is painted with the color purple, in others words, your
ARTCC/FIR’s sector airspace is painted with the color purple (this includes
the dots and lines that show where begins and ends your ARTCC/FIR’s
sector).
If you want, you can change the default color setting (purple) for your
airspace, by a new one, all you need to do is, go to the “Options” menu, then
“Color settings”, and click the “Your airspace” button, and set the new color
(for more details see
CHANGE THE COLOR OF ANY OBJECT IN THE RADAR SCREEN
topic).
HOW CAN I CENTER THE RADAR SCREEN IN A
SPECIFIC POSITION?
In order, to center the radar screen in a specific position, you must click with
the right button of the mouse, over the position that you want to center the
screen and then it will center the radar screen at that position.
HOW CAN I ZOOM IN THE RADAR SCREEN?
Just press the F5 key in your keyboard, and it will zoom in the radar screen.
You can see the zoom rate that is displayed in the “ZoomRate:” field, located
in the upper-left corner of the radar screen.
HOW CAN I ZOOM OUT THE RADAR SCREEN?
Just press the F6 key in your keyboard, and it will zoom out the radar screen.
You can see the zoom rate that is displayed in the “ZoomRate:” field, located
in the upper-left corner of the radar screen.
HOW CAN I CENTER THE RADAR SCREEN BACK
TO THE DEFAULT POSITION?
Just press the F7 key in your keyboard, this will center the radar screen, back
to the default position. When im telling you about the “default position”, i
mean the position where it was centered the radar screen, when it appeared or
loaded, after setting the lastest selected towered-airport or ARTCC/FIR’s
sector.
CONTROLLING THE OBJECTS THAT CAN BE
DISPLAYED IN THE RADAR SCREEN
Go to the “Options” menu, then select “Display settings”. After that, it will
appear the “Display settings” window. In this window, you must check the
objects that you want this program to display and you must uncheck the
objects that you don’t want this program to display.
RADAR RINGS
The total range of the radar rings is 90 miles, the little ring of the center has a
ratio or range of 10 miles, and the second ring (counting from the center) has a
ratio or range of 20 miles and so on. There are 9 rings.
If you want, you can change the default color setting (gray) for the radar rings,
by a new one, all you need to do is, go to the “Options” menu, then “Color
settings”, and click the “Radar rings” button, and set the new color (for more
details see
CHANGE THE COLOR OF ANY OBJECT IN THE RADAR SCREEN
topic).
RUNWAYS GUIDE LINES
If you want to see/hide the guides lines of the runway of an airport (located in
your control zone or area), then follow these steps:
1. Go to the “View” menu, then “Show area’s airports list”.
2. Then write the airport’s ICAO_ID, then drop-down the airports list and
select the airport, that you are looking for.
3. It will appear a list with all the runways, of the selected airport.
4. Check/uncheck the checkbox, of a runway, for then show/hide it's guides
lines, in the radar screen.
Each runway guide line has a length of 14 miles in each side of a runway.
If you want, you can change the default color setting (green) for the runways
guide lines, by a new one, all you need to do is, go to the “Options” menu,
then “Color settings”, and click the “Runways guide lines” button, and set the
new color (for more details see
CHANGE THE COLOR OF ANY OBJECT IN THE RADAR SCREEN
topic).
TCAS SYSTEM
The ATC Radar Screen, by default, will display in red color the players that
have, between them, a distance equal or less than 3 miles and a difference in
altitude of about 2,000 feet or less.
NOTE: You will see or notice, that in this version (version 5.0) the “Enable
traffic alert sound.” option is disabled, this is because, in future versions, there
will be a traffic alert sound, that means, that this option WILL GOING TO
BE enabled in future versions.
If you want to change the minimum distance or altitude bettween the players
(or pilots), then you must go to the menu “Options”, then “General settings”.
Now, if you want, you can change the “Minimum distance bettween aircrafts”
number, by default the ATC Radar Screen had set 3 miles. And if you want,
you can change the “Minimum altitude bettween aircrafts” number, by default
the ATC Radar Screen had set 2,000 feet. When you had finished, click the
“Ok” button, for apply the changes.
IMPORTANT NOTE: For set the “Minimum altitude bettween aircrafts”
you CANN’T use commas (“,”) or decimal points (“.”) and also you CANN’T
use the Flight Level (“FL”) designation. A good example for this is: 30000.
Some bad examples are: 30,000 or 30.000.00 or FL300.
DISPLAY THE PLAYERS LIST WINDOW
If you want to see the list of players, that are currently connected in the
multiplayer session, follow these steps:
1. Go to the “View” menu, then “Show players list”.
2. It will appear a window, with the list of players, that are currently inside of
the multiplayer session.
REMOVE/KICK A PLAYER FROM THE SESSION
For remove or kick a player, go to the menu (in the radar screen’s window)
“View”, then “Show players list”, select the player and press the
“Remove/Kick Selected Player” button.
IMPORTANT NOTE: You can remove/kick players from the session
ONLY, when you are hosting the multiplayer session.
EDITING THE ATIS MESSAGE OF THE SELECTED
TOWERED-AIRPORT
Sometimes, when you are controlling the “Ground” of an airport, it is a little
difficult to repeat the airport’s information data (ATIS = Airport Terminal
Information Service) to each player, because of this, i had designed a method
where you can enter a little ATIS message and save it in memory, so then
players can request it, and receive that ATIS message, avoiding to you the
work of repeat to every player the same information.
**IMPORTANT NOTE: You can edit the ATIS message **ONLY** if in
the “Choosing an airport or ARTCC/FIR” window, you had selected the
“Control a towered airport.” option and if you had selected an airport ID from
the “Towered-airport” list. Otherwise, the “Edit ATIS” option in the “Edit”
menu of the radar screen’s window, will going to appear as **disabled**.
For enter a new or edit the current ATIS message, follow these steps:
1. Go to the “Edit” menu, then select the “Edit XXXX ATIS” (XXXX =
selected towered-airport ID, examples: “Edit MPTO ATIS”, “Edit
KORD ATIS”, “Edit KMIA ATIS”, etc).
2. Then it should appear a window. In that window, you can enter the ATIS
message for the selected towered-airport. Example (without the quotes):
“Tocumen Intl Airport Information Zulu 0300, winds 300* at 3kts,
visibility 2 miles, altimeter 29.92.....”.
Or, if you had already wrote an ATIS message before, then, if you want,
you can delete the current ATIS message.
3. When you are done, just click the “Ok” button, for save the changes.
Now, any player can request the ATIS message by typing and sending (using
theirs FS chat window) this chat text command (without the quotes): “.atis,
[Selected towered-airport ID]”. Examples: “.atis, MPTO”, “.atis, KORD”,
etc. When this program (ATC Radar Screen) receives these ATIS requests, it
will answer automatly reply to that player with the ATIS message (in a private
chat text message), that you had wrote or entered, before.
**IMPORTANT NOTE: If the ATIS message is EMPTY (doesnt have any
text), this program (ATC Radar Screen) WILL NOT reply to the ATIS
request from the players, because there is not ANY ATIS text message avaible
at that moment. In others words, the ATC Radar Screen, CANNT reply with
an EMPTY chat text message.
GETTING REAL-WORLD WEATHER
There are many websites in the Internet, that provides you the lastest
observations for a specific airport. One of those websites, where you can
download the lastests METARs of the most airports in the world, is the
NOAA website:
http://weather.noaa.gov/weather/metar.shtml
Here, you enter or write the ICAO_ID of the airport, from which you want to
get the lastest weather observation, then press the SUBMIT button, then it will
display the latest METAR for that airport.
These METARs are coded, if you dont know how to decode or read that
weather information, you can go to this website:
http://www.sca.uqam.ca/doc/metar.html#13
There, it teaches to you how to read all the data of a METAR. It is very
interesting, i recommend you to check it out. It will not only show to you how
to read the basic weather information of a METAR, it will also, show to you
what means some stranges words that contains a METAR.
TIP: I recommend you, if you are connected to internet and using ATC Radar
Screen, to keep the NOAA website openned in a window of your internet
browser, so then when a player ask you for the weather information of a
certain airport, then you maximize the NOAA website and enter the desired
airport’s ICAO_ID, then get the weather information, and bring it to the
player.
RECEIVING FLIGHT PLANS AND FLIGHT ROUTES
DETAILS SENT BY PLAYERS
ATC Radar Screen has the ability of receive flight plans and flight routes
details sent by any player, during the FS multiplayer session. Also, the players
can cancel or delete theirs flight plans by typing and sending this chat text
command: “-fp” (without the quotes). With this feature, you dont need to fill
out or delete each player’s flight info, because the player can upload or delete
his/her flight plan to or from the ATC Radar Screen program by
himself/herself; and this will let you work more faster, during your ATC work.
When you receive a flight plan or a flight route, from a player, you will see a
message box, notifying you, that a player had filed a new flightplan. Also a
message box will appear, if the player had deleted his/her flight plan.
NOTE: If you dont want the ATC Radar Screen, notify you when a player’s
flight plan or flight route details arrives or is deleted, then go to the menu
“Options”, then “General settings”, and uncheck the “Notify me, when
updated or new players flight info arrives from others ATC Radar Screen's
controllers” option.
**The Players must use this format for send (to you, and to another ATC
Radar Screen’s controllers in the same multiplayer session) or delete
theirs flight plans:
1- SENDING A FLIGHT PLAN TO CONTROLLERS: Write (in your
FS’s chat window) this command: +fp [Flight Type], [Departure airport’s
ICAO_ID], [Destination airport’s ICAO_ID], [Cruise altitude, in feet].
Then press the “Send” button (in your FS’s chat window), for send the
command.
Example No1: +fp IFR, MPTO, KORD, 30,000.
Example No2: +fp VFR, KSFO, KDEN, 10,000.
After sending that, if you have a flight route, write (in your FS’s chat window)
this command: +fr [Write here the flight route details]. Then press the
“Send” button (in your FS’s chat window), for send the command.
Example No1: +fr runway 3R, TUM (VOR), MADEN (Intersection),....etc.
2- DELETING A FLIGHT PLAN: Write (in your FS’s chat window) this
command: -fp. Then press the “Send” button (in your FS’s chat window), for
send the command.
CHANGING THE MOUSE’S POINTER DISPLAYED
IN THE RADAR SCREEN
To change the mouse’s pointer in currently displayed in the radar screen’s
window, follow these steps:
1. Go to the “Options” menu, then “General settings”.
2. Drop-down the “Selected a mouse pointer” list and select a mouse pointer.
3. Click the “Ok” button for save the changes.
I WANT TO CHANGE THE CURRENT
CONTROLLED TOWERED-AIRPORT OR THE
CURRENT CONTROLLED ARTCC/FIR’S SECTOR
Go to the “File” menu, and select “Load all towered airports and
ARTCC/FIRs”. Then it will appear the “Choosing an airport or ARTCC/FIR”
window, wait until it load, and then choose one of the two options “Control a
towered airport.” or “Control an ARTCC/FIR.”, after this, type and select a
towered-airport or ARTCC/FIR’s sector, and finally, press the “NEXT STEP -->” button.
HOW CAN I DELETE THE CURRENT DATABASES
FILES AND CREATE ANOTHERS NEW FILES?
Before starting with this process, make sure that the “ATC Radar Screen
v5.0” program is not running, if it is currently running, then close it. Now
follow these steps:
1. Go to your Window’s “Start”, then “Programs”, then “Manuel’s Service
Pack 3”.
2. Run the “Manuel Database Creator v1.0” program.
3. Select the “ATC Radar Screen v5.0 (For FS2002/2004)” option.
4. Enter the directory or folder where you have installed the ATC Radar
Screen v5.0. Example (without the quotes):
“C:\Programs Files\ATC Radar Screen v5”
5. Click the “Ok” button, for continue.
NOTE: If you have your Flight Simulator 2002/2004 running, then close
it, before creating the databases files.
6. Click the “Create Databases Files” button.
7. Wait, until the “Manuel Database Creator v1.0” program, had finished
creating the databases files.
IMPORTANT NOTE: The “Manuel Database Creator v1.0” program will
display a message box, notifying you when it had finished creating the
databases files.
8. After creating the databases files, close the “Manuel Database Creator
v1.0” program.
9. Now you can run the ATC Radar Screen v5.0 program.
HOW CAN I RESIZE THE RADAR SCREEN’S
WINDOW?
Just click and drag the lower-right corner of the radar screen’s window. Or
maximize/restore the radar screen’s window
HOW CAN I DISCONNECT FROM THE FS
MULTIPLAYER SESSION AND CLOSE THIS
PROGRAM?
In order, to disconnect and close this program you must follow these steps:
1. Go to the “File” menu, then “Disconnect” or click the “X” button of this
window (The radar screen’s window) and wait until this window had
disappeared.
2. Then it will appear the “What you want to do?” window.
3. Click the “EXIT PROGRAM” button in the “What you want to do?”
window.
UNINSTALLING THE ATC RADAR SCREEN
PROGRAM
If you want to uninstall the ATC Radar Screen program, you can go to your
Window's “Start”, “Settings”, then “Control Panel”. Now doble-click the
“Add/Remove Programs” icon, now from the list, select “ATC Radar Screen
v5.0” and click the “Add/Remove...” button.
KNOWN BUGS
There is no bugs by this moment. If you had found a bug, then e-mail me and
report it to me.
NOTES BY THE AUTHOR
I created this program because i wanted to create my own ATC program for
FS multiplayer session. So, i hope it can help you to have a better controlled
game. And have fun!. For any comments, suggestions or report of bugs, please
e-mail me at: [email protected]
SPECIAL THANKS TO
•
•
•
•
•
•
•
Microsoft Flight Simulator's Team (By the SDKs documents)
Helge Schroeder (Author of FSNavigator)
Winfried Orthmann (Author of FS2004 *.BGL format description)
DJ Joe (Manuel's FS tools website's webmaster)
Shannon (Netdude)
Russell Gilbert
Pablo Norambuena
MY PROGRAMS WEB SITE
**Now you can visit my programs web site, with the lastest
versions of my programs: http://www.joenetwork.de/manuel
RECOMMENDED DOWNLOADS
♦
♦
♦
♦
♦
♦
FSNavigator v4.6
FSHost v3.0
Roger Wilco
Squawkbox v2.3.5 (For VATSIM's or IVAO's users)
PROcontroller v2.2 (For VATSIM's or IVAO's users)
Advanced Simulated Radar Client (For VATSIM's or IVAO's users)
***THIS IS A FREEWARE PROGRAM SO, PLEASE
DON’T DISTRIBUTE THIS PROGRAM OR THIS
DOCUMENT FOR COMMERCIAL PURPOSES
WITHOUT THE AUTHOR’S PERMISSION***
THE END, HAVE FUN!!!