1
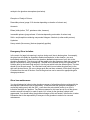
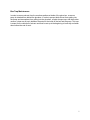
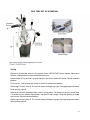
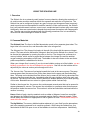
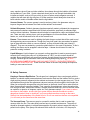
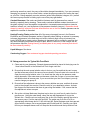
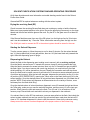
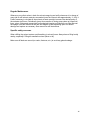
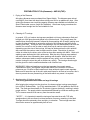
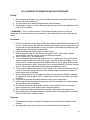
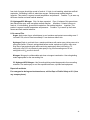
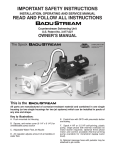
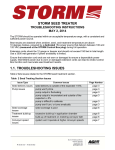
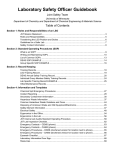
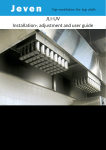
Standard Operating Procedures:
Bart Laboratory
TABLE OF CONTENTS
Emergency Shutdown of Glovebox
3
Operating Glovebox
4-7
Box Trap Set Up & Removal
8-9
Using Schlenk Line
10-14
Solvent Purification System
15-16
Using Rotovap
17-18
Preparation of UI3
19-20
Preparation of UCl4
21-22
Radioactive Waste
23
Quenching Reactive Compounds
24-25
Handling Pyrophoric Reagents on Schlenk Line
26-27
Liquid Oxygen Protocol
28
Compressed Gas
29-31
2
BART GROUP EMERGENCY SHUTDOWN PROCEDURES
In the event of a power failure, emergency, or pending emergency, the following procedure
should be used to shut down the laboratory. The steps should be followed in the given order:
1. All liquid nitrogen traps are to be immediately dropped using the standard procedure.
2. Gloveboxes should be shut down. If the power has gone out, cap all reactions and turn off
the main switch. If the power is still on, perform the following steps:
a. Close the catalyst
b. cap all reactions
c. Turn off the chambers
d. Shut down the vacuum pump
e. Turn off the main switch
3. Shut down the Schlenk lines in the hoods by closing off reactions and sealing off vacuum
and argon lines. If the power is still on, let a small amount of air into the vacuum pumps and
turn them off using the switch. If the power is off, turn off the switch and unplug them to
prevent them receiving a power surge.
4. Turn off and cap all reactions in hoods. Lower and close all hood sashes.
5. Shut down other equipment in the lab, such as the solvent system, rotovap, ovens, IR
spectrometer, potentiostat. If the power is out, unplug this equipment to prevent them
receiving a power surge.
6. Shut down the refrigerators in the offices and the labs. Do not open the refrigerators! If the
power is out, unplug this equipment to prevent them receiving a power surge.
7. Shut down computers in the offices and labs. If the power is out, unplug this equipment,
along with the coffee maker, to prevent them receiving a power surge.
8. Double check that all waste containers are capped and all reactions labeled.
3
GLOVEBOX STANDARD OPERATING PROCEDURES
Entering the Glovebox:
Items intended to enter the gloveboxes can enter through two antechambers (large and small).
These chambers must not be used at the same time.
All chemicals entering the glovebox must be degassed and/or rigorously dried. All glassware
entering the glovebox must also be dried in the drying oven for a minimum of 1 hour. All empty
vessels and dried solids should be vented so no positive pressure is created inside a flask. If a
liquid or a flask containing dry reagents is entering the glovebox in a sealed vessel, the vessel
must be evacuated on a Schlenk line prior to placing in the antechamber. If this is not done, it is
an explosion hazard. If a vessel is sealed at atmospheric pressure, when the antechambers
are evacuated to nearly 0 torr the glassware will likely explode due to the extremely high
positive pressure within the flask compared to outside the flask. Unopened chemicals packaged
under an inert atmosphere may be brought directly into the glovebox. Kimwipes should be dried
in the vacuum oven for several hours (>3 h) after the sides of the box have been cut and the
plastic opening has been removed (this ensures complete drying of all the Kimwipes). All
disposable glassware should be in the oven for a minimum of 3 hours, although up to 8 is
preferred.
Aqueous solutions, alcohols, acetone may never be brought into the glovebox. As they
compromise glove lifetime and/or the H2O/O2 free atmosphere.
Entering the small antechamber:
When bringing items into the glovebox through the small antechamber, it is imperative that the
chamber has been evacuated at least 5 minutes if an item has been removed through that
chamber. Refill the evacuated chamber by turning the valve from “Evacuate” to “Refill.” The
pressure in the chamber will rise to atmospheric pressure. Turn the valve to “closed” and open
exterior of the chamber to insert materials. After sealing the chamber, turn the valve cautiously
to “Evacuate.” Be patient when turning the valve so the pressure decreases slowly. This will
reduce the likelihood of glassware shattering if there is a small positive pressure within a flask.
Evacuate the chamber for a minimum of 5 minutes. During this time, you must perform 3
backfills. A backfill is accomplished by turning the valve to “Refill” to refill the chamber until the
gauge moves approximately 1/8 of the way. After 5 minutes, the chamber is returned to
atmospheric pressure.
Entering the large antechamber:
The large antechamber should be used for items that do not fit into the small chamber. In order
to use the large chamber, the small chamber must be closed under static vacuum. If an item
has recently been removed from the large antechamber (on the log), the chamber must be
evacuate for a minimum of 30 minutes prior to bringing anything new into the glovebox through
the large antechamber. The touch screen located on the front of the glovebox controls the large
antechamber. First, select “Manual Refill” from the “Antechamber” menu. Then open the
chamber and place items entering the glovebox into the chamber. An item entering the large
antechamber must be evacuated and refilled 3 times over a 30 min cycle. Once the
evacuate/refill process has been completed, the chamber can be manually refilled and the
item(s) can be brought into the glovebox. Finally, the empty chamber should be manually
evacuated immediately after emptying the chamber by selecting “Manual Evacuate” from the
4
“Antechamber” menu.
Working in the Glovebox:
All individuals working in the glovebox must remove all jewelry and watches from hands and
wrists. White nylon liner gloves must also be worn whenever using the gloves. This preserves
the glove lifetime.
When working in the glovebox with solids, the catalyst should be open. All solid waste should be
disposed in the open container. Avoid contacting solid chemicals with the gloves and clean up
spills after using solid chemicals.
Different solvents and materials affect the catalyst differently. Some catalyst poisons bind
irreversibly to the catalyst whereas others bind reversibly. If working with a solvent that binds
irreversibly, the catalyst must be closed. Reactions running in the glovebox should be stoppered
or capped regardless of the solvents being used to reduce atmosphere or catalyst
contamination.
Liquid waste should be placed in the capped bottle. The liquid waste bottle should be open for
as brief a duration as possible. It is particularly important that the glovebox catalyst is closed, as
all solutions (including solvents that poison the catalyst) are discarded here.
While working in the glovebox, the atmosphere must be checked constantly. This is done by
tipping and jostling the vial of diethyl zinc. If smoke or white vapors appear, the atmosphere is
bad and the box must be purged. If the diethylzinc vial is caked with zinc oxide, it is time for the
vial to be changed. Also, to effectively test the atmosphere, there must be a minimum of 1 mL
of diethyl zinc in the vial, although up to 3 mL is preferred.
All chemicals in the glovebox must be properly labelled on the outside of the vials. When any
waste jar is full, it should be removed from the glovebox, and a new bottle should be pumped in.
Exiting the Glovebox:
Items intended to exit the gloveboxes can exit through two antechambers (large and small). To
remove items from the glovebox, “Refill” the desired chamber, open the chamber, place in items
to be removed and reseal the chamber. Turn the chamber to “closed,” and open chamber
outside the glovebox to remove the items. After removing items, reclose the chamber and turn
to “Evacuate.” Put the items in the hood.
After Working in the Glovebox:
After working in the glovebox, ensure that all work spaces/glassware used has been thoroughly
cleaned or removed for cleaning. Furthermore, if solvents were used and are no longer open to
the glovebox atmosphere, the glovebox must be purged. Purging the glovebox is necessary to
ensure any chemicals remaining in the atmosphere have been removed prior to re-exposing the
5
catalyst to the glovebox atmosphere (see below).
Examples of Catalyst Poisons:
Reversible poisons (purge 5-10 minutes depending on duration of solvent use)
Ammonia
Ethers (diethyl ether, THF, petroleum ether, hexanes)
Irreversible poisons (purge at least 15 minutes depending on duration of solvent use)
Sulfur- and phosphine-containing compounds Halogens
Alcohols (or other acidic protons)
Hydrazine
Heavy metals (like mercury) Amines (especially pyridine)
Emergency Glove Isolation:
In the event of a large hole opening in a glove during work (due to broken glass, for example),
the glove box will rapidly be exposed to ambient atmosphere. In this situation, you must
immediately remove your hand from the glovebox, do not risk exposure of your skin to the
glovebox atmosphere. The glove port can be sealed using the emergency seal door, preventing
further compromise of the N2 atmosphere. The seal door is located in one of the gloveboxes.
Hold the door by the black knob and pull it into the port which holds the affected glove. The door
should fit into the port snugly. Turn the black knob (which is now inside the glove port) to the
right until the door shuts; you can no longer push the seal door outwards. At this point, the glove
is isolated from the rest of the box. Consult the glove box user’s manual for appropriate glove
change procedures.
Glove box maintenance:
You should always be informing the glovebox manager of all problems that are arising with the
atmosphere inside that are out of the ordinary. In the event that the glovebox atmosphere is
continually testing poorly with the ZnEt2, even when the recirculation purifier is on, this is
indicative that there is a problem. Two obvious reasons for this issue are a) One of the gloves
contains a small hole and is in need of repair, b) it is time for the glovebox catalyst to be
regenerated. You should inform the glovebox manager of this and assist if either action is taken.
Remember that is the responsibility of everyone in the glovebox to assist in its care and
maintenance.
6
Box Trap Maintenance:
In order to remove solvent from the reactions performed inside of the glove box, a vacuum
pump is attached from behind the glovebox. In order to prevent both solvent from getting into
the pump and atmosphere from getting into the glovebox, a liquid nitrogen trap, and three other
vacuum valves are set up in between the ports on the inside of the box and the pump. This trap
is meant for the collection of solvent and must be set up at the beginning of each day and taken
down before the end of work.
7
BOX TRAP SET UP & REMOVAL
Set Up
Dispose of all collected solvent in the organic waste. (IMPORTANT: Never dispose waste down
the drain) Glass should be clean and dried before use.
Locate rubber O-ring and set it in glass trap joint. Set joint in place with clamp. Should resemble
A above.
Close valve 1. This ensures the system is closed to ambient atmosphere.
Slowly begin to open valve 2. The vacuum pump will begin to gurgle. Once gurgling quiets down,
finish opening valve 2.
After all air has been evacuated from system, set up dewar. The bottom of the trap should hang
1-2 inches from the bottom of the dewar, and then fill with nitrogen. Wrap the opening of dewar
with a towel. Should resemble B above.
Slowly begin to open valve 3. The vacuum pump will begin to gurgle. Once gurgling quiets down,
finish opening valve 3.
8
Open valve 4 located behind the glove box. Open valve 5 located within the glove box.
(IMPORTANT: Neither of these valves should make the pump gurgle; if it does, that means there
is a leak.)
Removal
In order—close valves 5, 4, 3, and 2. Remove the towel and dewar.
Open valve 1 to release the vacuum. While holding onto the glass trap, remove the clamp and Oring.
Move trap to a fume hood to warm back up to room temperature. (IMPORTANT: Clamp trap to
ensure it does not tip over and break)
9
USING THE SCHLENK LINE
I. Overview
The Schlenk line is an extremely useful system for many chemists, allowing the conduction of
air- and/or water-sensitive reactions without the expense and restriction of a glove box. The
Schlenk line can be configured to pipe in any gas, but argon and nitrogen are most commonly
used to provide an inert atmosphere for sensitive reactions. When used correctly, the Schlenk
line is an invaluable asset; however, correct use is complicated and involves many extra steps.
Additionally, there are several serious hazards that can present themselves with inappropriate
use. The new user must be acquainted with the following procedures if he is to successfully
utilize the line without damage to himself or others.
II. Common Materials
The Schlenk Line: The lines in the Bart laboratories consist of two separate glass tubes. The
larger tube is the vacuum line, and the smaller tube is the nitrogen line.
The Nitrogen Line: The nitrogen line begins in the wall of the hood with the common nitrogen
source. The hose exits the wall and the nitrogen is then fed into the Schlenk line, where it can
be directed into glassware by opening the ports on the line. The nitrogen line continues to a
mercury bubbler, which serves as a gas barrier between the nitrogen line and the ambient
oxygen-containing atmosphere of the hood. The bubbler is also an indicator to the user that a
pressure equilibrium is established in the line.
When your nitrogen flow is running, if you do not see bubbles coming out of the bubbler, you are
building up pressure in the line and headed for an explosion. Gas flow into the bubbler can be
adjusted by the valves at various points throughout the line.
The Vacuum Line: The vacuum line begins beneath the hood at the vacuum pump. The pump
removes gases from the vacuum line, pulling them down into the pump and then exhausting
them. The pump can be isolated from the vacuum line by means of the first big valve where the
vacuum pump hose meets the line. Immediately after the pump isolation valve is the main vent
for the line. The vacuum line can be vented (returned to ambient pressure) by the slow opening
of this valve. Beneath these two valves is a glass cylinder called a solvent trap.
Similar to the nitrogen line, the vacuum line continues past several ports that can be opened to
expose glassware to vacuum. The vacuum line culminates in a pressure meter that measures
the pressure inside the vacuum line. This number is critical and should be monitored while the
vacuum is running.
Hoses: Made of tough, stretchy materials such as rubber or Nalgene, hoses form an airtight
seal between the Schlenk line and any connected reaction flasks or chemical vessels. These
should always be checked for appropriate fit and for gashes or holes. These should always be
used with hose clamps.
The Hg Bubbler: The mercury bubbler isolates whatever is in your flask from the atmosphere,
and is an essential component to air sensitive synthesis. While using the Schlenk line, your
flask should ALWAYS be open to one of the bubblers to avoid an overpressure. Additionally,
10
many reactions give off gas and other volatiles, thus release through the bubbler will maintain
the equilibrium in your flask. Certain chemicals should not be run through the bubbler, this
includes and acids, such as HCl gas, which is given off when certain reagents are used. If
volatiles that will react with Hg are given off, these reactions should always be done with a
buffer solution and/or oil bubbler rather than the Hg bubbler.
Vacuum Grease: The vacuum grease is used to seal any joints in the glassware setup to
improve the gas barrier between the flask and the ambient environment.
Schlenk Glassware: Schlenk glassware has been specially made to withstand the temperature
and pressure fluctuations associated with Schlenk procedures, specifically to withstand high
vacuum without implosion. Glassware should always be inspected for cracks and defects before
use. There are many various pieces, such as gas adapters, multi-necked flasks, distillation
heads, etc., and the exhaustive list will not be covered here.
Dewars: These dewars are used for holding the liquid nitrogen coolant that will be used to cool
the traps during vacuum procedures. Though they may look metal, they are made of a special
type of glass and also contain a vacuum chamber, so they will break loudly and violently if
dropped. They are surrounded by a protective plastic barrier in the event of implosion. If this is
missing, the dewar can be wrapped in electrical tape. A dewar should never be used if a
protective coating is absent!
Liquid Nitrogen: Liquid nitrogen is a cryogenic cooling agent that is used to prevent organic
solvents from entering the pump oil. Its temperature is -196 C, so skin contact should be
avoided. Burns and blisters may result from contact, though the pain is not more than a slight
stinging. Insulated gloves should be used while handling and pouring liquid N2. NITRILE
GLOVES SHOULD NOT BE WORN, AND ANY HAIR TIES ETC. SHOULD BE REMOVED
FROM WRISTS BEFORE USE. These items will freeze to the skin and prolong the exposure,
leading to more serious burns!
III. Safety Concerns
Keeping a Pressure Equilibrium: The nitrogen line is designed, when used properly with the
bubbler, to maintain equal pressure between each reaction flask and the inside of the line, and a
slight positive pressure compared to the ambient environment (so that oxygen stays out). This is
accomplished through the flow adjustment valves at various points throughout the nitrogen line.
When you activate the nitrogen flow using the faucet on the hood, check first to make sure that
there is gas exiting the mercury bubbler. If not, open the flow adjustment valves throughout the
line until gas is seen. Without this exhaust, nitrogen pressure builds up in the line and can cause
an explosion or ejection of stoppers, septa, etc. from glassware setups. If you close or reduce
the output to the bubbler, be sure that your system has an alternative exhaust to avoid a
dangerous situation! Keep in mind that if you have multiple reactions running on the same
Schlenk line the headspaces of the flasks will mix. Do not run reactions that are not compatible
(i.e. will react) on the same line at the same time.
The Vacuum Pump: The vacuum pump is a powerful machine that is used to create high
vacuum within the line. The main safety concern here is periodic maintenance. The pump oil
should be changed regularly to mitigate decomposition by organic solvent vapors that may be
pulled into the pump. If the pump ever exhausts thick smoke or a foul odor, or if the pump is
11
performing worse than usual, the pump oil should be changed immediately. If you are commonly
changing your pump oil due to solvent intake, review the proper procedure for cooling the traps
on your line. If using especially corrosive solvents (acids, thionylchloride, halogens, etc.) consult
the vacuum pump manual for setting up the use of the pump gas ballast.
Cracked Glassware: Star cracks and hairline fractures result in glassware from normal
handling, especially during cleaning. These easily-overlooked defects weaken the structure of
the glass, making it more susceptible to explosions in increased-pressure situations (cannula
transfers, refluxes, etc.) and implosions in low-pressure situations (vacuum). Glassware should
always be carefully inspected for these defects before use on the line. Broken glassware can be
repaired for use later or discarded.
Heating/Freezing Flasks on the Line: All of the same rules apply here as in the Pressure
Equilibrium and Cracked Glassware sections. Especially when heating, an exhaust is necessary
to ensure that pressure in the flask does not build to intensely high or drop to intensely low
levels. NEVER heat a closed system. Breakage in glassware can be avoided by ensuring that
any flask undergoing temperature change is open, either to vacuum or to the nitrogen line as
the procedure requires. Heating/freezing a closed system is very rarely necessary and should
be done extremely carefully.
Liquid Nitrogen: See above
Condensing Oxygen: See condensed oxygen standard operating procedures.
IV. Setup procedure for Typical Air-Free Work
1. Clean and dry your glassware. Cleaned glassware should be placed in the drying oven for
1 hour before transfer to the Schlenk line. Don’t forget a stir bar!
2. Ensure that the main pump isolation valve is shut on your line and that the vent is open,
and that all access ports to the vacuum line are closed. Close all vents to the vacuum line.
Open the main pump isolation valve. You should see the value on the pressure meter
rapidly decrease. If the meter does not decrease, check the O-rings on your solvent traps
and double-check all access ports. If you are sure that your line is not suspect, you may
need to change your pump oil.
3. Ensure that flow adjustment valves to the mercury bubbler are open, and that all access
ports to the nitrogen line are shut. Check the color of your dessicating column. Activate
the nitrogen flow and ensure that there is gas exiting the bubbler. If not, ensure that the
flow adjustment valves are open.
4. Set up the cold trap: Make sure the glass trap is clean, dry, and free of cracks from the
previous use. Using the metal clamp, clamp the trap with appropriate O-ring to the
Schlenk line. Close the air vent, and pump the air out of the trap by opening the valve to
the vacuum pump. Cool the trap with liquid N2. The safest way to do this is to fill an
appropriately-sized dewar about 1/3 full with liquid N2. Raise the dewar onto the traps and
secure with the clamps. Get a second dewar and fill with liquid N2. Carefully pour liquid
N2 into your clamped dewars until full. Wrap the lab towels around the top and tuck into
12
trap clamps to secure. Once the trap is cool, open the valve to the rest of the Schlenk line.
Note: The Schlenk line trap must be cooled at ALL times to prevent damage to the
vacuum pump. If the trap is to be left up overnight, it is to be dropped, cleaned out, and
set up again. An empty trap can only stay cold for 10-12 hours when properly wrapped
with a towel. If you cannot return in 10-12 hours, ask someone to re-fill your trap.
5. Put on some heat gloves and grab your glassware from the oven. Grease all joints with
vacuum grease while assembling your glassware setup. Be sure to push firmly and twist
joints to ensure a good seal. Once achieved, connect your gas adapter(s) to the Schlenk
line using the hoses. If your glassware has cooled, start over. If your glassware is still
warm, expose the setup to vacuum. Leave the setup exposed to vacuum until the
glassware cools to room temperature (approx 10 minutes). This eliminates any surface
water adhered to the inside of the glass.
It is never a good idea to have more than one system exposed to vacuum at a given time.
This leads to gas contamination and to an unreliable pressure reading, in addition to a
more frantic search for leaks should one arise.
6. Close the vacuum access port to the system and slowly open the nitrogen access port.
This is called backfilling. Evacuate and backfill three times to ensure an all-nitrogen
environment, then leave the nitrogen flowing to your system.
Reagent Additions
a. To add solid reagents: Ensure that the system is under a strong nitrogen flow.
Open the most convenient access to your system (probably a stopper) and add
in the solid reagents.
b. To add liquid reagents: If your reaction is not especially air- or water-sensitive,
solvents can be added using the above method. (Be careful of dissolving grease
into your reaction mixture.) However, if you need to minimize exposure, you can
cannulate or syringe-transfer solvent from a bomb flask or other airtight container
into your reaction flask.
7. Do chemistry! If you must heat or cool your system, be sure that you have taken the
appropriate pressure precautions.
If your reaction is very long and you are no longer using your vacuum line, you may want
to take down and thaw out your traps. If your reaction is very long and involves the
vacuum line, be sure to periodically refill your traps with nitrogen. Another common thing
is to see the pressure in the line increase as you are pulling solvent off on the vacuum
line. This is because your traps are too full. Follow the remaining steps as if you were
closing down your line, and then go back to step 2.
8. Isolate your system and perform whatever workup/glove box transfer you deem
necessary.
9. Close all ports and disable the nitrogen flow.
13
Close the main pump isolation valve. Take down the liquid N2 dewars, paying attention to the
contents of your solvent traps. IF YOU SEE LIQUID O2, PUT THE DEWAR BACK ON, OPEN
THE VACUUM LINE BACK UP, AND TAKE PRECAUTIONS. If everything is okay, slowly open
the system to ambient using the vent valve and drop the trap by disengaging the clamp. Once
the traps are thawed, empty the trapped solvent into the waste, not down the sink!!! Clean the
traps with acetone.
14
SOLVENT PURIFICATION SYSTEM STANDARD OPERATING PROCEDURE
All of these directions and more information on trouble shooting can be found in the Solvent
Purifier User Guide.
General lab PPE is required whenever working with the solvent system.
Drying the receiving flask (RF)
Check to ensure the receiving Strauss flask does not contain any cracks or hairline fractures.
Make sure to pay special attention to the joints. Ensure the teflon plug fits securely on the chem
thread and forms a seal with the glass at the neck. Dry the RF in the glass oven for at least 30
minutes.
If the Strauss flask has come from one of the GB, place it on the high vac line for 30 minutes
and it can be considered ‘dry’. Close the Teflon valve before removing from the high vac line.
The 24/40 joint used to connect the RF to the solvent system should be stored in the oven.
Starting the Solvent Dispenser
Turn the vacuum pump on. Allow the pump to run for about 5 minutes. On the solvent desired
turn V1 (the top black nob) to inert gas position, then turn V2 (the lower black nob) towards the
right. Allow the dispensing spout to purge.
Dispensing the Solvent
Attach the flask to the dispensing spout making sure to secure it with a cork ring and jack.
Once the flask is secured move V1 towards the vacuum, keep V2 pointing towards the right.
Allow the flask to evacuate for several minutes. Next, turn the V1 towards inert gas to backfill
the flask. Note: If you do not secure with a cork ring and jack, you must hold on to the flask
while backfilling, or it will be ejected from the port. Repeat the evacuation and refill step three
times (the flask must be under vacuum for a minimum of 5 minutes to ensure adequate removal
of moisture and oxygen). After the last refill evacuate, dispense the solvent by turning V1 to the
off position (VERY IMPORTANT!), opening the Teflon valve on the flask, then turning V2 to the
solvent position. Once the desired volume of solvent has been dispensed, turn V2 toward the off
position. NOTE: Each solvent will dispense at different rates due to a variety of factors, never
walk away from the flask while filling.
Once the desired volume of solvent has been dispensed, move V2 towards the right and close
the Teflon plug, make sure you see the seal with the glass, and then move V1 to the inert gas
position. Slowly lower the jack and remove the flask. Turn V2 and V1 to off and turn off the
vacuum pump. Record how much and which solvent you dispensed in the notebook.
If no solvent flows in to the RF first make sure a vacuum was pulled on the flask. Next check the
solvent system notebook too see how much of the solvent has been used since the last refill if
close to 15 L has been dispensed it is time to refill the reservoir. Never let the columns run dry.
Always record the volume of solvent dispensed in the proper column of the Solvent Log.
15
Regular Maintenance
Whenever you collect solvent, check the solvent usage log and notify whomever is in charge of
group job to refill solvent reservoirs as needed (once the reservoir has approximately 1 L left). It
is also necessary to circulate all the solvents at least overnight to ensure the desired purity of
the solvents at all times. Periodically (every three months or during group clean up) inspect all
lines, valves, fittings and connections for mechanical integrity and inspect the o-rings that seal
the sparge valve and those that seal the inlet adapter to the dispensing spout for solvent
damage and replace as necessary. See manual for refill instructions.
Specific safety concerns
When refilling the solvent system avoid breathing in solvent fumes. Always have a filling buddy
nearby, especially if filling an anesthetic solvent (ether or thf).
Make sure all flasks are sound (no cracks, fractures, etc.) to avoid any glass breakage.
16
USING THE ROTOVAPOR RII
Attention: Never apply grease to the seals inside area #4 and never touch them with sharp
objects; otherwise they will get damaged.
Before Use
Make sure all electrical connections are established correctly and all glass joints on bump trap
are inserted correctly and are greased.
Make sure the black knob and red knob are closed to create a vacuum.
Make sure the flask that collects the solvent that is distilled off is empty. If not, empty and return
it to its position.
Add dry ice into the reservoir and add isopropyl alcohol if needed.
Using Machine
Attach round bottom flask (less than 1 L- if 1L or higher, it must be taped) to machine and adjust
angle if necessary to insure the flask is in the water bath as wanted. Raise and lower the
evaporating flask (#9) if needed.
To adjust the angle:
MAKE SURE THE INSTRUMENT IS NOT ON!
Hold the glass assembly (where the dry ice is contained) with one hand and
loosen the anchoring (gray knob, #10) with the other hand by pulling out the
knob. Set the condenser in the desired position by tilting the drive unit
accordingly and let it catch. Release the knob.
Switch on the instrument (#1) and turn the knob to adjust the rotation speed (#2). Turn on the
pump and the slowly open up the valve that is attached to the pump and instrument so you do
not bump your solution. Turn on the heat bath (#8) if needed.
Allow solution to be distilled and adjust rotation speed and pumping pressure as needed. Add
dry ice as needed.
When the flask with the distilled off solvent gets 1/3 full, stop, empty, and continue use.
When Finished
Once all desired solvent is distilled off, turn the knob to close the valve and then turn off the
pump. Next, turn the knob to turn off the rotation (#2). Turn off the heating bath if on (#8).
Release the pressure by turning the red knob and then take flask off of machine. Turn off the
machine when done (#1).
Empty the flask which has the distilled off solvent and return it to machine.
17
18
PREPARATION OF UI3(dioxanes)1.5 AND UI3(THF)4
1. Drying of the Dioxanes
Anhydrous dioxanes were purchased from Sigma Aldrich. The dioxanes were stirred
over MgSO4 for at least two days before stirring over KH for an additional 2 days. After
stirring the dioxanes over two drying agents, dioxanes were distilled and collected in a
Straus Flask under vacuum (huge vac distillation). After these drying procedures the
dioxanes were brought into box and suitable for use.
2. Cleaning of U0 turnings
In general, 10.5 g of uranium turnings were weighed out into an ernlenmeyer flask and
brought out of the glove box and placed in the uranium hood. The turnings were first
washed three times with hexanes, followed by three washing with DI water (making sure
to rinse all sides of the flask to ensure the removal of ALL hexanes) and finally three
washing with HNO3. During the nitric acid washings, the acid was allowed to sit over the
uranium for a minute or two in order to really chew up all uranium oxides, however,
depending upon the size of the turnings, this may be detrimental as the nitric acid will
also react with the uranium metal to make uranium nitrate. Dissolution of uranium
oxides is evident by the silvery color of the turnings after reacting with HNO 3. Nitric acid
washings were decanted into nitric acid waste. Next the shiny turnings were washed
with water three times followed by three washings with Acetone. After the Nitric acid
washes, subsequent washes must be performed very quickly, as to not expose the
uranium turnings to air as they will re-oxidize very quickly. The turnings were brought
into the glove box via the small antechamber over a half an hour.
WARNING!!!! Nitric acid washing must be kept separate from organic waste.
Combination of HNO3 and organic compounds results in the evolution of a brown,
poisonous gas. Be sure to label containers to keep acid and organic waste separate.
Make sure to leave the cap of the nitric acid waste loose for at least an hour after, this is
done to prevent the over pressurizing of the bottle which may cause it to explode.
3. Amalgumation of Uranium turnings.
This is only performed when there are large U turnings
After bringing the turnings into the glove box, the clean uranium turnings were placed
into a 250 mL Schlenk flask. 1 g of HgI2 was dissolved in THF and added to the 250 mL
flask. The flask was then shaken for 10 minutes (vigorous shaking!!), resulting in a dark
purple solution. The purple solution was decanted followed by numerous washings with
THF to ensure removal of all mercury from the reaction vessel.
**NOTE** - - it is important to wash the turnings a few extra times with THF after
amalgumation to be sure there is minimal amounts of mercury remaining in the flask.
Turnings should be extremely silver and shiny in coloration. The turnings were then
dried under vacuum for approximately half an hour.
19
4. The Reaction!
Inside of the Glove Box, a 250 mL Schlenk flask was charged with uranium turnings (10
g after cleaning and amalgumation), a “football” shaped stir bar and Dioxanes were
poured in until the flask was half full. The flask is brought out of the GB and is attached
to the Schlenk line. While blowing Ar, 11.08 (a little over 1 equiv) freshly sublimed Iodine
crystals were added to the reaction flask. At this point the cap was attached to the flask
and the reaction was allowed to stir for a few hours. Initially the reaction mixture is a
red-brown (the color of dissolved iodine). The reaction does become warm to the touch,
indicating an exothermic process. Within four hours the reaction proceeds to a thick
purple solution. Normally the reaction will be allowed to proceed overnight.
5. Work up
The reaction was pumped down slightly (10 min) and allowed to warm to RT before
being brought back into the GB. To the reaction flask, a large measure of diethyl ether is
added to precipitate out as much of the UI3(Dioxanes)1.5 as possible. The solution is
filtered and the dark solid is collected. The dark purple solid was washed with ether and
then allowed to dry for a few hours. Resulting solid is UI3(dioxane)1.5 in 67% yield (22 g).
6. Conversion to THF adduct.
The entirety of the reaction is placed in a 250 Schlenk flask, slurried in ~ 150 mL of THF
and allowed to stir for approximately 1.5 hours. After such time, the reaction may either
be pumped down inside of the glove box and then stored in the freezer(only done if you
believe that there is no UI4 present in the reaction), or the solid may be crashed out with
pentane and filtered to remove a green byproduct (UI2(OC4H8I)2 from the reaction
mixture.
20
UCl4 SYNTHESIS STANDARD OPERATING PROCEDURE
Set Up:
1. Before beginning synthesis, the hood and Schlenk line need to be cleared of all other
reaction set ups or equipment.
2. The hood needs to be cleaned and protective sheet laid down.
3. All equipment is kept in a yellow radioactive bag above the liquid waste bottles and only
used for UCl4 synthesis.
***WARNING*** This is a radical reaction! The synthesis should be done only with the
knowledge of Suzanne and other group members. Never attempt this reaction while working
alone!
Procedure:
1. A 250 mL three neck round bottom is filled about halfway with hexachloropropene and a
stir bar. The three necks are fitted with a thermometer/septum (use a lot of grease to get
a good seal with the thermometer), a reflux condenser (connected to Schlenk line), and
a glass stopper. Don’t forget to grease joints.
2. Purge the system with flowing argon for about 15 min.
3. With consistent stirring the round bottom is heated to 190°C. (Don’t heat a closed
system!! Make sure your reaction is open to the argon manifold.
4. About 5 grams of UO3 are weighed out.
5. Once the hexachloropropene has reached 190 °C, a small portion of the UO3 is slowly
added through the open neck with argon purge. The reaction will foam slightly. Do not
add more UO3 until the temperature has stabilized back to 190°C (about 15-30 minutes
to allow the reaction to settle). (Remember, this is a radical reaction!!! So make sure that
the UO3 that you have added has reacted before you added any more.)
6. Then continue adding small portions of UO3 slowly in 10-15 minute increments until all
of the UO3 has been used or the foam of the reaction begins to become too great (if it
travels up the neck of the flask).
7. After the last portion of UO3 is added to the flask the round bottom should be resealed
and allowed to stir overnight at 190°C. (Make sure the reaction is left open to the argon
manifold!)
8. In the morning the flask should be allowed to cool to room temperature.
9. Under purge, switch the septum/thermometer and reflux condenser for a glass stopper
and a stopcock vacuum adapter.
10. The reaction should be placed under vacuum on the schlenk line to remove any air
(don’t forget the trap, some volatiles form during the reaction).
11. Then it should be taped closed with electrical tape, and brought into the glove box.
12. The insoluble green precipitate should be filtered off from the orange liquid, rinsed with
DCM (until the rinse is clear) and dried.
Clean up:
1. All glass pieces should be cleaned in Radioactive waste hood with Ethanol/HCL and
acetone.
2. Any disposable piece must be placed in the solid radioactive waste buckets.
21
3. Clean glass fittings and heating mantle should be placed back into yellow radioactive
bag and put back on the shelf.
4. The round bottom should be stored in the oven and ready for use next time. Ensure that
it is labeled so as only to be used for UCl4.
5. The lining of the hood should be carefully collected and put in the radioactive waste.
(Remember to note for waste pick up)
6. Use Geiger counter in hood to check for any remaining radioactive materials.
22
NEUTRALIZATION OF RADIOACTIVE WASTE
For REM to pick up our radioactive waste they require that the pH is between 6 and 8 so that it
is safe to transport. Therefore, we must neutralize the waste before we submit it for pick up.
Since additional solution must be added to the waste container to neutralize it, it is good
practice to leave space and not fill the container completely full with waste. After the waste
container is 80-90% full it should be neutralized, the outside should be cleaned, a proper label
should be attached (a sample label is taped above the radioactive hood), and it should be
placed in the flammables cabinet beside the hood. Do not wait to neutralize the waste
containers when they are getting full. If you fill a waste container, neutralize it and get it in the
flammable cabinet.
General Safety
All neutralizations should be done in a secondary container in the radioactive hood. Also, proper
protective equipment must also be worn at all times. This includes a labcoat, splash goggles,
and nitrile gloves.
Neutralization of Acidic Waste
1. After stirring the waste, test the pH with the pH paper in the radioactive hood.
2. If the solution is acidic (which is usually the case) add a small amount (about 2 mL) of
saturated NaOH solution (which can be found in the radioactive hood), and stir the
solution well.
3. Again test the pH to determine if more NaOH solution needs to be added.
4. Repeat this process until the pH is in the range of 6-8.
5. If the waste container is warm after neutralization, be sure to allow it to cool before
putting it in the flammables cabinet.
Nitric acid waste is kept in a separate container in the radioactive waste hood. Be very careful
when neutralizing this waste as it may be very reactive! Never add organics to the nitric acid
waste.
Neutralization of Basic Waste
1. After stirring the waste, test the pH with the pH paper in the radioactive hood.
2. If the solution is basic add a small amount of ethanol/HCl (which can be found in a bottle
in the radioactive hood), and stir the solution well.
3. Again test the pH to determine if more ethanol/HCl solution needs to be added.
4. Repeat this process until the pH is in the range of 6-8.
5. If the waste container is warm after neutralization, be sure to allow it to cool before
putting it in the flammables cabinet.
**It is common to have a few stir bars at the bottom of the waste container that accidently got
dumped in. Use the magnetic stir bar remover to stir the waste when neutralizing so that you
can remove these so that they are not just getting thrown away.
23
QUENCHING REACTIVE COMPOUNDS
Purpose. These guidelines are intended to assist laboratory personnel in quenching reactive
substances safely so that they may be transferred to ordinary Hazardous Waste containers.
Workers should not hesitate to ask for guidance from Suzanne before quenching an unfamiliar
substance.
Reactive Substances may include electropositive metals and alloys, organometallic
compounds, hydrides, acid chlorides and anhydrides, peroxides, and carbonates.
Quenching Procedures:
Always inform Suzanne and Labmates before this is done!
Highly Reactive Hydrides and Metals, such as sodium hydride, potassium hydride, lithium
aluminum hydride, sodium metal, potassium metal, or sodium-potassium alloy will release
hydrogen rapidly when quenched. The substance should be covered with (or slurried in) a
hydrocarbon solvent like toluene, preferably under a strong nitrogen or argon counterstream.
The quench is done first with isopropanol or ethanol, then cautiously with water. Finally dilute
sulfuric or hydrochloric acid is added until a neutral or slighly acidic pH is achieved. Given that 1
mole of gas occupies 22.4 L at standard temperature and pressure, quenching rates should be
chosen to allow enough time for gases and heat to be released in a controlled way.
Solvent Pots. When quenching solvent pots, one must exercise extreme care to ensure that
lumps or domains of the reactive substance are not protected or isolated from the quenching
agent by other residues such as benzophenone. Such mixtures must be fully quenched
according to the above procedure and pH-neutralized before transfer to waste containers.
Less reactive hydrides and metals such as lithium metal, calcium hydride, lithium hydride, or
sodium borohydride can be quenched directly with water in a manner analogous to their more
reactive counterparts. Lithium can react directly with nitrogen gas – use argon. Zinc,
magnesium, and aluminum can attain high “surface reactivity” during reactions (such as
Grignard reactions or dissolving metal reductions). The surface “hot spots” can be quenched by
treating the solid metal with water. The solid can then be transferred to a waste container, but
only one that does not also contain combustible items like paper or organic residues.
Acid Chlorides and Anhydrides such as phosphorus pentoxide, thionyl chloride, boron
trichloride, or trifluoroacetic anhydride should be quenched cautiously with water under a
nitrogen or argon counterstream. Adequate ventilation must be ensured to carry off HCl, HBr,
and other acidic fumes that may result. After the reactive material is quenched, the solution
should be neutralized with sodium hydroxide, potassium hydroxide, or sodium bicarbonate
before transfer to a waste container. If sodium bicarbonate is used, it must be back-neutralized
with sulfuric or hydrochloric acid before the mixture may be added to a waste container (see
“Carbonates” below).
Organolithium Reagents. Organolithium reagents (such as methyl lithium, n-butyl lithium, secbutyl lithium, and t-butyl lithium) are highly moisture sensitive and react violently with air and/or
water. Upon reaction with water, they can ignite and/or liberate highly toxic gases and as such
are generally sold as solutions in an organic solvent. They must be handled under an inert
atmosphere to minimize exposure to both air and moisture. They can cause severe burns and
are highly corrosive. In addition to the high flammability, they can be harmful to the liver,
24
kidneys and nervous system. Wear a laboratory coat made of flame-retardant material or cotton
and safety glasses. Work inside the hood. Keep the hood sash as low as possible to prevent
spills/splashes outside the hood. In case of a small fire, smother it using sand. For large fires,
use an ABC fire extinguisher. Do not use water or a CO2 extinguisher on the fire. In case of
contact with your person, get to the nearest safety shower immediately. Remove all
contaminated clothing and get underneath the running water quickly. The large amount of water
should put out the fire.
Procedure:
a. Clear all areas where the reagent will be opened prior to use. Do not use any organolithium
reagent while working alone.
b. There are two options for the handling of organolithium reagents. The first option is the use
of a syringe and needle, the second is to transfer using a cannula. For smaller amounts of
reagent, the preferred technique is to use a syringe and needle, while a cannula transfer is
safer and more practical for amounts >15 mL. Decide which is appropriate for this case. For
the syringing technique, see the Syringing SOP.
Cannula transfer standard operating procedure:
c. Some organolithium reagents are stored at room temperature (i.e. methyllithium, nbutyllithium) and can be used as such, but some (i.e. t-butyllithium) are stored at under
refrigeration and must be warmed to room temperature prior to use.
d. The organolithium reagent is contained in a Sure-Seal bottle, the septum of which is pierced
by clean, dry needle fitted to a Schlenk line which is supplying an inert gas. This line is used
to keep the reagent under a blanket of inert gas during the entire process. The inert gas
flow is adjusted by monitoring of the bubbler on the Schlenk line.
e. Quenching will be accomplished by transfer of the organolithium reagent to dry ice. Ready
to collection vessel, which should be a large glass crystallizing dish containing dry ice. The
dry ice should be pulverized to ensure that it is in a powder rather than a solid block, as a
powder will be more efficient for reactivity.
f.
A clean, dry cannula is used to pierce the septum but should remain above the level of the
liquid. A flow of inert gas should be felt coming out of the other end of the cannula. This is
necessary to check to make sure that the cannula isn’t clogged.
g. After ensuring the cannula is working properly and while holding it over the dry ice reaction
vessel, slowly and carefully submerge the tip into the organolithium reagent. At this point,
the reagent will flow onto the dry ice. Raise or lower the needle into the reagent as
necessary to control flow. This can also be controlled by adjusting the flow of the inert gas
into the bottle. Be careful to hold the cannula into the reagent bottle.
h. After all of the reagent has been expelled, the needle can be rinsed with hexanes multiple
times, then water. Clean the needle immediately after use to prevent clogging. Rinse all
flasks three times with hexanes and quench all washes. Take the crystallizing dish with
reagent, add water carefully, and dispose of in the organic waste.
25
HANDLING PYROPHORIC REAGENTS ON THE SCHLENK LINE
There are two options for the handling of organolithium reagents on the Schlenk line. The first
option is the use of a syringe and needle, the second is to transfer using a cannula. For smaller
amounts of reagent, the preferred technique is to use a syringe and needle, while a cannula
transfer is safer and more practical for amounts >15 mL.
For both techniques, glassware, transferring devices, and solvents should be dried prior to the
treatment with any organolithium reagent. Flame-dried glassware which has been cooled under
an inert atmosphere just before use is ideal. Some organolithium reagents are stored at room
temperature (i.e. methyllithium, n-butyllithium) and can be used as such, but some (i.e. tbutyllithium) are stored at under refrigeration and must be warmed to room temperature prior to
use.
Procedure for syringing:
a. Clear all areas where the reagent will be opened prior to use. Never use any organolithium
reagent while working alone.
b. The organolithium reagent is contained in a Sure-Seal bottle, the septum of which is pierced
by clean, dry needle fitted to a Schlenk line to supply an inert gas. This line remains in the
bottle, and is used to keep the reagent under a blanket of inert gas during the entire
process. The inert gas flow is adjusted by monitoring of the bubbler on the Schlenk line.
c. Using a clean, dry long reagent needle (<16 gauge) with the appropriate size syringe, pierce
the septum and draw inert gas in to the syringe. Remove the needle and expel the gas
inside to the atmosphere. This process is repeated several times, piercing the same hole in
the septum, to remove most air from the needle and syringe.
d. After purging the needle appropriately, the tip is submerged below the level of reagent and
the required amount is drawn up into the syringe. Be careful to hold the end of the plunger
as well as the joint where the needle and syringe meet. If either of these comes apart the
reagent will come out and a fire will ensue, potentially leading to injury and damage.
e. Once the desired amount of organolithium reagent has been drawn into the syringe, the tip
of the needle is pulled above the level of reagent, and the plunger is pulled out slightly to
draw a blanket of inert gas into the needle. The needle is then removed from the reagent
bottle and quickly pierced into the septum of the reaction flask. At this point, the
organolithium is dispensed, usually slowly to control heat evolution. Be careful to hold the
needle and syringe together, as applying force to dispense the reagent can cause them to
separate and expose the reagent to moisture.
f.
Once the addition of reagent is complete, the needle can be removed from the reaction
flask. The excess reactive reagent can be expelled into a beaker of sand or onto a chunk of
dry ice. After the excess reagent has been expelled, the needle can be rinsed with hexanes
multiple times, then water. Clean the needle immediately after use to prevent clogging. To
close the reagent bottle, simultaneously place a piece of tape over the hole formed by the
needle while removing it from the bottle. This should seal the bottle and keep air and/or
moisture from entering. Replace the cap and wrap the outside with parafilm to further
ensure safe storage.
26
Procedure for cannulation:
a. Clear all areas where the reagent will be opened prior to use. Never use any organolithium
reagent while working alone.
b. The organolithium reagent is contained in a Sure-Seal bottle, the septum of which is pierced
by clean, dry needle fitted to a Schlenk line to supply an inert gas. This line remains in the
bottle, and is used to keep the reagent under a blanket of inert gas during the entire
process. The inert gas flow is adjusted by monitoring of the bubbler on the Schlenk line.
c. Using a clean, dry cannula needle, pierce the septum being careful not to submerge the end
of the needle in the bottle into the reagent.
d. After purging the needle appropriately, the other end is placed into the flask where the
material is to be transferred. This is done by fitting the receiving flask with a subaseal
septum, and inserting the other end of the cannula into the septum. Once this is done, a
needle is placed into the septum in the receiving flask to avoid the buildup of pressure by
venting the system. Typically it is a good idea to cannula into a Schlenk flask, which can be
left open to the argon bubbler as well. Once the system is ready, the tip is submerged
below the level of reagent and the reagent will begin to transfer.
e. Once the desired amount of organolithium reagent has been transferred, the tip of the
needle is pulled above the level of reagent. The needle is then removed from the reagent
bottle and receiving flask. The needle can be rinsed with hexanes multiple times, then water.
Clean the needle immediately after use to prevent clogging. To close the reagent bottle,
place a piece of tape over the hole formed by the needle. This should seal the bottle and
keep air and/or moisture from entering. Replace the cap and wrap the outside with parafilm
to further ensure safe storage.
27
CONDENSED LIQUID OXYGEN STANDARD OPERATING PROCEDURE
Liquid oxygen is deposited into your solvent traps when air from the ambient environment is
pulled through the vacuum line and then cooled by the liquid nitrogen in the traps. This does not
occur during normal use, such as when evacuating a flask containing air, for example. When
there is a leak in your vacuum line, such as a cracked flask or improperly sealed joint, or when
an active vacuum port has been mistakenly left open to ambient for a period of time, oxygen can
be condensed. This is why it is important to watch the pressure gauges and listen carefully
during Schlenk line use. If your pressure is suddenly and inexplicably rising, seal off your line
ASAP.
Liquid oxygen is extremely reactive and very, very dangerous. The hazard presents itself when
the traps are removed and the system begins to heat to room temperature. The oxygen may
react explosively with organic solvents that are present in the trap. If that does not happen, then
the expansion of the gas due to normal heating can build up pressure within the Schlenk line
and cause an explosion. (Gases take up far more space than liquids do – remember your
general chemistry!)
Fortunately, liquid oxygen has a very distinct pale blue color, and it will be obvious if it is
present. However,if you are removing your liquid N2 dewars and you suspect that you have
condensed oxygen:
1. Call Suzanne and summarize the situation.
2. Replace the dewars IMMEDIATELY to prevent warming.
3. Turn off the vacuum, open the system to the atmosphere (with the closest and largest ports
available).
4. Close the hood sash, and allow the system to warm slowly as the N2 in the dewars
dissipates.
5. Warn any other labmates present of the explosion hazard and evacuate the lab.
6. After the traps have come to room temp, consider them still dangerous as peroxides may
have formed. Rinse the traps with water into a clean beaker and test the solution with the
peroxide strips. If peroxides are present, neutralize them with sodium thiosulfate or sodium
sulfite before disposing of the waste.
O2 CONDENSATION IS ONLY ACHIEVED THROUGH IMPROPER SCHLENK LINE USE.
THINK, AND DOUBLE CHECK, BEFORE DOING ANYTHING ON YOUR LINE.
28
COMPRESSED GAS STANDARD OPERATING PROCEDURE
Protective equipment needed: When exchanging gas cylinders, setting them up, removing or
placing regulators safety glasses are required for personal protection.
Procedure:
1. In order to transport a cylinder, a cylinder cart with secures should be used. Unhook the
cylinder from the current secure, place it on the cart and secure it. You may then transport
the cylinder where needed.
2. Before unhooking the cylinder and bringing it off the cart make sure there is another secure
at the place you plan to leave it. Remove the cylinder from the cart and secure it to the
restraints. The restraints should be fastened ¾ of the way up the cylinder. Return cart to
prevent obnoxious emails from Craig.
3. Next, take off the cylinder cap and open the gas cylinder valve slightly and then immediately
close it to blow out dirt or debris from the valve assembly. Aim the valve away from the
operator and any other personnel present during this operation.
4. Choose the correct regulator labeled for that specific gas type and attach it to the cylinder.
Do not use a gas regulator that does not correspond to the selected gas.
5. Always open valves slowly and never force valves open.
6. Attach appropriate tubing to the gas cylinder and make sure it is tightly secured. If the tubing
is attached freely, use a hose clamp in order to secure it.
7. Open main cylinder valve first and then proceed to open the regulator valve to set the gas
flow rate for your purposes. If you are not sure what an appropriate flow rate might be, ask
for assistance.
This can be avoided if you are simply careful not to move the diaphragm.
8. To shut off, close the main cylinder valve first in order to make sure there is not apressure
build up in the regulator. After a few minutes close the valve on the regulator.
Never:
• Drag, roll or slide cylinders
• Lift cylinders by the cap
• Use cylinders as rollers
• Submit cylinders to temperature extremes
• Allow cylinders to contact electrical circuits
29
Leaks
Minor Leaks: Occasionally a gas cylinder or one of its component parts may develop a leak.
Most of these leaks occur at the top of the cylinder in areas such as the valve threads, pressure
safety device, valve stem and valve outlet. The following information applies to the remediation
of minor leaks:
Verify suspected leaks using a soapy water solution (a flame should not be used for detection!).
If the leak cannot be stopped by tightening a valve gland or packing nut, remove the
regulator, and use some gas tight Teflon tape (yellow) on the threads.
If this does not work, close the cylinder, remove the regulator, and replace the cap. Seek
assistance.
Major Leaks: In the event of a large gas release or if an accident takes place in which readily
available personal protective equipment (PPE) is inadequate to ensure worker safety, activate
the following Emergency Procedures:
Immediately call 911 and report the incident.
Storage: Cylinders must be stored in dry, well-ventilated areas. Cylinders must be stored with
the protective caps in place. Cylinders must be fastened with restraints ¾ of the way up the
cylinders.
Empty Cylinders: Cylinders are considered "empty" if their pressure is less than 25 psig and
should then be returned to the stockroom. The tag should also then read “empty.”
Accident Procedures: (Found in the MSDS)
Argon
6.1.1 Skin: None expected.
Eyes: Check for and remove any contact lenses.
Immediately flush eyes with plenty of water for at least 15 minutes, occasionally lifting the upper
and lower eyelids. Get medical attention immediately.
Inhalation: Move exposed person to
fresh air. If not breathing, if breathing is irregular or if respiratory arrest occurs, provide artificial
respiration or oxygen by trained personnel. Loosen tight clothing such as a collar, tie, belt or
waistband. Get medical attention immediately.
Ingestion: As this product is a gas, refer to the
inhalation section.
Frostbite: Try to warm up the frozen tissues and seek medical attention.
Hydrogen: Skin: No harm expected
Eyes: No harm expected
Inhalation: Persons suffering
from lack of oxygen should be removed to fresh air. If victim is not breathing, administer artificial
respiration. If breathing is difficult, administer oxygen. Obtain prompt medical attention.
Nitrogen:
Skin: No harm expected.
Eyes: No harm expected Inhalation: Persons suffering
30
from lack of oxygen should be moved to fresh air. If victim is not breathing, administer artificial
respiration. If breathing is difficult, administer oxygen. Obtain prompt medical attention.
Ingestion: This product is a gas at normal temperature and pressure. Frostbite: Try to warm up
the frozen tissues and seek medical attention.
5% Hydrogen/95% Nitrogen:
Skin: No harm expected.
Eyes: If release of this gas mixture
has affected the eyes, seek immediate medical attention.
Inhalation: If inhaled, remove to
fresh air. If not breathing, give artificial respiration. Get medical attention.
Ingestion: This
product is a gas at normal temperature and pressure.
Frostbite: Try to warm up the frozen
tissues and seek medical attention.
6.2 In case of Fire:
Argon: Apply water from a safe distance to cool container and protect surrounding area. If
involved in fire, shut off flow immediately if it can be done without risk.
Hydrogen: Begin to cool tank from a maximum distance with water spray, taking care not to
extinguish flames. If flame is extinguished before cooled, explosive re-ignition may occur.
Stop flow of gas and extinguish while continuing water spray after intial cooling. To
extinguish, use CO2, dry chemical, water spray or fog for surrounding area. Do not
extinguish until H2 source is shut off.
Nitrogen: Nitrogen is nonflammable and does not support combustion. Use extinguishing
media appropriate for the surrounding fire.
5% Hydrogen/95% Nitrogen: Use fire-extinguishing material appropriate for surrounding
materials. Use water spray to cool fire exposed structures, cylinders and equipment.
Report all accidents.
For emergencies during non-business hours, call the Dept. of Public Safety at 911 (from
any campus phone).
31