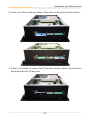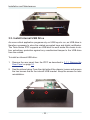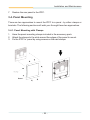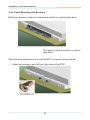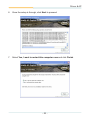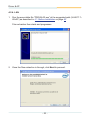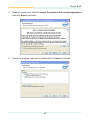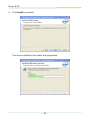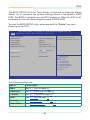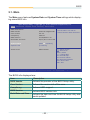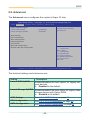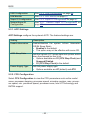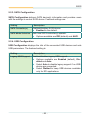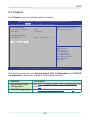
1
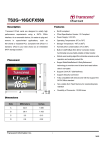
Tokin Series Fanless Industrial Panel PC with Intel® Celeron® 827E User’s Manual Version 1.0 P/N: 4010608300100P 2012.09 This page is intentionally left blank. Contents Chapter 1 - General Information................................................................... 1 1.1. Introduction................................................................................... 2 1.2. Packing List................................................................................... 2 1.3. Ordering Information.................................................................... 3 1.4. CD Driver Paths............................................................................. 4 1.5. Specifications................................................................................ 5 1.6. Locating Controls and Connectors............................................. 7 1.7. Dimensions.................................................................................. 11 Chapter 2 - Engine of the IPPC................................................................... 15 2.1. Board Layout............................................................................... 16 2.2. Jumpers and Connectors........................................................... 17 2.2.1. Jumpers & Connectors List........................................... 17 2.2.2. Jumper Setting................................................................ 18 2.2.3. Pin Assignments for Connectors.................................. 20 Chapter 3 - Installation and Maintenance.................................................. 23 3.1. Install SSD, PCIe, PCI and Mini-card......................................... 24 3.1.1. Remove the Rear Panel.................................................. 24 3.1.2. Install SSD....................................................................... 25 3.1.3. Install PCI Card................................................................ 28 3.1.4. Install PCIe Card.............................................................. 29 3.1.5. Install Mini-card............................................................... 30 3.2. Install/Uninstall CFast Card....................................................... 31 3.3. Install Internal USB Drive........................................................... 33 3.4. Panel Mounting........................................................................... 36 3.4.1. Panel Mounting with Clamps......................................... 36 3.4.2. Panel Mounting with Brackets....................................... 37 3.5. VESA Arm Mounting................................................................... 39 3.6. Wire the DC-Input Power Source............................................... 40 Chapter 4 - Driver & AP............................................................................... 41 4.1. Before Installation....................................................................... 42 4.2. Drivers.......................................................................................... 43 4.2.1. CHIPSET........................................................................... 43 4.2.2. Framework 3.5................................................................. 47 4.2.3. VGA.................................................................................. 49 4.2.4. LAN................................................................................... 53 4.2.5. TOUCH............................................................................. 57 Chapter 5 - BIOS.......................................................................................... 59 5.1. Main.............................................................................................. 62 5.2. Advanced..................................................................................... 64 -i- Contents 5.2.1. ACPI Settings.................................................................. 65 5.2.2. CPU Configuration.......................................................... 65 5.2.3. SATA Configuration........................................................ 66 5.2.4. USB Configuration.......................................................... 66 5.2.5. H/W Monitor..................................................................... 67 5.2.6. Super IO Configuration................................................... 67 5.2.7. Second Super IO Configuration..................................... 67 5.3. Chipset......................................................................................... 68 5.3.1. System Agent (SA) Configuration................................. 69 5.3.2. PCH-IO Configuration..................................................... 74 5.4. Boot.............................................................................................. 75 5.5. Security........................................................................................ 76 5.6. Save & Exit................................................................................... 77 Appendix...................................................................................................... 79 1.1. PenMount Monitor....................................................................... 80 1.2. PenMount Control Panel............................................................ 81 - ii - Copyright Notice All Rights Reserved. The information in this document is subject to change without prior notice in order to improve the reliability, design and function. It does not represent a commitment on the part of the manufacturer. Under no circumstances will the manufacturer be liable for any direct, indirect, special, incidental, or consequential damages arising from the use or inability to use the product or documentation, even if advised of the possibility of such damages. This document contains proprietary information protected by copyright. All rights are reserved. No part of this document may be reproduced by any mechanical, electronic, or other means in any form without prior written permission of the manufacturer. Declaration of Conformity CE The CE symbol on your product indicates that it is in compliance with the directives of the Union European (EU). A Certificate of Compliance is available by contacting Technical Support. This product has passed the CE test for environmental specifications when shielded cables are used for external wiring. We recommend the use of shielded cables. This kind of cable is available from ARBOR. Please contact your local supplier for ordering information. Warning This is a class A product. In a domestic environment this product may cause radio interference in which case the user may be required to take adequate measures. FCC Class A This device complies with Part 15 of the FCC Rules. Operation is subject to the following two conditions: (1)This device may not cause harmful interference, and (2)This device must accept any interference received, including interference that may cause undesired operation. NOTE: This equipment has been tested and found to comply with the limits for a Class A digital device, pursuant to Part 15 of the FCC Rules. These limits are designed to provide reasonable protection against harmful interference when the equipment is operated in a commercial environment. This equipment - iii - generates, uses, and can radiate radio frequency energy and, if not installed and used in accordance with the instruction manual, may cause harmful interference to radio communications. Operation of this equipment in a residential area is likely to cause harmful interference in which case the user will be required to correct the interference at his own expense. RoHS ARBOR Technology Corp. certifies that all components in its products are in compliance and conform to the European Union’s Restriction of Use of Hazardous Substances in Electrical and Electronic Equipment (RoHS) Directive 2002/95/EC. The above mentioned directive was published on 2/13/2003. The main purpose of the directive is to prohibit the use of lead, mercury, cadmium, hexavalent chromium, polybrominated biphenyls (PBB), and polybrominated diphenyl ethers (PBDE) in electrical and electronic products. Member states of the EU are to enforce by 7/1/2006. ARBOR Technology Corp. hereby states that the listed products do not contain unintentional additions of lead, mercury, hex chrome, PBB or PBDB that exceed a maximum concentration value of 0.1% by weight or for cadmium exceed 0.01% by weight, per homogenous material. Homogenous material is defined as a substance or mixture of substances with uniform composition (such as solders, resins, plating, etc.). Lead-free solder is used for all terminations (Sn(96-96.5%), Ag(3.0-3.5%) and Cu(0.5%)). SVHC / REACH To minimize the environmental impact and take more responsibility to the earth we live, Arbor hereby confirms all products comply with the restriction of SVHC (Substances of Very High Concern) in (EC) 1907/2006 (REACH --Registration, Evaluation, Authorization, and Restriction of Chemicals) regulated by the European Union. All substances listed in SVHC < 0.1 % by weight (1000 ppm) Important Safety Instructions Read these safety instructions carefully 1. Read all cautions and warnings on the equipment. 2. Place this equipment on a reliable surface when installing. Dropping it or letting it fall may cause damage 3. Make sure the correct voltage is connected to the equipment. 4. For pluggable equipment, the socket outlet should be near the equipment and should be easily accessible. - iv - 5. Keep this equipment away from humidity. 6. The openings on the enclosure are for air convection and protect the equipment from overheating. DO NOT COVER THE OPENINGS. 7. Position the power cord so that people cannot step on it. Do not place anything over the power cord. 8. Never pour any liquid into opening. This may cause fire or electrical shock. 9. Never open the equipment. For safety reasons, the equipment should be opened only by qualified service personnel. 10. If one of the following situations arises, get the equipment checked by service personnel: a. The power cord or plug is damaged. b. Liquid has penetrated into the equipment. c. The equipment has been exposed to moisture. d. The equipment does not work well, or you cannot get it to work according to the user’s manual. e. The equipment has been dropped or damaged. f. The equipment has obvious signs of breakage. 11. Keep this User’s Manual for later reference. About This Manual This User’s Manual is intended for experienced users and integrators with hardware knowledge of personal computers. If you are not sure about any description in this User’s Manual, please consult your vendor before further handling. Warning The Industrial PC and its components contain very delicately Integrated Circuits (IC). To protect the Industrial PC and its components against damage caused by static electricity, you should always follow the precautions below when handling it: 1. Disconnect your Industrial PC from the power source when you want to work on the inside. 2. Use a grounded wrist strap when handling computer components. 3. Place components on a grounded antistatic pad or on the bag that came with the Industrial PC, whenever components are separated from the system. -v- Replacing the Lithium Battery Incorrect replacement of the lithium battery may lead to a risk of explosion. The lithium battery must be replaced with an identical battery or a battery type recommended by the manufacturer. Do not throw lithium batteries into the trash can. It must be disposed of in accordance with local regulations concerning special waste. Technical Support If you have any technical difficulties, please consult the user’s manual first at: ftp://ftp.arbor.com.tw/pub/manual Please do not hesitate to call or e-mail our customer service when you still cannot find out the answer. http://www.arbor.com.tw E-mail:[email protected] Warranty This product is warranted to be in good working order for a period of one year from the date of purchase. Should this product fail to be in good working order at any time during this period, we will, at our option, replace or repair it at no additional charge except as set forth in the following terms. This warranty does not apply to products damaged by misuse, modifications, accident or disaster. Vendor assumes no liability for any damages, lost profits, lost savings or any other incidental or consequential damage resulting from the use, misuse of, or inability to use this product. Vendor will not be liable for any claim made by any other related party. Vendors disclaim all other warranties, either expressed or implied, including but not limited to implied warranties of merchantability and fitness for a particular purpose, with respect to the hardware, the accompanying product’s manual(s) and written materials, and any accompanying hardware. This limited warranty gives you specific legal rights. Return authorization must be obtained from the vendor before returned merchandise will be accepted. Authorization can be obtained by calling or faxing the vendor and requesting a Return Merchandise Authorization (RMA) number. Returned goods should always be accompanied by a clear problem description. - vi - 1 Chapter 1 General Information Chapter 1 - General Information -1- General Information 1.1. Introduction The Tokin industrial panel PC is a work of the state-of-the-art HMI. The IPPC comes with 8-, 12-, and 15-inch models loaded with Intel® Celeron® 827E processor and Intel® chipset to deliver high performance for industrial computing. Working with particular software, the panel PC can deliver some particular industrial application such as kiosk or factory automation. The IPPC is highly protected against extreme shock and vibration. It dissipates heat by fanless thermal conduction and runs on very low power. This makes the system highly reliable and inexpensive to maintain and therefore the best choise for industial automation. 1.2. Packing List Carefully inspect the contents in the package, which should contain the items listed hereunder. If any item is missing or appears damaged, contact your local dealer or distributor. T6083 T6123 T6153 1 x Tokin series Industrial Panel PC (T6083, T6123 or T6153) 1 x Accessory Box that contains the following items: • • • • • • -2- Driver CD User’s Manual Screws/Cable 3-pin plug for terminal block 2.5” HDD/SSD bracket PCIe x 1 riser card General Information 1.3. Ordering Information T6083/827E 8” Intel® Celeron® 827E industrial panel PC T6123/827E 12” Intel® Celeron® 827E industrial panel PC T6153/827E 15” Intel® Celeron® 827E industrial panel PC The following items are normally optional, but some vendors may include them as a standard package, or some vendors may not carry all the items. Optional Accessories PAC-P065W 65W AC/DC power adapter kit PAC-P120W-FSP 120W AC/DC power adapter kit Optional Configuration (Configure to Order Service) SSD-25040 Intel® 2.5” 40GB SATAII SSD kit MM-3C-2G / MM-3C-4G DDR3-1333 2GB/4GB SDRAM WIFI-IN1350 802.11 a/b/g/n WiFi module kit & internal wiring ANT-D11 1 x WiFi Dual-band 2.4G/5G antenna -3- General Information 1.4. CD Driver Paths Find the drivers on CD for each Windows XP and Windows 7 operating system. Windows XP Driver & AP Path CHIPSET \Chipset Framework 3.5 \NET Framework 3.5 VGA \Graphic\WinXP\x64 \Graphic\WinXP\x86 LAN \LAN\17.1\WinXP TOUCH \Touch\PenMount Windows XP Embedded Universal Driver V2.2.0.283\repository Windows 7 Driver & AP Path CHIPSET \Chipset Framework 3.5 \NET Framework 3.5 VGA \Graphic\Win7\x64 \Graphic\Win7\x86 LAN \LAN\17.1\Win7 TOUCH \Touch\PenMount Windows Universal Driver V2.2.0.283. (Win7_32_64bit_WHQL) -4- General Information 1.5. Specifications System Kernel Processor Intel® Celeron® 827E 1.4GHz processor Chipset Intel® HM65 System Memory 2 x DDR3 SO-DIMM Socket, supporting 1333/1066MT/s SDRAM up to 8GB LAN Chipset 2 x Gigabit Ethernet controllers Watchdog Timer 1 ~ 255 levels reset I/O Ports Serial Ports 2 x RS-232 and 2 x isolated RS-232/485 ports, all are DSUB 9-pin USB Ports 4 x Type-A USB ports LAN Ports 2 x RJ-45 Gigabit Ethernet ports DVI 1 x DVI-I connector WiFi 2 x SMA antenna holes for optional WiFi function Optional Port 1 x semi-piercing DSUB hole reserved for users’ internal wiring Storage Type 1 1 x outside accessible Primary CFast slot Type 2 1 x outside accessible 2nd CFast slot (default) or 2.5” Drive Bay (included in Standard Accessories) Qualification Certification CE, FCC Class A Environment Operating Temp. -20 ~ 60ºC (-4 ~ 140°F) Storage Temp. -20 ~ 70°C (-4 ~ 158°F) Operating Humidity 0 ~ 95% RH @40°C (non-condensing) Vibration 5 ~ 500Hz, 2Grms Random (with CF/SSD) Shock Operating 15G, 11ms & Non-operating 40G, 11ms (with CF/ SSD) Mechanical Mounting Type Panel Mounting and VESA-75/100 Mounting Chassis Panel-mounting chassis, Aluminum Front Bezel and SECC steel chassis -5- General Information Dimension (W x D x H) 274.96 x 77.0 x 207.96 mm (10.82” x 3.03” x 8.18”) for T6083 325.86 x 77.0 x 258.86 mm (12.82” x 3.03” x 10.18”) for T6123 389.93 x 84.3 x 309.93 mm (15.35” x 3.31” x 12.20”) for T6153 4.5 kg (9.92 lb) for T6083 Weight (Net) 5.6 kg (12.34 lb) for T6123 7 kg (15.43 lb) for T6153 LCD Display Size/Type 8” TFT LCD Panel for T6083 12” TFT LCD Panel for T6123 15” TFT LCD Panel for T6153 Max. Resolution 1024 x 768, XGA Max. Colors 16.2M Luminance 300 cd/m² for T6083 and T6153; 500 cd/m² for T6123 Touch Screen 5-wire, Analog Resistive Function Key Brightness up/down, Screen on/off Status LED Power-on LED Internal Sockets & Connectors CF Type 1 x CFast outside accessible push-pull socket 2 x Mini-Card sockets Expansion Slot 1 x PCI 32-bit slot (default) or 1 x PCI Express (included in Standard Accessories) Optional 1 x semi-piercing D-SUB9 hole reserved for field-bus card Power System Power Input DC 9~36V -6- General Information 1.6. Locating Controls and Connectors Front View of T6153 Brightness down Power on LED Screen on/off Brightness up Front View of T6123 -7- General Information Front View of T6083 Rear View of T6153 -8- General Information Rear View of T6123 Rear View of T6083 -9- General Information Bottom View of T6153 COM Ports USB DVI-I DC-IN Expansion Bus Bottom View of T6123 Bottom View of T6083 - 10 - LAN Power Switch Optional Port General Information 1.7. Dimensions T6153 Unit: mm - 11 - General Information T6123 Unit: mm - 12 - General Information T6083 Unit: mm - 13 - This page is intentionally left blank. - 14 - 2 Chapter 2 Engine of the IPPC Chapter 2 - Engine of the IPPC - 15 - Engine of the IPPC 2.1. Board Layout The engine of Tokin industrial panel PC is constructed with the carrier board PBC-9005P and SCDB-1443 (the CFast board). RSTB1 JPIC1 JATX1 USB5 MC1 PWRIN1 JVLCD1 DVI1 LAN1 LAN2 COM4 JBAT1 PCIE1 PCI1 SATA 1/2 COM3 BZ1 MC2 COM2 FAN1 COM1 DGP1 CF1 SW3 - 16 - CF2 Engine of the IPPC 2.2. Jumpers and Connectors 2.2.1. Jumpers & Connectors List Jumpers Label Function JBAT1 CMOS Jumper Setting JATX1 AT/ATX Mode Selector JVLCD1 LVDS VCC Selector SW3 RS232/485 Mode Switch Connectors Label Function JPIC1 PIC Programming Pin Header USB5 USB KEY PRO Pin Header BZ1 Buzzer Pin Header DGP1 External 80 Port Pin Header RSTB1 Reset Button Pin Header FAN1 Fan Connector MC1/2 Mini Card Slots (MC1 is full-size; MC2 is half-size) CF1/2 CFast Sockets PWRIN1 DC Adapter Power Input DVI1/2 DVI-I or DVI-D (DVI2 is DVI-I for T6083/6123/6153, but DVI-D for EPC-6300; DVI1 is DVI-I for EPC-6300, but optional for the rest) LAN1/2 Ethernet Connectors (includes USB Connectors) COM1/2 RS-232/RS-485 Serial Port Connectors COM3/4 RS-232 Serial Port Connectors SATA1/2 Serial ATA + Power Connectors PCI1 PCI Interface Slot PCIE1 PCIex1 Interface Slot - 17 - Engine of the IPPC 2.2.2. Jumper Setting JBAT1: Clears CMOS Setting Connector Type: onboard 1 x 3-pin 2.54mm pin-header Pin Description 1-2 Keeps CMOS (default) 3 2 1 2-3 Clears CMOS 3 2 1 JATX1: AT/ATX Mode Selector Connector Type: onboard 1 x 3-pin 2.00mm pin-header Pin Description 1-2 AT Mode 3 2 1 2-3 ATX Mode (default) 3 2 1 JVLCD1: LVDS VCC Selector Connector Type: onboard 1 x 3-pin 2.00mm pin-header Pin Description 1-2 VCC3 (default) 3 2 1 2-3 VCC5 3 2 1 - 18 - Engine of the IPPC SW3: RS232/485 Mode Switch Connector Type: onboard 1 x 6-pin DIP switch Pin Position Description ON 1,5-ON DIP COM1 RS485 Mode 1 2 3 4 5 ON 1,5-OFF 2-OFF DIP COM1 RS232 Mode 1 2-ON COM1 RS485 Terminators connected ON COM1 RS485 Terminators connected ON 1 1 2 3 4 5 2 3 4 5 DIP 2 3 4 5 2 3 4 5 6 DIP COM2 RS232 Mode 1 4-OFF 6 DIP ON 4-ON 6 COM2 RS485 Mode 1 3,6-OFF 6 DIP ON 3,6-ON 6 COM2 RS485 Terminators connected ON COM2 RS485 terminators connected ON Note: 1~6 OFF is the default. - 19 - 1 1 2 3 4 5 6 DIP 2 3 4 5 6 DIP 2 3 4 5 6 Engine of the IPPC 2.2.3. Pin Assignments for Connectors JPIC1: External PIC Programming Pin Header Connector Type: onboard 2.0mm pitch 2 x 3-pin headers Pin Description Pin Description 1 PIC_TX 2 ICSP-CLK 3 ICSP-DAT 4 GND 5 VCC5 6 MCU_RST 1 2 5 6 USB5: USB KEY PRO Pin Header Connector Type: onboard 2.54mmmm pitch 4-pin header Pin Description Pin Description 1 VCC5 2 D- 3 D+ 4 GND 1 BZ1: Buzzer Pin Header Connector Type: onboard 2.54mmmm pitch 2-pin header Pin 1 Description VCC5 Pin 2 Description GND 1 DGP1: External 80 Port Pin Header Connector Type: onboard 2.0mm pitch 10-pin header Pin 1 Description CLK Pin 2 Description GND 3 FRAME# 4 LAD0 5 PLTRST# 6 NC 7 LAD3 8 LAD2 9 VCC3 10 LAD1 - 20 - 1 2 9 10 Engine of the IPPC RSTB1: Reset Button Pin Header Connector Type: onboard 2.54mm pitch 4-pin headers Pin Description Pin Description 1 SYS_RESET# 2 GND 3 PWR_IN_SW# 4 GND FAN1: Fan Connector Connector Type: onboard 3-pin wafer connector Pin Description 1 GND 2 +12V 3 NC 1 2 3 - 21 - 1 2 3 4 This page is intentionally left blank. - 22 - 3 Chapter 3 Installation and Maintenance Chapter 3 - Installation and Maintenance - 23 - Installation and Maintenance 3.1. Install SSD, PCIe, PCI and Mini-card The Tokin industrial panel PC is based upon modular design for easier maintenance. This section will cover the simple hardware installations for the IPPC. Make sure the IPPC is powered off before any action is taken. 3.1.1. Remove the Rear Panel 1. Place the Industrial PC upside down. See the picture below and find where the screws are. Loosen and remove these screws and save them for later use. 2. Gently dismount the rear panel. Take a look at its inside. PCI or PCIe slot left panel SSD bracket or CFast socket bracket full-size mini-card socket half-size mini-card socket CFast socket bottom panel - 24 - Installation and Maintenance 3.1.2. Install SSD 1. Loosen and remove the four screws at the left and right panels. Gently dismount the right panel. - 25 - Installation and Maintenance 2. Loosen and remove the screw that fixes the SSD bracket. Then remove the bracket. 3. Attach the SSD to the bracket and fix them together by using screws at the four corners. - 26 - Installation and Maintenance 4. Restore the bracket (with the SSD) and fix them in place. 5. The SSD barcket is one of the standard accessories included in the accessory box. This SSD bracket can be replaced by an additional CFast socket bracket. - 27 - Installation and Maintenance 3.1.3. Install PCI Card 1. Loosen and remove the screw as marked in the picture below. Carefully dismount the bracket. 2. Insert your desired PCI card into the slot and fix it in place. - 28 - Installation and Maintenance 3.1.4. Install PCIe Card 1. The PCI slot can be replaced with the PCIe slot included in the accessory kit. Loosen and remove the two screws that fixes the PCI slot first of all. Carefully remove the PCI slot and insert the PCIe slot in place. - 29 - Installation and Maintenance 2. Insert your desired PCIe x 1 card into the slot and fasten it. 3.1.5. Install Mini-card 1. Locate the Mini-card socket. 2. Plug a Bluetooth or HSUPA module to the socket's connector by a slanted angle. Note the notch on the card should meet the break on the connector. 3. Press down the module and fix it in place using two screws. 1 3 2 - 30 - Installation and Maintenance 3.2. Install/Uninstall CFast Card If the OS is installed on the CFast card, power off the IPPC before proceeding with the uninstallation of CFast Card. 1. See the picture below. Loosen and remove the screw. Dismount the CFast card door. Keep the card door for later use. - 31 - Installation and Maintenance 2. Insert your CFast card into either of the slots as the pictures below show. 3. If later it is needed to remove the CFast card, simply remove the card door and push-eject the CFast card. - 32 - Installation and Maintenance 3.3. Install Internal USB Drive As some critical application programs rely on USB keys to run, an USB drive is therefore necessary to store the related encrypted keys and digital certificates. The Tokin-Series IPPC supports an USB drive to work inside the chasis to deliver extrodinary protection against any unauthorized tamper to the USB drive from the outside. To install an Internal USB drive: 1. Remove the rear panel from the IPPC as described in 3.1.1. Remove the Rear Panel on page 24. 2. See the picture below. From the right side of the chassis, loosen and remove the two screws that fix the internal USB bracket. Keep the screws for later reinstallation. - 33 - Installation and Maintenance 3. Detach the internal USB bracket from the carrier board. Detach the internal USB bracket. bumper rubber for USB Drive pin connector USB port Take a look at the detached USB bracket. 4. Install an USB drive to the USB bracket. - 34 - Installation and Maintenance 5. To reinforce the installation of the USB drive, slide the bumper rubber to the installed USB drive by loosening and relocating the bolt as displayed in the picture below. bumper rubber bolt Adjust the bumper rubber to the USB drive. 6. Find the internal USB connector on the carrier board. Reinstall the internal USB bracket (bearing the USB drive) by the two screws you saved in step 2. internal USB pin connector - 35 - Installation and Maintenance 7. Restore the rear panel to the IPPC. 3.4. Panel Mounting There are two approaches to mount the IPPC to a panel - by either clamps or brackets. The following sections will walk your through these two approaches. 3.4.1. Panel Mounting with Clamps 1. Have the panel-mounting clamps included in the accessory pack. 2. Attach the clamps to the slots around the edges of the panel to mount. 3. Fix the IPPC to panel by using screws on the said clamps. Panel - 36 - Installation and Maintenance 3.4.2. Panel Mounting with Brackets Before you proceed, make sure the panel to mount is no thicker than 4mm. The panel to mount must be no thicker than 4mm. Then follow the steps below to mount the IPPC to a panel using brackets: 1. Attach two screws to each left and right sides of the IPPC. - 37 - Installation and Maintenance 2. Assemble the brackets to each side. Fasten the screws. 3. Fine-tune the mounting firmness by adjusting bolts tightness. - 38 - Installation and Maintenance 3.5. VESA Arm Mounting The Tokin-Series supports VESA arm mounting of 75 x 75mm or 100 x 100mm mounting hole pattern. See the illustration below for the example. 1. Have the VESA arm and the four mounting screws that come with it. 2. Locate the VESA compliant holes at the rear of the IPPC. 3. Attach the VESA arm to the rear of the IPPC by meeting the screws holes on the VESA arm and the IPPC’s rear. 4. Fix them together with four screws. - 39 - Installation and Maintenance 3.6. Wire the DC-Input Power Source Warning Only trained and qualified personnel are allowed to install or replace this equipment. Follow the instructions below for connecting the computer to a DC-input power source. 1. Before wiring, make sure the power source is disconnected. 2. Find the terminal block in the accessory box. 3. Use the wire-stripping tool to strip a short insulation segment from the output wires of the DC power source. 4. Identify the positive and negative feed positions for the terminal block connection. See the symbols printed on the rear panel indicating the polarities and DC-input power range in voltages. 5. Insert the exposed wires into the terminal block plugs. Only wires with insulation should extend from the terminal block plugs. Note that the polarities between the wires and the terminal block plugs must be positive to positive and negative to negative. 6. Use a slotted screwdriver to tighten the captive screws. Plug the terminal block firmly, which wired, into the receptacle on the rear panel. Terminal Block + - DC-IN + - 40 - 4 Chapter 4 Driver & AP Chapter 4 - Driver & AP - 41 - Driver & AP 4.1. Before Installation After everything aforementioned is done, proceed to install the necessary drivers and the application so the IPPC can function for you. The following instructions take Windows XP (x86) as the exemplary OS. Different OS may vary slightly regarding driver/AP installation, but generally they are similar. Note to install the drivers as the sequece below: CHIPSET→Framework 3.5→VGA→LAN→TOUCH Follow This Procedure to install all necessary pieces of software in most cases to prevent errors. Find the drivers & AP for Windows 7 & Windows XP on the CD that goes with your purchase. The paths to find them on CD are tabulated as below. Windows XP Driver & AP Path CHIPSET \Chipset Framework 3.5 \NET Framework 3.5 VGA \Graphic\WinXP\x64 \Graphic\WinXP\x86 LAN \LAN\17.1\WinXP TOUCH \Touch\PenMount Windows XP Embedded Universal Driver V2.2.0.238\repository Windows 7 Driver & AP Path CHIPSET \Chipset Framework 3.5 \NET Framework 3.5 VGA \Graphic\Win7\x64 \Graphic\Win7\x86 LAN \LAN\17.1\Win7 TOUCH \Touch\PenMount Windows Universal Driver V2.2.0.283. (Win7_32_64bit_WHQL) - 42 - Driver & AP 4.2. Drivers 4.2.1. CHIPSET 1. Run the executable file “infinst_autol.exe” at the path (\Chipset) as described in 4.1. Before Installation on page 42. The installation wizard then opens and starts to extract the files required for driver installation. 2. Click Next to proceed. - 43 - Driver & AP 3. Read the license agreement and click Yes to proceed. 4. Read the readme file and click Next to proceed. - 44 - Driver & AP 5. The installation wizard then starts to proceed with some setup operations. 6. Once the setup operations are through, click Next to proceed. - 45 - Driver & AP 7. Click Finish to finish and quit the driver installation. - 46 - Driver & AP 4.2.2. Framework 3.5 1. Run the executable file “NET Framework 3.5.exe” at the suggested path (\ NET Framework 3.5) as described in 4.1. Before Installation on page 42. Files extraction is then triggered for the driver installation. Once the files extraction is through, the installation wizard opens. 2. Select I have read and ACCEPT the terms of the License Agreement and click Install to proceed. - 47 - Driver & AP 3. The driver installation then starts and progresses. 4. Once the installation is through, click Exit to finish and quit the installtion. - 48 - Driver & AP 4.2.3. VGA 1. Run the executable file “winxp_14469.exe” at the suggested path (\Graphic\ WinXP\x86) as described in 4.1. Before Installation on page 42. The installation wizard then opens. 2. Click Next to proceed. The installation wizard then starts to extract the files required for the installation. - 49 - Driver & AP 3. Once the files extraction is through, click Next to proceed. 4. Read the license agreement and click Yes to proceed. - 50 - Driver & AP 5. Read the readme file and click Next to proceed. Setup then starts and progresses. - 51 - Driver & AP 6. Once the setup is through, click Next to proceed. 7. Select Yes, I want to restart this computer now and click Finish. - 52 - Driver & AP 4.2.4. LAN 1. Run the executable file “PROWin32.exe” at the suggested path (\LAN\17.1\ WinXP) as described in 4.1. Before Installation on page 42. Files extraction then starts and progresses. 2. Once the files extraction is through, click Next to proceed. - 53 - Driver & AP 3. Read the agreement. Select I accept the terms in the License agreement and click Next to proceed. 4. Select the program features to install and click Next to proceed. - 54 - Driver & AP 5. Click Install to proceed. The driver installation then starts and progresses. - 55 - Driver & AP 6. Once the driver installation is through, click Finish to finish and quit the installation. - 56 - Driver & AP 4.2.5. TOUCH 1. Run the executable file “Setup.exe” at the suggested path (\Touch\PenMount Windows XP Embedded Universal Driver V2.1.0.238\repository) as described in 4.1. Before Installation on page 42. The installation wizard then opens. Click Next to proceed. 2. Read the license agreement and click I Agree to proceed. - 57 - Driver & AP 3. Select where to install the driver. Then click Install to proceed. 4. Once the installation is through, click Finish to finish and quit the installation. - 58 - 5 Chapter 5 BIOS Chapter 5 - BIOS - 59 - BIOS The BIOS SETUP utility for Tokin-Series is featured by American Megatrends Inc to configure the system settings stored in the system’s BIOS ROM. The BIOS is activated once the IPPC powers on. When the IPPC is off, the battery on the main board supplies power to BIOS RAM. To enter the BIOS SETUP utility, press-and-hold the “Delete” key upon powering on the IPPC. Aptio Setup Utility - Copyright (C) 2010 American Megatrends, Inc. Main Advanced Chipset Boot Security Save & Exit BIOS Information BIOS Vendor Core Version Compliency BIOS Version Build Date and Time American Megatrends 4.6.4.0 UEFI 2.1 T6153/827E 1.00 09/11/2011 15:07:58 System Date System Time [Wed 09/12/2012] [13:29:21] Access Level Administrator Set the Date. Use Tab to switch between Data elements. →←: Select Screen : Select Item Enter: Select +/-: Change Opt. F1: General Help F2: Previous Values F9: Optimized Defaults F10: Save & Exit ESC: Exit Version 2.10.1208. Copyright (C) 2010 American Megatrends, Inc. The featured settings are: Menu Description Main See 5.1. Main on page 62. Advanced See 5.2. Advanced on page 64. Chipset See 5.3. Chipset on page 68. Boot See 5.4. Boot on page 75. Security See 5.5. Security on page 76. Save & Exit See 5.6. Save & Exit on page 77. - 60 - BIOS Key Commands The BIOS SETUP utility relies on a keyboard to receive user’s instructions. Hit the following keys to navigate within the utility and use it. Keystroke Function ← → Moves left/right between the top menus. ↓ ↑ Moves up/down between highlight items. Enter Selects an highlighted item/field. Esc ► ► On the top menus Page Up / + Increases current value to the next higher value or switches between available options. Page Down / - Decreases current value to the next lower value or switches between available options. F1 Opens the Help of the BIOS SETUP utility. F10 Exits the utility saving the changes that have been made. (The screen then prompts a message asking you to select OK or Cancel to exit saving changes.) Use Esc to quit the utility without saving changes to CMOS. (The screen will prompt a message asking you to select OK or Cancel for exiting discarding changes. ► ► On the submenus Use Esc to quit current screen and return to the top menu. Note: Pay attention to the “WARNING” that shows at the left frame when making any change to the BIOS settings. - 61 - BIOS 5.1. Main The Main menu features System Date and System Time settings while displaying some BIOS info. Aptio Setup Utility - Copyright (C) 2010 American Megatrends, Inc. Main Advanced Chipset Boot Security Save & Exit BIOS Information BIOS Vendor Core Version Compliency BIOS Version Build Date and Time American Megatrends 4.6.4.0 UEFI 2.1 T6153/827E 1.00 09/11/2011 15:07:58 System Date System Time [Wed 09/12/2012] [13:29:21] Access Level Administrator Set the Date. Use Tab to switch between Data elements. →←: Select Screen : Select Item Enter: Select +/-: Change Opt. F1: General Help F2: Previous Values F9: Optimized Defaults F10: Save & Exit ESC: Exit Version 2.10.1208. Copyright (C) 2010 American Megatrends, Inc. The BIOS info displayed are: Item Description BIOS Vendor Delivers the provider of the BIOS Setup utility. Core Version Delivers the version info of the core. Compliency Delivers UEFI support. BIOS Version Delivers BIOS version info. Build Date and Time Delivers the date and time the BIOS Setup utility was made/updated. - 62 - BIOS The featured settings are: Setting Description System Time Sets system time. ► ► The time format is: Hour: 00 to 23 Minute: 00 to 59 Second: 00 to 59 System Date Sets system date. ► ► The date format is: Day: Sun to Sat Month: 1 to 12 Date: 1 to 31 Year: 1999 to 2099 - 63 - BIOS 5.2. Advanced The Advanced menu configures the system’s Super IO chip. Aptio Setup Utility - Copyright (C) 2010 American Megatrends, Inc. Main Advanced Chipset Boot Security Save & Exit Legacy OpROM Support Launch PXE OpROM Launch Storage OpROM [Disabled] [Enabled] ACPI Settings CPU Configuration SATA Configuration USB Configuration H/W Monitor Super IO Configuration Second Super IO Configuration System Super IO Chip Parameters. →←: Select Screen ↓↑: Select Item Enter: Select +/-: Change Opt. F1: General Help F2: Previous Values F9: Optimized Defaults F10: Save & Exit ESC: Exit Version 2.10.1208. Copyright (C) 2010 American Megatrends, Inc. The featured settings and submenus are: Setting Description Launch PXE OpROM Enables/disables the boot option for legacy network devices. ► ► Disabled is the default. Launch Storage OpROM Enables/disables the boot option for legacy mass storage devices with Option ROM. ► ► Enabled is the default. ACPI Settings See 5.2.1. ACPI Settings on page 65. CPU Configuration See 5.2.2. CPU Configuration on page 65. SATA Configuration See 5.2.3. SATA Configuration on page 66. - 64 - BIOS USB Configuration See 5.2.4. USB Configuration on page 66. H/W Monitor See 5.2.5. H/W Monitor on page 67. Super IO Configuration See 5.2.6. Super IO Configuration on page 67. Second Super IO Configuration See 5.2.7. Second Super IO Configuration on page 67. 5.2.1. ACPI Settings ACPI Settings configure the system’s ACPI. The featured settings are: Setting Description Enable Hibernation Enables/disables the system to/from hibernation (OS/S4 Sleep State). ► ► Enabled is the default. ► ► This option may not be effective with some OS. ACPI Sleep State Sets the highest ACPI sleep state that system enters when the suspend bu.tton is hit. ► ► Options available are S1 (CPU Stop Clock) and Suspend Diabled. ► ► S1 (CPU Stop Clock) is the default. Power-Supply Type Sets the power-supply type. ► ► Options available are AT (default) and ATX. 5.2.2. CPU Configuration Select CPU Configuration to view the CPU parameters such as the model name, processor stepping, processor speed, microdoe revision, max. processor speed, min. processor speed, processor cores, Intel HT Technology and EMT64 support. - 65 - BIOS 5.2.3. SATA Configuration SATA Configuration delivers SATA device(s) information and provides users with the settings to control SATA device. Featured settings are: Setting Description SATA Controller(s) Enables/disables SATA device. ► ► Enabled is the default. SATA Mode Selection Sets how SATA controller(s) operate. ► ► Options available are IDE (default) and AHCI. 5.2.4. USB Configuration USB Configuration displays the info of the connected USB devices and sets USB parameters. The featured setting is: Setting Legacy USB Support Description Enables/disables legacy USB support. ► ► Options available are Enabled (default), Disabled and Auto. ► ► Select Auto to disable legacy support if no USB device are connected. ► ► Select Diabled to keep USB devices available only for EFI applications. - 66 - BIOS 5.2.5. H/W Monitor H/W Monitor monitors the systems’ hardware status. Select H/W Monitor to run a health report of the IPPC that includes the info of CPU temperature, system temperature, VCC, VCORE and so on. 5.2.6. Super IO Configuration Super IO Configuration controls the system’s Super IO chip. The featured setting is: Setting Power On After Power Fail Description Defines which state to go to when power is resumed after a power failure. ► ► Options available are Power Off (default) and Power On. 5.2.7. Second Super IO Configuration Second Super IO Configuration sets the parameters for the serial port(s) available on the system. The featured settings are: Setting Description Serial Port Enables/disables the serial port (COM). ► ► Enabled is the default. Change Settings Sets the optimal IO address and IRQ info for the Super IO device. ► ► Options available are: IO=3F8h; IRQ=4; (default) IO=3F8h; IRQ=3,4,5,6,7,9,10,11,12; IO=2F8h; IRQ=3,4,5,6,7,9,10,11,12; IO=3E8h; IRQ=3,4,5,6,7,9,10,11,12; IO=2E8h; IRQ=3,4,5,6,7,9,10,11,12; - 67 - BIOS 5.3. Chipset The Chipset menu controls the system’s chipset. Aptio Setup Utility - Copyright (C) 2010 American Megatrends, Inc. Main Advanced Chipset Boot Security Save & Exit Boot Configuration Bootup NumLock State Quiet Boot [On] [Disabled] Boot Option Priorities Boot Option #1 [SATA: TS8GCFX500 Set the order of the legacy devices in this group ...] Hard Drive BBS Priorities →←: Select Screen : Select Item Enter: Select +/-: Change Opt. F1: General Help F2: Previous Values F9: Optimized Defaults F10: Save & Exit ESC: Exit Version 2.10.1208. Copyright (C) 2010 American Megatrends, Inc. The featured submenu are System Agent (SA) Configuration and PCH-IO Configuration, which are covered in the following sections. Submenu Description System Agent (SA) Configuration See 5.3.1. System Agent (SA) Configuration on page 69. PCH-IO Configuration See 5.3.2. PCH-IO Configuration on page 74. - 68 - BIOS 5.3.1. System Agent (SA) Configuration This submenu shows and configures System Agent (SA) settings. The featured settings are: Setting Description Graphic Configuration See 5.3.1.1. Graphic Configuration on page 70. DMI Configuration See 5.3.1.2. DMI Configuration on page 73. NB PCIe Configuration See 5.3.1.3. NB PCIe Configuration on page 73. Memory Configuration See 5.3.1.4. Memory Configuration on page 74. - 69 - BIOS 5.3.1.1. Graphic Configuration Select Graphic Configuration to view graphics info and accesses graphic settings. The featured settings are: Setting / Submenu Description Graphics Turbo IMON Current Sets the graphic turbo IMON current values. ► ► Options avaiable are 14 to 31. ► ► 31 is the default. Primary Display Sets which graphics device to use as the primary display or sets SG for switchable Gfx. ► ► Options available are Auto (default), IGFX, PEG, PCI and SG. Internal Graphics Enables/disables the internal graphic device. ► ► Options available are Auto (default), Enabled and Disabled. LCD Control Configures LCD settings. Options avaiable are: Setting Description Primary IGF Boot Display See Primary IGF Boot Display on page 71. LCD Panel Type See LCD Panel Type on page 71. Panel Scaling See Panel Scaling on page 71. Backlight Control See Backlight Control on page 71. BIA See BIA on page 72. Spread Spectrum clock Chip See Spread Spectrum clock Chip on page 72. ALS Support See ALS Support on page 72. Active LFP See Active LFP on page 72. Panel Color Depth See Panel Color Depth on page 73. - 70 - BIOS Primary IGF Boot Display Sets the video device to activate during POST. ►► ►► ►► ►► Options available are CRT, LVDS and CRT + LVDS (default). This setting has no effect if an external graphics card is present. Secondary boot display selection will appear based on your selection. VGA modes are supported only on primary display. LCD Panel Type Sets the LCD panel types. Options available are: VBIOS Default 800x600 LVDS 1024x768 LVDS (default) 1280x1024 LVDS 1400x1050 LVDS1 1400x1050 LVDS2 1600x1200 LVDS 1680x1050 LVDS 1920x1200 LVDS 1600x900 LVDS 1280x800 LVDS 1280x600 LVDS 2048x1536 LVDS 1366x768 LVDS Panel Scaling Sets the LCD panel scaling for the internal graphic. Options available are Auto (default), Off and Force Scaling. Backlight Control Configures LCD backlight. Options available are PWM Inverted (default), PWM Normal, GMBus Inverted, and GMBus Normal. - 71 - BIOS BIA Enables/disables BIA control. ► ► Options available are Auto (default), Disabled and Level 1~5. ► ► Select Auto to have GMCH backlight control use VBT default. ► ► Select Level 1~5 to enable BIA control with different aggressiveness. Spread Spectrum clock Chip Sets which hardware software to control the spread spectrum. ► ► Options available are Off (default), Hardware and Software. ► ► Select Hardware to control the spread spectrum by the chip. ► ► Select Software to control the spread spectrum by the BIOS. ALS Support Enables/disables ALS support. ► ► This setting is only efficacious for ACPI. ► ► For legacy, ALS is supprted through the internal graphic device INT10 function. ► ► For ACPI, ALS is supported through an ACPI ALS driver. Active LFP Configures LFP. ► ► Select No LVDS to have VBIOS disable LVDS. ► ► Select Int-LVDS to have BIOS enable LVDS driver by the integrated encoder. (Default.) ► ► Select SDVO LVDS to have VBIOS enable LVDS driver by SDVO en- coder. ► ► Select eDP Port-A to drive LFP by the Int-DisplayPort encoder from Port-A. - 72 - BIOS Panel Color Depth Sets the color depth for LFP panel. ► ► Options available are 18 Bit and 24 Bit. 5.3.1.2. DMI Configuration Use this submenu to control various DMI features. 5.3.1.3. NB PCIe Configuration Configures NB PCI Express. Featured settings are: Setting Description PEG0 - Gen X Configures PEG0 B0:D1:F0 Gen1-Gen2. ► ► Options avaiable are Gen1 (default) and Gen2. PEG1 - Gen X Configures PEG1 B0:D1:F1 Gen1-Gen2. ► ► Options avaiable are Gen1 (default) and Gen2. PEG2 - Gen X Configures PEG2 B0:D1:F2 Gen1-Gen2. ► ► Options avaiable are Gen1 (default) and Gen2. PEG3 - Gen X Configures PEG3 B0:D1:F3 Gen1-Gen2. ► ► Options avaiable are Gen1 (default) and Gen2. Always Enable PEG Enables/disables the PEG slot. ► ► Enabled is the default. PEG ASPM Sets ASPM support for the PEG device. ► ► This setting is inefficacious if PEG isn’t active at the moment. ► ► Options available are: Disabled, Auto (default), ASPM L0s, ASPM L1 and ASPM L0sL1. De-emphasis Control Configures the De-emphasis control on PEG. ► ► Options available are: -6 dB and -3.5 dB (default). - 73 - BIOS 5.3.1.4. Memory Configuration Select Memory Configuration to view the system’s memory information that includes memory RC version, memory frequency, total memory, DIMM presence, CAS latency and minimum delay tiem. 5.3.2. PCH-IO Configuration PCH-IO Configuration sets PCH parameters. Featured settings are: Setting / Submenu Description PCH LAN Controller Enables/disables the onboard NIC (network interface controller). ► ► Enabled is the default. Wake on LAN Enables/disables the integrated LAN to wake the system. ► ► Enabled is the default. PCIE Wake Up Enables/disables PCIE Wake# to wake the system. ► ► Disabled is the default. Azalia Controls Azalia device. ► ► Select Disabled to unconditionally disable Azalia ► ► Select Enabled to unconditionally enable Azalia. ► ► Select Auto to enable Azalia if it is present and disable it if otherwise. USB Configuration Controls USB devices. Featured settings are: Setting Description EHCI1 Enables/disables the USB EHCI (USB2.0) functions. ► ► Enabled is the default. ► ► One EHCI controller must always be enabled. EHCI2 Enables/disables the USB EHCI (USB2.0) functions. ► ► Enabled is the default. ► ► One EHCI controller must always be enabled. - 74 - BIOS 5.4. Boot The Boot menu configures how to boot up the system such as boot device priority. Aptio Setup Utility - Copyright (C) 2010 American Megatrends, Inc. Main Advanced Chipset Boot Security Save & Exit Boot Configuration Bootup NumLock State Quiet Boot [On] [Disabled] Boot Option Priorities Boot Option #1 [SATA: TS8GCFX500 ...] Set the order of the legacy devices in this group Hard Drive BBS Priorities →←: Select Screen : Select Item Enter: Select +/-: Change Opt. F1: General Help F2: Previous Values F9: Optimized Defaults F10: Save & Exit ESC: Exit Version 2.10.1208. Copyright (C) 2010 American Megatrends, Inc. The featured settings are: Setting Description Bootup NumLock State Sets keyboard’s NumLock state when the system boots up. ► ► Options available are On (default) and Off. Quiet Boot Enables/disables Quite Boot. ► ► Disabled is the default. Boot Option #1 Sets the very 1st boot devices. ► ► Options avaiable are the built-in SATA: TS8GCFX500 (default) and Disabled. Hard Drive BBS Prior- Sets hard drive boot priority. ity ► ► Options available are the built-in hard drive (the default) and Disabled. - 75 - BIOS 5.5. Security The Security menu sets up the administrator password. Once an administrator password is set up, this BIOS SETUP utlity is limited to access and will ask for the password each time any access is attempted. Aptio Setup Utility - Copyright (C) 2010 American Megatrends, Inc. Main Advanced Chipset Boot Security Save & Exit Password Description If ONLY the Administrator’s password is set, then this only limits access to Setup and is only asked for when entering Setup. If Only the User’s password is set, then this is a power on password and must be entered to boot or enter Setup. In Setup the User will have Administrator rights. The password must be 3 to 20 characters long. Administrator Password Set Setup Adminstrator Password →←: Select Screen : Select Item Enter: Select +/-: Change Opt. F1: General Help F2: Previous Values F9: Optimized Defaults F10: Save & Exit ESC: Exit Version 2.10.1208. Copyright (C) 2010 American Megatrends, Inc. The featured settings is: Setting Administrator Password Description To set up an administrator password: 1. Select Administrator Password. The screen then pops up an Creatg New Password dialog. 2. Enter your desired password that is no less than 3 charachers and no more than 20 characters. 3. Hit [Enter] key to submit. - 76 - BIOS 5.6. Save & Exit The Save & Exit menu configures how to quit the BIOS SETUP utility. Aptio Setup Utility - Copyright (C) 2010 American Megatrends, Inc. Main Advanced Chipset Boot Security Save & Exit Save Changes and Reset Restore Defaults Reset the system after saving the changes. Boot Override SATA: TS8GCFX500 →←: Select Screen : Select Item Enter: Select +/-: Change Opt. F1: General Help F2: Previous Values F9: Optimized Defaults F10: Save & Exit ESC: Exit Version 2.10.1208. Copyright (C) 2010 American Megatrends, Inc. Features settings are: Setting Description Save Changes and Reset Sets whether to resets the system after saving the changes. Restore Defaults Sets whether to restore factory defaults. Boot Override Boot Override presents a list of boot devices onscreen. Select the device to boot up the system regardless of the currently configured boot priority. - 77 - This page is intentionally left blank. - 78 - Appendix Touch Panel Appendix - 79 - Appendix 1.1. PenMount Monitor The PenMount Monitor icon (pm) will appear in the system tray at the bottomright corner after you turn on PenMount Monitor from Programs/ PenMount Universal Driver/PenMount Monitor. Right-click the pm icon in system tray and display its submenu. PenMount Monitor has the following functions: Control Panel Launch the PenMount Control Panel utility. You may also launch it from Programs. Beep Set the Beep function for each device. Right Button After ticking this item, a mouse icon right side of your screen. Exit Exits the PenMount Monitor function. - 80 - appears on the Appendix 1.2. PenMount Control Panel After you have selected the Control Panel item on the pop-up menu or open it up from Programs (as shown on previous page), the PenMount Control Panel utility UI appears as below. The functions of the PenMount Control Panel such as Device, Calibrate, Setting, Multiple Monitors, Tools and About are explained in the following sections. The Tools Tab When you click the PenMount icon in the system tray and select "Control Panel" from the menu, "PenMount Control Panel" will appear. Among the four tabs Device, Multiple Monitors, Tools and About - the function of Tools should be described first as follows: - 81 - Appendix Draw Tests or demonstrates the PenMount touch screen operation. Advanced Calibration Enable Advanced Calibration function. Right Button Icon Enable right button function. The icon can be shown on Desktop or in the system tray at the bottom-right corner. - 82 - Appendix The Device Tab In this window, you can find out how many devices are detected on your system. On the Device tab, select the device icon and tap Configure, or double tap the device icon for touch screen calibration. And then another window with the Calibrate tab appears. Device Calibration Dialog The Calibrate Tab This function offers two ways to calibrate your touch screen. ‘Standard Calibration‘ adjusts most touch screens while ‘Advanced Calibration’ adjusts aging touch screens. Standard Calibration The Standard Calibration function lets you match the touch screen to your display so that the point you touch is accurately tracked on screen. Standard Calibration only requires four points for calibration and one point for confirmation. Under normal circumstance Standard Calibration is all you need to perform an accurate calibration. By default, only the Standard Calibration button is available. - 83 - Appendix 1. Please tap the Standard Calibration button to start calibration procedures. 2. After tapping the button, the arrow appears pointing to a red square. Use your finger or stylus to touch the red square and hold down until the screen shows the message - "Lift off to proceed". 3. And then the next arrow appears. After the fifth red point calibration is complete, the program will jump out automatically, or you may press ESC key to quit it manually. - 84 - Appendix Note: The older the touch screen gets, the more Advanced Mode calibration points you need for an accurate calibration. Use a stylus during Advanced Calibration for better accuracy. Please follow the step as below: Advanced Calibration The Advanced Calibration function improves the accuracy of calibration by using more involved engineering calculations. Use this function only if you have tried the Standard Calibration and there is still a discrepancy in the way the touch screen maps to the display. You can choose 4, 9, 16 or 25 points to calibrate, though we suggest that you first try 9 points, if it is still not tracking well then try 16 or 25 points. The more points you use for calibration, the greater the accuracy is. Errors in calibration may occur due to viewing angle, or individual skill, and there may be little difference in using 16 or 25 points. Note that a stylus is recommended for most accurate results. 1. Come back to PenMount Control Panel and select the Tools tab. Tap the Advanced Calibration button to enable it (when enabled, the small rectangle in the middle appears in yellow). - 85 - Appendix 2. Select Device to calibrate, and then you can start to do "Advanced Calibration". Tap the arrow to pull down the drop-down menu and select the number determining how many points will be used for calibration. Note: You are recommended to use a stylus during Advanced Calibration for greater accuracy. 3. After tapping the button, a crosshair will appear on screen. Use your finger or stylus to touch the red spot inside it and hold down until the screen shows this message - “Lift off to proceed” and then the next crosshair will appear. After all crosshairs are clicked, the program will jump out automatically, or you may press ESC key to quit it manually. - 86 - Appendix Plot Calibration Data Check this function to have touch panel linearity comparison graph appear when you finish Advanced Calibration. The black lines reflect the ideal linearity assumed by PenMount's application program while the blue lines show the approximate linearity calculated by PenMount's application program as the result of user’s execution of Advance Calibration. Turn off EEPROM storage Tick this function to disable the write-in of calibration data in Controller. The Setting Tab Touch Mode This mode enables and disables the mouse's ability to drag on-screen icons. Mouse Emulation Select this mode and the mouse functions as normal and allows dragging of icons. Click on Touch Select this mode and the mouse only provides a click function, and dragging is disabled. - 87 - Appendix Beep Sound Turn On/Off Beep Sound. Beep on Pen Down Beep occurs when pen is down. Beep on Pen Up Beep occurs when pen is up. Beep on Both Beep occurs when pen is down or up. Beep Frequency Modifies sound frequency. Beep Duration Modifies sound duration. Cursor Stabilizer Enable the function supporting to prevent cursor shake. Use press and hold as right click You can set the time out and area as you need. The Edge Compensation Tab This tab is the edge compensation settings for the advanced calibration. You can adjust the settings from 0 to 30 for accommodating the difference of each touch panel. - 88 - This page is intentionally left blank. - 89 -