1
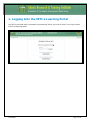
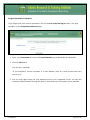
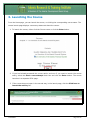
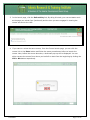
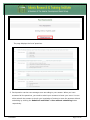
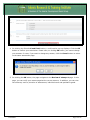
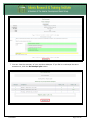
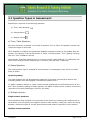
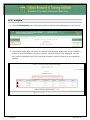
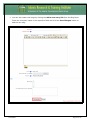
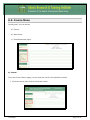
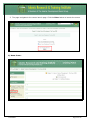
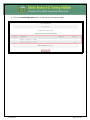
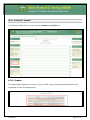
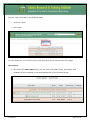
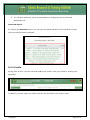
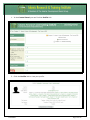
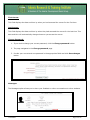
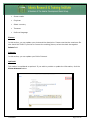
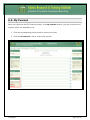
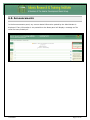
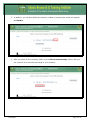
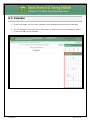
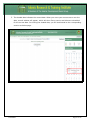
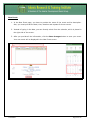
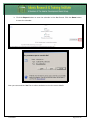
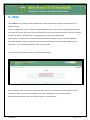
IRTI Virtual Learning Environment Student User Manual TABLE OF CONTENTS 1. Logging Into the IRTI e-Learning Portal ................................................ 3 2. Searching for Courses ..................................................................................... 6 3. Launching the Course ..................................................................................... 8 4. Launching the Assessment ......................................................................... 12 4.1 Question Types in Assessment: ............................................................................................................................. 17 a) True / False Question: ............................................................................................................................................ 17 b) Essay Question: ...................................................................................................................................................... 17 c) Multiple choices: ...................................................................................................................................................... 17 5. Launching the Summary .............................................................................. 18 6.1. People ........................................................................................................................................................................ 20 6.1.1. Blogs ................................................................................................................................................................... 21 6.2. Course Menu ............................................................................................................................................................ 23 6.3. Control Panel ............................................................................................................................................................ 27 6.3.1. Grades ................................................................................................................................................................ 27 6.3.2. Profile ................................................................................................................................................................. 29 6.4. My Courses ............................................................................................................................................................... 36 6.5. Announcements ....................................................................................................................................................... 37 6.6. Recent Activity .......................................................................................................................................................... 38 6.7. Calendar .................................................................................................................................................................... 40 6.8. Upcoming Events ..................................................................................................................................................... 42 6. Chat: ..................................................................................................................... 47 7. Logging out of the IRTI e-Learning Portal ........................................... 49 Confidential Page 2 of 49 1. Logging Into the IRTI e-Learning Portal You will be provided with a username and password, which you need to enter in the login screen of IRTI e-Learning Portal. Confidential Page 3 of 49 Forgot Username/Password If you forget your user name or password, click on the Yes, help me log in button. The page navigates to the Forgotten password page. 1. Enter your Username OR enter the E-mail address you provided during registration. 2. Click the OK button. You will see a message: “If you supplied a correct username or e-mail address, then an e-mail should have been sent to you." 3. You can login again using the new password sent to your registered e-mail. You can also contact the Administrator through the built-in chat functions or discussion forum available. Confidential Page 4 of 49 4. The courses, which are assigned by the Administrator, are shown in sequence when you login. You can click the course categories link to view the list of chapters available in it. A detailed explanation about launching, viewing and closing the course is given in the following pages of this document. Confidential Page 5 of 49 2. Searching for Courses After logging in, the list of available courses or course categories is displayed. A search option is also available to find a particular course by providing the course name in the search field. The sample screenshot below shows two listed course categories and the Search courses field. To search a course: 1. Type the course name into the Search courses field. 2. Click the Go button. After clicking the Go button, the search results are displayed. In the search result page, you can find the course name and its respective category will be displayed. Confidential Page 6 of 49 1. To launch the course, click the course name that is displayed. 2. To view the courses that are grouped under the respective category, click the Category link. Confidential Page 7 of 49 3. Launching the Course From the Home page, you can launch the course, on clicking the corresponding course name. The course launch page displays a summary statement about the course. 1. To launch the course, either click the Course name or click the Enter button. 2. If you had already accessed the course earlier and now if you want to launch the course newly, select the Start a new attempt check box and click the Enter button. The course launches in a separate HTML page. 3. If the course does not open in the normal way, in the launch page, click the Click here to launch the activity link. Confidential Page 8 of 49 4. On clicking the Click here to launch the activity link, the corresponding course opens in a separate HTML page. First, you will see a a brief visual introduction with background music, which will provide an overview of the key ideas of the course. At the end this introduction, which lasts a few seconds, you will be taken to the first screen of the course automatically. You can also skip this brief introductionscreen by clicking the Skip Intro button. Confidential Page 9 of 49 Exiting the Course 1. At any point of time you can exit the course by clicking the Exit ( ) button placed in the top of the course window. 2. When you click the Exit button, a pop-up opens and confirms or reconsiders your action. You can click either the OK button to exit the course or the Cancel button to continue with the course. Confidential Page 10 of 49 3. In the launch page, click the Exit activity link; By doing this task, your current status such as the page you exited from (bookmark) and the time you were engaged in viewing the course are sent to the LMS. 4. If you want to review the same course, from the Course Launch page, you can click the course link or the Enter button and follow the same procedure as before to launch the course. Now, before the course launches, a bookmark pop-up will be displayed. You can either resume the course from where you had left or start from the beginning by clicking the YES or NO button respectively. Confidential Page 11 of 49 4. Launching the Assessment Note: Each chapter is having a post assessment which has questions to be answered by the students and based on the students response grades will be provided. In post assessment, questions are created and stored in question bank Only the instructor can add or release questions into the question bank, and assign the assessment to a course and to a student and grading the assessment. You can access the assessment only after the instructor releases it for answering to you. After completing the course, you can assess your understanding of learned content using the Assessment. In the course launch page, you can view the panel called Course Menu. In that panel, you can view the corresponding Post-Assessment link of the course. 1. Click the Post Assessment link to reach the assessment screen. 2. Click the Attempt quiz now button to launch the assessment screen. Confidential Page 12 of 49 The page displays the list of questions. 3. Each question carries some average score according to your answer. When you have answered all the questions, you need to submit your answers to know your score. You can either submit the answers to check your knowledge of content or save the answers without submitting by clicking the Submit all and finish or Save without submitting button respectively. Confidential Page 13 of 49 4. On clicking the Submit all and finish button, a confirmation pop-up displays. Click the OK button to confirm your submission. Please note, on clicking OK button, you cannot change your answers. In case, if you want to change any answer, click the Cancel button to return to the same assessment page. 5. On clicking the OK button, the page navigates to the Review of attempt 1 page. In this page, you can verify your answers against the correct answers. In addition, you can view the summary such as, duration of assessment, individual mark and qualitative grade. Confidential Page 14 of 49 6. When you complete your verification, click the Finish review button to complete the assessment. Confidential Page 15 of 49 7. You can view the summary of your previous attempts. If you feel to re-attempt the same assessment, click the Re-attempt quiz button. Confidential Page 16 of 49 4.1 Question Types in Assessment: Assessment comprises of the following questions a) True / False question: b) Essay question: c) Multiple choice: a) True / False Question: Only two choices for an answer in this kind of question: True or False. The question content can include an image or html code. When feedback is enabled, the appropriate feedback message is shown to the student after the answer. For example, if the correct answer is "False", but they answer "True" (getting it wrong) then the "True" feedback is shown. Note that the True/False question type in a Lesson module is quite different. It is effectively the same as the Multiple Choice question type in a Lesson, but with only 2 responses b) Essay Question: The essay question type is intended for short answers of a paragraph or two, which one often finds on exams Question grading The essay question will not be assigned a grade until it has been reviewed by a teacher and manually graded. Until that happens, the student's grade will be 0. To grade a student's answer in a quiz, use the manual grading tab on the Results section of the quiz. When manually grading an essay question, the grader is able to enter a custom comment in response to the essay and assign a score for the essay. c) Multiple choices: Single-answer questions These questions allow one and only one answer to be chosen by providing radio buttons next to the answers. You will specify non-negative marks for each answer; usually zero marks for wrong answers, maximum marks for correct answers and partial marks for partially correct answers. Multiple-answer questions Confidential Page 17 of 49 The teacher can select "multiple answers are allowed" in a Multiple Choice question type. "Multiple answers" questions types in a quiz allow one or more answers to be chosen by providing check boxes next to the answers. Each answer may carry a positive or negative grade, so that choosing ALL the options will not necessarily result in good grade. If the total grade is negative then the total grade for this question will be zero. Feedback can be associated either with specific answers, or with the question as a whole. 5. Launching the Summary Each chapter has a summary which concludes the chapter by revising the points that has been covered in the particular chapter. The chapter summary will be in hidden state for the students and they will not be able to view the summary page. The instructor / teacher will release the summary page for the students after the class room activity gets completed. 6. Exploring the Activity Block When you select a course, you will be directed to the Course Launch page. In this page, you can view a summary statement about the course. Along with the course summary, you can view the content in various panels on both the sides of the summary. People Course Menu Control Panel Profile My Courses Announcements Recent Activity Calendar Upcoming Events Confidential Page 18 of 49 Confidential Page 19 of 49 6.1. People 1. Click the Participants link in the People panel to find the other participants in your course. 2. In the Participants page, you can also view the other students details such as the student’s picture, first and last name, city/town, country, last accessed time are displayed. You can also click the alphabet links (First name and Surname) to quickly search for the respective student. Confidential Page 20 of 49 6.1.1. Blogs 1. Blogs are used to post a discussion on the course. You can read a topic in a blog created by the Administrator. You can also view your previous entries, set your blog preferences, view course entries and view site entries. Confidential Page 21 of 49 2. You can also create new blogs by clicking the Add a new entry link from the Blog Menu. Enter the necessary inputs in the respective fields and click the Save Changes button to add the new blog. Confidential Page 22 of 49 6.2. Course Menu In this panel, you can access a) Course b) News forum c) Post Assessment (Quiz) a) Course: From the Course Launch page, you can view the link for the respective courses. 1. Click the course name link to review the course. Confidential Page 23 of 49 2. The page navigates to the course launch page. Click the Enter button to launch the course. b) News forum: Confidential Page 24 of 49 1. Click the News forum link to view the general news and announcements. Only the Administrator can create the news and announcement, whereas other students can only view the news. C) Post Assessment (Quiz): 1. Click the Post Assessment link to attempt a quiz of the respective course. You will be directed to the post assessment launch page. In this page, you can view the number of attempts you have already had and their corresponding date and time of completion, marks, grades and highest grades. Confidential Page 25 of 49 2. Click the Re-attempt quiz button to attempt the assessment again. Confidential Page 26 of 49 6.3. Control Panel In the Control Panel panel, you can view the Grades and Profile link. 6.3.1. Grades The Grades page displays the summary of your grade, range, percentage and feedback of the completed courses and assessments. Confidential Page 27 of 49 You can view your grade in two different views, Overview report User report You can select any one of these views in the drop down box present at top of the page. User report: 1. On clicking the User report view, you can view your grade, range, percentage, and feedback of the completed course and assessment in the following format. Confidential Page 28 of 49 2. You can also review the course or assessment on clicking the course name and assessment link. Overview report: On clicking the Overview report, you can view the grade and rank of the individual courses, which you have already completed. 6.3.2. Profile At any point of time, you can view and update your profile. View your profile by clicking your username. In addition, you can view your profile using the link provided in the Control Panel. Confidential Page 29 of 49 1. In the Control Panel you can find the Profile link. 2. Click the Profile link to view your profile. Confidential Page 30 of 49 The Profile page has the following tabs: 1) Profile 2) Edit profile 3) Blog 1) Profile: In this tab, you can view the summary of your details, such as: Country City/Town Courses assigned Date and time of first access Date and time of Last access Change Password Messages Country: When creating your profile, the Administrator has mentioned your country and the same is displayed in the Country field. City/Town: When creating your profile, the Administrator has mentioned your city or town of residence and the same is displayed in the city/town field. Courses: This field displays the list of courses assigned to you. Confidential Page 31 of 49 First Access: This field displays the date and time by when you had accessed the course for the first time. Last Access: This field displays the date and time by when they had accessed the course for the last time. This date and time will automatically change whenever you access the course. Change Password: 1. If you wish to change your current password, click the Change password button. 2. The page navigates to the Change password page. 3. Provide your current and new password in the appropriate fields and click Save changes button. Messages: The Messages option allows you to share your feedback or other conversations to other students. Confidential Page 32 of 49 2) Edit Profile: This tab has various sections with your information. You can update the details as per your current situation. General In this section, you can update the following details. First name Surname Email address Email display Email activated Email format Email digest type Forum auto-subscribe Forum tracking AJAX and Javascript Confidential Page 33 of 49 Screen reader City/town Select a country Timezone Preferred language Picture: In this section, you can update your photo and the description. Please note that the maximum file size should be 70MB. If you wish to remove the existing picture, select the check box against Delete field. Interest: In this section, you can update your field of interest. Optional: This section is considered as optional. If you wish to provide or update the information, click the Show advanced button. Confidential Page 34 of 49 You can view the following fields. Web page ICQ number Skype ID AIM ID Yahoo ID MSN ID ID number Institution Department Phone Mobile Phone Address After updating all the necessary fields, click the Update profile button to save your updates. Confidential Page 35 of 49 6.4. My Courses When you login into the IRTI Learning Portal, in the My courses section, you can view the list of courses, which are assigned to you. 1. Click the corresponding course name to review the course. 2. Click the All courses… link to view all the courses. Confidential Page 36 of 49 6.5. Announcements In the Announcements panel, any course related information posted by the Administrator is displayed. If any information is not posted then the News panel will display a message as “No news has been posted yet”. Confidential Page 37 of 49 6.6. Recent Activity In the Home page, you can view find one of the panels called Recent Activity. This panel displays the recent activities as well as the activities that were conducted earlier. 1. To view the past activities, click the Full report of recent activity link. 2. You can select the activities, sorting style and the date limits in the appropriate fields. Confidential Page 38 of 49 3. In addition, you can also disable the selection of date by selecting the check box against the Disable. 4. After you select all the necessary fields, click the Show recent activity button. Now you can view the list of activities according to your selection. Confidential Page 39 of 49 6.7. Calendar 1. In the home page, you can find a calendar, which displays the current month and date. 2. You can navigate to the previous or next month by clicking on the arrow indicators placed on the both sides of the calendar. Confidential Page 40 of 49 3. The shaded date indicates the current date. When you move your mouse cursor over the date, a small window will appear, which will show if any event or activities are scheduled for the current date. On clicking the shaded date, you will be directed to the corresponding event or activities page. Confidential Page 41 of 49 6.8. Upcoming Events In the home page, you can find the panel called, Upcoming Events. This panel displays the list of new tasks or events, which are assigned to you. You can click the link to complete that particular task or event. In addition to the tasks or events, you can also view two links, o Go to calendar o New Event Confidential Page 42 of 49 Go to Calendar: 1. The Go to calendar link displays the events, which are created by the other students or Administrator. 2. You can also create a new event on clicking the New Event button. Confidential Page 43 of 49 New Event: 1. In the New Event page, you have to provide the name of the event and its description. Also, you must provide the date, time, duration and repeats for these events. 2. Instead of typing in the date, you can directly select from the calendar, which is placed in the right side of the screen. 3. After you provide all the information, click the Save changes button to save your event. Your new event will be displayed in the New Event screen. Confidential Page 44 of 49 4. You can export the new event as a calendar and send the event to other students using the Export Calendar button. 5. Click the Export Calendar button to export the events. After selecting the desired options, you can share the event with other students either by sharing the corresponding URL or by exporting the calendar. 6. You can share the event details with other student by either sending the corresponding URL link or sending the respective .ics file. a. Click the Get calendar URL button to get an URL. When you share the URL, other students can view the event details in their browser. Confidential Page 45 of 49 b. Click the Export button to save the calendar in the .ics format. Click the Save button to save the calendar. Now you can send the .ics files to other students to view the event details. Confidential Page 46 of 49 6. Chat: The Chat activity module allows participants to have a real-time synchronous discussion in a Moodle course. This is a useful way to get a different understanding of each other and the topic being discussed – the mode of using a chat room is quite different from the asynchronous forums. The Chat module contains a number of features for managing and reviewing chat discussions. Chat session is created by the Instructor and assigned to student. Chat’s can be assigned to particular chapter. Chat is a effective way of communicating in the class and a students and instructors can communicate as any other normal chats. A chat link will look like as shown in the below screenshot After clicking on the click here to enter the chat now link, a new pop up window opens which shows the other users who has logged in the chat. Messages can be communicated simultaneously between the users and the same is shown below: Confidential Page 47 of 49 Confidential Page 48 of 49 7. Logging out of the IRTI e-Learning Portal To logout the current session, click on (Logout) link, which is placed next to the username. This link is available in top and bottom of the page. Confidential Page 49 of 49