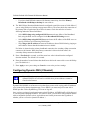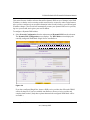
1
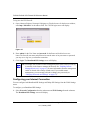
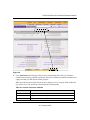
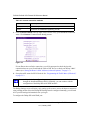
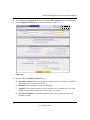
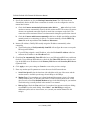
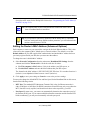
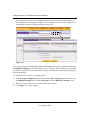
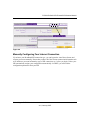
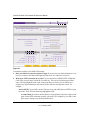
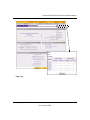
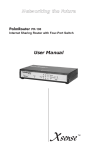
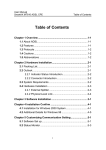
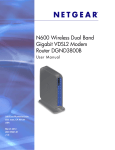
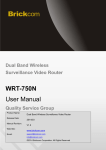
Chapter 2
Connecting the FVS338 to the Internet
This section provides instructions for connecting the VPN firewall. Setting up VPN tunnels are
covered in Chapter 5, “Virtual Private Networking”:
1. Connect the firewall physically to your network. Connect the cables, turn on your router
and wait for the Test LED to go out. Make sure your Ethernet and LAN LEDs are lit. (See the
FVS338 ProSafe VPN Firewall 50 Installation Guide on your Resource CD.)
2. Log in to the firewall. After logging in, you are ready to set up and configure your firewall.
You can also change your password and enable remote management at this time.
3. Configure the Internet connections to your ISPs. During this phase, you will connect to
your ISPs. You can also program the WAN traffic meters at this time if desired.
4. Configure the WAN mode. Select either Primary Broadband with Dialup as backup or
Use only single WAN port—and select the WAN port from the pull-down menu—either
Broadband or Dial-up.
5. Configure dynamic DNS on the WAN ports (if needed). Configure your fully qualified
domain names during this phase (if required).
6. Configure the WAN options (if needed). Optionally, you can enable each WAN port to
respond to a ping. You can also change the factory default MTU size, port speed, and uplink
bandwidth. However, these are advanced features and changing them is not usually required.
Connecting the VPN Firewall to Your Network
To physically connect your VPN firewall, refer to the IFVS338 ProSafe VPN Firewall 50
Installation Guide (a copy is also available on your Resource CD).
Logging in to the VPN Firewall
Note: To connect to the firewall, your computer needs to be configured to obtain an IP
address automatically via DHCP.
2-1
v1.0, January 2007
FVS338 ProSafe VPN Firewall 50 Reference Manual
To log in to the VPN firewall:
1. Open a Internet Explorer, Netscape® Navigator, or Firefox browser. In the browser window,
enter http://192.168.1.1 in the address field. The FVS338 login screen will display.
Figure 2-1
2. Enter admin for the User Name and password for the Password, both in lower case
letters.The firewall user name and password are not the same as any user name or password
you may use to log in to your Internet connection.
3. Click Login. The Broadband ISP Settings screen will display.
Note: You might want to enable remote management at this time so that you can log
in remotely in the future to manage the firewall. See “Enabling Remote
Management Access” on page 6-9 for more information. Remote management
enable is cleared with a factory default reset. If you enable remote
management, you are strongly advised to change your password (see
“Changing Passwords and Settings” on page 6-7).
Configuring your Internet Connection
You can configure both Broadband ISP Settings and Dialup ISP Settings.from the WAN Settings
menu.
To configure your Broadband ISP Settings:
1. Select Network Configuration from the main menu and WAN Settings from the submenu.
The Broadband ISP Settings screen will display.
2-2
Connecting the FVS338 to the Internet
v1.0, January 2007
FVS338 ProSafe VPN Firewall 50 Reference Manual
Figure 2-2
2. Click Auto Detect at the bottom of the screen to automatically detect the type of Internet
connection provided by your ISP. Auto Detect will probe for different connection methods and
suggest one that your ISP will most likely support.
When Auto Detect successfully detects an active Internet service, it reports which connection
type it discovered. The options are described in the following table.
Table 2-1. Internet connection methods
Connection Method
Data Required
PPPoE
Login (Username, Password).
PPTP
Login (Username, Password), Local IP, and PPTP Server IP.
BigPond Cable
Login Username, Password), Account Name, and Server IP.
Connecting the FVS338 to the Internet
2-3
v1.0, January 2007
FVS338 ProSafe VPN Firewall 50 Reference Manual
Table 2-1. Internet connection methods
Connection Method
Data Required
DHCP (Dynamic IP)
No data is required.
Fixed IP
IP address and related data supplied by your ISP.
3. Click Connection Status at the top right of the screen to verify your Broadband connection
status. Click Connect if connection not already present.
Figure 2-3
If Auto Detect does not find a connection, you will be prompted to check the physical
connection between your firewall and the cable or DSL line or to check your Router’s MAC
address (see “Setting the Router’s MAC Address (Advanced Options)” on page 2-7).
4. Set up the traffic meter for ISP1 if desired. See “Programming the Traffic Meter (if Desired)”
on page 2-12.
Note: At this point in the configuration process, you are now connected to the Internet
through the broadband Ethernet WAN. Optionally, you can continue with the
configuration of the dialup ISP serial WAN interface.
The Dialup Settings screen will assist you in setting up the router to access the Internet connection
using a dialup modem. Since the Dialup ISP Settings must be configured manually, you will need
all of your ISP settings information before you begin.
To configure the Dialup ISP serial WAN port:
2-4
Connecting the FVS338 to the Internet
v1.0, January 2007
FVS338 ProSafe VPN Firewall 50 Reference Manual
1. Select Network Configuration from the main menu, WAN Settings from the submenu and
click the Dialup ISP Settings tab to display the Dialup settings screen.
Figure 2-4
2. Enter the following Dialup Account settings:
a. Account/User name: Enter the account name or the user name provided by your ISP. This
name will be used to log in to the ISP server.
b. Password: The account password for the dialup ISP
c. Telephone: The telephone number or access number to dial for connectivity. Type in the
number using the format described in your modem's user manual.
d. Alternative Telephone: An alternative number which will be dialed if the first is not
available (optional).
Connecting the FVS338 to the Internet
2-5
v1.0, January 2007
FVS338 ProSafe VPN Firewall 50 Reference Manual
3. Specify the method to use for your Dial-up Connection Status. The VPN firewall can
automatically dial to the ISP when a connection is needed or can be configured to wait for
manual intervention.:
a. Check the Connect automatically disconnect after idle for ___ min. radios box for the
modem to connect automatically. Specify the idle minute amount. The router will connect
whenever an outbound connection request is made from a computer on the LAN. The
connection will be terminated if there is no data transfer during the specified time interval.
b. Check the Connect and disconnect manually radio box to disable auto dialing and allow
manual control over connecting via dial-up. To connect manually, click the DIAL-Up
Status link at the top and then click Connect or Disconnect.
4. Internet (IP Address). DialUp ISPs usually assign the IP address automatically when
connecting.
a. The default setting of Get Dynamically from ISP will configure the router to accept the
ISP assigned IP address.
b. If your ISP has assigned a static IP address, select the Use Static IP Address radio box
and enter the IP address in the IP Address field.
5. Check the Get Automatically From ISP radio box to use ISP assigned DNS server addresses
(default). To use different DNS addresses, check the Use These DNS Servers radio box and
type in the DNS server IP addresses in the Primary DNS Server and Secondary DNS Server
(optional) fields.
6. Click Apply to save your settings or Cancel to revert to the previous settings.
7. Enter any modem specific parameters to tune the router for different modems:
c. Serial Line Speed: Select the baud rate with which the serial port of the router and the
modem connect. Available speeds range from 4.8Kbps to 460.8Kbps.
d. Modem Type: If your modem type is listed in the pull-down menu, select it. For most
56Kbps modems, the U.S. Robotics 56K FAX EXT PnP selection should work. If this
does not work, select User Defined Modem and type in the Initial String for your modem.
The Initial string is usually defined in the modem’s user manual.
e. Dial-up Type: Check the Tone radio box if your phone line supports touch tone dialing;
select Pulse for pulse mode dialing. Select Other – use Dial String to configure
additional options such as Auto-Answer, etc. (consult your modem manual for dial
strings).
2-6
Connecting the FVS338 to the Internet
v1.0, January 2007
FVS338 ProSafe VPN Firewall 50 Reference Manual
Set up the traffic meter for the Dialup ISP if desired (see “Programming the Traffic Meter (if
Desired)” on page 2-12).
Note: The response time of your serial port Internet connection will be slower
than a broadband Internet connection.
Tip: If you experience connectivity problems with the Dialup ISP, try a different
baud rate setting and ensure that the modem parameters you selected match the
modem connected to the FVS338.
Setting the Router’s MAC Address (Advanced Options)
Each computer or router on your network has a unique 48-bit local Ethernet address. This is also
referred to as the computer's MAC (Media Access Control) address. The default is set to Use
Default Address. If your ISP requires MAC authentication and another MAC address has been
previously registered with your ISP, then you must enter that address.
To change the router’s default MAC Address:
1. Select Network Configuration from the main menu, Broadband ISP Settings from the
submenu and click the Advanced link. Check the radio box for either:
a. Use This computer’s MAC address, if this is the address your ISP expects, or
b. Use this MAC Address and enter the MAC address that your ISP expects.
The format for the MAC address is XX:XX:XX:XX:XX:XX where X is a number from 0 to 9
(inclusive) or an alphabetical letter between A and F (inclusive).
2. Click Apply to save your settings or Cancel to revert to the previous settings
You may also change the default MTU Size and Port Speed for the Broadband link on this screen,
based on the following criteria:
•
MTU Size. The standard MTU (Maximum Transmit Unit) value for Ethernet networks is
either 1500 Bytes or 1492 Bytes for PPPoE connections. Some ISPs may ask you to reduce the
MTU, but this is rarely required, and should not be done unless required by your ISP.
•
Port Speed. In most cases, your router can automatically determine the connection speed of
the Internet (WAN) port. If you cannot establish an Internet connection and the Internet LED
blinks continuously, you may need to manually select the port speed.
Connecting the FVS338 to the Internet
2-7
v1.0, January 2007
FVS338 ProSafe VPN Firewall 50 Reference Manual
This could occur on some older broadband modems. If you know that the Ethernet port on
your broadband modem supports 100BaseT, select 100BaseT; otherwise, select 10BaseT. Use
the half-duplex settings if full-duplex modes do not work.
Figure 2-5
You can also change the standard MTU (Maximum Transmit Unit) value for dialup modems from
the Dialup ISP Settings screen. THe standard value is 576 bytes, but some ISPs may require that
you reduce the MTU. However, this is rarely required, and should not be done unless specifically
required by the ISP,
To change the MTU value for your dialup modem:
1. Select Network Configuration from the main menu, WAN Settings from the submenu and
the Dialup ISP Settings tab. Click the Advanced link on the Dialup ISP Settings screen.
2. Select the Custom radio box and enter the MTU value, in bytes.
3. Click Apply to save your settings.
2-8
Connecting the FVS338 to the Internet
v1.0, January 2007
FVS338 ProSafe VPN Firewall 50 Reference Manual
.
Figure 2-6
Manually Configuring Your Internet Connection
If you know your Broadband ISP connection type, you can bypass the Auto Detect feature and
connect your router manually. Ensure that you have all of the relevant connection information such
as IP Addresses, account information, type of ISP connection, etc., before you begin. Unless your
ISP automatically assigns your configuration automatically via DHCP, you will need the
configuration parameters from your ISP
Connecting the FVS338 to the Internet
2-9
v1.0, January 2007
FVS338 ProSafe VPN Firewall 50 Reference Manual
Figure 2-7
To manually configure your WAN1 ISP settings:
1. Does your Internet connection require a login? If you need to enter login information every
time you connect to the Internet through your ISP, select Yes. Otherwise, select No.
2. What type of IPS connection do you use? If your connection is PPPoE, PPTP or BigPond
Cable, then you must login. Check the Yes radio box. The text box fields that require data
entry will be highlighted, based on the connection that you selected. If your ISP has not
assigned any login information, then choose the No radio box and skip this section. For
example:
•
Austria (PPTP): If your ISP is Austria Telecom or any other ISP that uses PPTP for login,
select this. Then, fill in the following highlighted fields:
–
Account Name (also known as Host Name or System Name): Enter the valid account
name for the PPTP connection (usually your email “ID” assigned by your ISP). Some
ISPs require entering your full email address here.
2-10
Connecting the FVS338 to the Internet
v1.0, January 2007
FVS338 ProSafe VPN Firewall 50 Reference Manual
•
•
–
Domain Name: Your domain name or workgroup name assigned by your ISP, or your
ISPs domain name. You may leave this field blank.
–
Idle Timeout: Check the Keep Connected radio box to keep the connection always
on. To logout after the connection is idle for a period of time, select Idle Time and
enter the number of minutes to wait before disconnecting in the timeout field. This is
useful if your ISP charges you based on the amount of time you have logged in.
–
My IP Address: IP address assigned by the ISP to make the connection with the ISP
server.
–
Server IP Address: IP address of the PPTP server.
Other (PPPoE): If you have installed login software such as WinPoET or Enternet, then
your connection type is PPPoE. Select this connection and configure the following fields:
–
Account Name: Valid account name for the PPPoE connection
–
Domain Name: Name of your ISPs domain or your domain name if your ISP has
assigned one. You may leave this field blank.
–
Idle Timeout: Select Keep Connected, to keep the connection always on. To logout
after the connection is idle for a period of time, select Idle Time and enter the number
of minutes to wait before disconnecting, in the timeout field.
BigPond Cable: If your ISP is Telstra BigPond Cable, select this option and fill in the
Login Server and Idle Timeout fields. The Login Server is the IP address of the local
BigPond Login Server in your area. You can find login server information at
http://www.netgear.com.sg/support/bigpond.asp
3. If your ISP has assigned a fixed (static or permanent) IP address, select the Use Static IP
Address radio box and fill in the following fields:
a. IP Address: Static IP address assigned to you. This will identify the router to your ISP.
b. Subnet Mask: This is usually provided by the ISP or your network administrator.
c. Gateway IP Address: IP address of the ISP’s gateway. This is usually provided by the ISP
or your network administrator.
If your ISP has not assigned a Static IP address, select the Get dynamically from ISP radio
box. The ISP will automatically assign an IP address to the router using DHCP network
protocol.
Connecting the FVS338 to the Internet
2-11
v1.0, January 2007
FVS338 ProSafe VPN Firewall 50 Reference Manual
4. If your ISP has not assigned any Domain Name Servers (DNS) addresses, select the Get
dynamically from ISP radio box. If your ISP has assigned DNS addresses, select the Use
these DNS Servers radio box. Ensure that you fill in valid DNS server IP addresses in the
fields. Incorrect DNS entries may cause connectivity issues.
Note: Domain name servers (DNS) convert Internet names such as www.google.com,
www.netgear.com, etc. to Internet addresses called IP addresses. Incorrect
settings here will result in connectivity problems.
5. Click Apply to save the settings or click Cancel to revert to the previous settings.
6. Click Test to try and connect to the NETGEAR Web site. If you connect successfully and your
settings work, then you may click Logout or go on and configure additional settings.
You can also click on the Broadband Status link or the Current IP Address link to check on
connection status and current IP address.
Programming the Traffic Meter (if Desired)
The traffic meter is useful when an ISP charges by traffic volume over a given period of time or if
you want to look at traffic types over a period of time.
To enable the traffic meter:
1. From the primary menu, select Monitoring, and then select Traffic Meter from the secondary
menu. The Broadband Traffic Meter screen will display. Fill out the information described
in Table 2-2.
2. Click Apply to apply the settings or click Cancel to return to the previous settings.
3. Select the Dialup Traffic Meter tab and repeat steps 1 through 3 to set the Traffic Meter the
the Dialup port (if required).
2-12
Connecting the FVS338 to the Internet
v1.0, January 2007
FVS338 ProSafe VPN Firewall 50 Reference Manual
Figure 2-8
Connecting the FVS338 to the Internet
2-13
v1.0, January 2007
FVS338 ProSafe VPN Firewall 50 Reference Manual
Table 2-2. Traffic Meter Settings
Parameter
Description
Enable Traffic Meter
Check this if you wish to record the volume of Internet traffic passing through the
Router's Broadband or Dialup port. Broadband or Dialup can be selected by clicking
the appropriate tap; the entire configuration is specific to each interface.
• No Limit - If this is selected specified restriction will not be applied when traffic limit
is reached.
• Download only - If this is selected the specified restriction will be applied to the
incoming traffic only
• Both Directions - If this is selected the specified restriction will be applied to both
incoming and outgoing traffic only
Enable Monthly Limit Use this if your ISP charges for additional traffic. If enabled, enter the monthly
volume limit and select the desired behavior when the limit is reached.
Note: Both incoming and outgoing traffic are included in the limit.
Increase this
month's limit
Use this to temporarily increase the Traffic Limit if you have reached the monthly
limit, but need to continue accessing the Internet. Check the checkbox and enter the
desired increase. (The checkbox will automatically be cleared when saved so the
increase is only applied once.)
This month's limit
This displays the limit for the current month.
Restart traffic
counter
This determines when the traffic counter restarts. Choose the desired time and day of
the month.
Restart Counter at a
Specific Time
Check this radio button to restart the Traffic Counter at a specific time and day of the
month. Fill in the time fields and select AM or PM and the day of the month from the
pull-down menus.
Send E-mail Report
before restarting
counter
If checked, an E-mail report will be sent immediately before restarting the counter.
You must configure the E-mail screen in order for this function to work (see “E-Mail
Notifications of Event Logs and Alerts” on page 4-27).
When limit is
reached
Select the desired option:
• Block all traffic – all access to and from the Internet will be blocked.
• Block all traffic except E-mail – Only E-mail traffic will be allowed. All other traffic
will be blocked.
• If using this option, you may also select the Send E-mail alert option. You must
configure the E-mail screen in order for this function to work.
Internet Traffic
Statistics
This displays statistics on Internet Traffic via the WAN port. If you have not enabled
the Traffic Meter, these statistics are not available.
Traffic by Protocol
Click this link if you want to know more details of the Internet Traffic. The volume of
traffic for each protocol will be displayed in a sub-window.Traffic counters are
updated in MBytes scale, counter starts only when traffic passed is at least 1MB.
2-14
Connecting the FVS338 to the Internet
v1.0, January 2007
FVS338 ProSafe VPN Firewall 50 Reference Manual
Configuring the WAN Mode
The WAN Mode screen allows you to configure how your router uses your external Internet
connections; for example, your WAN port or dialup modem connections.
•
NAT. NAT is the technology which allows all PCs on your LAN to share a single Internet IP
address. Viewed from the Internet, the WAN port on the VPN firewall is configured with a
single IP address—the “public” address. PCs on your LAN can use any “private” IP address
range, and these IP addresses are not visible from the Internet.
–
The Router uses NAT to select the correct PC (on your LAN) to receive any incoming data
and hides internal IP addresses from computers on the Internet.
–
If you only have a single Internet IP address, you MUST use NAT.
NAT is the default setting. Select NAT if your ISP has assigned only one IP address to you.
The computers that connect through the router must then be assigned IP addresses from a
private subnet (for example: 192.168.1.0).
•
Classical Routing. In this mode, the Router performs Routing, but without NAT. To gain
Internet access, each PC on your LAN must have a valid Internet IP address.
If your ISP has allocated many IP addresses to you, and you have assigned one of these
addresses to each PC, you can choose Classical Routing. Or, you can use Classical Routing for
routing private IP addresses within a campus environment. Otherwise, selecting this method
will not allow Internet access through this Router.
Note: The router will delete all inbound firewall rules when switching between NAT
and Classical Routing.
To configure the WAN Mode:
1. Select Network Configuration from the main menu and WAN Mode from the submenu. The
WAN Mode screen will display.
2. Check either the NAT or Classical Routing radio box. NAT is the default.
3. Select the Port Mode. The Port Mode settings allow you to configure your router to use only
one WAN port or to select the Dialup port as a backup.
•
If you are connected to only one ISP, then check the Use only single WAN port and select
the WAN port that is connected to your ISP from the pull down menu.
Connecting the FVS338 to the Internet
2-15
v1.0, January 2007
FVS338 ProSafe VPN Firewall 50 Reference Manual
•
If you have both ISP links connected for Internet connectivity, check the Primary
Broadband with Dialup as backup for auto-rollover.
4. The WAN Failure Detection Method must be configured to notify the router of a link failure if
you are using Dialup as a backup to engage auto-rollover. The router checks the connection of
the primary link at regular intervals to detect its status. Check the radio box of one the
following methods to detect link failure:
•
Select DNS lookup using configured DNS Servers to detect failure of the Broadband
link, using the DNS servers configured in the Broadband ISP Settings screen.
•
Select DNS lookup using this DNS Server and enter the IP address of the DNS server to
specify a DNS server for detecting WAN failure
•
Select Ping to this IP address and enter an IP address to detect WAN failure by pinging to
an IP address. Ensure that this destination host is reliable.
If a failure is detected on the primary broadband connection, the secondary dialup connection
connects to the Internet. When the primary connection is detected as back online, the
secondary dialup connection disconnects.
5. Enter a Test Period, in seconds, to tell the router how often it should run the configured
detection method. The default is 30 seconds.
6. Enter the number of router failures that should occur before the router rolls-over to the Dialup
port. The default is 4.
7. Enter Apply to save your settings or Cancel to revert to the previous settings.
Configuring Dynamic DNS (If Needed)
Note: If your ISP assigns a private WAN IP address such as 192.168.x.x or 10.x.x.x, the
dynamic DNS service will not be available since private addresses cannot be
routed on the Internet.
Dynamic DNS (DDNS) is an Internet service that allows routers with varying public IP addresses
to be located using Internet domain names. To use DDNS, you must setup an account with a
DDNS provider such as DynDNS.org, TZO.com or Iego.net.
Once you have registered your domain name to their IP address, all FQDN traffic will be directed
to your frequently-changing IP address. (For rollover mode, you will need a fully qualified domain
name to implement features such as exposed hosts and virtual private networks regardless of
whether you have a fixed or dynamic IP address.)
2-16
Connecting the FVS338 to the Internet
v1.0, January 2007
FVS338 ProSafe VPN Firewall 50 Reference Manual
This router firmware includes software that notifies dynamic DNS servers of changes in the WAN
IP address, so that the services running on this network can be accessed by others on the Internet.
After you have configured your account information in the firewall, whenever your ISP-assigned
IP address changes, your firewall will automatically contact your dynamic DNS service provider,
log in to your account, and register your new IP address.
To configure a Dynamic DNS address:
1. Select Network Configuration from the main menu and Dynamic DNS from the submenu.
The Dynamic DNS Configuration screen displays. The WAN Mode section displays the
currently configured WAN Mode: Single Port or Auto-Rollover.
Figure 2-9
If you have configured Single Port, choose a DNS service provider, then fill out the DDNS
section for that port. If you have enabled Auto-Rollover, choose a service provider and
complete both sections. (Only those options that match the configured WAN Mode will be
accessible.)
Connecting the FVS338 to the Internet
2-17
v1.0, January 2007
FVS338 ProSafe VPN Firewall 50 Reference Manual
2. Check the Dynamic DNS Service radio box you want to enable. The fields corresponding to
the selection you have selected will be highlighted. Each DNS service provider requires its
own parameters.
3. Access the Web site of one of the DDNS service providers and set up an account. A link to
each DDNS provider is opposite the DNS Configuration screen name.
4. After setting up your account, return to the Dynamic DNS Configuration screen and fill in the
required fields for the DDNS service you selected:
a. In the Host and Domain Name field, enter the entire FQDN name that your dynamic DNS
service provider gave you (for example: <yourname>.dyndns.org).
b. Enter the User Name, User email Address, or Account Name requested by the DDNS
Service to identify you when logging into your DDNS account.
c. Enter the Password, or User Key, for your DDNS account.
d. If your dynamic DNS provider allows the use of wild cards in resolving your URL, you
may check the Use wildcards radio box to activate this feature.
For example, the wildcard feature will cause *.yourhost.dyndns.org to be aliased
to the same IP address as yourhost.dyndns.org
5. Click Apply to save your configuration or click Cancel your settings and revert to the
previous settings.
2-18
Connecting the FVS338 to the Internet
v1.0, January 2007