1
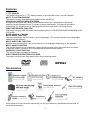
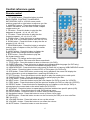
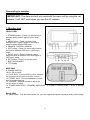
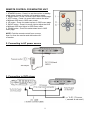
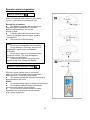
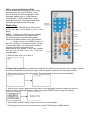
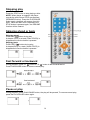
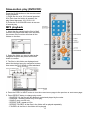
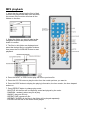
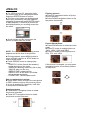
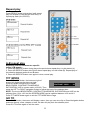
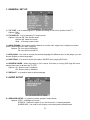
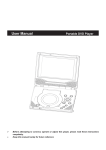
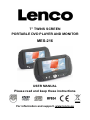
7” TWINS SCREEN
PORTABLE DVD PLAYER AND MONITOR
MES-216
USER MANUAL
Please read and keep these instructions
For information and support, www.lenco.eu
SAFETY INFORMATION
CAUTION:
DVD/VIDEO CD/CD PLAYER IS A CLASS 1 LASER PRODUCT. HOWEVER THIS DVD/
VIDEO, CD/CD PLAYER USES A VISIBLE LASER BEAM WHICH COULD CAUSE
HAZARDOUS RADIATION EXPO SURE IF DIRECTED. BE SURE TO OPERATE THE
DVD/VIDEO CD/CD PLAYER CORRECTLY AS INSTRUCTED.
WHEN THIS DVD/VIDEO CD/CD PLAYER IS PLUGGED TO THE WALL OUTLET, DO
NOT PLACE YOUR EYES CLOSE TO THE OPENING OF THE DISC TRAY AND
OTHER OPENINGS TO LOOK INTO THE INSIDE OF THIS PLAYER.
USE OF CONTROLS OR ADJUSTMENTS OR PERFORMANCE OF PROCEDURES OTHER
THAN THOSE SPECIFIED HEREIN MAY RESULT IN HAZARDOUS
RADIATION EXPOSURE.
DO NOT OPEN COVERS AND REPAIR YOURSELF. REFER SERVICING TO QUALIFIED
PERSONNEL
THIS DEVICE IS INTENDED FOR CONTINUOUS OPERATION!
TO REDUCE THE RISK OF FIRE OR ELECTRIC SHOCK, AND ANNOYING
INTERFERENCE, USE THE RECOMMENDED ACCESSORIES ONLY.
WARNING:
- TO PREVENT FIRE OR SHOCK HAZARD. DO NOT USE THIS PLUG WITH AN
EXTENSION CORD. RECEPTACLE OR OTHER OUTLET UNLESS THE BLADES
CAN BE FULLY INSERTED TO PREVENT BLADE EXPOSURE.
- TO PREVENT FIRE OR SHOCK HAZARD. DO NOT EXPOSE THIS APPLIANCE TO
RAIN OR MOISTURE.
CAUTION - LASER RADIATION WHEN OPEN, DO NOT STARE INTO BEAM.
VENTILATION WARNING - THE NORMAL VENTILATION OF THE PRODUCT SHALL
NOT BE IMPEDED FOR INTENDED USE.
The lighting flash and
arrow head within the
triangle is a warning sign
alerting you of
“dangerous voltage”
inside the product.
CAUTION: To reduce the risk of
electric shock. Do not remove cover
(or back). No user serviceable parts
inside. Refer servicing to qualified
service personnel.
The exclamation point
within the triangle is a
warning sign alerting you
of important instructions
accompanying the
product.
Always follow basic safety precautions when using electrical products, especially
when children are present.
WARNING: To avoid the risk of electrical shock, make sure the product is unplugged from
the electrical outlet before relocating, servicing, or cleaning it.
1
Read all instructions before using
•
•
•
•
•
•
•
•
•
•
Do not use this product near water.
Do not ceiling- or wall-mount the product.
Install the product in accordance with the operating instructions.
Do not set the product near heat sources, such as radiators, heat registers, stoves, or other
apparatus (including amplifiers) that produce heat.
Protect the power cord from being walked on or pinched, particularly at plugs, convenience
receptacles, and the point where they exit the product.
Unplug the product during lightning storms or when unused for long periods of time.
Do not expose the product to dripping or splashing water. Do not place objects filled with liquid
(e.g., vases) on the product.
Do not place in or expose the product to direct sunlight, extreme heat, humid or dusty locations.
Do not attempt to examine or repair this product yourself; take the product to a service centre for
inspection and repair.
Keep magnetic objects such as speakers,at a distance from the player.
LASER SAFETY
This set employs an optical laser beam system in the CD mechanism designed
with built-in safeguards. Do not attempt to disassemble. Exposure to this
invisible laser light beam may be harmful to the human eye. This is a Class-1
laser product. Use of controls, adjustments or procedures other than those
specified herein may result in hazardous laser light beam exposure. This
compact disc player should not be adjusted or repaired by anyone except
qualified service personnel. The laser mechanism in the set corresponds to the
stylus (needle) of a record player. Although this product uses a laser pick-up
lens, it is completely safe when operated according to directions.
NOTE: The manufacturer is not responsible for any radio or TV interference caused by unauthorized
modifications. Such modifications could void the user's authority to operate the equipment.
1) Operate turning controls and switches as instructed in the manual.
2) Before turning on the power for the first time,make sure that the power cord is properly installed.
3) Store your discs in a cool area to avoid damage from heat.
If at any time in the future you should need to dispose of this
product please note that: Waste electrical products should not be
disposed of with household waste. Please recycle where facilities
exist. Check with your Local Authority or retailer for recycling
advice. (Waste Electrical and Electronic Equipment Directive)
2
Table of contents
Getting Started:
Safety information
........................................................................................................................1-2
Features
..........................................................................................................................................4
Accessories
................................................................................................................................4
Control reference guide ...............................................................................................................
5-6
Basic connection ............................................................................................................................7-11
Remote control preparation ................................................................................................................12
Basic Operation:
Basic play ..........................................................................................................................................13
Stopping play ........................................................................................................................................14
Skipping ahead or back ......................................................................................................................14
Fast forward backward...........................................................................................................................14
Pause or play ........................................................................................................................................14
Slow-motion play [DVD/VCD] ................................................................................................................15
MP3 playback
................................................................................................................................ 15
MP4 playback .......................................................................................................................................16
JPEG CD..........................................................................................................................................17-18
Enjoying Video CD with playback control …………………………………..............................................18
USB playback........................................................................................................................................19
CARD playback.....................................................................................................................................20
On screen display information…………………………………….............................................................21
Advanced Operation:
Program play
..................................................................................................................................21
Repeat play
.................................................................................................................................22
A-B repeat play ..................................................................................................................................22
TFT MODE ........................................................................................................................................... 22
GO TO.................................................................................................................................................. 22
Changing subtitle language(DVD only) .................................................................................................23
ZOOM play.............................................................................................................................................23
Changing audio soundtrack language[DVD/VCD/CD disc] ................................................................23
Viewing from different angle(DVD only).................................................................................................24
Initial Settings:
Common procedure for initial settings ...................................................................................................24
General setup
…………… …………………………………………………………………………………25
Audio setup
…………… …………………………………………………..…………………………25-26
Password setup
……… ………………………………………… ……………………………………..… 26
For Reference:
Definition of terms
.........................................................................................................................27
Specifications
..................................................................................................................................28
Troubleshooting .............................................................................................................................29-30
DISC handling and maintenance ......................................................................................................30
Region Code Setting .............................................................................................................................30
3
Features
7" TFT DISPLAY
This player has a built-in 7" TFT display window, to provide clear vision, and low radiation.
MULTI TV SYSTEM SUPPORT
The player can play discs with signal system of PAL and NTSC.
GRAPHICAL USER INTERFACE SCREEN
Simply by pressing the OSD button on the remote control unit, information on the player
and disc can be displayed on the TV screen for easy identification, The player's operations
and settings can be performed by operating the remote control while monitoring screen.
USB/ CARD READER FUNCTION
This player can play USB /SD /MMC card containing files in VCD/SVCD/DVD/MP3/WMA/MP4/JPEG
/CD format.
SLIDE SHOW IN 17 MODES
MULTI-AUDIO FUNCTION
The audio soundtrack can be heard in up to 8 languages. (The number of audio sound languages
depends on the software.)
MULTI-SUBTITLES FUNCTION
Subtitles may be displayed in one of a maximum of 32 languages depending on the software.
MULTI-ANGLE FUNCTION
This function allows you to choose the viewing angle of scenes which were shot from a number
of different angles. (Limited to DVD recorded with multiple camera angles.)
PARENTAL LOCK FUNCTION
This prevents play unsuitable for children.
DISC FORMATS SUPPORTED BY PLAYER
The player can play back discs bearing any of the following marks:
Accessories
All the pictures in the instruction manual are just for your reference, specification should refer to
the actual accessories.
4
Control reference guide
Main unit
1. TFT Display window - Displays all information about DVD work scene.
2. UP navigation button - Press this button to move up.
3. OK button - Press this button to confirm a selection.
4. Built-in Speakers.
5. PREV button - Press this button to move left or to skip to the previous chapter or title (for DVD) or
track (for VCD/ CD).
6. NEXT button - Press this button to move right or to skip to the next chapter or title (for DVD) or track
(for VCD/ CD).
7. Remote Control Sensor
8. LEFT navigation button - Press this button to move left.
9. DOWN navigation button - Press this button to move down.
10. JAG - Push the door upward from the jag of the door cover
11. RIGHT navigation button - Press this button to move right.
12. MENU button - Press this button to return to the root menu (for DVD) or to turn on/off the PBC
(for VCD)
13. STOP button - Press this button to halt playing.
14. PLAY/PAUSE button - Press this button to start or pause playing the disc.
15. DC In Jack - Power input jack.
16. Power Switch- Switch this knob to turn on/off the player.
17. AV Out Jack - Connect to TV or other external AV equipment to use the player as a signal source.
18. PHONE 2 - Connect headphone to this jack for private listening.
19. PHONE 1 - Connect headphone to this jack or private listening.
20. Volume - Rotate this knob to adjust the volume to a suitable level.
21. Power Indicator - It is green in working mode.
22. SD/MMC card slot
23. USB slot
24. Holder - Pull the back bracket out, you can support and place the player levelly on the stage.
5
Control reference guide
Remote control
1. TFT MODE button - Press this button to select
BRIGHTNESS, CONTRAST, SHARPNESS,
SATURATION, HUE or 16:9/4:3 screen mode
and then press left or right button to adjust as you like.
2. NUMERIC buttons - Press these buttons to input
numeric information, such as track number, chapter
number and so on.
3. FR button - Press this button to play the disc
backward at speeds : x2, x4, x8, x16, x32.
4. FF button - Press this button to play the disc
forward at speeds : x2, x4, x8, x16, x32.
5. ZOOM button - Press this button to enlarge picture
size, max. to X 4 or to shrink picture size, min. to X1/4.
6. SLOW button - Press this button to play the disc at
speeds:1/2,1/4,1/8,1/16.
7. PROGRAM button - Press this button to setup the
memory order of chapter or title (for DVD) or tracks
(for VCD/CD).
8. ANGLE button - Press this button to display the
angle number and change to different angles.
9. STEP button - Press this button to play the
file forward step by step.
10. L/R button - To change audio output mode:
Left Mono, Right Mono, Mix-mono and Stereo soundtrack.
11. TITLE button - Press this button to return to title menu (for DVD).
12. SUBTITLE button - Press this button to display and change subtitle language (for DVD only).
13. LANGUAGE button - To select the soundtrack language (DVD).
14. USB/CARD/DVD - Press this button continuously to switch the unit among USB/CARD/DVD mode.
15. N/P button - Press this button to select NTSC or PAL system (for DVD only).
16. OSD button - Press OSD button continuously during playback, the screen will display the
playing information, such as elapsed time, remaining time and so on.
17. GO TO button - Press this button to set the player to play disc starting at a certain point.
18. PLAY/PAUSE button - Press this button to start or pause playing the disc.
19. STOP button - Press this button to halt playing.
20. NEXT button - Press this button to play the next chapter (for DVD) or track (for VCD/CD).
21. PREV button - Press this button to play the previous chapter (for DVD) or track (for VCD/CD).
22. REPEAT button - Press this button to repeat playing one chapter or one title (for DVD) or
repeat playing the current track or the whole tracks (for VCD/CD).
23. A-B button - Press this button to repeat playing sections between two specific points (A-B).
24. SETUP button - Press this button to enter initial settings menu.
25. ENTER button - Press this button to confirm what you have selected.
26. Navigation buttons - Press this button to move up, down, left or right.
27. MENU button - Press this button to return to the root menu(for DVD) or to turn on/off the
PBC (for VCD).
28. VOLUME + button - Press this button to turn up the volume.
29. VOLUME – button - Press this button to turn down the volume.
30. MUTE button - Press this button to mute the sound.
6
Basic connection
z
z
Ensure all the cables are disconnected from the main unit before connecting to AC power source
by AC power adaptor.
Read through the instructions before connecting other equipment.
Connecting to AC power source
7
Connecting to monitor
IMPORTANT: The slave unit will only work with the main unit by using the car
adaptor. It will NOT work when you use the AC adaptor.
1. Monitor Unit
FRONT VIEW
1. STANDBY button - Press it to set the unit in
standby mode, press it again to enter work
mode.
2. MENU button - Press it to enter initial
settings menu. Press it again to move up or
down to select different OSD item.
3. REMOTE CONTROL SENSOR
4. LEFT button - Press it to move left to reduce
the level of different OSD item in OSD menu
mode.
5. RIGHT button - Press it to move right to
adjust the level of different OSD item higher in
OSD menu mode..
6. EXIT button - Press it to exit the menu.
7. BUILT-IN SPEAKER
8. TFT Display
SIDE VIEW
9. POWER SWITCH
10.12V DC IN JACK
11. AV IN JACK - Connect DVD or other external
AV equipment to this jack to use the monitor.
12. PHONE JACK - Connect headphone to this
jack for private listening.
13. VOLUME - Rotate this knob to adjust the
volume lower or louder.
14. POWER INDICATOR / STANDBY INDICATOR - It is green in working mode, it is red in standby
mode.
BACK VIEW
15. Stand Holder - Pull the back bracket out, you can support and place the player levelly on the stage.
8
REMOTE CONTROL FOR MONITOR UNIT
1. STANDBY button - Press it to set the monitor in standby
mode; press it again to set the unit in working mode.
2. MENU button - Press it to enter OSD menu control page.
3. LEFT button - Press it to move left to reduce the level
of different OSD item in OSD menu mode.
4. UP button - Press it to select up item in OSD menu page.
5. RIGHT button - Press it to move right to adjust the level
of different OSD item higher in OSD menu mode.
6. DOWN button - Press it to select down item in OSD
menu page.
NOTE: Point the remote control from no more
than 6 m from the monitor and within about 60°
of monitor.
2. Connecting to AC power source
3. Connecting to DVD player
9
NOTE: The remote control is also effective to the monitor during playing.
z
z
z
z
z
It is recommended to connect a multi-system TV.
Disconnect the AC adaptor before commencing connection.
Do not block ventilation holes of equipment and arrange them so that air can circulate freely.
Read through the instructions before connecting other equipment.
Ensure that you observe the color coding when connecting audio and video cables.
Note:
During DVD play, the TV volume may be at a lower level than during TV broadcasts, etc. If this is the
case, adjust the volume to the desired level. If the DVD/VCD/CD player is connected to the TV through
a video cassette recorder, the picture may not be played back normally with some DVDs. If this is the
case, do not connect the player via the VCR.
Connecting to TV set
10
Connecting to audio equipment
Connect Headphones
1. Connect the Headphones.
- Adjust the volume to minimize the volume.
- Connect the headphones to phone jack.
2. Adjust the Volume to the level that you want.
11
Remote control preparation
Battery installation
Insert the batteries while observing the correct
(+) and (-) polarities as illustrated at right.
Service life of batteries
z
The batteries normally last for about one
year although this depends on how often,
and for what operations, the remote
control is used.
z
If the remote control fails to work even
when it is operated near the player, replace
the batteries.
z
Use one type CR2025 battery.
NOTE:
z
Do not use rechargeable (Ni-Cd) battery.
z
Do not attempt to recharge, short-circuit,
disassemble, heat or throw the batteries
into the fire.
z
Do not drop, step on or otherwise impact
the remote control . This may damage the
parts or lead to malfunction.
z
If the remote control is not going to be
used for a long time, remove the battery
Remote control operation range
Point the remote control from no more than
about 6 m from the remote control sensor and
within about 60° of the front of the player.
z
The operating distance may vary according to
the brightness of the room.
NOTE:
z
Do not point bright lights at remote control sensor.
z
Do not place objects between the remote
control and the remote control sensor.
z
Do not use this remote control unit while
simultaneously operating the remote control
of any other equipment.
12
Before enjoying DVD/Video CD/CD
The on-screen menu language of your player
has been factory pre-set to English. If you
want to change the menu language to other
language, please refer to "Initial settings /
General setup / OSD LANGUAGE". In the
explanation below it is assumed that English
has been selected as menu language.
Basic play
1. Switch on the POWER to the “ON” position
at the right side of the player to turn on the
player.
NOTE: 1).Make sure that all the connections
including connections to AC adapter, other
AV equipment etc. have been done before
switch the POWER switch to the "ON" position.
2).After switch the POWER switch to
the "OFF" position, if you want to switch it to the
"ON" position again, you should wait at least 2
seconds, otherwise some abnormal
phenomenon may appear, in this case, please
turn the unit off then turn it on, it will work
normally again.
2. Push the disc cover up to open it.
3. Place a disc onto the disc compartment. Hold the disc without touching either of its surfaces, position
it with the printed title side facing up, align it with the guides, and place It in its proper position.
4. After closing the disc cover, play begins. The player starts to read the disc immediately.
5. When a menu screen appears on the screen, move navigation buttons or press the numeric
buttons to select preferred chapter number, then press ENTER button to play the chapter.
6. Press PREV or NEXT button to play the previous or next chapter.
7. To stop play and return to the menu screen, press TITLE button or MENU button.
13
Stopping play
Press the STOP button to stop playing a disc.
NOTE: When player is stopped, the player
records the point where STOP was pressed
(RESUME function). Press the PLAY/PAUSE
button again, playback will resume from this
point . When the disc door is opened or the
STOP button is pressed again, the RESUME
function will be cleared.
Skipping ahead or back
Skipping ahead
button during play
Press NEXT
A chapter (DVD) or a track (Video CD/CD) is
skipped each time the button is pressed.
Skipping back
button during play
Press PREV
A chapter(DVD) or a track (Video CD/CD) is
skipped each time the button is pressed.
Fast forward or backward
During playback, press FF
button or FR
button to fast forward/rewind.
Press PLAY/PAUSE button to resume normal play.
Pause or play
During playback, press PLAY/PAUSE button, the play will be paused, To resume normal play,
press the PLAY/PAUSE button again.
14
Slow-motion play (DVD/VCD)
Press the SLOW button on the remote control
during playback.
1) Plays the disc at a 1/2 of normal speed at
first. Each time the button is pressed, the
play Speed becomes 1/2,1/4,1/8,1/16.
2) Press the PLAY/PAUSE button to resume
to normal play.
MP3 playback
1. Insert the disc containing the files in Mp3
format to be played and after a few seconds,
the screen of the monitor will show all the
folders on the disc:
2. Select the folder you want to play by the
navigation buttons and press the ENTER
button to confirm.
3. The files in this folder are displayed and
select the desired song by navigation buttons,
then press the PLAY button to start playback.
Current file type
4. Press the PREV or NEXT button to turn the current menu page to the previous or next menu page.
5. Press REPEAT button to change play mode.
- SHUFFLE: All the files will be randomly sorted and played by the order.
- RANDOM : randomly select any file to play.
- SINGLE: play one file only.
- REPEAT ONE: repeat one file.
- REPEAT FOLDER: all the files in the folder will be played repeatedly.
- FOLDER: all the files in the folder will be played
15
MP4 playback
1. Insert the disc containing the files in Mp4
format to be played and after a few seconds,
the screen of the monitor will show all the
folders on the disc:
2. Select the folder you want to play by the
navigation buttons and press the ENTER
button to confirm.
3. The files in this folder are displayed and
select the desired file by navigation buttons,
then press the PLAY/PAUSE button to start
playback.
4. Press the NEXT or PREV button play the next or previous file.
5. Press the GO TO button to play the disc from the certain point as you want to.
6. Press the DISP button to display the playing information, the time remain, the time elapsed
and so on.
7. Press REPEAT button to change play mode.
-SHUFFLE: All the files will be randomly sorted and played by the order.
-RANDOM : randomly select any file to play.
-SINGLE: play one file only.
-REPEAT ONE: repeat one file.
-REPEAT FOLDER: all the files in the folder will be played repeatedly.
-FOLDER: all the files in the folder will be played
16
JPEG CD
z For JPEG picture CD, select the folder
you want to play by the navigation buttons
and press ENTER button to confirm.
z The files in this folder are displayed and
select your pictures by using the up/down
navigation buttons and press ENTER button
to start playback. Thumbnail of picture will
be displayed while you scrolling across the
file name.
Flipping pictures
z Press UP navigation button to flip the
picture vertically.
z Press DOWN navigation button to flip
the picture horizontally.
z Once a folder and file is selected, the
picture is loaded onto the screen.
NOTE: The time to load and display picture
depends on the file size of the pictures.
z During playback, press MENU button to
return to folder selection or STOP button to
enter preview mode.
z Press REPEAT button to change play
mode:
- SHUFFLE: All the files will be randomly
sorted and play by the order.
- RANDOM: randomly select any file to play.
- SINGLE: play one file only.
- REPEAT ONE: repeat one file.
- REPEAT ALL: all the files in the folder
will be played repeatedly.
- FOLDER OFF: cancel repeat mode.
Picture Shrink/Zoom
z Press ZOOM button to enter the zoom
mode
z Press FF button to enlarge picture to
100%, 125%, 150% and 200%
z Press FR button to shrink pictures to
50%, 75%, and 100%
If the picture is enlarged, you may press
navigation buttons to see other portions
of the picture.
Skip to next/previous picture
z Press NEXT button to skip to the next picture
or PREV button to skip to the previous picture.
If no key is pressed for 5 seconds, it will skip
to next picture automatically.
Rotating pictures
z Press RIGHT navigation button to rotate
the picture clockwise.
z Press LEFT navigation button to rotate
the picture counter-clockwise.
17
JPEG CD
Slide show effects
Press PROGRAM button to select one of the effects
when changing from one picture to another :
1
2
3
4
5
6
7
8
9
10
11
12
13
14
15
16
17
Wipe Top
Wipe Bottom
Wipe Left
Wipe Right
Diagonal Wipe Left Top
Diagonal Wipe Right Top
Diagonal Wipe Left Bottom
Diagonal Wipe Right Bottom
Extend From Centre H
Extend From Centre V
Compress To Center H
Compress To Center V
Window H
Window V
Wipe From Edge To Centre
Move In Form Top
None
Enjoying Video CD with
playback control
1. When playing VCD 2.0 with PBC, the player
will show the VCD version and PBC status on
the screen.
2. After a few seconds, a menu will appear on
the screen.
3. Press numeric buttons to select corresponding track, if the track number is under 10, choose one of
the numeric buttons 0 ~ 9.If the track number is exceed 10, press 10+ button firstly, then press numeric
buttons 0 ~ 9.
4. Press NEXT or PREV button to play the next or previous track.
NOTE: When PBC is OFF, there will be no menu page on the screen, you can select any track to
play by using numeric buttons. When PBC is ON, there will be a menu page on the screen,
and you can select any track on the menu to play, however, when the selected track is being
played, you can not change the play order any more except pressing the MENU button to return
to the menu page again and select another track to play.
18
USB Playback
1. Insert USB containing the files in
VCD/SVCD/DVD/MP3/WMA/MP4/JPEG /CD
format to be played.
2.Press USB/CARD/DVD button to switch the
unit in USB reader mode. Then the screen will
display as following:
3. After several seconds, all the folders in the
USB will display on monitor screen:
4. Select a folder you want to play using the
navigation buttons and press the ENTER button to confirm.
5. The files in this folder are displayed and select the desired file by navigation buttons, then press the
ENTER button to start playback.
6. Press NEXT or PREV button to turn the current menu page to the next or previous menu page.
7. Press REPEAT button to set repeat playing mode.
- SHUFFLE: All the files will be randomly sorted and played by the order.
- RANDOM : randomly select any file to play.
- SINGLE: play one file only.
- REPEAT ONE: repeat one file.
- REPEAT FOLDER: all the files in the folder will be played repeatedly.
- FOLDER: all the files in the folder will be played
19
CARD Playback
1. Insert the CARD (SD/MMC) containing
the files in VCD/SVCD/DVD/MP3/WMA/
MP4/JPEG /CD format to be played.
2. Press USB/CARD/DVD button to switch
the unit in CARD reader mode.
3. After several seconds, all the folders in
the CARD will display on monitor screen:
4. Select a folder you want to play by using
the navigation buttons and press the ENTER
button to confirm.
5. The files in this folder display and select
the desired file by navigation buttons, then
press the ENTER button to start playback.
6. Press NEXT or PREV button to turn the current menu page to the next or previous menu page.
7. Press REPEAT button to change repeat playing mode.
- SHUFFLE: All the files will be randomly sorted and played by the order.
- RANDOM : randomly select any file to play.
- SINGLE: play one file only.
- REPEAT ONE: repeat one file.
- REPEAT FOLDER: all the files in the folder will be played repeatedly.
- FOLDER: all the files in the folder will be played
8. Press STOP button when playing, then you will enter preview mode.
9. Press MENU button to return files list menu.
10. Press right/ left button to rotate the image clockwise/ counter-clockwise during photo playback.
11. Press up/ down button to flip the image vertically/ horizontally during photo playback.
12. Press ZOOM button to enter the zoom mode:
-Press FF button to enlarge picture to 100%, 125%, 150% and 200%
-Press FR button to shrink pictures to 50%, 75% and 100%
20
On screen display Information
Press OSD button to display playing information.
Program play
The player plays the files in an desired order.
1. Press PROGRAM button and the screen will
display the program menu.
2. Press navigation buttons to choose memory index and then press ENTER button to start input.
Enter desire titles/chapters numbers by using the numeric buttons. The selected titles/
chapters are stored into the memory. Select NEXT on the menu to see the next page. Up to 20
memories can be stored.
NOTE: Leading zero is not necessary. If the track number is more than 10, press the 10+ key
first and then the unit digit.
Example: Track 12, press "10+" and then "2"
Track 21, press "10+" twice and then "1"
3. Select START on the menu and press ENTER button to start program play or select EXIT
on the menu and press ENTER button to exit without program play.
4. To clear programmed items, scroll the navigation button to the item to be cleared and press
ENTER button, the selected item will be deleted.
5. To stop the program, press PROGRAM button select STOP on the menu, then press ENTER
button.
21
Repeat play
Press REPEAT button during play, it will repeat
play one chapter or one title (for DVD disc), or
repeat play track (for VCD/CD).
A-B repeat play
Repeating sections between two specific
points (A-B repeat)
1. Press A-B REPEAT button during play at the point where repeat play is to be started (A).
2. Press A-B REPEAT button at the point where repeat play is to be ended (B). Repeat play of
the selection between points A and B starts.
3. Press A-B REPEAT button once again to return normal play.
TFT MODE
Press TFT MODE button, the bottom at right of
screen will display as the picture at right:
Press this button continuously to select
CONTRAST IIIIIIIIII........ 00
BRIGHTNESS, CONTRAST, SHARPNESS,
SATURATION, HUE or screen mode (16:9/4:3). Then
press the LEFT or RIGHT navigation button to adjust the level of the selected item.
NOTE: The level of BRIGHTNESS, CONTRAST, SHARPNESS, SATURATION and HUE can be
adjusted from -20 to +20. And the SCREEN MODE can be switched between 16:9 and 4:3.
Press TFT MODE button again to exit the TFT MODE Menu Page.
GO TO
Press GO TO button, the screen will display a menu, then you can move Up or Down Navigation button
and enter directly a time, chapter or track, the disc will play from the selected point.
Press GO TO button again to exit the menu.
22
Changing subtitle language (DVD only)
It is possible to change the subtitle language to
a different language from the one selected at
the initial settings. (This operation works only
with discs on which multiple subtitle languages
are recorded )
1. Press SUBTITLE button during play, the
screen will display the current language.
2. Press SUBTITLE button again to change
language or turn off.
NOTE: When no subtitles are recorded,
press this button will not work.
ZOOM PLAY
This function allows you to enjoy a motion
picture.
z Press ZOOM button when playing, the screen
shows:
z Press NAVIGATION button to scroll across the
enlarged picture.
Changing audio soundtrack language(DVD/VCD/CD disc)
It is possible to change the audio soundtrack language to a different language from the one selected at
the initial settings (This operation works only with discs on which multiple audio soundtrack
languages are recorded).
z Press LANGUAGE button while playing DVD disc the screen will display the number of current
soundtrack languages, pressing the button again will change the language.
z Pressing L/R button while playing VCD/CD disc will change audio output mode: Mono Left,
Mono Right, Mix-mono and Stereo soundtrack.
NOTE: When no soundtrack languages are recorded, pressing this button will not
work.When the power is turned on or the disc is removed, the language heard is the
one selected at the initial settings.
23
Viewing from different angle (DVD only)
Some DVDs may contain scenes which have
been shot simultaneously from a number of
different angles. For these discs, the same
scene can be viewed from each of these
different angles using the ANGLE button.
Press ANGLE during play, number of angle
being played will be displayed in the screen,
press the button to change to different angles.
Initial Settings
z
Once the initial programming is entered it is
retained in memory until changed, the player can
always be operated under the same conditions.
z
The settings will be retained in the memory
until the settings are changed even after setting
the player to the OFF mode.
Common procedure for initial settings
1. Press SETUP button.
2. Use the navigation buttons to select preferred
item, and press ENTER button, each screen
for setting the value is displayed. Then move
the navigation button to set the item and press
ENTER button to confirm the settings.
3. Press SETUP button to close setup menu in
any mode.
4. Use left navigation button to switch to another
main setup items
24
1. GENERAL SET UP
1.1 TV TYPE - It is for selecting the TV system according to the colour system of the TV.
Options: PAL
NTSC
1.2 TV DISPLAY - It is for selecting TV output mode.
Options: Normal /PS: Pan & scan mode
Normal/ LB: Letter box mode
Wide : 16:9 wide screen mode
1.3 ANGLE MARK - It is used to select whether or not the multi- angle icon is display on screen
when a Multi-angle DVD disc is playing.
Options: On: Icon will be displayed
Off: Icon will be turned off
1.4 OSD LANG - It is used to choose the desired language for different user. In this player, you can
choose English or other languages.
1.5 CAPTIONS - It is used to switch the caption ON/OFF when playing DVD disc.
1.6 SCREEN SAVER - When the player is not in use for 5 minutes, a running DVD logo will move
across the screen to protect the TV CRT.
Options: On: Screen saver is enabled
Off: Screen saver is disabled
1.7 DEFAULT - It is used to reset to factory settings.
2. AUDIO SETUP
2.1 SPEAKER SETUP - It is used to set the speaker Output levels
Options: LT/RT - Left/Right mix mode
STEREO - Select this option if you don't have a 2.1 channel amplifier.
SURROUND - It is used to set dummy surrounding audio effectiveness.
25
2.2 EQUALIZER SETUP - It is used to compensate for frequency distortion to improve its
frequency response in audio systems (not applicable).
Options: SOUND MODE - It is for selecting the Equalizer Type, in this unit, you can choose
Mono, Rock, Pop, Live, Dance, Techno, Classic or Soft.
BASS BOOST - It is used to turn the Bass Boost ON or OFF.
SUPER BASS - It is used to turn the Super Bass ON or OFF.
TREBLE BOOST - It is used to turn the Treble Boost ON or OFF.
3. PASSWORD SET UP
3.1 PASSWORD - It is used to change the password, and the procedure of changing password
is described as followings:
Enter old password in the OLD PASSWORD row
Enter new password in the NEW PASSWORD row
Enter the new password again in the CONFIRM PWD row
Press OK button on the screen to return to the Password Setup Page, then the
Password has been changed.
NOTE: The original password is 136900, you can change it, but you should write it
down and keep it safe. If you forget the password, please use the original password: 136900.
3.2 PARENTAL - This setting allows certain people to view certain discs, which may be
especially useful to forbid children from viewing some unbefitting discs. When you
have entered the Parental Control, the screen will display:
Scroll down the alternatives by moving Up or Down Navigation button, press ENTER button
and enter the password which you has set before, then you have set a Parental Control.
There are eight different settings from “Kid Safe” to “Adult” which you can choose.
26
Definition of terms
DVD
This refers to a high-density optical disc on which high-quality pictures and sound have been
obtained by means of digital signals. Incorporation a new video compression technology
(MPEG II) and high-density recording technology, DVD enables aesthetically pleasing
full-motion video to be recorded over long periods of time (for instance, a whole movie can
be recorded). DVD has a structure consisting of two 0.6 mm thin discs which are adhered
to each other. Since the thinner the disc, the higher the density at which the information can
be recorded, a DVD disc has a greater capacity than a single 1.2 mm thick disc. Since the
two thin discs are adhered to each other, there is the potential to achieve double-sided play
sometime in the future for even longer duration play.
Video CD
This contains recordings of pictures and sound whose quality is on a par with that of video
tape. This player also supports Video CDs with playback control (version 2.0).
MP3
These contain recordings of music which are compressed, allowing a significantly larger
amount of music to be stored on a CD.
Angle
Recorded onto some DVD discs are scenes which have been simultaneously shot from
a number of different angles (the same scene is shot from the front, from the left side, from
the right side, etc.). With such discs, the ANGLE button can be used to view the scene from
different angles.
Subtitles
This is the appearance of the dialogue at the bottom of the screen which are prerecorded on
some DVD discs.
Title number
These numbers are recorded on DVD discs. When a disc contains two or more movies, these
movies are numbered as title 1, title 2, etc.
Chapter number
These numbers are recorded on DVD discs. A title is sub- divided into many sections, each
of which is numbered, and specific parts of video presentations can be searched quickly
using these numbers.
Time number
This indicates the play time which has elapsed from the start of a disc or a title. It can be
used to find a specific scene quickly.(It may not work with some discs.)
Playback control (PBC)
This is recorded on a Video CD (version 2.0). The scenes or information to be viewed
(or listened to) can be selected interactively with the TV monitor by looking at the menu
shown on the TV monitor.
Track number
These numbers are assigned to the tracks which are re- corded on Video CDs and CDs. They
enable specific tracks to be located quickly.
27
Specifications
Power requirements: AC 100 -240V~ 50/60Hz
Power consumption (main unit): 9.6W
Signal system: NTSC/PAL
Resolution:1440 (H) X 234 (V)
Dots Distance: 0.107 (H) X 0.372 (V) mm
Visible Range: 154.08 (H) X 87.5 (V) mm
Discs played:
(1) DVD-VIDEO disc
12 cm single-sided,single-layer
12 cm single-sided,dual-layer
12 cm double-sided,single-layer
8 cm single-sided,single-layer
8 cm single-sided,dual-layer
8 cm double-sided,single-layer
(2) Compact disc (VIDEO CD)
12 cm disc
8 cm disc
Video output level: 1 Vp-p
Audio output level: 1.2V
Earphone output level: 1KHz, 0dB, 25mW
Pickup: Wave length: 655nm
Laser power: CLASS-1
Measurement (main unit): 270(L) X 167(W) X 36(D) mm
Weight (main unit): Approx.868g
Measurement (monitor): 270(L) X 167(W) X 36(D) mm
Weight (monitor): Approx.508g
Specifications are subject to change without notice.
28
Troubleshooting
Before requesting service for this player, check the chart below for a possible cause of the
problem you are experiencing. Some simple checks or an adjustment on your part may
eliminate the problem and restore proper operation.
Symptom(Common)
No power.
z Play fails to start even when
PLAY is pressed.
z Play starts but then stops
immediately.
No picture.
z No sound.
z Distorted sound.
Picture is distorted during rapid
advance or rapid reverse.
No rapid advance or rapid
reverse play
No operations can be
performed with the remote
control unit.
No key operation (by the main
unit and/or the remote control
unit) is effective.
Symptom [DVD]
Play does not start even
when title is selected.
Audio soundtrack and/or
subtitle language is not the
initial settings.
No subtitles.
Alternative audio soundtrack
(or subtitle) languages fail to
be selected.
Angle cannot be changed.
Remedy
Insert the AC adaptor securely into the power outlet.
z Condensation has formed: wait about 1 to 2 hours to allow the
player to dry out.
z This player cannot play a disc other than DVD, VCD and CD.
z The disc may be dirty and may require cleaning.
z Ensure that the disc is installed with the label side up.
Ensure that the equipment is connected properly.
z Ensure that the equipment is connected properly.
z Ensure that the input setting for the TV and stereo system are
correct.
z Adjust the master volume to a suitable volume by rotating
the volume knob at the side of the player.
The picture will be somewhat distorted at times: this is normal.
Some discs may have sections which prohibit rapid
advance (or rapid reverse.)
z Check the batteries are installed with the correct polarities.
z The batteries are exhausted: replace them with new ones.
z Point remote control at the remote control sensor and operate.
z Operate the remote control unit at a distance of not
more than 6 m from the remote control sensor.
z Remove the obstacles between the remote control and
remote control sensor.
Disconnect the power adaptor and then reconnect it. (The player
may not be operating properly due to lightning, static electricity or
some other external factor.)
Remedy
Confirm the region code setting is right.
If the audio soundtrack and/or subtitle language does not exist on
the disc, the language selected at the initial settings will not be
seen/heard.
z Subtitles appear only with discs which contain them.
Subtitles are cleared from the TV monitor, perform the
steps display the subtitles.
z An alternative language is not selected with discs which
do not contain more than one language.
z In the case of some discs, the alternative language can not be
selected by operating the LANGUAGE or SUBTITLE button. Try
selecting it from the DVD menu if one is available.
This function is dependent on software availability. Even if a disc has
a number of angles recorded, these angles may be
recorded for specific scenes only.
- To be continued
29
Troubleshooting (Continued)
The password for rating level
has been forgotten.
Symptom [Video CD]
No menu play.
Please contact your local sales dealer.
Remedy
This function works only for Video CDs with playback control.
DISC handling and maintenance
Handling precautions
z
Hold the disc by the edges so the surface will not be soiled with fingerprints. Fingerprints,
dirt and scratches can cause skipping and distortion.
z
Do not write on the label side with a ball-point pen or other writing utensils.
z
Do not use record cleaning sprays, benzine, thinner, static electricity prevention liquids.
z
Be careful not to drop or bend the disc.
z
Do not install more than 1 disc on the disc compartment.
z
Do not try to close the disc cover when the disc is not installed properly.
z
Be sure to store the disc in its exclusive case when not in use.
If the surface is soiled
Wipe gently with a soft, damp (water only) cloth.
When wiping discs, always move the cloth from the centre hole toward the outside, which will not cause
distortion. (If you wipe the discs using a circular motion, circular scratches are likely to occur, which will
cause distortion.)
If the disc is brought from a cold to a warm environment moisture may form on the disc
Wipe this moisture off with a soft, dry, lint-free cloth before using the disc.
Improper disc storage
You can damage discs if you store them in the following places:
z
Areas exposed to direct sunlight
z
Humid or dusty areas
z
Areas directly exposed to a heat outlet or heating appliance
Maintenance
z
Disconnect the AC adapter before maintaining the player.
z
Wipe the player with a dry, soft cloth.
z
If the surfaces are extremely dirty ,wipe clean with a cloth which has been dipped in a weak
soap-and-water solution and wrung out thoroughly, and then wipe again with a dry cloth.
z
Never use alcohol, benzine, thinner, cleaning fluid or other chemicals. And do not use
compressed air to remove dust
Region code setting
Region coding: All DVD discs are coded by the sales territory. Please note the player
is set to region 2 coding by the factory which cannot be changed. This is in compliance
with the DVD patent requirements
The region number for this DVD player is
30