1
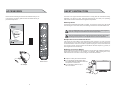
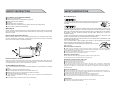
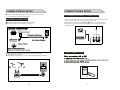
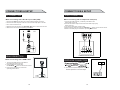
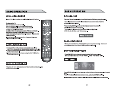
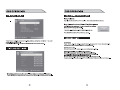
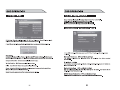
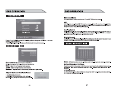
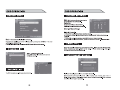
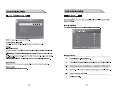
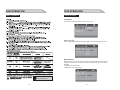
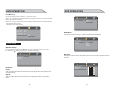
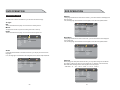
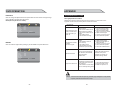
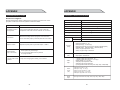
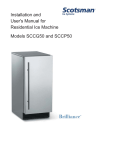
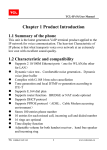
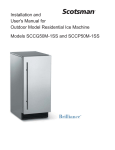
15.6” ATSC/NTSC
SYSTEM LED TV & DVD Combo
LCDVD157A
READ CAREFULLY BEFORE OPERATION
CONTENTS
CONTENTS
CONTENTS ....................................................................................................................01
ACCESSORIES
ACCESSORIES ...............................................................................................................02
SAFETY INSTRUCTION
SAFETY INSTRUCTION ..............................................................................................03~07
INSTRUCTION
CONTROLS......................................................................................................................08
CONNECTION OPTION ....................................................................................................09
REMOTE CONTROL KEY FUNCTIONS ..........................................................................10~12
INSTALLING BATTERIES ..................................................................................................13
INSTALLATION
STANDARD INSTALLATION..........................................................................................14~15
NOTES OF WALL INSTALLATION .......................................................................................15
CONNECTIONS & SETUP
ANTENNA CONNECTION .................................................................................................16
EXTERNAL EQUIPMENT CONNECTIONS ...........................................................................17
....................................................................................................17
USB CONNECTION
PC CONNECTION ............................................................................................................18
HDMI CONNECTION ........................................................................................................18
YPBPR CONNECTION ......................................................................................................19
EARPHONE CONNECTION ...............................................................................................19
BASIC OPERATION
TURNING THE TV ON .......................................................................................................20
VOLUME ADJUSTMENT....................................................................................................20
PROGRAM SELECTION ....................................................................................................20
SLEEP TIMER ..................................................................................................................21
RETURN FUNCTION ........................................................................................................21
SOURCE INPUT SWITCH .................................................................................................21
MAIN MENU .................................................................................................................21
OSD OPERATION
PICTURE MENU OPTIONS .........................................................................................22~25
SOUND MENU OPTIONS ............................................................................................26~27
CHANNEL MENU OPTIONS ........................................................................................28~29
PARENTAL MENU OPTIONS .......................................................................................30~34
SETUP MENU OPTIONS ............................................................................................35~37
OTHERS MENU OPTIONS ..............................................................................................38
MEDIA MENU OPTIONS ............................................................................................39~41
DVD OPERATION
BASIC OPTIONS .......................................................................................................42~46
GENERAL SETUP OPTIONS ......................................................................................47~48
AUDIO SETUP OPTIONS ........................................................................................48~49
PREFERENCE SETUP OPTIONS ..............................................................................50~52
APPENDIX
TROUBLE SHOOTING .............................................................................................53~54
PRODUCT SPECIFICATION ..............................................................................................55
ACCESSORIES
SAFETY INSTRUCTION
Ensure that the following accessories are included with your TV.
If an accessory is missing, please contact the dealer where you
purchased the product.
This LED TV is engineered and manufactured to comply with the international safety
standards. The same as other electrical equipments,all the safety and operating
instructions should be read before the appliance is operated.
About Symbols
This manual includes different kinds of symbols. To ensure the correct using, as well as
to avoid danger to users and others, the following introductions should be adhered to.
EPG
This is a WARNING symbol. If the users ignore this warning, there might be
personal damage or even death due to incorrect operation.
10+
15.6” ATSC/NTSC
SYSTEM LED TV & DVD Combo
SOURCE
This is an ATTENTION symbol. If the users ignore this warning, there might
be damage to the person or to the appliance due to incorrect operation.
No Operations when Problems Occur
LCDVD157A
If any event out of the ordinary, such as smoking, smell, no picture, no voice, over loud
voice, damage of part or cable, and inside of liquid or other things, there might be fire
or electrical shock. Under such occasions, please unplug the TV set, make sure there
is no smoke or smell, and get contact with the dealer. DO NOT repair it by yourself, or
there might be hurt to human body.
READ CAREFULLY BEFORE OPERATION
User Manual
Batteries
MTS
CC
CH LIST
GOTO
A-B
TITLE
AUDIO
SUBTITLE
ANGLE
D.SETUP
D.MENU
INTRO
REPEAT
PROG
Remote control
AC Adapter
2
No Entry of Liquid or Object
There might be fire or electrical shock if liquid or other object get inside the appliance.
Please pay more attention to your children. If it happens, please unplug the TV set,
make sure there is no smoke or smell, and get contact with the dealer.
■ Keep the TV away from rain and moisture.
■ Do not set liquids, including flower vases
and vessels filled with chemicals or water etc.
On top of the TV or around it.
■ Do not set metal or tinder on top of
the TV or around it.
3
SAFETY INSTRUCTION
SAFETY INSTRUCTION
Don’t Remove or Rejigger the TV Set
Connect to Earthing Connection
There is high voltage subassembly inside the TV set, which may cause fire or electrical
shock during repair.
■ DO NOT remove cover ( or back ).
This appliance shall be connected to a mains socket outlet with a protective earthing
connection. If the provided plug does not fit into your outlet, consult an electrician for
replacement of the obsolete outlet. Take care of the cord, or there might be fire or
electrical shock due to broken cord. Please make sure that the cord is not over hot,
pressed, or tensed. If the cord has problem (the core string emerges or the cord
breaks), please get contact with the dealer.
■ Never allow heavy objects such as the TV set itself to be placed on the power cord.
Never cover the cord with table cloth, for it may lead you to set heavy object on the cord
duo to ignorance.
■ When removing the power plug from the socket, always hold onto the plug, never pull by
the cord.
■ Don’t set the cord next to heaters.
■ Don’t touch the plug right after it is unplugged to avoid electrical shock.
■ Don’t touch the plug during lightning.
■ Don’t allow cord to become knotted or tangled.
■ Protect the power cord from being walked on or pinched particularly at plugs,
convenience receptacles, and the point where they exit from the apparatus.
NO Quiver or Concussion on TV Set
This appliance should not be exposed to dripping or broken. Continuous use might
cause fire or electrical shock. If the panel gets broken, please unplug the TV set, and
get contact with the dealer.
Set the TV on Balanced Spot
There will be damage if the TV drops or breaks.
■ Don’t set the TV on uneven, oblique, or shacking surface.
Ventilation
Don’t interfere with its proper ventilation when the TV is working or has just been
unplugged, or the display may be spoiled or life shortened due to over heating. In order
to keep proper ventilation, please allow a clearance of 10 inches on each side from the
wall.
■ Don’t set any object around the ventilation openings of the appliance.
■ Don’t block the ventilation openings.
■ No inversion of the screen.
■ Don’t cover the appliance with table cloth.
■ Don’t set the appliance on carpet, bedding, or near to curtain.
Power Sources
Unbefitting power sources may cause fire or electrical shock. The appliance should be
connected to a power supply of the type described in the operating instructions or as
marked on the appliance.
■ Power supply cord should adapt to the socket outlet.
Power Cord Connection
Incorrect connection of power cord may cause fire or electrical shock.
■ Don’t touch the cord with wet hands.
■ Please check the pontes if it is clean ( no dust ) before use. If it is not, please do the
cleaning with dry and soft fabric.
■ Fix the power cord steadily in to the socket outlet to avoid it becoming flexible, or it
may have malfunction.
■ Don’t cut off the cord, for it may debase the performance. If you want to lengthen it,
please make an appropriate one or get contact with the dealer.
■ If you want to change the fuse in the connector plugs, please change it with the same
rating and model.
4
Dispose the Batteries Carefully
■ Incorrect disposal of batteries may cause fire or human damage, and even
explosion.
■ Don’t throw batteries into fire or water.
■ Keep the batteries far away from fire or heat.
■ Keep the batteries under cool and dry environment.
■ Match the batteries to the (+) and (-) marks in the battery compartment.
■ Don’t charge up the batteries.
■ Don’t impact the batteries.
■ Please use the batteries that are appointed in the user’s manual.
■ Please treat the used batteries with the observance of the local law.
Keep the TV Set away from Moisture and Dust
If you set the appliance under moisture or dust environment, it might cause fire or
electrical shock due to lampblack or erosive gas.
■ Don’t set the TV in kitchen, places nearby heaters, or places of lampblack and
moisture. For heat from high temperature may affect the display or other components,
and cause distortion, meltage, and fire.
■ Don’t set the TV, remote control, or other components under sun or near heaters.
■ Don’t set the TV where the difference in temperature is great.Remove the power
plug from the socket on occasions when you will not be using the set for an extended
period.
■ Before cleaning, please turn off the TV and unplug the power cord. Or there might
be fire or electrical shock.
5
SAFETY INSTRUCTION
SAFETY INSTRUCTION
Don’t Set the TV in the places below:
Discs Maintenance
■
■
■
■
■
■
■
1. To remove a disc from its storage case, press on the center of the case and take the disc out.
2. Hold the disc by the edges, to avoid touching the Recorded side
of the disc.
Under sun or near heaters.
Places where difference in temperature goes great.
Places that have bad ventilation.
Near fire.
Moist places such as bathroom.
Places that human walks frequently or places where are quivering fiercely.
Places where is deflective or unbalanced.
Watching TV
Please watch TV indoors where there is proper brightness. Please make sure the sunlight
will not fall directly on the picture screen. Please relax your eyes every now and then by
taking an overlook.
How to Clean the Picture Screen
Before cleaning, please turn off the TV and unplug the power cord. Clean the screen with a
soft cloth moistened in warm water. A mild soap may be used if the screen is extremely
dirty. Dry the screen with a soft cloth after cleaning.
1. Fingerprints and dust should be carefully wiped from the disc's surface with a soft Cloth.
Audio discs and DVD discs have no grooves to collect dust and microscopic debris so gently
wiping with a soft cloth should remove most particles. Wipe in a straight line from the inside to
the outside of the disc. Small dust particles and light stains should have no effect on
reproduction quality.
2. Never use chemicals such as record sprays, antistatic sprays, Benzine, or thinners to clean
the discs. These chemicals can irreparably damage the disc's surface.
3. Discs should be returned to their cases after use. This avoids serious scratches that could
cause the laser pickup to skip.
4. Do not expose discs to direct sunlight, high humidity, or high temperature for extended
periods. Exposure to high temperatures can warp the disc.
5. Do not stick paper or write anything with a ball point pen on the label
Side of the disc.
Notes of Cable Connection
■ Make sure that all cables, including connector plugs, extend lines, and connecting cables
between equipments are specify by the manufacturer. Before changing the connection, please turn
off the power and unplug the power cord.
■ The power cord should not be the same one as other equipments.
■ Use plugs with a protective earthing connection.
Notes of Transportation
Please handle with care during transportation. Please use the original carton,
or it may damage the TV set. Please retain the original carton.
How to Clean the TV Set
Clean the TV and control panel with a soft cloth. A mild soap may be used if the screen
is extremely dirty. Dry them with a soft cloth after cleaning. Choose the right cleanser,
or it may fade the TV set, or make it scratched or cracked.
To Avoid Wireless Receiver
This TV set is designed to comply with the EMI standard to avoid problems of wireless
receiver.
■ Set the TV far away from wireless receiver.
■ Adjust the wireless’s antenna to avoid interference on TV;
■ Make sure the TV set is out of interference with the wireless;
■ The antenna should use coaxial line.
■ Turn off all the equipments, except the TV set to check if the TV interferes the
wireless receiver;
■ If the problem occurs, please check all the notes above.
Handle the remote control with care
Impacts on remote control may lead to trouble.
■ Please don’t throw the remote control;
■ Don’t set heavy object on remote control.
■ The sensor of remote control will not work if the lights, such as sunlight or bright indoor
illumination fall directly on it. Make sure that there is no interference from wireless, or it may cause
distortion of the picture or unusual sound. There should no equipment like mobile telephone or
wireless receiver.
Notes on Installation
■ Never use wooden screws and bracket to fix. Use those that are specified by the manufacturer.
■ Use only the stand, tripod, bracket, or table specified by the manufacturer, or sold with the
apparatus. Use caution when moving the apparatus.
■ Pleas follow all the operating instructions of the wall or ceiling mounting.
■ Use only the attachments/accessories specified by the manufacturer.
■ If you have any questions on installation, operation, or safety, please call the dealer.
Other Notes
■ Please dispose the appliance with the observance of the local law.
■ Do be ware of all electrical equipments.
6
7
INSTRUCTION
INSTRUCTION
CONTROLS
CONNECTION OPTION
This manual explains the features available on the model of 15.6 inch LED TV.
■ This is a simplified representation of a front panel. Here shown may be somewhat
different from your TV.
Front Panel Controls
1
2
3
4
5
This is the back panel LED TV
■ This is a simplified representation of a back panel.
Here shown may be somewhat different from your TV.
Left Connection Panel
6
7
8
9
LABEL SIDE
MIRROR SIDE
1
10
2
3
6
5
7
8
9
••
11
(1): (
) In DVD source Load /Eject DVD disk.
(2): (
) Press
to play or pause the disc under DVD mode.
(3): (VOL-) Press Volume- to decrease the volume.
(4): (VOL+) Press Volume+ to increase the volume.
(5): (CH-) Press the button to down the channel.
(6): (CH+) Press the button to up the channel.
(7): (SOURCE) Press this button to select AV source or TV source.
(8): (MENU) Press this button to display the OSD menu.
When the OSD menu is on, press this button to exit the menu.
(9): (POWER) Press this button to standby mode.
(10): Indicator.
(11): Remote control sensor window.
8
4
(01) (POWER) DC IN : Connect the power cord with DC12V to this input.
(02) USB:Input USB device input
(03) HDMI Input: Connect HDMI signal.
(04) YPBPR(Y:GREEN, PB:BLUE, PR:RED): Connect the component image output
of your AV devices here. Then Connect audio output of your AV devices to R and L.
(05)AV Video Input:Connect composite video output of your AV device and Connect the
audio output of your AV devices to R and L.
(06) PC VGA Input: Connect PC VGA signal output.
(07) RF: Antenna Input (75 ohm).
(08) PC AUDIO Input: Connect PC audio input.
(09) EARPHONE output: Connect to headphone output.
9
INSTRUCTION
INSTRUCTION
REMOTE CONTROL KEY FUNCTIONS
REMOTE CONTROL KEY FUNCTIONS
(1) POWER button: Switches the set on from power on or off .
(2) EPG/ button: Enter Electronic Program Guide;
Press in DVD source Load/ Eject DVD disk.
(3) MUTE button: Press to eliminate or restore the TV sound.
(4) P.MODE button: Press to select preset picture mode.
(5) S.MODE button: Press to select Sound mode button.
(6) ASPECT button:
Press to select picture mode 4:3, 16:9 etc.
(7) DISPLAY button: Press to display current status,
(24) MTS button: Press to select the audio channels.
(25) CC button: Press to display the closed caption.
button: Press
to play or pause the disc under DVD mode.
(26)
(27)
button:
(28) FAV+/ button: Changes the Favorite channels up;
EPG
TV channel, input source.
(8) Numerical buttons:
Press number buttons for direct access TV channels.
(9)
button: Press to return to previous channel.
(10) 10+/- button: Direct input numerical button
for 2 digit or 3 digit program.
(11) MENU button: LED menu selection.
(12) EXIT button: Exit the OSD menu (On-screen display).
(13) SOURCE button:
Press to display all possible input sources
(14) SLEEP button: Sets the sleep timer。
(15) "
"button: When OSD menu is on, press this button
to move the selection focus up or change settings.
20
(16) "
"button: When OSD menu is on, press this button
21
to move the selection focus down or change settings.
(17) "
"button: When OSD menu is on, press this button
to move the selection focus left.
(18) "
"button: When OSD menu is on, press this button
to move the selection focus right.
(19) " ENTER "button: Press the button to confirm the operation.
(20) CH- button: Changes the channels down.
(21) CH+ button: Changes the channels up.
(22) VOL- button: Adjusts the volume down.
(23) VOL+ button: Adjusts the volume up.
(29) FAV-/
button: Changes the Favorite channels down;
(30) FAV/
button: Add/Erase function for favorite;
10+
(31) CH LIST/
button: TV Channel List button;
10+
SOURCE
button:Single-step video file playback.To resume normal
playback , press play button .
(33) GOTO button: DVD start playing from the desired time.
(32)
19
23
22
MTS
(34)
(35)
(36)
(37)
CC
CH LIST
GOTO
A -B
PROG
TITLE
AUDIO
SUBTITLE
ANGLE
D.SETUP
D.MENU
INTRO
REPEAT
(38)
(39)
(40)
(41)
Press time and enter time. The unit starts playing
from you selected.
A-B button: Press to AB playback the DVD play.
PROG button: To select the DVD program playback.
TITLE: During a DVD disc playback,
press to go to title menu if the disc contains title.
AUDIO button: Change the DVD audio mode:
left, right, mono, stereo.
SUBTITLE button: Press the button to select
different captions.
ANGLE button: Select different angle of DVD.
D.SETUP button: Display the DVD SETUP menu.
D.MENU button: Display the DVD MENU.
(42) INTRO button: It will achieve navigation
function when play VCD disk.
While the disk is working, press INTRO button.
Play each clip by 3 sec(Video Discs) .
- If started the disc menu, preview will not function.
- If the current track started over 3 sec, this function
will start from next track.
(43) REPEAT button: Repeat playback the DVD play.
10
EPG
11
24
25
28
29
32
33
36
37
40
41
SOURCE
MTS
CC
CH LIST
GOTO
A-B
PROG
TITLE
AUDIO
SUBTITLE
ANGLE
D.SETUP
D.MENU
INTRO
REPEAT
27
26
31
30
35
34
39
38
43
42
INTRODUCTION
INSTALLATION
REMOTE CONTROL KEY FUNCTIONS
INSTALLING BATTERIES
Universal remote code
This is the code for remote control of LCDVD157A,if you want to change to a
universal remote control, you can edit this code into your universal remote control.
(1)Open the battery compartment cover on the back side
(2)Insert two 1.5V batteries of AAA type with correct polarity
(3)Close the battery compartment cover on the back side
Notes on Using Batteries
The use of the wrong type of batteries may cause chemical
leaks and/or explosion.
Please note the following:
Always ensure that the batteries are inserted with the
positive and negative terminals in the correct direction
as shown in the batteries compartment. Different types
of batteries have different characteristics. Do not mix
different types. Do not mix old and new batteries.
Mixing old and new batteries will shorten battery life
and /or cause chemical leaks from the old batteries.
When batteries fail to function, replace them immediately.
Chemicals which leak from batteries may cause skin
irritation. If any chemical matter seeps out of the batteries,
wipe it up immediately using a dry cloth.
Due to varying storage conditions, the battery life for the
batteries included with your unit may be shortened.
If the remote control is not used for a long period of
time, remove the batteries.
Notes on using the Remote control.
Do not strike or drop the remote.
Do not expose the remote control to liquids and do not
place it in humid environment.
Do not install or place the remote control in direct sunlight.
The heat may damage the remote control.
Not included.
The universal code for this remote is: 2295.
12
13
INSTALLATION
INSTALLATION
STANDARD INSTALLATION
STANDARD INSTALLATION
■The TV can be installed in various ways such as on a wall, or on a desktop etc.
10inches
b. Wall Mount: Horizontal installation
(2) Remove the table stand of the TV when install the TV on a wall as follow:
10inches
10inches
10inches
10inches
■The TV is designed to be mounted horizontally.
Ensure that you connect the earth ground wire to prevent possible electric shock.
If grounding methods are not possible, have a qualified electrician install a
separate circuit breaker.
(3)For proper ventilation, allow a clearance of 10” on each side from the wall.
10inches
10inches
10inches
Power
Supply
10inches
Short-Circuit
Breaker
NOTES OF WALL INSTALLATION
Do not try to ground the unit by connecting it to telephone wires, lightening rods or gas pipes.
a. Desktop Pedestal Installation
This is the default installation way of the TV.
(1) Keep the TV stand for may be future use.
(2) Don’t set the TV set on shelves, carpets, beds, or closets.
(3) Don’t cover the TV with curtain or paper.
(4) Leave ventilation space to avoid the following:
No good for ventilation
No good for ventilation
b. Wall Mount: Horizontal installation
(1) Secure the wall brackets with the bolts (not provided as parts of the product, must
purchase separately) on the wall. Match the height of the bracket that is mounted on
the wall. The wall bracket is of nomal dimension. Please see the position of the wall
brackets bolts as follow picture .The actual dimension of the wall brackts bolt should
according to the products.
The wall brackets bolt position
75mm
75mm
14
15
CONNECTIONS & SETUP
■ To prevent the equipment damage, never plug in any power cords until
you have finished connecting all equipment.
ANTENNA CONNECTION
■ For optimum picture quality, adjust antenna direction.
■ An antenna cable and converter are not supplied.
CONNECTIONS & SETUP
EXTERNAL EQUIPMENT CONNECTIONS
1. Connect the AV jacks between TV and external equipment. Match the jack colors
(Video = yellow, Audio Left = white, and Audio Right = red).
2. Select AV source with using the SOURCE/
button on the remote control.
3. Operate the corresponding external equipment. Refer to external equipment
operating guide.
Camcorder
P HI L IP S
TURBO
DRIVE
Video Game Set
AV
■In poor signal areas, to get better picture quality, install a signal amplifier
to the antenna as shown below.
■If signal needs to be split for two TVs, use an antenna signal splitter for connection.
USB CONNECTION
Note:Can only support MP3 format of music
USB
16
17
CONNECTIONS & SETUP
CONNECTIONS & SETUP
PC CONNECTION
YPBPR CONNECTION
When connecting with a D-sub 15 pin cable(VGA)
When connecting with a component cable (VGA)
1. Connect the VGA output of the PC to the PC VGA Input jack on the set.
2. Connect the audio outputs of the PC to the PC Audio Input jack on the set.
3. Turn on the PC and the set.
4. Select PC source with using the SOURCE/
button on the remote control.
5. Refer to the PC manual for operating instructions.
1. Connect the video outputs (Y, PB, PR) of the DVD to the
YpbPr jacks on the set
2. Connect the audio outputs of the DVD to the Audio Input (L/R)
jacks on the set.
3. Turn on the DVD player, insert a DVD.
4. Select YPbPr source with using the SOURCE/
button on the remote control.
5. Refer to the DVD player's manual for operating instructions.
PC
DVD
Y Pb Pr
L
R
Y=GREEN, Pb=BLUE, Pr=RED
HDMI CONNECTION
When connecting with a HDMI cable
1. Connect the HDMI output of the DVD to
the HDMI Input jack on the set.
2. Select HDMI source with using
the SOURCE/
button on the remote control
3. Refer to the DVD player's manual for
operating instructions.
18
EARPHONE CONNECTION
TV
EARPHONE
EARPHONE
EARPHONE
2. Turn on the TV, the earphone is sound,
but the sepeaker no sound output.
19
TV
DVD OPERATION
DVD OPERATION
Basic Operation
Basic Operation
SOURCE
20
CLOSE then LOADING
ENTER
20
Eject
STOP
authorized
D.MENU
D.MENU
D.MENU
ENTER
D.MENU
Forward / Backward
D.MENU
42
43
DVD OPERATION
DVD OPERATION
Basic Operation
Basic Operation
Forward / Backward
16,x32.
Forward / Backward
there are four:Stereo,Mix-Mono,Mono Left, and Mono Right.
Single-Step Play
Single-step video file playback. To resume normal playback , press play button .
there are four:Stereo,Mix-Mono,Mono Left, and
Mono Right.
REPEAT
REPEAT
Repeat Chapter/ Repeat Title/Repeat All .
REPEAT
There are three repeat options:Single Remain,Single Elapsed,and Display Off.
44
45
DVD OPERATION
DVD OPERATION
Basic Operation
General Setup
TV Display
This is used to select the aspect 4:3/PS, 4: 3/LB, 16: 9.
SUBTITLE
- - General Setup Page - TV Display
16:9
4:3/Pan Scan
ENG
OSD Lang
4:3/Letter Box
SUBTITLE
Screen Saver
Last Memory
MUTE
On
Off
Wide
to eliminate or restore the sound.
OSD Language
This is used to select the OSD language:English,French,German,Spanish,Italian,.
- - General Setup Page - TV Display
16: 9
OSD Lang
ENG
English
Screen Saver
Last Memory
On
Off
French
German
Spanish
Italian
Screen Saver
Start the screen saver, the screen saver image will appear when the player stops or
the picture is frozen for a few minutes. This saver can keep the screen from being
damaged.
·On (Start the screen saver).
·Off (Remove the screen saver).
- - General Setup Page - TV Display
16: 9
THE REGION CODE OF THE
PLAYER IS REGION 1
46
OSD Lang
ENG
Screen Saver
Last Memory
On
Off
On
Off
47
DVD OPERATION
DVD OPERATION
Last Memory
Can set the items on the last memory, “on”and “off” option.
Select “on”, shutdown the machine before the settings for memory, re-boot the machine
setting. Set near the same time.
Select “off”, every time the machine automatically switched back to the default settings.
·On (Start the last memory).
·Off (Remove the last memory).
- - Speaker Setup Page - Downmix
STR
LT/RT
Stereo
- - General Setup Page - TV Display
16:9
OSD Lang
ENG
Screen Saver
Last Memory
On
Off
Dual Mono
On
Off
This is used to select the Stereo, L-MONO, R-MONO and MIX-MONO.
- - Audio Setup Page - Speaker Setup
Dual Mono
Dynamic
Audio Setup
Stereo
L-Mono
R-Mono
Mix-Mono
Speaker Setup
In the “Audio Setup page” press “ ” button to select “Speaker Setup” item, press
the “ENTER”or “ ” button (play) into the “Speaker Setup Page”.
- - Audio Setup Page - Speaker Setup
Dual Mono
Dynamic
Dynamic
This option is used to set the compression ratio in order to control the sound (Volume)
contrast.
- - Audio Setup Page - Speaker Setup
Dual Mono
Dynamic
Downmix
LT/RT
FULL
3/4
1/2
A disc recorded multi channel soundtrack, the output signal will be incorporated to left
and right channel.
1/4
OFF
Stereo
A disc recorded multi channel soundtrack, The output signal will be incorporated to
stereo.
48
49
DVD OPERATION
DVD OPERATION
Preference Setup
Subtitle
You must sure no disc in the DVD then you can select Preference Page.
If a language listed below is recorded on the disc, you set the subtitle to be displayed in
such language.
If not, the language recorded will be used:English,French,German,Spanish,Italian.
TV Type
PAL
- - Preference Page - -
This is selected when the player is connected to an PAL System TV.
TV Type
Audio
Subtitle
Disc Menu
Parental
Password
Default
MULTI
The player will set the TV system according to the disc in the tray.
NTSC
This is selected when the player is connected to a NTSC System TV.
Multi
ENG
ENG
ENG
English
French
German
Spanish
Italian
Off
Disc Menu
- - Preference Page - TV Type
Audio
Subtitle
Disc Menu
Parental
Password
Default
Multi
ENG
ENG
ENG
PAL
Multi
NTSC
If a language listed below is record on the disc, you can set the Menu to be displayed
in such language.
If not, the language recorded will be used:English,French,German,Spanish,Italian.
- - Preference Page - TV Type
Audio
Subtitle
Disc Menu
Parental
Password
Default
Audio
If a language listed below is recorded on the disc, you can play the sound in such
language.
If not, the language recorded will be used:English,French,German,Spanish,Italian.
Multi
ENG
ENG
ENG
English
French
German
Spanish
Italian
Parental
- - Preference Page - TV Type
Audio
Subtitle
Disc Menu
Parental
Password
Default
Multi
ENG
ENG
ENG
English
French
German
Spanish
Italian
When playing disc with parental lock function, you may select an Age Control Grade
according to grade of disc and your own preference. For example, if PG is selected,
DVD Video disc rated higher than the PG grade cannot be played.
· KID SAFE ·G ·PG ·PG 13 · P GR ·R · NC 17 · ADULT
- - Preference Page - TV Type
Audio
Subtitle
Disc Menu
Parental
Password
Default
50
Multi
ENG
ENG
ENG
1 KID SAF
2 G
3
4
5
6
7
8
51
PG
PG 13
PGR
R
NC17
ADULT
APPENDIX
DVD OPERATION
Password
TROUBLESHOOTING
User can change the password that is required when the user wants to change the Age
Control Grade in the Parental Lock function.
NOTE:(Default password is 123456 )
The Symptom of Trouble
Symptom
- - Preference Page - TV Type
Audio
Subtitle
Disc Menu
Parental
Password
Default
Attempt the following steps to diagnose the symptom you have seen. If the
symptom couldn’t be corrected, please contact the dealer.
Multi
ENG
ENG
ENG
Change
Default
User can load the original factory setting by choose RESET and press OK button.
Multi
ENG
ENG
ENG
Correct measures
1. Connect antenna cables
again or change the plug.
2. Connect antenna cables
again or change new cables.
3. Adjust antenna again.
4. There is no need to correct.
5. Check with local operator.
1. The antenna cables may be
weak.
2. The television could not
tune correctly.
3. The weather is bad
4. The transmitter is wrong.
5. Television input incorrectly.
1. Adjust antenna again.
2. Search channels again or
adjust television.
3. There is no need to correct.
4. Check with local operator.
5. Check the outside devices.
Disturb Intermittent
Your unit is being affected by
other television, automobiles,
fluorescent lamps,
portable radio.
Check the shield contains of
television and put the
television as far away as
possible through cables.
No picture & No sound
1. Television is under AV mode.
2. The picture and volume are
set to minimum.
3. The television is under sleep
mode or electricity-saving mode.
There are spots on the
screen, and the sound
is not clear when you
watch TV.
The picture is doubled
or tripled,
but sound is good.
- - Preference Page - TV Type
Audio
Subtitle
Disc Menu
Parental
Password
Default
Possible causes
1. The antenna cables may be
disconnected.
2. The antenna cables may be
disconnected or cankered.
3. The antenna cables may be
weak.
4. The weather is bad.
5. The transmitter is wrong.
Reset
1. Check the picture/sound
control (enter main menu).
2. Make sure power in on.
NOTE : Consumer should not repair by yourself, high-voltage is in unit, please
request professional technician to help.
52
53
APPENDIX
APPENDIX
TROUBLESHOOTING
PRODUCT SPECIFICATION
Non-defect Judgment
Attempt the following steps to diagnose the symptom you have seen. If the
symptom couldn’t be corrected, please contact the dealer.
Phenomena
The display monitor's
panel goes hot.
Check Parts
LED TV takes inside lighten phosphor. It may increase the
temperature of the screen in some occasions. It's not a defect.
Model
LCDVD157A
Resolution
1366 X 768
Viewing size(mm)
344.23H X 193.54V
PC best Mode
1360 X 768 @60Hz
Sound output
2W +2W 4Ω
Power consumption
﹤36W
﹤1W
Stand by power consumption
Power input
Unusual dots
Black dots and Bright points may appear on the LED screen.
This is a structural property of the LED panel and is not a defect.
Stripes on screen
Adjust the impulse phase may decrease stripes.(RGB in)
Flicker fluctuate
(only in PC source)
1.Frequency from PC is below 75Hz, enhance it.
But the picture may be less bright.
2.Turn on the upright filter. But it may descend
the upright resolution.
The top of the monitor
gets hot.
Environment Temperature
conditions
Relative humidity
PC input
(VGA)
Radio frequency
(RF)
It may occur during long-time working. It's not a defect.
YPbPr
input
Video
input
(AV)
HDMI
input
54
DC12V, 3A
Work:5℃-35 ℃
Store:- 15 ℃ -60 ℃
Work:20%- 80%
Store:20%- 90%
RGB Input impedance:75Ω
RGB Input range:0.7±0.15Vp-p
RGB Input supported format: support resolution 640X480 (60Hz)
800X600 (60Hz) 1024X768 (60Hz) 1360X768 (60Hz)
Audio (L /R) Input impedance:20KΩ
Audio (L /R) Input range:500mVrms
Input impedance: 75Ω(un balance)
Incept system: NTSC/ATSC
Y, PB/ CB, PR/CR Input impedance: 75Ω
Y, PB/ CB, PR/CR Input range: Y: 1 ± 0.3 Vp-p
PB/PR (CB/CR): 0.7 ± 0.3 Vp-p
Audio(L/R) Input impedance: 20kΩ
Audio(L/R) Input range: 500mVrms
Input supported format: 480i, 480p, 576i, 576p, 720p, 1080i,1080p
CVBS input impedance:75Ω
CVBS input range:1±0.3Vp-p
Audio(L/R) input impedance:20KΩ
Audio(L/R) input range:500mVrms
CVBS input supported format:NTSC
Input supported format: 480i, 480p, 576i, 576p, 720p, 1080i, 1080p
55