1
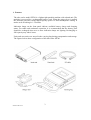
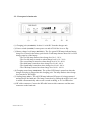
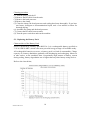
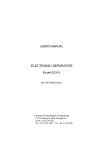
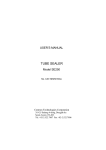
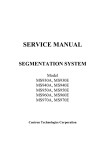
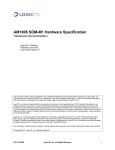
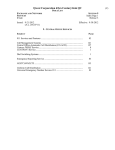
USER’S MANUAL
TUBE SEALER
Model SE700
No. CAT.SE70011Ce
Centron Technologies Corporation
319-25 Sadang-4-dong, Dongjak-ku
Seoul, Korea 156-823
Tel. +82-2.522.7807 Fax +82-2.522.7806
Important Note
1. Safety:
The machine generates strong high-frequency power when the trigger lever is pulled.
Users should be cautious of potential electric shock during sealing process.
• To avoid potential electric shock, always use the machine with the head protector
mounted on sealing head.
• The machine works even without the head protector mounted on sealing head. If
you should use the machine without the head protector with any reason, never touch
any metal part at sealing head while you are pulling the trigger lever. Finger may
scald instantaneously due to generated high-frequency power if touched at any metal
part in sealing head while the trigger lever is being pulled or the red SEAL lamp is lit.
2. Battery Recharging and Replacement:
• Recharge the battery prior to the first use. For stable operation, recharge it when
two or more indication lamps are on. Full charging may take 6 hours.
• The machine does not work during recharging. The charger unit should be removed
from charging jack in order that the machine can work. Refer to the Section 4-2.
• Replace the battery pack with a new pack when it seems the battery pack may have
been degraded too much. Refer to the Section 4-2 and 5-3 for details.
3. Cleaning and Maintenance:
• Always keep the sealing head clean and dry. If the sealing head is wet or dirty, arc
may appear. When it's wet, clean it with a dry soft cloth or a tissue paper.
• Use a soft cloth and mild detergent to clean the units. After cleaning, wait a few
minutes until the area cleaned is completely dry. Do not use paint thinner, benzene or
strong detergent. Refer to the Section 5-2.
• Be sure to turn the power switch off before cleaning the machine.
• Only authorized service personnel should remove the covers of the main unit and the
hand unit.
• Avoid pulling the trigger lever without tubing loaded in sealing head. It consumes
large amount of battery charge and may mar the sealing head
• Never put sharp objects or metal objects in sealing head as damage can occur.
• Avoid using or leaving the machine in a location where temperature is over 40 °C or
104 °F. Keep it away from any heating source or direct sunlight.
1
SE70011UMC.0312
Contents
Page
•
Important Note
1
1.
Features
3
2.
Specifications
4
3.
Appearance
3-1. Units
3-2. Front panel of main unit
5
5
6
4.
Operating procedures
4-1. Sealing tubing
4-2. Recharging the battery
7
7
7
5.
Maintenance
5-1. Troubleshooting
5-2. Cleaning
5-3. Replacing the battery pack
5-4. Service Call
2
SE70011UMC.0312
8
8
9
10
12
1. Features
The tube sealer model SE700 is a lightweight portable machine with a hand unit. The
machine is powered by a rechargeable battery pack. When the trigger lever is pulled,
the machine generates strong high-frequency power to melt thermoplastic tubing. It
makes seals on tubing in 1-2 seconds.
Indication lamps on the front panel indicate available battery charge and charging
status. For stable and continuous operation, it is recommended that the battery pack
should be recharged when two or more indication lamps are lighting. Recharging to
full capacity may take 6 hours.
Units and accessories are stored in the carrying bag during transportation and storage.
The figures below show configuration of the tube sealer SE700.
3
SE70011UMC.0312
2. Specifications
a. Physical specification:
(1) Main unit:
dimension (WxHxD) - 148x34x252 mm (5.8"x1.4"x9.9")
weight - 1700 gram (3.8 lb)
(2) Hand unit:
dimension (WxHxD) - 28x44x204 mm (1.1"x1.8"x8.1")
weight - 220 gram (0.5 lb)
(3) Charger unit: weight - 300 gram (0.7 lb)
(4) RF cable:
length - 1.8 m (6 feet), weight - 100 gram (0.2 lb), cord - RG-58
(5) Carrying bag: dimension (WxHxD) - 220x90x275 mm (8.7"x3.5"x10.9")
weight - 300 gram (0.7 lb)
type - material: black canvas, with shoulder strap
b. Power source:
(1) Battery pack: 12V/4.5AH, Ni-MH cell, rechargeable and replaceable
(2) Charger unit: Input - 100-120/220-240 VAC, 50/60 Hz, 25 watt
Output - 18 VDC, 1 ampere
c. Features:
(1) Tubing size to seal:
(2) RF frequency:
(3) Output RF power:
(4) Sealing time:
(5) Battery Charging:
(6) Indication lamps:
6 mm (1/4") diameter max.
40.68 MHz
effective level - 30 watts
1-2 seconds
full charging in 6 hours
charge level - BATTERY (5 green LED)
charging status - CHARGING (1 yellow LED)
sealing status - SEAL (1 red LED)
on sealing unit - SEALING (1 amber neon in head)
d. Environmental Conditions:
The machine should be operated within the following environmental conditions.
(1) Indoor use only
(2) Altitude up to 2,000 meters
(3) Operating temperature: 5 - 40 °C (41 - 104 °F)
Storage temperature: -20 - 70 °C ( -4 - 158 °F)
(4) Maximum relative humidity 80 % for temperature up to 31 °C,
decreasing linearly to 50 % relative humidity at 40 °C
(5) Mains supply voltage fluctuations up to +/- 10 % of the nominal voltage
(6) Transient overvoltages typically present on the mains supply
Note: The nominal level of transient voltages is impulse withstand (overvoltage)
category II of IEC 60364-4-443.
(7) Applicable rated pollution degree: Pollution Degree 1
4
SE70011UMC.0312
3. Appearance
3-1. Units
5
SE70011UMC.0312
3-2. Front panel of main unit
(1) Charging jack (CHARGER): It takes 18 volts DC from the charger unit.
(2) Power switch (POWER): It turns power on and off. Pull the lever to flip.
(3) Battery charge level lamps (BATTERY): The five green LED lamps indicate battery
charge level stored in the battery pack inside. Each lamp denotes about 20 % of full
charge capacity of the battery.
- The first left lamp flashes when charge level is 0 - 10 %.
- The first left lamp is turned on when charge level is 10 - 20 %.
- The second lamp is turned on when charge level is 20 - 40 %.
- The third lamp is turned on when charge level is 40 - 60 %.
- The fourth lamp is turned on when charge level is 60 - 80 %.
- The fifth lamp is turned on when charge level is 80 - 100 %.
(4) Charging status lamp (CHARGING): The yellow LED lamp is turned on when the
charger unit plug is plugged into the charging jack. The lamp flashes when charge
level reaches to full charge.
(5) Sealing lamp (SEAL): The red LED lamp indicates RF power is being generated
and applied to the hand unit. The lamp is turned on by pulling the trigger level, and
is turned off automatically when a seal is made at tubing, or in 3 seconds after.
(6) RF cable connector: Connect the RF cable between this connector and the same
connector on the hand unit.
6
SE70011UMC.0312
4. Operating Procedures
4-1. Sealing Tubing
(1) Connect the RF cable between main unit and hand unit.
(2) Turn the power switch on. Check that battery charge level is good for working.
Recharge it if charge level is not sufficient.
* For stable and continuous operation, it is recommended that the battery pack
should be recharged when two or more indication lamps remain lit.
(3) Place tubing in sealing head.
(4) Pull the trigger lever. Watch that amber light turns on at sealing head.
(5) After amber light turns off, wait for a while (approximately one second or more),
and then release the lever.
(6) Remove tubing and inspect it.
4-2. Recharging the Battery
When to recharge the battery
The BATTERY lamps indicate battery charge level stored in the battery pack. Each
lamp denotes about 20 % of full charge capacity. Refer to the Section 3-2.
For the best operation, recharge the battery pack when two or more indication lamps
remain lit. The machine does not work during recharging. The charger unit should be
removed from charging jack in order that the machine can work.
Recharging procedure
(1) Plug the charger unit plug into the charging jack on the front panel of main unit.
The CHARGING lamp turns on. As time goes on, more BATTERY lamps turn on.
* The power switch can be set at either ON or OFF position during recharging.
* The CHARGING lamp may flash slowly for a while if recharging procedure starts
when only the first lamp is on or the machine has been stored at a cold place.
(2) When charge level reaches to full charge, the CHARGING lamp flashes rapidly.
Remove the charger unit plug when the CHARGING lamp flashes.
* Recharging may take up to 6 hours. The first recharging may take longer.
* Battery will not be overcharged or damaged even if left for longer time.
Note: An independent charger unit BC167 is available, that charges 6 machines
same time. Contact your distributor for information on BC167 charger unit.
When to replace the battery
Battery packs are consumables. Available battery capacity decreases gradually with
time. Battery pack should be replaced with a new pack after the machine has been
used for some period. Battery manufacturers usually guarantee cells for 3 to 6
months only, but some field service reports show that it can go for a year or more,
sometimes up to three years. Replace the battery pack if any of the following case
happens:
7
SE70011UMC.0312
(1) If no BATTERY lamp illuminates when the power switch is turned on, recharge it
once. If no lamp is still turned on, the battery pack may have been damaged, or
the machine may have some trouble. Either replace the battery pack and try again,
or ask service.
(2) If the number of seals made with one cycle of full charging is significantly
reduced, e.g. below half of the number with a new battery pack, the battery pack
may have been degraded too much. Replace the battery with a new pack. Contact
your distributor for spare packs.
Refer to Section 5-3 for more information on battery replacement.
How to replace the battery pack
Refer to Section 5-3.
5. Maintenance
5-1. Troubleshooting
The following table covers common problems and suggested solution. Other problems
should be corrected by authorized service personnel.
Symptom
Likely Cause
Solution
Switch is on, but no
lamp illuminates.
Battery is exhausted or may
be damaged.
Equipment malfunction
Sealing is poor.
Low battery charge level
Sealed shape is bad.
Dirty clamp or sealing head
Sealing clamp doesn't
move smooth.
Arc appears.
Dirty clamp or sealing head
Number of seals per
full battery charge is
significantly reduced.
Battery may be damaged or
be degraded too much with
long use.
Recharge the battery.
Refer to Section 4-2 and 5-3.
Ask for repair service.
Refer to Section 5-4.
Recharge the battery.
Refer to Section 4-2 and 5-3.
Clean sealing head and clamp area.
Refer to Section 5-2.
Clean sealing head and clamp area.
Refer to Section 5-2.
Clean sealing head, dry thoroughly.
Refer to Section 5-2.
Replace the battery pack.
Refer to Section 4-2 and 5-3.
Wet or dirty sealing head
8
SE70011UMC.0312
5-2. Cleaning
The sealing head and clamp can easily be stained by dust or liquid. Frequent cleaning
will offer you the best long-term results.
For proper cleaning, use a dry cloth or a cloth dampened with water. A mild detergent
may be used. Thoroughly dry the sealing head area before applying power. If the
sealing head is wet when RF energy is applied, an arc may appear.
Follow the decontamination procedure of your facility as necessary.
Avoid spraying liquids in the sealing clamp or sealing head area.
How to take off and put on the head protector
To take off, push both sides.
To put on, just push in.
How to disassemble and reassemble the clamp
To remove the clamp;
(1) Push in.
(2) Pull down.
(3) Release it.
To install the clamp;
(1) Pull down.
(2) Push in.
(3) Push up.
(4) Release it.
9
SE70011UMC.0312
Cleaning procedure
(1) Turn the power switch off.
(2) Remove the RF cable from the units.
(3) Remove the head protector.
(4) Remove the clamp.
(5) Clean the clamp, the head protector and sealing head area thoroughly. If you have
used water, detergent or decontamination liquid, wait a few minutes to allow for
thorough drying.
(6) Assemble the clamp and the head protector.
(7) Connect the RF cable between units.
(8) Turn the power switch on and test the machine.
5-3. Replacing the Battery Pack
Characteristics of the Battery Pack
SE700 is powered by a battery pack BN123A. It is a rechargeable battery specified as
"12V/4.5AH Ni-MH", which is the most powerful energy storage cell available today.
All rechargeable batteries wear out, so battery pack is a kind of consumables. Charge
capacity of a battery diminishes gradually with discharging and recharging. Moreover
at tube sealers, as the machines draw exceptionally high amount of battery current
during sealing, battery degradation rate is higher than any other battery-using devices.
Refer to the chart below;
10
SE70011UMC.0312
The chart shows a performance degradation tendency of Ni-MH 12V/4.5AH battery
packs. The reason why it shows quite wide shaded area is that the Number of Sealing
varies with many factors, such as;
1) Material and diameter of tubing
2) Room temperature, tubing temperature, and temperature of the sealing head
3) Number of discharging/recharging cycles at the battery pack.
The chart data were made on the following condition;
1) PVC tubing of diameter 4.4 mm
2) Room temperature at 23 oC
3) Packs recharged 20 times per month.
What the chart indicates are;
1) With a new battery pack, approximately 1100-1500 seals could be made.
2) In 6-7 months, the number decreases down to almost half.
(Assuming recharging is done once everyday, 5 times a week, 20 times a month.)
When to replace the battery
Refer to Section 4-2.
How to replace the battery pack
11
SE70011UMC.0312
(1) Prepare a flat-tip screwdriver or a similar tool.
(2) On the rear panel, remove the 4 screws to take off the rear panel assembly.
(3) Take out the battery pack, and pull out to disconnect the battery connector.
(4) Replace it with a new pack, and connect the battery connector.
(5) Carefully push the pack into the housing.
Be careful the wire harness and connector don't twist or jam in the housing.
(6) Assemble the rear panel assembly with the 4 screws.
(5) Recharge the new pack. It may take 6 hours. Refer to Section 4-2.
* Disregard BATTERY lamp indication during the first charging. Indication may
be incorrect till charging ends. Stop charging when the CHARGING lamp flashes.
5-4. Service Call
If the machine doesn't operate properly, or if you need any assistance or spare parts,
contact your distributor:
12
SE70011UMC.0312