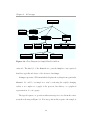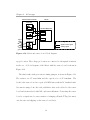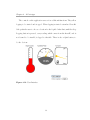
1
UNIVERSITY OF CALIFORNIA
Santa Barbara
DIOMEDES: An integrated automotive
diagnostics system that is customizable,
low-cost, and non-intrusive built on a wireless
sensor network
A Thesis submitted in partial satisfaction
of the requirements for the degree of
Masters of Science
in
Computer Science
by
Erik Olin Peterson
Committee in Charge:
Professor Rich Wolski, Chair
Professor Chandra Krintz
Professor Ben Zhao
June 2007
This work was supported by a grant from the National Science Foundation numbered CNS-0627183.
The Thesis of
Erik Olin Peterson is approved:
Professor Chandra Krintz
Professor Ben Zhao
Professor Rich Wolski, Committee Chairperson
May 2007
DIOMEDES: An integrated automotive diagnostics system that is
customizable, low-cost, and non-intrusive built on a wireless sensor network
c 2007
Copyright by
Erik Olin Peterson
iii
Acknowledgements
Thanks to Rich for getting me excited in the project and then getting me
through it.
Thanks to Ben for his honest critique of this work’s earliest form, as well as
his and Chandra’s invaluable assistance in getting it buttoned up and signed off.
Thanks to Ye and Wei for help with motes.
Thanks to James and Brian for the crash course in analog design.
Thanks to Julie for being supportive and for wasting all of that precious
gasoline driving up to Santa Barbara.
This document was written in a variety of places. Thanks to the Goleta
Camino Real Starbucks, Corner House Coffee in Los Olivos, Mayhem Lab 1.0,
Mayhem Lab 2.0, and Jalama House for giving me a place to sit and drink
caffeinated beverages and work.
This document was prepared in LATEXusing version 3.1 of the ucthesis
class by Daniel Gildea, improved for UCSB usage by Mathias Kölsch. The
LATEXCompanion by Mittelbach and Goossens was infinitely helpful. The javadoc appendix was generated using the TeXDoclet javadoc doclet, originally
written by Gregg Wonderly, revised by XO Software, and then revised, into the
form which I used, by Stefan Marx. The nesdoc documentation was created by
a tool of my own sinister design from the XML produced by nesdoc.
iv
Diagrams were produced in Omnigraffle.
Oh, and thanks to my MINI Cooper, Bertram, for putting up with all of the
poking and prodding with minimal complaint.
v
Abstract
DIOMEDES: An integrated automotive diagnostics system
that is customizable, low-cost, and non-intrusive built on a
wireless sensor network
Erik Olin Peterson
All persons who interact with a vehicle (e.g. drivers, mechanics) require a
unique set of data about its operation; diagnostics data. Drivers, for example,
need to know that their cars are healthy and that they are not currently breaking any traffic laws; mechanics, on the other hand, need to know the current
operational state of numerous components in the car, as well as a history of the
car’s performance, in order to do their jobs. Although the automotive industry has fully embraced the need for the ”mass customization” of their vehicles,
this trend does not extend to diagnostics displays. This leaves an open niche
for third-party solutions. Unfortunately, the third-party solutions tend to be
targeted at specific subsets of the problem and do not work in all cases. Our
solution employs a wireless sensor network which results in a system which is
integrated, customizable, low-cost, and non-intrusive. Wireless sensing nodes
are small and are located close to the signals they are measuring. A base station
aggregates the readings from the sensing nodes and then logs and displays them.
vi
We describe the design and implementation of the system and evaluate it, showing that ultimately it is a feasible solution for low-rate, non-critical automotive
diagnostics.
vii
Contents
Acknowledgements
iv
Abstract
vi
List of Figures
xi
List of Tables
xii
1 Introduction
1
2 The State of the Art
2.1 Background . . . . . . . . . . . . . . . . . . . . . . . . . . . . .
2.2 The Problem . . . . . . . . . . . . . . . . . . . . . . . . . . . .
6
6
7
3 A Solution
3.1 Architecture . . . .
3.1.1 Overview .
3.1.2 Justification
3.2 Challenges . . . . .
3.3 Requirements . . .
.
.
.
.
.
.
.
.
.
.
.
.
.
.
.
.
.
.
.
.
.
.
.
.
.
.
.
.
.
.
.
.
.
.
.
.
.
.
.
.
.
.
.
.
.
.
.
.
.
.
.
.
.
.
.
.
.
.
.
.
.
.
.
.
.
.
.
.
.
.
.
.
.
.
.
.
.
.
.
.
.
.
.
.
.
.
.
.
.
.
.
.
.
.
.
.
.
.
.
.
10
10
10
11
13
15
4 A Prototype
4.1 Introduction . . . . . . . . . .
4.2 Design . . . . . . . . . . . . .
4.2.1 Sensor Package . . . .
4.2.2 Mote Software . . . . .
4.2.3 User Interface Software
4.3 Implementation . . . . . . . .
.
.
.
.
.
.
.
.
.
.
.
.
.
.
.
.
.
.
.
.
.
.
.
.
.
.
.
.
.
.
.
.
.
.
.
.
.
.
.
.
.
.
.
.
.
.
.
.
.
.
.
.
.
.
.
.
.
.
.
.
.
.
.
.
.
.
.
.
.
.
.
.
.
.
.
.
.
.
.
.
.
.
.
.
.
.
.
.
.
.
.
.
.
.
.
.
.
.
.
.
.
.
.
.
.
.
.
.
.
.
.
.
.
.
17
17
20
20
24
25
29
.
.
.
.
.
.
.
.
.
.
.
.
.
.
.
.
.
.
.
.
.
.
.
.
.
viii
4.3.1
4.3.2
4.3.3
4.3.4
Introduction .
Sensor Board
Mote Software
User Interface
.
.
.
.
29
30
33
35
.
.
.
.
.
.
.
.
.
.
.
.
.
.
.
.
.
.
37
37
38
38
40
43
44
45
45
47
49
50
51
52
53
53
53
54
56
6 Related Work
6.1 Overview . . . . . . . . . . . . . . . . . . . . . . . . . . . . . . .
6.2 Existing Diagnostics Solutions . . . . . . . . . . . . . . . . . . .
6.3 Related Research . . . . . . . . . . . . . . . . . . . . . . . . . .
58
58
58
61
7 Conclusion and Potential Elaboration
7.1 Conclusion . . . . . . . . . . . . . . . . . . . . . . . . . . . . . .
7.2 Potential Elaboration . . . . . . . . . . . . . . . . . . . . . . . .
64
64
66
Bibliography
68
Appendices
72
A javadoc
73
.
.
.
.
.
.
.
.
.
.
.
.
.
.
.
.
.
.
.
.
.
.
.
.
.
.
.
.
.
.
.
.
.
.
.
.
.
.
.
.
5 System Evaluation
5.1 Criteria for Evaluation . . . . . . . . .
5.2 Evaluation Methodology . . . . . . . .
5.2.1 Calibration . . . . . . . . . . .
5.2.2 Data Collection . . . . . . . . .
5.2.3 Data Processing and Evaluation
5.2.4 Qualitative Evaluation . . . . .
5.3 Results . . . . . . . . . . . . . . . . . .
5.3.1 Effective Throughput . . . . . .
5.3.2 Reception Rate . . . . . . . . .
5.3.3 Measurement Resolution . . . .
5.3.4 Integration . . . . . . . . . . .
5.3.5 Customizability . . . . . . . . .
5.3.6 Cost . . . . . . . . . . . . . . .
5.3.7 Non-intrusiveness . . . . . . . .
5.4 Analysis . . . . . . . . . . . . . . . . .
5.4.1 What worked? . . . . . . . . . .
5.4.2 What didn’t work? . . . . . . .
5.4.3 Generalization . . . . . . . . . .
ix
.
.
.
.
.
.
.
.
.
.
.
.
.
.
.
.
.
.
.
.
.
.
.
.
.
.
.
.
.
.
.
.
.
.
.
.
.
.
.
.
.
.
.
.
.
.
.
.
.
.
.
.
.
.
.
.
.
.
.
.
.
.
.
.
.
.
.
.
.
.
.
.
.
.
.
.
.
.
.
.
.
.
.
.
.
.
.
.
.
.
.
.
.
.
.
.
.
.
.
.
.
.
.
.
.
.
.
.
.
.
.
.
.
.
.
.
.
.
.
.
.
.
.
.
.
.
.
.
.
.
.
.
.
.
.
.
.
.
.
.
.
.
.
.
.
.
.
.
.
.
.
.
.
.
.
.
.
.
.
.
.
.
.
.
.
.
.
.
.
.
.
.
.
.
.
.
.
.
.
.
.
.
.
.
.
.
.
.
.
.
.
.
.
.
.
.
.
.
.
.
.
.
.
.
.
.
.
.
.
.
.
.
.
.
.
.
.
.
.
.
.
.
.
.
.
.
.
.
.
.
.
.
.
.
.
.
.
.
.
.
.
.
.
.
.
.
.
.
.
.
.
.
.
.
.
.
.
.
.
.
.
.
.
.
.
.
.
.
.
.
.
.
.
.
.
.
.
.
.
.
.
.
.
.
.
.
A.1 Package org.ucsb.mayhem.diomedes . . . . . . . . . . . . . . . .
73
B nesdoc
122
B.1 Diomedes Application . . . . . . . . . . . . . . . . . . . . . . . 122
B.2 Diomedes Sensorboard . . . . . . . . . . . . . . . . . . . . . . . 123
x
List of Figures
3.1
Solution Architecture
4.1
4.2
4.3
4.4
4.5
4.6
4.7
4.8
4.9
4.10
4.11
4.12
DIOMEDES Prototype Architecture . . . . . . . . .
ADC2 signal conditioning . . . . . . . . . . . . . . .
ADC2 signal conditioning - w/ Voltage Divider . . .
ADC2 signal conditioning - w/ Filter . . . . . . . . .
ADC2 signal conditioning - w/ Protection Diode . .
Mote Software Architecture . . . . . . . . . . . . . .
Sequence Diagram of the mote software . . . . . . .
Class Diagram for Sample Handler children . . . . .
Sensor network message handling Sequence Diagram
Mica2 and sensor board block diagram . . . . . . . .
Sensor Board Implementation . . . . . . . . . . . . .
User Interface . . . . . . . . . . . . . . . . . . . . . .
.
.
.
.
.
.
.
.
.
.
.
.
18
20
22
24
25
26
27
28
29
32
33
36
5.1
5.2
5.3
Data Collection Photos . . . . . . . . . . . . . . . . . . . . . . .
Effective Throughput CDF . . . . . . . . . . . . . . . . . . . .
Reception Rate CDF . . . . . . . . . . . . . . . . . . . . . . . .
41
46
48
B.1 DiomedesAppC Dependencies . . . . . . . . . . . . . . . . . . .
B.2 DiomedesSB Dependencies . . . . . . . . . . . . . . . . . . . .
122
123
. . . . . . . . . . . . . . . . . . . . . . .
xi
.
.
.
.
.
.
.
.
.
.
.
.
.
.
.
.
.
.
.
.
.
.
.
.
.
.
.
.
.
.
.
.
.
.
.
.
.
.
.
.
.
.
.
.
.
.
.
.
.
.
.
.
.
.
.
.
.
.
.
.
11
List of Tables
4.1
4.2
Sizing R1 of the ADC front end circuit . . . . . . . . . . . . . .
Sizing R1 of the ADC front end circuit, actual values . . . . . .
22
30
5.1
Measurement ranges and resolutions
50
xii
. . . . . . . . . . . . . . .
Chapter 1
Introduction
. . . tu cum olfacies, deos rogabis
totum ut te faciant, Fabulle, nasum.1
G. Valerius Catullus, carmen tredecim
All people who interact with a vehicle require custom indicators of the vehicle’s performance; custom diagnostics data. Drivers need to see that the vehicle
has sufficient fuel and that the engine is not overheating; whereas mechanics
require detailed readouts of all operational parameters. Though the automotive
industry has recognized the need for options and customization in other aspects
of their vehicles, such as paint colors and wheel designs; customizable diagnostics displays are seldom offered. When an original equipment manufacturer does
provide diagnostics read-outs, they are typically insufficient for general uses, and
are always limited in scope. Temperature gauges only read engine coolant temperature, when other engine temperatures, for example, the air temperature at
the throttle intake, would also be valuable.
1
. . . when you smell it, Fabullus, you will beg the gods to make you all nose.
1
Chapter 1. Introduction
This leaves a niche to be filled by third-party developers. Unfortunately,
though third-party solutions greatly increase the flexibility of automotive diagnostics systems, they typically fail to provide all desired aspects: integration,
customizability, low cost, and non-intrusiveness.
The system must be integrated into the car to such a degree that it can
operate effectively whether the car is stationary or moving. Clearly, the goal is
not to have the driver actively interacting with the system, but rather to allow
data collection and display at all times. For troubleshooting, some conditions
may only occur when the car is operating.
The system must be customizable in order to support the full range of expected, and unexpected uses. It must be able to collect and display data from
any of the car’s on-board sensors and it must additionally be capable of introducing additional sensors to measure previously unplanned parameters.
The system must be low-cost so that it is feasible to collect a large number
of parameters from the operating vehicle while maintaining affordability. This
system must support the needs of all users, from the home user interested in
a little more feedback from his or her vehicle, to the well-established auto mechanic. While the mechanic may be able to afford another piece of expensive
diagnostics equipment, the home user would likely not be able to.
2
Chapter 1. Introduction
Finally, the system must be non-intrusive. The system must not affect the
operation of the car to which it is attached, and after it has been removed it
must leave minimal evidence of its presence.
Taking these requirements into account, the question then becomes:
Can integrated diagnostics systems be built that are customizable, lowcost, and non-intrusive?
We provide a solution to the problem, and probe the answer to this question,
using the nodes of a wireless sensor network to read and relate diagnostics data
to a central base station. The base station, either a notebook computer for a
temporary system, or an integrated carputer for a more permanent solution,
logs and displays the data in a coherent manner. By removing the wires which
characterize traditional automotive diagnostics systems, we enable the system to
be much more integrated, customizable, and non-intrusive. By utilizing sensor
network nodes, which are projected to be inexpensive and ubiquitous in the
future, we make the system low-cost.
After detailing the solution and giving its justification in relation to alternate approaches, we enumerate a series of requirements which an implementation
must meet. Then we present the design and implementation of our prototype
solution, which uses Crossbow Mica2 motes as the remote sensor nodes for the
system and an Apple notebook computer as the base station. The Mica2 motes
3
Chapter 1. Introduction
are fitted with Crossbow MDA100CB prototyping boards, which include temperature and light sensors and provide a space to construct a signal conditioning
circuit. The motes run a custom application built on top of TinyOS which handles the timing of all data acquisition and networking operations. The notebook
computer has another Mica2 mote attached to it via RS-232 serial, which acts
as a packet forwarder. It also runs a Java application which provides graphical
displays of the data, as well as data logging capabilities.
The prototype is built and exercised in a real-world scenario. The data
logs are reduced to statistics which are then evaluated. We also analyze the
qualitative aspects of the system. Finally, we discuss which aspects of the system
meet specifications, such as its integration and non-intrusiveness, and give ideas
for how to improve other aspects, such as the overall packet reception rate and
the customizability. We also review a body of related work, including other
commercial diagnostics systems, wireless networking in cars, and general work
on sensor networks.
The rest of this thesis is structured as follows. Chapter 2 states the problem being solved and gives some background on existing commercial solutions.
Chapter 3 presents a solution to the problem, its justification, the challenges
inherent in solving the problem, and then the requirements for any implementation of the solution to meet. Chapter 4 describes the design and implementation
4
Chapter 1. Introduction
of the prototype used to show the feasibility of this solution. Chapter 5 gives an
evaluation of the prototype with respect to the problem. Chapter 6 reviews a
body of related work. Finally, conclusions and potential elaboration are covered
in Chapter 7.
5
Chapter 2
The State of the Art
2.1
Background
All people who interact with vehicles need feedback from the vehicles about
how they are performing. Car owners lean towards increasingly elaborate displays of their vehicles’ operational parameters (e.g. any ad-hoc survey of Toyota
Prius owners will reveal how much their cars’ advanced dashboard readouts influenced their purchase); car tuners need data on the parameters that they are
tuning, during tuning operations in the shop and later during road testing; mechanics need to be able to measure a host of operational parameters for a car in
the shop, and could benefit from historical ’debug’ information about the state
of the car when a problem occurred. All of these people have different needs for
this feedback, or diagnostics, data.
6
Chapter 2. The State of the Art
The automobile industry is well aware of the need to cater to the diverse
needs of its customers. Embracing the notion of mass customization[27, 37],
companies offer hundreds of options in each of their models. Some manufacturers, notably MINI[22] and Scion[32], center their marketing campaigns on
the customizability of their cars; they make statements that ”over 10,000,000
possible configurations”[22] are available, or that no two cars are exactly alike.
Everything can be customized, from engine sizes and transmissions to interior
trim and wheel colors.
2.2
The Problem
Despite the displayed need for customized vehicle diagnostics displays, and
the auto industry’s espousal of mass customization in nearly every other facet of
its production, the development of factory customization of diagnostics data is
not keeping pace. It is left up to the third-party automotive test and modification
industries to fill this need. For a third-party solution to completely fill the
needs of all interested parties, it must achieve several high-level requirements:
integration, customizability, low cost, and non-intrusiveness.
It must be integrated, offering diagnostics data as easily on the road as it
does in the garage, with minimal modification. This is a requirement which is
7
Chapter 2. The State of the Art
not often seen in general-purpose diagnostics systems because most systems are
built specifically for installation on static vehicles. For a system to be truly
integrated it must require that its wiring be routed carefully around the vehicle
or it must be wireless.
It must be customizable, allowing the collection of data from a variety of
existing data sources on-board, as well as permitting the addition of data sources
not previously envisioned by the original equipment manufacturer. Thus, it
should be able to read the voltage from a temperature sensor already built into
the engine of a vehicle, but it should also be able to read temperature in a region
of the car which does not already have a temperature sensor in it. Typically
systems either allow connection to existing signals or measurement of conditions
(e.g. temperature) at arbitrary locations; to do both will require a more general
measurement platform than is currently available. It should also be able to work
on a variety of vehicle models and model years.
It must be low-cost, making it appropriate for home users as well as skilled
mechanics. This requirement may seem at odds with the others, but it is essential
that the system provide some utility to home users if it is to be truly general in
scope.
Perhaps most importantly, it must be non-intrusive. The system should be
capable of being attached to a vehicle, of taking data, and then of being removed
8
Chapter 2. The State of the Art
from the vehicle. During data collection the operation of the vehicle should
not be negatively impacted, and afterwards there should be minimal evidence
that the diagnostics system was ever installed. This is easy to achieve with a
system which does not directly interface with the vehicle, but it becomes more
difficult once electrical connections are made. This also implies that the system’s
components are small enough to fit in spaces existing in the vehicle, allowing all
panels and doors to be left unmodified and safely closed during operation.
The range of existing diagnostics solutions is discussed in Section 6.2. Chapter 3 discusses our solution to this problem.
9
Chapter 3
A Solution
3.1
3.1.1
Architecture
Overview
The basic notion of this solution is to build an automotive diagnostics system
utilizing a collection of wireless sensor nodes collecting data from the car. The
sensor network is arranged in a static star topology surrounding a central base
station which aggregates the data. The base station also provides display and
logging functionality.
Figure 3.1 shows the architecture. The diagram illustrates a couple of important aspects of the system. First, the wireless sensing nodes are scattered
around the car as close as possible to the signals which they are measuring, resulting in no wires more than a few inches long. Also, the base station is shown
outside of the car to emphasize the flexibility of the architecture. Depending
10
Chapter 3. A Solution
Legend
Wireless sensing node
Base Station
Figure 3.1: Solution Architecture
upon the need for the system, the base station could be a built-in carputer (i.e.
a computer built into an automobile) for a permanent installation, or it could
be a ruggedized laptop for a more temporary diagnostics system.
3.1.2
Justification
When approaching the architecture for a diagnostics system, an initial question is how to collect readings from disparate signals into a central place. Traditionally, this was done with long cables all connected to a central computing device. Wires either had to be routed through barriers, limiting the nonintrusiveness of the system, or routed externally to the car, limiting the system’s
integration. Making the system wireless adds significant flexibility.
11
Chapter 3. A Solution
Once wireless has been chosen as the medium of communication, we must
examine the available protocols. Two prime choices are Bluetooth or low-power
radio protocols such as ZigBee. Low power radios have numerous advantages
over Bluetooth for large, customizable deployments. ZigBee networks can contain more nodes, they are typically more resilient and reliable, and consume
much less power[3, 40]. Automotive applications of these protocols have been
suggested[24], even as a complete data cable replacement[8], but only in a speculative fashion, and with a fair amount of trepidation with respect to using them
in safety-critical instances. The nodes are also projected to be inexpensive and
tools exist to make them easier to program, and less platform-specific, than if
they were programmed directly in C or assembly.
The system can be expected to receive sufficient battery life for any reasonable temporary application, and more permanent applications could make use
of the on-board, switched 12V available in a car. Also, the ’indoor’ interference characteristics of Zigbee[9, 13], and other sensor network-specific low power
radio standards, make it an excellent choice for the cluttered and potentially
electromagnetically-noisy environment around a car’s engine.
The system also aims to be non-intrusive, meaning that for a temporary
application, it must be possible to clamp it onto a car, take measurements,
remove the system, and have little in the way of evidence that it had ever been
12
Chapter 3. A Solution
present; the car should continue to perform as if the system is not, and has never
been, attached. Sensor nodes are small and light and fulfill this aim well. Also,
since they are wireless there is no need to carefully route wires between areas of
the car. Ultimately, it is the wires, characteristic to most automotive diagnostics
systems, that limit the non-intrusiveness of these systems.
We discuss related research in Section 6.3.
3.2
Challenges
Although inter-vehicular networking has been studied[12, 31], and intravehicular networking has been examined using Bluetooth[24, 10, 28, 17], there
has been little empirical work with ZigBee and other low-power wireless radios
in automotive applications. Because of this, there are expected to be several
challenges to evaluate and overcome.
For one, the environment in a car is electromagnetically noisy, due in part
to the presence of high voltage, high frequency signals (such as those running
through the plug wires). Moreover, line-of-sight between wireless sensor nodes
in a typical application is often broken by large sheets of steel. More than in
other applications of low-power radios, it is expected that this application will
experience significant interference and, consequently, packet loss. Thus, reliabil-
13
Chapter 3. A Solution
ity mechanisms will need to be employed to reach acceptable packet reception
rate.
The environment is also inhospitable in other ways. Both vibration and high
temperatures could cause problems for the system. Luckily, there is a history of
sensor network solutions in far more extreme environments[20, 36], often achieved
by insulating the sensor nodes, either physically, from vibrations, or thermally,
from high temperatures.
Another source of challenge, common to any networking system, is coordination of network traffic. With a large number of wireless sensor nodes asynchronously transmitting samples to the base station, likely at different frequencies of transmission, the base station must be able to attribute the samples to
the proper data source on the proper sensor node, order them relative to other
messages sent from the same node, and determine which, if any, of the samples
were corrupted. This will require an additional application-level protocol on top
of any existing network-level protocols.
Finally, sensor node hardware is not well-suited to automotive signals. Signal
voltage ranges are potentially wide and varied, voltage spikes can potentially
damage analog to digital converters, and there can be significant noise. To
handle all of these issues, the sensor nodes will require some signal conditioning
in front of the analog to digital converter.
14
Chapter 3. A Solution
3.3
Requirements
At the high level, the solution must meet the requirements from Section 2.2;
it must be integrated, customizable, low-cost, and non-intrusive. Beyond these
high level requirements, however, lie the requirements on this particular solution
in order to make it a viable system. These requirements can be divided by the
component to which they pertain; they are either requirements for the wireless
sensing nodes or for the base station.
The wireless sensing nodes need to collect data samples and forward them
to the base station. The nodes should have a sensor package which allows them
to measure environmental parameters without the support of existing sensors.
They must also be able to clip onto existing wires in the vehicle, reading the
voltage present without damaging themselves or the car. In order to be nonintrusive, they must also be small and light, and ought to be battery-powered
with a reasonable battery life. Finally, they must be capable of completing all
of their tasks while inside a vehicle.
The base station needs to receive samples from all of the wireless sensing
nodes in the car, and then either display those samples in real-time or log them
to secondary storage for post-processing. In the case where samples are being
displayed, the base station would need a display device and a visual represen-
15
Chapter 3. A Solution
tation of each of the data sources, either as simple digital display or some more
complex graphical representation. In the case where samples are being logged,
the base station would require an interface to configure a logging session, and
then a means to extract the completed log data.
Chapter 4 discusses a prototype implementation of this solution, then Chapter 5 evaluates the prototype against these requirements.
16
Chapter 4
A Prototype
4.1
Introduction
This chapter describes the prototype which we built to determine the feasibility of the solution. The prototype system is called DIOMEDES, which stands
for: Diagnostics Implemented On Motes Expressly Designed for Engine Sensing1 . It is built using Crossbow Mica2 motes for the sensor nodes, which are
comprised of an Atmel ATMega128L microcontroller (with built-in 10bit analog
to digital converter) and a Chipcon CC1000 900MHz low-power radio. Another
Crossbow Mica2 mote is used as wireless interface for the base station, and an
Apple notebook computer is the user interface to the system, connected to the
base station mote with RS-232 serial. The architecture for the prototype is
shown in Figure 4.1.
1
Also a Greek hero from Homer’s Iliad.
17
Chapter 4. A Prototype
$
$
Legend
$
mote
$
User Interface Laptop
rs-232
$
Figure 4.1: Prototype Architecture, DIOMEDES (Image of car courtesy of
MINI USA[22]; image of motes courtesy of Crossbow[7])
The Mica2 motes were a good choice for wireless sensor nodes for a number of reasons. First, we had a number of them from previous experiments, so
finding three sensors and a base station mote was not a problem. They also
have sufficient on-board memory and processing capability to collect samples
and transmit them via their built-in radios in a light, compact package. Also,
Crossbow makes a prototyping board (MDA100) that connects to the Mica2’s
expansion port. This made it easy to experiment with our analog signal conditioning. The motes are battery-powered, as well, making them better suited for
a testing environment.
18
Chapter 4. A Prototype
The Mica2 motes were not without their downsides. The Mica2 uses a
900MHz radio, instead of the aforementioned 2.4GHz ZigBee radios. In this
sense we sacrifice some accuracy in our prototype. With ZigBee’s additional
protocol features and its wideband radio, it is expected that replacing our prototypes with ones using ZigBee radios would have yielded better results in terms
of reception rate, but slightly worse results in terms of range[29].
The software for the prototype system consists of three main components:
software running on the sensor modes, software running on the base station
mote, and software running on the user interface laptop. All of the sensor node
software is written on top of TinyOS[11], a lightweight, event-driven operating
system specifically designed for use with sensor networks. Components are written in a domain-specific version of the C programming language called NesC and
compiled with TinyOS to create the device images. The base station software
is the BaseStation module provided with TinyOS, while two components on the
sensor nodes were written custom. There is a Java language package to interface
between the network and the graphical user interface, which is also written in
Java.
The rest of this chapter deals with the design, and then the implementation,
of the DIOMEDES prototype.
19
Chapter 4. A Prototype
4.2
4.2.1
Design
Sensor Package
Considering that we want to read an external signal with the mote, we need
to interface with the Mica2’s on-board analog-to-digital converter (ADC). The
Mica2’s Atmel ATMega128L has 8 ADC inputs. Since the first ADC input,
ADC1, is already taken up by the built-in temperature and light sensors, we
have to use ADC2. This is accomplished by connecting a probe wire directly
to pin ADC2 on the Mica2 expansion connector (Figure 4.2), as in Figure 4.2,
broken out on the prototyping board.
Test Point
ADC2
Car Ground
Sensor Node Ground
Figure 4.2: ADC2 signal conditioning
This simplistic design does not account for the variety of voltage ranges
which could be present in the car. Because the ADC on the microcontroller
only supports voltages in the range of 0-3V, it is necessary to add a voltage
divider to the front end of the ADC, dividing the actual input voltage such that
the maximum voltage that the sensor could ’see’ does not exceed 3V. This is
20
Chapter 4. A Prototype
accomplished with the circuit shown in Figure 4.3. The ratio of R1 and R2
determine the amount that the voltage is divided, according to the following
formula:
V2 =
VT P · R2
R1 + R2
(4.1)
Where VT P is the voltage at the test point and V2 is the voltage across R2
(and, thus, the voltage that ADC2 ’sees’). Because the effect of the measurement
circuit on the car’s electronics must be minimal, the total resistance, R1 + R2
should be as large as possible. At the same time, the total resistance should be
several orders of magnitude lower than the input resistance of the ADC, which is
10M Ω. Thus, the value of R2 was fixed at 50KΩ, and R1 is subsequently sized
according to the desired maximum test point voltage as follows, solving Eqn 4.1
for R1 :
R1 = R2 ·
VT P
− R2
V2
(4.2)
And inserting our known quantities for R2 and the maximum V2 :
R1 = 50, 000Ω ·
VT P
− 50, 000Ω
3.0V
(4.3)
Which means that, given a desired maximum test point voltage, VT P , we can
size R1 using Table 4.1.
21
Chapter 4. A Prototype
maximum VT P
3.0V
5.0V
6.0V
10.0V
12.0V
15.0V
...
R1
0Ω
33, 333.33Ω
50, 000Ω
116, 666.67Ω
150, 000Ω
200, 000Ω
...
Table 4.1: Sizing R1 of the ADC front end circuit
Test Point
R1
ADC2
R2
Sensor Node Ground
Car Ground
Figure 4.3: ADC2 signal conditioning - w/ Voltage Divider
In order to filter out spikes and noise from the input signal, this circuit needs
a capacitor across the lower resistor (Figure 4.4). This creates a simple RC filter.
Now we must properly size C1 in order that our low-pass filter’s cutoff frequency
can be properly adjusted. The Nyquist frequency of our 10Hz sample rate is
5Hz. Thus, we want to size the filter such that the cutoff frequency is less than
or equal to 5Hz. This ensures that we are able to sample the highest frequencies
22
Chapter 4. A Prototype
which pass through our filter. So, given the relation of cutoff frequency in terms
of R and C:
f=
1
< 5Hz
2πRC
(4.4)
1
10πR
(4.5)
We can solve for C:
C>
In this case, R is equal to the equivalent resistance of R1 parallel to R2 , which
is 20, 000Ω, assuming R1 = 33, 333Ω for a voltage range of 0 − 5V across VT P .
So,
C >
1
10π · 20, 000Ω
C > 1.59µF
(4.6)
(4.7)
Finally, we must protect the mote from unexpectedly-large voltages. Although the resistors are large enough that reasonably large voltages would not
pull sufficient current to damage the microcontroller, as an added protective
measure a 3.0V Zener diode is placed across R2 (Figure 4.5)2 .
2
Analog design tips from electronics-minded colleagues James and Brian were instrumental
in getting to this point in the sensor package design
23
Chapter 4. A Prototype
Test Point
R1
ADC2
C1
R2
Sensor Node Ground
Car Ground
Figure 4.4: ADC2 signal conditioning - w/ Filter
4.2.2
Mote Software
The mote software consists of two custom components and several unmodified TinyOS components. One of the custom components is the abstraction of
the sensor board, which provides management of the ADCs, as well as any associated hardware I/O necessary. The other is the main application, DiomedesApp,
which must manage the timer, coordinate ADC reads, and initiate the sending
of messages via the radio. Both components run on top of the TinyOS operating system, making use of its ADC and Radio abstractions, among others. The
whole mote software architecture is shown in Figure 4.6.
A sequence diagram of the basic operation of the mote software is shown in
Figure 4.7. Essentially, during operation the mote need only wait on a timer
event and then kick off an ADC read from whichever of the three available
24
Chapter 4. A Prototype
Test Point
R1
ADC2
C1
R2
Sensor Node Ground
Car Ground
Figure 4.5: ADC2 signal conditioning - w/ Protection Diode
channels is chosen. When the ADC read completes it needs to format the data
into a message and pass the message to the Mote Radio for transmission.
Additional reliability mechanics are not shown. These involve an ’ACK’
mechanism for each packet sent, checked at the sensor node before another packet
is sent, and a CRC check for each packet, checked at the base station.
4.2.3
User Interface Software
The operation of the user interface software is based upon the receipt and
processing of messages from the distributed sensors. For this reason, most of
the classes in the design of the software implement a simple interface called
SampleHander, which defines a method called handleSample(...), as shown in
25
Chapter 4. A Prototype
DiomedesApp
Radio
DiomedesSB
ADC
Figure 4.6: Mote Software Architecture
the high-level Class Diagram (Figure 4.8). This diagram also elucidates the ”has
a” relationships present in the system, which will be discussed shortly.
The unmodified TinyOS class MoteIF handles all of the communication with
the base station mote. To abstract the concept of the network and its components, we introduce classes WirelessSensorNetwork, Mote, and Channel. The
user interface also uses classes SampleLogger and Gauge.
Class WirelessSensorNetwork receives the incoming DiomedesTLMMsg messages from MoteIF. Its job is threefold. First, it must decode the packet into
a Sample of the appropriate type, based upon what kind of data it contains.
Next, it must dispatch the Sample to the proper Mote class. Finally, it must
pass the Sample to any other registered handlers, typically implementers of the
SampleLogger interface which can log the samples to file, among other projected
uses.
26
Chapter 4. A Prototype
DiomedesApp
DiomedesSB
ADC
MoteRadio
Timer Fired
start ADC read
start conversion
conversion
complete
ADC read done
send message
Figure 4.7: Sequence Diagram of the mote software
Class Mote accepts objects of type Sample from the WirelessSensorNetwork
class and must dispatch them to the proper registered Channel class.
Channels in this case represent potential sources of data from the mote; in
the current prototype, these are TempChannel, LightChannel, and ADCChannel,
for temperature, light, and general voltage data, respectively. The channels encapsulate the type of data coming in from a particular mote, and must therefore
also provide conversion from raw ADC readings into the appropriate engineering
units. When a Sample is passed to a Channel, the Channel must register itself
with the Sample so that, later, the Sample’s engineering units can be expediently
27
Chapter 4. A Prototype
SampleHandler
handleSample(Sample)
WirelessSensor
Network
SampleLogger
Gauge
Mote
id : int
TempChannel
AcceleratorPedalChannel
Channel
function : int
convertUnits() : float
LightChannel
ADCChannel
EngineCoolantChannel
setScale()
setTitle()
paintComponent()
FuelGauge
DialGauge
TempGauge
FuelPumpLevelChannel
Figure 4.8: Class Diagram for Sample Handler children
extracted. The final job of the Channel is to pass the Sample to any registered
handlers, typically subclasses of the abstract class Gauge.
A Gauge represents a UI element which displays the readings from a particular
Channel. It could be as simple as a text box showing the rapidly changing
values or as complex as a graph of the previous data history or a graphical
representation of a car’s gauge.
The typical sequence of operations when a message is received from the sensor
network is showing in Figure 4.9. If at any point in this sequence the sample is
28
Chapter 4. A Prototype
: MoteIF
: WirelessSensorNetwork
: Mote
: Channel
: Gauge
: SampleLogger
messageReceived
handleSample()
handleSample()
handleSample()
handleSample()
Figure 4.9: Sensor network message handling Sequence Diagram
found to be invalid (e.g. impossible readings, nonexistent channels or motes),
an exception is thrown and all processing on that sample is halted.
4.3
4.3.1
Implementation
Introduction
This section describes the physical construction of the custom software and
hardware, focusing especially on the places where the ideal assumptions of the
design diverged from the reality of implementation.
29
Chapter 4. A Prototype
4.3.2
Sensor Board
The reality of hardware implementation typically provides a disconnect from
the ideals of hardware design. Where, in design, it is possible to pick any resistor
value desired and have it be exact, in reality there are only very particular resistor
values available, and those with tolerances upwards of 10-20%. The closest
resistor value available to the ideal 50KΩ R2 resistor is a 49.9KΩ resistor. To
compensate, R1 had to be sized as in Table 4.2 in order to achieve the desired
voltage division.
maximum VT P
3.0V
5.0V
6.0V
12.0V
20.0V
R1
0Ω
34KΩ
49.9KΩ
150KΩ
280KΩ
Table 4.2: Sizing R1 of the ADC front end circuit, actual values
All of these resistances take into account the tolerance of 1% in the resistance
of metal film resistors, since we would prefer to have the maximum voltage across
R2 be less than 3.0V, as opposed to greater than 3.0V. This translates into larger
resistances than would ideally be required.
The Zener diodes also proved to be a problem. They were sized to have a
3.0V breakdown voltage, but they appeared to be flowing too much current at
lower voltages, affecting the ADC reading. It was determined that the Zener
30
Chapter 4. A Prototype
diodes had leakage current at lower voltages which rivaled the typical current
flowing through the circuit. This resulted in hugely affected readings. The only
solution was to remove the Zener diodes and rely on the current limiting of the
resistors to protect the microcontroller. There was no reason to believe that this
would not be sufficient. It would be possible, in the future, to purchase Zener
diodes with more agreeable leakage characteristics.
The capacitors also caused issues. The original construction of the sensor
board used 3.3µF electrolytic capacitors, assuming a sampling rate of 10Hz. As
will be shown in the Section 5.3.1, the target sampling rate of 10Hz was not
always met, making this capacitor slightly undersized. The 3.3µF electrolytic
capacitors were replaced with 22µF tantalum capacitors. The change in capacitor type was necessary because larger electrolytic capacitors would not have fit
easily on the board; tantalum capacitors are significantly smaller in footprint.
The circuit was constructed on top of a Crossbow MDA100 prototyping sensor board. The board provides built-in temperature and light sensors, both
connected to the ADC1 pin on the microcontroller. Each of these built-in sensors has a general-purpose digital input/output (GPIO) pin used to enable and
disable it. The MDA100 also gives a break-out panel giving solder points corresponding to most of the pins on the expansion module interface, including the
needed ADC2 pin, where we connect our signal conditioning and arbitrary volt-
31
Chapter 4. A Prototype
MDA100 Sensor Board
Mica2
Photocell
Atmel ATMega128L
Thermistor
signal
probe
Signal
Conditioning
ADC1
PE.5
PC.0
ADC2
Legend
digital control signal
analog signal
signal
ground
Figure 4.10: Mica2 and sensor board block diagram
age probe wires. The voltage probe wires are connected to the signals of interest
in the car. A block diagram of the Mica2 with the sensor board is shown in
Figure 4.10.
The final result, with green wires forming jumpers, is shown in Figure 4.11.
The resistors are 1% metal film and the capacitor is a 6.3V tantalum. The
leads for the sensor board are a pair of 18AWG wires with 0.250” insulated male
disconnects crimped onto the ends, with their other ends soldered to the sensor
board and strain-relieved with 50lb. nylon monofilament. Connecting the sensor
board to a signal wire becomes a matter of crimping a Female T-Tap disconnect
onto the wire and slipping on the sensor board leads.
32
Chapter 4. A Prototype
Figure 4.11: Sensor Board Implementation
4.3.3
Mote Software
The software for the motes was written in NesC for the TinyOS operating
system. The details of the code can be found in Appendix B, which is the
nesdoc output. There are two main components, the Diomedes Sensorboard
and the Diomedes Application.
Diomedes Sensorboard
The Diomedes Sensorboard was based, at least philosophically, on the standard SensorMts300 sensor board provided with TinyOS. The component provides
three Read<uint16 t> interfaces called Light, Temp, and ADC2. Depending on
which read() command is called, the software enables the appropriate sensor,
33
Chapter 4. A Prototype
waits for it to warm up, starts the conversion, and then, when the conversion is
done, it posts the result in an event.
For ADC2, the act of enabling the sensor is trivial; it basically ensures that the
other sensors are disabled. Temp and Light share the same ADC channel, so it is
necessary to enable the proper sensor. This is done by setting the corresponding
digital output pin on the microcontroller (Port E pin 5 for the Light sensor,
Port C pin 0 for the Temp sensor).
Diomedes Application
The Diomedes Application uses three Read<uint16 t> interfaces (those corresponding to the interfaces provided by the Diomedes Sensorboard), the AMSend
interface, the Timer<TMilli> interface, and the PacketAcknowledgements interface.
Once the software has initialized it starts a periodic timer (10Hz, typical),
and goes to sleep. When it receives a timer event, if the previous packet has not
been acknowledged, it is retransmitted and the software goes to sleep. Otherwise
it calls read() on the appropriate Read interface and goes to sleep.
When the software receives a readdone() event, it builds a message containing the data sample, the mote’s ID, packet number (an ever-increasing counter),
and the type of data being sent. Then an acknowledge for the message is re-
34
Chapter 4. A Prototype
quested and it is sent. If the send ever fails or the message is not ACK’d before
the following timer event, then the same message is sent again until it succeeds.
4.3.4
User Interface
The user interface software is built in Java, making use of the existing java
packages (net.tinyos.*) for connecting to the base station mote through a
serial port and getting its messages. The graphical user interface code is written
using Java Swing. The details of the code can be found in Appendix A, the
javadoc of the code.
The classes in the application directly mirror those laid out in Section 4.2.3.
Every message received from the MoteIF is converted to a Sample and passed
through the hierarchy of SampleHandlers. If at any time the Sample object is
deemed to be invalid, a WSNException is thrown and its handling is stopped.
The UI of the application provides gauges and controls, as shown in Figure 4.12.
The gauges are subclasses of the class Gauge, which extend the standard
Swing class javax.swing.JPanel. Most of them are images with transparent
portions wherein simple vector art can be drawn to indicate the current value of
the mote’s channel. Gauges which look like thermometers, car dial gauges, car
fuel gauges, simple digital readouts, and stripcharts have been constructed.
35
Chapter 4. A Prototype
The controls on the application serve a few additional functions. They allow
logging to be started and stopped. When logging is started a standard Java file
dialog asks the user to choose a location for the logfile. After that, until the Stop
Logging button is pressed, every reading which comes from the MoteIF, and is
not deemed to be invalid, is logged to that file. There is also a Quit button, to
do the obvious.
Figure 4.12: User Interface
36
Chapter 5
System Evaluation
5.1
Criteria for Evaluation
Because the goal of this project is to build a system which is integrated,
customizable, low-cost, and non-intrusive clearly it must be shown that this
solution meets these overarching criteria. Also inherent in the construction of
an automotive diagnostics system is showing that the device can, indeed, be
used as an automotive diagnostics system. It must be capable of reading a
variety of signals with sufficient resolution, and presenting them to the user
in a sane way. This implies a reasonable minimum update rate per type of
channel. For example, temperatures need not be read as often as throttle pedal
position, because temperatures change slowly and throttle pedal position can
change quickly. This partly depends on the rate of collection at the motes,
themselves, and partly on the networking.
37
Chapter 5. System Evaluation
For a wireless application, update rate translates into a few parameters. Most
important are the ultimate packet throughput and the reception rate. Also
important is what is happening to the packets that do not make it to the frontend application intact. Are they lost? Are they corrupted? Packets which are
lost might be able to be resent whereas corruption of packets might be hard to
detect without more sophisticated packet integrity check mechanisms.
5.2
5.2.1
Evaluation Methodology
Calibration
Before data in engineering units could be collected from the sensors, each
sensor had to be calibrated. When the calibration was complete, the conversions
between raw ADC readings (DN ) to engineering units (EU ) were placed in the
user interface classes corresponding to each sensor.
The two built-in sensors on the MDA100 have generic calibration profiles
packaged with them. For the thermistor temperature sensor, Equation 5.1 converts from a raw ADC reading (DN) to Temperature in Kelvins. This is taken
directly from the datasheet[23].
38
Chapter 5. System Evaluation
EU =
1
(5.1)
0.001010024 + 0.000242127 · ln (Rthr ) + 0.000000146 · [ln (Rthr )]3
where Rthr =
10,000·(1023−DN)
.
DN
The light sensor measures a simple intensity, 0-100, and the conversion is
shown in Equation 5.2.
EU =
100 · DN
1023
(5.2)
The engine coolant sensor was calibrated by recording raw readings from
startup until the engine reached operating temperature (mid-way on the car’s
temperature gauge). The raw data were then scaled so that they corresponded
to the appropriate gauge readings, with the bottom of the gauge being 0 and
the top of the gauge being 100. The final conversion is shown in Equation 5.3.
EU = 65.820313 − 0.09765625 · DN
(5.3)
The throttle pedal position sensor was calibrated by taking a reading with
the pedal untouched and then taking a reading with the pedal on the floor.
These values were scaled to read 0% to 100%, with the conversion shown in
Equation 5.4.
39
Chapter 5. System Evaluation
EU = 0.30864198 · DN − 22.839506
(5.4)
Finally, the fuel level sensor was calibrated by taking a reading at full gas
tank and then taking a reading at half gas tank, scaling these values to read
from 0% fuel to 100% fuel. The final conversion is shown in Equation 5.5.
EU = 0.01082908 · DN
(5.5)
While the units of throttle pedal position calibration are percents (%), which
is appropriate for a throttle value, the other two sensors could only be decoded
into units of some arbitrary range (0 - 100 was chosen), not their true engineering
units (i.e. gallons for fuel, degrees Fahrenheit for coolant temperature). This is
ultimately acceptable since the goal is to mirror the physical gauges, and they
are unit-less.
5.2.2
Data Collection
Once the system was complete, it had to be tested in a real data collection scenario. A typical data collection experiment involves clamping three of
the motes into the test car, a 2004 MINI Cooper S, at interesting test points,
strapping a laptop into the passenger seat (Figure 5.1), and then driving around
Santa Barbara for an hour.
40
Chapter 5. System Evaluation
(a)
(b)
Figure 5.1: Data Collection Photos
(a) Sensorboard closeup affixed to the engine (b) Laptop strapped (safely) into
the car
Three sensors were chosen for the experiment: Engine Coolant Temperature,
Throttle Pedal Position, and Fuel Level. The location of the sensors and the
correct signal wires were collected from the Bentley Publishing MINI Cooper
Service Manual[21].
Engine Coolant should mirror exactly the readout on the dashboard ’temperature’ gauge. This signal from this sensor is accessible where it meets the
Electronics Control Module (ECM) under the car’s bonnet.
Throttle Pedal Position is also available under the bonnet at the ECM. For
a drive-by-wire vehicle, this is the desired throttle position, transferred from a
sensor the gas pedal in the passenger compartment. This is an attractive sensor
41
Chapter 5. System Evaluation
to monitor because it is easy for the experimenter (i.e. the driver) to interactively
affect.
Finally, the Fuel Level sensor was chosen as it differs from the other two
sensors in several ways. First, this signal is not available in the engine compartment with the other two. The only way to access this signal is to remove the
rear seats and place the sensor node directly on the fuel pump enclosure; this
varied the relative locations of the motes. Second, while the other two sensors
are well described in the service manual, this signal was poorly documented.
The output could be a simple voltage level proportional to the amount of fuel
in the tank–which was the preferred outcome–or it could be something entirely
different. The MINI has a two-lobed gas tank, equalized with a syphon pump
between the two lobes[21], with two independent fuel level sensors. It was assumed that one of the sensors would, typically, read half of the total fuel in the
vehicle.
So, with two motes secured under the hood, a mote sitting on the fuel pump
under the rear seats, and a laptop strapped securely into the passenger seat,
the car was driven and data was collected. There were also data collection
sessions wherein the motes were laid out at a workstation. These typically
provided baseline information, giving an idea of what to expect from the in-car
experiments.
42
Chapter 5. System Evaluation
The particular data collection session used in the following evaluation took
place over an hour of a variety of driving conditions. It began at UC Santa
Barbara, went out to Cathedral Oaks Road, east to Old San Marcos Road, back
down highway 154 to 101, and then back to campus. This provided slow city
traffic, rough and twisty hills, and relatively quick highway driving. All three
motes were programmed to collect and transmit data at a maximum rate of
20Hz.
5.2.3
Data Processing and Evaluation
The datafiles collected with the front-end’s logging facility were fed through
a series of bash and awk scripts which rendered them down to statistics and
graphs. Parameters extracted from the data, second-by-second, are:
• number of packets received - count of the number of seconds with the same
timestamp, to the precision of the second
• number of packets lost - count of packets missing during a particular second, as determined by missing ’packet numbers’
• total packets - sum of packets received and packets lost
• reception rate - ratio of packets received to total packets, expressed as a
percent
43
Chapter 5. System Evaluation
If a particular second of the experiment is found to not have packets associated with it, it is recorded appropriately to show instances of 0 packet reception.
The scripts also extract the data samples themselves as per-second averages.
This made it possible to generate graphs of the fuel level, engine coolant temperature, and throttle position throughout the experiment. Sanity checks were
performed on these data to see if they properly reflect the operation of the car.
Another helpful form of sanity check is to look at the laptop while the car is operating to compare the digital gauges with the physical ones. Ultimately, they
should match. Clearly this is dangerous if performed by the driver, so these
kinds of evaluations were limited to instances in controlled driving conditions or
with copilots.
The evaluation of these data rests on two parameters, the effective throughput
(Section 5.3.1), or the number of packets per second, and the reception rate
(Section 5.3.2). Another parameter of the system which is worth evaluating
is the resolution of the measurements. This can be calculated directly and is
covered in Section 5.3.3.
5.2.4
Qualitative Evaluation
Other criteria cannot be quantitatively evaluated. The integration, for example, is a purely qualitative measurement. It can be described and compared
44
Chapter 5. System Evaluation
with alternatives, but the decision must be left up to the reader as to whether
these criteria are met.
We must qualitatively examine the parameters set forth in the thesis question:
• integration - can the system be used in the service bay as easily as it can
be used in the field or even on the road?
• customizability - are a diverse range of modes of operation supported which
can support conceivable automotive applications?
• cost - is the final system relatively inexpensive?
• non-intrusiveness - does the presence of the system affect operation of the
vehicle or does the system leave any evidence of its installation?
5.3
5.3.1
Results
Effective Throughput
The CDF of the effective throughput for an hour-long run of the system
is shown in Figure 5.2. Each line represents a single mote in the system. The
graph is fairly straightforward. For example, for the Coolant Temperature mote,
10% of the time the system achieves 6 or less readings per second. In contrast,
the Fuel Level mote achieves roughly 10 or less readings per second 10% of
45
Chapter 5. System Evaluation
the time and the Accelerator Pedal mote achieves 8 or less readings per second
10% of the time. Another way of looking at this is that 90% of the time, the
Coolant Temperature mote achieves rates higher than 6 readings per second,
the Fuel Level mote achieves rates of higher than 10 packets per second, and the
Accelerator Pedal mote achieves more than 8 readings per second.
100
Coolant Temperature
Throttle Pedal Position
Fuel Level
80
CDF
60
40
20
0
0
2
4
6
8
10
Throughput (samples/second)
12
14
16
Figure 5.2: Effective Throughput CDF
Since all three motes are running the same software and all had new batteries
installed prior to the test, the variation in rates must be explained by something
environmental, by either the relative positioning of the motes to the base station,
46
Chapter 5. System Evaluation
by the amount of occluding material, or simply by the activity of the motes’ radio
protocol. We can rule out the simple explanation of the amount of occluding
material because the Temperature and Pedal motes were collocated; yet they
showed different throughputs. Physical orientation could have been a factor.
Previous studies have shown that sensor network mote radios are very sensitive
to placement and orientation[39].
5.3.2
Reception Rate
The CDF for reception rate for an hour-long run of the system is shown
in Figure 5.3. Each line represents a single mote in the system. Again, like
Figure 5.2, the graph is pretty straightforward. For both the fuel level and
throttle pedal motes, 90% of the time each had 90% or better reception rate.
This is in marked contrast to the coolant temperature mote which achieves 90%
or better reception rate only 60% of the time.
Again, the motes were all running the same software, so the variation between
the reception rates must be something more environmental. The mote connected
to the fuel pump was fully surrounded in the metal of the car’s body with what
can only be described as a metal blast shield screwed down on top of it. It was in
cramped quarters, squeezed down next to the fuel pump, and its antenna was in
a peculiar orientation. This almost certainly negatively impacted its reception
47
Chapter 5. System Evaluation
rate. And yet, it is the coolant temperature mote, sitting physically next to
the throttle pedal mote, which achieves the worst performance. It is doubtful
that electrical and physical interference alone are to blame since, again, the
throttle pedal position mote was directly next to the poorly-performing coolant
temperature mote. This may be a case where the previously documented miscalibrations of Mica2 radios comes into play[34]. It may be that the coolant
temperature mote inherently performs worse than the other two motes.
100
Coolant Temperature
Throttle Pedal Position
Fuel Level
80
CDF
60
40
20
0
0
20
40
60
Reception Rate (%)
Figure 5.3: Reception Rate CDF
48
80
100
Chapter 5. System Evaluation
5.3.3
Measurement Resolution
The key to understanding the resolution of our measurements is that the
ADCs on the Mica2 mote have 10 bits of resolution. For a voltage connected
directly to the ADC input, with its 0-3V range, this equates to a resolution of
about 3mV, as shown in Equation 5.6. In other words, the difference between
a measurement and the next highest measurement is 3mV, due to the discrete
nature of ADCs.
3.0V
= 0.00293V
210
(5.6)
With linear relationships in hand which convert raw ADC readings into reasonable units for the light sensor (Equation 5.2), engine coolant temperature
(Equation 5.3), throttle pedal position (Equation 5.4), and fuel level (Equation 5.5), it is a simple matter to determine the resolution of each measurement.
Unfortunately, with all of these readings being unit-less the resultant resolution
is also unit-less. Nevertheless, Table 5.1 shows the resolution of each of the
measurements; all sensors but the temperature sensor have a unit-less range of
0-100.
The only measurement which has real engineering units is the built-in temperature sensor on the MDA100 board. The default calibration curve (Equation 5.1)
for this thermistor is not linear, so it is impossible to give a single resolution for
49
Chapter 5. System Evaluation
measurement
range resolution
temperature sensor
0-50◦ C
∼ 0.1◦ C
light sensor
0-100
0.0978
engine coolant temperature sensor 0-100
0.0977
throttle pedal position sensor
0-100%
0.309%
fuel level sensor
0-100
0.0108
Table 5.1: Measurement ranges and resolutions
the measurement. Rather, since the curve is nominally valid over the range 0◦ C
to 50◦ C, it is possible to calculate the average resolution by determining the
ADC reading corresponding to 0◦ C and 50◦ C and calculating the slope of the
linear fit between those points. The result is also shown in Table 5.1.
5.3.4
Integration
When examining the criterion of integration, it is necessary to consider how
easily the system translates from operation in a static deployment (e.g. in a
garage) to another location, or even on the road in-between. Many existing
systems fail this criterion because they are designed specifically to be used on
an immobile vehicle. This system was designed with integration in mind and
proves successful in this regard. Because all of the components of the system
are modular and relatively decoupled, it proved simple to take the instrumented
car on the road. The only additional work required was to secure the motes to
their locations (using, in this case, 50 lb. test fishing line) and the laptop to the
50
Chapter 5. System Evaluation
passenger seat. Beyond those minor fixes, the system operated identically in the
garage as it did on the road.
5.3.5
Customizability
Another important criterion for this system was customizability. The system
needs to be capable of not only reading a variety of signals in the electrical
system of the car, but it needs to be capable of reading additional channels of
data which the user might want to see. Like any similar diagnostics system, this
one works well for connecting to existing signals. The front-end to the ADC can
be configured, through a minor hardware change (sizing a resistor), to read a
variety of voltage ranges. The series resistance of the front-end also limits the
current to the ADC input, thus protecting the micro-controller from out-of-range
voltages. The front-end software can also be modified to perform conversions of
these data into appropriate engineering units.
What this system also enables is the ability to read additional channels.
Currently, the software of the motes can be configured to read from the builtin temperature and light sensors; all of the infrastructure exists to make these
measurements. In future revisions of the sensor board, additional built-in sensors
could be added to further expand its customizability.
51
Chapter 5. System Evaluation
Without the wires of traditional diagnostics systems, installing the motes
becomes a simple prospect. The most difficult aspect is finding the signal wire
which is to be read. This wire is then tapped with a t-tap, a small, ubiquitous
connector requiring only a pair of pliers. Once the wire is tapped the mote can
be connected to the tap and secured in-place. Because the motes are small, they
can easily be placed anywhere on the car. With no wires to route, the mote is
now turned-on and the data immediately stream to the laptop, whether it be
outside of the car or, in our test case, on the passenger seat.
Right now the customization of the system requires changing the source code
in several places, but it has been abstracted to be straightforward. The infrastructure also exists for the front-end software to detect new motes in the system
and to automatically allow the user to customize its data channel(s).
5.3.6
Cost
Much of the work on sensor networks does so with the assumption that, in
the future, the sensor nodes will be ubiquitous and inexpensive[40, 30]. Although
each node in this prototype cost about $250 in materials per unit, it is projected
that sensor nodes could cost less than $1 per node. In this future, this whole
system will be very inexpensive to build. The motes are off-the-shelf with minimal analog front-ends consisting of a few passive components. Combine this
52
Chapter 5. System Evaluation
inexpensive mote hardware with an equally inexpensive serial packet-forwarding
base station, already a mainstay of sensor network design, and the total hardware
cost is projected to be minimal.
5.3.7
Non-intrusiveness
There are two aspects of non-intrusiveness worth evaluating: physical and
electrical. Physically, the motes are small and light and easily fit wherever they
needed to fit. Also, the probes were connected with t-taps, which remove easily,
leaving behind almost no trace of their previous installation. Electrically, the
total resistance of the whole sensor package is very high, which allows very
little current to flow. Consequently, the motes are nearly invisible to the car’s
electronics.
5.4
5.4.1
Analysis
What worked?
Ultimately, the system works to its requirements. Even with packet losses,
the rates are reasonable for monitoring and some post-processing. All the readings have sufficient resolution, and could conceivably be made even better with a
better knowledge of the signals being read. The system is integrated, customiz-
53
Chapter 5. System Evaluation
able, and relatively cheap. Certain mechanisms proved especially useful in the
system’s construction.
Filtering, in both hardware and software, did much to clean up the signals
received from the motes. The addition of the hardware filter (Figure 4.4) in
front of the analog to digital converter cleaned up most of the huge, periodic
voltage spikes common to automotive applications. Basic filtering in software,
by throwing out corrupted messages, as detected by a CRC check at the base
station, removes many of the packets which we can only assume are damaged
during transmission.
Also, making use of the built-in packet acknowledgment system in TinyOS
active messaging also did much to increase packet reception rates.
Of the three sensor positions chosen for this study, the throttle position and
temperature proved to be good choices. Both gave deterministic readings.
5.4.2
What didn’t work?
Not everything went perfectly in the system’s development. Some of the
more notable problems and less-conclusive results are described below.
For one, the protection diode was unusable due to its leakage current. One
of the assumptions is that the current leaking through the zener diode before its
breakdown voltage is minimal, at least compared with the total current flowing
54
Chapter 5. System Evaluation
through the circuit. Because the circuit was designed with large resistors, the
nominal current flow was already very small. With the zener diodes that we
chose, the leakage current was sufficient to negatively impact the voltage readings. Luckily we were able to rely on the total resistance of the circuit to protect
the microcontroller. Still, it would be worthwhile to investigate zener diodes
with less leakage current.
Also, the default active message protocol in TinyOS needs to be bolstered
with additional mechanisms in order to guarantee more reliable communication.
Retransmissions and CRC checks were not able to protect the system from packet
loss; there was inevitably at least one node in the system which experienced
noticeable packet loss.
While the packet reception rates may be sufficient for monitoring, they are
not sufficient for higher-rate data or for critical parameters. For example, under
normal operation, the throttle pedal position sensor proves difficult to analyze at
8Hz. The standard rule of thumb says that sampling ought to be done at twice
the frequency of the signal being sampled. Parameters such as temperature
change very slowly, so a couple of samples per second would be sufficient, but
one could imagine that the position of a pedal under one’s foot could have much
higher-frequency components to its position. An order of magnitude faster sam-
55
Chapter 5. System Evaluation
pling, infeasible with this system’s sample-and-send scheme, would be required
to better understand signals like this, with higher frequency components.
Finally, the fuel level sensor proved to be something of a mystery. When the
car started up, our measured value could be transformed into a reliable reflection
of the true fuel level gauge. However, several minutes into running the system the
readings from the fuel level sensor grew erratic and difficult to fathom. Again,
higher-rate sampling may reveal the problem with our readings, but for now this
sensor is only useful for the packet reception statistics, not as a reflection of the
fuel level.
5.4.3
Generalization
Now that this particular prototype has been evaluated, how will these results
generalize into other instantiations? We expect that, with the use of commodity
components and expandable technologies, this solution could work in numerous
situations; harsher conditions might require modification.
First, the hardware is off-the-shelf with only minor additions. The Crossbow
Mica series of motes are a standard in wireless sensor networking research. The
only modifications made were to add a few inexpensive passive components. This
design could be easily duplicated elsewhere.
56
Chapter 5. System Evaluation
Second, the software systems are all largely cross-platform. The user interface
is written in Java and the mote software is written in cross-platform NesC code,
with the exception of the digital I/O controls used to enable and disable the
on-board sensors.
Finally, the technologies employed would make it simple to expand the system
into tens or even hundreds of nodes. Changing from the Mica2 base to one using
ZigBee radios would allow for 64k addressable nodes. Also, while the particular
vehicle used with this prototype is arguably smaller than the average, there
would be nothing stopping the introduction of multi-hop networking into the
system. This would allow the sensor nodes to communicate across much larger
vehicles.
One situation which might require a redesign for the system is a more extreme
environment. Currently, the sensor nodes would not be able to operate exposed
to the elements. Encasing the nodes in weatherproof casings would enable them
to work as well outside of the vehicle as inside. There is also a history of running
sensor networks in much more extreme environments (e.g. volcanos)[36], so we
do not anticipate this being a problem.
57
Chapter 6
Related Work
6.1
Overview
This chapter discusses work related to this thesis in several fields. Related
to the thesis question are current commercial automotive diagnostics systems,
as well as research in the realms of wireless sensor networks, wireless networking
in vehicles, and wireless automotive diagnostics systems.
6.2
Existing Diagnostics Solutions
Numerous products have been developed to fill the need for diagnostics data.
They can be broken into the rough categories of: OEM offerings, on-board diagnostics readers, wired clamp-on devices, and after-market gauges. As we will
show, the offerings tend to be targeted towards a particular need and no individual solution fills all needs.
58
Chapter 6. Related Work
Original equipment manufacturers have made initial strides towards customizable diagnostics for car owners. Aside from the standard cluster of gauges
available on most cars, manufacturers typically offer additional on-board readouts. These can range from simple offerings, like additional gauge clusters and
single, multifunction LED displays, to the elaborate systems employed in models
like the aforementioned Toyota Prius[35]. These options are very integrated, in
that they are permanent components in the car, and they are very easy to use as
they blend into the standard user interface of the vehicle. Unfortunately, options
such as these are typically expensive for the end-user. They also fail to meet the
full customizability requirement, restricting the user to a small set of predefined
data sources, often only displaying one at a time.
Another class of diagnostics solutions involves the standard On-board Diagnostics II (OBD II) port, installed on all production automobiles since the
mid-1990’s [25]. The OBD II port gives access to a selection of data sources, a
standard set of fault codes, and the standard on-board data busses. These data
busses, such as the Controller Area Network Bus (CANbus or ISO 11898-1[15])
or the K-bus (ISO 9141[14]), provide digital interfaces between peripherals and
the central computer of a car. Companies such as AutoTap[25] and Snap-On[33]
market products which connect to the OBD II port and provide a display of
engine parameters and fault codes. These devices are very easy to use and can
59
Chapter 6. Related Work
often operate while the vehicle is driving, making them well integrated. Their
prices are reasonable. They are also completely non-intrusive since they plug into
existing ports on the vehicles made expressly for this purpose. Again, though,
they fail to meet the customizability requirement in that they can only read data
sources which have been predetermined. They can read engine coolant temperature, for example, but not the temperature in the undercarriage next to the fuel
tank. They are also not available on vehicles older than 1994, so a mechanic or
tuner looking to operate on an older-model car must find a different solution.
The third class of diagnostics options are wired clamp-on devices. These are
general purpose diagnostics systems employing collections of cables that can be
attached to arbitrary test points within the vehicle. They come from companies
such as Pico Technology[26] and Snap-On[33] and are targeted mainly at auto
mechanics. These systems are relatively easy to use, though they require more
knowledge of the operation of the vehicle than other options. They fail to meet
the integration and non-intrusive requirements as bundles of wires must be run
to each test point, a complicated and potentially impossible prospect. They are
also the most expensive of these options. Last, the customizability requirement
is still not completely fulfilled. Although these systems can read a large number
of existing voltages within the car, they cannot introduce new sensors out-ofthe-box.
60
Chapter 6. Related Work
Finally, there are aftermarket gauges and gauge clusters, perhaps most notably those made by Auto Meter[2]. These are additional gauges which are
installed in the passenger compartment to monitor small numbers of parameters
and are targeted at tuners. These gauges are extremely customizable, capable of
measuring any conceivable signal in a car, as well as adding additional sensors
where appropriate. They are also very inexpensive. Like the original equipment
manufacturer gauge clusters, these gauges install permanently in the vehicle,
making integration a given. Still, they too have their downside. The installation
of these gauges can be a difficult undertaking, requiring the routing of wires
through inaccessible paths. They also often require modification of the vehicle,
whether by perforating the firewall or installing mounting hardware, and thus
are not non-intrusive.
None of these solutions fully solves the problem stated in Section 2.2.
6.3
Related Research
Recent research in wireless sensor networks covers significant breadth[1], from
the early discussions of TinyOS[11] to discussions of habitat monitoring[18, 19]
and acoustic target tracking[38]. Still, there is little to find about the empiri-
61
Chapter 6. Related Work
cal application of these low-power, wirelessly networked devices in automotive
applications.
This is not the first paper to make a case for using wireless networking in
automotive applications, with many applications involving inter-vehicular communications. One such application is Internet connectivity[6, 4]. Also, the idea
of vehicular sensor networks is not new. Still, work on the subject has often focussed on the large-scale, inter-vehicle sensor networks[12, 31], without application of wireless sensor networks within the vehicle. Even connecting diagnostics
data to the wide area has been proposed, but its data source was the factory
OBD-II port[16].
There have been some discussions of entirely intra-vehicle wireless networks
and often the subject of the discussion is Bluetooth (802.15.1)[24, 10]. It has
been suggested as a choice for a partial replacement for cable bundles[5], with
the bluetooth nodes acting as wireless bridges between disparate on-board wired
networks, such as CANbus; the large number of bluetooth radio units required
for a complete replacement is cited as cause for only partial replacement[10].
At Unicamp, Brazil, Bluetooth modules were used as the sensor nodes with the
Bluetooth module acting as the central host[28]. Centralized wireless systems,
where all data are taken directly from the car’s electrical control module have
been built[17]. Wireless sensor networks have even been recommended as a
62
Chapter 6. Related Work
complete data cable replacement[8], but only in a speculative fashion, and with a
fair amount of trepidation with respect to using them in safety-critical instances.
63
Chapter 7
Conclusion and Potential
Elaboration
If there’s no one around
when the tour runs aground
and if you’re still around
then we’ll meet at the end of the tour
They Might Be Giants, End of the Tour
7.1
Conclusion
In this thesis we identified a problem in the automotive industry. Though
users of automobiles require customized diagnostics data about their operating
vehicles, and though the automotive manufacturers have fully embraced the idea
of mass customization in other facets of their production, factory customized diagnostics displays are not forthcoming. This creates a niche for third-party
manufacturers to fill. Unfortunately, third-party diagnostics systems fail to
64
Chapter 7. Conclusion and Potential Elaboration
meet all of the requirements of integration, customization, low-cost, and nonintrusiveness. Notably, they tend to trade off integration for customization.
As a solution to this problem we introduced a system architecture wherein
the automobile is instrumented with a wireless sensor network. The nodes in
the wireless sensor network transmit their readings to a central base station,
which displays the samples in real-time, and logs them for later analysis. We
then detailed a prototype implementation of the system using Crossbow Mica2
motes for the wireless sensor nodes and an Apple notebook as the base station
and user interface. We described the hardware signal conditioning and software
components which had to be designed and implemented.
Finally, we described the steps taken to test the system and evaluate its
performance. We showed that the resulting prototype successfully meets our requirements. Although packet loss was not negligible, we argued that for an application such as low-rate real-time monitoring, where the data are not being used
to make critical decisions, some packet loss is completely acceptable. Ultimately,
the solution and its prototype make strides towards filling the general-purpose
automotive diagnostics niche.
While this prototype represents an acceptable proof of concept, there are
certainly aspects which could be improved or elaborated upon. In the next, and
final, section, we outline some of these aspects.
65
Chapter 7. Conclusion and Potential Elaboration
7.2
Potential Elaboration
There are many facets of this system which, given additional resources, would
have been interesting to investigate. These items would make for potential elaboration on the system.
Already mentioned, additional work could be done in minimizing packet
loss. The addition of trivial retransmissions already greatly improved the performance, and more sophisticated retransmission mechanisms could do much to
increase message reception rate, at the expense of overall throughput. Building
the system using ZigBee radios should also yield better reception rates.
Also, taking the system to its logical conclusion by allowing customization at
run-time would be a valuable exercise. At present, the code must be recompiled
to support different data sources than the three experimental sensors. Allowing
a single mote to be used as a light, temperature, or voltage sensor, with a
fully-customizable front-end display, would be a matter of taking advantage of
mechanisms already available in the system framework, but not exposed to the
user.
Another often discussed addition to the system would be driving physical
gauges with readings from the wireless sensors. The idea would be to have a
general-purpose gauge mounted on the car’s dashboard, but to have its input
66
Chapter 7. Conclusion and Potential Elaboration
connected to the output of a computer-based voltage output card (digital-toanalog board). This would have the advantage of being able integrate the system
more cleanly into a car while still supporting the full customization of the totally
software display system.
A common question when pitching this system as a valid on-the-road data
collection scheme is how security is handled. There are currently no measures
taken to segregate packets from two nearby instances of the system. There is also
no protection against sniffers collecting data about the system while it operates.
In the future, sensor nodes should be paired with base stations so that base
stations are able to filter out messages destined for them.
Finally, the hardware could be made more robust. Adding an external ADC
could yield significantly higher measurement resolution, and having the readings
referenced to a precision voltage reference instead of the (variable) battery voltage would increase repeatability of measurements. The quality of the passive
components could also be increased, which would yield less effects from temperature swings and varying signal frequencies. All of these efforts would help to
increase trust in the measurements.
67
Bibliography
[1] I. F. Akyildiz, W. Su, Y. Sankarasubramaniam, and E. Cayirci. Wireless
sensor networks: a survey. Computer Networks (Amsterdam, Netherlands:
1999), 38(4):393–422, 2002.
[2] Auto Meter. http://www.autometer.com.
[3] N. Baker. ZigBee and Bluetooth strengths and weaknesses for industrial
applications. Computing & Control Engineering Journal, pages 20–25, 2005.
[4] V. Bychkovsky, B. Hull, A. K. Miu, H. Balakrishnan, and S. Madden. A
Measurement Study of Vehicular Internet Access Using In Situ Wi-Fi Networks. In 12th ACM MOBICOM Conf., Los Angeles, CA, September 2006.
[5] Y. Chen and L. Chen. Using Bluetooth wireless technology in vehicles. In
IEEE International Conference on Vehicular Electronics and Safety, pages
344–347, October 2005.
[6] M. Cilia, P. Hasselmeyer, and A. Buchmann. Profiling and internet connectivity in automotive environments. In Proceedings of VLDB, pages 1071–
1074, 2002.
[7] Crossbow technology inc. http://www.xbow.com.
[8] T. ElBatt, C. Saraydar, M. Ames, and T. Talty. Potential for intra-vehicle
wireless automotive sensor networks. In 2006 IEEE Sarnoff Symposium,
2006.
[9] G. Ferrari, P. Medagliani, S. Di Piazza, and M. Martal. Wireless sensor
networks: Performance analysis in indoor scenarios. EURASIP Journal on
Wireless Communications and Networking, 2007:Article ID 81864, 14 pages,
2007. doi:10.1155/2007/81864.
[10] L.-B. Fredriksson. Bluetooth in automotive applications. In Bluetooth ’99,
London, UK, June 1999.
68
Bibliography
[11] J. Hill, R. Szewczyk, A. Woo, S. Hollar, D. E. Culler, and K. S. J. Pister. System architecture directions for networked sensors. In Architectural
Support for Programming Languages and Operating Systems, pages 93–104,
2000.
[12] B. Hull, V. Bychkovsky, Y. Zhang, K. Chen, M. Goraczko, A. K. Miu,
E. Shih, H. Balakrishnan, and S. Madden. CarTel: A Distributed Mobile
Sensor Computing System. In 4th ACM SenSys, Boulder, CO, November
2006.
[13] O. Hyncica, P. Kacz, P. Fiedler, Z. Bradac, P. Kucera, and R. Vrba. The
ZigBee Experience. In Proceedings of the 2nd International Symposium on
Communications, Control, and Signal Processing, March 2006.
[14] ISO 9141:1989, 1989. Road vehicles – Diagnostic systems – Requirements
for interchange of digital information.
[15] ISO 11898-1:2003, 2003. Road vehicles – Controller area network (CAN) –
Part 1: Data link layer and physical signalling.
[16] W. Jenkins, R. Lewis, G. Y. Lazarou, J. Picone, and Z. Rowland. Real-time
vehicle performance monitoring using wireless networking. In Communications, Internet, and Information Technology, pages 375–380, 2004.
[17] D. La Clair. Auto analyzer a mobile based automotive diagnostics tool
utilizing wireless communications and embedded Java technology. Master’s
thesis, Arizona State University East, December 2002.
[18] T. Liu, C. M. Sadler, P. Zhang, and M. Martonosi. Implementing software
on resource-constrained mobile sensors: experiences with impala and zebranet. In MobiSys ’04: Proceedings of the 2nd international conference on
Mobile systems, applications, and services, pages 256–269, New York, NY,
USA, 2004. ACM Press.
[19] A. Mainwaring, J. Polastre, R. Szewczyk, D. Culler, and J. Anderson. Wireless sensor networks for habitat monitoring. In ACM International Workshop on Wireless Sensor Networks and Applications (WSNA’02), Atlanta,
GA, Sept. 2002.
[20] K. Martinez, P. Padhy, A. Elsaify, G. Zou, A. Riddoch, J. K. Hart, and
H. L. R. Ong. Deploying a sensor network in an extreme environment.
69
Bibliography
In SUTC ’06: Proceedings of the IEEE International Conference on Sensor Networks, Ubiquitous, and Trustworthy Computing -Vol 1 (SUTC’06),
pages 186–193, Washington, DC, USA, 2006. IEEE Computer Society.
[21] MINI Cooper Service Manual. Bentley Publishers, 2004.
[22] MINI USA. http://www.miniusa.com.
[23] MTS/MDA Sensor Board User’s Manual. Crossbow Doc. # 7430-0020-04
Rev. B.
[24] T. Nolte, H. Hansson, and L. L. Bello. Automotive communications - past,
current and future. In 10th IEEE Conference on Emerging Technologies
and Factory Automation, 2005.
[25] OBD II. http://www.obdii.com.
[26] Pico Technology. http://www.picotech.com/auto/.
[27] B. J. Pine. Mass Customization: The New Frontier in Business Competition. Harvard Business School Press, 1993.
[28] J. Polar, D. Silva, A. Fortunato, L. Almeida, and C. Dos Reis Filho. Bluetooth sensor network for remote diagnostics in vehicles. In 2003 IEEE International Symposium on Industrial Electronics, volume 1, pages 481–484,
June 2003.
[29] J. Polastre, R. Szewczyk, and D. Culler. Telos: enabling ultra-low power
wireless research. In IPSN ’05: Proceedings of the 4th international symposium on Information processing in sensor networks, page 48, Piscataway,
NJ, USA, 2005. IEEE Press.
[30] J. Rabaey, J. Ammer, J. L. da Silva Jr., and D. Patel. Picoradio: Adhoc wireless networking of ubiquitous low-energy sensor/monitor nodes. In
WVLSI ’00: Proceedings of the IEEE Computer Society Annual Workshop
on VLSI (WVLSI’00), page 9, Washington, DC, USA, 2000. IEEE Computer Society.
[31] H. Sawant, J. Tan, and Q. Yang. A sensor networked approach for intelligent transportation systems. In (IROS 2004). Proceedings. 2004 IEEE/RSJ
International Conference on Intelligent Robots and Systems, 2004., pages
1796–1801 vol.2, October 2004.
[32] Scion. http://www.scion.com.
70
Bibliography
[33] Snap-on. http://www.snapondiag.com/.
[34] K. Srinivasan and P. Levis. Rssi is under appreciated. In Proceedings of the
Third Workshop on Embedded Networked Sensors (EmNets), 2006., 2006.
[35] Toyota prius. http://www.toyota.com/prius/.
[36] Volcano sensorweb. http://sensorwebs.jpl.nasa.gov/.
[37] F. von Corswant and P. Fredriksson. Sourcing trends in the car industry:
A survey of car manufacturers’ and suppliers’ strategies and relations. International Journal of Operations & Production Management, 22:741–758,
2002.
[38] Q. Wang, W.-P. Chen, R. Zheng, K. Lee, and L. Sha. Acoustic target
tracking using tiny wireless sensor devices. In Proc. of the 2nd International
Workshop on Information Processing in Sensor Networks (IPSN’03), 2003.
[39] M. Yarvis, W. Conner, L. Krishnamurthy, J. Chhabra, B. Elliott, and
A. Mainwaring. Real-world experiences with an interactive ad hoc sensor
network. In International Conference on Parallel Processing, pages 143–
151, 2002.
[40] ZigBee Alliance. www.zigbee.org.
71
Appendices
72
Appendix A
javadoc
A.1
Package org.ucsb.mayhem.diomedes
Package Contents
Page
Interfaces
SampleHandler . . . . . . . . . . . . . . . . . . . . . . . . . . . . . . . . . . . . . . . . . . . . . . . . . . . . . . . . 75
Sample Handler.
SampleLogger . . . . . . . . . . . . . . . . . . . . . . . . . . . . . . . . . . . . . . . . . . . . . . . . . . . . . . . . . 76
Sample Logger.
Classes
AcceleratorPedalChannel. . . . . . . . . . . . . . . . . . . . . . . . . . . . . . . . . . . . . . . . . . . . .76
Accelerator Pedal Channel.
ADCChannel . . . . . . . . . . . . . . . . . . . . . . . . . . . . . . . . . . . . . . . . . . . . . . . . . . . . . . . . . . 77
ADC Channel.
ADCSample . . . . . . . . . . . . . . . . . . . . . . . . . . . . . . . . . . . . . . . . . . . . . . . . . . . . . . . . . . . 79
ADC Sample.
Channel . . . . . . . . . . . . . . . . . . . . . . . . . . . . . . . . . . . . . . . . . . . . . . . . . . . . . . . . . . . . . . . . 79
Channel.
ConsoleSampleLogger. . . . . . . . . . . . . . . . . . . . . . . . . . . . . . . . . . . . . . . . . . . . . . . . .83
Console Sample Logger.
consoletest . . . . . . . . . . . . . . . . . . . . . . . . . . . . . . . . . . . . . . . . . . . . . . . . . . . . . . . . . . . . . 83
Console Test.
Constants . . . . . . . . . . . . . . . . . . . . . . . . . . . . . . . . . . . . . . . . . . . . . . . . . . . . . . . . . . . . . . 84
DialGauge . . . . . . . . . . . . . . . . . . . . . . . . . . . . . . . . . . . . . . . . . . . . . . . . . . . . . . . . . . . . . 86
Dial Gauge.
73
Appendix A. javadoc
DigitalGauge . . . . . . . . . . . . . . . . . . . . . . . . . . . . . . . . . . . . . . . . . . . . . . . . . . . . . . . . . . 87
Digital Gauge.
DiomedesTLMMsg . . . . . . . . . . . . . . . . . . . . . . . . . . . . . . . . . . . . . . . . . . . . . . . . . . . . 88
DummyMote . . . . . . . . . . . . . . . . . . . . . . . . . . . . . . . . . . . . . . . . . . . . . . . . . . . . . . . . . . 96
Dummy Mote.
DummyWirelessSensorNetwork . . . . . . . . . . . . . . . . . . . . . . . . . . . . . . . . . . . . . 97
Dummy Wireless Sensor Network.
EngineCoolantTempChannel . . . . . . . . . . . . . . . . . . . . . . . . . . . . . . . . . . . . . . . . . 98
Engine Coolant Temp Channel.
FileSampleLogger . . . . . . . . . . . . . . . . . . . . . . . . . . . . . . . . . . . . . . . . . . . . . . . . . . . . . 99
File Sample Logger.
FuelGauge . . . . . . . . . . . . . . . . . . . . . . . . . . . . . . . . . . . . . . . . . . . . . . . . . . . . . . . . . . . . 101
Fuel Gauge.
FuelPumpLevelChannel . . . . . . . . . . . . . . . . . . . . . . . . . . . . . . . . . . . . . . . . . . . . . 102
Fuel Pump Level Channel.
Gauge . . . . . . . . . . . . . . . . . . . . . . . . . . . . . . . . . . . . . . . . . . . . . . . . . . . . . . . . . . . . . . . . . 103
Gauge.
GraphGauge . . . . . . . . . . . . . . . . . . . . . . . . . . . . . . . . . . . . . . . . . . . . . . . . . . . . . . . . . . 106
Graph Gauge.
LightChannel . . . . . . . . . . . . . . . . . . . . . . . . . . . . . . . . . . . . . . . . . . . . . . . . . . . . . . . . . 107
Light Channel.
LightSample . . . . . . . . . . . . . . . . . . . . . . . . . . . . . . . . . . . . . . . . . . . . . . . . . . . . . . . . . . 108
Light Sample.
LogfileFilter . . . . . . . . . . . . . . . . . . . . . . . . . . . . . . . . . . . . . . . . . . . . . . . . . . . . . . . . . . 108
Mote . . . . . . . . . . . . . . . . . . . . . . . . . . . . . . . . . . . . . . . . . . . . . . . . . . . . . . . . . . . . . . . . . . 109
Mote.
RealWirelessSensorNetwork . . . . . . . . . . . . . . . . . . . . . . . . . . . . . . . . . . . . . . . . 111
Real Wireless Sensor Network.
Sample . . . . . . . . . . . . . . . . . . . . . . . . . . . . . . . . . . . . . . . . . . . . . . . . . . . . . . . . . . . . . . . . 112
Sample.
TempChannel . . . . . . . . . . . . . . . . . . . . . . . . . . . . . . . . . . . . . . . . . . . . . . . . . . . . . . . . 116
Temperature Channel.
TempGauge. . . . . . . . . . . . . . . . . . . . . . . . . . . . . . . . . . . . . . . . . . . . . . . . . . . . . . . . . . .117
Temperature Gauge.
TempSample. . . . . . . . . . . . . . . . . . . . . . . . . . . . . . . . . . . . . . . . . . . . . . . . . . . . . . . . . .118
TempSample.
74
Appendix A. javadoc
WirelessSensorNetwork . . . . . . . . . . . . . . . . . . . . . . . . . . . . . . . . . . . . . . . . . . . . . 119
Wireless Sensor Network.
Exceptions
WSNException . . . . . . . . . . . . . . . . . . . . . . . . . . . . . . . . . . . . . . . . . . . . . . . . . . . . . . . 121
Wireless Sensor Network Exception.
A.1.1
Interface SampleHandler
Sample Handler. Interface for any class capable of receiving samples.
Declaration
public interface SampleHandler
All known subinterfaces
TempGauge (in A.1.28, page 117), TempChannel (in A.1.27, page 116), SampleLogger (in A.1.2, page 76), Mote (in A.1.24, page 109), LightChannel (in A.1.21,
page 107), GraphGauge (in A.1.20, page 106), Gauge (in A.1.19, page 103), FuelPumpLevelChannel (in A.1.18, page 102), FuelGauge (in A.1.17, page 101), FileSampleLogger (in A.1.16, page 99), EngineCoolantTempChannel (in A.1.15, page 98),
DigitalGauge (in A.1.11, page 87), DialGauge (in A.1.10, page 86), ConsoleSampleLogger (in A.1.7, page 83), Channel (in A.1.6, page 79), ADCChannel (in A.1.4, page
77), AcceleratorPedalChannel (in A.1.3, page 76)
All classes known to implement interface
Mote (in A.1.24, page 109), Gauge (in A.1.19, page 103), Channel (in A.1.6, page
79)
Method summary
handleSample(Sample)
Methods
• handleSample
void handleSample( Sample s ) throws
org.ucsb.mayhem.diomedes.WSNException
75
Appendix A. javadoc
A.1.2
Interface SampleLogger
Sample Logger. Parent interface for all logger classes.
Declaration
public interface SampleLogger
extends SampleHandler
All known subinterfaces
FileSampleLogger (in A.1.16, page 99), ConsoleSampleLogger (in A.1.7, page 83)
All classes known to implement interface
FileSampleLogger (in A.1.16, page 99), ConsoleSampleLogger (in A.1.7, page 83)
A.1.3
Class AcceleratorPedalChannel
Accelerator Pedal Channel. Represents the data coming from the ’requested
throttle position’ signal in a MINI Cooper S.
Declaration
public class AcceleratorPedalChannel
extends org.ucsb.mayhem.diomedes.ADCChannel (in A.1.4, page 77)
Constructor summary
AcceleratorPedalChannel() Default Constructor.
Method summary
convertUnits(Sample) Convert Units.
Constructors
• AcceleratorPedalChannel
public AcceleratorPedalChannel( )
76
Appendix A. javadoc
– Description
Default Constructor. Constructs the channel with known R1 and R2
values, as measured on the existing system.
Methods
• convertUnits
public double convertUnits( Sample samp )
– Description
Convert Units. Converts from a raw sample to the position of the
accelerator pedal.
– Parameters
∗ samp – Sample to convert.
– Returns – Pedal Position (0-100, w/ 100 = pedal to the metal)
A.1.4
Class ADCChannel
ADC Channel. Handles samples from ADC channels, converting them to
Volts based on the values of R1 and R2 (resistor values in the circuit).
Declaration
public class ADCChannel
extends org.ucsb.mayhem.diomedes.Channel (in A.1.6, page 79)
All known subclasses
FuelPumpLevelChannel (in A.1.18, page 102), EngineCoolantTempChannel (in
A.1.15, page 98), AcceleratorPedalChannel (in A.1.3, page 76)
Constructor summary
ADCChannel(int) Constructor.
77
Appendix A. javadoc
Method summary
convertUnits(Sample) Convert Units.
getMaxV() Get Maximum Voltage.
setR1(long) Set Resistor 1.
setR2(long) Set Resistor 2.
Constructors
• ADCChannel
public ADCChannel( int ch )
– Description
Constructor. Creates an ADC Channel handling the given ADC channel number.
– Parameters
∗ ch – ADC channel to handle (currently only FUNCTION ADC2)
Methods
• convertUnits
public double convertUnits( Sample samp )
– Description
Convert Units. Converts the reading into volts, based on the value of
the sample and the resistors in the divider network.
– Parameters
∗ samp – Sample to convert
• getMaxV
public double getMaxV( )
– Description
Get Maximum Voltage. Returns the maximum voltage reading, based
upon the resistors in the voltage divider circuit.
– Returns – max voltage
• setR1
public void setR1( long newR1 )
78
Appendix A. javadoc
– Description
Set Resistor 1. Set the value of R1.
– Parameters
∗ newR1 – new value of R1
• setR2
public void setR2( long newR2 )
– Description
Set Resistor 2. Set the value of R2.
– Parameters
∗ newR2 – new value of R2
A.1.5
Class ADCSample
ADC Sample. Represents a sample from an ADC channel.
Declaration
public class ADCSample
extends org.ucsb.mayhem.diomedes.Sample (in A.1.26, page 112)
Constructor summary
ADCSample(DiomedesTLMMsg)
Constructors
• ADCSample
public ADCSample( DiomedesTLMMsg m )
A.1.6
Class Channel
Channel. Abstracts the concept of a data stream from a single mote.
Declaration
public abstract class Channel
extends java.lang.Object
implements SampleHandler
79
Appendix A. javadoc
All known subclasses
TempChannel (in A.1.27, page 116), LightChannel (in A.1.21, page 107),
FuelPumpLevelChannel (in A.1.18, page 102), EngineCoolantTempChannel (in A.1.15,
page 98), ADCChannel (in A.1.4, page 77), AcceleratorPedalChannel (in A.1.3, page
76)
Field summary
function
handlers
units
unitsName
Constructor summary
Channel(int) Constructor.
Method summary
addHandler(SampleHandler) Add Handler.
convertUnits(Sample) Convert Units.
getFunction() Get Function.
getUnits() Get Units.
getUnitsName() Get Units Name.
handleSample(Sample) Handle Sample.
setUnits(String) Set Units.
setUnitsName(String) Set Units Name.
Fields
• protected int function
• protected java.util.Vector handlers
• protected java.lang.String units
• protected java.lang.String unitsName
80
Appendix A. javadoc
Constructors
• Channel
public Channel( int newfunc )
– Description
Constructor. Creates a new Channel with the given function.
– Parameters
∗ newfunc – The function that this Channel should handle.
Methods
• addHandler
public void addHandler( SampleHandler hand )
– Description
Add Handler. Registers a Handler with the Channel. Typically used
with Gauges.
– Parameters
∗ hand – Handler to register.
• convertUnits
public abstract double convertUnits( Sample samp )
– Description
Convert Units. Method which all children must implement that converts from a raw ADC sample into engineering units.
– Parameters
∗ samp – sample to convert to EU.
• getFunction
public int getFunction( )
– Description
Get Function. Returns the function of the Channel
– Returns – The function of the Channel
• getUnits
public java.lang.String getUnits( )
81
Appendix A. javadoc
– Description
Get Units. Returns the abbreviation of the Channel’s units.
– Returns – The abbreviation of the units of the Channel (e.g. V for
Volts)
• getUnitsName
public java.lang.String getUnitsName( )
– Description
Get Units Name. Gets the full name of the units of the Channel.
– Returns – The full name of the units of the Channel. (e.g. ”Volts”
for Volts).
• handleSample
public void handleSample( Sample samp ) throws
org.ucsb.mayhem.diomedes.WSNException
– Description
Handle Sample. Pass the sample to all registered handlers.
– Parameters
∗ samp – Sample to handle.
– Throws
∗ org.ucsb.mayhem.diomedes.WSNException – Sample is not
handled within Channel.
• setUnits
public void setUnits( java.lang.String newunits )
– Description
Set Units. Sets the abbreviation of the Channel’s units.
– Parameters
∗ newunits – The new abbreviation of the Channel’s units (e.g.
”V” for Volts)
• setUnitsName
public void setUnitsName( java.lang.String newname )
– Description
Set Units Name. Sets the full name of the units of the Channel.
82
Appendix A. javadoc
– Parameters
∗ newname – The full name of the units of the Channel (e.g. ”Volts”
for Volts)
A.1.7
Class ConsoleSampleLogger
Console Sample Logger. Logs all samples to stdout, instead of a file.
Declaration
public class ConsoleSampleLogger
extends java.lang.Object
implements SampleLogger
Constructor summary
ConsoleSampleLogger()
Method summary
handleSample(Sample)
Constructors
• ConsoleSampleLogger
public ConsoleSampleLogger( )
Methods
• handleSample
public synchronized void handleSample( Sample s ) throws
org.ucsb.mayhem.diomedes.WSNException
A.1.8
Class consoletest
Console Test. Jumping-off point for Diomedes. Accepts command line arguments and constructs the system.
83
Appendix A. javadoc
Declaration
public class consoletest
extends java.lang.Object
Constructor summary
consoletest()
Method summary
main(String[]) Main.
Constructors
• consoletest
public consoletest( )
Methods
• main
public static void main( java.lang.String[] args )
– Description
Main. Console entry point. Parses the command line, constructs the
network, and builds the GUI.
– Parameters
∗ args – Command line arguments.
A.1.9
Class Constants
Declaration
public class Constants
extends java.lang.Object
Field summary
AM DIOMEDESTLMMSG
FUNCTION ADC0
FUNCTION ADC1
84
Appendix A. javadoc
FUNCTION
FUNCTION
FUNCTION
FUNCTION
FUNCTION
FUNCTION
FUNCTION
FUNCTION
ADC2
ADC3
ADC4
ADC5
ADC6
ADC7
LIGHT
TEMP
Constructor summary
Constants()
Fields
• public static final byte FUNCTION ADC2
• public static final byte FUNCTION ADC5
• public static final short FUNCTION LIGHT
• public static final short FUNCTION ADC7
• public static final byte AM DIOMEDESTLMMSG
• public static final byte FUNCTION ADC6
• public static final short FUNCTION TEMP
• public static final byte FUNCTION ADC3
• public static final byte FUNCTION ADC4
• public static final byte FUNCTION ADC1
• public static final byte FUNCTION ADC0
Constructors
• Constants
public Constants( )
85
Appendix A. javadoc
A.1.10
Class DialGauge
Dial Gauge. Creates a generic Dial Gauge.
Declaration
public class DialGauge
extends org.ucsb.mayhem.diomedes.Gauge (in A.1.19, page 103)
Constructor summary
DialGauge(boolean) Constructor.
Method summary
handleSample(Sample) Handle Sample.
paintComponent(Graphics) Paint Component.
Constructors
• DialGauge
public DialGauge( boolean floating )
– Description
Constructor. Construct a Dial Gauge and detatch it if requested.
– Parameters
∗ floating – Whether or not to detatch the frame.
Methods
• handleSample
public void handleSample( Sample samp ) throws
org.ucsb.mayhem.diomedes.WSNException
– Description
Handle Sample. Stores the sample and calls repaint().
– Parameters
∗ samp – Sample to handle.
– Throws
∗ org.ucsb.mayhem.diomedes.WSNException –
86
Appendix A. javadoc
• paintComponent
protected void paintComponent( java.awt.Graphics g )
– Description
Paint Component. Place the gauge image and render a needle in the
correct direction.
A.1.11
Class DigitalGauge
Digital Gauge. A digital readout which displays the readings as text in a
textbox.
Declaration
public class DigitalGauge
extends org.ucsb.mayhem.diomedes.Gauge (in A.1.19, page 103)
Constructor summary
DigitalGauge(boolean) Constructor.
Method summary
handleSample(Sample) Handle Sample.
paintComponent(Graphics) Paint Component.
Constructors
• DigitalGauge
public DigitalGauge( boolean floating )
– Description
Constructor. Constructs a Digital gauge, detatching it if requested.
– Parameters
∗ floating – Whether or not to detatch the frame.
87
Appendix A. javadoc
Methods
• handleSample
public void handleSample( Sample samp ) throws
org.ucsb.mayhem.diomedes.WSNException
– Description
Handle Sample. Store the value of the sample and call repaint()
– Parameters
∗ samp – The sample to handle.
– Throws
∗ org.ucsb.mayhem.diomedes.WSNException –
• paintComponent
protected void paintComponent( java.awt.Graphics g )
– Description
Paint Component. Write the sample to the text box.
A.1.12
Class DiomedesTLMMsg
Declaration
public class DiomedesTLMMsg
extends net.tinyos.message.Message
Field summary
AM TYPE The Active Message type associated with this message.
DEFAULT MESSAGE SIZE The default size of this message
type in bytes.
Constructor summary
DiomedesTLMMsg() Create a new DiomedesTLMMsg of size 7.
DiomedesTLMMsg(byte[]) Create a new DiomedesTLMMsg using the given byte array as backing store.
DiomedesTLMMsg(byte[], int) Create a new DiomedesTLMMsg
using the given byte array as backing store, with the given base
offset.
88
Appendix A. javadoc
DiomedesTLMMsg(byte[], int, int) Create a new DiomedesTLMMsg
using the given byte array as backing store, with the given base
offset and data length.
DiomedesTLMMsg(int) Create a new DiomedesTLMMsg of the
given data length.
DiomedesTLMMsg(int, int) Create a new DiomedesTLMMsg
with the given data length and base offset.
DiomedesTLMMsg(Message, int) Create a new DiomedesTLMMsg
embedded in the given message at the given base offset.
DiomedesTLMMsg(Message, int, int) Create a new DiomedesTLMMsg embedded in the given message at the given base offset
and length.
Method summary
get function() Return the value (as a int) of the field ’function’
get packetnum() Return the value (as a int) of the field ’packetnum’
get sample() Return the value (as a int) of the field ’sample’
get source() Return the value (as a short) of the field ’source’
isArray function() Return whether the field ’function’ is an array
(false).
isArray packetnum() Return whether the field ’packetnum’ is an
array (false).
isArray sample() Return whether the field ’sample’ is an array
(false).
isArray source() Return whether the field ’source’ is an array (false).
isSigned function() Return whether the field ’function’ is signed
(false).
isSigned packetnum() Return whether the field ’packetnum’ is
signed (false).
isSigned sample() Return whether the field ’sample’ is signed (false).
isSigned source() Return whether the field ’source’ is signed (false).
offset function() Return the offset (in bytes) of the field ’function’
offset packetnum() Return the offset (in bytes) of the field ’packetnum’
offset sample() Return the offset (in bytes) of the field ’sample’
offset source() Return the offset (in bytes) of the field ’source’
offsetBits function() Return the offset (in bits) of the field ’function’
89
Appendix A. javadoc
offsetBits packetnum() Return the offset (in bits) of the field
’packetnum’
offsetBits sample() Return the offset (in bits) of the field ’sample’
offsetBits source() Return the offset (in bits) of the field ’source’
set function(int) Set the value of the field ’function’
set packetnum(int) Set the value of the field ’packetnum’
set sample(int) Set the value of the field ’sample’
set source(short) Set the value of the field ’source’
size function() Return the size, in bytes, of the field ’function’
size packetnum() Return the size, in bytes, of the field ’packetnum’
size sample() Return the size, in bytes, of the field ’sample’
size source() Return the size, in bytes, of the field ’source’
sizeBits function() Return the size, in bits, of the field ’function’
sizeBits packetnum() Return the size, in bits, of the field ’packetnum’
sizeBits sample() Return the size, in bits, of the field ’sample’
sizeBits source() Return the size, in bits, of the field ’source’
toString()
Fields
• public static final int DEFAULT MESSAGE SIZE
– The default size of this message type in bytes.
• public static final int AM TYPE
– The Active Message type associated with this message.
Constructors
• DiomedesTLMMsg
public DiomedesTLMMsg( )
– Description
Create a new DiomedesTLMMsg of size 7.
• DiomedesTLMMsg
public DiomedesTLMMsg( byte[] data )
– Description
Create a new DiomedesTLMMsg using the given byte array as backing
store.
90
Appendix A. javadoc
• DiomedesTLMMsg
public DiomedesTLMMsg( byte[] data, int base offset )
– Description
Create a new DiomedesTLMMsg using the given byte array as backing
store, with the given base offset.
• DiomedesTLMMsg
public DiomedesTLMMsg( byte[] data, int base offset,
int data length )
– Description
Create a new DiomedesTLMMsg using the given byte array as backing
store, with the given base offset and data length.
• DiomedesTLMMsg
public DiomedesTLMMsg( int data length )
– Description
Create a new DiomedesTLMMsg of the given data length.
• DiomedesTLMMsg
public DiomedesTLMMsg( int data length, int base offset )
– Description
Create a new DiomedesTLMMsg with the given data length and base
offset.
• DiomedesTLMMsg
public DiomedesTLMMsg( net.tinyos.message.Message msg,
int base offset )
– Description
Create a new DiomedesTLMMsg embedded in the given message at
the given base offset.
• DiomedesTLMMsg
public DiomedesTLMMsg( net.tinyos.message.Message msg,
int base offset, int data length )
– Description
Create a new DiomedesTLMMsg embedded in the given message at
the given base offset and length.
91
Appendix A. javadoc
Methods
• get function
public int get function( )
– Description
Return the value (as a int) of the field ’function’
• get packetnum
public int get packetnum( )
– Description
Return the value (as a int) of the field ’packetnum’
• get sample
public int get sample( )
– Description
Return the value (as a int) of the field ’sample’
• get source
public short get source( )
– Description
Return the value (as a short) of the field ’source’
• isArray function
public static boolean isArray function( )
– Description
Return whether the field ’function’ is an array (false).
• isArray packetnum
public static boolean isArray packetnum( )
– Description
Return whether the field ’packetnum’ is an array (false).
• isArray sample
public static boolean isArray sample( )
– Description
Return whether the field ’sample’ is an array (false).
92
Appendix A. javadoc
• isArray source
public static boolean isArray source( )
– Description
Return whether the field ’source’ is an array (false).
• isSigned function
public static boolean isSigned function( )
– Description
Return whether the field ’function’ is signed (false).
• isSigned packetnum
public static boolean isSigned packetnum( )
– Description
Return whether the field ’packetnum’ is signed (false).
• isSigned sample
public static boolean isSigned sample( )
– Description
Return whether the field ’sample’ is signed (false).
• isSigned source
public static boolean isSigned source( )
– Description
Return whether the field ’source’ is signed (false).
• offset function
public static int offset function( )
– Description
Return the offset (in bytes) of the field ’function’
• offset packetnum
public static int offset packetnum( )
– Description
Return the offset (in bytes) of the field ’packetnum’
93
Appendix A. javadoc
• offset sample
public static int offset sample( )
– Description
Return the offset (in bytes) of the field ’sample’
• offset source
public static int offset source( )
– Description
Return the offset (in bytes) of the field ’source’
• offsetBits function
public static int offsetBits function( )
– Description
Return the offset (in bits) of the field ’function’
• offsetBits packetnum
public static int offsetBits packetnum( )
– Description
Return the offset (in bits) of the field ’packetnum’
• offsetBits sample
public static int offsetBits sample( )
– Description
Return the offset (in bits) of the field ’sample’
• offsetBits source
public static int offsetBits source( )
– Description
Return the offset (in bits) of the field ’source’
• set function
public void set function( int value )
– Description
Set the value of the field ’function’
94
Appendix A. javadoc
• set packetnum
public void set packetnum( int value )
– Description
Set the value of the field ’packetnum’
• set sample
public void set sample( int value )
– Description
Set the value of the field ’sample’
• set source
public void set source( short value )
– Description
Set the value of the field ’source’
• size function
public static int size function( )
– Description
Return the size, in bytes, of the field ’function’
• size packetnum
public static int size packetnum( )
– Description
Return the size, in bytes, of the field ’packetnum’
• size sample
public static int size sample( )
– Description
Return the size, in bytes, of the field ’sample’
• size source
public static int size source( )
– Description
Return the size, in bytes, of the field ’source’
95
Appendix A. javadoc
• sizeBits function
public static int sizeBits function( )
– Description
Return the size, in bits, of the field ’function’
• sizeBits packetnum
public static int sizeBits packetnum( )
– Description
Return the size, in bits, of the field ’packetnum’
• sizeBits sample
public static int sizeBits sample( )
– Description
Return the size, in bits, of the field ’sample’
• sizeBits source
public static int sizeBits source( )
– Description
Return the size, in bits, of the field ’source’
• toString
public java.lang.String toString( )
– Description
A.1.13
Class DummyMote
Dummy Mote. Runnable class to simulate the operation of a single mote in
the system, for development.
Declaration
public class DummyMote
extends java.lang.Object
implements java.lang.Runnable
96
Appendix A. javadoc
Constructor summary
DummyMote(short, short, double, WirelessSensorNetwork)
Constructor.
Method summary
run() Run.
Constructors
• DummyMote
public DummyMote( short newid, short newfunction,
double freq, WirelessSensorNetwork wsn )
– Description
Constructor. Creates a dummy mote with the given ID, function,
data generation frequency, and network.
– Parameters
∗
∗
∗
∗
newid – The ID of the mote.
newfunction – The function of the data to generate.
freq – The frequency to generate the data.
wsn – The associated WSN.
Methods
• run
public void run( )
– Description
Run. Sleep based on the frequency and then wake up and generate
some data.
A.1.14
Class DummyWirelessSensorNetwork
Dummy Wireless Sensor Network. A ’dummy’ wsn which consists of three
dummy motes generating data.
97
Appendix A. javadoc
Declaration
public class DummyWirelessSensorNetwork
extends org.ucsb.mayhem.diomedes.WirelessSensorNetwork (in A.1.30, page 119)
Constructor summary
DummyWirelessSensorNetwork() Default Constructor.
Constructors
• DummyWirelessSensorNetwork
public DummyWirelessSensorNetwork( )
– Description
Default Constructor. Create three dummy motes (1, 2, 3), all running
at 10Hz.
A.1.15
Class EngineCoolantTempChannel
Engine Coolant Temp Channel. Channel which mirrors the operation of the
MINI Cooper S engine coolant temperature gauge.
Declaration
public class EngineCoolantTempChannel
extends org.ucsb.mayhem.diomedes.ADCChannel (in A.1.4, page 77)
Constructor summary
EngineCoolantTempChannel() Default Constructor.
Method summary
convertUnits(Sample) Convert Units.
Constructors
• EngineCoolantTempChannel
public EngineCoolantTempChannel( )
98
Appendix A. javadoc
– Description
Default Constructor. Constructs an Engine Coolant Temperature
Channel using the R1 and R2 values measured from the existing system.
Methods
• convertUnits
public double convertUnits( Sample samp )
– Description
Convert Units. Converts raw sample into 0-100 value suitable for
display.
– Parameters
∗ samp – The sample to convert
– Returns – temp gauge reading (0-100(
A.1.16
Class FileSampleLogger
File Sample Logger. Writes samples to file for later analysis. Also presents
appropriate GUI elements.
Declaration
public class FileSampleLogger
extends javax.swing.JPanel
implements SampleLogger, java.awt.event.ActionListener
Constructor summary
FileSampleLogger() Default Constructor.
Method summary
actionPerformed(ActionEvent) ActionPerformed.
handleSample(Sample) Handle Sample.
startLogging(String) Start Logging.
stopLogging() Stop Logging.
writeFileHeader() Write File Header.
99
Appendix A. javadoc
Constructors
• FileSampleLogger
public FileSampleLogger( )
– Description
Default Constructor. Construct a File Sample Logger, registering all
button actions.
Methods
• actionPerformed
public void actionPerformed( java.awt.event.ActionEvent e )
– Description
ActionPerformed. Handles Start and Stop button presses.
• handleSample
public synchronized void handleSample( Sample samp )
throws org.ucsb.mayhem.diomedes.WSNException
– Description
Handle Sample. If there is a valid file, write to it!
– Parameters
∗ samp – Sample to convert to a logfile line.
• startLogging
public void startLogging( java.lang.String fname )
– Description
Start Logging. Starts logging to the filename given, if the file exists.
– Parameters
∗ fname – File to log to.
• stopLogging
public void stopLogging( )
– Description
Stop Logging. Close the current logfile.
• writeFileHeader
public void writeFileHeader( )
100
Appendix A. javadoc
– Description
Write File Header. Start the logfile with the file header.
A.1.17
Class FuelGauge
Fuel Gauge. Gauge meant to mirror the MINI Cooper S’s fuel gauge.
Declaration
public class FuelGauge
extends org.ucsb.mayhem.diomedes.Gauge (in A.1.19, page 103)
Constructor summary
FuelGauge(boolean) Constructor.
Method summary
handleSample(Sample) Handle Sample.
paintComponent(Graphics) Paint Component.
Constructors
• FuelGauge
public FuelGauge( boolean floating )
– Description
Constructor. Constructs a Fuel Gauge, either integrated or floating.
– Parameters
∗ floating – Whether or not to detach the frame.
Methods
• handleSample
public void handleSample( Sample samp )
throws org.ucsb.mayhem.diomedes.WSNException
– Description
Handle Sample. Stores the value of the sample and calls repaint().
– Parameters
101
Appendix A. javadoc
∗ samp – Sample to handle.
– Throws
∗ org.ucsb.mayhem.diomedes.WSNException –
• paintComponent
protected void paintComponent( java.awt.Graphics g )
– Description
Paint Component. Draws the gauge and renders a needle pointing to
the appropriate place on the gauge.
A.1.18
Class FuelPumpLevelChannel
Fuel Pump Level Channel. Channel which converts the raw samples into a
reading of fuel level on a MINI Cooper S.
Declaration
public class FuelPumpLevelChannel
extends org.ucsb.mayhem.diomedes.ADCChannel (in A.1.4, page 77)
Constructor summary
FuelPumpLevelChannel() Default Constructor.
Method summary
convertUnits(Sample) Convert Units.
Constructors
• FuelPumpLevelChannel
public FuelPumpLevelChannel( )
– Description
Default Constructor. Constructs a fuel level channel assuming R1
and R2 values consistent measurements in the current system.
102
Appendix A. javadoc
Methods
• convertUnits
public double convertUnits( Sample samp )
– Description
Convert Units. Convert from raw samples to a 0-100 value meant to
mirror the operation of the car’s on-board fuel gauge.
– Parameters
∗ samp – Sample to convert.
– Returns – fuel gauge reading (0-100)
A.1.19
Class Gauge
Gauge. Abstraction of a gauge, which embodies a sample-handling object
and a GUI display.
Declaration
public abstract class Gauge
extends javax.swing.JPanel
implements SampleHandler
All known subclasses
TempGauge (in A.1.28, page 117), GraphGauge (in A.1.20, page 106), FuelGauge
(in A.1.17, page 101), DigitalGauge (in A.1.11, page 87), DialGauge (in A.1.10, page
86)
Field summary
scaleMax Max and min displayed scale.
scaleMin Max and min displayed scale.
title Gauge title.
XOFFSET Internal graphical placement offsets.
YOFFSET Internal graphical placement offsets.
Constructor summary
Gauge() Default constructor.
103
Appendix A. javadoc
Method summary
isScaleVisible() Is Scale Visible.
paintComponent(Graphics) Paint Component.
setScale(double, double) Set Scale.
setScaleVisible(boolean) Set Scale Visible.
setTitle(String) Set Title.
toFloat() To Float.
Fields
• protected double scaleMax
– Max and min displayed scale.
• protected double scaleMin
– Max and min displayed scale.
• protected java.lang.String title
– Gauge title.
• protected static final int XOFFSET
– Internal graphical placement offsets.
• protected static final int YOFFSET
– Internal graphical placement offsets.
Constructors
• Gauge
public Gauge( )
– Description
Default constructor. Constructs a Gauge with Arial as its title font.
Methods
• isScaleVisible
public boolean isScaleVisible( )
– Description
Is Scale Visible. Checks the visibility of the scale.
104
Appendix A. javadoc
– Returns – Whether he scale numbering is visible (true: visible)
• paintComponent
protected void paintComponent( java.awt.Graphics g )
– Description
Paint Component. Draws the title. Called by subclasses.
– Parameters
∗ g – Graphics context
• setScale
public void setScale( double min, double max )
– Description
Set Scale. Adjusts the visible scale.
– Parameters
∗ min – Minimum value of the scale
∗ max – Maximum value of the scale
• setScaleVisible
public void setScaleVisible( boolean val )
– Description
Set Scale Visible. Changes whether the scale numbering is visible on
the gauge.
– Parameters
∗ val – true: make visible; false: make invisible
• setTitle
public void setTitle( java.lang.String newTitle )
– Description
Set Title. Sets the String title for the gauge.
– Parameters
∗ newTitle – The new value for the title.
• toFloat
protected void toFloat( )
– Description
To Float. Causes the gauge to be rendered in a separate window,
instead of the default mode as a child container.
105
Appendix A. javadoc
A.1.20
Class GraphGauge
Graph Gauge. A gauge which graphs the data arriving at a Channel.
Declaration
public class GraphGauge
extends org.ucsb.mayhem.diomedes.Gauge (in A.1.19, page 103)
implements java.awt.event.ActionListener
Constructor summary
GraphGauge(boolean) Constructor.
Method summary
actionPerformed(ActionEvent) Action Performed.
handleSample(Sample) Handle Sample.
paintComponent(Graphics) Paint Component.
Constructors
• GraphGauge
public GraphGauge( boolean floating )
– Description
Constructor. Constructs a Graph Gauge, displays buttons, and detatches the frame, if desired.
– Parameters
∗ floating – Whether or not to construct the frame detatched.
Methods
• actionPerformed
public void actionPerformed( java.awt.event.ActionEvent e )
– Description
Action Performed. Handles the ’clear graph’ button.
• handleSample
public void handleSample( Sample samp )
throws org.ucsb.mayhem.diomedes.WSNException
106
Appendix A. javadoc
– Description
Handle Sample. Adds the sample to the history array and fires off a
repaint()
– Parameters
∗ samp – The sample to add to the graph.
– Throws
∗ org.ucsb.mayhem.diomedes.WSNException –
• paintComponent
protected void paintComponent( java.awt.Graphics g )
– Description
Paint Component. Draw the graph based on the history array and
the running max and min times.
A.1.21
Class LightChannel
Light Channel. Channel which handles onboard light sensor data.
Declaration
public class LightChannel
extends org.ucsb.mayhem.diomedes.Channel (in A.1.6, page 79)
Constructor summary
LightChannel()
Method summary
convertUnits(Sample) Convert Units.
Constructors
• LightChannel
public LightChannel( )
107
Appendix A. javadoc
Methods
• convertUnits
public double convertUnits( Sample samp )
– Description
Convert Units. Converts the raw binary reading into an ’intensity’,
that is percenta of full scale.
– Parameters
∗ samp – The sample to convert.
– Returns – light sensor reading (0-100)
A.1.22
Class LightSample
Light Sample. A sample taken from an onboard light sensor.
Declaration
public class LightSample
extends org.ucsb.mayhem.diomedes.Sample (in A.1.26, page 112)
Constructor summary
LightSample(DiomedesTLMMsg)
Constructors
• LightSample
public LightSample( DiomedesTLMMsg m )
A.1.23
Class LogfileFilter
Declaration
public class LogfileFilter
extends javax.swing.filechooser.FileFilter
Constructor summary
LogfileFilter()
108
Appendix A. javadoc
Method summary
accept(File)
getDescription()
getExtension(File)
Constructors
• LogfileFilter
public LogfileFilter( )
Methods
• accept
public abstract boolean accept( java.io.File arg0 )
• getDescription
public abstract java.lang.String getDescription( )
• getExtension
public java.lang.String getExtension( java.io.File f )
A.1.24
Class Mote
Mote. Abstracts the concept of a mote from the sensor network. Mainly
used to organize channels and to funnel samples to them.
Declaration
public class Mote
extends java.lang.Object
implements SampleHandler
Constructor summary
Mote(int) Constructor, ID only.
Mote(int, String) Constructor, ID and Name.
109
Appendix A. javadoc
Method summary
addHandler(int, SampleHandler) Add Handler.
getID() Get ID.
getName() Get Name.
handleSample(Sample) Handle Sample.
Constructors
• Mote
public Mote( int newid )
– Description
Constructor, ID only. Constructs a Mote using only the ID. The name
of the mote defaults to the modeID.
– Parameters
∗ newid – The ID of the Mote to construct
• Mote
public Mote( int newid, java.lang.String newname )
– Description
Constructor, ID and Name. Constructs a Mote using both the supplied
ID and name.
– Parameters
∗ newid – The ID of the Mote to construct
∗ newname – The explicit name to assign to the Mote
Methods
• addHandler
public void addHandler( int function, SampleHandler hand )
– Description
Add Handler. Registers a handler to this Mote on the given function.
Typically for a Channel.
– Parameters
∗ function – The channel to register the handler to (defined in
Constants.java).
110
Appendix A. javadoc
∗ hand – The handler to register.
– See also
∗ Constants.java
• getID
public int getID( )
– Description
Get ID. Returns the ID of this Mote.
– Returns – The ID of this Mote.
• getName
public java.lang.String getName( )
– Description
Get Name. Returns the name of this Mote.
– Returns – The name of this Mote.
• handleSample
public void handleSample( Sample s )
throws org.ucsb.mayhem.diomedes.WSNException
– Description
Handle Sample. Routes the Sample to the appropriate, registered
Channel.
– Parameters
∗ s – The Sample to handle.
– Throws
∗ org.ucsb.mayhem.diomedes.WSNException – If the channel corresponding to the Sample is not found.
A.1.25
Class RealWirelessSensorNetwork
Real Wireless Sensor Network. Wireless Sensor Network which listens on the
serial port for active messages from the TinyOS Basestation node.
Declaration
public class RealWirelessSensorNetwork
extends org.ucsb.mayhem.diomedes.WirelessSensorNetwork (in A.1.30, page 119)
111
Appendix A. javadoc
Constructor summary
RealWirelessSensorNetwork()
Constructors
• RealWirelessSensorNetwork
public RealWirelessSensorNetwork( )
A.1.26
Class Sample
Sample. Encapsulates message data, receive timestamp, and the information
necessary to convert the message’s sample to engineering units.
Declaration
public abstract class Sample
extends java.lang.Object
All known subclasses
TempSample (in A.1.29, page 118), LightSample (in A.1.22, page 108), ADCSample (in A.1.5, page 79)
Field summary
chan The associate Channel, for the purposes of EU conversion.
m The original Message object.
timestamp Time of sample receipt at the computer.
Constructor summary
Sample(DiomedesTLMMsg) Constructor.
Method summary
getFileHeader() Get File Header.
getFunction() Get Function.
getPacketNumber() Get Packet Number.
getRawSample() Get Raw Sample.
getSource() Get Source.
112
Appendix A. javadoc
getTimestamp() Get Timestamp.
getTimestampInMillis() Get Timestamp in Milliseconds.
getTimestampInS() Get Timestamp in Seconds.
getUnits() Get Units.
getUnitsName() Get Units Name.
getValue() Get Value.
setChannel(Channel) Set Channel.
toLog() To Log.
Fields
• protected java.util.Calendar timestamp
– Time of sample receipt at the computer.
• protected DiomedesTLMMsg m
– The original Message object.
• protected Channel chan
– The associate Channel, for the purposes of EU conversion.
Constructors
• Sample
public Sample( DiomedesTLMMsg newm )
– Description
Constructor. Stores the message, timestamps, and returns.
– Parameters
∗ newm – Message to convert to a Sample
Methods
• getFileHeader
public static java.lang.String getFileHeader( )
– Description
Get File Header.
– Returns – The standard logfile header, in String format.
113
Appendix A. javadoc
• getFunction
public int getFunction( )
– Description
Get Function.
– Returns – The function from the Message
• getPacketNumber
public int getPacketNumber( )
– Description
Get Packet Number.
– Returns – The packet number from the Message
• getRawSample
public int getRawSample( )
– Description
Get Raw Sample.
– Returns – The raw sample from the Message
• getSource
public int getSource( )
– Description
Get Source.
– Returns – The source mote from the Message
• getTimestamp
public java.lang.String getTimestamp( )
– Description
Get Timestamp.
– Returns – The timestamp of the receipt, in String format.
• getTimestampInMillis
public long getTimestampInMillis( )
– Description
Get Timestamp in Milliseconds.
114
Appendix A. javadoc
– Returns – The timestamp of the receipt, in milliseconds since the
epoch.
• getTimestampInS
public long getTimestampInS( )
– Description
Get Timestamp in Seconds.
– Returns – The timestamp of the receipt, in seconds since the epoch.
• getUnits
public java.lang.String getUnits( )
– Description
Get Units. Returns a String containing the units of the value, suitable
for concatenation to the end of the value in a display.
– Returns – The abbreviation of the value’s engineering units (e.g. V,
km).
• getUnitsName
public java.lang.String getUnitsName( )
– Description
Get Units Name. Returns the full name of the units of the value.
– Returns – The full name of the value’s engineering units (e.g. Volts,
Kilometers).
• getValue
public double getValue( )
– Description
Get Value. Converts the raw sample value into Engineering Units
with the help of the associated Channel.
– Returns – The value of the sample, in engineering units.
• setChannel
public void setChannel( Channel c )
– Description
Set Channel. Associates a Channel with the Sample, allowing EU
conversions.
115
Appendix A. javadoc
– Parameters
∗ c – The Channel to associate.
• toLog
public java.lang.String toLog( )
– Description
To Log.
– Returns – The Sample as a logfile line.
A.1.27
Class TempChannel
Temperature Channel. Converts raw binary readings from on-board temperature sensor into degrees Celcius.
Declaration
public class TempChannel
extends org.ucsb.mayhem.diomedes.Channel (in A.1.6, page 79)
Constructor summary
TempChannel() Default Constructor.
Method summary
convertUnits(Sample) Convert Units.
Constructors
• TempChannel
public TempChannel( )
– Description
Default Constructor.
116
Appendix A. javadoc
Methods
• convertUnits
public double convertUnits( Sample samp )
– Description
Convert Units. Converts a sample into Celcius, based on the conversion curve found in the Crossbow documentation.
– Parameters
∗ samp – Sample to convert
– Returns – sample in degrees Celcius
A.1.28
Class TempGauge
Temperature Gauge. Temperature gauge, consisting of a thermometer which
displays the value with the level of a red indication ’fluid’.
Declaration
public class TempGauge
extends org.ucsb.mayhem.diomedes.Gauge (in A.1.19, page 103)
Constructor summary
TempGauge(boolean) Constructor.
Method summary
handleSample(Sample) Handle Sample.
paintComponent(Graphics) Paint Component.
Constructors
• TempGauge
public TempGauge( boolean floating )
– Description
Constructor. Sets the size, loads the overlay image, initializes the
container, and then spawns the floating frame, if desired.
– Parameters
117
Appendix A. javadoc
∗ floating – Whether to launch the gauge as floating.
Methods
• handleSample
public void handleSample( Sample samp )
throws org.ucsb.mayhem.diomedes.WSNException
– Description
Handle Sample. Saves the sample value and units and repaints.
• paintComponent
protected void paintComponent( java.awt.Graphics g )
– Description
Paint Component. Draws the temperature gauge with the appropriate
level.
– Parameters
∗ g – Graphics context.
A.1.29
Class TempSample
TempSample. Sample from a temperature sensor.
Declaration
public class TempSample
extends org.ucsb.mayhem.diomedes.Sample (in A.1.26, page 112)
Constructor summary
TempSample(DiomedesTLMMsg)
Constructors
• TempSample
public TempSample( DiomedesTLMMsg msg )
118
Appendix A. javadoc
A.1.30
Class WirelessSensorNetwork
Wireless Sensor Network. Encapsulates the first layer of packet handling
from a WSN.
Declaration
public abstract class WirelessSensorNetwork
extends java.lang.Object
implements net.tinyos.message.MessageListener
All known subclasses
RealWirelessSensorNetwork (in A.1.25, page 111), DummyWirelessSensorNetwork (in A.1.14, page 97)
Field summary
handlers All first-level packet handlers (i.e.
motes Known motes in the network.
Constructor summary
WirelessSensorNetwork() Default constructor.
Method summary
addGlobalHandler(SampleHandler) Add Global Handler.
addHandler(int, int, SampleHandler) Add Handler.
messageReceived(int, Message) Message Received.
Fields
• protected java.util.Vector handlers
– All first-level packet handlers (i.e. loggers).
• protected java.util.Vector motes
– Known motes in the network.
119
Appendix A. javadoc
Constructors
• WirelessSensorNetwork
public WirelessSensorNetwork( )
– Description
Default constructor. Creates the wireless sensor network with three
motes: 1, 2, 3.
Methods
• addGlobalHandler
public void addGlobalHandler( SampleHandler hand )
– Description
Add Global Handler. Registers a handler which is called on all messages. This is typically a logging object.
– Parameters
∗ hand – The handler object to register.
• addHandler
public void addHandler( int moteID, int function,
SampleHandler hand )
– Description
Add Handler. Registers a SamplerHandler with the appropriate mote
and on the proper channel.
– Parameters
∗ moteID – The id of the mote with which to register the handler
∗ function – The function, or channel, of data to handle
∗ hand – The handler object to register.
• messageReceived
public void messageReceived( int dest addr,
net.tinyos.message.Message msg )
– Description
Message Received. Converts the message to a Sample and then passes
it to the appropriate Mote and to any registered SampleHandlers.
– Parameters
120
Appendix A. javadoc
∗ dest addr – The destination address of the packet (should always
be ’10’)
∗ msg – The actual contents of the message
A.1.31
Exception WSNException
Wireless Sensor Network Exception. Thrown when errors are found in a
packet received from the packetforwarder. Ceases all further processing of the
packet.
Declaration
public class WSNException
extends java.lang.Exception
Constructor summary
WSNException(String)
Constructors
• WSNException
public WSNException( java.lang.String message )
121
Appendix B
nesdoc
B.1
Diomedes Application
Figure B.1: DiomedesAppC Dependencies
B.1.1
DiomedesAppC
Configuration for the Diomedes Application.
Author: Erik Peterson
B.1.2
DiomedesC
Implementation for the Diomedes Application.
Author: Erik Peterson
122
Appendix B. nesdoc
Uses
• interface PacketAcknowledgements as Acks
• interface Leds
• interface Read<uint16 t> as ADC2
• interface Timer<TMilli> as MilliTimer
• interface SplitControl as RadioControl
• interface Read<uint16 t> as Light
• interface Packet
• interface Read<uint16 t> as Temp
• interface AMSend
• interface Boot
B.2
Diomedes Sensorboard
Figure B.2: DiomedesSB Dependencies
B.2.1
tos.sensorboards.diomedessb.DiomedesSBP
Implementation of the Diomedes Sensorboard software.
Author: Erik Peterson ([email protected])
123
Appendix B. nesdoc
Uses
• interface Timer<TMilli> as WarmUpTimer
• interface Read<uint16 t> as GeneralADC
• interface GeneralIO as TempPin
• interface GeneralIO as LightPin
• interface TaskBasic as getSample
• interface Read<uint16 t> as SensorADC
Provides
• interface ResourceConfigure as ADC2ResourceConfig
• interface ResourceConfigure as SensorADCResourceConfig
• interface Atm128AdcConfig as SensorADCAtm128AdcConfig
• interface Atm128AdcConfig as ADC2Atm128AdcConfig
• interface Read<uint16 t> as ADC2
• interface Read<uint16 t> as Light
• interface Read<uint16 t> as Temp
• interface Init
B.2.2
tos.sensorboards.diomedessb.DiomedesSBC
Modified to work with the temp sensor on an MTS series board.
Author: Erik Peterson
Provides
• interface Read<uint16 t> as Temp
• interface Init
• interface Read<uint16 t> as ADC2
• interface Read<uint16 t> as Light
124