1
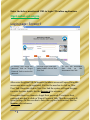
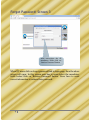
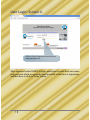
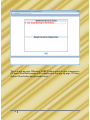
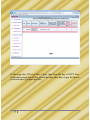
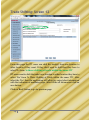
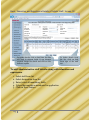
BRIEF USER MANUAL FOR
NABET DGET
Enter the below mentioned URL to login ITI online application:
Dget.nabet.qci.org.in
Login page: Screen1
If existing user forgot the
password, click on ‘Forgot
Password’ link to retrieve the
password
To create a new client/user
under NABET click on ‘New
User’ link
To view site assessment
date
click
on
‘Site
Assessment Date ‘link
After enter the given URL in browser the above screen will open. From this
screen new user can be registered. For this the user has to click on ‘New
User’ link. Once user click on New User link the system will open the page
for enter the user details. See the Screen-2 for reference
Sometimes there is a chance to forget their password. To retrieve their
password user has to click on ‘Forgot Password’ link. Then the system will
open the page. In this user has to enter the required information. See the
Screen 3 for reference
2
User Creation Page: Screen 2
User name will be auto generated by the
system once click on save button after
enter the all required information by the
user
To create new district and sub
district user has to click on these
buttons and has to enter the
required information and then save
In this page user has to enter/select all mandatory information details.
After enter/select the all mandatory fields user has to click on save. Once
click on save the system will add the details for the user and generate the
user name.
3
Forgot Password: Screen 3
After enter/select the all
mandatory fields click on
‘Retrieve Password’ button
When ITI users click on forgot password link in login page, then the above
screen will open. In this screen user has to enter/select the mandatory
fields before click on ‘Retrieve Password’ button. Users have to enter
correct information to retrieve their password.
4
User Login: Screen 4
Click on ‘Login’ button after enter the user
name and password
After registered under NABET to login, users have to enter their user name
and password which are generated and provided at the time of registration
and then have to click on ‘Login’ button.
5
Main Page of the ITI ‘Documents to be uploaded’: Screen 5
Click on ‘Next’ button for further process
Once ITI user gets successful login then the above screen will open. This
page contains all the information of the documents which are necessary to
upload by the user during filling up online application. After read the all the
written information in this page click on ‘Next’ button for further process.
6
Institute type Selection Page: Screen 6
Select the Institute type and then click on
save button
From this page the user will have to decide that for which type of institute
they want to take affiliation.
The ITI is new, and then user has to select ‘New Industrial Training
Institute’ and click on save button. If the ITI is existing, there are options
for adding more trade(s) or adding more unit(s) in existing trade. User has
to save relevant to their requirement and proceed to next.
7
This is a pop up page. Whenever NABET Admin wants to give a message to
ITI users, then that message will be displayed in this pop up page. ITI users
click on Close button and proceed to next…
8
After clock on Close button, this exception page will open. In this page there
are 4 links of exceptions which we are capturing for ITI users.
1st link is Pending ITI for D.A. When ITI user click on this link then the
following page will open…
9
In this page, ITI users have 14 days time from the day of N.C. raised by
assessor of Desktop Assessment date. If ITI user has not reply within 14
days from the date of N.C. raised by assessor, then Pending days will
blinking with minus(-) sign. Based on these minus (-).
Total fine will be calculated by multiply minus days with 50. ITI user has to
pay total fine for proceeding for next stage.
2nd link is Pending ITI for S.V. When ITI user click on this link then the
following page will open…
10
Same in this page. ITI users have 14 days time from the day of N.C. raised
by assessor of Site Assessment date. If ITI users will not reply of the N.C.’s
within interval of time, days will appears with minus (-) sign.
Again if there is days with minus (-) sign, total fine will be taken from ITI
users.
3rd link is Pending ITI for A.C. When ITI users click on this page then the
following page will open…
11
Also in this page, ITI users have 7 days of time from the day of
Accreditation Committee N.C. raised date. If they exceed the time, they
have to pay the fine as per minus days (50 rupee per day).
Same in case of 4th link, i.e. Pending ITI for NCVT. When ITI users click on
that button then the following page will open…
12
In this page also ITI users have 7 days time from the day of NCVT NonConformity raised date. If they exceed the time, they have to pay the fine as
per minus days (50 rupee per day).
13
If the ITI is under private sector then the ‘Center of Excellence
Scheme’ field selected value will be ‘No’ by default. If it is under
government sector then the field enables the list. User has to select
from the list
General Information: Screen 7
In this page some general information data related to login user institute
will be fetched from new user creation form. From this page user can
update their institute details if wants. Otherwise they can skip the update
clicking the ‘Next’ button.
For further process users have to click on ‘Next’ button after fill the
required mandatory information.
14
In this screen organization details
will be fetched from general
information form. If they want to
update then they can update.
To add NCVT affiliated ITI institute
under the organization they have to fill
the all mandatory information before
click on ‘Add’ button.
Organization Details: Screen 8
Click on ‘Save’ button to update
organization details
To delete any institute click on
Red Cross sign
In this page ITI users have to enter the information of the organization
under which ITI is running. If there is any trust or society for ITI then ITI
user have to upload the legal documents of that Trust/Society.
If there is any trust/society which is running under the same organization
then ITI users have to add the information of that institute along with
trade. Once they fills all the details of that institute then they have to click
on add button to save.
To edit the institute details users have to click on institute name from the
list, then all the saved details will bind in relevant fields. Then users can
easily update the information. For delete any institute, users have to click
on Red Cross sign from the list row.
To upload legal documents users have to click on Upload/Show files button
then a pop up will open, where users can upload the relevant file and
upload it. After upload if users can delete and view the upload files.
15
Premises Shifting: Screen 9
To shift premises from one location to another location, users have to
select ‘Change of Premises’ value as ‘Yes’. Then application will allow
enter/select premises details. After enter/select the all details click on
save button to change the premises details. Click on ‘Next’ button for
further process.
16
Trade for Which Affiliation Sought: Screen 10
To update any trade
information, click on
trade name from the
list
To delete any trade
information from the
list, click on Red Cross
sign of the trade row
From this page ITI users can enter/select their information of the trade for
which affiliation is to be sought. New ITI users have to enter at least two
minimum units.
To fill trades information users have to select the Trades from the ‘Trades’
list. After select the trade they have to fill the all units, Number of students
shift wise and session of month and year for which they want to take
affiliation. After fill the all information, click on save button.
17
Previously Granted Affiliation: Screen 11
To update any trade
information, click on
trade name from the
list
To delete any trade
information from the
list, click on Red Cross
sign of the trade row
For existing ITI’s, they have to fill all the information of previously granted
trade. For that first they have to select trade name from trades list, and then
enter information regarding units, no. of students, DGET file reference no.
etc and then save it.
After fill the all previous granted trade(s) details, click on ‘Next’ button for
further process. To go to previous application click on ‘Back’ button
18
Trade Shifting: Screen 12
From this page the ITI users can shift the trade(s) from one location to
other location if they want. If they don’t want to shift then they have to
select ‘No’ from ‘is there shifting of trade within the same ITI’
ITI users want to shift the trade’s one location to other location they have to
select ‘Yes’ from ‘Is There Shifting of Trade within the same ITI’. After
select the ‘Yes’ then the application will allow for enter/select information
with the indication of mandatory sign. After fill the all information click on
save button.
Click on ‘Back’ button to go for previous page.
19
Technical Staff as per NCVT Norms: Screen 13
ITI users have to enter actual no. of posts for
technical staff running in their institutes. No. of pots
as per NCVT norms data will be fetched from
NABET standard conditions. After enter the actual
pots(s) click on save button
Actual no. of post(s) of technical staff should be greater than or equals to
no. of post of technical staff as per NCVT norms. If actual post(s) are less
than no. of post(s) as per NCVT norms, then users can not submit their
application.
Click on ‘Next’ button for further process
20
Basic, Education and Experience Details of Technical Staff: Screen 14
To update any staff details, click on
designation then the data will bind in relevant
fields. If any changes required change the
details and click on save button to update
To delete any staff
details from the list, click
on Red Cross sign of the
staff row
From this page ITI users can add technical staff details along with their
education experience details.
To add technical staff details users have to select designation from the
‘Designation’ list and then fill the all mandatory fields. After enter/select
the all mandatory fields click on save button.
In this page ITI users have to save details of all the staff as mentioned in
Technical staff as per NCVT norms page (See the Screen 13). Even one
record is missing the users can not able to proceed for next process.
21
Instructor Staff as Per NCVT Norms: Screen 15
Enter the actual No. of
theory instructors
Enter the actual No. of
practical instructors
From this page ITI users have to enter instructor staff details as per NCVT
norms. Here two types of instructors for a trade. Theory and Practical
Instructor
Users have to add staff detail of actual no. of Theory and Practical
instructors relevant to no. of Theory and Practical instructors as per NCVT
norms. Actual no. of instructors should be greater than or equal to no. of
instructors as per NCVT norms.
If actual no. of instructors is less than the no. of instructors as per NCVT
norms, otherwise system will not allow submitting their application(s)
22
Basic, Education and Experience Details of Instructor Staff: Screen 16
To update details, click on qualification then
the data will bind in relevant fields. If any
changes required change the details and click
on save button to update
To delete details from
the list, click on Red
Cross sign of the trade
row
To add instructor details along with education and experience
1.
2.
3.
4.
5.
Select Trade Name from list
Select instructor type
fill the all mandatory fields
Upload documents as mentioned in the application
click on ‘Save’ button
There are some points which are needs to be addressed while saving the
data
1. For theory instructor, mandatory qualification is 10th and Degree OR
10th and Diploma.
2. For practical instructor, mandatory qualification is 10th, but ITI user
has to upload all higher degree certificates of practical instructor.
In this page ITI users have to add details of all the instructor staff as
mentioned in Instructor staff as per NCVT norms page. Otherwise system
will not allow for further process
23
Administrative Staff as Per NCVT Norms: Screen 17
Enter Actual No. of post(s)
and click on save button
In this page ITI users have to enter administrative staff actual no. of post(s)
staff as per NCVT norms.
Actual no. of staff should be greater than or equal to No. of staff as per
NCVT norms.
Click on ‘Next’ button for further process
24
Basic, Education and Experience Details of Admin Staff: Screen 18
To update details, click on Staff then the data
will bind in relevant fields. If any changes
required change the details and click on save
button to update
To delete details from
the list, click on Red
Cross sign of the staff
row
To add Administrative staff details along with education and
experience
1.
2.
3.
4.
5.
Select staff from list
Select designation from list
Enter/select all mandatory fields
Upload documents as mentioned in application
Click on ‘Save’ button
25
Infrastructure Details: Screen 19
To add land and building details users have to enter all mandatory
fields’ data including upload documents. In building details, when
building type ‘Rented Building’ selects then users have to enter
Date of occupation and Expiry of agreement. The duration of the
lease will be auto calculated. After fill the all mandatory fields click
on save button to add the Land and Building details for the
institute.
To add other details of the institute users have to click on ‘Other
details’ tab and have to fill the all mandatory fields and then click
on save.
After enter the land and Building and other details click on ‘Next’
button for further process
26
Workshop Area Details: Screen 20
To update area available details for
any trade, click on that trade and
click on save after change the details
To delete area available
details for any trade click
on Red Cross sign
To go back to previous
page click on ‘Back’
button
To add ‘Area Available In the Institute Workshop’ users have to select
Trade Name from list. Once users selects the trade from list ‘Workshop
are as per NCVT Norms data will be fetched from NABET standard
conditions master. Users have to enter only actual area. Shortage will be
auto calculated from the values of ‘As per NCVT norms’ and ‘Actual area’.
Actual Area value should be greater than or equals to ‘As per NCVT Norms
area. Otherwise users cannot submit their application. After enter the
actual area click on save button.
After enter the all details to go to further process click on ‘Next’ button.
27
Power Supply: Screen 21
To go back to previous
page click on ‘Back’
button
To go to further process
click on ‘Next’ button
While entering the power supply details users have to select connection
type single phase/Three phase. After enter the all mandatory details
including documents upload click on save button. After save the power
supply details click on ‘Next’ button for further process.
28
Power Supply Details: Screen 22
To go back to previous
page click on ‘Back’
button
To go to further process
click on ‘Next’ button, it
will be enabled after save
the details
In this page, trades and units list will be fetched from ‘Affiliation sought for’
application (see the screen 10). Power supply required as per Norms in KW
data will be fetched form NABET standard conditions application. Users
have to fill the Power supply Available in KW column only. After fill the all
values trade wise click on save button. Without save the power supply
details users cannot go for further process.
Actual power supply in the institute for each trade would automatic come
by multiplying maximum no. of units in one shift column with power
supply as per NCVT norms column.
In this application ‘Total power supply available in the institute’ should be
greater than or equal to ‘Total power supply required as per norms’.
Otherwise users cannot submit their application.
29
Tools and Equipments Trade Wise: Screen 23
To add Tools and Equipments details trade wise users have to select Trade
from the list. Based on trade Equipments and its quantity will be fetched
from NABET standard conditions master. In this users have to fill the
‘Affiliation sought for’ and ‘Tools Cost’. Each tool cost will be auto
calculated from ‘Affiliation sought for’ and ‘Tools cost’ after save the record.
‘Affiliation sought for’ should be greater than or equals to ‘As per Norms’
value. Otherwise users cannot submit their application. After enter the all
details click on save.
From this application users can upload the all tools details to excel trade
wise. For this they have to click on ‘Upload to Excel Sheet’.
Click on ‘Next’ button for further process.
30
Tools, Equipments & Machineries Costing Above Rs. 10000: Screen 24
Click on ‘Browse’ then select
file + click on upload button to
upload the Tools/Equipments
bill documents. To view upload
documents click on ‘View File’
button
Click on ‘Browse’ then select
file + click on upload button to
upload the Tools/Equipments
images with principals. To view
upload documents click on
‘View File’ button
To go back to previous application
click on ‘Back’ button
In this application users can enter purchase details of more than 10000
rupees cost of Tools/Equipments (See the screen 23 for reference).
Once user selects the trade then that trade related tools list will display in
Tools & Equipments drop down. From this list users have to select
Tool/Equipment and then enter the all mandatory fields. After enter the all
mandatory fields users have to click on ‘Save’ button to add the purchase
details. Users have to fill the all tools/equipments information from this
application
After fill the all information click on ‘Next’ button for further process
31
Declaration Page: Screen 25
Click on this button to view QCI
bank details (See the screen 26
for reference)
By clicking on this button users
can view all filled information in
previous pages and the can take
printout also(see the screen 27).
Click on this button to take print
out of Declaration form.
By clicking on this button users can upload files
and they can down load the uploaded files to
view
In this application users have to fill the all mandatory fields before
submitting the application. Once they click on submit button if anything
missed as per NCVT norms the application will check and display the
applications list with the hyperlink of the same (See the screen 26 for
reference). Once users click on the application hyperlink it will redirect to
the application to fill the missing information. After all the applications
issues solved then users have to click on submit button. After successful
submission system will generate one application number. With this
reference users can see their application process by online
Users have to fill the payments details before submit
32
QCI Bank Details: Screen 26
Institute details Report: Screen 27
33
Status of the Institute: Screen 28
By clicking on this link they can view their
application status frequently on this
button to take print out of Declaration
form.
34
Institute Feedback: Screen 29
By clicking on this link users
can view their submitted
application feedback/complaint
details.
By clicking on this button users can send
their feedback/complains/queries to QCI. See
the screen 30 for reference
Feedback/Complaints/Queries: Screen 30
35
In this users have to enter their comments. After enter the comments they can send
the comments by the clicking on save button. From this page users can send more
than one complaint/feedback/queries requests. After send one request if they want
to send another request they have to click on ‘New’ button.
NABET Remarks: Screen 31
By clicking on this link users
can view NABET remarks list.
By clicking on this link users
can view NABET remarks.
By clicking on this button users
can view all NC’s and ITI user
responses in report format.
After submission of any application by the users those applications will be
reviewed by NABET. If there is any discrepancies related any application
they will inform by online with the proper remarks. Those remarks can be
viewed by ITI user and they can give proper response by online for NABET
Non-Conformity/Observations.
36
Assessor Non-Conformity/ Observation for Desktop Assessment: Screen 32
By clicking on this link users
can view Non-Conformity
/Observations for Desktop
Assessment
By clicking on this button
users can view in report
format of all NC’s and ITI
users response.
Click on this button to
upload ay documents
37
Assessor Non-Conformity/ Observation for Site Assessment: Screen 33
By clicking on this button
users can view assessor’s
remarks/queries on physical
visit to institute
In this application users can view site visit assessor remarks/queries. Once
assessor click on save button after enter the remarks the mail will goes to
ITI user’s mail id. ITI users can enter their response. Once click on save
button after enter the response the mail will goes to assessor. If the assessor
is satisfied with user’s response they will close all their NC’s and assign the
application for next phase.
38
Institute Payment Details: Screen 34
When the user click on this link ‘Payment Details for Site Visit’
application will open, in this users can enter their payment details
In this application users have to choose their ‘payment for’ option. They
have to enter the payment paid/paying details. If users have paying the
payments through DD then they have to enter in the relevant fields. If they
are paying the payments through online then they have to enter transaction
id and date of transaction. Once users enter the details and save the details
will be displayed to NABET administrator, after verified the payment
details they will assign the application for assessment
39