1
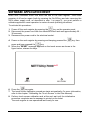
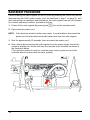
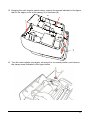
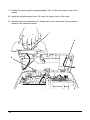
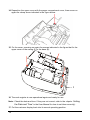
ENGLISH
FRANÇAIS
DEUTSCH
ESPAÑOL
int'l
NETTUN@7000
CASH REGISTER
ERRORS AND TROUBLESHOOTING
Publication issued by:
Olivetti S.p.A.
Telecom Italia Group
Via Jervis, 77 - 10015 Ivrea (TO)
Copyright © 2012, by Olivetti
All rights reserved.
This manual describes the CRF7100 cash register sold with the name
int’l
NETTUN@7000 , and provides information of a general nature necessary for
using the cash register for the first time.
For more detailed information on how to use the cash register functions, a
Programming manual can be downloaded from the Olivetti site (www.olivetti.com)
that contains detailed information on programming the settings.
The manufacturer reserves the right to carry out modifications to the product
described in this manual at any time without any notice.
The quality requirements of this product are attested
through display of
marking on the product.
Your attention is drawn to the following actions which could compromise the
conformity attested to above and also product characteristics:
• incorrect power supply;
• incorrect installation, incorrect or improper use or use not in compliance with
the warnings provided in the User’s Manual furnished with the product;
• replacement of original components or accessories with others of a type not
approved by the manufacturer, or performed by unauthorised personnel
User Safety
Connect the machine to a nearby and readily accessible current outlet.
Access the print unit area only to replace accessories. Do not use the machine
above or close to sources of heat (e.g. radiators) or very close to water (e.g.
swimming-pools or showers).
To effectively disconnect the appliance, remove the plug of the power cord from the
current outlet. To clean the machine, disconnect it from the current outlet, use a
damp cloth. Do NOT not use corrosive liquids.
TABLE OF CONTENTS
ERRORS AND TROUBLESHOOTING .......................................... 1
ERROR MESSAGES ................................................................... 3
EJ MESSAGES..............................................................................................3
GENERAL ERRORS LIST...............................................................................4
OPERATOR MANAGEMENT ERRORS ........................................................6
EJ ERRORS...................................................................................................6
CHIPCARD ERRORS.....................................................................................7
SLIP PRINTER ERRORS ................................................................................7
TROUBLESHOOTING ..................................................................................8
SOFTWARE APPLICATION RESET ............................................. 9
RAM RESET PROCEDURE........................................................ 10
iii
DIRECTIVE 2002/96/EC ON THE TREATMENT, COLLECTION, RECYCLING
AND DISPOSAL OF ELECTRIC AND ELECTRONIC DEVICES AND THEIR
COMPONENTS
1. FOR COUNTRIES IN THE EUROPEAN UNION (EU)
The disposal of electric and electronic devices as solid urban waste is
strictly prohibited: it must be collected separately. The dumping of
these devices at unequipped and unauthorized places may have
hazardous effects on health and the environment. Offenders will be
subjected to the penalties and measures laid down by the law.
TO DISPOSE OF OUR DEVICES CORRECTLY:
a) Contact the Local Authorities, who will give you the practical
information you need and the instructions for handling the waste
correctly, for example: location and times of the waste collection
centres, etc.
b) When you purchase a new device of ours, give a used device similar
to the one purchased to our dealer for disposal.
The crossed dustbin symbol on the device means that:
- When it to be disposed of, the device is to be taken to the
equipped waste collection centres and is to be handled
separately from urban waste;
- Olivetti guarantees the activation of the treatment,
collection, recycling and disposal procedures in
accordance with Directive 2002/96/EC (and subsequent
amendments).
2. FOR OTHER COUNTRIES (NOT IN THE EU)
The treatment, collection, recycling and disposal of electric and
electronic devices will be carried out in accordance with the laws in
force in the country in question.
ERRORS AND TROUBLESHOOTING
This document is provided to help the user understand the error messages that
appear on the touch screen and to handle situations where the cash register does
not function correctly.
The various types of error message that may appear on the touch screen are listed in
the following tables. The information provided in the tables includes: the error
message that is displayed (MESSAGE), the cause of the error (CAUSE) and, when
possible, the solution (SOLUTION).
To make consulting the errors easier, they are grouped according to the
environments in which they appear :
•
EJ messages
•
General errors list
•
Operator management errors
•
EJ errors
•
Chipcard errors
•
Slip printer errors
•
Troubleshooting.
In the case of anomalies or functional errors that prevent the cash register from being
used, the following schema provides a summary of the remedial actions that can be
taken to restore correct operation, with more detailed information provided in the
successive pages.
1
Switch the cash register off and on again using the
power key
Check if normal operating conditions have been
restored.
1
Disconnect the power cord from the electrical socket
(220V), wait approx. 20 seconds then reinsert the cord
into the socket. Press the
key.
Check if normal operating conditions have been
restored.
If not, proceed to the next step.
⇓
Perform the Software Application Reset procedure
Check if normal operating conditions have been
restored.
2
If not, proceed to the next step
⇓
3
Perform the RAM Reset procedure
Check if normal operating conditions have been
restored.
If not, proceed to the next step
⇓
4
2
Contact the Help Centre
ERROR MESSAGES
Dialogue boxes are displayed on the touch screen when an error occurs.
In the dialogue box you can select:
•
OK to confirm that you have accepted notification of a critical error
•
Yes/No to accept or cancel a cash register notification relating to a configuration
setting or other condition that has occurred during normal operation.
The following tables provide the messages that are both printed and displayed on the
touch screen to indicate the error condition.
EJ MESSAGES
MESSAGE
CAUSE
SOLUTION
EJ NEARLY FULL
The EJ multimedia card has almost
reached its maximum capacity.
Terminate the current
operation and replace
the EJ multimedia card.
REPLACE EJ
DEVICE
NEGATIVE VERIF.
The EJ multimedia card has
reached its maximum capacity.
Functional errors have been
encountered while verifying the
congruency of the data registered in
the Electronic Journal.
Replace the EJ
multimedia card
Replace the EJ
multimedia card.
MESSAGE
PRINTER ERROR
CAUSE
Printer is malfunctioning.
SOLUTION
Call Technical
Services.
3
GENERAL ERRORS LIST
MESSAGE
RETURN TO REG
MAX.LIM.EXCEEDED
LESS MIN.LIMIT
CAPACITY EXCEEDED
WRONG SEQUENCE
TICKET OPEN
NOT MANAGED
QUANTITY = 0
QUANTITY EXCEEDED
NOT ALLOWED
INSERT AMOUNT
SET PRICE
LALO LIMIT EXCEED
HALO LIMIT EXCEED
BAL. EXC. HALO
CREDIT LIMIT EXCEEDED
WRONG AMOUNT
PRICE EXCEEDED
INSER. EXCHANGE
COVER OF PAPER PRESS
OPEN
PAPER MISSING
END OF PAPER
RUN REP.
4
CAUSE
Appears when a sales ticket is open and an attempt is made to
change the operating mode of the cash register.
Appears when the maximum capacity is exceeded, for
example, when configuring descriptors.
Appears when the minimum limit is exceeded.
Appears when an arithmetic operation causes an overflow in a
register counter.
Appears when the key sequence entered is not permitted in
the current machine condition.
Appears when a ticket is open. The requested operation
cannot be performed until the ticket is closed.
Appears in conditions when a code is not handled.
Appears when a quantity must be entered but the user
proceeds with the operation without inserting it, for example,
for operations involving the X key.
Appears when a quantity counter overflows while performing
certain arithmetic operations.
Appears when an operation is not allowed.
Appears when the mandatory balance calculation option is set
and the user does not enter the amount for its calculation.
Appears when a price is not programmed for the department
entered.
Appears when the sales price of an item is less than the
(LALO) price programmed.
Appears when the sales price of an item is greater than the
(HALO) price programmed.
Balance exceeds HALO.
Appears when the maximum credit amount allowed is
exceeded (also for CHIPCARD).
Appears when an incorrect amount is entered.
Appears when the amount of the discount applied is greater
than the price of the item sold.
Appears when the exchange value has not been entered in
currency management.
Appears when the cover of the printer is open.
Appears for the NEAR END OF PAPER condition (not a
blocking error).
Appears for the END OF PAPER condition (blocking error)
Appears when you must run the closure report (Z10) to be
able to perform the operation requested by the user.
MESSAGE
END Z10 REP.
PRINTER DISCNNCTD
WRONG VALUE
CAUSE
Appears when the Z10 report results as still open and the user wants to
perform another operation.
Appears when there are communication problems or errors are detected
when printing invoices or receipts on a slip printer.
Appears when an invalid value is inserted, for example, because it is outside
the range of allowed values.
RETURN DISABLED
Appears when a return operation is requested for a department, but the
return flag for the department is set as disabled (in department
management).
DISCOUNT DISABLED
Appears when a discount operation is requested for a department, but
the discount flag for the department is set as disabled (in department
management).
GOODS REFUND
DISABLED
Appears when a refund operation is requested for a department, but the
refund flag for the department is set as disabled (in department
management).
PRICE INPUT
DISABLED
Appears when a price bypass operation is requested for a department,
but the price flag for the department is set as disabled (in department
management).
CLOSE DRAWER
Appears when you try to open a ticket but the drawer is open.
WRONG CODE
Appears after a validity check on the user entry, signalling an incorrect code.
NO LOGO
Warns that the logo number selected is not present in the cash register.
PROG. VAT N./TC
Appears when the VAT No. or Tax Code is not yet programmed on the cash
register.
Appears when the user attempts to perform an operation, but the report
indicated after the message must first be run.
Appears when the memory capacity available for BCR PLUs is exceeded.
DB OVERFLOW
Appears when the BCR PLU DB is full.
DB FULL
Appears when the maximum limit allowed for printing a multiple ticket is
MULTIPLE TK.LIM.EXC.
exceeded.
Appears during keypad programming when an invalid combination is
NOT PROG.
programmed.
Appears when option 102 terminates because the maximum memory size
WRONG SIZE
has been exceeded.
POWERING OFF
Appears at times when the machine cannot be powered off.
NOT POSSIBLE
RUN REPORT Z
5
OPERATOR MANAGEMENT ERRORS
MESSAGE
CAUSE
NOT PRESENT
Appears during operating mode (the operator requested is not
present).
OPERATOR NOT
ACTIVE
The operator activated is not enabled or not programmed.
OPERATOR ACTIVE
CLOSE SHIFT
ENTER OPERATOR
Appears when the operator is active and you enter option 601 to
modify their personal details.
An attempt is made to activate an operator (start shift) without
first closing the previous operator shift.
A request is made to run a Z10 report, but the current operator
shift has not been closed.
A sales ticket has been started but no operator is active.
EJ ERRORS
MESSAGE
JOURN. DELETED
OPEN DOOR
DOOR OPEN
NOT POSSIBLE
EJ FULL
NO CLOSURE
TICKET MISSING
JOURN. NOT INIT.
INITIALISE?
JOURN. NOT INIT.
INIT. TERMINATED
JOURN. NOT INIT.
EJ OTHER TILL
JOURNAL NOT
RECOGNISED
JOURNAL NOT
USABLE
6
CAUSE
Appears at the end of the deletion procedure.
Appears when the door of the EJ bay is open.
Appears when the data on the multimedia card cannot be deleted.
Appears when there is no more free space for making registrations
in the electronic journal.
Appears when the user requests printing of tickets by date and NZ, but
the closure has not yet been performed.
Appears when a request is made to print a ticket in the EJ but no
ticket of that number exists.
Appears in conditions of electronic journal not initialised.
Appears at the end of initialising the multimedia card.
Appears when a multimedia card is inserted that has been
initialised on another cash register.
The multimedia card is not of the specific type supplied by the Authorised
Centres.
Appears when the electronic journal cannot be used due to an
initialisation error.
CHIPCARD ERRORS
MESSAGE
CHIPCARD ERROR
CAUSE
An error has occurred while programming the chipcard.
INVALID CHIPCRD
The chipcard is invalid.
CHIPCARD EXPIRED
The chipcard has expired. The current date is greater than or equal
to the expiry date written on the card.
DEALER CODE
ERROR
Appears when an error occurs for the dealer code.
CARD CODE ERROR
Appears when an error occurs for the card code.
WALL. CODE ERROR
Appears when an error occurs for the wallet code.
NO WALLET
The operation on the chipcard wallet cannot be executed because
the wallet is not enabled.
POINTS LIMIT
Appears when the upper limit for points contained on the chipcard
is exceeded.
INVALID DATA
The user details related to the chipcard are invalid.
CHECK BALANCE
The card cannot be deleted because the value associated with the
electronic wallet is not 0.
MAX. CREDIT EXC.
The operation requested for the card would result in the credit limit
being exceeded.
SLIP PRINTER ERRORS
MESSAGE
CAUSE
SOLUTION
INSERT FORM
Appears when you must insert the printing
form into the slip printer
Insert the form.
REMOVE FORM
Appears when printing an invoice or receipt
and printing must continue on the next form.
Remove the form from
the printer.
7
TROUBLESHOOTING
PROBLEM
The machine does not
power on.
The machine does not
perform the functions
requested.
Error messages
related to the EJ are
shown on the operator
display.
POSSIBLE CAUSE
Temporary power failure
while performing an operation
on the machine.
Too rapid disconnection and
reconnection of the power
cord.
Opening / closing the EJ slot
hatch or extracting the EJ
while an operation is being
performed on the machine.
The EJ card is damaged.
The cash register
powers on after the
key is used to
power off.
SOLUTION
Disconnect the power cord from the
electrical socket, wait approx. 20
seconds then reinsert the cord into
the socket. Press the
key.
With the power cord disconnected
from the electrical socket, extract the
EJ and then reinsert it.
With the power cord disconnected
from the electrical socket, replace
the EJ card.
If the problem persists, replace the
EJ multimedia card.
key has been kept Release the key when the message
“powering off” appears on the touch
pressed for too long.
screen.
The
“End of paper”
condition. Cash
register cannot be
powered off with the
Correct behaviour.
Insert a new paper roll and conclude
the operation in course.
key.
Warning when using EJ :
To avoid any risk of damage to the EJ. it is recommended that you follow the
indications in the User Manual when using the EJ.
8
SOFTWARE APPLICATION RESET
When error conditions occur that block the use of the cash register - even after
powering it off and on again (both by pressing the On/Off key and also removing the
220V power supply cord, as described in step 1 on page 2), you must perform a
software application reset operation to restore normal operating conditions.
To activate this procedure:
key on the operator panel.
1. Power off the cash register by pressing the
2. Disconnect the power cord from the electrical socket and wait approximately 20 30 seconds.
3. Reconnect the power cord to the electrical socket.
4. Power on the cash register by pressing and keeping pressed the
key, then
press and keep pressed the
key.
5. When the "RESET" message appears on the touch screen as shown in the
figure below, release the keys.
NETTUN@7000int’l
RESET
RECOVERY
6. Press the
key again.
7. The touch screen calibration procedure starts automatically (for more information,
refer to the chapter “Calibrating the Touch Screen” in the User Manual).
8. Perform touch screen calibration and, at the end, wait until the initialisation
procedure completes and a message is printed on the ticket.
The cash register is now operational and ready for use.
9
RAM RESET PROCEDURE
If after powering the cash register off and on (both by pressing the On/Off key and by
disconnecting the 220V power supply cord, as described in step 1 on page 2), and
after performing the operation reset procedure, the cash register has still not returned
to a normal operating condition, proceed as follows.
1. Power off the cash register by pressing the
key on the operator panel.
2. Disconnect the power cord.
NOTE: if the electrical socket is within easy reach, it is preferable to disconnect the
power cord from the electrical socket rather than from the cash register.
3. Wait for approximately 20 seconds, then reconnect the power cord.
4. Now, without disconnecting the cash register from the power supply, extract the
customer display from its slot until only the last part is still inserted, as shown in
the illustration below.
(This operation makes it easier to raise the upper cover to gain access to the
controller board housed inside the cash register).
10
5. Keeping the cash register upside down, remove the screws indicated in the figure
that fix the upper cover of the casing (1) to the base (2).
2
1
6. Turn the cash register over again, returning it to its normal position, and remove
the clamp screw indicated in the figure below.
11
7. Rotate the cash register by approximately 180° to allow the upper cover to be
raised.
8. Applying a slight upward force (1), raise the upper cover of the case.
9. Release the front restrainers (2), taking care not to disconnect the connectors
inside on the controller board.
1
2
2
12
10. Identify the K1 reset microswitch illustrated in the figure.
Press the K1 reset microswitch present on the controller board and keep it
pressed.
11. With the K1 RESET microswitch pressed, power on the cash register by
pressing the
key on the operator panel.
Power key
12. Close the upper cover and paper compartment cover.
13. The cash register is now operational again in «sales» or «table» mode as was
previously configured on the cash register.
13
14. Reposition the upper cover with the paper compartment cover, then screw on
again the clamp screw indicated in the figure below.
15. Fix the cover, screwing on again the screws indicated in the figure that fix the
upper cover of the casing (1) to the base (2).
2
1
16. The cash register is now operational again and ready for use.
Note: Check the date and time. If they are not correct, refer to the chapter “Setting
the Date and Time” in the User Manual for how to set them correctly).
17. Put the customer display back into its normal operating position.
14
Code: 573403