1
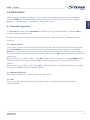
Picture similar
Digital Terrestrial Twin Tuner
Receiver SRT 5220
User Manual
PART 1 • English
2
2
3
3
4
2.0 CONNECTION
2.1 Connecting to Terrestrial Antenna
2.2 Connecting to TV with SCART cable
2.3 Connecting to Video/DVD Recorder with SCART cable
2.4 Connecting to TV with S-VIDEO cable
2.5 Connecting to a Digital Audio Amplifier
2.6 Connecting to PC
5
5
5
5
5
5
5
3.0 YOUR RECEIVER
3.1 Front Panel
3.2 Rear Panel
3.3 Remote Control
6
6
6
7
4.0 FIRST TIME INSTALLATION
8
5.0 MAIN MENU
5.1 Channel Organiser
5.2 Channel Search
5.3 Installation
5.4 Timer
5.5 Game
9
9
10
10
13
13
6.0 OTHER OPERATIONS
6.1 Mosaic
6.2 EPG
6.3 Teletext
6.4 Subtitles
6.5 Information
14
14
14
14
14
14
A.1 TROUBLESHOOTING
15
A.2 SPECIFICATIONS
16
A.3 GLOSSARY OF TERMS
17
* €0.14/Min. from German wired line
per January 2007
1.0 INSTRUCTION
1.1 Safety Instructions
1.2 Storage
1.3 Equipment Set-up
1.4 Features & Accessories
English
TABLE OF CONTENTS
* €0.12/Min. from Austrian wired line
1
PART 1 • English
1.0 INSTRUCTION
1.1 Safety Instructions
DO NOT INSTALL YOUR RECEIVER:
n In a closed or poorly ventilated cabinet; directly on top of or under any another equipment; on a
surface which might obstruct the ventilation slots
DO NOT EXPOSE THE RECEIVER OR ITS ACCESSORIES:
n To direct sunlight or near any other equipment that generates heat; to rain or intense moisture;
to intense vibration and to any shock which may cause permanent damage to your receiver or to
any magnetic objects, such as loudspeakers, transformers, etc.
n Do not use a damaged power cord. It may cause a fire or an electrical shock. Do not touch a
power cord with wet hands. It may cause an electric shock
n Never open the cover. It is dangerous to touch the inside of the receiver due to high voltage
currents and possible electrical hazards. Your warranty will be void if the receiver has
been opened
n When the receiver is not used for a long period of time, you should unplug the power cord from
the wall socket
n Do not use alcohol or ammonia based liquids to clean the receiver. If you wish, you may clean
your receiver with a soft lint-free cloth slightly made damp with a mild soap solution, only after
disconnecting from the mains voltage supply. Make sure no foreign objects fall through the
ventilation slots because this could cause fire or an electric shock
n Do not place any objects on top of the receiver because this might prevent proper cooling of the
components inside
SAFETY PRECAUTIONS
n Do not open the receiver cover, as you will be exposed to a shock hazard. It will also void your
warranty. Refer all maintenance or servicing to suitably qualified personnel
n When you are connecting the cables, be sure that the receiver is disconnected from the mains
supply voltage. Wait a few seconds after switching off the receiver before you move the receiver
or disconnect any equipment.
n It is a necessity that you only use an approved extension and compatible wiring that is suitable
for the electrical power consumption of the installed equipment. Please ensure that the electrical
power supply corresponds with the voltage on the electrical identification plate at the back of
the receiver
If the receiver does not operate normal even after strictly following the instructions of this user manual, it
is recommended to consult your dealer.
2
PART 1 • English
Your receiver and its accessories are stored and delivered in a packaging, protected against electric
damage and moisture. When unpacking, make sure all parts are included. Keep packaging away from
children. For transportation from one place to another or if you are returning the receiver under warranty
make sure it is repacked in its original packaging with all accessories. Failing to comply with such
packaging procedures could void your warranty.
1.3 Equipment Set-up
We recommend you consult a professional installer to set up your equipment. Otherwise, please follow
these instructions carefully:
n Refer to the user manual of your TV and your antenna.
n Make sure that the SCART cable and outdoor components of the antenna are in a good
condition and the SCART connections are well shielded.
This manual provides complete instructions for installing and using this receiver.
The following symbols will serve as follow.
Warning
Indicates warning information.
Tips
Indicates any other additional important or helpful information.
MENU
Move to
Represents a button on the remote control or the receiver
Represents a menu item within a window
3
English
1.2 Storage
PART 1 • English
1.4 Features & Accessories
n
n
n
n
n
n
n
n
n
n
n
n
n
n
n
n
n
n
n
n
n
n
n
n
n
n
n
For all digital Free-To-Air TV and Radio programmes (with outdoor- or indoor* antenna)
Twin Tuner Technology: Watch one programme while simultaneously recording another one on
your Video or DVD Recorder
1 000 channels memory capacity
Display showing channel number or time
Favourite list for TV and Radio programmes
Quick and easy installation & user-friendly menu
Mosaic function: 9 TV Channels in overview
Excellent Audio- and Video quality
Digital Sound through coaxial output (S/PDIF)
Set-up support for first time installation
Electronic Programme Guide (EPG) for present / following event information and up to 7 days
for on screen programme information
Advanced timer function – easy recording of your favourite TV or Radio programme once, daily
or weekly
Support Teletext via OSD and VBI
Multi-lingual subtitling and audio track support
Multilingual OSD on-screen menu
Parental lock function for menu and selectable per channel
High speed channel zapping
Automatic and manual channel scan options
User-friendly Remote Control
Low power consumption
Separate power switch
RS-232 port for updating control software
Games (Mine, Tetris, Gomoku)
DVB-T compliant, UHF/ VHF Tuner with Loop-through function
Support of active antenna by 5 V output
Connections: ANT IN, LOOP IN, LOOP OUT, TO TV, 2 SCARTs (TV/ VCR), S/PDIF, S-VIDEO,
Serial Port RS-232, Power switch
Accessories: User Manual, Remote control, 2x Batteries (AAA), Short RF (coax lead) cable
* Subject of local broadcast condition
NOTE: The batteries should not be recharged, disassembled, electrically short-circuited or be mixed or
used with other types of batteries.
4
PART 1 • English
2.0 CONNECTION
2.1 Connecting to Terrestrial Antenna
English
To receive the broadcast signal, the terrestrial antenna cable should be connected to the ANT IN
connector at the back of the receiver. Connect the LOOP OUT to the LOOP IN with the short RF-Coax
cable (fig. 1).
2.2 Connecting to TV with SCART cable
Connect the TV set to the TV SCART connector of the receiver through a SCART cable (fig. 1).
2.3 Connecting to Video/DVD Recorder with SCART cable
This terrestrial receiver may also be operated together with a Video or DVD recorder. (fig. 1).
Connect your Video/DVD Recorder through a SCART cable on VCR SCART.
The signals from Video/DVD Recorder will pass to your TV-set if this terrestrial receiver is powered off or
the AV button on remote control is pressed.
Optional: using coaxial cable, connect TO TV output of the receiver to aerial input of your VCR and aerial
output of VCR to aerial input of your TV set. This will allow you to watch and record analogue
aerial programs to your VCR.
2.4 Connecting to TV with S-VIDEO cable
On the back of your receiver you will find the S-VIDEO connector. Install an S- VIDEO cable between
connector of the receiver and the one of your TV set. This S-VIDEO output is connected to the same
tuner as TV SCART.
NOTE: This output supports only video. Please set to S-VIDEO in menu System settings > Video
Output. If RGB mode is selected this output is not active. (Fig. 3)
2.5 Connecting to a Digital Audio Amplifier
The Digital Audio Amplifier is connected with the receiver from the S/PDIF connector (fig. 4)
2.6 Connecting to PC
The RS-232 connector on the receiver is to connect to the PC using a serial cable (fig. 5). This allows you
to download new versions of software to your receiver.
5
PART 1 • English
3.0 YOUR RECEIVER
3.1 Front Panel
Fig. 6
1. Power ON/STAND-BY button
2. MENU
By pressing this button you’ll open the OSD menu
3. OK
By pressing this button, you’ll confirm a selection
4. Mode indicator
The RED light indicates that the receiver is in STAND-BY mode. The GREEN light indicates
that the receiver is in AWAKE mode.
5. 4 digits display
In STAND-BY mode indicates current time
In AWAKE mode indicates current channel number
In Extern/TV mode it shows AV
6. Channel Up/Down buttons
In TV mode: channel up/down
In OSD: menu up/down
7. Volume buttons left/right
In TV mode: volume up/down
In OSD: page up/down or depending on option
3.2 Rear Panel
Fig. 7
1. ANT IN
To connect a digital aerial antenna for receiving broadcasting signal.
2. LOOP OUT
To connect a short RF cable to LOOP IN
3. LOOP IN
To connect a short RF cable to LOOP OUT
4. TO TV
To connect an extra receiver or TV set (see chapter 2.3)
5. TV SCART Connector
To connect your receiver with your TV set using a SCART cable.
6. VCR SCART Connector
Option 1: To connect your receiver with your VCR using a SCART cable.
Option 2: To connect your receiver with your DVD recorder using a SCART cable.
Option 3: To connect your second TV set using a SCART cable.
7. Coax S/PDIF (BLACK RCA)
To connect your receiver to digital audio amplifier
6
8. RS-232 Serial Port
Connect a PC to your receiver to download new software versions.
9. S-VIDEO
To connect to your TV set
10. Main power switch
11. Power Cord
Your receiver requires a current of 90 ~ 240 V AC (Auto-selectable), 50 ~ 60 Hz +/-5 %. Make
sure to check the power specification before connecting your receiver to the wall outlet.
3.3 Remote Control
Turns the receiver On/Standby
Mutes audio output of the receiver
Freeze/Resume picture
Shows list of available audio languages for the channel you
are watching. In addition it sets the current channel audio to
stereo, left-double mono or right-double mono
MENU
Opens the main menu
A->B
To transfer selected TV program from 1st to 2nd tuner (e.g. for
recording and watching another programme on the 1st tuner)
A/B
To switch between tuner 1 and tuner 2. Show running
program on TV SCART output from VCR SCART / 2nd tuner.
(disables all other buttons when this mode is active)
INFO
Shows information of the current channel
P+ / PPage up and down in menu list
EXIT
Exits from the menu or sub-menu and cancels the progressing
function if applicable
CHANNEL pq
Menu Off: Change the current program to the previous/next
program.
Menu On: Moves the cursor up/down.
tu
Menu Off: Increases/decreases the volume level.
Menu On: Change the setting values in specific Menu item
V+ / VUse to increase or decrease the receiver volume level.
OK
Activates the highlighted menu item. Displays a channel list
according to TV /Radio Mode
TEXT
Shows current service’s Teletext on OSD (On Screen Display)
SUB
Show list of subtitled languages current channel is supporting
RCL
Switches back to previous channel
FAV
Toggle Favourite mode ON / OFF
TV/R
Toggle between TV or RADIO mode
PAUSE
AUDIO
7
English
PART 1 • English
PART 1 • English
EPG
Shows the EPG (Electronic Program Guide) during No-menu state only
0~9
Channel selection
MOSAIC
Show pictures up to 9 channels on the screen( depends on Broadcaster support)
AV
Toggle between TV and AV mode
4.0 FIRST TIME INSTALLATION
Make sure your terrestrial receiver is connected correctly to your TV and terrestrial antenna and the
signal quality is good enough. Confirm the power plug of the receiver is plugged into the wall outlet. Turn
on the receiver.
It is recommended to perform the first time installation following the Installation Wizard step by
step. This will help you to easily achieve system configuration and channel installation. If you are a
professional installer then you can skip the wizard by pressing EXIT button and set-up the channels using
the Channel Search menu.
1. You are asked to Select a Language out of the list.
Press UP/DOWN to choose your language, press OK to confirm.
2. The Preference Menu will appear.
Please select your Country, Antenna Power mode and Channel numbering. Press UP/DOWN to
select the items, press RIGHT/LEFT to change the value of the item. If you choose BACK, it
will go back to the previous menu screen. Press OK to confirm.
3, You enter the Adjust antenna menu.
Press LEFT/ RIGHT to select Channel No, adjust your antenna direction and position (if
necessary) to get maximum levels on the signal level and quality indicators. You can check
with your dealer on which channels digital terrestrial broadcast is available at your location.
Move cursor to Scan, press OK to confirm, The Automatic Search screen will appear. On
completing the search, the receiver will save services information automatically and exit to
normal play state.
8
PART 1 • English
5.0 MAIN MENU
English
All the important settings and features of your receiver can be operated in Main Menu. With Menu
off, press MENU key. The MAIN MENU screen will appear. It consists of five sub-menus: "Channel
Organiser", "Channel Search", "Installation", "Timer" and "Game".
5.1 Channel Organiser
In MAIN MENU screen, press UP/DOWN to move the cursor to Channel Organiser, and press OK to
enter the Channel Organiser menu.
The Channel Organiser menu consists of three sub-menus: “Edit TV Channel”, “Edit Radio Channel”
and “Sort”.
5.1.1 Edit TV channel
In this menu, you can set the favourite channels, change the order of the channels and delete channels.
Press UP/DOWN keys to point the focus of the menu to the channel of your selection. Press LEFT/
RIGHT keys to point the focus of the menu to the column with the function, which you want to apply to
the selected channel. When the focus is on column “Favour”, press OK to add the selected channel to the
Favourite list.
When the focus is on column “Move”, press OK to confirm channel selection. Using UP/DOWN moves
the channel to the new location and press OK to confirm. Repeat this for every channel you want
to move.
When the focus is on column “Del”, press OK to mark the channel to be deleted from the list. To apply
changes, press EXIT and confirm channel deletion.
5.1.2 Edit Radio Channels
This menu is similar to 5.1.1 “Edit TV Channels” description.
5.1.3 Sort
You can sort the order of the channel list by Channel Name, LCN (Logical Channel Number) or
Channel Number.
9
PART 1 • English
5.2 Channel Search
There are 2 items in the Channel Search menu: Automatic Search and Manual Search
5.2.1 Automatic Search
Press OK over the Automatic Search.
The warning message “Do you want to start Automatic Search?” will appear. Press LEFT/RIGHT to move
the cursor and OK to continue. The message “Please press LEFT/RIGHT to choose whether to erase your
previous channel list.” will appear. If you want to cancel channel search press the EXIT button.
On completing the search, the receiver will save automatically the services information and exit to
normal play state.
5.2.2 Manual Search
Press OK over the Manual Search, the Manual Search screen will appear.
Press LEFT/RIGHT to choose channel No. or press numerical buttons to input channel number. Check
indicators of the signal level and quality to make sure the values are entered correctly. Press UP/DOWN
to move cursor to Search and press OK to search current channel. If no service is installed, there will be
the warning “No Signal”. Press any key to return.
Tips
Different countries have different VHF/UHF frequency plans. It is important to select
the proper region.
5.3 Installation
5.3.1 System Setting
In this menu, you can configure the system settings Language, TV Settings, Country, Channel Numbering,
Antenna Power, Time Settings, and Factory Default.
5.3.1.1 Language
You can change the language of the OSD and Audio.
Press UP/DOWN to select the OSD Language or Audio language.
Press OK/RIGHT to enter the language list and Press UP/DOWN to select the language. Press OK
to confirm.
5.3.1.2 TV Settings
You can set TV Standard, TV Format and Video Output.
n TV Standard
Press OK/RIGHT to select PAL or NTSC and OK to confirm. If you don’t know which standard
your TV has, please select AUTO.
n TV Format
Press OK/RIGHT to select 4:3, 4:3 Full or 16:9, and OK to confirm.
n Video Output
Press OK/RIGHT to select CVBS, RGB or S-VIDEO, and OK to confirm
10
PART 1 • English
5.3.1.3 Country
Press OK/RIGHT to select your country, press OK to confirm. If your country is not in the list, select
Other. It will apply the most common frequency plan for European countries.
English
5.3.1.4 Channel Numbering
Here you can set the channel list by different number format: Appearing order or Operator defined.
5.3.1.5 Antenna Power
Press OK/RIGHT to select turn OFF or ON the antenna power, press OK to confirm. Before setting
the Antenna Power to ON: make sure your antenna is ACTIVE, requires power 5 V DC and it’s power
consumption is not more then 100 mA.
5.3.1.6 Time Settings
If a broadcaster provides GMT, you can set the time using GMT, or set time by yourself.
n If the GMT usage is ON then the Current time is set automatically or you can set the time
zone. If your broadcaster provides the correct time offset then your receiver will change from
summertime to wintertime automatically.
n If you set GMT Usage to OFF, Set Date and Set Time item are displayed. To set the time value
manually, move the cursor to the time item and use the numeric buttons on the remote control.
5.3.1.7 Factory Default
Select Factory default and press OK. Select YES and for the warning “Do you want to set factory default?”
press OK, then the receiver will return to its factory default state, and all user data will be deleted.
5.3.2 Personal Style
In this menu, you can set the Menu Colour, Transparency Level, Border Pattern.
Press UP/DOWN to select the item, and Press LEFT/RIGHT to set the value and OK to confirm.
11
PART 1 • English
5.3.3 Parental Control
In this menu, you can set Channel Lock status (ON or OFF), the Menu Lock status, Parental Setting and
change the PIN Code.
The default PIN code is 0000.
5.3.3.1 Channel Lock
Set the system Channel Lock to ON or OFF. If the channel lock is ON, the parental PIN code has to be
entered correctly before watching the locked channel.
5.3.3.2 Menu Lock
Press YES or NO, whether you want to lock the Menu or not and press OK to confirm. If the menu lock is
on, you need to enter your PIN for operations such as search program and set factory default.
5.3.3.3 Parental Setting
Set some programs to lock status. If a program is locked, the parental PIN code has to be entered
correctly before watching the locked program. Use UP/DOWN keys to select the channel you want to
lock and press OK to confirm.
5.3.3.4 Change PIN
PIN is Personal Identification Number. To modify the password, you need to enter the current PIN,
a new 4 digit password and once again the new one for confirmation; the system password will be
changed then.
5.3.4 System Information.
Displays the software version information. Press OK/EXIT keys to return.
5.3.5 Update through PC to STB
1. Connect Computer to receiver (receiver must be power off) with a 9-pin cross cable
(two females)
2. Download the specially STBload tool for SRT 5220 from www.strong.tv website.
3. Read the instructions how to load new software it to your receiver.
NOTE: INCORRECT OPERATION MAY CAUSE UNREPAIRABLE DAMAGE TO THE RECEIVER.
1. Do NEVER use HyperTerminal to download software.
2. DO NOT POWER OFF THE RECEIVER DURING THE PROCESS OF DOWNLOADING. Wait
until “Burn OK” is shown.
3. DO NOT PLUG IN OR UNPLUG THE RS232 INTERFACE WHEN RECEIVER IS
POWERED ON.
12
PART 1 • English
Timer functions control only the VCR SCART output/ 2nd tuner. The TV SCART output/ 1st tuner is
“Free” to use during Timer is running.
Timer starts 2nd tuner while 1st tuner is in Stand-by mode.
Use UP/DOWN buttons to select a timer. Press LEFT/RIGHT to activate/switch off current timer. Press
OK to enter selected timer settings.
You can select from the following functions:
“Power On”:
The 2nd tuner powers on at the designated date and time. (no indication on front panel,
it keeps in standby mode)
“Time interval”: The 2nd tuner switches on at the designated date and time, displays the channel and
then switches off at the designated date and time (The value set at the end time).
“Power Off”:
The 2nd tuner powers off at the designated date and time.
Cycle:
You can set the cycle of the action designated in the timer mode (one time, Daily or Weekly).
Start Date:
You can set the start date of the timer action.
Start Time:
You can set the start time of the timer action.
End Time:
You can set the end time of the channel view when the Timer mode is on Time Interval.
Channel Type:
select between TV and Radio.
Channel Name: Press Right button to display channel list and using navigation buttons to select
channel to be shown when the 2nd tuner will power on by timer.
5.5 Game
The receiver has a calendar and three games (Mine, Tetris and Gomoku). Select a game and press OK
for playing.
5.5.1 Mine
UP / DOWN / LEFT / RIGHT button: Move the cursor.
MENU button: To mark the mine.
5.5.2 Tetris
LEFT / RIGHT: Move block to left or right direction.
DOWN: drop block.
UP: Rotate block.
5.5.3 Gomoku
UP / DOWN / LEFT / RIGHT: Move the cursor.
OK: Place the gobang.
5.5.4 Calendar
UP / DOWN: +/- months.
LEFT / RIGHT: +/- years the range from 1900 to 2100.
13
English
5.4 Timer
PART 1 • English
6.0 OTHER OPERATIONS
6.1 Mosaic
In no-menu state, press MOSAIC button. Screen will be divided into nine pictures.
n Press UP / DOWN/ LEFT / RIGHT keys to choose one of current programs
n Press P+ / P- keys to view another nine programs
n Press OK key to return to normal play state and play the selected program
n Press EXIT key to return normal play state and change nothing
6.2 EPG
EPG (Electronic Program Guide) is transmitted by broadcasters to display information about
program content.
In no-menu state, press EPG, EPG Menu will appear:
Press UP / DOWN to choose channel. Press RIGHT to enter EPG schedules of current channel.
1. In EPG schedules menu:
Press UP / DOWN keys to choose schedule items. Press P+ / P- into next / previous day
schedules. Press LEFT/EXIT return to EPG Menu. Press OK/RIGHT to show the details of
this item.
2. In EPG schedule details:
Press P+ / P- into next / previous page. Press LEFT/EXIT return to EPG schedule Menu. You
can set up the event timer by pressing OK in EPG schedule details or EPG schedule screen.
3. To set up an event timer:
Press UP/DOWN to move the cursor to the event for which you want to add a timer. Press
OK to add a timer. To quit event timer setup, press EXIT.
6.3 Teletext
In no-menu state, press TEXT. Press UP / DOWN to move up or down from the displayed page number.
Press Numeric keys to input page directly. If the current program has no Teletext, you’ll see the message
“Teletext no data – Press any key to exit”.
6.4 Subtitles
In no-menu state, press SUB. Press LEFT/RIGHT to select between teletext and dvb subtitles. Use UP/
DOWN to select subtitles language. Confirm your selection with OK button.
6.5 Information
When you press INFO key twice in the no-menu state, the screen will show you current
channel information.
14
PART 1 • English
A.1 TROUBLESHOOTING
Symptom
English
Before requesting service, please check the table for a possible cause of the problem. Some simple
checks or minor adjustments may restore proper operation. The most common problems are related
to cable connections, please disconnect and connect all cables again. If none of the below indicated
remedies solve the problem, consult your vendor.
Remedy
Installation
Decoder does not
find channels
If you are using a directional aerial, make sure it is directed towards a digital
TV transmitter and positioned correctly.
Make sure it is possible to receive digital terrestrial signal in your area.
It is advisable to use a standard outdoor aerial, which normally have better
specifications than an indoor one.
Check the cable of the aerial.
If you cannot solve the problem easily have your aerial and installation
tested by a professional.
General
Standby indicator on
front panel does not
light up
Check if power is available at the wall socket. Check if the SCART cable
and antenna cable are correctly connected and the receiver is switched on.
Disconnect these cables, and reconnect them to ensure they are in place
Standby indicator on
front panel is red
Your receiver is in standby, press the power button on front panel or your
remote control
Remote control fails to
operate receiver
Check the batteries in your remote control. Make sure your receiver is in
the operate mode. Make sure you are pointing your remote control at the
receiver’s front panel
Make sure there is no direct sunlight from behind the receiver.
There may be a temporary transmission error, or your receiver has lost
some of its software settings. Switch off your receiver at the power source
and switch it on again after a few seconds.
No program broadcast
recorded on VCR
Check the connection between receiver and VCR. Please make sure your
VCR is set properly
No program /broadcast
on VCR
Check the connection on rear of receiver between LOOP OUT and LOOP
IN. These must be connected with a short COAX cable
No program /broadcast
on VCR
Press the A > B button on your remote control to start running program
from TV SCART
Electronic Program Guide (EPG)
EPG empty
The selected program does not support EPG. The local time is incorrect. Set
the correct local time
15
PART 1 • English
Symptom
Remedy
Audio & video issues
TV Picture changes
colour
This may happen after a power-cut or disconnection from the power source.
Your receiver has lost some software settings. Switch off your receiver and
on again after a few seconds. If the problem persists, contact your vendor.
Blocks in the TV picture
The signal is too weak or defective due to e.g. bad weather conditions. Try to
adjust your aerial position or wait for the signal to be re-established.
A.2 SPECIFICATIONS
Demodulator
Demodulator:
Transmission mode:
COFDM; 16 QAM/64 QAM
2K~8K
Video Decoder
Profile level:
Video resolution:
Decoding & Video Out:
Aspect ratio:
MPEG-2 MP@ML
720 x 576 pixels (PAL), 720 x 480 (NTSC)
PAL & NTSC
4:3, 4:3 FULL, 16:9
Audio Decoder
MPEG MusiCam Layer I & II
Sampling rate:
Audio mode:
32, 44.1, 48 kHz
Stereo, Joint Stereo, Dual Mono
Tuner
Front End:
Input frequency range:
Loop through frequency range:
Input signal level:
DVB-T, UHF & VHF Tuner
174 ~ 470 MHz (VHF) and 470 ~ 862 MHz (UHF)
47~862 MHz
-82 ~-20 dBm
Memory and System
Flash memory:
SDRAM:
8 Mbits
64 Mbits
16
PART 1 • English
General Data
Supply Voltage:
Power Consumption (max):
Standby Power Consumption:
Operating Temperature:
Storage Temperature:
Operating Humidity Range:
Net-weight:
Size (W x D x H) in mm:
IEC Female
IEC Male
supports RGB, CVBS, Audio Left/Right Output with Volume Control
supports CVBS, Audio Left/Right Output
English
Connectors
ANT input:
LOOP IN
LOOP OUT
TO TV:
TV SCART:
VCR SCART:
S-VIDEO output (1nd tuner)
Coax S/PDIF (Black)
Data Interface- serial port:
RS-232, 9-Pin D-Sub Male type
90 ~ 240 V AC (SMPS), 50/60 Hz
20 W
< 10 W
0 ~ 40 °C
-30 ~ 80 °C
10 ~ 85%, RH, Non-condensing
1.53 kg
280 x 235 x 60
A.3 GLOSSARY OF TERMS
DVB-T
MPEG
Network
PAL
PID
RS-232
Digital Video Broadcasting Terrestrial – Digital TV via antenna (same as DTT- Digital
Terrestrial Television).
Moving Picture Experts Group is founded by the ISO. MPEG is a standard method for
digital transmission of video and audio.
Also known as bouquet is a set of channels offered by a single broadcaster.
Phase Alternate Line colour system adopted by European broadcasters.
The transmitted packages have identifiers (PID) telling the receiver what to do with the
received information. Receivers normally use four types of PID, these are V-PID (video
PID), A-PID (audio PID), P-PID (Program PID) and data PID (EPG information).
Serial data port.
17
PART 1 • English
18