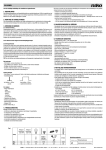
1
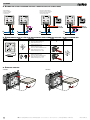
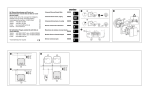
310-0280X
Read the complete manual before attempting installation and activating the system.
To connect the load and the necessary power supply voltage, see the wiring diagrams below ➥➊.
To regulate the minimum level in cases of incorrect light output, see ➥➋. For installation, see ➥➌.
The dimmer is equipped with thermal protection. If the temperature climbs too high as a result of overloading,
the dimmer switches off. If this happens:
-check whether the load is too high
-check whether mixed loads are being used
-check whether the minimum dimming level is set too low (for operation with memory)
-check the ambient temperature and positioning conditions. Depending on these factors, the maximum connection
output must be reduced as follows:
-10% per 5°C in excess of the ambient temperature of 35°C
-25% for flush-mounting in an insulated wall (gypsum, wood) or when 2 dimmers are positioned next to one
another
3. OPERATION AND USE
5. USAGE WARNINGS
1. DESCRIPTION
This flush-mounting push button dimmer with reverse phase control has a maximum load of 100W and is suitable
for dimming Philips© LED fixtures (see 3.4) and dimmable economy lamps. Remote control via N.O. contacts.
Maximum of 30 non-illuminated push buttons in parallel.
2. INSTALLATION AND CONNECTIONS
3.1. Normal operation
Remote control unit via N.O. contacts (not illuminated). Press briefly to switch on and off. Hold down to dim up
and down. When holding down, the dimming direction is switched after each interruption (dimming up -> stop
-> dimming down-> stop -> dimming up -> etc.). Once the maximum intensity has been reached, the dimming level remains unchanged. The last dimming level reached before the dimmer is switched off is saved in
a memory (3.3). Up to 30 N.O. contacts (170 00000) can be connected in parallel (max. distance 100 m). The
push buttons are not galvanically isolated.
3.2 The dimmer works according to the reverse phase control principle.
3.3 Memory function
The dimmer can be used with or without memory. The standard setting of the dimmer is without memory function.
To change this setting, dim up to the maximum light level and then hold the control button in for 10 sec. After 10
sec., the light dims from 100% to a lower light level to indicate that this function has been switched on. After this
change in light intensity, immediately release the push button. Repeat the procedure to deactivate the memory
function. This function, and the last set light level, is stored in a non-volatile memory; i.e. they will not be lost in
the event of a power failure. With the memory function, the dimmer switches on for the first time at a light level
chosen by the manufacturer. Thereafter the dimmer switches on at the last set value.
TIP! When using dimmable economy lamps, we recommend switching off the memory function.
With memory
-Press briefly = on at previous level / off
-Hold down when off = the dimmer dims up from the minimum light level
-When dimming up, the dimmer stops at the maximum.
-When dimming down, the dimmer stops for 2 sec. at the minimum and then dims back up.
-A renewed (long) press reverses the dimming direction.
Without memory
-Press briefly = on at maximum / off . Apart from that, the control is analogous to the control with memory.
-Push button control:
brief press < 400 ms;
= on / off
holding down > 400 ms
= dimming up / dimming down
3.4 Lamps
-Philips© LED fixtures
- Ledino
- Roomstylers
- Arcitone
- Smartspot
- Lirio by Philips
-Topselection of Massive
-Dimmable economy lamps CFLi
-Electronic transformers
-Halogen 230 V
See table below (Fig. 1)
-Control signals that are sent via the mains can interfere with the operation of the dimmer. (This is not a defect.)
-This dimmer produces a limited amount of heat under normal operating conditions. Allow for sufficient heat
dissipation; do not cover the dimmer with insulating material.
-Reaction of the device after a power failure: return to the previous setting with memory/without memory.
-The dimmer is never electrically separated from the mains due to the operation of the control. In other words, all
parts remain connected to the power even if the load (e.g., the light) is “off”.
-This appliance is not suitable for controlling motors and ferromagnetic mains transformers.
6. TECHNICAL DATA
-Power supply voltage: 230V~ ± 10%, frequency 50Hz
-Mounting: This dimmer fits in a standard flush-mounting box with a min. depth of 40mm
-Weight: ± 75g
-Ambient temperature (Ta): 35°C
-Designed for use in an environment with non-condensing humidity
-No-load power consumption: ± 0.6W (unloaded)
-Maximum wire diameter per connection terminal: 2.5 mm²
-Power supply and load: 2 x 1.5 mm2 or 1 x 2.5 mm2
-Push button input: 2 x 1.5 mm2 or 1 x 2.5 mm2
-Minimum load: 2W
-Maximum load: 100W
-No voltage drop over the dimmer
-Protections: thermal overload protection; short circuit protection
-Push button controls: 230 V, 5 mA (not galvanically isolated)
-Max. distance to the last push button: 100m
-Complies with the EN60669-2-1 standards
7. LEGAL WARNINGS
-The installation has to be carried out by a qualified person and in compliance with the statutory regulations.
-This user manual has to be handed over to the user. It has to be included in the electrical installation file
and has to be passed on to any new owners. Additional copies are available on the Niko website or via the
support service.
-During installation, the following has to be taken into account (not limited to list below):
-The statutory laws, standards and regulations;
-The state of the art technique at the moment of installation;
-This user manual, which must be read within the scope of each specific installation, only states general
regulations;
-The rules of proper workmanship
-In case of questions, you can consult Niko’s support service or contact a registered control organisation.
Support Belgium:
Support UK:
+32 3 778 90 80
+44 1525877707
website : http://www.niko.be
http://www.nikouk.com
e-mail: [email protected]
[email protected]
In case of a defect, you can return your product to a registered Niko wholesaler, together with a clear description of your complaint (Conditions of use, stated defect…).
8. GUARANTEE PROVISIONS
-Period of guarantee: 2 years from date of delivery. The delivery date is the invoice date of purchase of the
product by the consumer. If there is no invoice, the date of production applies.
-The consumer is obliged to inform Niko in writing about the defect, within two months after stating the
defect.
-In case of a failure to conform, the consumer has the right to a repair or replacement (decided by Niko) free of
charge.
-Niko cannot be held liable for a defect or damage as a result of an incorrect installation, improper or careless
use or wrong usage or transformation of the goods.
-The compulsory regulations of the national legislation concerning the sales of consumer goods and the protection
of the consumers in the countries where Niko sells, directly or via sister or daughter companies, chain stores,
distributors, agents or permanent sales representatives, take priority over the rules and regulations mentioned
above.
4. TROUBLESHOOTING
Possible causes of dimmer malfunction:
-the dimmer is switched off; the load is not dimmable in reverse phase control
-the mains voltage is not connected
-the load is not connected or is too high
-the lamp or the cable used is defective
-the connected load is not suitable (e.g., a ferromagnetic transformer)
-the thermal protection has been activated
-a combination of the above causes
Fig.1
Philips©
LED fixture
type 30W
Philips©
LED fixture
type 7,5W
Lamp
HAL.230V
HAL.230V
HAL.12V
dimmable
Key to symbols
Metal filament lamps
Max.
3 units
10 units
100W
100W
100W
100W
Min.
1 unit
1 unit
2W
2W
2W
2W
nv Niko sa
Electronic transformers
Industriepark West 40, BE-9100 Sint-Niklaas, Belgium — tel. +32 3 778 90 00 — fax +32 3 777 71 20 — e-mail: [email protected] — www.niko.be
PM310-0280XR10263
310-0280X
➥ ➊ Dimmer aansluiten/ Raccordement variateur / Dimmer anschlieSSen / Connect dimmer
1 bedieningspunt
1 point de commande
1 Bedienungspunkt
1 control point
2...100W
Meerdere bedieningspunten
Plusieurs points de commande
Mehrere Bedienungspunkte
Several control points
230V~50Hz
N N L L
2...100W
230V~50Hz
N N L L
ε
N N L L
ε
0
230V~50Hz
2...100W
2...100W
N N L L
ε
0
230V~50Hz
ε
170-0000X
170-0000X
max. 30
x 170-00000
max. 30
x 170-00000
12V
12V
N
L 230V~
N
L 230V~
N
L 230V~
N
L 230V~
➥ ➋ Minimumniveau instellen / Réglage du niveau minimum / Mindestdimmniveau einstellen / Setting the minimum level
ACTION
CHECK
CONCLUSION
Dim to MINIMUM
Min level
310-0280X
MIN
MAX
OR
ACTION
√
Minimum dimniveau OK
Niveau de variation minimum OK
Mindestdimmniveau ist OK
Minimum dimming level OK
X
Minimum dimniveau te hoog
Niveau de variation minimum trop élevé
Mindestdimmniveau ist zu hoch
Minimum dimming level too high
X
Minimum dimniveau te laag
Niveau de variation minimum trop bas
Mindestdimmniveau ist zu niedrig
Minimum dimming level too low
CHECK
/
➥ ➌ Montage / Mounting
310-02800
310-02801
Min
l
leve
-02
310
80X
nv Niko sa
Min
leve
l
80X
-02
310
Industriepark West 40, BE-9100 Sint-Niklaas, Belgium — tel. +32 3 778 90 00 — fax +32 3 777 71 20 — e-mail: [email protected] — www.niko.be
PM310-0280XR10263