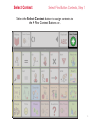
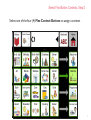
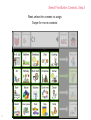
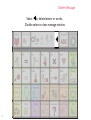
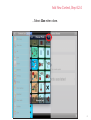
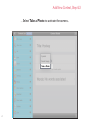
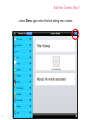
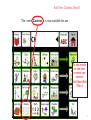
1
Tobii Sono Flex User’s Manual
User’s Manual
For iPad
Celebrating Communication
Tobii Sono Flex User’s Manual
Tobii Sono Flex User’s Manual
for iPad
Manual Version 1.0.1
11/2011
All rights reserved.
© Tobii Technology AB
The information contained in this document
is proprietary to Tobii Technology. Any
reproduction in part or whole without prior
written authorization by Tobii Technology is
prohibited.
Products that are referred to in this document
may be either trademarks and/or registered
trademarks of the respective owners. The
publisher and the author make no claim to these
trademarks.
While every precaution has been taken in the
preparation of this document, the publisher and
the author assume no responsibility for errors
or omissions, or for damages resulting from the
use of information contained in this document or
from the use of programs and source code that
may accompany it. In no event shall the publisher
and the author be liable for any loss of profit or
any other commercial damage caused or alleged
to have been caused directly or indirectly by this
document.
Content subject to change without notice.
Tobii_manual_SonoFlex_iPad_V1_0_1_01112011_UsEng
Contents
Introduction3
Overview4
Communicate10
Select Context
15
Common Buttons
19
History27
Add New/Edit Word
32
Delete Word
56
Change Word Order
62
Add New Context
68
Make Context Visible
88
Delete Context
91
Settings94
Lite Version Restrictions 106
Introduction
Welcome to Sono Flex for iPad!
In Sono Flex for iPad you can use the
application with two different start pages.
Common Vocabulary Home Page
or
Context Based Home Page
From the Context Based Home Page: only
contexts are available.
The Main Vocabulary Page is the default start
page, but you can switch between the different
start pages in Settings
(see Settings).
Giving the care giver the ability to choose
The manual explains in detail the default
between alternative start pages, one with less
Main Vocabulary Page mode as it offers more
and one with more complexity, allows the
complexity, but the individual button functions program to grow along with the user’s ability.
of the Context Based Home Page mode are
the same.
Starting an early user on the Context
Based Home Page allows for a smooth
The difference between the two start pages transition between situational, context based,
is in the amount that is accessible by the end
communication into the more categorized
user from the start page.
versatile “categorized core vocabulary with
additional contexts available” communication
From the Common Vocabulary Home
of the Common Vocabulary Home Page.
Page: Categories, Core Words and 4 Flex
buttons with contexts are available.
This follows the regular learning curve of
preliterate AAC users, and assists with growth
and learning.
3
Overview
Common Vocabulary Home Page
Fitzgerald Key (FK) Categories
4
Common Vocabulary Home Page
Four (4) Flex Context buttons
Changeable by: Select Context button
5
Common Vocabulary Home Page
Core Words
6
Context Based Home Page
Context Home Page with access to the Common Vocabulary Page
7
Common Buttons
History, Quick Phrases, Keyboard and Home
8
Message Window
Grammar button,
Message Window and
Delete button.
9
Communicate
Create Messages, Step 1
Select words from Core Words...
1
2
10
3
Create Messages, Step 2
...select words from the Categories Pages (e.g. Verbs)...
4
11
Create Messages, Step 3
...and/or select words from the
Context pages (e.g. Context Birthday)...
5
12
Create Messages, Step 4
...to compile the message to communicate.
Here, “today” added from Category “Time”.
6
13
Create Message, Step 5
Select the Message Window to speak the message.
7
14
Select Context
Select Flex Button Contexts, Step 1
Select the Select Context button to assign contexts to
the 4 Flex Context Buttons or...
15
From within Context Based Layout
Long-hold on the Home button and select the Select Context...
16
Select Flex Button Contexts, Step 2
Select one of the four (4) Flex Context Buttons to assign a context.
17
Select Flex Button Contexts, Step 3
Next, select the context to assign.
Swipe for more contexts.
18
Common Buttons
Speak a Message
Select the Message Window to speak the message.
19
Delete Message
Select to delete letters or words...
Double select to clear message window.
20
Grammar, Step 1
Select
to apply correct grammar form...
21
Grammar, Step 2
... next select the correct grammar form.
“NOT” allows you to choose negatives and “HOME” to cancel.
22
Quick Phrases
Select Quick Phrases to choose a phrase that will be spoken
immediately upon selection.
23
Home Button
Select Home to return to the Start page.
24
Keyboard
Alphabetical
Select Keyboard to enable the keyboard to type a word or message...
25
Keyboard Numeric
... and swipe to the next keyboard view to type numbers.
26
History
Access History, Step 1
Select History...
The recording
of messages
to History
can be turned
“On/Off” in
Settings.
27
Access History, Step 2
...to select an earlier used phrase.
There are three different time frames to choose from.
28
Use History
Select the phrase to speak.
See Settings for optional output behavior.
29
Delete History Items, Step 1
Select
30
to choose the history item to delete...
Delete History Items, Step 2
Select Delete to delete the history item or
to cancel.
31
Add New/Edit Word
Edit Word, Step 1A
Long-hold a button to access Edit mode.
Select Edit “xxx”...
32
Add New Word, Step 1B
Long-hold on an empty button to add a new word (e.g. Stone).
Select Add word...
33
Add New/Edit Word, Step 2
...select Message and/or Label to edit the message and/or label for this button...
34
Add New/Edit Word, Step 3
...type the new message using the keyboard.
Select
when finished.
35
Add New/Edit Word, Step 4
... Select Symbol in the menu and seclect the Picture to change the symbol...
36
Add New/Edit Word, Step 5
... Select image type...
37
Add New/Edit Word, Step 6.1
... Select Symbol to search the symbol library...
38
Add New/Edit Word, Step 6.1.1
...use the keyboard to search for a new symbol.
Select
when finished typing.
If there are
symbols for
your word, they
will appear
automatically.
39
Add New/Edit Word, Step 6.1.2
... Select the symbol to represent your word.
40
Add New/Edit Word, Step 6.2
... Select Image to browse the picture library...
41
Add New/Edit Word, Step 6.2.1
... Select the Photo Album where your picture is stored...
42
Add New/Edit Word, Step 6.2.2
... Select the picture to represent your word....
43
Add New/Edit Word, Step 6.2.3
... Use one finger to Move and pinch two fingers to Scale the picture ....
44
Add New/Edit Word, Step 6.2.4
... Select Use when done.
45
Add New/Edit Word, Step 6.3
... Select Take picture to activate the camera...
46
Add New/Edit Word, Step 6.3.1
... Select the Shutter button to take the picture...
47
Add New/Edit Word, Step 6.3.2
... Use one finger to Move and pinch two fingers
to Scale the picture ....
48
Add New/Edit Word, Step 6.3.3
... Select Use when done.
49
Add New/Edit Word, Step 7
... Select Context to include
in one or multiple Context pages...
50
Add New/Edit Word, Step 8
... Select Category to select Fitzgerald Key Category from the list.
51
Add New/Edit Word, Step 9
... Select Part of Speech to select the Part of Speech the word/phrase belongs to.
52
Add New/Edit Word, Step 10
... select Done when finished editing word.
53
Add New/Edit Word, Step 13A
The edited element is ready to be used.
54
Add New/Edit Word, Step 13B
The added word (Stone) will be in the list and ready to be used.
55
Delete Word
Delete Word, Step 1
Long-hold a Context or Category button.
Select Edit “xxx”...
56
Delete Word, Step 2
Select Words...
57
Delete Word, Step 3
Select
58
to choose the word to delete...
Delete Word, Step 4
Select Delete to delete the word or
to cancel.
59
Delete Word, Step 5
The edited element is now deleted from the list.
Select Back...
60
Delete Word, Step 6
... Select Done to finish.
61
Change Word Order
Change Word Order, Step 1
Long-hold a Context or Category button.
Select Edit “xxx”...
62
Change Word Order, Step 2
Select Words...
63
Change Word Order, Step 3
Select and
64
hold
the word to move...
Change Word Order, Step 4
...drag the word to the new location.
(Note: Only movable within the group)
65
Change Word Order, Step 5
Release the button. The word is now in its new location.
Select Back...
66
Change Word Order, Step 6
... Select Done to finish.
67
Add New Context
Add New Context, Step 1
Long-hold a context button.
Select Full Context List...
68
Add New Context, Step 2
Select Add Context...
69
Add New Context, Step 3
...select Title to give the new context a title...
70
Add New Context, Step 4
...type a Title using the keyboard.
Select
when finished typing.
71
Add New Context, Step 5
... Select the Picture to change the symbol...
72
Add New Context, Step 6
... Select image type...
73
Add New Context, Step 6.1
... Select Symbol to search the symbol library...
74
Add New Context, Step 6.1.1
...use the keyboard to search for a new symbol.
Select
when finished typing.
If there are
symbols for
your word, they
will appear
automatically.
75
Add New Context, Step 6.1.2
... Select the symbol to represent your word.
76
Add New Context, Step 6.2
... Select Saved Image to browse the
picture library...
77
Add New Context, Step 6.2.1
... Select the Photo Album where your picture is stored...
78
Add New Context, Step 6.2.2
... Select the picture to represent your word....
79
Add New Context, Step 6.2.3
... Use one finger to Move and pinch two fingers to Scale the picture ....
80
Add New Context, Step 6.2.4
... Select Use when done.
81
Add New Context, Step 6.3
... Select Take a Photo to activate the camera...
82
Add New Context, Step 6.3.1
... Select the Shutter button to take the picture...
83
Add New Context, Step 6.3.2
... Use one finger to Move and pinch two fingers
to Scale the picture ....
84
Add New Context, Step 6.3.3
... Select Use when done.
85
Add New Context, Step 7
... select Done again when finished adding new context.
86
Add New Context, Step 8
The new Context
is now available for use.
To add words
to the new
context, see
section:
Add New/Edit
Word
87
Make Context Visible
Make Context Visible, Step 1
Long hold a Context button.
Select Full Context List...
88
Make Context Visible, Step 2
Select
to the toggle visibility of that context within the
Select Context pages, (Visible)
89
Make Context Visible, Step 3
Select
90
to the toggle visibility of that context within
the Select Context pages, (Invisible)
Delete Context
Delete Context, Step 1
Long hold a context button.
Select Full Context List...
91
Delete Context, Step 2
Select the context to be deleted and then select
92
....
Delete Context, Step 3
Select Delete to confirm deleting the context or Cancel to abort.
93
Settings
Access to Sono Flex Settings, Step 1
Select Settings...
94
Access to Sono Flex Settings, Step 2
In Settings, scroll down and select Sono Flex...
95
Change Voice, Step 1
To change the synthetic voice used in Sono Flex select Synthetic Voice...
96
Change Voice, Step 2
...select the voice of your choice.
97
Message Window
Toggle Clear After Speaking in Message Window On
to clear the message automatically after speaking...
98
Return to Home Page
Toggle Categories and Context On if you want to automatically be
returned to the start page after a selection...
99
Multitasking, Step 1
Select Multitasking to set behavior for Sono Flex when switching to Flex...
100
Multitasking, Step 2
... and select the behavior of your choice.
101
History View, Step 1
Select History View to set the history behavior for Sono Flex..
102
History View, Step 2
...and select the behavior of your choice.
103
Record History
Toggle Record My Messages Off
to not save spoken messages to History.
Only available
in Full version
of Sono Flex
104
Alternative Home Page
Enable start with “Context Home Page” On to start Sono Flex
on the alternative Context Based Start Page.
105
Lite Version Restrictions
Restriction 1: Spoken Messages
Every 10th time the user taps the message window
the following message is spoken before the actual,
chosen, message: “This is the free version of Sono
Flex from Tobii Technology”. After 20 messages, the
chosen message will not be spoken at all, only the
“free version” message. To reset this, and to get
20 more of your own chosen messages, you need
to fully restart Sono Flex Lite. Do so be following
these steps:
1. Tap the home button on your device to exit
Sono Flex Lite.
2. From your device home screen, double-tap
the home button on your device. The image
of the screen will rise and at the bottom you
will see a row of app icons. These are the apps
that are “running” in the background.
3. Swipe to move forward or backward between
the apps. Chances are that you will have many
more running than the four to seven that first
show themselves at the bottom.
4. Find the Sono Flex Lite app icon. Long-hold it
until all the running apps start jiggling. A small,
106
Page 1
red, delete circle will appear at the top left of
the icons.
5. Select the red circle and the Sono Flex Lite
app icon will disappear. The app is now no
longer running in the background.
6. Tap the home button on your device when
you have finished shutting things down and
the running apps will stop wiggling.
7. Tap the home button on the device again to
return to your device home screen.
8. Restart Sono Flex
Restriction 2: Limited Number of PreDefined Contexts
Only 12 out of over 50 pre-defined contexts are
available.
Restriction 3: Limited Number of Symbols
Available for Use
Only about 3,250 of the 11,000 + symbols from
the full version (used in both the main vocabulary
and the 12 included contexts) are included for use
in the Sono Flex Lite version.
Page 2
Restriction 4: Limit to Maximum Number of
Contexts
There are 12 pre-defined Contexts included in
Sono Flex Lite. In Lite you are allowed have a
maximum of 15 Contexts in total, consisting of
those that are included plus those that you might
create on your own.
From download, this means that there is room for
you to create 3 new contexts.You may also delete
(or modify in any way) the pre-defined, included
Contexts, thereby freeing up more slots for your
own Contexts; but altogether they may not add up
to more than 15.
In the full version of Sono Flex there are no
numbers restrictions, the number of available slots
for Contexts is unlimited.
Restriction 5:Turn Off History Recording
The Setting “Record My Messages On/Off” is not
available.
107
www.tobii.com
Tobii Support
SWEDEN
GERMANY
USA
JAPAN
Phone: +46 8 522 950 20
Phone: +49 69 24 75 03 4-28
Toll-Free: +1-800-793-9227
Phone: +1-781-461-8200
Phone: +81-3-5793-3316
[email protected]
[email protected]
[email protected]
[email protected]
Support hours: 8 am - 6 pm
Between July-August: 9 am - 5 pm
(Central European Time, GMT +1)
Support hours: 8 am - 6 pm
Between July-August: 9 am - 5 pm
(Central European Time, GMT +1)
Support hours: 9 am - 9 pm
(US Eastern Standard Time, GMT -6)
Support hours: 9 am - 5.30 pm
(Japan Standard Time, GMT +9)
EUROPE, MIDDLE EAST, AFRICA
Tobii Technology AB
CENTRAL EUROPE
Tobii Technology GmbH
NORWAY
Tobii Norge
ASIA
Tobii Technology, Ltd.
North America
Tobii ATI
Karlsrovägen 2D
S-182 53 Danderyd
Sweden
Niedenau 45
D-60325 Frankfurt am Main
Germany
Thormøhlens gate 55
5008 Bergen
Norway
3-4-13 Takanawa, Minato-ku
Tokyo 108-0074
Japan
333 Elm Street
Dedham, MA 02026
USA
Phone : +46 8 663 69 90
Fax: +46 8 30 14 00
Phone: +49 69 24 75 03 40
Fax: +49 69 24 75 03 429
Phone: +47 55 55 10 60
Fax: ++47 55 55 10 61
Phone: +81-3-5793-3316
Fax: +81-3-5793-3317
Toll-Free: 800-793-9227
Phone: 781-461-8200
Fax: 781-461-8213
www.tobii.com
[email protected]
www.tobii.com
[email protected]
www.tobii.com
[email protected]
www.tobiiATI.com
[email protected]
www.tobii.com
[email protected]