1
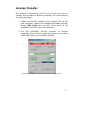
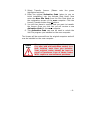
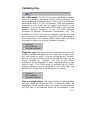
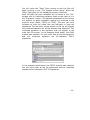
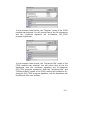
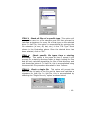
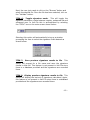
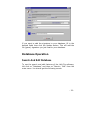
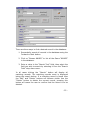
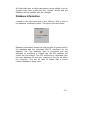
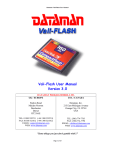
Version 3.0.1 Vali-File is designed to be user-friendly; furthermore this manual is your source for successful use and software operation. Rev: 1.0 -1- Table of Contents For quick reference to section headers please refer to the page numbers below. Introduction ................................................................. 3 System Requirements ................................................... 3 Installation................................................................... 4 Software Registration .................................................... 4 Recorded Registration Information .................................. 6 License Transfer ........................................................... 7 Software Operation ....................................................... 9 Validating Files ............................................................ 10 Multiple File Validation.................................................. 11 CDCK Mode................................................................. 16 Adding File (Game) To Database.................................... 20 Database Operation .....................................................22 Search And Edit Database............................................. 22 Database Information................................................... 25 Database Backup/Restore Operations............................. 26 -2- Introduction Thank you for purchasing Dataman Vali-File for your validation needs. Dataman Vali-File is a PC-based validator for calculating CRC-32 and SHA-1 signatures for various files. Vali-File offers many advanced features including: Support for all Windows file format types Additional Utility for reading Linux formatted disks with Windows1 Signature compatibility with all other Dataman validator products Signature compatibility with the GLI_CDCK program provided by Gaming Laboratories International, Inc. Full database features including searching and editing of all records Encrypted Database and visual CRC32 checksum – to prevent tampering Compressed Program File (.exe ) to prevent tampering • • • • • • • System Requirements Microsoft® Windows® 95/98/ME/2000/NT/XP Available CD-ROM drive for CD installation 32MB RAM Minimum 40 MB or more of free disk space. Package Contents CD-ROM containing the Vali-File software Software License Agreement User’s Manual 1 Explore2fs.exe was written by John Newbigin and distributed under the terms of the GNU General Public License. Please read the Explore2fs-readme.txt for more information. -3- Installation Installation is designed to be as easy and painless as possible. The general procedure is as follows: 1. Check to make sure that your system meets the minimum system requirements listed on the previous page. 2. Install Dataman Vali-File from the included CD or our website. License management is exactly the same regardless of the installation source. a. From the CD-ROM: Setup will automatically start when the CD is inserted, provided that auto-insert notification is enabled. If setup does not start then just run setup.exe from your CD-ROM drive. b. From the Website: http://www.dataman.com/ Download and then run the Vali-File 3.01 Full Version executable file. 3. Please register Dataman Vali-File in order to activate the software. Software Registration Please Note Please be sure to record all of your registration codes in a secure location to ensure software registration and licensing. The end user is responsible for retaining these codes at all times. Loss of these codes will require a new Vali-File software purchase. Once the software has been installed, you will need to register this product. When you run the software for the first time you will see a screen similar to the following: -4- Please note the above codes were masked out for security reasons. To register your product, simply click on the Activate button or call our Support Hot Line at (800) 328-2336. To register you will need the 8-digit Site Code and the corresponding Mid Code. Please see the green highlighted sections. You will notice that the Application Status block will display “LOCKED”. Once you receive your activation code you will be able to activate your product. Enter the activation code in the Activate code block and click Continue. Please be sure to record your registration codes (i.e. site, mid and activation codes) in a safe location. Your original codes should be kept as proof of purchase. Loss of these codes WILL require a new software purchase. Once you have entered the activation code then you have completed the registration process. -5- Personal Registration Information Original Codes Site Code: MID Code: Activation Code: Dataman Invoice # ValiFile 3.0.1 Registered On: ______________ __________________________________________________ __________________________________________________ __________________________________________________ __________________________________________________ Transferred To: Site Code: MID Code: Activation Code: Computer Name: _____________ Date: _______ __________________________________________________ __________________________________________________ __________________________________________________ Transferred To: Site Code: MID Code: Activation Code: Computer Name: _____________ Date: _______ __________________________________________________ __________________________________________________ __________________________________________________ Transferred To: Site Code: MID Code: Activation Code: Computer Name: _____________ Date: _______ __________________________________________________ __________________________________________________ __________________________________________________ Transferred To: Site Code: MID Code: Activation Code: Computer Name: _____________ Date: _______ __________________________________________________ __________________________________________________ __________________________________________________ Transferred To: Site Code: MID Code: Activation Code: Computer Name: _____________ Date: _______ __________________________________________________ __________________________________________________ __________________________________________________ Transferred To: Site Code: MID Code: Activation Code: Computer Name: _____________ Date: _______ __________________________________________________ __________________________________________________ __________________________________________________ Additional Notes: -6- License Transfer This product is licensed for one PC only. If you ever need to transfer this program to another computer you must perform the following steps: 1. Install the Vali-File software (from original CD) on the new computer. Launch the software and obtain the new 8-digit Site Code from the Site Code block of the registration screen of the new computer. 2. Run the LICENSED Vali-File program on original computer. Enter into the registration screen by pressing CAPS LOCK when you first start Vali-File. Please note the above codes were masked out for security reasons. -7- 3. Select Transfer license. (Please note the green highlighted sections) 4. Enter the original Activation Code (given to you on initial installation) into the Activate code block. Now enter the New Site Code from the Site Code block on the registration screen of the new computer. Click the License Transfer button then Continue. 5. You will then have to confirm that you want to transfer the license. Once you click Yes you will receive a new Activation Code for the new computer. 6. This Activation Code can now be used to unlock the Vali-File program you installed on the new computer. The license will be removed from the original computer and will now be installed on the new computer. Please Note Please record your registration codes (i.e. site, mid and activation codes) in a safe location each time you transfer. Your original codes should be kept as proof of purchase. Loss of these codes WILL require a new software purchase. -8- Software Operation Once the registration process has been completed and the program is unlocked, the following screen should appear. NOTE: For optimum viewing, your screen resolution should be set to a minimum of 800 x 600 DPI. Viewing this program in a lower resolution may result in some screens being clipped or not fully viewable. You can check your screen resolution by right clicking your mouse on your “Windows Desktop”, then left clicking on “Properties”, and then selecting the “Settings” tab. -9- Validating Files GLI_CDCK Mode: The Vali-File program can produce several types of signatures depending which mode is selected. The program defaults to Dataman mode (CDCK off). This mode will generate an SHA-1 or CRC-32 signature. Only the signatures produced in this mode can be added and stored in the database. The user can also select CDCK mode. This mode will produce identical signatures to the GLI_CDCK program provided by Gaming Laboratories International, Inc.. The signatures in CDCK mode are for reference purposes only and are not stored in the database. This option will be discussed in more detail later in this manual. Within each mode, you have the option to select one of three validation methods: Single file only: This option should be selected when the user wants to validate the signature of a single file. In this mode, the user needs to select a file by clicking on the “Browse” button. The user can then select the desired file, then click on “Open” followed by “Validate”. The CRC-32 and SHA-1 signatures will be displayed in their respective fields for the user to view. If the CDCK mode is selected, the GLI_CDCK program signature will be displayed in the CDCK field. The default CRC-32 and SHA-1 signatures will be omitted. Files in a single folder: This option should be selected when the user wants to validate all files in a particular folder. All subfolders will be ignored when this option is selected thus only the files in the selected folder will be validated. If the - 10 - CDCK mode is selected, the GLI_CDCK program signature will be displayed in the CDCK field. The default CRC-32 and SHA-1 signatures will be omitted. Files in folder and subfolders: This option should be selected when the user wants to validate all files in a given folder including subfolders, or when the user wants to validate the entire drive. If the CDCK mode is selected, the GLI_CDCK program signature will be displayed in the CDCK field. The default CRC-32 and SHA-1 signatures will be omitted. Multiple File Validation When the user selects one of the multiple file options (“Files in a single folder” or “Files in folder and subfolders”), the following screen will be displayed. - 11 - The user can then click the “Select” button to select the desired folder and files that need to be validated. Please notice that the expanded portion of the screen will ONLY appear when one of the multiple file options has been selected. When the user clicks the “Select” button, the following screen will be displayed. The user can then select the desired “Drive” and “Folder” (from the tree displayed on the left side of the screen). Once the drive and folder have been selected, the user can then select the desired “File type”. The default setting for this field is an “*” (which represents all files in the selected folder). Any desired file extension can be entered in this field (such as exe, dll, bat, bak, etc.). If the files you have selected use long file names (greater then 8 characters followed by a 3 or more character extension), then you must check the box marked “Use DOS (8.3) filenames”. Once the user has finished selecting the file type, they can then click the “OK” button. The “Select Folder and File Type” screen will then disappear and the full path name and selected file types will appear in the appropriate fields of the main Vali-File screen as shown below. - 12 - The next step is to select the validation method you wish to use. If you select “SHA1”, all selected files will be validated using the SHA-1 algorithm. If you select “CRC32”, all selected files will be validated using the CRC-32 algorithm. If you select “CDCK”, the following screen will appear. You will be prompted to select one of three signature types. These selections correspond to the options available in the GLI_CDCK program and will be discussed later in this manual. Once the desired validation method has been selected, the user is ready to validate. To begin the validation process, click the “Validate” button. - 13 - You will notice the “Busy” light coming on and the files will begin scrolling in the “File” window shown above. When the “Busy” light goes off, the validation process is finished. Each file that has been validated will be listed in the “File” window with it’s matching signature listed to the right of it in the “Signature” column. The signature displayed in this column will depend on which validation method you selected in the previous steps (SHA1, CRC32 or CDCK). The user can scroll up/down to view the listed files and left/right to view the signatures. The last entry at the bottom of the list will display the combined signature for all the selected files displayed. This combined signature is the signature that will appear in the main Vali-File screen. In the example listed below, the SHA1 method was selected. You will notice that all the file signatures and the combined signature are 40-character SHA-1 signatures. In the example listed below, the CRC32 method was selected. You will notice that all the file signatures and the combined signature are 8-character CRC-32 signatures. - 14 - In the example listed below, the “Regular” mode of the CDCK method was selected. You will notice that all the file signatures and the combined signature are 4-character GLI_CDCK program signatures. In the example listed below, the “Enhanced Old” mode of the CDCK method was selected. You will notice that all the file signatures and the combined signature are 40-character GLI_CDCK program signatures. Both the “enhanced Old” and “Enhanced New” modes of the CDCK method will produce a 40character GLI_CDCK program signature, but the signatures will be different from one another. - 15 - CDCK Mode Gaming Laboratories International, Inc. has a utility program called “GLI_CDCK”. This program was written and distributed by Gaming Laboratories International, Inc., and can be obtained directly from them. It has been used by a number of end users and regulatory organizations to validate files, folders, or entire disks. These users must have the ability to replicate the original GLI_CDCK program signatures. The ValiFile program provides this capability since it has incorporated all functionalities of the GLI_CDCK program (version 4.3) as well as providing you the Dataman signatures. This will allow users to migrate from the GLI_CDCK program signatures to the Dataman signatures without loosing continuity along the way. Listed below are the “Menu Option Descriptions” in the GLI_CDCK program and their equivalent options in Vali-File: Note: This statement is taken directly from the GLI_CDCK program notes. The GLI_CDCK program will function on Windows 95, 98, NT and 2000, however, if the file being verified are long file name, different signatures will be calculated on Windows NT as compared to Windows 95 or 98. This is due to how the Operating System views long file names. The security of the signatures is not affected. ITEM 1: Enter a new seed value. This option allows the user to enter a new seed value for the signature calculation - 16 - algorithm. The option is only available in the “Regular Signature” mode. Seed values range from 0000 to FFFF. Each value will produce a different result. Gaming Laboratories International, Inc. uses a seed value of 0000 in the signatures they provide on approval letters and reports. Listed below is how you select the same mode within the Vali-File program. This window appears when you check the CDCK box on the main screen. To change the seed value, just enter the desired value, if other then the default value of 0000. ITEM 2: Check an entire disk. This option will prompt the user for the disk drive to check and then read and produce a signature for the entire disk. Listed below is how you select the same mode within the Vali-File program. Select the “Files in folder and subfolders” mode from the main screen as shown below: Once you have selected the above mode, click the “select” button and choose the desired drive you want to validate. The following window will appear, allowing you to choose the drive of your choice. Once you have selected the desired drive, click “OK”. - 17 - ITEM 3: Check all files of a specific type. This option will prompt the user for a file extension and will then proceed to calculate a signature for every file of that type on the selected drive. In Vali-File, this option is accomplished by entering the file extension (ie exe, dll, bat, etc.) in the “File Type” block shown in the illustration above. Once the desired drive has been selected, click on “OK”. ITEM 4: Check specific file types from a starting directory. This option is the same as item 3 except it will prompt for a starting directory/folder to begin looking for files and will only calculate signatures for files in that directory and sub directories below it. In Vali-File, this is accomplished using the same Vali-File procedure discussed in item 2 above. ITEM 5: Check a single file. This option will prompt the user for the full path of the file and its name and calculate a signature for that file. In Vali-File, this is accomplished by selecting the “Single file only” option as shown below: - 18 - Next, the user just needs to click on the “Browse” button and select the desired file. Once the file has been selected, click on the “Validate” button. ITEM 6: Toggle signature mode. This will toggle the signature calculation mode between regular, enhanced old and enhanced new. In Vali-File this is accomplished by selecting the “CDCK” box on the main screen shown below: Selecting this option will automatically bring up a window prompting the user to select the signature mode desired as shown below: ITEM 7: Save previous signature results to file. This option will prompt for a file name and save the signature results to that file. This feature is not present in Vali-File since there is a database provided and the signatures are recorded there. ITEM 8: Display previous signature results to file. This option will display the last set of signatures calculated. Again, this feature is not present in Vali-File since there is a database provided and the signatures are recorded there. - 19 - ITEM 0: Calculates the overall signature of non-PC based media. This option will allow the user to select non-PC based media. In this mode, the selected media will be read in full and a temporary image file of this media will be created on your hard disk. The program will then calculate the signature of this image file. This feature is not present in Vali-File. ITEM 9: Exits the program. In Vali-File, this is accomplished in the same manner as all windows applications. You can either click on “File” then “Close”, or click on the “X” at the top right hand corner of the Vali-File screen. Adding File (Game) To Database Once the signatures are calculated, they are then compared against the database for a match. If no match is found, the user is prompted and asked if this new signature should be added to the database. If the user selects “No”, the signatures will not be added. If “Yes” is selected, the user will be prompted to enter a Game Name. Once the user enters a Game Name, the signatures will be added to the database. The next time this file (game) is validated it should find a match and pull up the Game Name you just entered. NOTE: There are only two conditions that will prompt you to enter a new game: Either the file (game) being validated does not exist in the database, or the data in the file (game) being tested does not match the data of the file (game) in the database, hence a different signature. If you get this message and you believe the file (game) already exist in the database, you should search the database for the file (game) to confirm that it does not exist. If the file (game) exists, but the signatures are different, you should take all precautionary measures to verify the data integrity of the file (game). - 20 - - 21 - If you want to add the signature to your database, fill in the desired fields then click the Update button. This will add the file (game) signature you just read to your database. Database Operation Search And Edit Database To use the search and edit features of the Vali-File software, left click on “Database” and then on “Search / Edit” from the main menu. You should get the following screen: - 22 - There are three ways to find a desired record in the database: 1. Sequentially search all records in the database using the Forward or Back button. 2. Click on “Browse NAMES” to list all the Game “NAMES” in the database. 3. Enter a value in the “Search Text” field, then select the field you wish to search by selecting it from the “Search Field” drop down menu. In all cases clicking the “Search” button will display all matching records. The matching records count is displayed below the search button. If a matching record is found then the “Edit” and “Delete” buttons will become visible. Use the “Delete” button to delete the current record, pressing this button will cause the user to confirm that the record is to be deleted. - 23 - NOTE: Once the record has been deleted there is no way of retrieving it. If there is more than one record which meets the search criteria then the forward and back buttons become enabled. The Search field lets the user choose which field of the database to search on. The default search criteria is “All records”. This enables you to look at each record in the database by clicking the “Forward” or “Back” button. You can also display a list all the names by clicking the “Browse NAMES” button, this will open a drop down listing of all game titles. Once a game has been found in the database it is possible to edit the details. To find the game, simply use the search function and then click the “Edit Record” button. This will display the following screen: Edit Screen - 24 - All fields that have a white background can be edited, once all changes have been made click the “Update” button and the Database will be updated with the changes. Database Information Located on the right hand side of the “Search / Edit” screen is the database information panel. This panel looks as follows: Database information shows the total number of games held in the database and the calculated CRC-32 checksum for the database file. The database itself is encrypted and any attempts at modifying it outside the Vali-File software will render the file useless. The CRC checksum is calculated from the main database file and any changes to this file will affect the checksum. This can be used to ensure that a known trusted database is being used. - 25 - Database Backup/Restore Operations Once you have recorded all of your games into the database, it is highly recommended that you keep a backup of your database. In the unlikely event that you lose your data you can always restore it from a backup location. How frequently you backup your database depends on how often you add new games. The database file is fairly small and can be backed up on a floppy disk, CD-R/CD-RW, or to a network location. Backup To backup the database file, select DatabaseÆBackup. You will then be prompted to enter a file name. Once you save the database, a snapshot is taken and saved into that file. Restore To restore a database from a file, select DatabaseÆRestore. You will then be prompted to enter an existing filename. Once you have selected the file, Vali-File will overwrite the existing database with the selected database. - 26 - Contact Us If you wish to contact us for sales, technical support, or general questions then please use the information below. D A T A M A N O F F I C E S DATAMAN PROGRAMMERS, LTD. UK / WORLDWIDE DATAMAN, INC. USA / CANADA 1A, Station Road Maiden Newton Dorchester Dorset DT2 0AE Dataman, Inc. 215 East Michigan Avenue Orange City, FL 32763 USA Office Hours: Monday-Friday 9:00A to 5:30P GMT Office Hours: Monday-Friday 7:30A to 4:30P EST TEL:01300 320719 (+44 1300 320719) FAX: 01300 321012 (+44 1300 321012) EMAIL: [email protected] WEB: www.dataman.com Hotline: 1 (800) 328-2336 TEL: (386) 774-7785 FAX: (386) 774-7796 EMAIL: [email protected] WEB: www.dataman.com Thank you for reading this manual. Please note, that all trademarks, service marks, and registered trademarks listed in this document are held by their respective owners. - 27 -