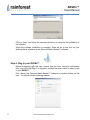
1
RAVEn™ Radio Adaptor for Viewing Energy User Manual Version 1.05 Feb 2012 www.rainforestautomation.com RAVEn™ User Manual Copyright © 2012 by RAINFOREST AUTOMATION, INC (“RFA”). All rights reserved. No part of this manual may be reproduced or transmitted in any from without the expressed, written permission of RFA. Under copyright law, this manual or the software described within, cannot be copied, in whole or part, without the written consent of the manufacturer, except in the normal use of the software to make a backup copy. The same proprietary and copyright notices must be affixed to any permitted copies as were affixed to the original. This exception does not allow copies to be made for others, whether or not sold, but all of the material purchased (with all backup copies) can be sold, given, or loaned to another person. Under the law, copying includes translating into another language or format. Rainforest Automation may have patents, patent applications, trademarks, copyrights, or other intellectual property rights covering subject matter in this document. Except as expressly provided in any written license agreement from Rainforest Automation, the furnishing of this document does not give you any license to these patents, trademarks, copyrights, or other intellectual property. Trademarks Third-party brands and company names mentioned herein may be trademarks and/or registered trademarks of their respective companies and are the sole property of their respective manufacturers. Notice The author(s) assumes no responsibility for any errors or omissions that may appear in this document nor does it make a commitment to update the information contained herein. 2 www.rainforestautomation.com RAVEn™ User Manual RAVEn™ – Radio Adaptor for Viewing Energy RFA-Z106 Version 1.05 User Manual Table of Contents Regulatory information ................................................................................................. 4 Initial Setup .................................................................................................................... 5 Step 1: Prerequisite software and hardware ................................................................ 5 Step 2: Register your RAVEn™ ................................................................................... 5 Step 3: Install the Personal Meter Reader™ software ................................................. 5 Step 4: Plug in your RAVEn™ ..................................................................................... 6 Using the Personal Meter Reader™ Software ............................................................ 8 Display Tabs ................................................................................................................ 8 Electric Information Display ............................................................................... 8 RAVEn™ Information Display .......................................................................... 10 Configuration Tabs .................................................................................................... 11 Home Menu ..................................................................................................... 11 Help Menu ....................................................................................................... 12 www.rainforestautomation.com 3 RAVEn™ User Manual Regulatory information FCC Notices Changes or modifications not expressly approved by the manufacturer could void the user‟s authority to operate the equipment. FCC/IC RF Exposure Statement This equipment complies with FCC and Industry Canada radiation exposure limits set forth for an uncontrolled environment. The antenna(s) used for this equipment must be installed to provide a separation distance of at least 8 inches (20cm) from all persons. ICES-003 Compliance This Class B digital apparatus complies with Canadian ICES-003. This device complies with Industry Canada licence-exempt RSS standard(s). Operation is subject to the following two conditions: (1) this device may not cause interference, and (2) this device must accept any interference, including interference that may cause undesired operation of the device. Le présent appareil est conforme aux CNR d'Industrie Canada applicables aux appareils radio exempts de licence. L'exploitation est autorisée aux deux conditions suivantes : (1) l'appareil ne doit pas produire de brouillage, et (2) l'utilisateur de l'appareil doit accepter tout brouillage radioélectrique subi, même si le brouillage est susceptible d'en compromettre le fonctionnement Note: This equipment has been tested and found to comply with the limits for a Class B digital device, pursuant to part 15 of the FCC Rules. These limits are designed to provide reasonable protection against harmful interference in a residential installation. This equipment generates, uses and can radiate radio frequency energy and, if not installed and used in accordance with the instructions, may cause harmful interference to radio communications. However, there is no guarantee that interference will not occur in a particular installation. If this equipment does cause harmful interference to radio or television reception, which can be determined by turning the equipment off and on, the user is encouraged to try to correct the interference by one or more of the following measures: Reorient or relocate the receiving antenna. Increase the separation between the equipment and receiver. Connect the equipment into an outlet on a circuit different from that to which the receiver is connected. Consult the dealer or an experienced radio/TV technician for help. COMPLIANCE REGULATIONS ROR AUSTRALIA AND NEW ZEALAND This equipment complies with the C-Tick labeling requirements for Australia and in New Zealand. As a radio transmitter, this device complies with the requirements of AS/NZS 4268:2008 as designated in the Radiocommunications (Short Range Devices) Standard 2004 for Australia and as required by the Radiocommunications Regulations (General Users Radio License for Short Range Devices) Notice 2011 for New Zealand. This device is a Category A device as defined in the Radiocommunications (Compliance Labeling Electromagnetic Radiation) Notice 2003. 4 www.rainforestautomation.com RAVEn™ User Manual Initial Setup Step 1: Prerequisite software and hardware Your computer must be running Windows XP, Windows Vista, or Windows 7. It must also have the .NET Framework (ver 2.0) installed. If .NET is not installed on your computer, you will be prompted to download it during the software installation procedure. You must also have an available USB port on your computer to plug your RAVEn™ into. Step 2: Register your RAVEn™ In order for your RAVEn™ to connect to the smart meter, you will need to register your RAVEn™ with your utility. Please follow the procedure provided by your utility. You will need the Install Code and MAC Address, which are found on the Information Label on the underside of your RAVEn™. Note that it may take some time for your utility to enable the smart meter to connect with your RAVEn™. You should be advised by your utility how long this will take. Your utility should also provide you with a Username and Password to download the Personal Meter Reader™ software. Step 3: Install the Personal Meter Reader™ software Go to the link: http://www.rainforestautomation.com/raven_support Click on the Personal Meter Reader™ link to download the software. Save the .ZIP file when prompted. Extract the files in the .ZIP folder. Double click on the application file named “setup.exe”. Note that this installation requires that you have the necessary permissions to install programs on your hard drive. You may need Power User/Admin permissions. You must agree to run the install when you are prompted to do so. You will see the Welcome screen for the Setup Wizard: www.rainforestautomation.com 5 RAVEn™ User Manual Click on “Next” and follow the onscreen directions to complete the installation of the software. When the software installation is complete, there will be a new icon on your desktop that is a shortcut to the Personal Meter Reader™ software: Step 4: Plug in your RAVEn™ Before proceeding with this step, ensure that you have received confirmation from your utility that Step 2 is complete, and that the smart meter is ready to talk to your RAVEn™. First, launch the Personal Meter Reader™ software by double clicking on the icon. You should see the following window: 6 www.rainforestautomation.com RAVEn™ User Manual Then, plug your RAVEn™ into a USB port of your computer. You should see the red LED inside your RAVEn™ flash briefly once per second. Once it has found the meter, it will flash longer every three seconds. Finally, when it is connected to the meter, the LED will stay on continuously. When your RAVEn™ is plugged in for the first time, the device drivers have to be installed. This should be done automatically by Windows. If, for some reason, Windows is unable to find the drivers, you will need to install them manually: 1. First, unplug your RAVEn™ from the USB port of your computer. 2. Go to the link: http://www.rainforestautomation.com/raven_support and click the Device Driver link. Save the .ZIP file when prompted. Extract the “RFA 2.08.14 – WHQL” folder from the .ZIP folder. 3. Plug your RAVEn™ into a USB port of your computer. When Windows fails to find the drivers, then you will be prompted to provide a location for the files. Point Windows to the “RFA 2.08.14 – WHQL” folder that you just extracted, and Windows will find the drivers. It may take a while for Windows to make the device „active‟ but it will let you know; just as with any USB device, there will be a popup in the Status Bar. When your RAVEn™ is ready, the display will switch to the “Electric” tab, and you will see graphical real-time energy data on your PC: www.rainforestautomation.com 7 RAVEn™ User Manual Using the Personal Meter Reader™ Software The Personal Meter Reader™ software allows you to control your RAVEn™, and to display the data it retrieves from the smart meter in a convenient graphical format. At the top of the program window are a series of menu tabs: Configuration Tabs Tab Expander Display Tabs The lower row of tabs selects the information display. The upper row of tabs selects configuration options. Display Tabs The active Display Tab is colored green, and the screen attached to that tab is displayed. The other tabs are blue, and their attached screens are not shown. There are currently two display tabs available: the Electric Information Display (labeled „Electric‟), and the RAVEn™ Information Display (labeled „RAVEn‟). Electric Information Display This is the main screen to show real-time smart meter electricity data. It is set up to resemble a car speedometer. The rate of energy consumption is shown on the dial in both kilowatts (inner scale) and estimated cost per hour (outer scale). The estimated cost is calculated from the current price per kilowatt-hour multiplied by the current rate of energy consumption. The display dial is self calibrating, and will rescale as usage changes. The absolute values for usage are also shown digitally within (kW) and above (¢/hr) the dial. Below the dial and to the left is the Meter Reading, which is the raw total accumulated kilowatt-hours reading from the smart meter. On the right is the Energy Price that is currently in effect. The rate is shown in cents per kilowatt-hour. The current price value is usually obtained directly from the smart meter, but it is also possible to manually set this value (see Configuration Tabs, Home Menu). On the upper right side of the display, the Wireless Link Quality is indicated by a small bar graph. Five bars are shown for a good signal; fewer bars indicate a lower quality signal. If the connection to the smart meter is lost, a large “X” will replace the bar graph. 8 www.rainforestautomation.com RAVEn™ User Manual Demand Cost Wireless Link Quality Active Tab Rate Label Demand Power Price Tier Indicator Energy Price Meter Reading Confirm Message Button Message Display Box If your utility has sent a Rate Label for the current Energy Price, then it will be shown just below the Wireless Link Quality indicator. A Rate Label can be up to 12 characters long. If the Energy Price has been set manually, then the Rate Label will be shown as “Set by User”. Just below the Rate Label is the Price Tier Indicator. This is shown as a bar graph with colored bars in the familiar “stoplight” pattern, i.e., red on top, amber in the middle, and green at the bottom. The tiers progress up the graph; that is, the first two tiers are green, the next two are amber, and the top tiers are red. This bar graph is an indication of the current Price Tier that is in effect.. Along the bottom of the display is the Message Display Box, which will show the contents of a text message when there is a message from your utility. A message can be up to 100 characters long. If the message requires an acknowledgment, the Confirm Message Button to the right will be highlighted. Clicking this button sends a confirmation to your utility, telling them that you have read the latest text message that they have sent to you. www.rainforestautomation.com 9 RAVEn™ User Manual RAVEn™ Information Display This screen shows information about your RAVEn™. Each section has an expander button in the top left-hand corner that will alternately hide or reveal the detailed information in that section. The Connection section shows the serial port that your RAVEn™ is emulating through the USB connection. The Connect button initiates the connection between the Personal Meter Reader™ software and your RAVEn™. The Registration section reports the Install Code and MAC Address, as read from the RAVEn™ (you must be connected to the RAVEn™ to read this information). This information is used to register your RAVEn™ with your utility. These numbers should match those found on the Information Label on the underside of your RAVEn™. The Version section reports the manufacturer‟s information, as read from the RAVEn™ (you must be connected to the RAVEn™ to read this information). This information is used to identify the specific revision of the firmware installed on your RAVEn™, as well as the hardware version. 10 www.rainforestautomation.com RAVEn™ User Manual Configuration Tabs The Tab Expander Button in the top right-hand corner of the window will alternately hide or reveal the Configuration menu items. Also, clicking on any Configuration Tab will cause the window to drop open and reveal the menu items for that tab. Home Menu The Connect USB item initiates the connection between the Personal Meter Reader™ software and your RAVEn™. The Disconnect USB item terminates the connection between the Personal Meter Reader™ software and your RAVEn™. These actions do not affect the connection between your RAVEn™ and the smart meter. The Restart item will cause the firmware on the RAVEn™ to restart, but retain its registration with the smart meter. The Hard Reset item will cause the RAVEn™ to reset, erasing all existing data and configurations, and cause it to be decommissioned. It will then not be able to immediately rejoin the smart meter. The smart meter will not allow the RAVEn™ to join until the meter has also decommissioned the RAVEn™, and then reregistered the RAVEn™ for joining. The Set Price item allows you to manually set the Energy Price value. Clicking on it will bring up the following sub screen: The up and down arrows allow you to change the price in increments of one cent. You can also place the cursor in the text box and type in a value. Clicking the “Ok” button will round the price to the nearest tenth of a cent and enter the value as the new Energy Price. www.rainforestautomation.com 11 RAVEn™ User Manual Help Menu The About item displays information about this version of the Personal Meter Reader™ software. 12 www.rainforestautomation.com