1
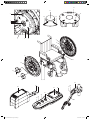
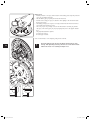
KRAFT, DIE AUS DEN
RÄDERN KOMMT.
M15 Gebrauchsanweisung Umschlag 5 5
Gebrauchsanweisung
D
User manual
GB/US
Instructions d’utilisation
F
Manual de instrucciones
E
Istruzioni per l‘uso
I
Brugsvejledning
DK
Gebruiksaanwijzing
NL
Bruksanvisning
N
Instruktionsbok
S
Käyttöohjeet
FIN
28.08.2008 14:05:03
Service Center (Deutschland)
Montag bis Donnerstag von
8.00 - 18.00 Uhr
Freitags von
8.00 - 16.00 Uhr
erreichbar unter
Telefon (0800) 9096-250
(gebührenfrei)
Der e-motion ist klassifiziert als Gerät Typ B.
M15 Gebrauchsanweisung Umschlag 6 6
28.08.2008 14:05:04
12
13
1
11
14
14
2
3
4
5
6
11
7
8
9
17
10
11
12
19
18
15 16
29
27
26
27
21
20
31
28
22
23
24
25
30
M15 Gebrauchsanweisung Umschlag 1 1
28.08.2008 14:04:59
Content
1. Introduction
2
1.1 Important safety information – please be sure to observe
2
1.2 Intended use of the e-motion
2
1.3 Permissible operating conditions/places of use
3
1.4 Standard scope of delivery
3
1.5 Optional accessories
3
1.6 Specifications
4
1.7 The most important elements at a glance
4
2. Start-up
5
2.1 Mounting the wheels
6
2.2 Switching on the wheels on the wheel hub
7
2.3 Switching on the wheels with the remote control (optional)
7
2.4 Switching off the wheels on the wheel hub
8
2.5 Switching off the wheels with the remote control (optional)
8
2.6 Removing the wheels
9
2.7 Transport and storage of the wheels10
3. General safety instructions for driving with the e-motion11
4. Battery pack12
4.1 Safety instructions on charging the battery pack12
4.2 Charging the battery pack14
4.3 Removal and protection of the battery pack15
4.4 Storage and transport of the battery packs removed from the wheel16
4.5 Protection of the wheel with the battery pack removed16
4.6 Inserting the battery pack17
5. Indicators and error messages on the wheel19
5.1 Charge status of the battery pack19
5.2 Display during charging of battery pack
20
5.3 Acoustic error messages
21
6. Power stages and stored parameters
22
6.1 Power stages
22
6.3 Rollback delay (only with e-motion wheels with remote control)
22
7. Automatic self switch-off
23
7.1 Automatic wheel self switch-off
23
7.2 Remote control (optional) self switch-off
23
8. Fuse replacement
23
9. Remote control (optional)
24
9.1 Operating controls
24
9.2 Function display
25
9.3 Display of the battery pack charge status
26
9.4 Display of error messages
27
10. Anti-tippers (optional)
30
10.1 Attaching and removing the Alber anti-tippers
30
10.2 Using the Alber anti-tippers
31
10.3 Important operating and safety information
32
11. Safety and hazard notes
33
11.1 Safety notes
33
11.2 Safety note on using the e-motion in vehicles
34
11.3 Obstacles
34
11.4 Hazard points and hazardous situations
35
12. Care, safety checks (maintenance), reuse and disposal
35
12.1 Care
35
12.2 Safety checks (maintenance)
35
12.3 Re-use
36
12.4 Disposal
36
13. Guarantee, warranty and liability
36
13.1 Warranty for defects
36
13.2 Guarantee of durability
36
13.3 Liability
36
GA_M15_GB.indd 1
01.12.2008 10:48:56
8
1. Introduction
1.1 Important safety information – please be sure to observe
The e-motion is an add-on drive for wheelchairs. For safety reasons it may only be operated by persons who
- have received instructions on its handling,
- can move and coordinate both hands or arms without major restrictions,
- are physically and mentally able to safely operate the device in all operating situations.
For new units, orientation regarding the device operation is included in the scope of delivery and is provided by arranging an
appointment with your specialist dealer. This service is free of charge.
Please contact your specialist dealer also if you are not yet sure about handling the e-motion.
In case of possible technical malfunctions, you may contact your specialist dealer or the Alber Service Center
(Phone 0800 9096-250).
When operating the e-motion, you should exactly follow the data specified by the manufacturer of your wheelchair (for example, the maximum slopes, the tire pressure in the wheels, etc.) as well as its general operating instructions. Specifications on
limit values must never be exceeded.
The e-motion should first be switched of on safe terrain when starting to use mobile phones or similar devices. Travel near
strong electrical interference fields should also be avoided.
The operation of the e-motion may possibly cause disturbances in other facilities, for example, anti-theft barriers in department stores.
!
Be absolutely sure not to start up the e-motion prior to the device orientation by an authorized specialist dealer!
1.2 Intended use of the e-motion
Wheelchairs with added e-motion wheels are exclusively intended for the transport of persons with walking impairments. No
other parts may be added on except the accessories approved by Alber for operation.
The e-motion must be handled under the following prerequisites:
• Observing the specifications, instructions and recommendations of this instruction manual
• The device is handled exclusively by an instruction person
• Neither the user nor third parties have made technical modifications to the device
A person having received orientation is someone who has been instructed on the assigned duties and possible hazards resulting from improper action and who has been introduced into the handling of the e-motion. This is normally the drive of the
wheelchair to which the e-motion wheels have been installed.
Instruction is provided by authorized specialist dealership or Ulrich Alber GmbH.
Handling of the e-motion by persons not having received instruction or unsuitable users is explicitly prohibited.
The intended use also includes compliance with this instruction manual's stipulated specifications on performing safety checks
as well as observation and compliance with the safety and hazard information on driving operation.
The e-motion may not be used for purpose contradicting the intended use. This applies especially to any type of load transport such as moving general objects of daily use or additional persons.
Escalators and motorized walkways may not be entered with the e-motion.
It is also not permitted to combine the e-motion with accessories not approved by Alber.
Any use contrary to the directions and recommendations of this operating manual or exceeding the technical performance limits defined in these instructions is considered by Alber as misuse of the device.
Alber refuses any liability for resulting damage occurrences.
GA_M15_GB.indd 2
01.12.2008 10:48:57
1.3 Permissible operating conditions/places of use
Observe the instructions on permissible operating conditions in the user manual of your wheelchair to which the e-motion is attached. Any
limitations on permissible operating conditions (e.g. maximum climbing capacity, maximum permissible obstacle height, maximum user
weight, etc.) must also be observed when operating the e-motion!
The e-motion may be operated only at temperatures between –25 °C and +50 °C.
Avoid travel on non-solid surfaces (e.g. on loose gravel, sand, mud, snow, ice or through deep puddles).
Observe the safety and hazard notes in Chapter 11.
1.4 Standard scope of delivery
• two e-motion wheels
• two battery packs (maintenance free)
• two protective covers for the wheel contacts
• two protective covers for the battery contacts
• one mains charger inc. operating instructions
• These operating instructions
The wheelchair must have special brackets for attaching the e-motion. If this is not the case, please contact your specialist dealer directly
or one of the Alber factory representatives.
1.5 Optional accessories
- Rechargeable battery pack / spare battery
- Anti-tippers for the wheelchair
- Remote control
- Bracket for remote control
- Spoke cover
We recommend using only original Alber accessories.
The e-motion is designed to yield superb performance when using with original Alber accessories. Alber is not liable for damages on the
product or accidents (e.g. fires, etc.) caused by a malfunction of non-original accessories or spare parts (e.g. leakage or explosion of a battery pack). The warranty does not cover any repair required due to a malfunction of non-original accessories. However, you may commission
repairs on a chargeable basis.
USA / Canada
This device complies with Part 15 of the FCC rules. Operation is subject to the following two conditions: (1) This device may not cause
harmful interference, and (2) this device must accept any interference received, including interference that may cause undesired operation.
Any changes or modifications not expressly approved by the party responsible for compliance could void the user‘s authority to operate the
equipment.
GA_M15_GB.indd 3
01.12.2008 10:48:57
8
1.6 Specifications
Range:
Max. speed:
Drive power:
Motor voltage:
Operating temperature:
Max. load capacity:
25 km per ISO 7176 - 4
6 km/h
2 x 60 W
24 V
–25 °C - +50 °C
130 kg
Battery pack
Battery type:
Nominal operating voltage:
Charge temperature:
Lithium-Ions
25.2 V
0 °C - 40 °C
Weight of the individual parts
Wheel:
Battery pack:
Battery charger:
Overall weight:
Range:
9.2 kg
1.3 kg
0.8 kg
21.0 kg
25 km per ISO 7176 - 4
(*) The range varies depending on the terrain traversed and the prevailing driving conditions. The stated range can be achieved if driving
conditions are optimal (even terrain, freshly charged batteries, ambient temperature of 20 °C, even travel, etc.).
The e-motion complies with the EC directive for medical products 93/42/EEC.
We reserve the right to make alterations to the technology and design as part of ongoing further developments.
Battery charger
Please refer to the technical notes and instructions in the manual accompanying the charger.
1.7 The most important elements at a glance
(Please unfold the general drawing contained in the envelope)
WheelProtective cover for battery contacts
LED display
1Cover
18
Rubber cover of the charger socket
2Locking pin of the cover
19
Charger socket
3
Lock of the stub axle
4Remote control (optional)
On/Off button 5Info button
20
Handle area
6Display
21
Fins (rear of wheel)
7Button 2
22
Stub shaft
8Button 1
23
Push rim
9Button 0 24
Battery contacts (inside of wheel hub)
10Reset button
25
Battery pack
Battery pack locking pin
Battery pack
Protective cover for battery contacts
Burls of plastic cover
11Battery charger
12Housing
13Charger plug
14
Wheelchair (not included in scope of delivery)Anti-tippers (optional)
Bracket with wheel receiver
15Quickpin
Parking brake of wheelchair
16Receiver fork of bracket
Bracket for remote control (optional)
17Holding rod
Clamping piece
GA_M15_GB.indd 4
26
27
28
29
30
31
01.12.2008 10:48:57
15
GA_M15_GB.indd 5
2. Start-up
The e-motion wheels and, if applicable, the accessories you ordered are mounted to your
wheelchair by Alber or your specialist dealer and delivered to you ready for operation.
Both sides of your wheelchair are therefore equipped with new brackets [15] with wheel
receivers into which the two e-motion wheels are inserted (see Chapter 2.1). The manual
wheelchair wheels which you have previously used are also returned to you for possible
future use.
When the e-motion is delivered to you, your specialist dealer will instruct you about the
operation of the system and the accessories you may have ordered. He will also hand the
operating instructions to you which contain important information on driving, in addition
to the technical information.
!
The brackets [15] may only be mounted to the wheelchair by Alber
or a specialist dealers authorized by Alber.
!
Check at regular intervals to make sure that the brackets [15] are
still screwed securely to the wheelchair. If these screw connections have become loose or have even unscrewed, please have them
retightened by an authorized specialist dealership.
!
Alber manufactures brackets in different designs, for example, as a
complete single part or made up of separate parts. For this reason,
graphic representations in this operating manual may differ from
the bracket mounted to your wheelchair.
01.12.2008 10:48:58
8
2.1 Mounting the wheels
Different driving parameters can be assigned to each e-motion wheel. It is therefore
absolutely necessary to always mount the two e-motion wheels according to their identification on the left and right side of your wheelchair, respectively!
Technically, the stub axles [8] of the e-motion wheels are similar to the stub axles of
your previously used manual wheelchair wheels. In so far, you may mount the e-motion
wheels to your wheelchair as you are used to.
4
7
8
15
GA_M15_GB.indd 6
• Unless already done, place the battery pack [12] into the wheel hub and lock it with
the same (see Chapter 4.6).
• Push on the locking mechanism [4] located in the center of the wheel hub and at the
same time push the stub axle [8] of the e-motion wheel into the wheel receivers [15]
on the wheelchair.
• You may possible need to turn the e-motion wheel a few millimetres around its axis to
allow the fins [7] located at the rear of the wheel to engage with the torque receiver.
• Check if the e-motion wheel can be pulled out of the wheel receiver [15] without
pushing the lock [4]. If this is the case, the e-motion wheel is not seated correctly
in the wheel receiver [15] and must be reintroduced into the wheel receiver [15] as
described above.
• Attach the second e-motion wheel on the other side of the wheelchair.
These few steps complete the mounting of the e-motion wheels on your wheelchair.
!
!
Driving is only permitted with e-motion wheels that are correctly
engaged in the wheel receiver [15].
!
Therefore always mount the e-motion wheels according to their
identification on the left and right side of your wheelchair, respectively.
Check the functionality of your wheelchair brakes [16] before each
drive. They must be adjusted correctly to the e-motion wheels and
able to prevent the unintentional rolling away of the wheelchair at
any time.
01.12.2008 10:48:59
2.2 Switching on the wheels on the wheel hub
You can now switch on the system if the two e-motion wheels were correctly mounted to
your wheelchair as described in Chapter 2.1.
• Push the On/Off buttons [5], located in the wheel hub, for approximately one second.
• e-motion with remote control (optional):
Depending on the power stage used last (refer to chapter 6), an acoustic signal
sounds (one signal tone for power stage 1, two signal tones for power stage 2).
• e-motion with remote control (optional):
A signal tone sounds.
• All five LEDs [1] of the display light up briefly and then change to the display status
for the charge status of the battery pack (see Chapter 5.1).
• The wheel is operational after approx. 2 - 3 seconds and you can start driving. Please
note the instructions in Chapters 3 and 11.
5
1
Note
If the switched on wheels are not used, they switch off automatically after a predefined
period (refer to the information in Chapter 7).
21
22
23
GA_M15_GB.indd 7
2.3 Switching on the wheels with the remote control (optional)
Instead of activating the wheels via the On/Off switch [5] in the wheel hub, they can
also be switched on via the optionally available remote control.
• When pushing button 1 [23], both wheels are switched on in power stage 1 and one
signal tone each sounds on the wheels.
• When pushing button 2 [22], both wheels are switched on in power stage 2 and two
signal tones each sounds on the wheels.
•
After the wheels have been switched on, the charge status of the two battery packs and
the selected power stage are indicated on the display [21].
Please refer to Chapter 9 for a detailed description of this and other functions, displays
and possible error messages.
!
A fault is present if no or more than 2 signal tones sound when
switching on the wheels. Refer to Chapters 5.3 or 9.4.
!
For e-motion systems without remote control we recommend switching on the wheels one after the other and not at the same time.
Activating the wheels at the same time may cause you not to hear
possible warning signals (see Chapter 5.3) or allocating them to the
wrong wheel.
01.12.2008 10:49:00
8
2.4 Switching off the wheels on the wheel hub
After you are done driving, you should always switch off the two e-motion wheels and
pull the parking brakes on the wheelchair. This does not save the energy of the two battery packs but also prevents a possibly inadvertent rolling away of your wheelchair.
•
•
•
•
Push the On/Off buttons [5], located in the wheel hub, for approximately one second.
To confirm the switch-off, an acoustic signal (1 beep) sounds on each wheel.
The LED [1] on the wheels goes off.
Secure your wheelchair against unintentional rolled away by pulling the parking
brakes of the wheelchair.
5
21
24
2.5 Switching off the wheels with the remote control (optional)
Please proceed as follows if you are switching off the wheels with the optional remote
control:
•
•
•
•
•
Push the "0" [24] button; both wheels are switched off at the same time.
To confirm the switch-off, an acoustic signal (1 beep) sounds on each wheel.
The LED [1] on the wheels goes off.
The display (21) goes off after approx. 5 seconds.
Secure your wheelchair against unintentional rolled away by pulling the parking
brakes of the wheelchair.
Please refer to Chapter 9 for a detailed description of this and other functions, displays
and possible error messages.
!
GA_M15_GB.indd 8
The e-motion wheels are not equipped with built-in brakes. It is
therefore absolutely necessary to adjust the brakes installed on your
wheelchair to the e-motion wheels to be able to protect the wheelchair from at any time from unintentionally rolling away.
Please contact your specialist dealer in this regard.
01.12.2008 10:49:01
2.6 Removing the wheels
The e-motion wheels will usually remain on your wheelchair. If they need to be removed
(for example to facilitate transport), then please proceed as follows:
4
9
• Switch off the e-motion wheels if not yet done (see Chapter 2.4).
• When using Alber anti-tippers:
Lift your wheelchair as described in Chapter 10.2 and operated the anti-tippers.
• Reach with the fingers into the opening between wheel hub and battery pack as
shown in the graphic.
• Push on the locking mechanism [4] located in the center of the wheel hub and pull
the e-motion wheel with care off the wheelchair.
• Once both wheels have been removed, you can return the anti-tippers to the original
position as described in Chapter 10.2.
• Without Alber anti-tippers:
Lift the wheelchair by its push handles.
• Reach with the fingers into the opening between wheel hub and battery pack as
shown in the graphic illustration.
• Push on the locking mechanism [4] located in the center of the wheel hub and pull
the e-motion wheel with care off the wheelchair.
!
GA_M15_GB.indd 9
When removing an e-motion wheel, never pull on its push rims [9].
This could damage the sensors attached to them.
01.12.2008 10:49:02
8
2.7 Transport and storage of the wheels
You shouldn’t lift or hold the e-motion wheels by the push rims [9] when transporting
the wheels. This could damage the sensors attached to them.
Instead, reach into the opening between the battery pack and wheel hub as shown in the
graphic illustration or carry the e-motion wheel by its rim. There is no risk of damaging
the wheel at these points.
Pay special attention to the fins [7] and the stub axle [8] on the rear of the wheel when
putting or placing down the wheel. Both parts may not be damaged.
The specifications of the respective wheelchair manufacturer regarding the securing of
the complete wheelchair and/or its individual parts apply for transport.
We recommend removing the e-motion wheels from the wheelchair and transporting them
individually.
10
7
8
During transport, the wheels must be secured against flying about in all cases, so that
they cannot lead to danger for the occupants during a braking maneuver. To secure the
wheels, we suggest (we do not assume any liability for this recommendation) fastening
them in the vehicle with sufficiently strong fabric straps as shown in the graphic illustration.
If there are national regulations regarding the securing of wheelchairs and wheels in your
country, these have priority and must be observed.
In regard to dangerous traffic situations or, more precisely, in regard to an accident, sitting in the wheelchair during transport is strictly forbidden.
The national legal regulations apply in all cases.
Ulrich Alber GmbH and its representatives reject any liability for accidents of any type
and their consequences, which come about as a result of the non-observance of these
notes.
GA_M15_GB.indd 10
01.12.2008 10:49:04
9
3. General safety instructions for driving with the e-motion
The operation of the e-motion wheels is analogous to the manual wheels you have used
so far. This means that you can move your wheelchair with the push rims [9] as used
to, however, the power assistance of the e-motion must be taken into account (see also
Chapter 6).
It is therefore recommended to first conduct some training on driving after receiving the
e-motion. This will help you to thoroughly familiarize yourself with the drive and its features.
• Make sure that the parking brakes [16] of your wheelchair were adjusted to the e-motion wheels thereby preventing unintentional rolling away. If this has not been done, contact the speciality dealership authorized by Alber and have the brakes readjusted.
e-motion with remote control (optional):
• First select power stage 1 for the initial driving attempts. Switch only to power stage 2 after you have familiarized yourself with the
power assistance of the drive.
11
e-motion without remote control:
• Start your first driving attempts with special care and begin your training on level surfaces.
•
Important information
• Carry out your driving training in areas without obstacles.
• Before driving the e-motion on slopes or hills, you should be able to safely master handling the device on flat terrain.
• Always adjust your speed to the circumstances to be able, e.g. to safely circumvent obstacles that may suddenly occur or to stop your
wheelchair.
• Always drive up slopes with full battery packs.
Although the wheels continue to run when the battery packs are empty, the power assistance for the rolling motion and especially the
braking maneuver is no longer available!
• Special care must be exercised when driving down slopes of any kind.
When descending them with fully charged battery packs and at high speed, this can lead to a forced shut-down of the e-motion due to
overvoltage. Although the wheels continue to run, the power assistance for the braking process is no longer available!
For this reason, drive down slopes in such cases at a low speed. This is generally always advisable to be able to circumvent suddenly
occurring obstacles or to bring the wheelchair to a stop.
• Observe the information, safety and hazard notes of your wheelchair manufacturer. They apply also for driving with the e-motion.
!
Caution when driving on downhill slopes with fully charged battery packs!
The system may shut down automatically at fully charged battery packs and at high speed. Reduce your speed for
this reason.
!
Overcome obstacles (e.g. curbs) only while driving backward, if possible. The maximum permitted height of the
obstacle is thereby 50 mm.
Attention! When driving over obstacles in reverse, the full functionality of the Alber anti-tippers is not guaranteed! Therefore, drive slowly and carefully in reverse until the wheels of your e-motion touch the obstacle. Then,
carefully drive over the obstacle. We recommend the assistance of an accompanying person.
!
Observe the safety and hazard notes in Chapter 11!
GA_M15_GB.indd 11
01.12.2008 10:49:04
8
4. Battery pack
4.1 Safety instructions on charging the battery pack
The battery packs [12] always remain in the wheel hubs of the e-motion wheels and should be removed only in case of air transport or for
service situations. The charge process takes only place directly on the wheels which do not have to be removed from the wheelchair for this
purpose. Principally, both battery packs should always be recharged at the same time; the charger is therefore equipped with two charger
cables.
Read and follow all instructions and warning information included with the charger before starting with the charging process and pay
attention to the following warning notes.
Wheelchair
Switch off both wheels before beginning with the charge process and secure the wheelchair with its parking brakes against rolling away
unintentionally.
12
Battery charger
• Only use the supplied Alber charger to charge the e-motion battery pack. This switches off automatically as soon as the battery pack is
charged up. For this reason, overloading is not possible.
• Do not charge any other battery packs with the charger except those delivered.
• When the e-motion wheels are not used for some time (more than 1 day), the charger must first be disconnected from the line supply
socket and then from the battery pack.
• Never use a charger not supplied by Alber.
• Never subject the charger to humidity (water, rain water, snow) during the charge process.
• Caution with condensation. If the charging device is brought from a cold room into a warm room, condensation can form. Wait using
the charger in this case until the condensate has evaporated. This may take several hours.
• Never carry out the charging process in rooms where humidity may settle on the charger.
• Never carry the charger on the power cable or the charger cables.
• Never pull on the power cable to remove the charger from the socket.
• Route the power cable and the attached two charger cables to prevent persons from stepping on them or tripping over them and to
keep them from being exposed to damaging impacts or stresses.
• Do not operate the charger if the power cable, one or both charger cables or the plugs attached to them are damaged. Damaged parts
must be replaced without delay by the specialist dealership authorized by Alber.
• Never use or dismantle the charger if it has incurred a hard blow, was dropped or damaged otherwise. Bring the damaged charger for
repair to a specialist dealer authorized by Alber.
• The charger may not be used by small children.
• The charger may only be operated at 100 V - 240 V AC.
• Do not disassemble or modify the charger.
• Do not cover the charger during the charging process and do not place any objects on top of the device.
• Place the charger securely in a vertical position on a level surface.
• Do not expose the cable and the plug to any pressure. Excessive stretching or bending the cable, pinching the cable between a wall and
a window frame or placing heavy objects on the cable or the plug may cause electrical shock or fire.
• Never shorten the two poles with metallic objects.
• Make sure that the plug is firmly plugged into the socket.
• Do not touch the plug with wet hands.
• Do not use the plug of the charger and/or the plug of the power cable if they are wet or soiled. Clean them with a dry cloth before
plugging them into the socket.
• After the charge procedure is completed, first pull the plug of the charger from the socket and then the charger plug from the e-motion
wheels.
• Do not plug the charger plug into the charge socket while the battery has been removed.
GA_M15_GB.indd 12
01.12.2008 10:49:05
Battery pack
• Only the battery packs supplied by Alber may be used for the operation of the e-motion wheels. Other battery types may burst and
cause injuries or property damages.
• Never charge the batteries in the presence or vicinity of flammable liquids or gasses.
• Keep the battery pack away from fire.
• Never subject the wheels with the battery packs in them to humidity (water, rain water, snow) during the charge process.
• In the (unlikely) event of overheating or fire of the battery pack it must not come into contact with water or any other liquids at any
rate. The battery manufacturers recommend sand as the only useful means to extinguish the fire.
• Never carry out the charging process in rooms where humidity may settle on the wheels with the battery packs in them.
• Never charge the battery packs at temperatures below 0 °C or over 40 °C.
• When attempting to charge the batteries outside of this temperature range, the automatic mechanism of the e-motion wheel cuts off
the charge process automatically.
• Your e-motion uses power each time it is used. You should never run the battery pack completely empty since this may damage it over
time. We recommend recharging the battery pack after each use if possible.
• Only use the Alber charger supplied with the e-motion to charge the battery pack. This switches off automatically as soon as the battery
pack is charged up. For this reason, overloading is not possible.
• When the e-motion wheels are not used for some time (more than 1 day), the charger must first be disconnected from the line supply
socket and then from the battery pack.
• Use the battery packs only for the purposes outlined in these operating instructions.
• Do not disassemble or modify the battery pack.
• Never shorten the poles of the battery pack with metallic objects.
• Never shorten the poles with metallic objects.
• Do not submerge the battery pack in water. This could cause irreparable damages.
• Attach the protective cover for the battery contacts [13] as soon as you have removed it from the wheel.
• The service life of a battery pack also depends on its storage location. Therefore do not leave the battery pack at hot locations for longer periods (regardless whether it is installed in the wheel hub or has been removed from it). Especially the trunks/boots of passenger
cars parked in the sun should be used only for transport but not for general storage.
13
Wheel
The orientation of the sensors is checked during the charge process; for this reason, neither compression nor tensile forces may be exerted
on the push rim during this time. Make sure during each charge process that both push rims are free from any load or weight.
If the push rims was accidentally exposed to any forces during the charge process and the sensor orientation was therefore misadjusted,
please proceed as follows:
• Make sure that the push rim is not exposed to any loads, that is, neither to tensile or compression forces.
• Carry out the charge process once more for approx. 10 minutes; this will readjust the sensors.
• Complete the charge process.
The correct charging process on the e-motion wheels is described below.
Carry out the charging process only according to these instructions!
GA_M15_GB.indd 13
01.12.2008 10:49:05
8
2
4.2 Charging the battery pack
• Open the rubber cover [2] attached on the wheel hub above the charge socket [3].
• Push the charger plug [27] into the charger socket [3].
• Push the power cable of the charger only now into an outlet.
• Depending on the remaining capacity in the batteries, one or several LEDs on the
wheel come on (see also Chapter 5.1).
• All five LEDs come on if the battery back is fully charged.
• Pull the power plug of the charger from the socket.
• Pull the charger plug [27] only now from the charger socket [3].
• Close the charger socket [3] again with the rubber cover [2].
!
When the e-motion wheels are not used for some time (more than
1 day), the charger must first be disconnected from the line supply
socket and then from the battery pack.
Always check the charge status of the battery packs each time you
prepare to drive. They should be fully charged before beginning to
drive.
Please follow also the notes and instructions in the manual accompanying the charger.
!
The e-motion wheel shuts off automatically if the charger plug [27]
is pulled from the charger socket [3].
!
If a fault occurs during the charging process, all 5 LEDs flash at the
same time.
!
If the e-motion wheels have been left attached to the wheelchair
during charging, switch off both wheels before beginning with the
charge process and secure the wheelchair with its parking brakes
against rolling away unintentionally.
If you disregard this and the wheels roll away during the charging
process, an acoustic warning signal sounds (several beeps) to alert
you to this critical safety condition.
!
Remove the rubber covers [2] only to charge the battery pack.
Attach the rubber covers [2] again to the wheel hub after the charging process is completed.
3
14
27
2
GA_M15_GB.indd 14
01.12.2008 10:49:06
4.3 Removal and protection of the battery pack
We once more point out that the battery pack always remains in the wheel hub of the
e-motion wheel and should be removed only in case of air transport or for service situations. Please proceed as follows in this case:
11
11
• Loosen the 4 locking pins [11] using a coin.
• After loosening the last locking pin, the battery pack [12] jumps slightly out of the
wheel hub.
• Remove the battery pack [12] from the wheel hub.
11
12
On the bottom of the battery pack:
• Immediately after removing the battery pack, place the round side of the protective
cover [13] in the center of the battery pack housing [12] as shown in the graphic
illustration and firmly push it in place.
• Push the burls [14] of the protective cover into the openings on the bottom of the
battery pack housing and push them in place.
• The protective cover [13] and its burls [14] must be connected firmly enough with the
battery pack housing so that they cannot become detached from it on their own.
11
12
14
14
13
!
Protect the battery pack immediately after removing it from the
e-motion wheel. Neither humidity nor foreign objects
(e.g. metal shavings, small nails or other conducting metals) may
enter the openings on the battery pack.
!
The battery pack must normally only be removed from an e-motion
wheel in case of air transport. Status of current knowledge (as of
June 2008):
The wheels are transported in the cargo compartment of the plane,
the two battery packs are to be carried as hand luggage in the passenger cabin. However, make sure to contact the respective airline
carrier on the applicable regulations in this matter before commencing your journey and also on the legal applicable regulations in your
country of origin or your vacation destination in regard to the air
transport of batteries and rechargeable lithium-ion batteries.
15
12
12
13
GA_M15_GB.indd 15
01.12.2008 10:49:07
8
4.4 Storage and transport of the battery packs removed from the wheel
Never subject the battery pack to humidity (water, rain water, snow, etc.)!
Information regarding storage:
• The battery pack removed from the wheel should always be stored upright as shown in
the graphic illustration and inaccessible to children.
• Charge the battery pack before long-term storage and check the charge status every 3
months.
• Store the battery pack at a cool and dry location where it is protected from damage
and unauthorized access.
Information regarding transport:
• The battery pack should generally be transported in the original package (therefore
keep the carton).
• The battery pack may remain in the wheel with all types of transport except air transport. This must be clarified with the respective airline when transporting the battery
pack by plane (see note in Chapter 4.3).
• Contact your specialist dealer or the Alber Service Center for clarification prior to
shipping or transporting a damaged battery pack.
16
Instructions in case of damages or defect of the battery pack
If the battery pack is damaged or defective, it must be set apart and inspected. Please
contact your specialist dealer and discuss the further procedure regarding return shipment and repair with him.
By no means may the defective/damaged battery pack continue to be used or opened.
12
13
!
The battery pack [12] removed from the wheel may only be stored or
transported with the protective cover [13] in place.
Transport or storage without the protective cover in place [13] is
not permitted.
4.5 Protection of the wheel with the battery pack removed
After you have removed the battery pack and secured it as described in Chapter 4.3, in
the next step you must protect the wheel against dirt and damage as follows:
• Remove the cover [18] and push it slightly into the wheel hub in place of the battery
pack as shown in the graphic illustration.
• Insert a coin into the slot [32] of one of the two locking pins [19].
• Push the locking pin [19] inside and rotate it by 90 degrees.
• Repeat the procedure with the second locking pin [19].
• The cover [18] has only been correctly inserted into the wheel hub if it does not protrude beyond it at any point.
• The cover [18] is only correctly secured in the wheel hub if its marks [33] and the
slots [32] of the locking pins [19] are properly aligned (refer to the following graphic
illustration).
18
A
19
B
32
32
33
33
A=Locking pin locked
B=Locking pin released
19
!
GA_M15_GB.indd 16
Protect the wheel immediately after removing the battery pack. Neither humidity nor foreign objects (e.g. metal shavings, small nails
or other conducting metals) may enter the wheel hub.
01.12.2008 10:49:08
4.6 Inserting the battery pack
Carry out the following steps if you want to insert a battery pack again in the wheel hub:
19
19
19
18
A
B
32
32
33
33
Wheel
• Insert a coin into the slot [32] of one of the two locking pins [19].
• Push the locking pin [19] slightly toward the inside and turn it by approx. 90 degrees
until the slot [32] and the marks [33] of the cover [18] are properly aligned (refer to
the graphic illustration). This releases the locking pin and it jumps out slightly.
The graphical illustration explains:
A= locking pin locked
B= locking pin released
• Repeat the procedure with the second locking pin.
• Remove the cover [18] from the wheel hub and store it for future transports of the
wheel.
• Check if moisture is present inside the wheel hub. Dry wet spots immediately with a
clean, dry cloth.
• Check if dirt or foreign objects (especially metal shavings, small nails or other conducting metals) are present inside the wheel hub and remove them.
• Dry and clean especially the battery contacts [10] inside the wheel hub if necessary.
17
10
GA_M15_GB.indd 17
01.12.2008 10:49:09
8
Battery pack
• Pull the protective cover [13] off the bottom of the battery pack. Keep the protective
cover [13] for further transports.
• Take the battery pack [12] and push it into the wheel hub.
• Push the four locking pins [11] one after the other slightly to the inside and rotate
them by 90 degrees.
• The battery pack [12] has only been correctly inserted into the wheel hub if it does
not protrude beyond it at any point.
• The cover [12] is only correctly secured in the wheel hub if its marks [33] and the
slots [32] of the locking pins [11] are properly aligned (refer to the graphic illustration).
The graphical illustration explains:
A= locking pin locked
B= locking pin released
13
Your e-motion wheel is now completely ready for the next ride.
!
18
Insert the battery pack only into the wheel hub if both are clean
and dry. Both parts may never be joined in case of dirt and moisture.
Observe the notes in on cleaning in Chapter 12.1.
12
11
11
11
11
A
B
32
32
33
33
GA_M15_GB.indd 18
01.12.2008 10:49:10
5. Indicators and error messages on the wheel
1
5.1 Charge status of the battery pack
The charge status of the two e-motion battery packs is indicated by the LEDs [1] attached
to the wheel. Please note that because of different drive moments or possibly differently
adjusted wheels the current consumption may also vary (see Chapter 6).
Each time when switching on a wheel and after each operation of the push rim, one or
several LEDs come on (refer to the following table) and indicate the respective charge
status of the battery pack. The LEDs go off after approx. 10 seconds and the top green
LED (signal for the operational readiness of the wheel) flashes approx. every 2 seconds.
They mean:
5 LEDs come on – Battery pack is charged 100 %.
Avoid driving down slopes at high speeds because a forced shut-down of the wheel may occur due to the current return in
the wheels and the risk of overvoltage in the battery pack.
19
4 LEDs come on – Battery pack is charged 80 %.
3 LEDs come on – Battery pack is charged 60 %.
2 LEDs come on – Battery pack is charged 40 %.
We recommend not driving too far without charging the batteries first.
1 LED comes on – Battery pack is charged 20 %.
Charge the batteries before starting a ride.
1 LED (red) flashes – Battery pack is charged 10 %.
Charge the batteries before starting a ride.
GA_M15_GB.indd 19
01.12.2008 10:49:11
8
5.2 Display during charging of battery pack
1 LED (red) flashes – Battery pack is charged less then 20 %.
LED (red) flashes
1 LED flashes, 1 LED come on – Battery pack is charged between 20 % and 40 %.
1 LED flashes, 2 LEDs come on – Battery pack is charged between 40 % and 60 %.
20
1 LED flashes, 3 LEDs come on – Battery pack is charged between 60 % and 80 %.
1 LED flashes, 4 LEDs come on – Battery pack is charged between 80 % and 100 %.
5 LEDs come on – Battery pack is fully charged.
!
The e-motion wheel shuts off automatically if the charger plug [27] is pulled from the charger socket [3].
!
If a fault occurs during the charging process, all LEDs flash slowly and an acoustic warning tone sounds (refer to
Chapter 5.3).
GA_M15_GB.indd 20
01.12.2008 10:49:12
5.3 Acoustic error messages
The following table describes the errors occurring most frequently and are mainly due to faulty handling of the e-motion wheel. They mean:
Short signal tone, duration approx. 0.2 seconds
Long signal tone, duration approx. 0.8 seconds
Acoustic
Repetition
signal on the Acoustic signal
wheel
GA_M15_GB.indd 21
Error description
What to do
every 8 seconds
Overvoltage in the battery pack; a forced shutdown is immediately pending.
The error occurs especially when driving down
slopes with fully charged battery pack. Drive at a
slower speed.
every 10 seconds
Overvoltage of the battery pack, the drive was
shut down by force.
The error occurs especially when driving down
slopes with fully charged battery pack. Drive at a
slower speed.
every 10 seconds
The charging process was terminated because
the ambient temperature
is below 0 °C
or
above 0 °C.
Charge the battery packs only at temperatures
above 0 °C
and
below 40 °C.
every 5 minutes
Voltage of the battery pack < 20 % remaining
capacity
Charge the battery pack as soon as possible.
every 60 seconds
Undervoltage of the battery pack (< 10 %
remaining capacity), a forced shut-down is
immediately pending.
Charge the battery pack immediately.
every 10 seconds
Undervoltage of the battery pack (< 5 %
remaining capacity), a forced shut-down is
immediately pending.
Complete a ride down a slope. Charge the battery
pack immediately.
every 5 seconds
The charger plug is inserted in the charger
socket but no charge current is flowing.
Check the operational readiness of the charger.
Possible defect on the charger or wheel; repair is
then required.
Each time when
switching on the
e-motion 1 time
The battery pack has less than 60 % capacity
of a new battery.
The achievable range is significantly reduced.
Replace the battery pack against a new one.
every 10 seconds
The battery pack was charged longer than 12
hours but is not completely charged.
The charger is defective is both battery packs are
charged at the same time and the error messages
is indicated for both battery packs.
If both battery packs are charged at the same
time and the error message is indicated for only
one battery pack, this battery pack is defective.
Repair is required in both cases.
every 10 seconds
The voltage in the battery pack is no longer
sufficient for operation, the drive was shut
down by force.
Charge the battery pack immediately.
21
01.12.2008 10:49:14
8
Acoustic error messages (continued)
Acoustic
Repetition
signal on the Acoustic signal
wheel
22
!
Error description
What to do
every 3 seconds
The charger plug is inserted in the charger
socket; the wheel turns at the same time.
Pull the charger plug from the charger socket or
stop the movement of the wheel.
every 10 seconds
The charge process was terminated because
one battery pack is defective.
Repair is required.
every 10 seconds
Overtemperature
of the motor.
Switch off the system and allow it to cool down;
observe the ambient temperature.
every 10 seconds
The signal coming from the push rim is applied
longer than one wheel rotation.
A foreign object may have become wedged in the
push rim. Remove this foreign object.
Defect in the wheel, repair required.
A serious fault of the system is present if other error messages than those shown in the list are signaled. The emotion wheel is then no longer operational and must be sent to the Alber factory for inspection.
6. Power stages and stored parameters
6.1 Power stages
Individual driving parameters can be assigned individually to each e-motion wheel to possibly adapt a wheel to an existing disease pattern
of the wheelchair driver. With regards to this topic, please contact your specialist dealer.
The standard version of the e-motion is equipped with only one power stage. Both power stages can only be utilized with a remote control
which is offered as optional accessory and can be retrofitted at any time.
Power stage 1 (factory setting)
A beep sounds when switching on the wheel, the motor output is 50 % of the maximum possible output of the e-motion.
This power stage is primarily recommended for driving indoors. This results in low current consumption, the battery packs are preserved
and achieve a greater range per battery charge than in power stage 2.
Power stage 2 (factory settings, only in connection with optional remote control)
Two beeps sound when switching on the wheel, the motor output is 80 % of the maximum possible output of the e-motion.
This power stage is primarily recommended for driving outdoors. The current consumption is higher than in
power stage 1 resulting in a correspondingly lower range per battery charge.
6.2 Power assistance
To start moving an e-motion wheel, the push rim mounted to it is moved forward (to drive forward) or backward (to drive backward). This
movement requires a certain amount of force in the hands of the wheelchair driver.
The push rim of the e-motion wheel can now be set so that a comparatively small push is already sufficient to set the wheel in motion.
Programming is done by the specialist dealer authorized by Alber who will also be glad to educate you on additional options of the individual adjustment of the e-motion.
6.3 Rollback delay (only with e-motion wheels with remote control)
If your e-motion is equipped with remote control, it will have a rollback delay that can be activated. This helps the wheelchair driver to
drive up slopes and ramps by preventing the wheelchair from rolling back while repositioning the hands after a push motion.
GA_M15_GB.indd 22
01.12.2008 10:49:14
Driving up slopes and down inclines with activated rollback delay.
You can drive up and down slopes as usual whereby the motors move the e-motion wheels according to the power stage selected and the
preprogrammed power assistance. The automatic rollback delay kicks in when the wheel electronics senses the wheel rolling back against
the original direction of travel. This means that the wheels are slowed down by braking for 5 seconds thus being prevented from rolling
back. This is followed by two short signal tones and the brake function is gradually cancelled. The wheel run free after 5 seconds.
Safe travel on a slope (with activated hill-holder) depends on the total weight (=weight of the person in the wheelchair, the wheelchair,
both e-motion wheels and any other accessories), as well as the charge level of the battery. The following table shows which slopes can be
travelled safely with only a minimally charged battery.
Total weight
Slope that is safe to travel
115 kg
14%
140 kg
11,50%
170 kg
9%
Activating / deactivating the rollback delay
To activate the rollback delay, push the following buttons on the remote control:
• button 1 [23] (for activation in power stage 1), or
• button 2 [22] (for activation in power stage 2).
Push the buttons longer than 3 seconds. Activation is confirmed with a long signal tone.
If you want to switch off the rollback delay, push (depending on the selected power stage) button 1 or 2 again longer than 3 seconds.
Deactivation is confirmed with a long signal sound.
Alternatively, you can also switch off the e-motion wheels. The rollback delay is deactivated if the e-motion is switched off and on again.
23
Safety notes
• In case of especially steep slopes and/or very heavy wheelchair drivers, the rollback delay may possibly not be able to prevent a slow
rolling back of the wheelchair.
• The rollback delay is not a parking brake but delays the wheelchair from rolling back only for a few seconds. Therefore secure your
wheelchair with the parking brakes if you want to stop on a slope.
• Use the rollback delay only with sufficient battery capacity (if at least 2 LEDs are still on)!
• The rollback delay must be reactivated each time after the e-motion wheels have been switched off.
7. Automatic self switch-off
To save energy, time periods have been assigned to the e-motion wheels and the remote control after which they are switch off automatically.
7.1 Automatic wheel self switch-off
The value preset at the factory for the automatic self switch off is 30 minutes.
This value can be changed with the optional remote control. With regards to this topic, please contact your specialist dealer.
7.2 Remote control (optional) self switch-off
The value preset at the factory for the automatic self switch off of the remote control display is 5 minutes. This value can be changed by
corresponding programming of the remote control. With regards to this topic, please contact your specialist dealer.
If the remote control does not find any wheel (for example, because the remote communication could not be established), it always
switches off after 5 seconds. This value cannot be changed.
8. Fuse replacement
As any electric or electronic device, your e-motion is equipped with fuse protection. The fuse responds in case of a defect and thereby protects the electronic components from lasting and expensive damages.
The fuse of the e-motion wheel is located in the electronic system inside the wheel hub. A possibly required fuse replacement, together
with a complete diagnosis of the entire electronic system may only be carried out by the authorized specialist dealer.
GA_M15_GB.indd 23
01.12.2008 10:49:14
8
21
24
23
22
20
9. Remote control (optional)
9.1 Operating controls
They mean:
• Information button [20] to retrieve the current operating status (with the wheels
switched on) as well as activate or deactivate the button lock.
• Display [21] for the optical indication.
• Button 2 [22] to simultaneously switch on both e-motion wheels in power stage 2 as
well activate or deactivate the rollback lock (see chapter 6.3).
• Button 1 [23] to simultaneously switch on both e-motion wheels in power stage 1 as
well activate or deactivate the rollback lock (see chapter 6.3).
• Button 0 [24] to simultaneously switch off both e-motion wheels.
• RESET button [25] to program the wheels.
• Never push this button since the parameters stored in the software of the
wheel may otherwise change requiring them to be reset by the specialist
dealer.
25
An optional bracket [17] is available to store the remote control on the wheelchair.
24
17
Activation / deactivation of the button lock
To prevent accidental activation of functions, the buttons of the remote control can be
locked. For this purpose, press the information button [20] two times in quick succession. The lock of the keypad will be shown in the display [21] as „L“ (alternating with
the displays of other functions already activated and an error display, if applicable).
The button lock remains active until it is canceled again. For this purpose,
press the information button [20] again two times in quick succession.
Based on an average daily use of the remote control, the life of the battery already
inserted at the factory is roughly 5 years.
If the battery replacement becomes necessary, the battery symbol lights up at the lower
right part of the display during all display situations.
The battery may only be replaced by the specialist dealer authorized by Alber.
GA_M15_GB.indd 24
01.12.2008 10:49:15
9.2 Function display
The remote control is activated after pushing any of the operating controls introduced in Chapter 9.1. All
display elements light up hereby for approx. 1 second (refer to the adjacent graphic illustration).
Push the button [23] on the remote control to simultaneously switch on both e-motion wheels in power
stage 1.
Power stage 1 and the charge status of both battery packs is indicated in the display.
A beep sounds at the e-motion wheels. The LEDs [1] on the wheel hub also signal the charge status of
the respective battery pack.
If you press the button [23] longer than 3 seconds, you will activate or deactivate the rollback lock (see
chapter 6.3) with this action. Attention: Power stage 1 is also activated at the same time.
25
Push the button [22] on the remote control to simultaneously switch on both e-motion wheels in power
stage 2.
Power stage 2 and the charge status of both battery packs is indicated in the display.
Two beeps sound at the e-motion wheels. The LEDs [1] on the wheel hub also signal the charge status of
the respective battery pack.
If you press the button [22] longer than 3 seconds, you will activate or deactivate the rollback lock (see
chapter 6.3) with this action. Attention: Power stage 2 is also activated at the same time.
Push the button [24] on the remote control to simultaneously switch off both e-motion wheels. A zero
and the charge status of both battery packs is indicated in the display.
A beep sounds at the e-motion wheels.
If the remote control does not detect the two wheels (for example, due to a poor remote communication), the information message shown here appears on the display.
GA_M15_GB.indd 25
01.12.2008 10:49:16
8
If button 1 or 2 is pressed longer than 3 second to activate or deactivate the rollback lock, a long signal
tone sounds on the e-motion wheel in each case. If the rollback lock is active, the following will be
displayed: the current charge status of the two battery packs, an „H“ in alternating fashion, the power
stage currently set (1 or 2) and, if applicable, additional functions (e.g. the button lock).
In case of an error, only the corresponding error code is displayed.
When activating the button lock, the following is shown in the display: the current charge status of the
two battery packs, an „L“ in alternating fashion, the power stage currently set (1 or 2) and in case an
error occurs, the corresponding error code.
26
9.3 Display of the battery pack charge status
The charge status of the two e-motion battery packs is indicated in the upper half of the display [21].
Please note that because of different drive moments or possibly differently adjusted wheels the current
consumption may also vary (see also Chapter 6).
The respective charge status of a battery pack is indicated as follows:
5 bars come on – Battery pack is charged 100 %.
Avoid driving down slopes at high speeds because a forced shut-down of the wheel may occur due to the
current return in the wheels and the risk of overvoltage in the battery pack.
4 bars come on – Battery pack is charged 80 %.
3 bars come on – Battery pack is charged 60 %.
2 bars come on – Battery pack is charged 40 %.
We recommend not driving too far without charging the batteries first.
GA_M15_GB.indd 26
01.12.2008 10:49:17
1 bar comes on – Battery pack is charged 20 %.
Charge the batteries before starting to drive.
No bars come on – Battery pack is empty.
Driving without charging the battery pack is not possible.
27
9.4 Display of error messages
If an error is indicated according to the table on the following page and the left battery symbol flashes
at the same time, the error indicated occurs only in the left wheel or in the battery pack of the left
wheel.
If an error is indicated according to the table on the following page and the right battery symbol flashes
at the same time, the error indicated occurs only in the right wheel or in the battery pack of the right
wheel.
If an error is indicated according to the table on the following page and both battery symbols flash at
the same time, the error indicated occurs in both wheels or in the battery packs of both wheels.
GA_M15_GB.indd 27
01.12.2008 10:49:18
8
Table Error Messages
Indication in
the display
Acoustic signal on the
wheel
Repetition
Acoustic
signal
Error description
What to do
every 10
seconds
Overtemperature
of the motor.
Switch off the system and allow it to
cool down; observe the ambient temperature.
every 8
seconds
Overvoltage in the battery pack; a forced
shut-down is immediately pending.
The error occurs especially when driving
down slopes with fully charged battery
pack. Drive at a slower speed.
every 10
seconds
Overvoltage of the battery pack.
The system is shut down by force.
The error occurs especially when driving
down slopes with fully charged battery
pack. Drive at a slower speed.
every 60
seconds
Undervoltage of the battery pack (< 10 %
remaining capacity), a forced shut-down is
immediately pending.
Charge the battery pack immediately.
every 10
seconds
Undervoltage of the battery pack (< 5 %
remaining capacity), a forced shut-down is
immediately pending.
Complete a ride down a slope. Charge
the battery pack immediately.
every 10
seconds
The voltage in the battery pack is no longer sufficient for operation, the drive was
shut down by force.
Charge the battery pack immediately.
every 10
seconds
The signal coming from the push rim is
applied longer than one wheel rotation.
A foreign object may have become
wedged in the push rim. Remove this
foreign object.
Defect in the wheel, repair required.
1 time each
time the
e-motion is
switched on
The battery pack has less than 60 % capac- The achievable range is significantly
ity of a new battery.
reduced. Replace the battery pack
against a new one.
every 3
seconds
The charger plug is inserted in the charger
socket; the wheel turns at the same time.
28
GA_M15_GB.indd 28
Pull the charger plug from the charger
socket or stop the movement of the
wheel.
01.12.2008 10:49:20
Table Error Messages (continued)
Indication in
the display
!
GA_M15_GB.indd 29
Acoustic signal on the
wheel
Repetition
Acoustic
signal
Error description
What to do
every 5
seconds
The charger plug is inserted in the charger
socket but no charge current is flowing.
Check the operational readiness of the
charger.
Possible defect on the charger or wheel;
repair is then required.
every 10
seconds
The battery pack was charged longer than
12 hours but is not completely charged.
The charger is defective is both battery
packs are charged at the same time and
the error messages is indicated for both
battery packs.
If both battery packs are charged at
the same time and the error message is
indicated for only one battery pack, this
battery pack is defective.
Repair is required in both cases.
every 10
seconds
The charging process was terminated
because the ambient temperature
is below 0 °C
or
above 0 °C.
every 10
seconds
The charge process was terminated because Repair is required.
one battery pack is defective.
29
Charge the battery packs only at temperatures
above 0 °C
and
below 40 °C.
A serious fault of the overall system is present if other error messages than those listed in the display are shown
or other signal tones that those listed sound on the wheels. Your e-motion is then no longer operational and
must be sent to the Alber factory for inspection.
01.12.2008 10:49:20
8
10. Anti-tippers (optional)
Because your wheelchair may already be equipped with anti-tippers, Alber anti-tippers are only offered as accessory. When using the original wheelchair anti-tippers, the
instructions and safety information of the manufacturer apply to their usage.
When using Alber anti-tippers, two additional brackets are attached to your wheelchair in
which the anti-tippers are introduced. The following instructions and safety information
applies.
10.1 Attaching and removing the Alber anti-tippers
• Pull the quickpin [28] out of the receiver fork of the bracket [29] by using your thumb
to press on the pin and at the same time using your forefinger and middle finger to
pull it out.
28
29
28
• Insert the clamping piece of the anti-tipper [31] into the receiver fork of the bracket
[29].
• Lock the receiver fork of the bracket [29] with the quickpin [28]. Press on the pin
with your thumb and then push it all the way against the stop into the bracket.
30
31
29
30
28
• Check the secure seat of the quickpin [28] in the receiver fork of the bracket [29]. It
may not be pulled out again without pushing the unlocking mechanism.
• Attach the second anti-tipper.
Remove anti-tippers in the reverse order.
GA_M15_GB.indd 30
01.12.2008 10:49:21
10.2 Using the Alber anti-tippers
• Push with the foot against an anti-tipper as shown in the graphic illustration.
• At the same time, pull the wheelchair by its handles slightly to the top and rear until
the wheelchair was raised and the anti-tippers engage in a fixed position.
31
• You can not attach or remove a wheel. Repeat the process with the second anti-tipper
on the other side of the wheelchair.
• Once the wheels have been attached, you can return the anti-tippers to the original
position. To do so, push the wheelchair forward and the holding rod [30] back with
the foot at the same time.
30
GA_M15_GB.indd 31
01.12.2008 10:49:22
8
10.3 Important operating and safety information
32
GA_M15_GB.indd 32
30
!
Jacking up the wheelchair while the driver is in it is not permitted!
!
Anti-tippers are no transfer rolls!
Do not move the wheelchair while jacked up!
!
Careful when adjusting or folding the anti-tippers, especially when
making the settings or operation with your hand. There is a risk of
crushing due to the required high spring force between holding rod
[30] and the clamping piece [31].
31
01.12.2008 10:49:23
11. Safety and hazard notes
For reasons of safety, apply the wheelchair parking brakes when you have stopped, especially on hills and slopes to avoid the wheelchair
from rolling away unintentionally.
In order to ensure safe use of your e-motion, the following notes must be strictly observed.
11.1 Safety notes
In the (unlikely) event of overheating or fire of the battery pack it must not come into contact with water or any other liquids at any rate.
The battery manufacturers recommend sand as the only useful means to extinguish the fire.
Before starting a ride/journey, observe the following:
• The e-motion may only be attached to wheelchairs with hand rims which have been approved by Ulrich Alber GmbH for this purpose.
• Therefore always mount the e-motion wheels according to their identification on the left and right side of your wheelchair, respectively.
Incorrectly attached wheels may lead to accidents because of their different programming.
• The bracket for the e-motion may only be assembled and altered by Ulrich Alber GmbH or the medical supplies provider authorized by
Alber.
• The wheelchair user manual must be followed when using the e-motion.
• The wheelchair may not be driven without the two anti-tippers attached.
• Attach the original anti-tippers of the wheelchair manufacturer or the optionally available Alber anti-tippers to your wheelchair.
• Before each ride, check the condition of the e-motion wheels. The e-motion may no longer be operated once the tires have reached
their wear limit (a tire thread can no longer be seen).
• Before each ride, check the function of the parking brakes of your wheelchair. You may not drive without functioning parking brakes.
• If your wheelchair has pneumatic tires:
Check the tire pressure of the e-motion wheels at regular intervals. It must be between 6.0 bar (85 psi) and 10.0 bar (145 psi). Check
the tire pressure of the steering wheels according to the notes and specifications of the wheelchair manufacturer. If the air pressure is
too low, this can severely influence the driving behaviour and range.
• Check the correct seat of the e-motion wheels in the two wheel receivers on your wheelchair before each ride.
33
When riding with the e-motion, observe the following:
• Before driving the e-motion on slopes or hills, you should be able to safely master handling the device on flat terrain.
• The maximum permissible gradient specified by the wheelchair manufacturer must not be exceeded.
• Approach steps or steep drops with exceptional care.
• If the e-motion is switched on, each impulse on the push rims is converted into a drive command. When stopping or waiting at potential hazard spots (e.g. while waiting at a pedestrian crossing, on hills and slopes or on ramps of any type) remove your hands from the
push rims and secure your wheelchair with the parking brakes.
• Never reach into the wheel while the e-motion is switched on.
• Never insert or throw any objects into an e-motion wheel that is switched on or off.
• Never attach any objects to the push rims! This could lead to undesirable drive movements.
• When driving on paths, keep a sufficient distance (if possible, at least a wheelchair's width) from the curbstone edge.
• Avoid travel on non-solid surfaces (e.g. on loose gravel, sand, mud, snow, ice or through deep puddles).
• Never leave the e-motion unattended, either switched off or on.
• The performance of the e-motion can be impaired by electromagnetic fields, for example, generated by mobile phones. The supplementary drive must therefore be switched off when mobile phones are used in direct proximity to the wheelchair.
• The e-motion can have a disruptive effect on other equipment, such as security panels in department stores.
• Escalators and motorized walkways may not be entered with the e-motion.
• While driving at the highest speed, never change the direction of travel suddenly to the left or right, as this many cause the wheelchair
to tip over to the side.
• Reduce your speed when negotiating curves.
• If you intend to stop with your wheelchair on an incline or downhill slope, the wheelchair must be parked perpendicular to the slope or
incline and the parking brake pulled.
• Pull the parking brakes of your wheelchair after each ride or when stopping the wheelchair to prevent unintentional rolling away!
• Never drive parallel along slopes.
• Never reach into the spokes of the e-motion wheels while driving or into the front wheels of your wheelchair.
• Brake the e-motion gently and according to your speed (not abruptly).
• While driving in vehicles, sit only on the seats installed there using the pertaining restraint systems. Disregarding these instructions
bears the risk that both you and the other passengers could be injured in case of an accident.
• Secure your wheelchair and the e-motion wheels according to the respective applicable legal stipulations and rules when driving in
vehicles.
• When driving on public roads and paths, observe the instructions of the Highway Code and the Federal Motor Safety Standards (StVZO).
GA_M15_GB.indd 33
01.12.2008 10:49:23
8
• The e-motion is only intended for persons with limited mobility and may not be used for any other purpose, e.g. for playing children or
to transport goods.
• Operating the e-motion in the vicinity of strong magnetic fields as they may be caused by magnetic clamps, transformers, tomography,
etc. is not permitted.
• Avoid driving with the e-motion during adverse conditions, for example, during storm, hail and tall brushwood.
Observe the following after completing the ride with your e-motion:
• When not in operation, switch off the e-motion straightaway to avoid unintentionally triggering a drive movement through contact with
the push rims and battery from self-discharging.
• Apply the parking brakes of the wheelchair at each stop.
• If possible, charge the battery pack on your e-motion after each ride.
34
11.2 Safety note on using the e-motion in vehicles
Wheelchairs or the combination of the e-motion wheels with a wheelchair are not approved in all states to be used as a seat in vehicles or
transport vehicles for disabled persons.
If you plan such use, you are obligated to learn the regulations and laws applicable in your home country.
If the combination of the e-motion wheels with a wheelchair are approved in your country for use as a seat in vehicles or transport vehicles for disabled persons,
• the wheelchair and the e-motion wheels must be secured according to the applicable regulations and laws of your country.
• Suitable mechanical systems must be chosen which relieve the axles of the e-motion during this type of use and do not put additional
strain on them. No additional forces may work on the stub axles of the e-motion wheels.
Ulrich Alber GmbH rejects any liability for accidents and their consequences or for damages to the wheelchair or the e-motion wheels due
to
• non-compliance with the regulations and laws applying in your country
• and the use of prohibited or unsuitable safety systems.
11.3 Obstacles
Overcome obstacles (e.g. curbs) only while driving backward, if possible. The maximum permitted height of the obstacle is thereby 50 mm.
Attention! When driving over obstacles in reverse, the full functionality of the Alber anti-tippers is not guaranteed! Therefore, drive slowly
and carefully in reverse until the wheels of your e-motion touch the obstacle. Then, carefully drive over the obstacle. We recommend the
assistance of an accompanying person.
GA_M15_GB.indd 34
01.12.2008 10:49:23
11.4 Hazard points and hazardous situations
• The operator of the wheelchair makes an independent decision about the routes to be traveled based on his/her driving skills and physical capabilities.
• Before starting a ride, the user must check the e-motion wheels for run-down or damaged tires, as well as the charge status of the two
battery packs and the proper functioning of the optical and acoustic signal devices on the wheel and the remote control.
• These safety checks as well as the personal driving skills of the user are particularly important at the following hazard points which are
to be negotiated at the discretion of the e-motion driver:
- Quays, landing places and moorings, paths and places near bodies of water, unsecured bridges and dikes
- narrow paths, sloping paths (e.g. ramps and entrance ramps), narrow paths on a downhill slope, mountain paths
- narrow and/or steep/sloping paths on main traffic routes and side streets or near steep drops
- leaf and snow covered or icy tracks/roads
- ramps and lifts on vehicles.
!
When negotiating a curve or when turning on hills or sloping paths, there can be an increased inclination to tip
to the side due to a shift in the center of gravity. For this reason, carry out this drive maneuver with increased
caution and at a slower speed!
!
Utmost caution is called for when crossing roads, junctions and railway crossing points. Never cross rail tracks
embedded in roads or at railway crossings parallel as the wheels could become jammed.
!
Utmost care is called for when traversing ramps and lifts on vehicles. The e-motion must be switched off while
the ramp or lift is being raised or lowered. Likewise, the parking brakes must be applied on the wheelchair. Rolling away, e.g. due to unintentional drive commands, is hereby prevented.
!
When conditions are wet, the grip of the tires on the surface is reduced; there is an increased risk of slipping.
Adjust your driving behaviour accordingly and never drive with run down tires.
35
12. Care, safety checks (maintenance), reuse and disposal
12.1 Care
As already pointed out in other chapters, the battery pack principally remains in the e-motion wheel and is only removed for service situations or air transport. Cleaning is therefore usually only done on the surface of the wheel and not inside the wheel hub or on the bottom of
the battery pack.
Neither damp nor wet cloths or liquid cleaning agents may be used for any cleaning procedure. This means, rub the wheel and the inside
battery pack only with dry cloths.
Always make sure that neither liquids nor moisture enters the wheel hub or the battery pack.
12.2 Safety checks (maintenance)
Your e-motion is an exceptionally low-maintenance device. Nonetheless, check all attachment and accessory parts for a firm seat at regular
intervals. Your e-motion shall be subjected to a professional safety inspection no later than every 2 years to examine the full functionality
and safety. Especially damages due to system usage or wear and fatigue signs can be uncovered during this inspection that are not detectable from the outside. Please contact your specialist dealer, authorized by Alber, in this regard.
With the exception of the tires, no part of the drive is subject to any wear worth mentioning. The tires must not be used below their wear
limit in order to safely transfer drive and braking force to your e-motion at all times.
!
GA_M15_GB.indd 35
Service work and repairs to the e-motion may only be carried out by authorized specialist dealers or by Alber. If
any errors occur, please contact your specialist dealer or the Alber Service Center as well.
01.12.2008 10:49:24
8
12.3 Re-use
If your e-motion has been made available to you by your health insurance company and you do not need it any longer, you should contact
your health insurance company or your medical supplies provider. Your e-motion can be re-used easily and economically.
• Alber recommends conducting a safety inspection before each re-use depending on the condition of the device. However, your e-motion
shall be subjected to a professional safety inspection no later than every 2 years to examine the full functionality and safety.
• The brackets with which the e-motion is secured to the wheelchair can be easily and quickly removed from the wheelchair by the
authorized specialist dealer and attached to a new wheelchair.
• The system is protected against corrosion, but as a precaution you should check it regularly by a visual check.
• In addition to the cleaning instructions detailed in Chapter 12.1, the push rims and all plastic parts of the e-motion wheel accessible
from the outside as well as the optional remote control must be disinfected before re-use. To do this, use cleaning agents suitable for
disinfection by wiping according to the instructions of the corresponding manufacturer.
12.4 Disposal
36
This device, its battery pack and accessories are long-lasting products.
However, they may contain materials that prove to be hazardous for the environment if they are disposed of in places
(e.g. landfills) that are not intended for this purpose according to the current applicable legislation in the respective
country.
The symbol of the “crossed-out refuse bin" (in accordance with WEEE Directive 2002/96/EC) is placed on this product to
remind you of your obligation to recycle.
Therefore please act in an environmentally-conscious manner and bring this product to your regional recycling centre at
the end of its service life.
Please familiarize yourself with the applicable legislation in your country regarding disposal, because the WEEE Directive does not apply
in all European States. For example, this product does not fall under the national implementation of WEEE in the Electrical and Electronic
Equipment Act as means of transport.
These components are also alternatively taken back by Alber or Alber dealers for proper and environmentally sound disposal.
13. Guarantee, warranty and liability
13.1 Warranty for defects
Alber guarantees that the e-motion is free from defects at the time of transfer. These warranty claims expire 24 months after delivery of the
e-motion.
13.2 Guarantee of durability
Alber provides a 24 month guarantee of durability for the e-motion (exception: the guarantee of durability for the battery pack is 12 months).
The guarantee of durability does not include
• devices where the serial numbers have been altered, disfigured or removed
• wear parts such as tires or operating controls
• defects due to natural wear and tear, faulty handling, in particular defects due to non-compliance with this user manual, defects due to
accidents, negligent damage, the effects of fire or water, force majeure and other events which lie outside the influence of Alber.
• any servicing work required due to daily use (e.g. replacing the tires)
• Checking the device without finding any fault
13.3 Liability
Ulrich Alber GmbH as the manufacturer of the e-motion is not responsible for its safety and reliability if:
• the e-motion is handled inappropriately
• the e-motion is not serviced by an authorized specialist dealer or by Ulrich Alber GmbH every 2 years
• the e-motion is operated contrary to instructions/notes in this user manual
• the e-motion is operated with insufficient battery charge
• repairs or other work is carried out by unauthorized persons
• foreign parts (parts not belonging to the system) are attached or connected to the e-motion
• parts of the e-motion are dismantled.
GA_M15_GB.indd 36
01.12.2008 10:49:24
Ihre Alber-Vertretung / Your Alber representative / Votre représentation Alber /
Vostra rappresentanza Alber / Su representación Alber / Din Alber representant /
Din Alber-agenturene / Uw distributeur Alber / Deres Alber-repræsentation
Ulrich Alber GmbH
Vor dem Weißen Stein 21
72461 Albstadt-Tailfingen
Telefon +49 (0)7432 2006-0
Telefax +49 (0)7432 2006-299
[email protected]
www.alber.de
© Ulrich Alber, Albstadt
M15 Gebrauchsanweisung Umschlag 4 4
www.alber.de
28.08.2008 14:05:00