1
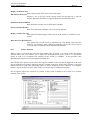
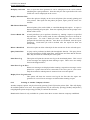
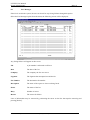
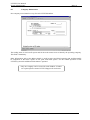
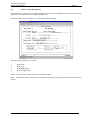
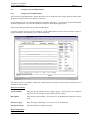
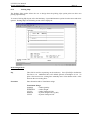
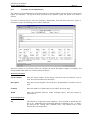
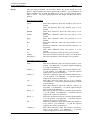
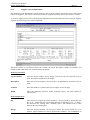
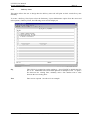
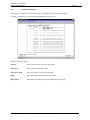
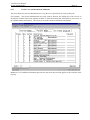
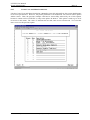
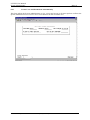
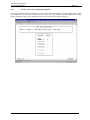
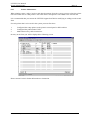
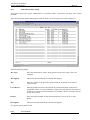
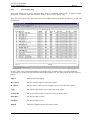
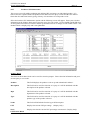
LETTUS User Manual System Administrator Menu 0 Menu 0 - Table of Contents 0.1 Printer System Administration .................................................................................0-2 0.1.1 Printer Selection..............................................................................0-3 0.1.2 Printing to Another Company's Printer...........................................0-5 0.2 Fax Messages............................................................................................................0-6 0.3 Agreement Type Maintenance..................................................................................0-7 0.4 Sale Type Maintenance ............................................................................................0-8 0.5 Company Maintenance .............................................................................................0-9 0.6 Bank Account Maintenance.....................................................................................0-10 0.7 Stationery Layout Maintenance...............................................................................0-11 0.7.1 Cheque Layout Maintenance .........................................................0-11 0.7.2 Picking Slips ..................................................................................0-14 0.7.3 Customer Layout Maintenance ......................................................0-15 0.7.4 Supplier Layout Maintenance ........................................................0-18 0.7.5 Delivery Notes ...............................................................................0-20 0.8 Parameter Maintenance ...........................................................................................0-21 0.9 Cashier Maintenance ...............................................................................................0-22 0.10 System Configuration ..............................................................................................0-23 0.11 Archive Database.....................................................................................................0-28 0.12 Menu Password Maintenance .................................................................................0-29 0.13 Modify Your Own Password ...................................................................................0-30 0.14 Create Users and Permissions Manually .................................................................0-31 0.15 Create Users and Menu Permissions .......................................................................0-32 0.16 Create Users and Permissions Automatically ..........................................................0-33 0.17 Review Access for Specific Menu Options .............................................................0-34 0.18 Printer Type Maintenance .......................................................................................0-35 0.19 Printer Maintenance.................................................................................................0-36 0.20 Fax Maintenance......................................................................................................0-37 0.21 Immediate Printer Setup ..........................................................................................0-38 0.22 User Activity............................................................................................................0-38 0.23 User Activity Log ....................................................................................................0-40 0.24 Indexes.....................................................................................................................0-41 0.25 Produce GST Maintenance ......................................................................................0-42 0.26 Master Charge GST Maintenance ...........................................................................0-44 Printed on 16 May, 2002 Fresh Computer Systems Pty Ltd 0-1 LETTUS User Manual System Administrator 0.1 Menu 0 Printer System Administration Whenever the user requests a report they will be prompted to select which printer to print on. This is done via the printer selection screen. This printing process is handled at the System level by the Printer Administration screen and at the User level by the Printer Selection screen. The system administrator is able to provide general control of all of the printers in the system by using this option. This menu option will allow the system administrator to: view and control jobs going to printers start and stop the printer scheduler make the printer unavailable to the system The screen will display all printers that have been setup for this system and a list of permissible options. The following options require the entry of a printer number once the option is selected. Reject Further Jobs on Printer Will allow the printer to process the current print jobs but will close the printer and will not allow any further spooled print jobs to be sent to it. This command is issued automatically whenever a user attempts to print direct on pre-printed stationery. Accept Further Jobs on Printer Will open a closed printer so that it may be used by any operator again. Display Jobs on Printer Lists all current jobs on the selected printer showing the print job ID, who submitted the job along with the job and printers current status. Kill Job on Printer Immediately kills the current job on the selected printer. Note that you may have to use the same UNIX login as the original user. The following options do not require the entry of a printer number for their operation. Printed on 16 May, 2002 Fresh Computer Systems Pty Ltd 0-2 LETTUS User Manual System Administrator Menu 0 Display All Printer Jobs Shows all print jobs, their owner and current status. Kill Selected Print Job Displays a list of all jobs on the current printer and prompts for a job's ID number. When the ID number is supplied that job is immediately killed. Shut Down Print Scheduler Shuts down the currently active UNIX print scheduler. Start Up Print Scheduler Starts the UNIX print scheduler if it is not already running. Display or Kill a Fax Job This option will either display or kill a fax job if the facility is available on your system. Reset Screen to 80 characters This option will reset the screen to 80 characters wide should it have become locked in 132 character mode. Whilst not normally required this may occur on occasions when a module has been terminated abnormally. 0.1.1 Printer Selection When a report is run from the menu and from within some programs, you will be shown the Printer selection form. This form enables you to display the document on the screen, print it to a nominated printer or send it to a nominated fax machine (if this facility is available). It also provides some administration facilities to kill jobs and process batch jobs. The left half of the printer selection form lists options available to the user and the right half of the form lists all of the devices (printers and faxes) that are available to the user. Each printer will have a specified number and this is used when nominating where to send a document to have it printed. For example, Printer 1 may be on the sales floor while Printer 5 is used solely for management reports. Not all options require the selection of a printer as they result in output to the screen or to a printer attached to the screen. Printed on 16 May, 2002 Fresh Computer Systems Pty Ltd 0-3 LETTUS User Manual System Administrator Menu 0 Selecting any of the following options will require you to choose a printer from the list on the right side of the form. Send Report to Printer Reprint Last Report This option is used to specify which printer to print a report on. Select 1 to print on Printer 1, select 2 to print on Printer 2 and so on. This option can be used to reprint the last report that was specified to any available printer. For example if the user selected a report to be displayed on the screen and then decided to print this report then this option would be used. The report parameters do not need to be re-specified. For each UNIX login user, the last copy of each different report generated is retained on file, and so is available for immediate re-print through this option. Background Print A report can be run in background, freeing the terminal for further use. When selecting this option the report will be formatted "behind the scenes" and be printed when the printer becomes available. This is used particularly for reports that require some time to format and have a low priority. Note however that once the report has begun formatting you can not stop it processing, but you can kill it once it starts printing. Display jobs on Specific Printer Select this option to display on the screen all printer jobs currently printing and to be printed on the selected printer. Details provided include the printer job queue, print id number, the owner of the print job, the size of the print job and the date that the job was queued. Kill current Job on Printer If you wish to stop a print-out from being completed on the selected printer you select this option. The job that is currently being printed will be stopped and will be removed from the print queue. This is often used when only the first few pages of a long report are required, or if a report was asked for by mistake. Change Printer Setting The pitch of the printer (size of the printing) can be changed via the terminal through this option. Available pitches are displayed to allow you to select the required pitch. Note that you will have to set the pitch back to the default once you have finished. The following Options do not require the selection of a printer. Slave Screen Printer Where a printer has been connected to the slave port of your screen it is selected using this option. Only the terminal to which the printer is connected can access this printer. Display on Screen Select this option to view the document on the screen. You will be able to move up and down through the document. You can not scroll sideways. Reports that are wider than 132 characters will only show the first 132 characters, however all characters will be printed if the printer has the capability. Reprint on Slave Screen Printer When a report has been generated it may be reprinted on a printer that has been connected to the slave port of your screen. Only the terminal to which the printer is connected can access this printer. Printed on 16 May, 2002 Fresh Computer Systems Pty Ltd 0-4 LETTUS User Manual System Administrator Redisplay on Screen Menu 0 Once a report has been generated it can be redisplayed on the screen without redefining the report parameters. Note that only the last report defined for each UNIX user can be redisplayed on the screen. Display all Printer Jobs Select this option to display on the screen all printer jobs currently printing and to be printed. This report lists the printer job queue, report, print id, owner, size and date. Kill Selected Print Job Selected printer jobs can be killed or cancelled through this option. A report is displayed detailing all print jobs. Enter the required print id at the prompt at the bottom of the screen. Create a Batch Job A batch job allows you to perform a function e.g. running a report at a specified date and time. This is usually used for time consuming processes to be done at off-peak times. To create a batch job select this option. The user will be prompted for the batch day and time. Once these are confirmed, enter the report parameters. Each batch job will be deleted after the report has been run successfully. Delete a Batch Job Select this option to delete a batch job for the current user for the selected report. Query Batch Jobs A query can be performed on batch jobs through this function. This query shows the report description, UNIX login name, entered Date and Time and the Execute Date, Day and Time for all batch jobs in the queue. Print Error Log This option will print the current error log to the nominated printer. This is used if error messages are displayed when running a report. These errors are usually faxed to the Support Office. Print Error Log on Slave When error messages are displayed when running a report these messages can be printed on a printer that has been connected to the slave port of your screen. Only the terminal to which printer is connected can access this printer. Display Error Log on Screen This option will show the current error log for the first time the report was generated. It is used if error messages are deleted when running a report. 0.1.2 Printing to Another Company's Printer Another company's printer may be selected by pressing [ListVal] from the printer field. This will display all available printers to be used. The required printer may be selected by pressing [NxtRec] and [PrvRec] to highlight the printer and pressing [NxtFld] to confirm the selection. Note that this feature is only available for systems where there are more than one company established. Printed on 16 May, 2002 Fresh Computer Systems Pty Ltd 0-5 LETTUS User Manual System Administrator 0.2 Menu 0 Fax Messages If the fax is used in the system, the user can check for any faxing failures through this option. Select the Fax Messages option from the menu, the following screen will be displayed: Any faxing failures will appear in this screen. Job A job number is allocated to all faxes. Date The date of the fax. Company The company the fax was sent to. Logname The logname that attempted to send the fax. Fax Number The destination fax number. Description The name of the report etc. that was being faxed. Status The status of the fax. Retry Number of retries. Reason The reason for failure. Lines of information may be removed by positioning the cursor on the line that requires removing and pressing [Delrec]. Printed on 16 May, 2002 Fresh Computer Systems Pty Ltd 0-6 LETTUS User Manual System Administrator 0.3 Menu 0 Agreement Type Maintenance Agreement Types are used throughout the system to distinguish different groups of supplier purchases, for example, purchases from growers. These agreement types exist to control data entry, assist in maintaining data integrity and for reporting. Note that these types are usually setup by your Support Staff. It is recommended that you contact them before making any changes or adding new types. Select the Agreement Type Maintenance option from the menu. Enter the following fields: Type Enter the code for the method of lot purchased. Name Enter the name for the method of lot purchased. Description Enter the description for the method of lot purchased. Printed on 16 May, 2002 Fresh Computer Systems Pty Ltd 0-7 LETTUS User Manual System Administrator 0.4 Menu 0 Sale Type Maintenance Sale Types are used throughout the system to distinguish different groups of sales, for example, cash sales, credit sales or normal sales. These sales types exist to control data entry, assist in maintaining data integrity and for reporting. Note that these types are usually setup by your Support Staff. It is recommended that you contact them before making any changes or adding new types. Select the Sale Type Maintenance option from the System Administration menu and the following screen will be displayed: Enter the following fields: Type Enter the type of sale. Name Enter the name of the sale type. Up to 6 characters may be used. Note the following restrictions: O type sale must have the name OPEN, T - TAKEON and X - XFER. Description A 20 character description for this sale type can be entered in this field. Printed on 16 May, 2002 Fresh Computer Systems Pty Ltd 0-8 LETTUS User Manual System Administrator 0.5 Menu 0 Company Maintenance One company record must be set up for each LETTUS database. The trading name is used on all reports and for the main menu screen to identify the operating company. This field is mandatory. Other information, such as the address details, is used in some specialised reporting and would normally be completed so that these reports do not print with blank spaces. For the normal operation of the LETTUS system this additional information is optional. Only one company can be created for each database. If others are required please contact LETTUS Support for assistance. Printed on 16 May, 2002 Fresh Computer Systems Pty Ltd 0-9 LETTUS User Manual System Administrator 0.6 Menu 0 Bank Account Maintenance Each bank account used by the company should have a bank record established. The bank record directs payments and receipts to the correct general ledger code. Selection of this option will display a screen similar to the following: The following information is required: Bank name Bank code Bank BSB number General ledger code If EFT is to be used the details must also be established here. Note The bank account record must be established before any receipts or payments can be made on the system. Printed on 16 May, 2002 Fresh Computer Systems Pty Ltd 0-10 LETTUS User Manual System Administrator Menu 0 0.7 Stationery Layout Maintenance 0.7.1 Cheque Layout Maintenance The Cheque Layout Maintenance option allows the user to design how the cheque printing option prints cheques to conform to their own cheque/s stationery. Cheque Stationery can vary between financial institutions and states. Consult your financial institutions for their requirements. For more information or samples contact the Support Office. The layout is then specified in the cheque printing option. To create a cheque layout select the stationery Layout Maintenance from the menu and select option 1, Cheque Stationery, the following screen will be displayed: The form consists of two blocks. Block one contains the layout number and description while block two contains the layout details. In the Layout block Layout Number Enter the layout number for this cheque design. Note that only one character may be used. This cheque layout number must be unique. Description Enter the layout description. Note that up to 30 alphanumeric characters may be used. Stationery Type Enter the Type of Stationery: (L) Loose Leaf, (C) Continuous Cheques Per Page Enter the number of cheques per page. In the Design block Printed on 16 May, 2002 Fresh Computer Systems Pty Ltd 0-11 LETTUS User Manual System Administrator Menu 0 Seq This field is used for sequencing on the cheque stationery. Press [NxtFld] to default the first line to 10. Additional lines will default upwards in multiples of ten. To print a line between two existing lines manually enter a line number with a value between the two existing lines. Design Enter the design variables (as listed below) where the cheque details are to be printed. Spaces (blanks) are used to position the variables. Expandable Design Variables PPPPPPPPP Enter a series of "P"'s where the payee is to be printed. The number of P (characters) entered will represent the number of characters printed on the cheque. Note that between 9 and 80 characters may be used. The Supplier Name field is used as the payee when printing cheques. NNNNNNNNN Enter a series of Ns where the payee line 2 is to be printed, which can optionally be used as a bilingual supplier name. The number of N (characters) entered will represent the number of characters printed on the cheque. Note that between 9 and 80 characters may be used. AAAAAAAAA Enter a series of As where the payee address line 1 is to be printed. The number of A (characters) entered will represent the number of characters printed on the cheque. Note that between 9 and 80 characters may be used. BBBBBBBBB Enter a series of As where the payee address line 2 is to be printed. The number of A (characters) entered will represent the number of characters printed on the cheque. Note that between 9 and 80 characters may be used. CCCCCCCCC Enter a series of Cs where the city is to be printed. The number of C (characters) entered will represent the number of characters printed on the cheque. Note that between 9 and 80 characters may be used. Static Design Variables SSS Enter these characters where the state is to be printed. POST Enter these characters where the postcode is to be printed. Printed on 16 May, 2002 DD-MMM-YY Enter this series of characters where the cheque date is to be printed. 9999999.99 Enter these characters where the cheque amount is to be printed. Fresh Computer Systems Pty Ltd 0-12 LETTUS User Manual System Administrator Menu 0 Amt in words The following variables are to be entered where they are to appear on the cheque: 00000 Cents 11111 Units 22222 Tens 33333 Hundreds 44444 Thousands 55555 Ten Thousands 66666 Hundred Thousands 77777 Millions (Optional) All variables are of fixed length as displayed in the Legend except for Payee which must be between 9 and 80 characters. Note that a standard cheque is 21 lines. [DupFld] enables the user to regenerate line numbers into multiples of 10. [DupRec] enables the user to print the layout on plain paper. This printout can be positioned on the cheque stationery to check for correct design. The [Menu] key may be used to copy the layout to assist with the creation of another cheque layout. Printed on 16 May, 2002 Fresh Computer Systems Pty Ltd 0-13 LETTUS User Manual System Administrator 0.7.2 Menu 0 Picking Slips The Picking Slips option allows the user to design how the picking slips option prints on their own picking slip stationery. To create a Picking Slip layout select the Stationery Layout Maintenance option from the menu and select option 2, Picking Slips, the following screen will be displayed: In the Design block Seq This field is used for sequencing on the stationery. Press [NxtFld] to default the first line to 10. Additional lines will default upwards in multiples of ten. To print a line between two existing lines manually enter a line number with a value between the two existing lines. Narration Enter Narration and/or Translation strings. Translation Strings. QQQQQ = Order Quantity WWWWW = Order Weight CCCCC = Order Transport Units KKKKK = System Weight Unit (eg KG) TTTTT = System Transport Unit Printed on 16 May, 2002 Fresh Computer Systems Pty Ltd 0-14 LETTUS User Manual System Administrator 0.7.3 Menu 0 Customer Layout Maintenance The customer Layout Maintenance option allows the user to design labels, mail merge letters, and general reports on customers. The layout is then specified in the customer layout list option. (See menu 4 section). To create a customer layout, select the Stationery Maintenance from the menu and select option 3, Customer Layouts, the following screen will be displayed: This form consists of two blocks. Block one contains the layout description, number of columns, and column widths while block two contains the layout details. In the Layout block Layout Number Enter the layout number for the design. Note that only one character may be used. This layout number must be unique. Description Enter the layout description. Note that up to 30 alphanumeric characters may be used. Columns Enter the number of columns this layout requires across the page. Width Enter the maximum character width, including spaces, that each column is required to be. In the Design block Seq Printed on 16 May, 2002 This field is for sequencing on the stationery. Press [NxtFld] to default the first line to 10. Additional lines will default upwards in multiples of ten. To print a line between two existing lines, manually enter a line number with a value between the two existing lines. Fresh Computer Systems Pty Ltd 0-15 LETTUS User Manual System Administrator Design Menu 0 Enter the design variables (as list below) where the layout details are to be printed. Spaces (blanks) are used to position the variables. Any combination of design variables may be used depending on the type of report required (report, label, or letter). Any other typing apart from the design variables will also be printed. Static Design Variables cccccc @ hhhhhh aaaaaa pppp nnn [] tttttt sss country .. dd-mmm-yy Enter these characters where the customer code is to be printed. Enter this character where the customer type is to be printed. Enter these characters where the head code is to be printed. Enter these characters where the area code is to be printed. Enter these characters where the postcode is to be printed. Enter these characters where the copy number is to be printed. Enter these characters where the customer category is to be printed. Enter these characters where the territory is to be printed. Enter these characters where the state is to be printed. Enter these characters where the country is to be printed. Enter these characters where the date is to be printed. Expandable Design Variables name .. address_1 address_2 city .. contact .. phone_1 .. phone_2 .. fax comment_1 Printed on 16 May, 2002 Enter these characters where the customer name is to be printed. Use additional . to pad the required length up to a total of 30 characters. Enter these characters where the customer address line 1 is to be printed. Use additional . to pad the required length up to a total of 30 characters. Enter these characters where the customer address line 2 is to be printed. Use additional . to pad the required length up to a total of 30 characters. Enter these characters where the city is to be printed. Use additional . to pad the required length up to a total of 20 characters. Enter these characters where the customer contact is to be printed. Use additional . to pad the required length up to a total of 20 characters. Enter these characters where the customer phone number 1 is to be printed. Use additional . to pad the required length up to a total of 16 characters. Enter these characters where the customer phone number 2 is to be printed. Use additional . to pad the required length up to a total of 16 characters. Enter these characters where the customer fax number is to be printed. Use additional . to pad the required length up to a total of 16 characters. Enter these characters where the customer comment 1 field is to be printed. Use additional . to pad the required length up to a total of 45 characters. Fresh Computer Systems Pty Ltd 0-16 LETTUS User Manual System Administrator Menu 0 comment_2 Enter these characters where the customer comment 2 field is to be printed. Use additional . to pad the required length up to a total of 45 characters. All these variables are displayed in the legend. The expandable design variables are a minimum of 12 characters up to the maximum indicated in brackets. [DupFld] enables the user to regenerate line numbers into multiples of 10. [DupRec] enables the user to print the layout on plain paper. The [Menu] key may be used to copy the layout to assist with the creation of another customer layout. Printed on 16 May, 2002 Fresh Computer Systems Pty Ltd 0-17 LETTUS User Manual System Administrator 0.7.4 Menu 0 Supplier Layout Maintenance The supplier Layout Maintenance option allows the user to design labels, mail merge letters, and general reports on suppliers. The layout is then specified in the supplier layout list option. (See menu 7 section). To create a supplier layout, select the Stationery Maintenance from the menu and select option 4, Supplier Layouts, the following screen will be displayed: This form consists of two blocks. Block one contains the layout description, number of columns, and column widths while block two contains the layout details. In the Layout block Layout Number Enter the layout number for the design. Note that only one character may be used. This layout number must be unique. Description Enter the layout description. Note that up to 30 alphanumeric characters may be used. Columns Enter the number of columns this layout requires across the page. Width Enter the maximum character width, including spaces, that each column is required to be. In the Design block Seq This field is for sequencing on the stationery. Press [NxtFld] to default the first line to 10. Additional lines will default upwards in multiples of ten. To print a line between two existing lines, manually enter a line number with a value between the two existing lines. Design Enter the design variables (as list below) where the layout details are to be printed. Spaces (blanks) are used to position the variables. Any combination of Printed on 16 May, 2002 Fresh Computer Systems Pty Ltd 0-18 LETTUS User Manual System Administrator Menu 0 design variables may be used depending on the type of report required (report, label, or letter). Any other typing apart from the design variables will also be printed. Static Design Variables ssssss Enter these characters where the supplier code is to be printed. @ Enter this character where the supplier type is to be printed. aaaaaa Enter these characters where the area code is to be printed. ? Enter this character where the active status is to be printed. pppp Enter these characters where the postcode is to be printed. sss Enter these characters where the state is to be printed. country .. Enter these characters where the country is to be printed. Expandable Design Variables name .. Enter these characters where the supplier name is to be printed. Use additional . to pad the required length up to a total of 30 characters. address_1 Enter these characters where the supplier address line 1 is to be printed. Use additional . to pad the required length up to a total of 30 characters. address_2 Enter these characters where the supplier address line 2 is to be printed. Use additional . to pad the required length up to a total of 30 characters. city .. Enter these characters where the city is to be printed. Use additional . to pad the required length up to a total of 20 characters. phone_1 .. Enter these characters where the supplier phone number 1 is to be printed. Use additional . to pad the required length up to a total of 16 characters. phone_2 .. Enter these characters where the supplier phone number 2 is to be printed. Use additional . to pad the required length up to a total of 16 characters. fax Enter these characters where the supplier fax number is to be printed. Use additional . to pad the required length up to a total of 16 characters. comment_1 Enter these characters where the supplier comment 1 field is to be printed. Use additional . to pad the required length up to a total of 45 characters. comment_2 Enter these characters where the supplier comment 2 field is to be printed. Use additional . to pad the required length up to a total of 45 characters. All these variables are displayed in the legend. The expandable design variables are a minimum of 12 characters up to the maximum indicated in brackets. [DupFld] enables the user to regenerate line numbers into multiples of 10. [DupRec] enables the user to print the layout on plain paper. The [Menu] key may be used to copy the layout to assist with the creation of another supplier layout. Printed on 16 May, 2002 Fresh Computer Systems Pty Ltd 0-19 LETTUS User Manual System Administrator 0.7.5 Menu 0 Delivery Notes This option allows the user to design how the delivery notes tail will print on their own delivery note stationery. To create a Delivery Note layout select the Stationery Layout Maintenance option from the menu and select option 5, Delivery Notes, the following screen will be displayed: Seq This field is for sequencing on the stationery. Press [NxtFld] to default the first line to 10. Additional lines will default upwards in multiples of ten. To print a line between two existing lines, manually enter a line number with a value between the two existing lines. Text Enter text as required. See above for an example. Printed on 16 May, 2002 Fresh Computer Systems Pty Ltd 0-20 LETTUS User Manual System Administrator 0.8 Menu 0 Parameter Maintenance The parameter maintenance form controls the numbering of documents in the system. Key documents are automatically numbered by the system. The next available number to be used is stored in the parameter file. As this number is used by the program the next number to use is updated. Additional records should only be inserted into the parameter file by LETTUS Support Staff. When changing the next number to use in the parameter record care should be taken not to enter a number that has already been used by the system. Printed on 16 May, 2002 Fresh Computer Systems Pty Ltd 0-21 LETTUS User Manual System Administrator 0.9 Menu 0 Cashier Maintenance Each cashier is setup so as to have their own code and password for security purposes. To setup a cashier code, select Cashier Maintenance from the menu. Enter the following fields: Cashier Enter a character as a code for the cashier. Password Enter a password for the cashier. Next Invce Num Enter the cashiers next invoice number. Bank Enter the bank account code for this cashier. Description The bank account description will automatically come up. Printed on 16 May, 2002 Fresh Computer Systems Pty Ltd 0-22 LETTUS User Manual System Administrator 0.10 Menu 0 System Configuration The LETTUS system is both powerful and flexible. By changing system parameters you can direct the system to work the way best suited to your needs. Each company may work in a different manner and each has a different system configuration. The details in this record are maintained through one of the following form pages. Use [NxtBlk] and [PrvBlk] to move between the forms. Use [NxtFld] to move through the fields on each form and subsequently between forms. It is recommended that only your System Administrator make any changes to this file. General Ledger Installed (Y/N) This field is set to Y if the general Ledger module is installed. This will cause all transactions within the system to update specified general ledger accounts. If the General Ledger is not installed then this flag is set to N and the updates will not take place. General Ledger Updates by....... If the general Ledger is installed the setting in this field will indicate how updates are to be applied. Values are: D - values are to be applied based on the department of the produce. P - values are to be applied based on the produce type. S - values are to be applied based on the supplier type. G/L Code for Debtors Control Enter here the code of the General Ledger account that is to be used as the Debtors control account. [ListVal] can be used here. G/L Code for Creditors Control Enter here the code of the General Ledger account that is to be used as the Creditors control account. [ListVal] can be used here. GL Account for Year End Profit Enter here the code of the General Ledger account that is to be used for the Year End Profit. [ListVal] can be used here. G/L Account Format Here you enter the format of the accounts used in the general ledger. When an account number is entered it will be checked against this format and a warning will be given if the format does not match. The format is entered using X and symbols to allow for numbers and separators. Each character position must be filled and numerics may be zero or space filled. Thus XXX-XXX-XX will allow for an account numbers of 111-222-33 or 7- 7-07 but not 7-888-999, or 7-7-7. This field is optional. Cash Book Installed (Y/N) This field is set to Y if the cash book module is installed. This will stop any general ledger journals updating the Bank Account thus causing the Bank Reconciliation to misbalance. If the cash book is not installed then this field should be set to N. Debtors Installed (Y/N) This field is set to Y if the Debtor module is installed. Debtor records will not be updated if this field is set to N. Creditors Installed (Y/N) Printed on 16 May, 2002 Fresh Computer Systems Pty Ltd 0-23 LETTUS User Manual System Administrator Menu 0 This field is set to Y if the Creditor module is installed. Creditor records will not be updated if this field is set to N. Print Company headings on pre-printed stationery If the stationery being used does not have the company name already printed then set this field to Y to print the name at the top of the stationery. If this field is N then the company name will not print. Print Aged headings on Statement Pre-printed stationery If the stationery being used does not have the aged balance headings already printed then set this field to Y to print the headings on the statements. If this field is N then the aged headings will not print. EFT File Transfer Method Enter (D)isk for Floppy Disk Transfer, else (F)tp for Network Transfer. EFT File Transfer Directory Enter the Directory to store the file for Network Transfer. This field is only required if the value of (F) is used in the EFT File Transfer method. Terms to be used for AR statistics Accounts receivable statistics will be maintained for periods of the number of days entered here. Typically this would be set to 7 days. Terms to be used for AP statistics Accounts payable statistics will be maintained for periods of the number of days entered here. Typically this would be set to 7 days. Due Date for Supplier Credits Enter the default due date to be used when entering Supplier credits. Valid options are: B= Backdated. The due date will be backdated from the document date by the terms. D= Document Date. The due date will be dated the same date as the document date. F= Forward Date. The due date will be forward dated from the document date by the terms. Create Contra Documents with the (D)ocument Date or (S)ystem Date This field determines if the system uses the document or system date when creating contras. Enter (D) for document date or (S) for system Date Use System Assigned Supplier Codes Enter Y in this field if you wish to use supplier codes which are assigned by the system. These codes are assigned in ascending numeric order. Use System Assigned Supplier Codes Enter (Y)es if you wish the system to use system assigned supplier codes. Host System Interface Format Enter the Host System Interface Format. Contact your local Support Office for the required format. Host System Interface DC G/L Codes Enter the Host System Interface G/L Code. Contact your local Support Office for the required format. Printed on 16 May, 2002 Fresh Computer Systems Pty Ltd 0-24 LETTUS User Manual System Administrator Menu 0 External Customer Interface Installed (Y/N) Enter Y if an external customer interface has been installed. information contact your local Support Office. For further Systems base unit of Measure for Production Where the manufacturing module is installed, this field defines the units to be used in recipes. System's base Unit of Packaging for Transportation Enter the System's Base Unit of Packaging for Transportation purposes. This field is optional. Permit Code merging Enter (Y)es or (N)o for permit code merging. This option is used to merge Customer and Supplier codes. Please contact Fresh Computers Support for assistance when merging records. Default currency symbol Enter here the symbol to be used for currency on forms and reports. The default value is $. Backdate Invoices created during Invoice generation and print To allow invoices to be backdated during the invoice generation and print, set this flag to Y. If set to N sales backdated will be generated as per the invoice run date. Backdate Credits created during Invoice generation and print To allow credit notes to be backdated during the invoice generation and print, set this flag to Y. If set to N credits backdated will be generated as per the invoice run date. Maximum Number of Days by which Sales can be Back Dated Enter the maximum number of days by which a sale can be backdated. Maximum Number of Days by which Sales can be Forward Dated Enter the maximum number of days by which a sale can be forward dated. Sales are made from (L)ots (P)ools or (B)oth Produce can be booked into either Lots or combined into Pools. If sales are only made out of Lots then set this flag to (L)ot. If sales are only made out of pools set to (P)ools. If sales are made out of both Lots and Pools set to (B)oth. Pools are Pooled by Supplier Where lots are combined into Pools by Supplier code set this flag to Y. Pools are Pooled by Grade Where lots are combined into Pools by Grade set this flag to Y. Pools are Pooled by Count Size Where lots are combined into Pools by Count Size set this flag to Y. Pools are Pooled by Department Where lots are combined into Pools by Department set this flag to Y. Display Item Description on Sales Screens Enter Y here if you wish the item description to appear on the sales screens. Enter N here if the item descriptions are not required. Printed on 16 May, 2002 Fresh Computer Systems Pty Ltd 0-25 LETTUS User Manual System Administrator Menu 0 Validate Lot Supplier References Enter (Y)es to Validate Lot Supplier References otherwise (N)o. Pallet Numbers are unique to Suppliers, Consignments or Not unique Enter (S)uppliers, (C)onsignments or (N)ot unique Default Item Tracking on Statement in Customer Maintenance to (Y/N) To default the Item Tracking on Statement flag in Customer Maintenance to Y enter Y in this field. Default Combined Invoicing in Customer Maintenance to (Y/N) To default the Combined Invoicing flag in Customer Maintenance to Y enter Y in this field. Automatically Generate Return Prices for Commission Lots (Y/N) Set indicator to (Y)es to generate Prices automatically for Commission Lots Summarise grower sales returns Return Prices entered in Return Price Entry can be summarized on Grower Returns if this flag is set to Y. If set to N return prices will be printed as entered in the Return Price Entry form. Grower Return Stationery Type Enter the stationery type for your Growers Returns: 1 - Standard 80 column stationery 2 - 132 column stationery Expected Posted Date must be (R)eceived Date or (A)ny Date Enter either (R)eceived Date or (A)ny Date Cash Invoice Stationery Type Enter the Cash Invoice Stationery Type here. Enter 0 for plain paper stationery or enter 1 for Invoice Stationery. Allow Unmatched Cash Sales (Y/N) Enter Y here if you wish the system to allow unmatched cash sales. Entering N here will not allow unmatched cash sales. Allow Cash Float (Y/N) Enter (Y)es to allow the Cash Float functionality. Sundry Product for Cash Float Enter the Sundry Product to be linked to the Cash Float. Press [ListVal] for Sundry Product listing. Automatically Create Cash Sale Receipts If indicator is set to (Y)es the system will automatically generate a cash receipt for all cash sales when Cash Cleardown Menu 3, is run. This indicator should only be set to (Y) if all customers keyed using Menu 3 option Sales Entry - Cash Sales ALWAYS pay by cash at time of purchase. Password for Sale Transfers and Take-Ons Add security to Sale transfers and Take-Ons by keying a password here. If entered the system will prompt for the password when keying Sale Transfers or Take-ons. Printed on 16 May, 2002 Fresh Computer Systems Pty Ltd 0-26 LETTUS User Manual System Administrator Menu 0 Enforce Allocations of Invoices and Charges at the Item Level Enter (Y)es to enforce all allocations of invoices and charges at the item level. Use Expected Date of Receival for Lots Enter (y)es for the system to use the expected date for Receival of lots. Automatically Profitise Lots Posted up to this many days ago The system will automatically profitise lots that are fully completed and are the specified amount of days old. Print Prices on Delivery Dockets Enter (Y)es or (N)o for process to print on Delivery dockets. Delivery Docket Description Enter the description to appear at the top of the document. Example: DELIVERY DOCKET. Using Purchase memo number Auto generation & printing system For Queensland agents set this flag to Y if using the automatic generation and printing system for Purchase Memorandums. Printed on 16 May, 2002 Fresh Computer Systems Pty Ltd 0-27 LETTUS User Manual System Administrator 0.11 Menu 0 Archive Database The archiving process is normally run every 3 to 6 months, but may be run more or less often as desired. The frequency with which you perform archiving will depend on a combination of your need to access old information, available space in the database and the current system's performance. Archiving will clear old information from the database so the available storage space on the hard disk does not fill up. Note This archiving process does not affect General Ledger Transactions. There are two levels of clearing old information: ARCHIVE - Clears all detail records before a given date. For example: All Sales and Items from a Lot. All Receipt Allocations for Customer invoices. All Payment Allocations for Supplier invoices. DELETE - Clears all high level records before a given date, which have been previously ARCHIVED. For example: All Lots (previously ARCHIVED). All Receipts (previously ARCHIVED). All Payments (previously ARCHIVED). No record will be deleted unless it is completely processed. That is, a receipt or payment must be fully allocated or an invoice must be fully paid, or it is ignored. The prefix 'arc' will be added to any document number (as part of a payment allocation) where the document becomes deleted but the cheque is not archived. Note that this is only done where both archiving and deleting is done in the same process. Important Before performing an Archive ensure that a complete backup of all information is stored for record keeping purposes. It is recommended that one or two of the backup tapes be taken out of the backup cycle and stored in a safe place off site. These should be replaced with new tapes. Before adding or deleting debtors, it is recommended that statements should be generated on the screen twice for all customers who do not normally have statements printed. This will finalise old receipts and documents, making the debtor eligible to be cleared off the system. Every high level record deleted has its details printed to a file which can be viewed or re-printed at a later time through this option. An archive is usually followed by a re-organisation of the database. See Database Re-organisation in Section 3 of this manual or contact the LETTUS Support Staff. Printed on 16 May, 2002 Fresh Computer Systems Pty Ltd 0-28 LETTUS User Manual System Administrator 0.12 Menu 0 Menu Password Maintenance The LETTUS system allows a user with a specific Security ID and PASSWORD to set up additional security features by requiring a password to be entered for a specified option number. This is performed in the menu Password Maintenance Option. For Example:- If "OFFICE1" wishes to use the password feature for Menu 4 Option B (Customer Receipt Batch Entry) for their security ID only, they use this form. Thus if an unauthorised person uses the "OFFICE1" security ID they cannot gain access to the Customer Receipt Batch Entry form without that password. Printed on 16 May, 2002 Fresh Computer Systems Pty Ltd 0-29 LETTUS User Manual System Administrator 0.13 Menu 0 Modify Your Own Password This form allows you to change the password of your current security ID. In small organisations there may be only a few people with physical access to the computer and password security may not be necessary. However, the larger and more diverse an organisation becomes, the more the need for system security rises. The security ID password provides a simple and effective security method. This security is effective only as long as security ID passwords are not widely known. To assist with security it is strongly recommended that passwords be changed at least once every six months and that consideration be given to password changes when staff who use this system leave the company. Before changing your password check with your system administrator to ensure that this will not impact on the operation of the system. To change the password you enter the current password and then enter your new password. Where individual user names are setup it is recommended that all users be allowed to change their passwords via this option. Printed on 16 May, 2002 Fresh Computer Systems Pty Ltd 0-30 LETTUS User Manual System Administrator 0.14 Menu 0 Create Users and Permissions Manually This form allows the System Administrator to set up the access permission for each Security ID. For Example:- The System Administrator may only wish for Security ID "OFFICE2" to have access to all Options of Menu 4 and some Options in Menu 5, while the Security ID "SYSTEM" to have access to all available Menus and Options. This form can be used to define both Menus and Options. Note that if you establish and maintain passwords in this form the password applies to the username at the top only. Printed on 16 May, 2002 Fresh Computer Systems Pty Ltd 0-31 LETTUS User Manual System Administrator 0.15 Menu 0 Create Users and Menu Permissions Like the Create Users and Menu Permissions Manually form, this option allows the system administrator to set access permissions. However, only menu permissions can be defined. You can not restrict options within a menu. Thus, the previous example could not be successfully achieved by use of this Option, because it cannot restrict "OFFICE2" to only some options in Menu 5. This option is used to give all or no access to each menu. The value S indicates the user has some access to that menu. To review this users access see the previous option. Printed on 16 May, 2002 Fresh Computer Systems Pty Ltd 0-32 LETTUS User Manual System Administrator 0.16 Menu 0 Create Users and Permissions Automatically This form allows the System Administrator to give a user total access to all menu options or allows the System administrator to set a user's access to be identical to that of another user. Printed on 16 May, 2002 Fresh Computer Systems Pty Ltd 0-33 LETTUS User Manual System Administrator 0.17 Menu 0 Review Access for Specific Menu Options This form will allow display and update of user's access permission based on a single Menu Option. That is, it enables the user to know exactly who has access, for a given option, and accordingly can modify these as desired to allow access permission to be easily created for new Menu Options. Printed on 16 May, 2002 Fresh Computer Systems Pty Ltd 0-34 LETTUS User Manual System Administrator 0.18 Menu 0 Printer Type Maintenance This option is set up by Fresh, any queries please contact Fresh Support. Printed on 16 May, 2002 Fresh Computer Systems Pty Ltd 0-35 LETTUS User Manual System Administrator 0.19 Menu 0 Printer Maintenance When printing reports, orders, invoices and other documents from the system you must select the printer to be used from a list of valid printers. This form allows valid printers to be added to the selection list. It is recommended that you contact the LETTUS Support Staff before modifying or adding records to this form. For each printer that is to be used in the system you must first have: 1. 2. 3. Configured the setup options on the printer's control panel or DIP switches. Configured the printer under UNIX. Made all necessary cable connections. On entry to the form you will be displayed the following screen. Please contact Fresh for further information or instruction. Printed on 16 May, 2002 Fresh Computer Systems Pty Ltd 0-36 LETTUS User Manual System Administrator 0.20 Menu 0 Fax Maintenance This option is where fax machine details are setup and is normally setup by Fresh, although usage start and end times, and active status can be changed as needed. Usage Start Enter the start time of when faxing is allowed to commence. If faxing is to be allowed at all times, then enter now. End Enter the end time of when faxing is to cease. Active Enter Y if the fax machine is active, and N if the fax machine is inactive. Any other queries please contact Fresh. Printed on 16 May, 2002 Fresh Computer Systems Pty Ltd 0-37 LETTUS User Manual System Administrator 0.21 Menu 0 Immediate Printer Setup This option allows the system administrator to customise where a document will print, from which terminal. Select the Immediate Printer Setup option from the menu., the following screen will be displayed: Enter the following fields: Doc Type Enter the document for what is being printed. Refer to the entries above for examples. Description This field will automatically be entered and skipped. Key Enter key number to be pressed to print document. If number is not known contact Fresh. Users Device Entering default will cause all terminals to print that document to the device nominated. If there is one terminal that is required to print the same document to another device then enter that terminals TTY number, which is located at the top of any menu screen. Printer Enter the printer number for the destination printer, or LOCAL for a slave printer. Description This field will automatically be entered and skipped. Any queries please phone Fresh. 0.22 User Activity Printed on 16 May, 2002 Fresh Computer Systems Pty Ltd 0-38 LETTUS User Manual System Administrator Menu 0 This option displays the users who are currently logged into the system, the device and which menu option they are using. This is a query screen only. Select the User Activity option from the System Administration menu and the following screen will be displayed: The following fields will be displayed: Company The company name which the user is logged into will be displayed. Login The unix login will be displayed here. Security Id The security id of the user will be displayed here. IP Address This field will display the IP Address or device of the user (e.g. tty number). Menu The menu option codes will be displayed in these fields. Description The Menu option Description of the menu codes in the previous two fields will be displayed. Printed on 16 May, 2002 Fresh Computer Systems Pty Ltd 0-39 LETTUS User Manual System Administrator 0.23 Menu 0 User Activity Log This screen allows you to query what users have been in a particular menu option. It displays Login, Security ID, IP Address, time, date and time elapsed. This is a query screen only. Select the User Activity Log option from the System Administration menu and the following screen will be displayed: In query mode enter selection information in particular field. Example: Enter 3a in option field and execute query to display all users that have been in Menu option 3A. All fields can be used for selection purpose. Option Displays the menu option. Description Displays the Description on the menu option. IP Address Displays the IP Address of the computer used to access the menu option. Login The UNIX Login used to access particular menu option. Security ID The Fresh Lettus Security ID used to access the menu option. Enter Date The date and time of enter. Exit Date The date and time of exit. Elapsed Total time elapsed between enter and exit time. Printed on 16 May, 2002 Fresh Computer Systems Pty Ltd 0-40 LETTUS User Manual System Administrator 0.24 Menu 0 Indexes This option is for Freshs management of the database only. Printed on 16 May, 2002 Fresh Computer Systems Pty Ltd 0-41 LETTUS User Manual System Administrator 0.25 Menu 0 Produce GST Maintenance This screen is used for adding, updating and deleting GST percentages on individual produce. It is broken into two separate blocks, the produce block that is used to query records and the GST Entries block that lists individual entries giving a history of transactions on each produce code. Select the Produce GST Maintenance option and the following screen will appear. Enter your selection information in the Produce block and execute the query for your results. Use the NxtBlk and PrvBlk keys for navigation between the two blocks and the up and down arrows to change records within a block. The Produce block is display only and is not updateable. Produce Block The fields in the Produce block can be used for selection purpose. Enter selection information and press execute query to see results. Produce This field displays the produce code set up and maintained in Menu 1. Description This field can be used for selection of a query or it will be defaulted with the description of the produce selected. Dept This field can be used for selection of a query or it will be defaulted with the department of the produce selected. Type This field can be used for selection of a query or it will be defaulted with the produce type of the produce selected. Name This field will default the Produce type full description. GST Displays the current GST percentage. (Display Only) Start GST Entries Block Displays the date the current GST percentage commenced. (Display Only) Printed on 16 May, 2002 Fresh Computer Systems Pty Ltd 0-42 LETTUS User Manual System Administrator Menu 0 Updateable fields GST Use this field to enter the GST percentage rate to be entered against the produce. Start Enter the start date for the new or updated GST percentage to be applicable from. Display only fields All other fields in this block are used for display only. All updates and modifications all logged and are displayed. Printed on 16 May, 2002 Fresh Computer Systems Pty Ltd 0-43 LETTUS User Manual System Administrator 0.26 Menu 0 Master Charge GST Maintenance This screen is used for adding, updating and deleting GST percentages on Master Charges. It is broken into two separate blocks, the Master Charge block that is used to query records and the GST Entries block that lists individual entries giving a history of transactions on each Master Charge. Select the Master Charge GST Maintenance option and the following screen will appear. Enter your selection information in the Master Charge block and execute the query for your results. Use the NxtBlk and PrvBlk keys for navigation between the two blocks and the up and down arrows to change records within a block. The Master Charge block is display only and is not updateable. Master Charge Block The fields in the Master Charge block can be used for selection purpose. Enter selection information and press execute query to see results. Charge This field displays the Master Charge codes set up and maintained in Menu 1. Description This field can be used for selection of a query or it will be defaulted with the description of the Master Charge selected. Type This field can be used for selection of a query or it will be defaulted with the Master Charge type of the Master Charge selected. Supplier This field can be used for selection of a query or it will be defaulted with the Pay Supplier established in Menu 1 Master charge. Name This field will default the full description of the Pay Supplier. (Display Only) GST Displays the current GST percentage. (Display Only) Start Displays the date the current GST percentage commenced. (Display Only) Printed on 16 May, 2002 Fresh Computer Systems Pty Ltd 0-44 LETTUS User Manual System Administrator Menu 0 GST Entries Block Updateable fields GST Use this field to enter the GST percentage rate to be entered against the Master Charge. Start Enter the start date for the new or updated GST percentage to be applicable from. Display only fields All other fields in this block are used for display only. All updates and modifications all logged and are displayed. Printed on 16 May, 2002 Fresh Computer Systems Pty Ltd 0-45