1
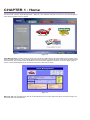
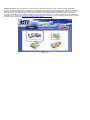
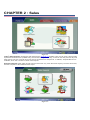
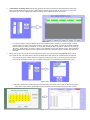
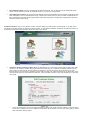
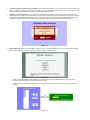
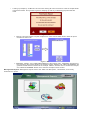
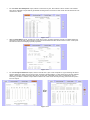
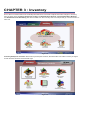
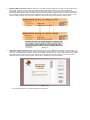
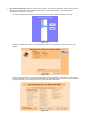
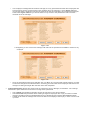
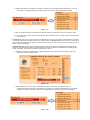
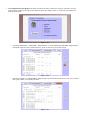
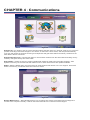
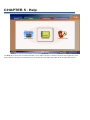
Enterprise Control Enterprise control is a program that allows the user to operate many aspects of a store or a chain of stores from a central location. Viewing sales and history, and maintaining inventory are just a couple of the things that are able to be done with the software. When opening the program, one will see that there are multiple tabs: Home, Sales, Inventory, Communications, and Help. This guide will go over each one and what is accessed from them. Table of Contents CHAPTERS CHAPTER ONE – HOME 1. Fleet Management…………………………………………………………………………………………3 2. eSticker & Cards……………………………………………………………………………………………4 CHAPTER TWO – SALES 1. Today’s Sales Reports……………………………………………………………………………………..5 2. Past Sales Reports…………………………………………………………………………………………5 3. Cash Drawer and Daily Sales……………………………………………………………………………..6 4. Time Clock…………………………………………………………………………………………………..6 5. Statistical Sales Report…..………………………………………………………………………………...7 6. Employee Incentive Report..………………………………………………………………………………7 7. Customer History…………………………………………………………………………………………...7 8. Management Reports……………………………………………………………………………………...9 CHAPTER THREE – INVENTORY 1. Inventory Enterprise Controls………………………………………………………………...………...11 Maintain Master Inventory File…………………………………………………………………………………12 Enterprise Inventory Control…………………………………………………………………………………...12 View Inventory By Store………………………………………………………………………………………..14 Change Passwords……………………………………………………………………………………………..15 Adjustments, Shipments & Transfers…………………………………………………………………………16 Entry Log…………………………………………………………………………………………………………18 2. Individual Store Reports………………………………………………………………………………...19 3. Consolidated Store Reports…………………………………………………………………………….19 Consolidated Inventory Report………………………………………………………………………………..20 Master File Exception Report………………………………………………………………………………….21 Inventory Alert Report………………………………………………………………………………………….21 Non-Stocked Items Report…………………………………………………………………………………….21 CHAPTER FOUR – COMMUNICATIONS 1. Autopoll.net………………………………………………………………………………………………22 2. Autopoll.net Sales Only………………………………………………………………………………....22 3. Auto Update………………………………………………………………………………………………22 4. E-Mail……………………………………………………………………………………………………...22 5. Remote Maintenance……………………………………………………………………………………22 CHAPTER FIVE – HELP………………………………………………………………………………………………23 FAQ………………………………………………………………………………………………………………………24 CHAPTER 1 : Home The home tab is where “Fleet Management”, “QB Link”, and “eSticker & Cards” can be found. The functionality of each will be explained in this chapter. Figure 1-1 Fleet Management– Certain chains of stores may decide to handle all their fleet information from the back office. When choosing whether or not to handle fleets from the back office it should be known that all stores will have the same fleet list. Any changes made to fleets from the office will be applied to all stores. A more in-depth guide to how to use Fleet Management can be found in the Pos-I-Lube User’s Guide. Figure 1-2 QB Link– QB Link is a feature we offer for a fee that allows you to import sales and other accounts having to do with Auto Data into QuickBooks. eSticker & Cards– Many stores print out and email oil change reminders to their customers. With Enterprise Control, one is able to print out or email all the reminders for their stores from the back office. eSticker is another feature we offer for additional fee. It allows your customers to download an app specifically made for your store or chain of stores. The app gives your customers the ability to look at their vehicle’s histories, look up coupons, schedule reminders, and a number of other things all from their smart phone. A more in depth look into eSticker is available on our website at: http://autodatainc.com/solutions/esticker.html. A more in depth guide on how to handle reminder cards can be found in the Pos-I-Lube User’s Guide. Figure 1-3 CHAPTER 2 : Sales Figure 2-1 Today’s Sales Reports- Clicking this will redirect to the Autopoll.net website. Here one can view a store’s sales reports and charts that are updated every five minutes throughout the day, as well as view the previous day’s full sales report. The end of month report can also be accessed from autopoll.net. In addition, Autopoll.NET Plus is available, which has a number of other useful reports. Past Sales Reports- Past sales reports from the office work very much the same way they do at the store level, with the exception of the statistical sales report. Figure 2-2 Cash Drawer and Daily Sales reports will generate the same report that is generated at the store level, with the main difference being how the date range is chosen. Both will ask for a month and a year, and once those are chosen a grid is generated including all the dates the stores were open. Figure 2-3 o To choose a date or range of dates, either click individual green squares, or click and drag to select multiple dates. Once the date range has been selected, one can either combine all the dates selected into one report by clicking “Combine,” or view each individual dates reports for each store by clicking “By Store”. Note that the “Combine” option is not available for the Cash Drawer report. Each individual day’s Cash Drawer reports would be generated instead of a summary report of all the days that were selected. Many store chains do payroll from the enterprise location, and the employee Time Clock report can be very useful for this. The back office is able to generate time clock reports for all their stores’ employees. o First, select the store number that the employee or employees work. A list of employees from that store will be generated. Select one or multiple employees to be included in the time clock report. Figure 2-4a o Select the dates from the calendar to be included in the time clock report. Click ok and an Employee Time Clock report will be generated including the dates and hours the employees have worked. Figure 2-4b The Statistical Sales report is available at the Enterprise level, but not the store level. Statistical Sales report can be viewed by month for multiple stores, or by year for a single store. The Employee Incentive report shows what tickets and commissionable services certain employees have been assigned to over a selected date range. Like the time clock report, a store number is selected and a list of employees from that store is generated. Select the employee or employees to generate a report for and then select a date range. Customer History- Here, one is able to access customer history by VIN number, license plate, or by last name. The ability to reprint receipts by license, receipt number, or fleet is also available. Changes can also be made to a customer’s information from the back office and sent to the stores. Figure 2-5 Customer History Lookup by Acct. # has to with looking up a customer by their license plate, their VIN number, or an account number that is generated from their VIN. If a customer is initially entered into the store’s point of sale by their license plate and cashed out, then their history will be looked up by their license plate. If the customer is entered by their VIN, then they can either be looked up by their VIN, or the account number that is generated from the VIN. A license plate customer cannot be looked up by VIN and vice versa. o Figure 2-6 Once the customer’s account number has been entered, their “Edit Customer History” page will show. Here, their customer info can be edited and sent back to the stores. One can also view, print, or email that customer’s history report. Customer History Lookup by Last Name is the same idea as looking up by account number, but with last name. Typing in a customer’s last name will bring up a list of people with that last name or close to it. From there, the same “Edit Customer History” window will show on screen. Reindex Customer History is a process that organizes the customer history at the back office if there seems to be any issues with it. Depending on how many customers are in the system, the process can take some time. The first thing that is asked is if you want to purge old customers. Clicking yes will remove any customers that haven’t returned to the store in two years. From there the reindex process will run. Figure 2-7 Reprint Receipt allows the back office to reprint, view, or email receipts from any of their stores. Receipts can be generated from account number, receipt number, or fleet account. o o Figure 2-8 Looking by “LICENSE #” means looking up a customer’s history by their license, VIN, or account number, and being able to access all of their receipts. Looking up by “RECEIPT #” is just that. Select a store to pull an invoice from and type in the receipt number. Figure 2-9 o Looking up receipts by “FLEET #” has to do with viewing all of the invoices for a fleet or multiple fleets over the last month. This process is good for keeping up with any outstanding payments that are owed. Figure 2-10a Choose a year and month to reprint receipts from. Then choose which fleet or fleets to reprint receipts for that month. Figure 2-10b “PRINTER”, “EMAIL”, and “VIEW ON SCREEN” are the options given. “PRINTER” will print all of the receipts for the chosen fleets for the selected month. “EMAIL” and “VIEW ON SCREEN” will generate a PDF file that contains all the receipts. “EMAIL” will allow one to email those receipts, and “VIEW ON SCREEN” allows one to view the receipts on their monitor. Management Reports- Management reports refer to the “Sales Tax Exemption”, “Fleet Sales”, and “Hourly Performance” reports. Figure 2-11 For the Sales Tax Exemption report, select a month and a year, then select a store number. Once these have been selected a report will be generated showing all the invoices for that month and what amount was not taxed on them. Figure 2-12 With the Fleet Sales report, choosing a month and a year, and then selecting a fleet or multiple fleets will generate a report showing that month’s invoices for those fleets and the amount of the invoice. This report can also be useful for keeping up fleet payments. Figure 2-13 For the Hourly Performance report, select a month and a year. This will produce a grid showing all stores and the dates they were open for that month. Choose individual dates, or click and drag to choose multiple dates. Choosing to view the reports “By Store” shows each individual day’s hourly performance report. Choosing “Combine” creates a report that combines all of the stores and days hourly performance report’s into one report. Figure 2-14 CHAPTER 3 : Inventory One of the most useful features of the Enterprise software is to be able to adjust and make changes to inventory from the back office. Inventory Enterprise Controls, Individual Store Reports, Consolidated Store Reports, and Automatic Parts Reordering are all accessible from the inventory tab. This chapter will go over the function of each one. Figure 3-1 Inventory Enterprise Controls- With Inventory Enterprise Controls, the Back office can make inventory changes to their stores that will be received that night. Figure 3-2 Maintain Master Inventory File is where one can add inventory items to be to able to edit or add to the store level. If the item is not in the back office master inventory file, then it cannot be accessed in Enterprise Inventory Control, meaning changes cannot be made to it and it cannot be added to stores. If the item already exists at the store level and you want to be able to make changes to it at the back office, you must make sure the spelling in the master inventory file is the same as in the store inventory. If you want to make changes to it or add it to the stores, then it has to be in the Master Inventory File. Figure 3-3 Enterprise Inventory Control: Once inventory items have been added to the Master Inventory File, you will have to ability to make changes, add or delete them from the stores. The inventory you are looking at when you click Enterprise Inventory Control is the Master Inventory File. If you make changes to a certain item and that item exists at one of your stores, the store will receive that change once the back office autopolls and once the store autopolls, which will be explained in the next chapter. Figure 3-4a o First, select the store, or stores to edit the inventory for. Figure 3-4b o Next, select the category of inventory to be edited. Figure 3-4c o In the example in Figure 3-4c shows a full service where the retail price and the taxable amount have been changed. Like Figure 3-3 shows, the same service exists at site 0040, so these changes will be made to site 0040 and any other sites that were selected that have the same service. o If a certain service doesn’t exist at a store, clicking “Add” to the selected service will add it to their inventory. o To delete a certain service that does exist at a store, choose that service and click “Delete” o The process for stores receiving changes usually goes: 1. The Back office makes inventory changes then autopolls. 2. Those changes are now waiting for the stores on our server. 3. The stores close down and an automatic autopoll runs. 4. Stores receive those changes and they will be made that night. View Inventory By Store will show each store’s inventory. It is useful for looking at each store’s inventory and see what is missing from the Master Inventory File, and to check spelling. This is also where “Employee Permissions” can be set: o To edit an employee’s permissions, first select the store number that the employee works at. Figure 3-5a o Select the “Employees” option. An inventory menu with all the employee’s names at the store will appear. Figure 3-5b o Choose “Set Permissions” and a menu with all the employee permissions will appear. At the top left, check off whether or not to designate that employee as “Store Manager”. Check off which permissions to give that employee, and then give them a 4 digit PIN at the bottom left. Figure 3-5c o If an employee is designated as the store manager, the only permissions that the other employees will have access to are the ones that have been checked off for the manager. Look at Figure 3-5c and you will see that the employee has been checked off as the store manager. Now look at the employee in the below Figure 3-5d and you will see there is only access to the permissions that have been checked off for the manager. Figure 3-5d Designating no one as the store manager will make all the permissions available to select for any employee. Figure 3-5e o Once the permissions have been selected, click “Go Back” and a prompt will appear asking if you want to send the changes to the selected stores. Choosing yes means the store’s employee will receive the changes at closing that night after the back office has autopolled. Change Passwords: Stores have three levels of passwords: Owner, Manager, and Cashier. The “Change Passwords” option allows the back office to change those passwords. o o o The OWNER level password will allow access to everything in the store software. The MANAGER level password allows making changes to employee rate of pay, but does not allow changes regarding inventory QUANTITIES and any SALES figures regarding DAY/MONTH/YEAR Cashier is the same as manager but will not be able to see employee rate of pay or have access to set up codes. Adjustments, Shipments & Transfers: The back office also is able to keep track of inventory quantities and make changes to them. Figure 3-6 o New Shipments are where shipments that a store has received will be entered. 1. First, choose the store number where the shipment was received. 2. Then choose whether it is PARTS or LUBRICANTS quantities to add to the inventory. Figure 3-7a 3. For parts, choose the category of parts where new shipments have been received. In this example, we’ve chosen oil filters. Figure 3-7b 4. Click “Enter Data” and enter the quantity received from the shipment and press enter. You will see that the “Quantity Received” quantity will now show the quantity that was entered. Figure 3-7c 5. Run an autopoll and the new shipments will be ready for the store to receive once they close. 6. For “Lubricants”, choose the lubricant that the store received and, in quarts, input the amount that was received. o Transfers In works very much same as new shipments, but you only want to use transfers if the parts or lubricants that were received came from another store. Transfers Out works the same, except that you choose the store that the parts or lubricants came from, and the number you are inputting is being taken out of the inventory. o Adjustments are usually made towards the end of the month when most stores are going through inventory. Adjustments should be entered whenever there is a difference between the “Quantity On Hand” number in Auto Data, and what is physically on hand. Adjustments works the same way as New Shipments and Transfers until you get to the point where you enter the adjustment. Figure 3-8a When entering in the quantity for adjustments at the back office, you will see that the “Adjustments” will be filled out with whatever quantity you entered. Adjustments can be either negative or positive numbers, whereas new shipments and transfers can only be positive. Figure 3-8b Once the store receives the adjustment, the quantity entered at the back office will either be added or subtracted to the quantity on hand, depending on whether the quantity was negative or positive. Figure 3-8c Entry Log is where reports for inventory changes from the back office can be viewed. Entry log reports show any changes that have been made in “Enterprise Inventory Control”, as well as adjustments, shipments, and transfers. 1. Select the store number to view entry log reports for, and a list of enterprise changes made will be generated. Figure 3-9a o Select a date to view an entry log report for. The report will show any inventory changes that were made on that date, as well as shipments, transfers, and adjustments. Figure 3-9b Individual Store Reports are the same reports that are accessible from the store. Just select a store number to view reports for. The only difference is the “End Of Month” report, which will direct you towards Autopoll.net, where you will be able to access the end of month report for any of the stores in the “Inventory Reports” section. Figure 3-10 Consolidated Store Reports contains the “Consolidated Inventory Report”, “Master File Exception Report”, “Inventory Alert Report”, and the “Non-Stocked Items Report”. Figure 3-11 Consolidated Inventory Report will show what services, parts, lubricants, coupons, discounts, and full service add-ons exist at what stores and what the price and usage of each is. It also shows quantities for parts and lubricants. Figure 3-12a o Choosing “SERVICES”, “COUPONS”, “DISCOUNTS”, or “FULL SERVICE ADD-ONS” will generate a report that shows the price, taxable amount, month to date and year to date usage. Figure 3-12b o Choosing “PARTS” or “LUBRICANTS” will generate a report that shows will show price, cost, month to date, year to date, and quantity numbers. Figure 3-12c The Master File Exception Report shows everything that exists in the store inventories that does not exist in the Master Inventory File. This includes services, parts, lubricants, coupons, discounts, and full service add-ons, but not employees and packages. Figure 3-13 o This report is useful for making sure anything that exists at the store level is in the Master Inventory File, so that changes can be made to it. The Inventory Alert Report shows what parts and lubricants are in low supply compared to what their optimum quantity is. Once a store has been in business for a couple months, an optimum quantity can be calculated according to how often shipments of certain parts are entered into the system and what the quantities of those shipments are. The report also shows what the average monthly usage of those parts or lubricants are. Figure 3-14 Non-Stocked Items Report is a report that is available with an extra feature of the software called POS-I-PLUS. CHAPTER 4 : Communications Figure 4-1 Autopoll.net – For stores to get any of the changes made at the back office, an “Autopoll” must be run. This is the process of sending back office changes to our servers, so that when a store closes, and autopoll automatically runs, they will receive the changes. Running an autopoll also will grab store sales and inventory numbers so the back office is able to view them. Autopoll.Net sales Only – Choose this option to receive sales numbers from the stores without sending out any inventory changes that may have been made. Auto Update – If there are ever any version updates that should be made to the back office software, “Auto Update” is how they are received. We will make it known to back offices if there are updates available. E-Mail – With the E-Mail option, the back office can send emails to their stores or to us for support. This is also where to access any e-mails that have been sent from stores. Figure 4-2 Remote Maintenance – “Remote Maintenance” is a program that is used by Auto Data Technical Support to connect to the computer remotely. It will be used if the back office is in need of technical support. CHAPTER 5 : Help Figure 5-1 The Help tab is where one can find information on our office and how to contact us and our tech support line. The User’s Manual can also be accessed from here, as well as some Video Help Files about the Auto Data system. Frequently Asked Questions Inventory Why are changes that I have made in Enterprise Inventory Control not appearing at the store? There could be several different reasons for this: 1. First, if the inventory item you’re trying to make changes to already exists at the store, you will want to make sure that the spelling and labeling of it is the same at the store as it is in your Master Inventory File. 2. After making inventory changes, make sure to run an Autopoll.net. If this hasn’t been run, the changes will not be sent to the store at closing when they Autopoll. 3. Stores will not receive inventory changes in the middle of the day. Stores receive changes at closing, so when making inventory changes from the back office, do not expect the store to get them the same day. 4. Make sure the store has a running internet connection. Inventory changes may be waiting to be received from the store, but if the store has no internet connection, they will not be able to receive them.