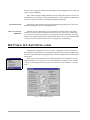
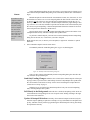
1
026-1002 Rev 3 9-28-99
8OWUD6LWH8VHU·V*XLGH
Computer Process Controls, Inc.
1640 Airport Road Suite #104
Kennesaw, GA 31044
Phone (770) 425-2724
Fax (770) 425-9319
ALL RIGHTS RESERVED
The information contained in this manual has been carefully checked and is believed
to be accurate. However, Computer Process Controls, Inc. assumes no responsibility
for any inaccuracies that may be contained herein. In no event will Computer Process
Controls, Inc. be liable for any direct, indirect, special, incidental, or consequential
damages resulting from any defect or omission in this manual, even if advised of the
possibility of such damages. In the interest of continued product development, Computer Process Controls, Inc. reserves the right to make improvements to this manual,
and the products described herein, at any time without notice or obligation.
7DEOHRI&RQWHQWV
Table of Contents ................................................................................................................................5
Installation ...........................................................................................................................................9
System Requirements .....................................................................................................................9
Recommended Requirements .................................................................................................................................9
Minimum Requirements .........................................................................................................................................9
Hardware Setup ...............................................................................................................................9
Installing UltraSite ........................................................................................................................10
Setup Procedure ....................................................................................................................................................10
Network Setup ......................................................................................................................................................11
Quick Start ........................................................................................................................................13
Login Procedure ............................................................................................................................13
Setup Users and Passwords ...........................................................................................................13
Setup Ports ....................................................................................................................................14
For Modems ..........................................................................................................................................................14
For Direct Connection ..........................................................................................................................................15
Add Directory ...............................................................................................................................15
Add Site ........................................................................................................................................15
Modem Sites Only ................................................................................................................................................16
Direct Connect Sites Only ....................................................................................................................................16
Network Sites Only ...............................................................................................................................................16
Serial Network (Enhanced REFLECS only) ........................................................................................................16
Add Components ..........................................................................................................................17
Define Computer Options .............................................................................................................17
Backup Site ...................................................................................................................................18
UltraSite Interface ............................................................................................................................19
Understanding the Tree View .......................................................................................................19
What is the Tree View? ........................................................................................................................................19
Directories .............................................................................................................................................................20
Sites ......................................................................................................................................................................20
Units ......................................................................................................................................................................20
Components ..........................................................................................................................................................20
Logs ......................................................................................................................................................................20
Navigating the Tree View .............................................................................................................21
Expand / Collapse Branches .................................................................................................................................21
Right Clicking .......................................................................................................................................................21
The Alarm Button .........................................................................................................................22
Programming a Controller ..............................................................................................................23
Programming Reflecs ...................................................................................................................23
Using Offline Programming .................................................................................................................................23
Setup Wizard ........................................................................................................................................................24
Backing Up and Restoring Information ................................................................................................................24
Backing Up a Database .........................................................................................................................................24
Restoring a Database ............................................................................................................................................24
Adding New Components Online .........................................................................................................................25
8OWUD6LWH8VHU·V*XLGH
7DEOHRI&RQWHQWV³
Einstein .........................................................................................................................................26
The Device Setup List ...........................................................................................................................................27
Edit User Access List ............................................................................................................................................28
Add New Application ...........................................................................................................................................28
View Status ........................................................................................................................................29
Accessing Status/Summary Screens .............................................................................................29
Status Screen ........................................................................................................................................................29
Summary Screen ...................................................................................................................................................29
Status Screens and Labeled Captions ...........................................................................................30
Animations ............................................................................................................................................................30
Gauges/Thermometers ..........................................................................................................................................30
Slide Bars ..............................................................................................................................................................31
Summary Screens .........................................................................................................................31
Graphic Alarms and Notices .................................................................................................................................32
Viewing I/O Board Status .............................................................................................................32
Logs and Graphs ...............................................................................................................................33
Gathering Logs and Graphs ..........................................................................................................33
Logs ......................................................................................................................................................................33
Viewing Logs and Graphs ............................................................................................................34
Table .....................................................................................................................................................................34
Graph ....................................................................................................................................................................34
Operating the Graph View ............................................................................................................35
Scale Changes .......................................................................................................................................................35
Multi Graphs .........................................................................................................................................................35
Exporting Logs .............................................................................................................................36
Clearing Logs ................................................................................................................................37
Autopurge .............................................................................................................................................................37
Manually Change Logs .........................................................................................................................................37
Real Time Graphs View ...............................................................................................................37
How to Get Them .................................................................................................................................................38
How to Operate Them ...........................................................................................................................................38
Alarms ................................................................................................................................................39
Viewing Alarms ............................................................................................................................39
The Alarm Button .................................................................................................................................................39
The Alarm Log ..............................................................................................................................40
Alarms/Notices/Failures .......................................................................................................................................40
The Asterisk .........................................................................................................................................................40
Reading Logged Alarms .......................................................................................................................................40
Return-to-Normal and Forced-to-Normal .............................................................................................................41
What to do With Alarms ...............................................................................................................41
Acknowledge One/All ..........................................................................................................................................41
Reset One/All ........................................................................................................................................................41
Clear One/All ........................................................................................................................................................41
Dialing Out Alarms .......................................................................................................................41
Setting Controller to Dial Out Alarms ..................................................................................................................41
Setting Up UltraSite to Receive Dialouts .............................................................................................................42
Emailing and Faxing Alarms ................................................................................................................................42
Changing Configuration ...................................................................................................................45
Changing Setpoints in the Tree View ...........................................................................................45
³7DEOHRI&RQWHQWV
5HY
Changing Setpoints from Status Screens ......................................................................................46
Slide Bars ..............................................................................................................................................................46
Right Clicking Parameter .....................................................................................................................................46
The “Send To” Feature (REFLECS Only) ...................................................................................46
Send Now to Instances ..........................................................................................................................................47
Send Later to Group ..............................................................................................................................................47
Preview .................................................................................................................................................................47
All/Changed Values ..............................................................................................................................................47
Override and Bypass Functions .......................................................................................................49
How to Override ...........................................................................................................................49
From the Status/Summary Screen ........................................................................................................................49
Einstein .................................................................................................................................................................49
If Device is in Override ........................................................................................................................................50
Manually Defrosting .....................................................................................................................50
Einstein .................................................................................................................................................................50
Removing Bypass in Einstein ...............................................................................................................................51
RMCC ...................................................................................................................................................................51
End Manual Mode in RMCC ................................................................................................................................51
Autopolling ........................................................................................................................................53
Introduction to Autopolling ..........................................................................................................53
Autopoll Scheduling .............................................................................................................................................53
Autoprinting ..........................................................................................................................................................54
Multiple Site Updates ...........................................................................................................................................54
Setting Up Autopolling .................................................................................................................54
Enabling Autopolling for All Sites .......................................................................................................................55
Autopolling Options for On-Site Computers ........................................................................................................55
Setting Up Sites to be Autopolled ........................................................................................................................56
Item Autopoll Setup ......................................................................................................................59
The Autopoll Setup Dialog Box ...........................................................................................................................60
Changing the Autopoll Schedule ..........................................................................................................................61
Changing autoprint options ..................................................................................................................................61
Exporting Log Data ..............................................................................................................................................62
Manual Autopolling ......................................................................................................................62
Index ...................................................................................................................................................65
8OWUD6LWH8VHU·V*XLGH
7DEOHRI&RQWHQWV³
&+$37(5
,QVWDOODWLRQ
This section of the manual will walk you through the process of installing UltraSite on
your computer. Included in this section are the minimum and recommended system requirements for running UltraSite, and instructions on how to log on to UltraSite for the first time.
6\VWHP5HTXLUHPHQWV
UltraSite has both recommended and minimum system requirements. To take full advantage of UltraSite’s features, a system with the recommended requirements should be used. To
utilize only the basics of UltraSite, a system with the minimum requirements may be used.
5HFRPPHQGHG •
5HTXLUHPHQWV •
A Pentium (or Pentium equivalent) 120mhz or above computer, with 32 MB RAM.
100 MB of hard disk space (hard disk requirement based on 200 sites at 0.5 MB per site containing five controllers and keeping 30 logs.
•
A VGA monitor and adapter set to at least 640x480 16-color graphics resolution.
•
Windows 95, 98 or NT.
•
Sound card.
•
Mouse or trackball.
0LQLPXP •
5HTXLUHPHQWV
A 486DX or higher, with 16 MB RAM (computer may need to be more powerful, depending
on minimum requirements for operating system).
•
15 MB of free hard disk space.
•
A VGA Monitor and adapter set to at least 640x480 16-color graphics resolution.
•
Windows 95 or NT.
•
Mouse or trackball.
+DUGZDUH6HWXS
UltraSite is capable of communicating with sites in any of four different ways:
•
Modem - Remote connection from a modem on the PC to a modem on-site.
•
Direct Connection - On-site connection from a serial port on the PC to a serial port of a controller on-site. If the computer is physically located within 50 feet (15.2 m), use a standard 9pin RS232 cable to connect the computer’s serial port to the 9-pin jack on the Einstein or the
RMCC. If the computer is located farther than 50 feet from the controller, a Short-Haul
Modem kit (P/N 535-3700) is required. Refer to the instructions included with the Short-Haul
Modem kit for installation details.
8OWUD6LWH8VHU·V*XLGH
&KDSWHU,QVWDOODWLRQ³
•
Network - Connection from one PC running UltraSite to another PC that is connected to the
controller (via modem or direct connection).
•
Serial Network (REFLECS Enhanced only) - Remote connection from a modem on the PC to
another PC that has a direct connection to an on-site controller.
Refer to Figure 1 for diagrams of these communications configurations.
02'(0
',5(&7
&211(&7
1(7:25.
6(5,$/
1(7:25.
Figure 1 - UltraSite Communication Configurations
,QVWDOOLQJ8OWUD6LWH
Before installing UltraSite, make sure the minimum system requirements have been met
(see “Installing UltraSite” on page 10) and all of the following disks are available:
•
Installation Disk
•
ODBC Disks
•
Support Disk
•
Sounds/Misc. Disk
•
Offline Modules Disks
•
Add-Ons Disk
6HWXS 1. Close any open applications in Windows
3URFHGXUH 2. Insert the first floppy disk (Disk 1, Installation Disk) into the appropriate disk drive (usually
A:).
3.
Click on the Start button.
³&KDSWHU,QVWDOODWLRQ
5HY
4.
From the Start menu, select Run.
5.
In the “Run” dialog box that appears, type
a:\setup and click the OK button. Or, if your 3.5”
floppy drive is set up as “b:”, type b:\setup and
click OK.
6.
After running the setup program, the “Welcome” screen should appear. To continue with
setup, click the Next button. If you have not already closed down all open applications in
Windows, do so now before continuing to Step 7.
7.
Choose the directory in which you wish to install UltraSite. By default, UltraSite will choose
to install the program files in “C:\Program Files\Ultra32.” If you want to use another directory, enter the path name or click Browse to choose a folder. When finished choosing the
install directory, click Next.
7,3
At any time,
you may cancel setup by
pressing the
F3 key.
1HWZRUN 8. UltraSite will ask you if this computer will be using a network
database. If this computer will be communicating with other com6HWXS
puters across a TCP/IP or serial network, you will want all computers on the network to use the same network database in order
to share system information.
Click “Yes” to have UltraSite use a network database. Otherwise, click “No” to install the
database on the hard disk or to use an existing database on the hard disk, and skip to Step 9.
After clicking “Yes,” UltraSite will ask you to specify the location of the network database.
Type the network path of the database, or click Browse to select the desired folder. When finished, click Next.
9.
Choose the type of setup for UltraSite by clicking the Typical or Custom buttons:
•
Typical - A Typical installation includes all necessary
program files, including sound support. Recommended
for most computers.
•
Custom - A Custom installation allows users to include
sound and database support, as well as custom UltraSite
options. Recommended for advanced users.
10. Choose the program folder in which UltraSite will appear in your Start>Programs menu. By
default, UltraSite will place itself in a folder called Energy Management. You may type a different name in the Program Folders box, or you may choose an existing one from the list at
the bottom of the dialog box.
When finished, click Next.
11. In this next box, the program will ask you if you wish to overwrite the existing database and
run UltraSite from your start-up group.
8OWUD6LWH8VHU·V*XLGH
&KDSWHU,QVWDOODWLRQ³
If the Run UltraSite From Startup Group box is checked, UltraSite will place a short-cut in the
start-up group folder, which causes the computer to load UltraSite every time it is rebooted or
restarted.
:$51,1*
Over-writing a
database can
not be undone.
Do NOT check
this box if you
are installing
over a previous version of
UltraSite and
wish to keep
the old sites’
setup information.
If the Overwrite Existing Database box is checked, any UltraSite database found in the install
directory will be erased, and UltraSite will start anew with a new database. All setup information within the old database is lost.
If the Overwrite Existing Database box is unchecked, any UltraSite database found in the
install directory will automatically be converted for use in the new version of UltraSite (if
necessary).
When you have finished selecting your options, click Next.
12. In the final dialog box, the Setup Type, Destination Directory, and Program Folder you have
selected is displayed. Double-check this information to make sure it is correct. If one or more
options needs to be changed, press the Back key several times and change the information in
the appropriate dialog box(es). If everything is correct, press Next to begin installation.
13. UltraSite will copy all necessary files to your hard drive. When finished, a dialog box will
appear announcing that setup has been completed and that the computer must be restarted.
To restart the computer, click on the Yes button and press Finish. To exit installation without
restarting, click on the No button and press Finish. You will need to restart your computer at a
later time in order to run UltraSite.
³&KDSWHU,QVWDOODWLRQ
5HY
&+$37(5
4XLFN6WDUW
This section of the manual gives step-by-step instructions to show you how to log in to
UltraSite, set up user access, and set up communications information. From here you can also
add directory and site information, and connect UltraSite to the controllers.
/RJLQ3URFHGXUH
From Windows 95, 98, or NT, left-click the Start button,
and locate the program folder to which UltraSite was
installed. Click on “UltraSite32” to open UltraSite. (Note: if
you chose to run UltraSite from your start-up group, UltraSite
will automatically open when the computer restarts).
When finished opening, a login dialog box will appear.
To log on for the first time:
1.
Enter “USER” in the User Name field.
2.
Press the TAB key, or click the mouse inside the Password field.
3.
Enter “PASS” in the Password field.
4.
Click OK.
6HWXS8VHUVDQG3DVVZRUGV
1.
From the System menu in the UltraSite toolbar, select the User Maintenance option. The User
Maintenance dialog box (Figure 2) will appear.
Figure 2 - User Maintenance Dialog Box
2.
Select the word USER from the Users list and press the Edit button. The Edit User dialog box
(Figure 3) should appear.
8OWUD6LWH8VHU·V*XLGH
&KDSWHU4XLFN6WDUW³
Figure 3 - Edit User Dialog Box
3.
Enter the desired user name in the Username field.
4.
Enter the desired password in the Password field.
5.
From the Access Level pull-down menu, select “Administrator”.
6.
Enter the full name of the selected user in the Full Name field.
7.
Select OK.
6HWXS3RUWV
)RU0RGHPV 1. Select “Setup Ports” from the System menu in the UltraSite toolbar.
2.
Select the “Modem Ports...” option from the Port List options box.
3.
The Modem Connect Ports dialog box (Figure 4) should list all modems that have been properly installed on your computer and recognized by Windows. Select the modem UltraSite will
use for dialing and receiving, and click the Setup button.
Figure 4 - Modem Connect Ports Dialog Box
4.
In the Select Modem Port dialog box (Figure 5), click the button marked Connect In/Out.
³&KDSWHU4XLFN6WDUW
5HY
Figure 5 - Setup Modem Port Box
5.
Click the OK button to return to the Modem Connect Ports box.
6.
Click OK in the Modem Connect Ports dialog box.
)RU'LUHFW 1. Select “Setup Ports” from the System menu in the UltraSite toolbar.
&RQQHFWLRQ 2. Select the “Direct Connect Ports...” option from the Port List options box.
3.
Highlight the com port (COM1, COM2) you want to use. Click on the Setup button.
4.
In the Select Modem Port dialog box (Figure 5), click the button marked Connect In/Out.
$GG'LUHFWRU\
1.
Select the UltraSite Level branch in the directory tree at the Tree View Screen and click the
right mouse button.
2.
Select “Add Directory...” from the UltraSite Level Action menu.
3.
In the “New Directory” dialog box (Figure 6), enter “Region 1” in the Directory Name field.
Figure 6 - New Directory Dialog Box
4.
Select OK.
$GG6LWH
1.
Select the added directory, “Region 1,” in the directory tree and click the right mouse button.
2.
Select “Add Site” from the Directory Level action menu.
3.
Enter “Site #1” in the Site Name field.
4.
Enter a Site ID designation in the Site ID field (REFLECS Enhanced and Einstein only).
8OWUD6LWH8VHU·V*XLGH
&KDSWHU4XLFN6WDUW³
5.
In the “Devices” box, choose the controller type (REFLECS Standard, REFLECS Enhanced,
or Einstein) by clicking the appropriate button.
6.
In the “Connection” box, choose the type of connection (Modem, Direct Connect, Network,
Serial Network) by clicking the appropriate button.
To continue setup, refer to the section below that matches the choice you made in the
“Connection” box.
0RGHP6LWHV 1. In the “Modem/Direct Settings” box, choose the desired baud rate from the Baud Rate pulldown menu.
2QO\
2.
Enter the phone number of the site in the Phone Number field. If the call is long distance, do
not include a “1” or the country code as part of the phone number (see step 9). Also, do not
include the area code (unless the call is local and an area code is required to make a local call
in your area).
3.
If the call will be long-distance or international, check the “Use country code and area code”
box. Enter the necessary area code in the Area Code field, and select the country to which the
call will be made from the Country Code pull-down menu.
4.
Click OK.
'LUHFW 5. In the “Modem/Direct Settings” box, choose the desired baud rate from the Baud Rate pulldown menu.
&RQQHFW6LWHV
2QO\ 6. Select the serial (COM) port to which the site will be connected to the PC from the Port pulldown menu.
7.
Click OK.
1HWZRUN 7. In the “Network Settings” box, type the network address of the computer to which the site is
connected in the Address field.
6LWHV2QO\
8.
In the “Port” field, type “700.”
9.
If this computer will be the network server (i.e. if other PCs on the network will connect to
this PC to retrieve site database information), select the method this computer will use to connect to the site in the Local Connection pull-down menu. After selecting this communication
method, enter the necessary modem or direct connection properties in the “Modem/Direct
Settings” box (see “Modem Sites Only” or “Direct Connect Sites Only” above for setup
instructions).
10. Click OK.
6HULDO 7.
1HWZRUN
(QKDQFHG 8.
5()/(&6
RQO\ 9.
In the “Network Settings” box, select “9600” from the “Serial Network Baud Rate” pull-down
menu.
Follow the instructions given in “Modem Sites Only” above to enter the site’s phone number,
area code, and country code.
Click OK.
³&KDSWHU4XLFN6WDUW
5HY
$GG&RPSRQHQWV
10. Click the right mouse button on the site name in the Tree View, and select Get Site Inventory
from the menu.
11. Click the right mouse button on one of the units that appears under the site name in the tree
view, and select Get Unit Inventory from the menu.
'HILQH&RPSXWHU2SWLRQV
1.
From the System menu in the UltraSite toolbar, select the System Options option. The System
Options dialog box (Figure 7) should appear.
Figure 7 - System Options Dialog Box
2.
If you are using UltraSite on a notebook or portable computer, put a check in the Notebook/
Portable check box.
3.
If you are using UltraSite on a touchscreen computer, put a check in the Touchscreen check
box.
4.
If UltraSite will be used on-site to communicate using direct connect or network, check the
Enable On Site Options box (Figure 8), and click the Advanced Options button to call up the
on-site options box.
8OWUD6LWH8VHU·V*XLGH
&KDSWHU4XLFN6WDUW³
Figure 8 - On Site Options
5.
In the pull-down menu labeled “Directory,” choose “Region 1.”
6.
In the pull-down menu labeled “Site,” choose “Site #1.”
7.
Press the OK button to return to the System Options menu.
8.
Press the OK button on the System Options menu to return to UltraSite.
%DFNXS6LWH
1.
Click the right mouse button on the site named “Site #1.”
2.
Select “Backup All Units” from the action menu. UltraSite will then retrieve and save all set
points and setup configurations for all controllers on the site.
³&KDSWHU4XLFN6WDUW
5HY
&+$37(5
8OWUD6LWH,QWHU
IDFH
This section is for helping you understand the screens in UltraSite. Navigating UltraSite
is quite simple and only takes a few minutes to learn how to proceed efficiently around the
screens.
8QGHUVWDQGLQJWKH7UHH9LHZ
:KDWLVWKH
7UHH9LHZ"
The UltraSite Directory Tree is displayed on the Main screen, or Tree View screen, within
UltraSite. This directory tree is the means by which users define and move about sites and
their inventories.
Use of UltraSite begins and ends with the directory tree. Users familiar with Windows
will recognize the tree structure as similar to that found in the Windows File Manager or Windows Explorer. Levels, or branches, of the directory tree are defined completely by the user.
When UltraSite is initially accessed, only the UltraSite Level branch is available. From this
level, the following levels are added: Directory, Site, Unit, and Component.
When a level is added to the directory tree, UltraSite automatically updates the tree with
the new entry. These entries are displayed in a hierarchical format so that components at any
site may be quickly located. Further, expand and collapse icons indicate when a tree entry
may be expanded to view additional information, or when an entry may be collapsed to
remove unneeded information.
The directory tree is also interactive. When any tree entry is highlighted, UltraSite displays the Action pull-down menu that contains a list of related commands. Most commands
require UltraSite be connected to the specified site; therefore, UltraSite automatically connects to the site when these commands are selected. If UltraSite is unable to connect or communicate with the site, the selected branch in the Directory Tree will become gray until a
connection is successful.
8OWUD6LWH8VHU·V*XLGH
&KDSWHU8OWUD6LWH,QWHUIDFH³
Directory Level
Unit Level
Site Level
Component Level
Log
Figure 9 Levels in the Tree View
Directories
The Directory Level is defined as a base location where all defined sites are placed. Typically, different directories are defined for different regions.
Sites
A site represents a number of units that are networked together via the COM C or Echelon network and share a common modem (or similar communications device) for remote
communication.
Units
The Unit Level is defined for each Einstein or REFLECS controller at a defined site.
Units are manually added under the selected site at the Add Unit dialog box .
The Add Unit dialog box automatically adds the appropriate unit located at a selected site
through its Get Site Inventory command. On a command for a site inventory, UltraSite will
connect to the selected site and search for connected units and their components. These units
are then added under the selected site level.
Components
A Component Group is defined for each component running with a defined Einstein or
Enhanced REFLECS unit. Components are manually added under the selected unit at the Add
New dialog box . Component groups differ from controller to controller and must be defined
accordingly. For more information on the types of components that can be defined for a controller see the UltraSite Supplement for the individual controller or the Installation and Operation Manual for the particular controller.
UltraSite will automatically add the appropriate components running with a selected unit
through its Get Unit Inventory command. On a command for unit inventory, UltraSite will
connect to the selected unit and search for its components. These components are then added
under the selected unit level.
Logs
Multiple logs may be collected and graphed from multiple sites and units using the Collect command on the Logs pull-down menu.
20— Chapter 3: UltraSite Interface
026-1002 Rev 3 9-28-99
1DYLJDWLQJWKH7UHH9LHZ
The main directory on UltraSite is viewed using the Tree View. If you are familiar with
Windows, this is the same format for expanding and opening folders and files. Like Windows
Explorer, UltraSite uses Expand and Collapse icons (plus and minus symbols) to resize the
directory tree.
Figure 10 Expand and Collapse icons
([SDQG
&ROODSVH
%UDQFKHV
To expand a single level of the directory tree, click on a “plus” symbol. To completely
expand a branch, use the Expand Branch command found in the Tree pull-down menu from
the Command Line. Use the Expand One Level command found in the Tree pull-down menu
to expand a highlighted level.
To collapse a single level in the directory tree, click on the “minus” symbol. To completely collapse all levels under a directory tree branch, use the Collapse Branch command
found in the Tree pull-down menu from the command line.
Figure 11 Expand and Collapse Icons in the Command Line
The Command Line also contains Expand and Collapse icons that act the same as the
“Plus and Minus” symbols in the directory tree. To activate, left click to highlight a branch in
the directory tree and press either the Expand or Collapse icons in the Command Line.
5LJKW&OLFNLQJ
Figure 12 Right Click Menu
8OWUD6LWH8VHU·V*XLGH
&KDSWHU8OWUD6LWH,QWHUIDFH³
Right Clicking an item on the tree view calls up a content-sensitive menu which acts like
a short-cut to a number of functions that are used with the item selected. This is the most common way to perform functions in UltraSite.
Use right clicking to:
•
Add new sites, directories, etc. to the tree view.
•
Select a unit or component to view status, edit setpoints, and change configuration.
•
Select a site for editing communications and other important control settings.
7KH$ODUP%XWWRQ
Alar m B utton
When UltraSite receives new alarms from an Einstein or REFLECS controller, the Alarm
Button will indicate that a new alarm has been received. Click on the Alarm Button and the
Alarm View Screen will appear.
Figure 13 Alarm View Screen
The Alarm View screen displays all alarms for the unit or site in a tabular format. An
alarm’s date and time, unit number, alarm type, location, and a brief alarm description are
shown in the Alarm View screen.
³&KDSWHU8OWUD6LWH,QWHUIDFH
5HY
&+$37(5
3URJUDPPLQJD
&RQWUROOHU
You can program a REFLECS or Einstein controller without having to be in front of the
actual controller or even on the site. Programming can be done either on a local computer or
over telephone lines using a modem.
3URJUDPPLQJ5HIOHFV
8VLQJ2IIOLQH
3URJUDPPLQJ
Entering program information with Offline Programming is the preferred method for setting up your REFLECS controller in UltraSite. When using Offline Programing, all of the
information for the controller is entered before controller is connected to. The Offline method
saves time because when programming online, each section of information entered to the controller takes a while to upload. Programming offline saves you time and keeps your phone line
free until you are ready to download the information.
To access Offline Programming:
1.
From the tree view, right click on the REFLECS controller you need to program.
2.
Select Offline Programming.
At this point, you can choose to set up the devices you have already added or add devices
to the controller (see Figure 14).
Figure 14 Offline Device Setup and Add New Menus
3.
If you need to setup your devices or scheduling, select one of the options from the list. Selecting the Setup Wizard takes you screen by screen through the setup process (see “Setup Wizard” on page 24).
4.
If you need to add components first, select Add New and choose the components you need to
add.
8OWUD6LWH8VHU·V*XLGH
&KDSWHU3URJUDPPLQJD&RQWUROOHU³
6HWXS:L]DUG
The Setup Wizard utility is designed to allow users to define an entire REFLECS unit in
one session. To use Setup Wizard, right click on the controller, select Setup Wizard from the
menu and follow the instructions given on the screen.
Running Setup Wizard in on-line mode requires a lot of time-consuming interaction
between UltraSite and the controller. For faster programming, it is recommended that Setup
Wizard be executed from Offline Programming mode and uploaded the completed program to
the controller using the Restore command.
%DFNLQJ8S
DQG5HVWRULQJ
,QIRUPDWLRQ
Figure 15 Backup and Restore Status Screens
%DFNLQJ8SD
'DWDEDVH
The Backup command is found in the File menu. When backup is selected, UltraSite
retrieves the current set points and setup configuration of all controllers at the site. This information is stored within UltraSite and is used to restore settings lost as a result of a catastrophic
system failure or loss of critical data. Backing up a database is also used when upgrading a
system’s controller.
Set point and setup data for all units at a particular site may be backed up at the Backup
All Units dialog box. All settings defined within the selected unit are backed up.
If an error message is displayed, backup the data again. If the problem persists, disconnect from the site, reconnect, and try again.
5HVWRULQJD
'DWDEDVH
After a unit or site is backed up, the saved settings may be restored by selecting Restore
from the File menu at the desired unit level.
³&KDSWHU3URJUDPPLQJD&RQWUROOHU
5HY
Restoring a
Database
After a unit or site is backed up, the saved settings may be restored by selecting Restore
from the File menu at the desired unit level.
The restore option replaces the current unit settings with the saved backup settings. This
option is only active after the unit has been backed up.
Most commands that change unit set points automatically connect to the selected unit so
that the unit may be automatically configured with the new settings. When ready, users may
install the new set points in the selected unit by selecting Restore from the Unit Level Action
menu.
Adding New
Components
Online
If you have a component to add, a couple of setpoints to alter, or a small amount of data
to change, then programming online is the way to do it. To program online, connect to the site
(right-click the site name from the Tree View and select Connect), and then right-click the
unit you wish to change.
Figure 16 RMCC and BCU Add New Menus
When the desired unit is selected, the Add New component dialog box will be displayed.
This dialog box contains a field where the desired component number is entered; by default,
the number after the highest numbered component in the group is entered in this field. Clicking the Yes button adds the component and the component number to the system tree.
After the new component is added, UltraSite presents a series of dialog boxes where
setup information for the new component may be specified. For information about the dialog
boxes that appear, refer to the appropriate Setup Instance section in the BCU, BEC, or RMCC
UltraSite supplemental manual.
You can also change set points for an existing component or unit online. Refer to Chapter
8 for more information.
UltraSite 32 User’
s Guide
Chapter 4: Programming a Controller— 25
Einstein
Figure 17 Offline Programming Dialog Box and Application Setup Box
Offline programming for Einstein can only be performed in version 3.01 or later. The
interface for programming Einstein off-line uses screens similar to those you would see on the
Einstein front panel. When the components are added to the system, the configuration screens
are presented in the same order as the Einstein controller interface.
To access Einstein offline programming:
1.
If you are configuring a new controller, make sure to already have a controller added (See
page 23).
2.
Right click the new controller and select Offline Programming. The I/O Boards and Controllers Associated With This Controller dialog box will appear.
3.
Enter in the values for how many I/O boards and associated controllers that are additions to
the Einstein controller.
4.
Press OK.
5.
The Application Setup dialog box will appear. Enter the number of applications that the Einstein will control.
6.
Click on Add Applications. The Offline Programming screen will appear.
Figure 18 Offline Programming Screen
26— Chapter 4: Programming a Controller
026-1002 Rev 3 9-28-99
7.
In the Offline Programming screen, highlight Device Setup and select each parameter one at a
time. An edit screen will come up for each menu option.
7KH'HYLFH •
6HWXS/LVW
Time and Date - Adjusting the time and date for einstein must be one of the first things to set
up before going online.
•
General Setup - General Setup includes Baud Rate setup, Engineering Units, Modem Select,
and System Refrigeration type.
•
User Access Levels - You can setup your user list and the access levels from here. The
Detailed Log option can also be activated from this screen.
•
Network/Board Setup - In this screen you can Add an I/O Board or a Unit Controller, Add an
RX or BX Controller, Delete the Controller, Set its Address, enter Expanded Information for
the Controller, and Set the Domain Address by clicking on the Full Options check box.
•
Alarm/Advisory Setup - This screen includes Alarm Enabling, Reporting and Priority Setup.
You also setup the Alarm Advisory feature.
•
Remote Dialout Setup - Remote Dialout Setup includes information on Day and Night Dialing times, Dialout locations and Printing Baud rates.
•
Application Defaults - Here, you can setup Suction Group, Condenser, and Global Properties
and Setup the controller for TD3s.
•
Associate CCBs/Circuits - This screen is for setting up an association with the controller to
Case Control Boards or Circuits not already associated with it.
Figure 19 Edit Configuration Screen
Each Device Setup option will have an Edit Configuration box with a set of user-definable parameters in it. These screens are identical to those you would see from the Einstein
front panel. For more information on how to program them, consult your Einstein User’s
Guide.
8OWUD6LWH8VHU·V*XLGH
&KDSWHU3URJUDPPLQJD&RQWUROOHU³
Edit User
Access List
Figure 20 Edit Access User List Box and Edit User Info Box
The Edit User Access List dialog box is where you may associate an UltraSite username
with an Einstein username. Each defined UltraSite user name can be given a corresponding
username and password to allow logins to Einstein during site connection.
1.
Right-click a unit on the Offline Programming screen.
2.
Click on the Add button and the Edit User Info box will appear.
3.
Click on the UltraSite Users pull-down menu and select the type of user.
4.
Fill in the User Name(s) and then the Password for each entry.
5.
Click OK.
Add New
Application
Figure 21 New Application Dialog Box and Application Selections
To add a new application:
1.
Click on the Cell Type pull-down menu and click on what application to add.
2.
Type in the number of applications.
3.
Type the name(s) for each application.
4.
Click Add.
28— Chapter 4: Programming a Controller
026-1002 Rev 3 9-28-99
&+$37(5
9LHZ6WDWXV
Viewing the status of controllers is one of UltraSite’s most important features. When you
view a status, you are looking at a real-time representation of what is going on at that moment
with the devices of that controlling system.
$FFHVVLQJ6WDWXV6XPPDU\6FUHHQV
6WDWXV
6FUHHQ
Status Screens are available at the component level.
Status screens display real time information about specific individual components within
the control system. A status screen usually displays the current state of the component using
animated graphics and/or gauges, fields, and indicators.
Status screens are explained in detail in each controller’s UltraSite supplemental manual.
Refer to these manuals for more information.
Right
Clicking Tree
View
Figure 22 Status and Summary Screens
6XPPDU\
6FUHHQ
Summary Screens are available at the unit level.
Summary screens provide real time tabular views of the status of one or more groups of
components. Each group of components in an Enhanced REFLECS or Einstein control system
(such as air handling units for BECs, rooftop controllers for BCUs, and circuits for RMCCs)
has its own summary screen, where the status of all components may be viewed. Summary
screens for all groups of components within the control system may be viewed all at once in a
Unit Summary screen such as the one pictured above.
8OWUD6LWH8VHU·V*XLGH
&KDSWHU9LHZ6WDWXV³
Right
Clicking Tree
View
Summary screens differ depending on the controller and the component groups, but navigation is similar among all summary screens. Double-clicking the left mouse button on any of
the components shown in a summary screen will call up the selected component’s individual
Status Screen. Right-clicking a component in a summary screen will bring up a menu identical to the one called up when the component is right-clicked from the system tree (refer to the
controller’s UltraSite supplemental manual for more information). Other navigational commands are available from the pull-down menus.
6WDWXV6FUHHQVDQG/DEHOHG&DSWLRQV
Figure 23 Animated Air Handler Unit and Thermometer Detail
$QLPDWLRQV
Animations in UltraSite are used to represent actual displays and equipment on a site in
real time format. Refrigerator compressor racks and air handling units are displayed with
moving components and status indicators while thermometers and pressure gauges instantly
show changes in temperature and pressure.
*DXJHV
7KHUPRPHWHUV
Multi Log
Check Box
Figure 24 Pressure Gauge
³&KDSWHU9LHZ6WDWXV
5HY
Gauges and thermometers are pictured in real time and are a feature of the status screens.
They display the current temperature or pressure reading and the current setpoint. Logging
icons are located in close proximity. Logging is covered in the next section, “Logs and
Graphs” on page 33.
6OLGH%DUV
Figure 25 Thermostat Setpoint Slide Bar
Slide bars are interactive graphics that allow you to view and change the setting of a setpoint. To change the value of the setpoint, click on the pointer and drag up or down to the new
setpoint. The slide bar caption will reflect the new value.
6XPPDU\6FUHHQV
Figure 26 RMCC Summary Screen
8OWUD6LWH8VHU·V*XLGH
&KDSWHU9LHZ6WDWXV³
*UDSKLF
$ODUPVDQG
1RWLFHV
Summary screens are used to display a unit’s current status summary. The display shows
a number of real time graphs representing many areas of importance in the system. If circuit
names or other devices are highlighted in red, they are in active alarm at the controller. If the
names are highlighted in yellow, they are in active notice at the controller.
9LHZLQJ,2%RDUG6WDWXV
Figure 27 I/O Board Status Screen
The I/O board status screen is used to view the current status of each I/O board in the system. To reach the I/O board status screen, right click on a controller name in the tree view and
select I/O Board Status.
If an I/O board is indicated ON, then on-line with the controller. If it is indicated OFF,
then the board is offline.
³&KDSWHU9LHZ6WDWXV
5HY
&+$37(5
/RJVDQG*UDSKV
Logs and graphs in UltraSite help you keep track of how the system has been performing
over a period of time. Logs are data entries set up by you for UltraSite to record. Graphs are
visual representations of information that a sensor has been reading over time.
*DWKHULQJ/RJVDQG*UDSKV
/RJV
There are a number of ways to gather Logs in UltraSite.
To gather logs that have not been previously retrieved in UltraSite:
1.
From the tree view, right click on the controller (RX, RMCC, BCU) name.
2.
Select Get Logs. The select Log screen will appear. This screen contains a list of loggable
components for that controller.
3.
Click on all of the components you wish to log and press either Collect or Collect & Graph.
For multiple graphs, hold the Ctrl key and click on additional components. Then press either
Collect or Collect & Graph.
If Collect is chosen, the tree view will list available logs to view. To view the logs, click in
the Check Boxes the graphs you want to view and click on the Log Button in the command
line (see Figure 28).
If Collect & Graph is chosen UltraSite will display all of the graphs after they are collected (this may take some time if more than one is chosen).
Select Cancel form the Select Graphs window if you do not wish to collect or graph logs.
Log Button
Log Button
Check Box
Check Boxes
Figure 28 Log Check Boxes in Tree View, Log Icon in Command Line and Log Button on Animated Screen
You can gather logs in the animated graphic screen (see Figure 28).
To view log graphs from an animated status screen:
1.
Get to the Status Screen of the device you want to log (see “Accessing Status/Summary
Screens” on page 29).
2.
If you want to view one log a time, click on the Log button located near the animated device.
If you want to view more than one log graph from the same status screen, click each Check
8OWUD6LWH8VHU·V*XLGH
&KDSWHU/RJVDQG*UDSKV³
Box near the device, then click the Log Button in the command line at the top of the screen
(see Figure 28).
9LHZLQJ/RJVDQG*UDSKV
Figure 29 Log Graph
7DEOH
The Graph Table is feature that allows you to see each value entered by the controller on
the selected graph in table form.
To view this table:
*UDSK
1.
From the graph screen (see “Gathering Logs and Graphs” on page 33) click on the Data menu
in the command line.
2.
Select Show Table.
3.
The Graph Table will be included with the graph. To remove this feature, follow the same procedure above and uncheck Show Table by clicking on it.
UltraSite plots log graphs using two variables. The X axis (left to right) is always time
while the Y axis (up and down) are pressure, temperature or other values that vary on the
application. The values and increments are listed up and across these axes.
When you view a graph, whatever the current position of the cursor is, the X and Y axis
coordinates are displayed in the top left corner and bottom and change as you move the cursor
around in the graph (See Figure 29). Even though the scales are labeled along the bottom and
left sides of the graph, you can position the cursor anywhere in the graph and the exact X
value (time) and Y value represented in the graph will be displayed.
³&KDSWHU/RJVDQG*UDSKV
5HY
2SHUDWLQJWKH*UDSK9LHZ
Figure 30 Graph View with Magnification Box Drawn; Zoom Out Button
6FDOH
&KDQJHV
When you are viewing a graph in UltraSite, sometimes you need to see a section in more
detail. To magnify a section of the graph:
1.
Click and drag the cursor to draw a box around the section of the graph you want magnified.
2.
To resize the box drawn, click and hold one of the corner or side tag makers attached to the
box and drag it in or out to the desired shape.
3.
When the box is drawn, double click inside the box drawn and the image will be “zoomed in”
on that section.
4.
To back out of the zoomed image, click on the zoom out icon (the magnifying glass with a
minus symbol inside Figure 30).
0XOWL*UDSKV
Check
Box
Graph
Figure 31 Log Graph Icons and Check Boxes
You can view more than one log graph at a time in UltraSite.
8OWUD6LWH8VHU·V*XLGH
&KDSWHU/RJVDQG*UDSKV³
1.
Open up an animated status screen.
2.
Click on the device’s Check Box (see Figure 31) located next to the Log Graph Icon. A
“check” will appear in the box.
3.
Click on other devices’ Check Boxes in the same status screen.
4.
Click on the Graph Icon in the command line (see Figure 28).
The grid plots several graphs at a time; each with their own color. A legend for the graphs
is shown in the top right corner of the screen.
UltraSite remembers which logs were plotted. When the tree view is completely
expanded, the devices will appear with log graph icons and check boxes for easy future
retrieval.
7LS
Graph Icons
will appear in
the tree view
only if they
have been previously logged.
If you want to plot multiple graphs from the tree view:
1.
From the tree view expand the list until check boxes along with log graph icons are displayed
(see Figure 28).
2.
Click on the boxes of the graphs you want grouped together.
3.
Click on the Log Graph icon in the Command Line.
([SRUWLQJ/RJV
Logged data can be exported to other files. This helps in archiving the performance of a
device over time. Normally a controller logs about three days of information.
Log data may be exported to either tab or comma delimited files using Export Log Data.
Both file types are simple text files that may be read using Windows Notepad or imported to a
variety of other Windows applications.
To Export Logs:
1.
From the tree view, right click on a log (see Left).
2.
Select Export Log Data.
3.
Dialog box will appear. Select where to export log data to and press OK.
³&KDSWHU/RJVDQG*UDSKV
5HY
&OHDULQJ/RJV
$XWRSXUJH
Logs stored in UltraSite must occasionally be removed to make room for more logs that
the controller generates. AutoPurge is an option that allows you to determine how long logs
last in UltraSite.
To Autopurge Logs:
1.
From the tree view, click on the System Menu button in the command line.
2.
Select Autopurge Options.
3.
Set the time of day to purge the logs.
4.
Set the number of days a log is to last in UltraSite.
5.
Enter exceptions, if any.
6.
Click OK.
0DQXDOO\
To manually change logs in UltraSite:
&KDQJH/RJV 1. Right click on a log in the tree view.
2.
Select Edit Logs.
3.
Make appropriate changes.
5HDO7LPH*UDSKV9LHZ
Data may be viewed in a real-time graph format by choosing Select Real Time Points
from the Action pull-down menu of a Status or Summary Screen. A real time graph takes data
from sensors you select and sets them in a scrolling graph that plots points along a moving
screen.
8OWUD6LWH8VHU·V*XLGH
&KDSWHU/RJVDQG*UDSKV³
+RZWR*HW
7KHP
From a Status Screen
From a Summary Screen
While at the Status Screen, select items to be viewed
by placing a check mark in the box next to it. Choose
Select Real Time Points from the Actions pull-down
menu.
Select Real Time Points from the Actions menu. The
Select Points/Logs To Graph dialog box will appear.
Or
Click the Graph button when all of the desired items
have been added to the Point/Log List.
+RZWR
2SHUDWH7KHP
7LS
Graphs may
be saved,
restored, or
printed
through the
File menu.
Using the pointer, add items to the Point/Log List by
left clicking in the table cell of the item to be added to
the list.
Click the Graph button when all of the desired items
have been added to the Point/Log List.
Real time graphs may be saved and opened from the Real Time Graph View. When the
Save command is used, UltraSite saves all the log names currently being graphed to a file with
an RTG extension. When an RTG file is opened using the Open command, the logs listed in
the file are displayed in the Real Time Graph View. If a graph is being saved for the first time,
the Save As command must be used. The Save As command allows a file name and directory
to be assigned to the graph.
Selecting the Print command from the File pull-down menu prints one copy of the current
real time graph from the selected printer. Users may preview how the hard copy will look by
choosing the Print Preview command.
To set up a printer to receive the printout, select Print Setup and choose the necessary
configuration options. Refer to the printer’s user manual for the correct configuration.
³&KDSWHU/RJVDQG*UDSKV
5HY
&+$37(5
$ODUPV
All REFLECS and Einstein controllers may be configured to send alarm dialouts to UltraSite. This feature provides the user with the ability to view, acknowledge, clear, or reset
incoming alarms without having to be at the site. Refer to the appropriate controller Installation and Operation Manual for the configuration of the controller.
9LHZLQJ$ODUPV
Select the site and click the New Alarms button to view
site alarms.
For site, unit, or component alarms, right click on the
corresponding level and select View Site Alarms from
the menu.
Or
Figure 32 Alarm View Options
To gather alarms in the tree view:
1.
Right click on the site.
2.
Select View Site Alarms.
Click on the Alarms menu in the Command Line and select Update Alarms. If you are not
connected to the site, click Yes when the site connection dialog box appears.
7KH$ODUP
%XWWRQ
Figure 33 Alarm Button
8OWUD6LWH8VHU·V*XLGH
&KDSWHU$ODUPV³
In UltraSite, all of the major screens have an Alarm Button located in the top right corner
of the screen. If the button is colored red, then a new alarm has been logged. Clicking on this
button will call up the alarm log screen with the new alarms displayed.
7KH$ODUP/RJ
Alarms may be viewed, acknowledged, reset, or cleared at this screen. View Alarms
screens are available for all sites, units, and for each component within a unit. The View
Alarms command is located in the Action menus for each directory tree level.
The View Alarms screen displays the real time status of any alarms that have occurred
within the selected level. Icon buttons provide the necessary options to view, acknowledge,
reset, clear, or print the selected alarms in the View Alarms screen. The Alarms pull-down
menu commands allow users to acknowledge, reset, or clear all alarms displayed in the View
Alarms screen as well as connect to the site and update the alarms list. Also available in the
Alarms pull-down menu is the Change Filter command that displays the Set Alarm Filter dialog box.
Figure 34 Alarm Log
$ODUPV
1RWLFHV
)DLOXUHV
An alarm is sent by the controller to UltraSite if a sensor reaches a value that is out of
range for its particular application. Alarm levels are setup when programming the controller.
An alarm notice is generated when a notice value is reached by a sensor. Alarm notice levels
are setup when the controller is programmed. Failures are reported when a sensor fails to
function altogether.
7KH$VWHULVN
Unacknowledged alarms are signified in the View Alarms list by an asterisk appearing
after “Alarm” or “Notice” in the State column. To acknowledge an alarm, select it from the
View Alarms list and left-click either the Acknowledge option from the pull-down menu or
the Ack button at the bottom of the alarm screen. When an alarm is acknowledged, the asterisk in the Alarm Type column is replaced with a hyphen.
5HDGLQJ
/RJJHG
$ODUPV
To read logged alarms, right click on the site in the tree view and select View Alarms. All
of the alarms that have not been cleared will come up. If there is not a connection to the site,
no new alarms will be shown.
³&KDSWHU$ODUPV
5HY
5HWXUQWR
1RUPDODQG
)RUFHGWR
1RUPDO
Sometimes a device will reset itself from an alarm condition to a normal condition. A
device that returns to normal after being in an alarm condition will not reset the alarm that has
been relayed to UltraSite. Other times an alarm can be reset from the controller and therefore
forced-to-normal.
:KDWWRGR:LWK$ODUPV
$FNQRZOHGJH
2QH$OO
You can acknowledge individual alarms by clicking in the entry and pressing Ack in the
Alarm Action Menu at the bottom of the screen. The asterisk in the Alarm Type column signifies that the alarm is unacknowledged.
Choosing Acknowledge All from the Alarms pull-down menu acknowledges all unacknowledged alarms in the alarms list. All of the entries will have the asterisk replaced by a
dash in the Alarm type column and the red Alarm button will be reset.
5HVHW2QH$OO
An alarm entry with a dash included in the Alarm Type column means that the alarm has
not been reset. The controller keeps the device in an alarm condition until it is reset either at
the controller or through UltraSite. Select one alarm entry to be reset by clicking it and clicking on Reset in the Alarm Action Menu.
Choosing Reset All from the Alarms pull-down menu resets all alarms in the alarms list.
&OHDU2QH$OO
Clearing an alarm removes it from the alarm list entirely. You can clear individual alarms
entries in the alarm list by clicking on the entry and pressing clear. To clear more entries without clearing all the entries, hold the “Ctrl” key on the keyboard while clicking on the entries.
Choosing Clear All from the Alarms pull-down menu clears all alarms in the alarms list.
'LDOLQJ2XW$ODUPV
6HWWLQJ
&RQWUROOHU
WR'LDO2XW
$ODUPV
The Einstein and REFLECS controllers must be configured to send alarms to the UltraSite interface. Consult the controller’s programming manual for instructions on how to do
this.
8OWUD6LWH8VHU·V*XLGH
&KDSWHU$ODUPV³
6HWWLQJ8S
8OWUD6LWHWR
5HFHLYH
'LDORXWV
When setting up UltraSite to monitor sites, you can have the controller at the site call the
remote computer with UltraSite installed to relay alarms, logs or other information.
To set up UltraSite to receive controller dialouts:
1.
Start from the Tree View. Highlight the controller.
2.
Click the System menu from the command line and select Setup Ports and then Modem Ports.
3.
Click on Setup.
4.
Select the appropriate Port Usage. If UltraSite is being used off site and you want to be able to
change setpoints, select In/Out.
5.
Click Modem to setup baud rate (make sure to use 9600) or other connection parameters.
6.
Click OK.
(PDLOLQJDQG
)D[LQJ$ODUPV
5()/(&6
2QO\
UltraSite can send alarm messages to your email account or your fax machine. Currently,
this feature works only with RMCC, BEC, and BCU alarm reporting.
To set this feature up:
1.
Right click on the site from the Tree View and select Remote Annunciation. A dialog box will
appear with two boxes set up to send alarm messages by either email, fax or both.
2.
Fill in the appropriate fields with the email address and/or the fax number.
3.
Click OK.
Note: E-mail annunciation of alarms will only work if you have a network or dial-up connection to the Internet and a mail client software program (such as Eudora or Microsoft Outlook).
³&KDSWHU$ODUPV
5HY
&+$37(5
&KDQJLQJ&RQILJX
UDWLRQ
This section explains how to change your configuration while online. This method results
in an instantaneous change in configuration instead of having to program offline.
&KDQJLQJ6HWSRLQWVLQWKH7UHH9LHZ
From the Tree View you can change the setpoints in a device or controller. To change the
setpoints in the Tree View:
1.
Expand the Tree View out to the device you want to change.
2.
Right Click and select Setup or Configuration from the menu.
3.
The Setup Menu will appear. Make the changes.
4.
Click “OK.”
The configuration change will be set in instantly.
8OWUD6LWH8VHU·V*XLGH
&KDSWHU&KDQJLQJ&RQILJXUDWLRQ³
&KDQJLQJ6HWSRLQWVIURP6WDWXV
6FUHHQV
6OLGH%DUV
Setpoints can be adjusted from the status screens using Slide Bars. Click on and hold the
Slide Bar and drag up or down the scale. The printed Setpoint value below the scale will
change when the movement is complete (there might be a slight delay).
5LJKW&OLFNLQJ
3DUDPHWHU
Setpoints from the status screens can also be adjusted by right clicking on a parameter. A
content-sensitive menu will pop up with options for changing setpoints.
7KH´6HQG7Rµ)HDWXUH5()/(&62QO\
Set point data in the selected dialog box may be sent to other instances within the current
controller or to one or more instances on the network by using the Send To command.
From most dialog boxes where setup and set point data are entered for a component or a
group of components, the Send To command may be used to copy data to one or more compo-
³&KDSWHU&KDQJLQJ&RQILJXUDWLRQ
5HY
nents in the unit, site, or directory levels. In this manner, users may set up numerous instances
with the same settings, such as identical refrigeration cases or rooftop units, all at once rather
than individually.
6HQG1RZWR
,QVWDQFHV
When the Send Now to Instances option is selected, the box below the option is highlighted. This box lists all instances connected to the control unit that may receive the selected
data from the Send To command. For example, if sensor set points are being sent, the list will
show all sensors defined for the controller.
The list of components in the Send Now to Instances box will not show components
defined for other units on the network. To send to other units, use the Send Later to Group
option.
To select one or more instances from the Send Now to Instances list, left-click each
desired item on the list while holding down the Control key on the keyboard. A range of
instances may also be selected by clicking and holding the left mouse button on an item and
dragging the mouse pointer up or down the list.
6HQG/DWHUWR
*URXS
The Send Later to Group command allows users to send data to components that are part
of other units or sites. Changes sent using the Send Later to Group option are made during
autopolling; therefore, in order for a site or unit to receive the changes, autopolling must first
be set up for the site or unit, or they may be made manually by selecting the Send Only Pending Changes option from the Manual Autopoll dialog box.
To send to groups, select the Send Later to Group option and choose a group from the
scroll options.
3UHYLHZ
$OO&KDQJHG
9DOXHV
After a group is selected from the scroll options, selecting the Preview button calls up a
list of all instances the data will be sent to within the group. Only those instances in a group
that may receive the data will be shown in this list; if sending sensor alarm set points, for
example, Preview will show only sensors that are part of the selected group.
Choosing the All Values option sends all the selected data to the chosen instances or
groups. Choosing the Changed Values option sends only the data that was changed in the dialog box before the Send To button was pressed. For example, if a user called up the Sensor
Alarms Setpoint dialog box, changed a High Alarm value, and executed a Send To command
with the Changed Values option selected, only the High Alarm setpoint would be sent to the
chosen instances or groups.
8OWUD6LWH8VHU·V*XLGH
&KDSWHU&KDQJLQJ&RQILJXUDWLRQ³
CHAPTER
9
Override and
Bypass Functions
This section will demonstrate how to perform Override and Bypass functions as well as how to
place a refrigeration or freezer unit into Manual Defrost.
How to Override
From the
Status/
Summary
Screen
Figure 35 Einstein Override and REFLECS Manual Mode Screens
To override inputs or outputs from the Status/Summary screens, double click on an item
on the screen and the Manual Mode or Override dialog box will appear.
1.
Click on the check box to place the device in override. If you want to defrost a circuit, see
“Manually Defrosting” on page 48.
2.
Choose the type of override for the device.
Override Types:
•
Fixed - This means that the device will stay in the override state. The override will not time
out, so the override must be removed.
•
Timed - The override will terminate after the amount of time that you enter.
3.
If the override is timed, enter the amount of time for the override.
4.
Enter the override value. Either ON, OFF, or NotAct (NotAct means that the device state will
not be considered for other actions during the override period).
•
Overrides can also be analog. If the device you want to override is analog, type in the override
value in the dialog box.
5.
Click “OK.”
UltraSite 32 User’
s Guide
Chapter 9: Override and Bypass Functions— 49
,I'HYLFHLVLQ
2YHUULGH
Figure 36 Override Indicators in Animated and Status Screens
If a device is in Override, the image on the status screen will have a highlighted ON or OFF next to
the device name. When viewing a tabular status screen, the override value will be hightlighted in
the Value column. The status column will state “OVR” for the duration of the override state.
0DQXDOO\'HIURVWLQJ
Occasionally, a freezer or refrigerated case will need an additional defrost outside its normally
scheduled routine. It could be needed because of changing humidity levels or a failed sensor. For
whatever reason, the ability to call up a defrost is easy in both the Einstein RX and RMCC.
(LQVWHLQ
Figure 37 Bypass Setup in Einstein
To defrost an Einstein system manually, you need to call up the associated dialog box and
set up the defrost parameters.
1.
Right Click on the circuit from the Tree View.
2.
Select Circuit Bypass. The bypass dialog box will appear.
3.
Click to check the In Bypass box.
4.
Choose the type of bypass.
For the Einstein controller, there are three types of bypass modes.
•
Defrost - Puts the unit in its normal defrost routine.
•
Emergency Defrost - Begins defrost immediately. This event continues until the bypass is
removed.
•
Start Cleaning - The clean or wash mode begins. The refrigeration cycle ends without any
defrost action. The normal time programmed for the cleaning mode is in effect.
³&KDSWHU2YHUULGHDQG%\SDVV)XQFWLRQV
5HY
5HPRYLQJ To remove the bypass in Einstein, go to the same dialog box and click on the In Bypass check and
%\SDVVLQ click OK.
(LQVWHLQ
50&&
Figure 38 Manual Mode Setup in RMCC
The manual mode in RMCC is where bypasses and manual defrosts for a circuit are performed from. To set up a manual defrost in RMCC:
1.
Right click on the circuit in the tree view.
2.
Select Manual Mode. If you are bypassing from a case control circuit, select Circuit then
Manual Mode.
3.
Select the defrost type. See below:
Manual Mode selections for RMCC:
•
Start Defrost - This starts the normal defrost routine programmed for the circuit.
•
End Manual Mode - This ends any override or defrost selected through Manual Mode.
•
Start Override (Wash) - The refrigeration cycle ends but does not go into any defrost routine.
•
Emergency Defrost - The defrost cycle begins immediately and continues until it is reset from
this dialog box.
4.
When the Manual Mode is selected, click OK.
(QG0DQXDO To remove the manual mode from the circuit, get back to the same dialog box above, click on End
0RGHLQ50&& Manual Mode, and click OK.
8OWUD6LWH8VHU·V*XLGH
&KDSWHU2YHUULGHDQG%\SDVV)XQFWLRQV³
&+$37(5
$XWRSROOLQJ
This section of the manual will discuss the functions of autopolling and show how autopolling is set up and used.
,QWURGXFWLRQWR$XWRSROOLQJ
Autopolling is the process of automatically collecting and receiving selected information, (such as logs, alarms, and set point backup configurations) at scheduled daily, weekly, or
monthly intervals. Autopolling allows a PC running UltraSite to automatically connect to
sites, retrieve selected logs and alarms, and/or back up the set point configurations of all controllers on-site.
Autopolling is configured by scheduling polling times for each site or unit that will participate in autopolling and by selecting the type of information that will be gathered during the
poll. On each scheduled time, UltraSite will automatically connect to the sites and units,
retrieve the desired data, and store it in the UltraSite database for off-line viewing.
The types of data that may be gathered by auto-polling include:
Logs. You may select one or more logs from a unit to be updated in the UltraSite database when
an autopoll occurs.
New alarm messages. Autopolling can gather new alarms from control units.
Site or unit inventory. This is equivalent to using the Backup command (see “Backing Up a
Database” on page 24).
$XWRSROO
6FKHGXOLQJ
UltraSite is designed with very flexible autopoll scheduling capabilities that allow users
to program different autopoll times for each group of data polled.
Each site has its own user-defined default autopolling schedule, called the “site default.”
When setting up groups of data to be autopolled (such as a log from a unit or the alarms from
a unit), the user has the option of either using the site’s default autopolling schedule or creating a separate schedule that applies to that group of data only.
1RWH
Autopolling
will not be
available if
you selected
Notebook/Portable settings
in the System
Options dialog box.
For example, suppose “Site #1” is by default configured to autopoll once a day at midnight. For the purposes of retrieving unit logs and storing them in the database, polling Site #1
once a day might be satisfactory. However, if it is determined that once a day is not enough for
retrieving alarms, UltraSite may be configured to ignore the site default schedule and autopoll
Site #1’s alarms twice a day or as much as five times a day. It may also be determined that
backing up the site’s set points once a day is not necessary; if so, UltraSite may be configured
to back up Site #1 only a few times a week or even once a month.
Autopolling schedules are carried out only when no users are logged in to UltraSite. This
is because autopolling requires a lot of communication between UltraSite and the controllers
being polled, making it impossible to carry out any other tasks such as viewing status screens
or real-time graphs. If UltraSite cannot perform autopolling at the scheduled autopoll time
8OWUD6LWH8VHU·V*XLGH
&KDSWHU$XWRSROOLQJ³
because a user is logged in, UltraSite will wait until the user has logged out for more than one
minute to begin autopolling.
Often, when a computer running UltraSite is directly connected to an on-site network, the
user DEFAULT will be logged in to the controller 24 hours a day. If UltraSite is running on an
on-site PC, users have the option of enabling autopolling during logins.
$XWRSULQWLQJ
0XOWLSOH6LWH
8SGDWHV
If desired, log data and alarm messages gathered during autopolling may be sent to the
Windows default printer after each autopolling session.
UltraSite also uses autopolling to carry out multiple site updates. When a user orders
UltraSite to transfer set point configuration from one unit, site, or directory to another unit,
site, or directory, the user has the option of carrying out the transfer immediately or waiting
until the next scheduled autopoll time. When the latter option is chosen, the set point transfer
occurs the next time UltraSite connects to the site for purposes of autopolling.
6HWWLQJ8S$XWRSROOLQJ
Autopolling is configured on a site-by-site basis. Configuration involves choosing the
dates and times of autopolling times, selecting the data that will be polled (for both the entire
site and for individual units), and programming any desired exceptions to the default autopolling schedule.
Before any site autopolling may occur, autopolling must first be enabled in the System
Options dialog box (see Figure 39). To access this dialog box from the Tree View, left-click
“System” in the Menu Bar at the top of the screen, and select “System Options...” from the
menu.
Figure 39 - System Options Dialog Box
³&KDSWHU$XWRSROOLQJ
5HY
(QDEOLQJ
$XWRSROOLQJ
IRU$OO6LWHV
The System Options dialog box (Figure 39) is where autopolling for all sites is enabled
and autopolling options used by all sites, such as autopolling times and disconnect options,
are configured.
1.
QRWH
If “Notebook/
Portable” is
selected in the
Computer
Options section
of this dialog
box, the Autopoll
Start Time field
will be grayed
out.
$XWRSROOLQJ
2SWLRQVIRU
2Q6LWH
&RPSXWHUV
To enable autopolling for UltraSite, put a check the Autopoll Master Enable check box.
UltraSite will not autopoll any sites or units unless this box is checked.
2.
Enter the time of day you want autopolling to occur in the Autopoll Start Time field (in 24hour format).
If any of your sites will be using more than one autopoll per day, the Autopoll Start Time
will the time of day at which the first daily autopoll will occur. Other autopolls will occur at
regular intervals after this time has passed (see Step 3 below for more).
3.
For sites that use multiple autopolls per day, select the number of polls that will occur in a day
from the Autopolls Per Day pull-down menu.
UltraSite will begin multiple autopolls at the time entered in the Autopoll Start Time field
and evenly space the rest of the autopolls over a 24-hour period afterward. For example, if the
Autopoll Start Time field is set to midnight (00:00), autopolling would occur at 00:00 and
12:00 if two multiple autopolls are being used, or 00:00, 8:00, and 16:00 for three multiple
autopolls, and so on.
If UltraSite is installed on an on-site computer and is being used to directly connect to a
site via direct connect cable or network, there are two important autopolling options that are a
part of UltraSite’s on-site system settings. To access these options, click the Advanced
Options button in the System Options dialog box (Figure 39, page 54). The On-Site Options
dialog box should appear (Figure 40).
Figure 40 - On-Site Options Dialog Box
The two check boxes at the bottom of this dialog box, “Autopolling While Logged In”
and “Make Autopolling Silent,” are advanced autopolling options designed specifically for
on-site computers that remain constantly connected to a site.
8OWUD6LWH8VHU·V*XLGH
&KDSWHU$XWRSROOLQJ³
Autopoll While Logged In. “Autopoll While Logged In” allows autopolling to occur even
when a user is logged in to UltraSite. Normally, autopolling is suspended during logins,
because remote users would be prohibited from executing site commands during downloads of autopoll data. However, in most on-site configurations (especially touchscreen
networks), user DEFAULT will be logged in to UltraSite 24 hours a day.
In cases where UltraSite has a constant user log-on, the “Autopoll While Logged In” box
must be checked in order for autopolling to occur in UltraSite. When the “Enable On-Site
Options” box is checked in the System Options dialog box (Figure 39, page 54), “Autopoll While Logged In” is checked by default.
Make Autopolling Silent. Under normal conditions, UltraSite will display a number of dialog boxes during the autopolling process to show the current status of the autopoll and to
notify users of any problems that may occur. When the “Make Autopolling Silent” box is
checked, no dialog boxes will be displayed during autopolling, and all system alerts and
messages will be automatically acknowledged by UltraSite without being shown. To indicate that an autopoll is in progress, the word “Polling” will appear in the message bar at
the bottom right corner of the screen.
If you want UltraSite to autopoll silently, check the “Make Autopolling Silent” check
box.
6HWWLQJ8S
6LWHVWREH
$XWRSROOHG
After the master autopolling settings have been set up in the System Options dialog box,
individual sites may now be configured to autopoll.
To enable autopolling for a site, right-click the site name from the Tree View, and select
the option “Setup Autopolling...” from the Action Menu. The Site Autopoll Setup dialog box
(Figure 41) should appear.
Figure 41 - Site Autopoll Setup
If setting up autopolling for the first time, the check box named “AutoPoll” should be
unchecked, and all other options in the dialog box should be grayed out.
1.
To enable autopolling for the selected site, put a check in the “Autopoll” check box.
Checking this box makes the other options within the Site Autopoll Setup dialog box
editable.
2.
Configure the site’s default autopolling schedule by selecting one of the four radio buttons in
the Site Default box.
Choose one of these four options:
³&KDSWHU$XWRSROOLQJ
5HY
Every Day. Autopolling for the site occurs once a day at the time specified in the Autopoll Start
Time field (see Enabling Autopolling for All Sites, step 2., page 55).
Specific Days of the Week. Autopolling for the site occurs once a day on selected days of
the week. Choose the days of the week you want autopolling to occur by checking the
check boxes next to the days. The autopoll is carried out at the time specified in the Autopoll Start Time field.
On the xth day of the month . Autopolling for the site occurs once a month on a specific
day. Select the day of the month you want autopolling to occur from the pull-down menu.
The autopoll is carried out at the time specified in the Autopoll Start Time field.
Multiple Polls Per Day. Autopolling will occur multiple times every day. The number of
autopolls and the times at which they will occur are determined by the values of the Autopoll Start Time and the Autopolls Per Day fields (see Enabling Autopolling for All Sites,
step 2. and step 3., on page 55).
3.
To enable autoprinting of logs or alarms, check the “Autoprint Logs” or “Autoprint Alarms”
check boxes.
When “Autoprint Logs” is checked, all new log data gathered by the autopoll is printed to
the printer set up as the default in Windows. Likewise, when “Autoprint Alarms” is checked,
all new alarm messages will be sent to the printer.
4.
If the site is a network site with multiple computers, select the name of the machine that will
perform the autopoll of this site from the “Owner” pull-down menu.
This pull-down menu will list all of the machine names on the network. Only the machine
whose name is selected in the Owner pull-down menu will perform the autopoll. Polled data
will be sent from the selected computer to the computer that is holding the shared database.
5.
Click the Setup Site button to select site data to autopoll.
The Unit Autopoll Setup dialog box for this site should appear (Figure 42).
Figure 42 - Unit Autopoll Setup Dialog Box
6.
To backup site inventory during autopolling, click on “Site Inventory” in the Available Items
box, and press the “<--Add” button.
8OWUD6LWH8VHU·V*XLGH
&KDSWHU$XWRSROOLQJ³
Site inventory is the only data type that can be selected in this dialog box. Other autopoll
data types, such as logs, alarms, and unit inventories, are unit-level items that are set up separately in the unit’s own Unit Autopoll Setup dialog box.
If you want to use an autopolling schedule for site inventory that differs from the default
schedule configured in steps 1 through 4 above, you may do so by highlighting the item in the
“Items to Autopoll” list and clicking the Edit button. Refer to Figure 47 and the corresponding instructions on page 61 for more information about using this dialog box.
7.
Click Done.
8.
Click the “Setup Units” button to select log data, alarm messages, and unit inventories for
autopolling.
The Select Unit dialog box (Figure 43) should appear. This box lists all units that are a
part of the site.
Figure 43 - Unit Autopoll Setup Dialog Box
9.
Left-click the unit you wish to set up autopolling for, and press the “Configure Unit” button.
This will bring up the Unit Autopoll Setup dialog box (Figure 44).
Figure 44 - Unit Autopoll Setup Dialog Box
10. From the “Available Items” list, select a data group to autopoll and press the “<--Add” button.
³&KDSWHU$XWRSROOLQJ
5HY
The items listed in the “Available Items” list will be of one of the following types:
7LS
Alarms. Alarm messages for the controller.
Setpoint Backup. The controller’s set points.
To select multiple items from
the Available
Items list, hold
down the Ctrl
key and left-click
each item. Then,
press the Add
button to move
all selections to
the Items to
Autopoll list.
Logs. All logs available for viewing in the controller are listed by name and may be selected for
autopolling individually.
Repeat step 9 for each of the items you wish to include in the autopoll. When finished, all
selected items should be listed in the “Items to Autopoll” box. To remove an item from the
“Items to Autopoll” list, left-click the item and press “Remove.”
If you wish to change the autopoll schedule for one or more of the items you wish to autopoll, you may do so by highlighting the item in the “Items to Autopoll” list and clicking the
Edit button. Refer to Figure 47 and the corresponding instructions on page 61 for more information about using this dialog box.
11. Click “Done.”
12. If you wish to set up autopolling in other controllers, Repeat steps 8. through 11. for each unit
in the site.
13. Click “Done” to return to the Site Autopoll Setup dialog box.
14. Click “OK” to save the settings and return to the tree view.
Autopolling setup for the site is now complete. If autopolling was correctly enabled, you
will see a small green clock symbol next to the name of the sites, units, and logs in the Tree
View (see Figure 45). The autopoll symbol signifies that the site, unit, or log has an active
autopolling schedule. If autopolling is set up but is for some reason disabled or otherwise not
able to occur, a red X will appear over the clock symbol, signifying that autopolling will not
take place.
Figure 45 - The Autopoll Symbols (Tree View)
Unless you have specifically enabled autopolling to occur during logons (see Autopolling
Options for On-Site Computers, page 55), UltraSite will not begin autopolling until you log
out of UltraSite using the File > Logout option in the Menu Bar.
,WHP$XWRSROO6HWXS
The previous section, “Setting Up Sites to be Autopolled,” page 56, showed how to perform the following tasks:
•
Enabling autopolling for UltraSite,
•
Enabling autopolling for a site,
•
Selecting default autoprinting options for a site,
8OWUD6LWH8VHU·V*XLGH
&KDSWHU$XWRSROOLQJ³
•
Choosing a site default autopolling schedule, and
•
Selecting site-level and unit-level data to be autopolled.
This section will show how to use the Autopoll Setup dialog box to configure an individual data item (such as a log) with different autopoll scheduling and autoprinting options than
the site’s default settings. This section will also cover how to configure autopolled log data to
be exported to a text file.
7KH$XWRSROO
6HWXS'LDORJ
%R[
Changing the autopolling schedule, autoprint options, and log data exporting settings for
a single item is achieved by changing the settings in the item’s Autopoll Setup dialog box
(Figure 47). An item’s Autopoll Setup dialog box must be accessed from the Unit Autopoll
Setup dialog box.
To open the Unit Autopoll Setup dialog box for a single unit:
1.
Right-click the unit name in the tree view.
2.
Select “setup autopolling” from the action menu.
To open the Unit Autopoll Setup dialog box for a single site:
1.
Right-click the site name in the tree view.
2.
Select “Setup Autopolling” from the action menu.
3.
In the dialog box, click the “Setup Site” button.
Figure 46 - Unit Autopoll Setup Dialog Boxes (for site and unit)
Autopoll schedules for individual items can be changed by selecting the item from the
“Items to Autopoll” list and clicking the “Edit” button. The Autopoll Setup dialog box (Figure 47) should appear.
³&KDSWHU$XWRSROOLQJ
5HY
Figure 47 - Autopoll Setup Dialog Box
&KDQJLQJWKH
The five radio buttons in the “Poll Schedule” box determine the autopolling schedule the
selected
item will follow. The options are as follows:
$XWRSROO
6FKHGXOH Site Default. The item will use the site default autopoll schedule.
1RWH
Regardless of the
schedule options
chosen in this dialog box, if Autopolling is not
enabled for the
site to which the
item belongs,
autopolling will
not take place.
Every Day. The item will ignore the site default and autopoll this item every day at the time
specified in the Autopoll Start Time field (see Enabling Autopolling for All Sites, step 2.,
page 55).
Specific Days of the Week. This item will ignore the site default and poll multiple times per
week (once per day). Choose the days of the week you want autopolling to occur by
checking the check boxes next to the days. The autopoll is carried out at the time specified in the Autopoll Start Time field.
On the xth day of the month . The item will ignore the site default and poll once a month
on a specific day. Select the day of the month you want autopolling to occur from the
pull-down menu. The autopoll is carried out at the time specified in the Autopoll Start
Time field.
Multiple Polls Per Day. The item will ignore the site default and poll multiple times every
day. The number of autopolls and the times at which they will occur are determined by
the values of the Autopoll Start Time and the Autopolls Per Day fields (see Enabling
Autopolling for All Sites, step 2. and step 3., on page 55).
&KDQJLQJ
DXWRSULQW
RSWLRQV
If the item you selected to edit in the Unit Autopoll Setup dialog box was a log or a set of
alarm messages, the Auto Print Options pull-down menu will be enabled. You may choose
one of three autoprint settings for this item:
Site Default. The item will use its site’s autoprint settings. See “Setting Up Sites to be Autopolled” on page 56 for more information about site autoprint settings.
Enable. The item will ignore its site’s autoprint settings and will autoprint.
Disable. The item will ignore its site’s autoprint settings and will not autoprint.
8OWUD6LWH8VHU·V*XLGH
&KDSWHU$XWRSROOLQJ³
([SRUWLQJ/RJ
'DWD
If the item you selected to edit in the Unit Autopoll Setup dialog box is a log, you may
choose to configure autopolling to export polled data to a text file.
1.
Put a check in the check box labeled “Export Log Data.”
A dialog box named “Save As” should appear (Figure 48).
Figure 48 - Save As Dialog Box
2.
Use the “Save In” pull-down menu to choose a directory to save the exported log.
3.
Enter the desired file name in the “File Name” field.
4.
Select the format for the log data from the “Save As Type” pull-down menu.
There are two different ways an exported log may be written to a text file.
Tab Delimited Files (*.txt). This export format will insert a tab between each piece of data
in the log. For example, if a single log has a log time, log date, and log value, each log record
will take the format “LOG TIME<TAB>LOG DATE<TAB>LOG VALUE.” If you will be
importing log data into a word processing program, tab delimited files are the easiest to work
with.
Comma Delimited Files (*.csv). Comma delimited files are like tab delimited files, except
a comma will be placed between each piece of data in the log entry. Comma delimited files
are designed for easier importing into spreadsheet programs.
5.
Click “Save.”
0DQXDO$XWRSROOLQJ
An autopoll can be initiated manually by a user logged in to UltraSite. When initiated,
manual autopolls are carried out just like scheduled autopolls: logs, alarms, and set point
backup data that have been earmarked for autopolling are gathered, and (if applicable) site
update information is transferred to its chosen destination(s) (see “Using Manual Autopolling
for Site Updates” on page 7).
³&KDSWHU$XWRSROOLQJ
5HY
Unlike scheduled autopolling, the user does not have to be logged out of UltraSite to perform a manual autopoll. Manual autopolling occurs immediately after the user commands it to
begin.
1RWH
Manual autopolls are initiated from the Action Menus of units, sites, directories, or from
the UltraSite level in the Tree View. The autopoll gathers all data from the selected unit, site,
or directory and all of the sites, units, and directories underneath the selected unit, site, or
directory in the Tree View. For example, a manual autopoll initiated by right-clicking a directory in the tree view will cause UltraSite to poll all sites and units in the selected directory that
have been set up for autopolling. A manual autopoll initiated from the UltraSite level action
menu will poll all sites and units in all directories.
If you have a slow
computer and/or a
slow modem, manual autopolling
may take a long
time to complete.
You will not be
able to perform
other tasks in UltraSite while the
autopoll is taking
place.
Special options can be selected for manual autopolling that pertain to the transfer of site
configuration data used by UltraSite’s Multiple Site Update feature.
To perform a manual autopoll, you must first access the Manually Initiated Autopolling
dialog box for the unit, site, or directories you wish to autopoll.
1.
Right-click the unit, site, or directory to be autopolled, or right-click “UltraSite” to poll all
directories.
2.
Select “Manual Autopoll” from the action menu.
The Manually Initiated AutoPolling dialog box (Figure 49) should appear.
Figure 49 - Manually Initiated AutoPolling Dialog Box
There are three settings in the Manually Initiated Autopolling dialog box that affect the
way UltraSite will perform the poll.
Send Only Pending Changes. When this box is checked, the manual autopoll will not poll
any logs, alarms, or perform site or unit backups as normal. Only Multiple Site Updates that
have been marked “Send Later To Group” will be carried out during the autopoll. Refer to
“Send Later To Group” on page 3.
When the box is not checked, the manual autopoll will carry out its usual autopolling
tasks, including Multiple Site Updates.
Poll Silently in the Background. When this box is checked, autopolling will be silent. No
visual indications of autopolling will be seen except the word “Polling” flashing in the right
most corner of the status bar.
Update All Autopoll Selections. Normally, when a manual autopoll is initiated, only the
items that require updating are polled. For example, if a log is scheduled to be autopolled once
per day, UltraSite will not poll the log again during the manual autopoll if the log has already
been polled once that day.
8OWUD6LWH8VHU·V*XLGH
&KDSWHU$XWRSROOLQJ³
When the “Update All Autopoll Selections” box is checked, UltraSite will poll all items
configured for autopolling regardless of their autopoll schedules. All items with the green
“autopoll” symbol next to it in the selected directory tree will be updated.
To carry out the manual autopoll, press the OK button. To cancel without autopolling,
press Cancel.
³&KDSWHU$XWRSROOLQJ
5HY
,QGH[
site 18
A
Action Menu
right clicking to access 21
Alarm Button 22, 39
Alarm View Screen. See Alarms.
Alarms 39
acknowledge one/all 41
alarm button 39
alarm log 40
alarm view screen 22
clear one/all 41
definition of ‘alarm’ 40
definition of ‘failure’ 40
definition of ‘notice’ 40
dialing out 41
setup 41
emailing 42
faxing 42
forced-to-normal 41
reading logged 39, 40
reset one/all 41
return-to-normal 41
the alarm button 22
Autopolling 53
autopoll setup dialog box 60
autoprinting 54
options 61
enabling for all sites 55
exporting log data 62
introduction to 53
item setup 59
making silent 56
manual 62
options for on-site computers 55
scheduling 53
changing schedule 61
setting up 54, 56
Autopurge 37
B
Backing Up 24
8OWUD6LWH8VHU·V*XLGH
C
Changing
Configuration.
Programming.
Clean Mode
Einstein
initiating 50
RMCC
initiating 51
Communication
setup ports 14
See
Online
D
Defrost, Emergency. See Manual Defrost,
Emergency.
Defrost, Manual. See Manual Defrost.
Dialing Out
alarms 41
setup 42
setting up UltraSite to receive 42
Direct Connect
hardware setup 9
on site options 17
connecting to site on startup 18
setting port 15
Directory
adding a 15
E
Einstein, Offline Programming. See Offline
Programming, Einstein.
E-Mailing Alarms 42
Exporting
logs 36
F
Failures. See Alarms.
Faxing Alarms 42
G
Gauges 30
Get Site Inventory 17
Graphs 33, 34
operating the graph view 35
,QGH[³
scale changes 35
viewing 34
viewing multiple logs on 35
Graphs, Real Time. See Real Time Graphs.
H
Hardware Setup 9
direct connect 9
modem 9
network connection 10
serial network connection 10
I
I/O Board Status, Viewing 32
Installation 9
custom configuration 11
overwriting existing database 12
run UltraSite from startup group 12
typical configuration 11
L
Laptop Computer Settings 17
Log, The Alarm. See Alarms, Alarm Log.
Logging In 13
default username and password 13
Logs 33
autopurge 37
clearing 37
exporting 36
gathering 33
graphing 34
graphs 33
scale changes 35
viewing 34
viewing multiple logs on 35
manually changing 37
multiple logs, viewing 33
tabluar data view 34
the get logs command 33
viewing 34
M
Manual Autopolling. See Autopolling, Manual.
Manual Defrost 50
Einstein 50
bypass modes 50
emergency
initiating in Einstein 50
³,QGH[
initiating in RMCC 51
RMCC 51
ending manual mode 51
Minimum System Requirements 9
Modem
baud rate setting 16
dialout phone number 16
hardware setup 9
port usage setting 14
setting port 14
using country code and area code 16
Modem, Short-Haul 9
Multiple Site Update. See Send To Feature.
Multiple Site Updates 54
N
Navigating The Tree View 21
Network Connection 10
network address setting 16
on site options 17
connecting to site on startup 18
port setting 16
shared database installation 11
Network Setup 11
Notebook Computer Settings 17
Notices. See Alarms.
O
Offline Programming 23
backing up a database 24
backing up and restoring information 24
Einstein 26
27
add new application 28
setting time and date 27
the device setup dialog 24
REFLECS 23
restoring a database 24
On Site Options 17
connecting to site on startup 18
Online Programming
adding new components 25
slide bars 46
using the Action Menu 46
Override 49
choosing type 49
5HY
displaying on status screen 50
displaying on summary screen 50
Einstein 49
disabling bypass 51
fixed 49
from the status/summary screen 49
timed 49
P
Portable Computer Settings 17
Ports, Setup 14
Q
Quick Start 13
R
Real Time Graphs 37, 38
operating 38
Recommended System Requirements 9
REFLECS
programming 23
Restoring 24
Right Clicking. See Action Menu.
Rs232 Serial Connection. See Direct Connect.
S
Send To Feature
previewing send to groups 47
send later to group 47
send now to instances 47
sending all/changed values 47
Serial Connection. See Direct Connect.
Serial Network Connection 10
Setpoints
changing from status screens 46
changing from Tree View 45
Setup Ports 14
Setup Wizard 24
Short-Haul Modems
hardware setup 9
Site
adding 15
backup 18
Site Inventory, Get 17
Site Inventory, Getting 17
Slide Bars 31
Start, Quick 13
Status Screens 29
8OWUD6LWH8VHU·V*XLGH
accessing 29
alarms and notices 32
animations 30
changing setpoints from 46
check boxes 36
displaying overrides on 50
gauges/thermometers 30
labeled captions 30
log/graph icons 36
overriding from 49
slide bars 31, 46
Summary Screens 29, 31
accessing 29
alarms and notices 32
displaying overrides on 50
overriding from 49
viewing i/o board status 32
System Options 17
T
TCP/IP. See Network Connection.
The Send To Feature 46
Thermometers 30
Touchscreen Computers
settings 17
Tree View
adding a directory 15
adding a site 15
changing setpoints from 45
collapsing branches 21
components 20
directories 20
expanding branches 21
levels of the 20
logs 20
navigating 21
sites 20
understanding the 19
units 20
U
UltraSite
hardware setup 9
installation 10
custom configuration 11
overwriting existing database 12
,QGH[³
running from startup group 12
typical configuration 11
logging in to 13
minimum system requirements 9
network setup 11
network shared database installation 11
on site options 17
connecting to site on startup 18
quick start 13
recommended system requirements 9
tree view interface 19
User Access
edit user access list 28
User Maintenance
access level 14
adding a user 13
the default user 13
³,QGH[
5HY