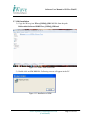
1
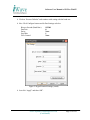
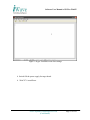
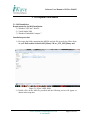
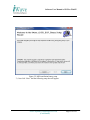
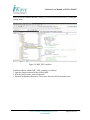
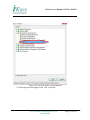
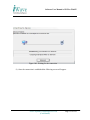
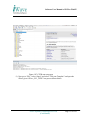
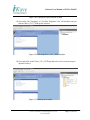
Software User Manual of G15 for WinCE Software User Manual for iW-G15 WinCE iW-PRDVZ-UM-01-R1.0-REL1.0-WinCE7.0 09th Jun 2012 AUTHOR (s) Name Seetharam APPROVAL Name Mr. Abdul Cader Organisation Date iWave systems 09/06/2012 Function Project Leader Signature Organisation Signature iWave systems iWave Systems Tech. Pvt. Ltd. 7/B, 29th Main, BTM Layout, 2nd Stage, Bangalore –560 076, India DISTRIBUTION CONTACT INFO Name iWave Systems Tech. Pvt. Ltd. 7/B, 29th Main, BTM Layout, 2nd Stage, Bangalore –560 076, India. Telephone E-mail +91-80-26786243 [email protected] iWave Systems Technologies Pvt. Ltd. (Confidential) Page 1 of 129 Software User Manual of G15 for WinCE DOCUMENT IDENTIFICATION Project Name Document Name Document Home Revision No Status Audience PRDVZ iW-PRDVZ-UM-01-R1.0-REL1.0.doc file://server/prdvz/svn/trunk/iW-PRDVZ-PF-01-R1.0/iWPRDVZ-SF-01-R1.0/iW-PRDVZ-UM-01-R1.0/iW-PRDVZUM-01-R1.0-RELx.yz-WinCE7.0/iW-PRDVZ-UM-01R1.0-REL1.0-WinCE7.0 Rev 1.0 Standard Release iWave Systems and Technologies Pvt.Ltd. DOCUMENT REVISION HISTORY Revision Date Change Description Author 1.0 09/06/12 Initial Version Seetharam PROPRIETARY NOTICE: This document contains proprietary material for the sole use of the intended recipient(s). Do not read this document further if you are not the intended recipient. Any review, use, distribution or disclosure by others is strictly prohibited. If you are not the intended recipient (or authorized to receive for the recipient), you are hereby notified that any disclosure, copy or distribution or use of any of the information contained within this document is STRICTLY PROHIBITED. Thank you. ―iWave Systems Tech. Pvt. Ltd.‖ iWave Systems Technologies Pvt. Ltd. (Confidential) Page 2 of 129 Software User Manual of G15 for WinCE WinCE User Manual for iW-i.MX6Q-Rainbow-G15 iWave Systems Technologies Pvt. Ltd. (Confidential) Page 3 of 129 Software User Manual of G15 for WinCE Table of Contents 1. Introduction .............................................................................................. 8 1.1. 1.2. 1.3. Purpose and Scope .............................................................................................. 8 Glossary .............................................................................................................. 8 References ........................................................................................................... 9 2. Power on Sequence for G15 Platform ..................................................... 9 2.1 2.2 2.3 Host Requirements .............................................................................................. 9 Target Requirements ......................................................................................... 10 Power ON procedure......................................................................................... 10 3. Peripheral Testing .................................................................................. 14 3.1. 3.2. 3.3. 3.4. 3.5. 3.6. 3.7. 3.8. 3.9. 3.10. Display driver.................................................................................................... 14 1GB RAM ......................................................................................................... 14 USB Host .......................................................................................................... 16 USB Mouse and Keyboard Support .................................................................. 17 SD/MMC card ................................................................................................... 21 USB OTG.......................................................................................................... 21 Ethernet ............................................................................................................. 23 Touch Calibration Process ................................................................................ 48 Touch ................................................................................................................ 51 SATA ................................................................................................................ 54 4. Miscellaneous Testing ........................................................................... 55 4.1. 4.2. 4.3. Open GL and Open VG applications ................................................................ 55 Silverlight application on iW-G15 .................................................................... 58 Video playback ................................................................................................. 59 5. Development Environment .................................................................... 61 5.1. MSI Installation ................................................................................................ 61 5.2. Configuring the OS image ................................................................................ 66 5.3. Building the OS image ...................................................................................... 73 5.4. Flashing the binaries into SD/MMC of iW-G15 platform ................................ 82 5.4.1. Using CFIMAGER.exe tool...................................................................... 82 5.4.2. Downloading NK.bin through Ethernet .................................................... 86 5.5. Booting WinCE image ...................................................................................... 98 5.5.1. Boot loader Main Menu ............................................................................ 98 5.5.2. Select Boot Device .................................................................................. 100 iWave Systems Technologies Pvt. Ltd. (Confidential) Page 4 of 129 Software User Manual of G15 for WinCE 5.5.3. Set MAC address .................................................................................... 101 5.5.4. KITL Enable mode ................................................................................. 104 5.5.5. Change the ether device .......................................................................... 105 5.5.6. Save settings............................................................................................ 106 5.5.7. Boot WinCE 7.0 ...................................................................................... 106 5.6. CETK Test Setup ............................................................................................ 108 5.7. SDK Installation.............................................................................................. 121 6. Technical Support ................................................................................ 129 List of Figures Figure 1: HyperTerminal Settings .................................................................................... 11 Figure 2: HyperTerminal Settings (contd) ........................................................................ 12 Figure 3: Hyper Terminal screen after settings................................................................. 13 Figure 4:Windows CE image screen................................................................................. 14 Figure 5: System memory ................................................................................................. 16 Figure 6: USB hard disk ................................................................................................... 17 Figure 7: USB Mouse working ......................................................................................... 18 Figure 8: Mouse double click working ............................................................................. 19 Figure 9:USB Keyboard working ..................................................................................... 20 Figure 10: SDMemory detection ...................................................................................... 21 Figure 11:USB OTG detection ......................................................................................... 22 iWave Systems Technologies Pvt. Ltd. (Confidential) Page 5 of 129 Software User Manual of G15 for WinCE Figure 12: USB OTG disconnection ................................................................................. 23 Figure 13:Ethernet IP assignment ..................................................................................... 24 Figure 14:Ethernet IP assignment (contd) ........................................................................ 25 Figure 15: DHCP IP assignment ....................................................................................... 26 Figure 16: Ethernet detection ............................................................................................ 27 Figure 17: Getting DHCP IP ............................................................................................. 28 Figure 18: Setting static IP................................................................................................ 29 Figure 19: Setting static IP (contd) ................................................................................... 30 Figure 20: Static IP set ...................................................................................................... 31 Figure 21:Inverted symbol of Ethernet connection after static IP .................................... 32 Figure 22: Static IP set ...................................................................................................... 33 Figure 23: Setting static IP for case 2 ............................................................................... 34 Figure 24: Setting static IP for case 2 (contd)................................................................... 35 Figure 25: Static IP set for case 2 ..................................................................................... 36 Figure 26: Inverted symbol of Ethenet connection in case 2 ........................................... 37 Figure 27: Static IP set case 2 ........................................................................................... 38 Figure 28: Setting static IP in host PC case2 .................................................................... 39 Figure 29: Setting static IP in host PC case2 (contd)........................................................ 40 Figure 30: Setting static IP in host PC case2 (Network connections) ............................. 41 Figure 31: Local area connection properties ..................................................................... 42 Figure 32: Internet Protocol(TCP/IP) Properties .............................................................. 43 Figure 33: Internet Protocol Properties (contd) ................................................................ 44 Figure 34: Entering to command prompt .......................................................................... 45 Figure 35: Entering command prompt (contd) ................................................................. 46 Figure 36: WinCE command prompt ................................................................................ 47 Figure 37: Internet Explorer window ................................................................................ 48 Figure 38: Stylus properties .............................................................................................. 49 Figure 39: Touch calibration ............................................................................................ 50 Figure 40: ETCHA application to test touch .................................................................... 51 Figure 41: ETCHA application ......................................................................................... 52 Figure 42: ETCHA application to test touch driver .......................................................... 53 Figure 43:ETCHA application to test touch driver (contd) .............................................. 54 Figure 44: SATA disk ....................................................................................................... 54 Figure 45: SATA disk ....................................................................................................... 55 Figure 46: SATA disk ....................................................................................................... 56 Figure 47: SATA disk ....................................................................................................... 57 Figure 48: SATA disk ....................................................................................................... 58 Figure 49: Silverlight application ..................................................................................... 59 Figure 50: Video window ................................................................................................. 60 Figure 51: iWave‘s MSI folder ......................................................................................... 61 Figure 52: MSI installation binary setup .......................................................................... 62 Figure 53: Select folder to install the MSI ........................................................................ 63 iWave Systems Technologies Pvt. Ltd. (Confidential) Page 6 of 129 Software User Manual of G15 for WinCE Figure 54: Changed the folder .......................................................................................... 64 Figure 55: Confirming the installation .............................................................................. 65 Figure 56: Installation complete ....................................................................................... 66 Figure 57: Image build type changing .............................................................................. 67 Figure 58: BSP_NOXXX variables .................................................................................. 68 Figure 59: BSP_XXX variables ........................................................................................ 69 Figure 60: Platform builder window for properties ......................................................... 70 Figure 61: Project properties window (contd) .................................................................. 71 Figure 62: Project properties window for IMG ................................................................ 72 Figure 63: Project properties window for IMG (contd) .................................................... 73 Figure 64: Folder with pbxml file ..................................................................................... 74 Figure 65: Platform builder window ................................................................................. 74 Figure 66: Building for first time ...................................................................................... 75 Figure 67: Build started .................................................................................................... 76 Figure 68: Copy files to release diretory........................................................................... 77 Figure 69: Make run-time image ...................................................................................... 78 Figure 70: Select HDMI catalog item ............................................................................... 79 Figure 71: Build HDMI image .......................................................................................... 80 Figure 72: Properties window of the project..................................................................... 81 Figure 73: Changing the state of KITL ............................................................................. 81 Figure 74: Changing the Kernel debuger .......................................................................... 82 Figure 75: Command prompt in host PC .......................................................................... 83 Figure 76: Cfimager for flashing eboot.nb0 ..................................................................... 83 Figure 77: Cfimager for flashing eboot.nb0 (contd) ......................................................... 84 Figure 78: Cfimager for flashing NK.nb0........................................................................ 84 Figure 79: Cfimager for flashing NK.nb0 (contd) ............................................................ 85 Figure 80: Cfimager for flashing NK.nb0 completed ....................................................... 85 Figure 81: Connectivity options ....................................................................................... 86 Figure 82: Connectivity options (contd) .......................................................................... 87 Figure 83: Terminal window during downloading ........................................................... 88 Figure 84: Terminal window during downloading got the IP........................................... 89 Figure 85: Terminal window sending BOOTME message.............................................. 90 Figure 86: Platform builder while attaching the device .................................................... 91 Figure 87: Platform builder device detection.................................................................... 92 Figure 88: Platform builder window downloading NK.bin .............................................. 93 Figure 89: Terminal window after downloading .............................................................. 94 Figure 90: Copying NK.bin to SD/MMC ......................................................................... 95 Figure 91: Reset option after NK is copied to SD/MMC. ................................................ 96 Figure 92: Rebooting the board after downloading the image ......................................... 97 Figure 93: WinCE desktop................................................................................................ 98 Figure 94: Boot loader window ........................................................................................ 99 Figure 95: Terminal with boot loader menu during changes .......................................... 100 iWave Systems Technologies Pvt. Ltd. (Confidential) Page 7 of 129 Software User Manual of G15 for WinCE Figure 96: Terminal changing the boot device ............................................................... 101 Figure 97: Setting MAC address..................................................................................... 102 Figure 98: Setting MAC address (contd) ........................................................................ 103 Figure 99: MAC address set ........................................................................................... 104 Figure 100: Disabling the KITL ..................................................................................... 105 Figure 101: Changing the Ether device .......................................................................... 106 Figure 102: WinCE Desktop ........................................................................................... 107 Figure 103: CETK set up ................................................................................................ 109 Figure 104: CETK connect to device.............................................................................. 110 Figure 105: Select the device to get connected ............................................................... 111 Figure 106: Waiting for the connection ......................................................................... 112 Figure 107: CETK test setup page .................................................................................. 113 Figure 108: CETK open test pass template..................................................................... 114 Figure 109: Opening test pass template (contd) ............................................................. 115 Figure 110: Selecting iWave_G15_CETK template....................................................... 115 Figure 111:Running the template.................................................................................... 115 Figure 112: Folder with i.MX6 SDK .............................................................................. 121 Figure 113: Installation of SDK ...................................................................................... 121 Figure 114: SDK installation contd ................................................................................ 122 Figure 115: SDK installation contd ................................................................................ 123 Figure 116: Selecting User name in installation ............................................................. 124 Figure 117: SDK installation contd ................................................................................ 125 Figure 118: Destination folder selection ......................................................................... 126 Figure 119: Ready to install window .............................................................................. 127 Figure 120: Completing the installation ......................................................................... 128 1. Introduction 1.1. Purpose and Scope The purpose of the document is to guide you how to use the iW-G15 development platform. 1.2. Glossary Acronyms BSP DHCP ENET Description. Board Support Package Dynamic Host Control Protocol Ethernet iWave Systems Technologies Pvt. Ltd. (Confidential) Page 8 of 129 Software User Manual of G15 for WinCE FEC GB HID IP IPU KITL LCD MAC MMC MSI OAL OS OTG PC RAM SATA SD USB VGA WinCE 7.0 Fast Ethernet Controller Giga Byte Human Interface Device Internet Protocol Image Processing Unit Kernel Independent Transport Layer Liquid Crystal Display Media Access Control Multi Media Card Microsoft Software Installer OEM Abstraction Layer Operating System On The Go Personal Computer Random Access Memory Serial Advanced Technology Attachment Secure Digital Universal Serial Bus Video Graphics Array Windows Embedded Compact 7.0 1.3. References Linux User Manual file://server/prdvz/svn/trunk/iW-PRDVZ-PF-01-R1.0/iW-PRDVZ-SF-01-R1.0/iWPRDVZ-UM-01-R1.0/iW-PRDVZ-UM-01-R1.0-RELx.yz-Linux/iW-PRDVZ-UM01-R1.0-REL1.0-Linux/iW- PRDVZ-UM-01-R1.0-REL1.0-Linux.doc 2. Power on Sequence for G15 Platform 2.1 Host Requirements To see the booting of WinCE 7.0 on an iW-RainboW-G15 board, the host machine must meet the following requirements: A host PC (Windows). An available serial port on your Development Host. iWave Systems Technologies Pvt. Ltd. (Confidential) Page 9 of 129 Software User Manual of G15 for WinCE 2.2 Target Requirements To boot iW-RainboW-G15 Board using micro SD, Following Items are required: iW-RainboW-G15 board. 12V Power Supply RS232 Serial Cable Micro SD. Note: The above mentioned items are part of the iWave deliverables. 2.3 Power ON procedure The iW-RainboW-G15 Platform can be powered ON using external power supply .Refer the Section 2.23.1 in Generic Q7 Carrier_HardwareUserGuidel_REL_1.0.doc document provided along with iWave Deliverables. Insert one end of the serial cable to PC/Laptop serial connector and connect other end to the G15 Platform serial port. Refer the Section 2.4.1 in Generic Q7 Carrier_HardwareUserGuidel_REL_1.0.doc document provided along with iWave Deliverables. Insert micro SD card (if it is not inserted) with iW-RainboW-G15 images to micro SD slot in iW-RainboW-G15 board. Refer the Section 2.3 in Generic Q7 Carrier_HardwareUserGuidel_REL_1.0.doc document provided along with iWave Deliverables. Open the HyperTerminal on PC/Laptop with following settings (use COM1 or COM2). Baud rate: 115200 bps Data bits: 8 Parity: none Stop bits: 1 Flow control: none iWave Systems Technologies Pvt. Ltd. (Confidential) Page 10 of 129 Software User Manual of G15 for WinCE Figure 1: HyperTerminal Settings iWave Systems Technologies Pvt. Ltd. (Confidential) Page 11 of 129 Software User Manual of G15 for WinCE Click on ―Restore Defaults‖ and continue with setting with the baud rate. Now Click Configure button and do Port Settings as below. Bits per Second (Baud Rate) Data bits Parity Stop Bits Flow Control :115200 :8 :None :1 :None Figure 2: HyperTerminal Settings (contd) Just click ―Apply‖ and then ―OK‖. iWave Systems Technologies Pvt. Ltd. (Confidential) Page 12 of 129 Software User Manual of G15 for WinCE Figure 3: Hyper Terminal screen after settings Switch ON the power supply for target board. WinCE 7.0 would boot. iWave Systems Technologies Pvt. Ltd. (Confidential) Page 13 of 129 Software User Manual of G15 for WinCE 3. Peripheral Testing 3.1. Display driver This section explains about the display test in iW-G15 board after booting WinCE 7.0. Procedure 1) Power on iW-G15 platform. 2) Boot the WinCE7.0. 3) The WinCE 7.0 image will be displayed on the screen as follows. If it does not boot refer section 5.5 to make boot configuration settings. Figure 4:Windows CE image screen 3.2. 1GB RAM This Section explains 1GB RAM identification in WinCE 7.0 Procedure 1) Power on iW-G15 board. 2) Boot WinCE 7.0 through SD/MMC. 3) Go to Start Settings Control Panel System Memory iWave Systems Technologies Pvt. Ltd. (Confidential) Page 14 of 129 Software User Manual of G15 for WinCE 1GB = NK.bin Size + Storage Memory + Program Memory + ARGS & IPU For Example: Storage Memory Program Memory 123552 Kilo Bytes 863900 Kilo Bytes --------927 MB (Appro) --------- NK.nb0 94 MB (Appro.) ARGS, IPU 3 MB (Appro) ----------1024 MB ----------- iWave Systems Technologies Pvt. Ltd. (Confidential) Page 15 of 129 Software User Manual of G15 for WinCE Figure 5: System memory 3.3. USB Host This section explains about using USB mass storage. Procedure 1) Power on iW-G15. 2) Boot WinCE7.0 through SD/MMC Card. 3) Insert USB memory stick to the USB Host port. 4) Check ―Hard Disk‖ Folder available in the ―My Device‖ Folder. iWave Systems Technologies Pvt. Ltd. (Confidential) Page 16 of 129 Software User Manual of G15 for WinCE Figure 6: USB hard disk 5) ―Hard Disk‖ icon is shown as and Not as . 6) Size of the memory stick is shown as approximately 3.7GB in ―Storage Manager Control Panel Applet‖ (In this example Inserted the 4GB USB Memory stick). 3.4. USB Mouse and Keyboard Support To check the USB HID class functionality using USB US Layout keyboard and USB Mouse in WinCE 7.0 on iW-G15 platform. Procedure 1) Power on iW-G15 platform. 2) Boot WinCE7.0 through SD/MMC card. 3) Insert the USB Keyboard and USB Mouse in the USB slots. iWave Systems Technologies Pvt. Ltd. (Confidential) Page 17 of 129 Software User Manual of G15 for WinCE 4) The following snap shots show the working of USB mouse. Figure 7: USB Mouse working iWave Systems Technologies Pvt. Ltd. (Confidential) Page 18 of 129 Software User Manual of G15 for WinCE Figure 8: Mouse double click working 5) Double click on the ―Microsoft wordpad‖ present on Desktop to open the wordpad. Type in it using the keyboard connected. iWave Systems Technologies Pvt. Ltd. (Confidential) Page 19 of 129 Software User Manual of G15 for WinCE Figure 9:USB Keyboard working iWave Systems Technologies Pvt. Ltd. (Confidential) Page 20 of 129 Software User Manual of G15 for WinCE 3.5. SD/MMC card This section explains about using SD/MMC card. Procedure 1) Power on iW-G15 platform. 2) Boot WinCE7.0. 3) Insert the SD card in to the SD slot of the G15M Platform. 4) ―SDMemory‖ folder available in the ―My Device‖ Folder. 5) Double click on the ―SDMemory‖ icon to open it. Figure 10: SDMemory detection 6) ―SDMemory‖ icon is shown as and Not as . 7) Size of the SD/MMC is approximately near to the size of the card inserted. 3.6. USB OTG This section explains about using USB OTG to connect to the PC using ActiveSync. iWave Systems Technologies Pvt. Ltd. (Confidential) Page 21 of 129 Software User Manual of G15 for WinCE Using this we can copy files from/to the Desktop PC to the G15M Platform. Procedure 1) Power on iW-G15 board. 2) Boot WinCE7.0. 3) Before Connecting USB OTG from Desktop PC to G15M Platform, Make sure Active sync has installed in the Desktop PC, If not installed then use the below link to download and install the Active Sync in the Desktop PC. For Windows XP: http://www.microsoft.com/download/en/details.aspx?id=15 For Windows Vista: http://www.microsoft.com/download/en/details.aspx?id=14 For Windows 7: http://www.microsoft.com/download/en/details.aspx?id=14 4) Connect the desktop PC with Microsoft ActiveSync installed and iW-G15 board using USB OTG cable. 5) We can explore the iW-G15 files in the Desktop PC using Microsoft ActiveSync Application, then we can copy files from and to the system. 6) While connecting the OTG cable please make sure that the Active Sync for the last communication has properly disconnected the device from the PC. This has to be confirmed every time while inserting the OTG cable. Figure 11:USB OTG detection iWave Systems Technologies Pvt. Ltd. (Confidential) Page 22 of 129 Software User Manual of G15 for WinCE 7) The symbol marked on above image will disappear once the OTG cable is disconnected from the port as shown in below snap shot. Figure 12: USB OTG disconnection 3.7. Ethernet This section explains about using Ethernet. Configuring the IP Using DHCP Procedure 1) Power on iW-G15 platform. 2) Boot WinCE7.0. 3) Connect Ethernet cable to the iW-G15 board. 4) Configure WinCE 7.0 with DHCP IP Configurations as follows. 5) Go to Start Settings Network and Dial-Up Connections. iWave Systems Technologies Pvt. Ltd. (Confidential) Page 23 of 129 Software User Manual of G15 for WinCE Figure 13:Ethernet IP assignment 6) Right Click ―ENET1‖ icon and Click Properties. iWave Systems Technologies Pvt. Ltd. (Confidential) Page 24 of 129 Software User Manual of G15 for WinCE Figure 14:Ethernet IP assignment (contd) iWave Systems Technologies Pvt. Ltd. (Confidential) Page 25 of 129 Software User Manual of G15 for WinCE 7) Select the DHCP IP option as follows and click OK. Figure 15: DHCP IP assignment iWave Systems Technologies Pvt. Ltd. (Confidential) Page 26 of 129 Software User Manual of G15 for WinCE 8) Click the inverted ‗T‘ icon in the Task bar of the WinCE 7.0 screen as shown below. Figure 16: Ethernet detection iWave Systems Technologies Pvt. Ltd. (Confidential) Page 27 of 129 Software User Manual of G15 for WinCE 9) This will show the IP from the DHCP Server in an popup window as follows Figure 17: Getting DHCP IP Configuring the Static IP Case 1: Procedure 1) 2) 3) 4) 5) Power on iW-G15 platform. Boot WinCE7.0. Connect Ethernet cable to the iW-G15 platform. Configure WinCE 7.0 with static IP Configurations as follows. Go to Start Settings Network and Dial-Up Connections iWave Systems Technologies Pvt. Ltd. (Confidential) Page 28 of 129 Software User Manual of G15 for WinCE Figure 18: Setting static IP iWave Systems Technologies Pvt. Ltd. (Confidential) Page 29 of 129 Software User Manual of G15 for WinCE 6) Right Click ―ENET1‖ icon and Click Properties. Figure 19: Setting static IP (contd) iWave Systems Technologies Pvt. Ltd. (Confidential) Page 30 of 129 Software User Manual of G15 for WinCE 7) Select the static IP option as follows and click OK. Figure 20: Static IP set iWave Systems Technologies Pvt. Ltd. (Confidential) Page 31 of 129 Software User Manual of G15 for WinCE 8) Click the inverted ‗T‘ icon in the Task bar of the WinCE 7.0 screen as shown below. Figure 21:Inverted symbol of Ethernet connection after static IP iWave Systems Technologies Pvt. Ltd. (Confidential) Page 32 of 129 Software User Manual of G15 for WinCE 9) This will show the IP from the static IP configuration in a popup window as follows. Figure 22: Static IP set Case 2: Procedure 1) 2) 3) 4) 5) Power on iW-G15 platform. Boot WinCE7.0. Connect Ethernet cable to the iW-G15 platform. Configure WinCE 7.0 with static IP Configurations as follows. Go to Start Settings Network and Dial-Up Connections iWave Systems Technologies Pvt. Ltd. (Confidential) Page 33 of 129 Software User Manual of G15 for WinCE Figure 23: Setting static IP for case 2 iWave Systems Technologies Pvt. Ltd. (Confidential) Page 34 of 129 Software User Manual of G15 for WinCE 6) Right Click ―ENET1‖ icon and Click Properties. Figure 24: Setting static IP for case 2 (contd) iWave Systems Technologies Pvt. Ltd. (Confidential) Page 35 of 129 Software User Manual of G15 for WinCE 7) Select the static IP option as follows and click OK. Figure 25: Static IP set for case 2 iWave Systems Technologies Pvt. Ltd. (Confidential) Page 36 of 129 Software User Manual of G15 for WinCE 8) Click the inverted ‗T‘ icon in the Task bar of the WinCE 7.0 screen as shown below. Figure 26: Inverted symbol of Ethenet connection in case 2 iWave Systems Technologies Pvt. Ltd. (Confidential) Page 37 of 129 Software User Manual of G15 for WinCE 9) This will show the IP from the static IP configuration in a popup window as follows. Figure 27: Static IP set case 2 Now in host PC set the IP as static as follows. iWave Systems Technologies Pvt. Ltd. (Confidential) Page 38 of 129 Software User Manual of G15 for WinCE Figure 28: Setting static IP in host PC case2 10) Right click on the icon marked on above image. Select Open Network Connections as shown in below snap shot. iWave Systems Technologies Pvt. Ltd. (Confidential) Page 39 of 129 Software User Manual of G15 for WinCE Figure 29: Setting static IP in host PC case2 (contd) 11) Following screen would appear. iWave Systems Technologies Pvt. Ltd. (Confidential) Page 40 of 129 Software User Manual of G15 for WinCE Figure 30: Setting static IP in host PC case2 (Network connections) 12) Double click on Local Area Connection and select properties tab as shown below. iWave Systems Technologies Pvt. Ltd. (Confidential) Page 41 of 129 Software User Manual of G15 for WinCE Figure 31: Local area connection properties 13) Scroll down items to select Internet Protocol (TCP/IP) and click on properties tab. Following screen would appear. iWave Systems Technologies Pvt. Ltd. (Confidential) Page 42 of 129 Software User Manual of G15 for WinCE Figure 32: Internet Protocol(TCP/IP) Properties 14) Click on Use the following IP address and set the IP address and subnet mask. iWave Systems Technologies Pvt. Ltd. (Confidential) Page 43 of 129 Software User Manual of G15 for WinCE Figure 33: Internet Protocol Properties (contd) 15) Click OK. 16) Use cross cable to connect the target device and Host PC. Ping the Target device IP from Host PC and vice- versa. Pinging This section explains about pinging Desktop PC IP Address from the iW-G15 platform. Procedure 1) Ping the Desktop PC IP Address from the iW-G15 board using command prompt application in the WinCE 7.0 as follows 2) Launch the command prompt application by click Start Run and type ―cmd‖ and click OK button. iWave Systems Technologies Pvt. Ltd. (Confidential) Page 44 of 129 Software User Manual of G15 for WinCE Figure 34: Entering to command prompt iWave Systems Technologies Pvt. Ltd. (Confidential) Page 45 of 129 Software User Manual of G15 for WinCE Figure 35: Entering command prompt (contd) iWave Systems Technologies Pvt. Ltd. (Confidential) Page 46 of 129 Software User Manual of G15 for WinCE Figure 36: WinCE command prompt Internet Explorer This section explains about launching Internet Explorer in iW-G15 platform. Procedure 1) Open the Internet Explorer Application in WinCE7.0 desktop screen 2) Internet explorer application opens the web page as shown below. 3) Using this we can browse the internet. iWave Systems Technologies Pvt. Ltd. (Confidential) Page 47 of 129 Software User Manual of G15 for WinCE Figure 37: Internet Explorer window 3.8. Touch Calibration Process This section explains about the Touch Panel Calibration procedure. This is used to calibrate touch panel. Procedure 1) Connect the LCD interface with iW-G15 platform. 2) Power on iW-G15 platform. 3) Boot the WinCE7.0. 4) Run the Microsoft Touch Calibration test application from Start Menu Settings Control Panel Styles Calibration (Tab) Click Recalibrate. 5) Calibration window will be as shown below. iWave Systems Technologies Pvt. Ltd. (Confidential) Page 48 of 129 Software User Manual of G15 for WinCE Figure 38: Stylus properties iWave Systems Technologies Pvt. Ltd. (Confidential) Page 49 of 129 Software User Manual of G15 for WinCE Figure 39: Touch calibration 6) Touch the center of the ‗+‘ sign, ‗+‘ sign will move along the corner. Continue until ‗+‘ disappears. iWave Systems Technologies Pvt. Ltd. (Confidential) Page 50 of 129 Software User Manual of G15 for WinCE 3.9. Touch This section explains about the checking the touch in iW-G15 board. Procedure 1) Power on iW-G15 board. 2) Boot WinCE7.0 through SD/MMC card. 3) Run the touch application as follows. Figure 40: ETCHA application to test touch iWave Systems Technologies Pvt. Ltd. (Confidential) Page 51 of 129 Software User Manual of G15 for WinCE Figure 41: ETCHA application 4) Touch anywhere on the white screen to draw something and you can notice the lines drawn on the surface. And just touch the ―Touch here to clear‖ place to clear the drawings on the surface. iWave Systems Technologies Pvt. Ltd. (Confidential) Page 52 of 129 Software User Manual of G15 for WinCE Figure 42: ETCHA application to test touch driver iWave Systems Technologies Pvt. Ltd. (Confidential) Page 53 of 129 Software User Manual of G15 for WinCE Figure 43:ETCHA application to test touch driver (contd) 3.10. SATA This section explains the using of SATA Hard disk in iW-G15 platform. Procedure 1) Connect SATA hard disk drive to the slot provided in the iW-G15 board. 2) Power on iW-G15 board. 3) Boot WinCE7.0 through SD/MMC card. 4) ―Hard Disk‖ folder available in the ―My Device‖ Folder. 5) ―Hard Disk‖ icon is shown as and Not as . 6) Size of the Hard Disk is approximately near to the size of the Hard disk inserted. Figure 44: SATA disk iWave Systems Technologies Pvt. Ltd. (Confidential) Page 54 of 129 Software User Manual of G15 for WinCE 4. Miscellaneous Testing 4.1. Open GL and Open VG applications 1) Go to ―My device->Windows‖ following screen will appear. Figure 45: SATA disk 2) Now locate ―cube‖ application and double click on it. It will run the application. iWave Systems Technologies Pvt. Ltd. (Confidential) Page 55 of 129 Software User Manual of G15 for WinCE Figure 46: SATA disk 3) The above screen shot shows the running of Open GL application on iW-G15 platform. Open VG application 1) Go to ―My device->Windows‖ following screen will appear. iWave Systems Technologies Pvt. Ltd. (Confidential) Page 56 of 129 Software User Manual of G15 for WinCE Figure 47: SATA disk 2) Locate ―gctiger‖ application and double click on it. It will run the application. iWave Systems Technologies Pvt. Ltd. (Confidential) Page 57 of 129 Software User Manual of G15 for WinCE Figure 48: SATA disk 4.2. Silverlight application on iW-G15 1) First copy the ―Silverlight‖ application from the \Deliverables\Software\Binaries\WinCE Application\ to any of the media in iW-G15 board. 2) Double click on the ―Silverlight‖ application. Following screen will appear. 3) Click button ‗A‘ to enter the character ‗a‘ and click ―<-― to clear the letter ‗a‘ and click button ‗c‘ to close the application. iWave Systems Technologies Pvt. Ltd. (Confidential) Page 58 of 129 Software User Manual of G15 for WinCE Figure 49: Silverlight application 4.3. Video playback 1) First copy the iWave given .WMV files from the path \Deliverables\Software\Sample_Videos to any media or desktop of the iW-G15 board. 2) Double click on the .WMV file to play the video. Following screen shot will appear when the video file is playing. iWave Systems Technologies Pvt. Ltd. (Confidential) Page 59 of 129 Software User Manual of G15 for WinCE Figure 50: Video window iWave Systems Technologies Pvt. Ltd. (Confidential) Page 60 of 129 Software User Manual of G15 for WinCE 5. Development Environment 5.1. MSI Installation Requirements for the MSI Installation: 1) Windows XP/Vista/7 host PC 2) Visual Studio 2008 3) Windows Embedded Compact 7 Installation procedure 1) First open the folder containing the MSI file and cab file given by the iWave from the path \Deliverables\Software\MSI_Binary\ iWave_G15_MSI_Binary.msi, Figure 51: iWave‘s MSI folder 2) Double click on the MSI file provided and the following screen will appear as shown in the snap shot. iWave Systems Technologies Pvt. Ltd. (Confidential) Page 61 of 129 Software User Manual of G15 for WinCE Figure 52: MSI installation binary setup 3) Just click ―Next‖ and the following snap shot will appear. iWave Systems Technologies Pvt. Ltd. (Confidential) Page 62 of 129 Software User Manual of G15 for WinCE Figure 53: Select folder to install the MSI 4) Specify the path as Drive/WINCE700/ to install the MSI as shown in the following screen shot and click ―Next‖. iWave Systems Technologies Pvt. Ltd. (Confidential) Page 63 of 129 Software User Manual of G15 for WinCE Figure 54: Changed the folder 5) Click ―Next‖ and the following screen will appear. iWave Systems Technologies Pvt. Ltd. (Confidential) Page 64 of 129 Software User Manual of G15 for WinCE Figure 55: Confirming the installation 6) Just click ―Next‖ to confirm the installation of the MSI. iWave Systems Technologies Pvt. Ltd. (Confidential) Page 65 of 129 Software User Manual of G15 for WinCE Figure 56: Installation complete 5.2. Configuring the OS image 1) Use the Platform Builder to select one of the two default build configurations provided in the BSP sample solution. These configurations control the type of OS image (debug or release) that is generated by the Platform Builder tools. 2) In addition, the build configuration encapsulates all of the platform environment variables and custom build instructions that are used during OS image creation. 3) This section describes the configuration options available for the i.MX6Q BSP. 5.2.1. Image Build Type 1) The type of OS image generated by Platform Builder can be controlled using the Build > Configuration Manager... menu item and choosing the appropriate Active Solution Configuration item from the drop-down list. 2) The sample workspace provided with the i.MX6Q BSP provides the following three image build types: • Freescale i_MX6Q SABREAuto ARMV7 Release—Retail build that includes KITL and kernel debugger support. This image type provides a smaller image with faster execution at the expense of limited debug capability. iWave Systems Technologies Pvt. Ltd. (Confidential) Page 66 of 129 Software User Manual of G15 for WinCE • Freescale i_MX6Q SABREAuto ARMV7 Debug—Debug build that includes KITL and kernel debugger support. This image type provides full debug capability at the expense of a larger image size and slower execution. • Freescale i_MX6Q SABREAuto ARMV7 Checked—Checked build that includes KITL and kernel debugger support. These image types provide richer check and debug capability at the expense of a larger image size and slower execution. Figure 57: Image build type changing NOTE The Standard toolbar can enable or disabled by selecting the Tools > Customize... menu item followed by the Toolbars tab and then select or deselect the standard toolbar item. iWave Systems Technologies Pvt. Ltd. (Confidential) Page 67 of 129 Software User Manual of G15 for WinCE 5.2.2. BSP Environment Variables There are three types of BSP environment variables used to configure the BSP: • BSP_NOXXX • BSP_XXX • IMGXXX • BSP_NOXXX Variables: The i.MX6Q BSP supports the Windows Embedded Compact 7 dependency feature, which simplifies the BSP configuration process. Support for this feature means that the selection of certain SYSGEN components in the workspace (for example SYSGEN_SMARTCARD) triggers the automatic selection of certain BSP drivers (for example SIM). The drivers that have a SYSGEN dependency have a corresponding BSP_NOXXX variable defined in the platform batch file listed below. These variables Provide a means for excluding a driver from the OS image that might otherwise be included, due to a SYSGEN dependency. WINCE700\platform\iMX6Q_SABREAuto\iMX6Q_SABREAuto.bat Figure 58: BSP_NOXXX variables • BSP_XXX Variables: The i.MX6Q BSP uses the BSP_XXX variables defined in the catalog to configure the drivers that cannot be automatically be selected by SYSGEN dependency. In these cases, iWave Systems Technologies Pvt. Ltd. (Confidential) Page 68 of 129 Software User Manual of G15 for WinCE users can use the Platform Builder Catalog UI to select or deselect drivers by clicking the catalog items. Figure 59: BSP_XXX variables Another method to add the BSP_XXX variables is as follows. 1. Open the sample solution for the i.MX6Q BSP. 2. From the Project menu, choose Properties. 3. Expand Configuration Properties if necessary and select the Environment item. iWave Systems Technologies Pvt. Ltd. (Confidential) Page 69 of 129 Software User Manual of G15 for WinCE Figure 60: Platform builder window for properties iWave Systems Technologies Pvt. Ltd. (Confidential) Page 70 of 129 Software User Manual of G15 for WinCE Figure 61: Project properties window (contd) • IMGXXX Variables The IMG_XXX variables are used to control the Make Run-Time Image procedure. The variables can be viewed and configured within the Environment dialog as follows: 1. Open the sample solution for the i.MX6Q BSP. 2. From the Project menu, choose Properties. 3. Expand Configuration Properties if necessary and select the Environment item. iWave Systems Technologies Pvt. Ltd. (Confidential) Page 71 of 129 Software User Manual of G15 for WinCE Figure 62: Project properties window for IMG iWave Systems Technologies Pvt. Ltd. (Confidential) Page 72 of 129 Software User Manual of G15 for WinCE Figure 63: Project properties window for IMG (contd) 5.3. Building the OS image 1) Once the installation of the MSI is finished go to Drive\WINCE700\osdesigns>iMX6Q_SABREAuto_Mobility and double click on iMX6Q_SABREAuto_Mobility file. It will open the workspace for the image creation. iWave Systems Technologies Pvt. Ltd. (Confidential) Page 73 of 129 Software User Manual of G15 for WinCE Figure 64: Folder with pbxml file 2) Once the iMX6Q_SABREAuto_Mobility file it looks like below snap shot. Figure 65: Platform builder window 3) Now go to ―Build‖ main menu and select ―Sysgen‖ as follows. By default LCD image will be built. iWave Systems Technologies Pvt. Ltd. (Confidential) Page 74 of 129 Software User Manual of G15 for WinCE Figure 66: Building for first time 4) The build process will start. The platform builder will look like the following screen shot. iWave Systems Technologies Pvt. Ltd. (Confidential) Page 75 of 129 Software User Manual of G15 for WinCE Figure 67: Build started 5) For the first time build errors will be thrown in the make image process. Select Build-> Copy files to release directory. iWave Systems Technologies Pvt. Ltd. (Confidential) Page 76 of 129 Software User Manual of G15 for WinCE Figure 68: Copy files to release diretory 6) Then click on Build->make run-time image. iWave Systems Technologies Pvt. Ltd. (Confidential) Page 77 of 129 Software User Manual of G15 for WinCE Figure 69: Make run-time image 7) Once the build is over the image will generated in the release directory. 8) The LCD image will be generated in the folder Drive: \WINCE700\osdesigns\iMX6Q_SABREAuto_Mobility\RelDir\Freescale_i_MX6 Q_SABREAuto_ARMV7_Release directory. 9) For HDMI image select ―IPU support for HDMI output‖ in catalog items as shown below. iWave Systems Technologies Pvt. Ltd. (Confidential) Page 78 of 129 Software User Manual of G15 for WinCE Figure 70: Select HDMI catalog item 10) Then go to build menu and select ―advanced build options‖ and click ―build current BSP and Subprojects‖. It will show cross mark once clicked on it but still ok to proceed. iWave Systems Technologies Pvt. Ltd. (Confidential) Page 79 of 129 Software User Manual of G15 for WinCE Figure 71: Build HDMI image Enabling KITL and Kernel Debugger 1) KITL and Kernel debugger can be enabled if required for debugging before building the image as follows otherwise these steps can be ignored. 2) In platform builder, go to ―Project‖ menu and select ―iMX53_EVK_Mobility_Properties‖. iWave Systems Technologies Pvt. Ltd. (Confidential) Page 80 of 129 Software User Manual of G15 for WinCE Figure 72: Properties window of the project 3) Now expand ―Configuration‖ and select ―Build Options‖ as follows. Figure 73: Changing the state of KITL 4) Now click on second column of ―Enable kernel debugger‖ and ―Enable KITL‖ iWave Systems Technologies Pvt. Ltd. (Confidential) Page 81 of 129 Software User Manual of G15 for WinCE and change them to ―Yes‖ as shown below. Figure 74: Changing the Kernel debuger 5) Now click ―Apply‖ and click ―OK‖. And now your image will have KITL and debugger as you build the image using the same procedure explained above. 5.4. Flashing the binaries into SD/MMC of iW-G15 platform 1) 2) 3) 4) 5.4.1. Using CFIMAGER.exe tool Connect the card reader with microSD card to the development PC. Create a folder in C: drive and copy iWave given cfimager.exe, eboot.nb0 and NK.nb0 into that folder. Open command prompt by typing ―cmd‖ in Run. Change the directory to the folder which has cfimager.exe, eboot.nb0 and NK.nb0. iWave Systems Technologies Pvt. Ltd. (Confidential) Page 82 of 129 Software User Manual of G15 for WinCE Figure 75: Command prompt in host PC 5) Execute the following commands as shown in the snap shots. Cfimager –f eboot.nb0 –d L –imx53 If it shows an error, change the above command as follows. i.e. Formatting the card and copying the image. Cfimager -always-format –f eboot.nb0 –d L –imx53 Cfimager –f NK.nb0 –d L –imx53 Figure 76: Cfimager for flashing eboot.nb0 6) The following screen will appear. iWave Systems Technologies Pvt. Ltd. (Confidential) Page 83 of 129 Software User Manual of G15 for WinCE Figure 77: Cfimager for flashing eboot.nb0 (contd) Figure 78: Cfimager for flashing NK.nb0 iWave Systems Technologies Pvt. Ltd. (Confidential) Page 84 of 129 Software User Manual of G15 for WinCE Figure 79: Cfimager for flashing NK.nb0 (contd) Figure 80: Cfimager for flashing NK.nb0 completed iWave Systems Technologies Pvt. Ltd. (Confidential) Page 85 of 129 Software User Manual of G15 for WinCE 5.4.2. Downloading NK.bin through Ethernet 1) Before downloading the wince image through Ethernet refer the section ―5.5 Booting WinCE image‖ to make the boot loader setting. Do the settings till subsection 5.5.6. 2) Once the build is completed, in platform builder go to Target->Connectivity options as following snap shot. Figure 81: Connectivity options 3) Following screen would appear. In Target Device Connectivity options make sure that kernel download and Kernel Transport are selected as Ethernet. Select kernel debugger as Kdstub. Click Apply and then click OK. iWave Systems Technologies Pvt. Ltd. (Confidential) Page 86 of 129 Software User Manual of G15 for WinCE Figure 82: Connectivity options (contd) 4) In boot loader main menu, select the option ―D‖, following screen would appear. iWave Systems Technologies Pvt. Ltd. (Confidential) Page 87 of 129 Software User Manual of G15 for WinCE Figure 83: Terminal window during downloading 5) The next snap shot shows that it has got the IP from the DHCP server. iWave Systems Technologies Pvt. Ltd. (Confidential) Page 88 of 129 Software User Manual of G15 for WinCE Figure 84: Terminal window during downloading got the IP 6) Next it will send BOOTME message to platform builder as following screen shot. iWave Systems Technologies Pvt. Ltd. (Confidential) Page 89 of 129 Software User Manual of G15 for WinCE Figure 85: Terminal window sending BOOTME message 7) Now in platform builder go to Target->Attach Device option as following screen shot. iWave Systems Technologies Pvt. Ltd. (Confidential) Page 90 of 129 Software User Manual of G15 for WinCE Figure 86: Platform builder while attaching the device 8) Following screen would appear once the Platform builder detects the target device. Click apply. iWave Systems Technologies Pvt. Ltd. (Confidential) Page 91 of 129 Software User Manual of G15 for WinCE Figure 87: Platform builder device detection 9) Following snap shot shows the downloading progress once the previous step is executed. iWave Systems Technologies Pvt. Ltd. (Confidential) Page 92 of 129 Software User Manual of G15 for WinCE Figure 88: Platform builder window downloading NK.bin 10) Once the download is finished, the terminal screen would look like the following snap shot. It would ask to update the flash. Press ‗y/Y‘ to proceed. iWave Systems Technologies Pvt. Ltd. (Confidential) Page 93 of 129 Software User Manual of G15 for WinCE Figure 89: Terminal window after downloading 11) Now it is copying the NK.bin to SD/MMC card. iWave Systems Technologies Pvt. Ltd. (Confidential) Page 94 of 129 Software User Manual of G15 for WinCE Figure 90: Copying NK.bin to SD/MMC 12) Once the image has been copied to SD/MMC card, it will ask for the reboot as the following snap shot. Just press ‗y/Y‘ to continue. iWave Systems Technologies Pvt. Ltd. (Confidential) Page 95 of 129 Software User Manual of G15 for WinCE Figure 91: Reset option after NK is copied to SD/MMC. 13) Once the key ‗y/Y‘ is pressed the terminal would look like the following screen shot. iWave Systems Technologies Pvt. Ltd. (Confidential) Page 96 of 129 Software User Manual of G15 for WinCE Figure 92: Rebooting the board after downloading the image 14) After some 24 seconds, LCD on iW-G15 module would look like the following snap shot. iWave Systems Technologies Pvt. Ltd. (Confidential) Page 97 of 129 Software User Manual of G15 for WinCE Figure 93: WinCE desktop 5.5. Booting WinCE image 5.5.1. Boot loader Main Menu 1) After powering on the board, HyperTerminal displays as shown below. iWave Systems Technologies Pvt. Ltd. (Confidential) Page 98 of 129 Software User Manual of G15 for WinCE Figure 94: Boot loader window Note: Options mentioned in this boot loader test are case-insensitive. 2) Press [SPACE] key on PC/Laptop within 2 seconds after power up, to launch the boot loader menu in HyperTerminal as shown below. Otherwise system will start loading the image from the SD/MMC card. If image is not present in SD/MMC iWave Systems Technologies Pvt. Ltd. (Confidential) Page 99 of 129 Software User Manual of G15 for WinCE then system will hang. Figure 95: Terminal with boot loader menu during changes 3) The marked options should be changed for our requirement as of now. 5.5.2. Select Boot Device 1) Select option ‗5‘ to set the boot device as SD/MMC. iWave Systems Technologies Pvt. Ltd. (Confidential) Page 100 of 129 Software User Manual of G15 for WinCE Figure 96: Terminal changing the boot device 5.5.3. Set MAC address 1) Select option ‗6‘ to enter into Short Ram test. 2) Set the MAC address as 00:11:22:33:44:55 3) The MAC address can be different also. iWave Systems Technologies Pvt. Ltd. (Confidential) Page 101 of 129 Software User Manual of G15 for WinCE Figure 97: Setting MAC address iWave Systems Technologies Pvt. Ltd. (Confidential) Page 102 of 129 Software User Manual of G15 for WinCE Figure 98: Setting MAC address (contd) iWave Systems Technologies Pvt. Ltd. (Confidential) Page 103 of 129 Software User Manual of G15 for WinCE Figure 99: MAC address set 5.5.4. KITL Enable mode 1) Press ‗K‘ to disable or enable KITL as required. iWave Systems Technologies Pvt. Ltd. (Confidential) Page 104 of 129 Software User Manual of G15 for WinCE Figure 100: Disabling the KITL 5.5.5. Change the ether device Press ‗E‘ until the option ‗ENET’ appears in main menu. iWave Systems Technologies Pvt. Ltd. (Confidential) Page 105 of 129 Software User Manual of G15 for WinCE Figure 101: Changing the Ether device 5.5.6. Save settings 1) Select the option ‗S‘ in the main menu to save the configurations. 2) This option will save all the changes in the SD/MMC. 5.5.7. Boot WinCE 7.0 1) Press ‗l/L‘ to launch the image from the SD/MMC 2) The iW-G15 display looks like the following screen shot. iWave Systems Technologies Pvt. Ltd. (Confidential) Page 106 of 129 Software User Manual of G15 for WinCE Figure 102: WinCE Desktop iWave Systems Technologies Pvt. Ltd. (Confidential) Page 107 of 129 Software User Manual of G15 for WinCE 5.6. CETK Test Setup Requirements: 1) Windows XP/Vista/7 host PC 2) USB OTG cable 3) Windows Embedded Compact 7 Procedure: 1) Power ON iW-G15 board. 2) Boot WinCE 7.0 from SD/MMC card. 3) First connect the iW-G15 board and the Host PC with the Active sync 4.5 if host PC is Windows XP using USB OTG cable. 4) Open Installed Windows Embedded Compact Test in your PC as shown in the following screen shot. iWave Systems Technologies Pvt. Ltd. (Confidential) Page 108 of 129 Software User Manual of G15 for WinCE Figure 103: CETK set up 5) Following screen shot will appear on the host PC. iWave Systems Technologies Pvt. Ltd. (Confidential) Page 109 of 129 Software User Manual of G15 for WinCE Figure 104: CETK connect to device 6) Select Connect to Device option. Following screen will appear. Select Windows Mobile 5.0 Smartphone Device R2 as a device name. iWave Systems Technologies Pvt. Ltd. (Confidential) Page 110 of 129 Software User Manual of G15 for WinCE Figure 105: Select the device to get connected 7) Following screen will appear when ―OK‖ is pressed. iWave Systems Technologies Pvt. Ltd. (Confidential) Page 111 of 129 Software User Manual of G15 for WinCE Figure 106: Waiting for the connection 8) Once the connection is established the following screen will appear. iWave Systems Technologies Pvt. Ltd. (Confidential) Page 112 of 129 Software User Manual of G15 for WinCE Figure 107: CETK test setup page 9) Now go to ―File‖, select ―Open‖ and select ―Test pass Template‖ and open the iWave given ―iWave_G15_CETK‖ test pass as shown below. iWave Systems Technologies Pvt. Ltd. (Confidential) Page 113 of 129 Software User Manual of G15 for WinCE Figure 108: CETK open test pass template 10) Once the previous step is over, check the right side window for ―Test Pass Templates View‖ tab. If it is present then click that and go to next step. If that tab is not there then click on ―View‖ menu option and select ―Test Pass Templates View‖ as follows. iWave Systems Technologies Pvt. Ltd. (Confidential) Page 114 of 129 Software User Manual of G15 for WinCE Figure 109: Opening test pass template (contd) 11) Now select ―My Templates‖ in ―Test Pass Templates View‖ tab and there one can fine the iWave_G15_CETK.tpt file selected. Figure 110: Selecting iWave_G15_CETK template 12) Now right click on the iWave_G15_CETK.tpt and select Use as current test pass option as follows. Figure 111:Running the template iWave Systems Technologies Pvt. Ltd. (Confidential) Page 115 of 129 Software User Manual of G15 for WinCE 13) Now select ―Run Test Pass‖. It will start executing the tests in a row. It may take several hours of time. 14) Or else user can select the basic CETK Testing using the above procedure. 15) The result of the tests that we performed has been attached here. No Module Test Name No of Test test result cases MSDN LINK 1 Audio Audio Drift Test 1 Pass http://msdn.microsoft.com/enus/library/gg154549.aspx 2 Audio Audio Loop Back Test 1 Pass 3 Audio 11 Pass 4 Audio 14 Pass 5 Audio 11 Pass 6 3 Pass 5 Pass 5 Pass 3 Pass 10 CE Database CE Database CE Database CE Database Registry 40 Pass 11 Registry 6 Pass 12 USB/keyb oard /input USB/Mou se/Input Touch/inp Full-duplex Audio Playback and Record Verification Full-duplex Audio Playback Verification Half-duplex Audio Playback and Record Verification CE Database Build Verification Test CE Database Extended Performance Test CE Database Performance Test EDB Build Verification Test Registry API and Functionality Test Registry Performance Test English Key map http://msdn.microsoft.com/enus/library/gg154618.aspx http://msdn.microsoft.com/enus/library/gg154978.aspx 1 Pass Mouse Verfication Test 11 Pass Calibration Abort Test 1 Pass 7 8 9 13 14 iWave Systems Technologies Pvt. Ltd. (Confidential) http://msdn.microsoft.com/enus/library/gg154592.aspx http://msdn.microsoft.com/enus/library/gg154926. http://msdn.microsoft.com/enus/library/gg154496.aspx http://msdn.microsoft.com/enus/library/gg154495.aspx http://msdn.microsoft.com/enus/library/gg154942.aspx http://msdn.microsoft.com/enus/library/gg154942.aspx http://msdn.microsoft.com/enus/library/gg154501.aspx http://msdn.microsoft.com/enus/library/gg154459.aspx http://msdn.microsoft.com/enus/library/gg155168.aspx http://msdn.microsoft.com/enus/library/gg155136.aspx http://msdn.microsoft.com/en- Page 116 of 129 Software User Manual of G15 for WinCE 15 16 17 18 19 20 21 22 23 24 25 ut Touch/inp ut Touch/inp ut Touch/inp ut Touch/inp ut Touch/inp ut Touch/inp ut Touch/inp ut Touch/inp ut Touch/inp ut Touch/inp ut Touch/inp ut Touch/inp ut Calibration Test 1 Pass Drawing Test 1 Pass Null Parameter Test 1 Pass Pen Up and Down Test 1 Pass Point Test 1 Pass Query Device Caps Test 1 Pass Power Capabilities Test 1 Pass Read Calibration Point 1 Test Set Sample Rate Test 1 Pass Touch BVT Test 1 Pass Pass Pass us/library/gg154921.aspx http://msdn.microsoft.com/enus/library/gg155109.aspx http://msdn.microsoft.com/enus/library/gg154558.aspx http://msdn.microsoft.com/enus/library/gg154645.aspx http://msdn.microsoft.com/enus/library/gg154610.aspx http://msdn.microsoft.com/enus/library/gg154958.aspx http://msdn.microsoft.com/enus/library/gg154983.aspx http://msdn.microsoft.com/enus/library/gg155172.aspx http://msdn.microsoft.com/enus/library/gg155121.aspx http://msdn.microsoft.com/enus/library/gg154845.aspx http://msdn.microsoft.com/enus/library/gg154563.aspx http://msdn.microsoft.com/enus/library/gg154953.aspx http://msdn.microsoft.com/enus/library/gg154650.aspx 27 Kernel Touch Driver Unloaded 1 Test Touch Panel APIs, 1 Functional, Power Management, and Fault Injection Tests Kernel BVT Test 5 28 Kernel Kernel Scheduler Test 2 Pass 29 Kernel Notification Test 9 Pass 30 Networki ng/Ethern et Networki ng/Ethern et Networki ng/Ethern et Networki ng/Ethern et Internet Control Message 42 Protocol API Test Pass NDIS 6 Performance Test 1 Pass http://msdn.microsoft.com/enus/library/gg154989.aspx Winsock 2.0 Test v4 and 8 v6 Pass http://msdn.microsoft.com/enus/library/gg154542.aspx Winsock Stress Test - 1 Name Resolution Pass http://msdn.microsoft.com/enus/library/gg155163.aspx 26 31 32 33 Pass Pass iWave Systems Technologies Pvt. Ltd. (Confidential) http://msdn.microsoft.com/enus/library/gg154816.aspx http://msdn.microsoft.com/enus/library/gg154473.aspx http://msdn.microsoft.com/enus/library/gg154971.aspx http://msdn.microsoft.com/enus/library/gg154810.aspx Page 117 of 129 Software User Manual of G15 for WinCE 34 Networki ng/Ethern et Networki ng/Ethern et Networki ng/Ethern et OAL/Cac he OAL/Cac he OAL/Cac he OAL/Cac he OAL/Inte rrupt OAL/Inte rrupt OAL/IOC TL OAL/IOC TL OAL/IOC TL OAL/IOC TL OAL/IOC TL OAL/Tim er Winsock Stress Test - 1 OpenClose Pass http://msdn.microsoft.com/enus/library/gg154839.aspx Winsock Stress Test - 1 ReceiveSend Pass http://msdn.microsoft.com/enus/library/gg154613.aspx Winsock Stress Test - 1 Socket Binding Pass http://msdn.microsoft.com/enus/library/gg154667.aspx OAL - No Cache Tests 11 Pass OAL Cache Churn Test 5 Pass 11 Pass 11 Pass 33 Pass 18 Pass 12 Pass 3 Pass 3 Pass 5 Pass 5 Pass 4 Pass 49 OAL/Tim er 2 Pass http://msdn.microsoft.com/enus/library/gg154606.aspx 50 OAL/Tim er OAL/Tim er OAL/Tim er Shell/Silv Write-back Cache Mode Tests Write-through Cache Mode Tests OAL Kernel Mode Interrupt Tests OAL User Mode Interrupt Tests IOCTL_HAL_GET_DEV ICE_INFO Test IOCTL_HAL_GET_RAN DOM_SEED Test IOCTL_HAL_GET_WA KE_SOURCE Test IOCTL_HAL_ILTIMING (Kernel Mode) Test IOCTL_PROCESSOR_I NFORMATION Test Compare All Three Timers Drift - Busy Sleep and OS Sleep Compare All Three Timers Drift Test Periodic and Random OEMIdle OAL High Performance Timer Tests OAL Timer GetTickCount Tests Wall Clock Timer Tests http://msdn.microsoft.com/enus/library/gg154590.aspx http://msdn.microsoft.com/enus/library/gg154808.aspx http://msdn.microsoft.com/enus/library/gg155130.aspx http://msdn.microsoft.com/enus/library/gg154968.aspx http://msdn.microsoft.com/enus/library/gg154680.aspx http://msdn.microsoft.com/enus/library/gg154881.aspx http://msdn.microsoft.com/enus/library/gg154556.aspx http://msdn.microsoft.com/enus/library/gg154571.aspx http://msdn.microsoft.com/enus/library/gg154820.aspx http://msdn.microsoft.com/enus/library/gg154643.aspx http://msdn.microsoft.com/enus/library/gg154869.aspx http://msdn.microsoft.com/enus/library/gg154483.aspx 3 Pass 4 Pass 3 Pass - 1 Pass http://msdn.microsoft.com/enus/library/gg154476.aspx http://msdn.microsoft.com/enus/library/gg154891.aspx http://msdn.microsoft.com/enus/library/gg154802.aspx http://msdn.microsoft.com/en- 35 36 37 38 39 40 41 42 43 44 45 46 47 48 51 52 53 Applications Load iWave Systems Technologies Pvt. Ltd. (Confidential) Page 118 of 129 Software User Manual of G15 for WinCE 54 55 56 57 58 59 60 61 62 63 64 65 66 67 68 69 70 71 erLight Shell/Silv erLight Shell/Silv erLight Shell/Silv erLight Shell/Silv erLight Shell/Silv erLight Shell/Silv erLight Shell/Silv erLight Shell/Silv erLight Strorage Media/SD Card Strorage Media/SD Card Strorage Media/SD Card Strorage Media/SD Card Strorage Media/SD Card Strorage Media/US B Storage Strorage Media/US B Storage Strorage Media/US B Storage Strorage Media/US B Storage Strorage Browser Applications Load Music Player Applications Load Picture Viewer Applications Load Sample Home Screen Applications Load Video Player Background Animation - 1 Pass - 1 Pass - 1 Pass - 1 Pass 3 Pass Image Manipulation 10 Pass List Performance Tests 9 Pass Screen Transition 6 Pass us/library/gg155065.aspx http://msdn.microsoft.com/enus/library/gg154653.aspx http://msdn.microsoft.com/enus/library/gg154901.aspx http://msdn.microsoft.com/enus/library/gg154938.aspx http://msdn.microsoft.com/enus/library/gg154482.aspx http://msdn.microsoft.com/enus/library/gg154462.aspx http://msdn.microsoft.com/enus/library/gg154551.aspx http://msdn.microsoft.com/enus/library/gg154596.aspx http://msdn.microsoft.com/enus/library/gg154641.aspx http://msdn.microsoft.com/enus/library/gg155106.aspx File System Driver Test 44 for SD Card Pass File System Performance 31 Tests for SD Card Pass http://msdn.microsoft.com/enus/library/gg154471.aspx Storage Block Driver API Verification Tests for SD Card Storage Block Driver Performance Test for SD Card Storage Block Driver ReadWrite Test for SD Card File System Performance Test for USB devices 26 Pass http://msdn.microsoft.com/enus/library/gg154814.aspx 2 Pass http://msdn.microsoft.com/enus/library/gg154944.aspx 9 Pass http://msdn.microsoft.com/enus/library/gg154573.aspx 31 Pass http://msdn.microsoft.com/enus/library/gg154570.aspx Storage Device Block Driver API Test for USB Device Storage Device Block Driver Benchmark Test for USB Device Storage Device Block Driver Performance Test for USB Storage Storage Device Block 26 Pass http://msdn.microsoft.com/enus/library/gg154863.aspx 9 Pass http://msdn.microsoft.com/enus/library/gg154595.aspx 2 Pass http://msdn.microsoft.com/enus/library/gg154874.aspx 10 Pass http://msdn.microsoft.com/en- iWave Systems Technologies Pvt. Ltd. (Confidential) Page 119 of 129 Software User Manual of G15 for WinCE 72 73 74 75 Media/US B Storage Strorage Media/US B Storage USB/Fun ction USB/Host USB/OT G Driver ReadWrite Tests for USB Device Storage Device File System Driver Test for USB Device USB Function Driver Verification Tests USB Host Driver Verification Tests USB OTG Bus IOCTL Test us/library/gg154837.aspx 44 Pass http://msdn.microsoft.com/enus/library/gg154911.aspx 7 Pass 12 Pass 5 Pass http://msdn.microsoft.com/enus/library/gg154876.aspx http://msdn.microsoft.com/enus/library/gg154522.aspx http://msdn.microsoft.com/enus/library/gg155112.aspx iWave Systems Technologies Pvt. Ltd. (Confidential) Page 120 of 129 Software User Manual of G15 for WinCE 5.7. SDK Installation 1) Copy the iWave given IWave_IMX6Q_SDK MSI file from the path Deliverables\Software\SDK\IWave_IMX6Q_SDK.msi Figure 112: Folder with i.MX6 SDK 2) Double click on SDK MSI file. Following screens will appear in the PC. Figure 113: Installation of SDK iWave Systems Technologies Pvt. Ltd. (Confidential) Page 121 of 129 Software User Manual of G15 for WinCE Figure 114: SDK installation contd 3) Click ―Next‖. iWave Systems Technologies Pvt. Ltd. (Confidential) Page 122 of 129 Software User Manual of G15 for WinCE Figure 115: SDK installation contd 4) Select ―Accept‖ and click ―Next‖. In following screen enter organization name and click ―Next‖. iWave Systems Technologies Pvt. Ltd. (Confidential) Page 123 of 129 Software User Manual of G15 for WinCE Figure 116: Selecting User name in installation 5) Following screen appears when clicked ―Next‖. iWave Systems Technologies Pvt. Ltd. (Confidential) Page 124 of 129 Software User Manual of G15 for WinCE Figure 117: SDK installation contd 6) Click ―Next‖. iWave Systems Technologies Pvt. Ltd. (Confidential) Page 125 of 129 Software User Manual of G15 for WinCE Figure 118: Destination folder selection 7) Click ―Install‖. Following screen will appear. iWave Systems Technologies Pvt. Ltd. (Confidential) Page 126 of 129 Software User Manual of G15 for WinCE Figure 119: Ready to install window iWave Systems Technologies Pvt. Ltd. (Confidential) Page 127 of 129 Software User Manual of G15 for WinCE Figure 120: Completing the installation 8) Click ―Finish‖ to complete the installation. iWave Systems Technologies Pvt. Ltd. (Confidential) Page 128 of 129 Software User Manual of G15 for WinCE 6. Technical Support iWave Systems Technologies Pvt. Ltd. # 7/B, 29th Main, BTM Layout 2nd Stage, Ban galore – 560 076 Phone: +91-80-26683700, 26786245 Fax : +91-80-26685200 Email : [email protected] web : www.iwavesystems.com iWave Systems Technologies Pvt. Ltd. (Confidential) Page 129 of 129