1
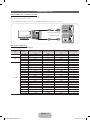
Contact SAMSUNG WORLDWIDE
If you have any questions or comments about your Samsung TV, please contact the SAMSUNG customer care center.
Comment contacter Samsung dans le monde
Si vous avez des suggestions ou des questions concernant les produits Samsung, veuillez contacter le Service Consommateurs
Samsung.
Comuníquese con SAMSUNG WORLD WIDE
Si desea formular alguna pregunta o comentario en relación con los productos de Samsung, comuníquese con el centro de
atención al cliente de SAMSUNG.
Country
CANADA
Address
Samsung Electronics Canada Inc.,
Customer Service
55 Standish Court Mississauga
Ontario L5R 4B2 Canada
Customer Care
Center
1-800-SAMSUNG (726-7864)
Web Site
www.samsung.com
U.S.A
Samsung Electronics America, Inc.
85 Challenger Road
Ridgefield Park, NJ 07660-2112
LED TV
user manual
E-MANUAL
Thank you for purchasing this Samsung product.
To receive more complete service, please register
your product at
www.samsung.com/register
Model______________ Serial No.______________
✎✎If you have any questions, please call us at 1-800-SAMSUNG (1-800-726-7864) for assistance.
© 2012 Samsung Electronics Co., Ltd. All rights reserved.
[UE6030-ZA]BN68-04458A.indb 1
BN68-04458A-01
BN68-04458A
2012-05-10 �� 5:38:08
A detailed User’s Manual is built into your TV. For more information about how to view this e-Manual, see page 16.
Figures and illustrations in this User Manual are provided for reference only and may differ from actual product appearances.
Product design and specifications may be changed without notice.
Important Warranty Information Regarding Television Format Viewing
✎✎ See the warranty card for more information on warranty terms.
Wide screen format LED Displays (16:9, the aspect ratio of the screen width to height) are primarily designed to view wide screen format full-motion video.
The images displayed on them should primarily be in the wide screen 16:9 ratio format, or expanded to fill the screen if your model offers this feature and
the images are constantly moving. Displaying stationary graphics and images on screen, such as the dark sidebars on non- expanded standard format
television video and programming, should be limited to no more than 5% of the total television viewing per week. Additionally, viewing other stationary
images and text such as stock market reports, video game displays, station logos, web sites or computer graphics and patterns, should be limited as
described above for all televisions. Displaying stationary images that exceed the above guidelines can cause uneven aging of LED Displays that leave
subtle, but permanent burned-in ghost images in the LED picture. To avoid this, vary the programming and images, and primarily display full screen moving
images, not stationary patterns or dark bars. On LED models that offer picture sizing features, use these controls to view different formats as a full screen
picture. Be careful in the selection and duration of television formats you use for viewing. Uneven LED aging as a result of format selection and use, as well
as burned-in images, are not covered by your Samsung limited warranty.
• SAMSUNG ELECTRONICS NORTH AMERICAN LIMITED WARRANTY STATEMENT
Subject to the requirements, conditions, exclusions and limitations of the original Limited Warranty supplied with Samsung Electronics (SAMSUNG)
products, and the requirements, conditions, exclusions and limitations contained herein, SAMSUNG will additionally provide Warranty Repair Service
in the United States on SAMSUNG products purchased in Canada, and in Canada on SAMSUNG products purchased in the United States, for the
warranty period originally specified, and to the Original Purchaser only.
The above described warranty repairs must be performed by a SAMSUNG Authorized Service Center. Along with this Statement, the Original Limited
Warranty Statement and a dated Bill of Sale as Proof of Purchase must be presented to the Service Center. Transportation to and from the Service
Center is the responsibility of the purchaser. Conditions covered are limited only to manufacturing defects in material or workmanship, and only
those encountered in normal use of the product. Excluded, but not limited to, are any originally specified provisions for, in-home or on-site services,
minimum or maximum repair times, exchanges or replacements, accessories, options, upgrades, or consumables.
For the location of a SAMSUNG Authorized Service Center, please call toll-free:
- In the United States : 1-800-SAMSUNG (1-800-726-7864)
- In Canada : 1-800-SAMSUNG
Still image warning
Avoid displaying still images (such as jpeg picture files) or still image elements (such as TV channel logos, panorama or 4:3 image format, stock
or news bars at screen bottom etc.) on the screen. Constant displaying of still pictures can cause ghosting of LED screen, which will affect image
quality. To reduce risk of this effect, please follow below recommendations:
• Avoid displaying the same TV channel for long periods.
• Always try to display any image on full screen, use TV set picture format menu for best possible match.
• Reduce brightness and contrast values to minimum required to achieve desired picture quality, exceeded values may speed up the burnout process.
• Frequently use all TV features designed to reduce image retention and screen burnout, refer to proper user manual section for details.
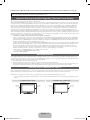
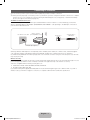
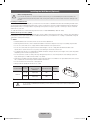
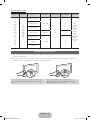
Providing Proper Ventilation for Your TV
When you install your TV, maintain a distance of at least 4 inches between the TV and other objects (walls, cabinet sides, etc.) to ensure proper ventilation.
Failing to maintain proper ventilation may result in a fire or a problem with the product caused by an increase in its internal temperature.
✎✎Whether you install your TV using a stand or a wall-mount, use parts provided by Samsung Electronics only.
xx If you use parts provided by another manufacturer, it may cause difficulties with the product or result in injury caused by the product
falling.
Installation with a stand.
Installation with a wall-mount.
4 inches
4 inches
4 inches
4 inches
4 inches
4 inches
4 inches
English - 2
[UE6030-ZA]BN68-04458A.indb 2
2012-05-10 �� 5:38:09
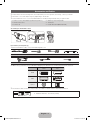
Accessories and Cables
✎✎Please make sure the following items are included with your TV. If any items are missing, contact your dealer.
✎✎The items’ colors and shapes may vary depending on the model.
✎✎Check that there are no accessories hidden behind or under packing materials after you open the box.
yy Remote Control (AA59-00601A) & Batteries (AAA x 2)
yy Owner’s Instructions
yy Power Cord
yy Warranty Card / Safety Guide
yy 3D Glasses
yy Holder-Wire Stand (BN61-05491A)
Assembling the Holder-Wire stand
Input Cables (Sold Separately)
To purchase the RS232 cable, contact www.SamsungParts.com.
RS232 (AA39-00311A)
HDMI
Component
HDMI-DVI
Audio
Composite (AV)
Coaxial (RF)
✎✎Make sure you have the correct cable before plugging it in. Illustrations of common plugs and jacks are below.
Cable
Ports
HDMI
USB
Optical
✎✎For the best cable connection to this product, use cables no thicker than the cable illustrated below:
yy Maximum thickness - 0.55 inches (14mm)
English - 3
[UE6030-ZA]BN68-04458A.indb 3
2012-05-10 �� 5:38:16
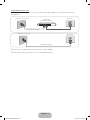
Connecting the Power Cord and the Antenna or Cable Connection
VHF/UHF Antenna
Antenna Cable (Not Supplied)
Cable
or
ANT OUT
Power Input
✎✎Plug the power cord into a wall outlet only after you have made all other connections.
✎✎If you are connecting your TV to a cable or satellite box using HDMI, Component, or Composite connections, you do not
need to connect the ANT IN jack to an antenna or a cable connection.
✎✎Use caution when you move or swivel the TV if the antenna cable is tightly connected. You could break the antenna jack
off the TV.
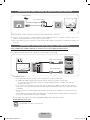
Connecting to AV Devices (Blu-ray Players, DVD Players, etc.)
Using an HDMI cable or HDMI to DVI Cable for an HD connection (up to 1080p, HD, digital signals)
For the best quality HD picture, we recommend using an HDMI connection.
Use on DVD players, Blu-ray players, HD cable boxes, and HD satellite receivers (STB).
Device
HDMI to DVI Cable (Not Supplied)
W
Red
DVI OUT
White
2
HDMI IN
1 (DVI)
EX-LINK
Device
HDMI Cable (Not Supplied)
AUDIO
OUT
DIGITAL
AUDIO OUT
(OPTICAL)
HDMI OUT
✎✎HDMI IN 1 (DVI), 2
xx For better picture and audio quality, connect to digital devices using an HDMI cable.
xx An HDMI cable supports digital video and audio signals, and does not require an audio cable.
–– To connect the TV to a digital device that does not support HDMI output, use an HDMI to DVI cable and
separate audio cables.
xx If you connect an external device to the TV that uses an older version of HDMI, the video and audio may not
work. If this occurs, ask the manufacturer of the device about the HDMI version and, if it is out of date, request
an upgrade.
xx Be sure to purchase a certified HDMI cable. Otherwise, the picture may not display or a connection error may
occur.
xx We recommend using a basic high-speed HDMI cable or an HDMI cable that supports Ethernet. Note that this
TV does not support the Ethernet function via HDMI.
✎✎If an HDMI to DVI cable is connected to the HDMI IN 1(DVI) port, the audio does not work.
The EX-LINK Cable Connection
EX-LINK
The EX-LINK connection is for service only.
English - 4
[UE6030-ZA]BN68-04458A.indb 4
2012-05-10 �� 5:38:18
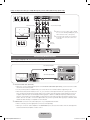
Using a Component Cable (up to 1080p HD signals) or Video Cable (480i, analog signals only)
Use on DVD players, Blu-ray players, cable boxes, STB satellite receivers, and VCRs.
Device
Red White
Red
Blue Green
Audio Cable (Not Supplied)
Component Cable (Not Supplied)
✎✎When you connect a Video cable to AV IN,
the color of the AV IN [Y/VIDEO] jack (green)
will not match the video cable (yellow).
✎✎For better picture quality, we recommend
the Component connection over the A/V
connection.
Audio Cable
(Not Supplied)
Video Cable
(Not Supplied)
Red White Yellow
Device
Connecting Audio Devices
Using an Optical (Digital) Cable Connection or a Standard Stereo Connection
Use on Digital Audio Systems, Amplifiers, and Home Theaters.
Audio cable (Not Supplied)
DVD Home Theater
AUDIO IN
R-AUDIO-L
2
Digital Audio System
1 (DVI)
EX-LINK
Optical Cable (Not Supplied)
OPTICAL
AUDIO
OUT
DIGITAL
AUDIO OUT
(OPTICAL)
✎✎DIGITAL AUDIO OUT (OPTICAL)
xx When you connect a Digital Audio System to the DIGITAL AUDIO OUT (OPTICAL) jack, decrease the volume
of both the TV and the system.
xx 5.1 CH (channel) audio is available when you connect the TV to an external device supporting 5.1 CH.
xx When the receiver (home theater) is set to on, you can hear sound output from the TV’s optical jack. When the
TV is receiving a DTV signal, the TV will send 5.1 CH sound to the home theater receiver. When the source is
a digital component such as a DVD player / Blu-ray player / cable box / STB (Set-Top-Box) satellite receiver
and you connected it to the TV via HDMI, you will only hear 2 CH audio from the home theater receiver. If you
want to hear 5.1 CH audio, connect the digital audio out jack from your DVD / Blu-ray player / cable box / STB
satellite receiver directly to an amplifier or home theater.
✎✎AUDIO OUT: Connects to the audio input jacks on your amplifier/home theater.
xx When connecting, use the appropriate connector (sold separately).
xx When you connect an audio amplifier to the AUDIO OUT jacks, decrease the volume of the TV and adjust the
volume level with the amplifier’s volume control.
English - 5
[UE6030-ZA]BN68-04458A.indb 5
2012-05-10 �� 5:38:20
Connecting to a PC
Using an HDMI cable or an HDMI to DVI cable
✎✎Your PC may not support an HDMI connection.
✎✎ Use your PC speakers for audio.
✎✎If an HDMI to DVI cable is connected to the HDMI IN 1(DVI) port, the audio does not work.
DVI OUT
2
HDMI IN
1 (DVI)
EX-LINK
HDMI to DVI Cable (Not Supplied)
HDMI Cable (Not Supplied)
AUDIO
OUT
DIGITAL
AUDIO OUT
(OPTICAL)
HDMI OUT
Display Modes (HDMI Input)
Optimal resolution is 1920 X 1080@60Hz.
Mode
Resolution
Horizontal Frequency (KHz)
Vertical Frequency (Hz)
Pixel Clock Frequency (MHz)
Sync Polarity (H / V)
640 x 350
31.469
70.086
25.175
+/-
720 x 400
31.469
70.087
28.322
-/+
640 x 480
35.000
66.667
30.240
-/-
832 x 624
49.726
74.551
57.284
-/-
1152 x 870
68.681
75.062
100.000
-/-
640 x 480
31.469
59.940
25.175
-/-
640 x 480
37.861
72.809
31.500
-/-
640 x 480
37.500
75.000
31.500
-/-
800 x 600
37.879
60.317
40.000
+/+
800 x 600
48.077
72.188
50.000
+/+
800 x 600
46.875
75.000
49.500
+/+
1024 x 768
48.363
60.004
65.000
-/-
1024 x 768
56.476
70.069
75.000
-/-
1024 x 768
60.023
75.029
78.750
+/+
1152 x 864
67.500
75.000
108.000
+/+
1280 x 720
45.000
60.000
74.250
+/+
1280 x 800
49.702
59.810
83.500
-/+
1280 x 1024
63.981
60.020
108.000
+/+
1280 x 1024
79.976
75.025
135.000
+/+
1366 x 768
47.712
59.790
85.500
+/+
1440 x 900
55.935
59.887
106.500
-/+
1600 x 900RB
60.000
60.000
108.000
+/+
1680 x 1050
65.290
59.954
146.250
-/+
1920 x 1080
67.500
60.000
148.500
+/+
IBM
MAC
VESA DMT
English - 6
[UE6030-ZA]BN68-04458A.indb 6
2012-05-10 �� 5:38:22
Connecting to a Network
You can connect your TV to your local area network (LAN) using a wired or wireless connection.
✎✎After you have “physically” connected your TV to your network, you must configure the network connection to complete
the process. You can configure the connection during the Initial Setup process (see page 10 ) or after the Initial Setup
process, through the TV’s menu (see page 15).
The Wireless Network Connection
You can connect your TV to your LAN through a standard wireless router or modem. To connect wirelessly, you must first
attach a “Samsung Wireless LAN Adapter” (WIS09ABGNX, WIS12ABGNX - sold separately) to the USB port on the side of
your TV. See the illustration below.
The LAN Port on the Wall
Wireless IP Sharer
(AP having DHCP Server)
TV Side Panel
Samsung Wireless
LAN Adapter
LAN Cable (Not Supplied)
Samsung’s Wireless LAN adapter is sold separately and is offered by select retailers, E-commerce sites, and Samsungparts.
com. Samsung’s Wireless LAN adapter supports the IEEE 802.11a/b/g and n communication protocols. Samsung
recommends using IEEE 802.11n. When you play video over a network connection using one of the other protocols, the video
may not play smoothly.
Wireless Security
Most wireless network systems incorporate a security system that requires devices that access the network through an access
point or AP (typically a wireless router or modem) to transmit an encrypted security code called an access key.
Your TV is compatible with the following security protocols:
yy Authentication Mode: OPEN, SHARED, WPAPSK, WPA2PSK
yy Encryption Type: WEP, TKIP, AES
If you select Pure High-throughput (Greenfield) 802.11n mode and the Encryption type is set to WEP or TKIP on your AP or
wireless router, your TV will not support a connection, in compliance with new Wi-Fi certification specifications.
English - 7
[UE6030-ZA]BN68-04458A.indb 7
2012-05-10 �� 5:38:23
The Wired Network Connection
There are two main ways to connect your TV to your network using cable, depending on your network setup. They are
illustrated below:
The Modem Port on the Wall
External Modem
(ADSL / VDSL / Cable TV)
Modem Cable (Not Supplied)
TV Rear Panel
LAN Cable (Not Supplied)
The Modem Port on the Wall
TV Rear Panel
LAN Cable (Not Supplied)
✎✎The TV does not support network speeds less than or equal to 10Mbps.
✎✎Use Cat 6 (STP Type*) cable for the connection. (*Shielded Twisted Pair)
English - 8
[UE6030-ZA]BN68-04458A.indb 8
2012-05-10 �� 5:38:24
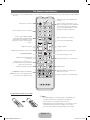
The Remote Control Buttons
✎✎This remote control has Braille points on the Power, Channel, and Volume buttons and can be used by visually impaired
persons.
Display and select the available video
sources.
Turns the TV on and off.
Turns the remote control light on or off.
When on, the buttons become illuminated
for a moment when pressed. (Using the
remote control with this button set to On
will reduce the battery usage time.)
Press to directly access to channels.
Press to select additional digital
channels being broadcasted by the
same station. For example, to select
channel ‘54-3’, press ‘54’, then press
‘-’ and ‘3’.
Return to the previous channel.
Cut off the sound temporarily.
Adjusts the volume.
Change channels.
Displays the channel list on the screen.
Displays the main on-screen menu.
View Contents Home.
Turns the 3D image on or off.
Quickly select frequently used
functions.
Displays information on the TV screen.
Moves the cursor, selects the onscreen menu items, and changes the
values seen on the menu.
Exit the menu.
Return to the previous menu.
Use these buttons according to the
directions on screen.
E-MANUAL: Displays the e-Manual.
P.SIZE: Lets you choose the picture size.
CC: Controls the caption decoder.
Use these buttons in a specific feature.
Installing batteries (Battery size: AAA)
✎✎NOTE
xx Install the batteries so that the polarity of the batteries (+/-)
matches the illustration in the battery compartment.
xx Use the remote control within 23 feet of the TV.
xx Bright light may affect the performance of the remote control.
Avoid using when near fluorescent lights or neon signs.
xx The color and shape may vary depending on the model.
English - 9
[UE6030-ZA]BN68-04458A.indb 9
2012-05-10 �� 5:38:26
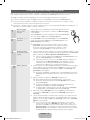
Configuring the Basic Settings in Initial Setup
When you turn the TV on for the first time, a sequence of screens and on-screen prompts will assist you in configuring the TV’s
basic settings. Plug the power cord into a wall outlet, and then press the POWERP button to turn on the TV.
✎✎Setup is available only when the Source is set to TV. See Changing the Input Source on page 12.
✎✎To return to the previous step in the Setup sequence, select Previous, and then press ENTERE button.
✎✎If you are not using a cable box or satellite box, make you sure have connected the TV to an antenna or cable
connection before you turn on the TV. See page 4 for instructions.
✎✎If you want to configure a network connection, make sure you’ve connected the Samsung Wireless LAN Adaptor or a
LAN cable to your TV. See pages 7 and 8 for instructions.
1
Menu Language:
Select a menu
language.
After you press the Power Button, the Start Screen appears. Press the
ENTERE button on your remote to continue. The Menu Language
screen appears.
Use the ▲/▼buttons to select a language, and then press ENTERE.
The cursor jumps to Next. Press the ENTERE button.
2
Use Mode: Select the
Use Mode.
On the Use Mode screen, press ENTERE to select the Home Use
mode. The cursor jumps to Next. Press the ENTERE button. The
Network Settings screen appears.
POWER
P
✎✎Store Demo mode is for retail environments only. If you select
Store Demo, some functions will not work, and the TV will reset
all functions to their factory default every 15 minutes. For more
information about Store Demo, go to the end of this section.
3
Network Settings:
Configure the network
settings.
1. The TV automatically senses whether you connected the Wireless Adaptor or a LAN
cable to the TV. To continue configuring the network settings, press the ENTERE
button, and then go to Wireless Network or Wired Network below.
✎✎ If you do not have a network, select Skip, press the ENTERE button, and
then go to Auto Program (1) on the next page.
✎✎ If you have a Network, you can also select Skip, and then configure your
3
a
Wireless Network
network later through Network Settings in the TV’s Menu. For more
information, refer to “Setting the Wired Network / Setting the Wireless
Network” in the e-Manual or go to page 16 in this manual.
1. The TV searches for and then displays all the wireless networks within range. When
done, it displays a list of the networks. Use the ▲/▼buttons to select a network,
and then press ENTERE. The cursor jumps to Next. Press ENTERE. The
Security Key screen appears.
✎✎ If you have a WPS(PBC) compatible router, select WPS(PBC) instead, press
ENTERE, and then follow the directions on the screen. When done, go to
Step 4.
2. Enter your network security key or WPS PIN using the remote.
✎✎ Enter numbers by pressing the number buttons on your remote.
✎✎ Enter letters by selecting a letter using the ▲/▼/◄/► buttons, and then
pressing ENTERE.
✎✎ To display capital letters (or redisplay small letters if capital letters are
displayed), select Shift, and then press ENTERE.
✎✎ To display symbols and punctuation, select , and then press ENTERE.
To redisplay letters, select Shift, and then press ENTERE.
3. When done, use the ▲/▼/◄/► buttons to select Next if you have entered
a security key or WPS PIN if you have entered a WPS PIN, and then press
ENTERE.
4. The TV checks the wireless connection. If the connection is successful, the “Your
wireless network and Internet connection are setup and ready to use.” message
appears. The cursor jumps to Next. Press ENTERE, and then go to 4 Software
Update on the next page.
✎✎ If the connection fails, select Previous, repeat Step 1 and 2, carefully
re-enter your security key or WPS PIN, then repeat Steps 3 and 4. If it
fails again, select Next on the “Connection Failed” screen, and then go to
Auto Program (1) on the next page. Configure your network later through
Network Settings in the TV’s Menu. For more information, refer to “Setting
the Wired Network / Setting the Wireless Network” in the e-Manual.
English - 10
[UE6030-ZA]BN68-04458A.indb 10
2012-05-10 �� 5:38:27
INFO
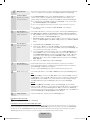
3
4
b
Wired Network
The TV checks the network connection, then displays the “Wired network and Internet
connection complete” message appears and highlights Next. Press ENTERE.
Software Update:
Upgrade the software
to the latest version.
On the Software Update screen, press the ENTERE button to upgrade the TV’s
software. If new software is available, the player downloads and installs the new
software. When the download is complete, select Next, and then press ENTERE.
✎✎To upgrade later, select Skip, and then press ENTERE. For more information,
see “Software Update” in the e-Manual.
✎✎You can only upgrade software if your TV has an active network connection.
✎✎If no update software is available, the Auto Program screen appears
automatically.
5
Auto Program (1):
Select where your TV
signal comes from.
Press the ▲ or ▼ button to select the correct option, and then press ENTERE twice.
Let’s find and store channels on your TV. Do you need to search for channels?
yy Yes, I need to.: Select if you have an antenna or a cable connection without a settop-box, and then go to Auto Program (2) below.
yy No, I don’t need to.: Select if you have a satellite or cable set-top-box. You do not
need to run Auto Program. Select Next or Skip, and then go to 6 Clock - Manual
below.
6
Auto Program (2):
Select the search
options
1. Press ENTERE. The Air/Cable screen appears.
2. Press the ▲ or ▼ button to select Air or Cable, and then press ENTERE. A
check appears next to your selection. Select Next, and then press ENTERE. You
can check both if you have both connected.
3. If you selected Air, channel memorization starts. Go to 5 Auto Program (3). If you
selected Cable, you’ll go to the Cable System screen. Use the▲ or ▼ button to
select Digital Cable System, and then press ENTERE. Use the ▲ or ▼ button
to select the correct cable signal format - STD, HRC, or IRC - and then press
ENTERE. Most cable systems use STD. Repeat the same process for Analog
Cable System.
4. When done, select Next, and then press ENTERE.
7
Auto Program (3):
Channel memorization
Channel memorization starts. Channel memorization can take up to 45 minutes.
When channel memorization is complete, the Channels Memorized screen appears.
Press ENTERE. The Clock screen appears.
✎✎You can press ENTERE at any time to halt the memorization process.
8
Clock: Set the Clock
Press the ▲ or ▼ button to select Auto or Manual, and then press ENTERE twice.
Auto
If you selected Auto, you’ll go to the Time Zone screen, and then the DST screen. On
the Time Zone screen, use the ▲ or ▼ button to select your time zone, and then press
ENTERE twice. On the DST screen, select whether to turn DST (Daylight Savings
Time) On or Off, and then press ENTERE. When done, press ENTERE.
Manual
If you selected Manual, select Date, and then press ENTERE. Use the number
buttons or the ▲ or ▼ button to set the date. Use the ◄ or ► button to move between
entry fields. When done, press ENTERE. Select Time, and then press ENTERE.
Set the time in the same fashion. When done, press ENTERE. Then, select Next, and
then press ENTERE. The Setup Complete screen appears.
9
Setup Complete
Review the Setup data, and then press the ENTERE button.
If You Want to Re-run Setup...
OO MENU
→ System → Setup → ENTERE
If You Want to Turn the Store Demo Mode On or Off.
To set or unset Store Demo mode outside of Setup, press and release the Controller when the power is on. The Function
menu screen appears. Push the Controller to the left (to MENU (m)) and hold for more than 5 seconds. The Store Demo
mode is set. To cancel Store Demo, bring up the Function menu using the Controller, push the Controller to the right (to
Source(s) and hold for more than 5 seconds. See page 13 for information about the Controller.
English - 11
[UE6030-ZA]BN68-04458A.indb 11
2012-05-10 �� 5:38:29
Changing the Input Source
How to Use Edit Name
Edit Name lets you associate a device name to an input
source. To access Edit Name, press the TOOLS button
when the Source is displayed. The following selections
appear under Edit Name:
Source
When you are watching TV and you want to
watch a movie on your DVD player or Blu-ray
player or switch to your cable box or STB
satellite receiver, you need to change the
Source.
1. Press the SOURCE button on your
remote.
■■ VCR / DVD / Cable STB / Satellite STB / PVR STB /
AV Receiver / Game / Camcorder / PC / DVI PC / DVI
Devices / TV / IPTV / Blu-ray / HD DVD / DMA
Select the name of the device connected to each input jack
to make your input source selection easier.
✎✎If you have connected a PC to the HDMI IN 1 (DVI)
2. Select a desired external input source.
port with an HDMI cable, select PC under Edit Name
to enter a device name.
■■ TV / HDMI1/DVI / HDMI2 / AV / Component
✎✎If you have connected a PC to the HDMI IN 1 (DVI)
✎✎You can only choose external devices that are
connected to the TV. In Source, connected inputs are
highlighted.
port with an HDMI to DVI cable, select DVI PC under
Edit Name to enter a device name.
✎✎If you connected an AV device to the HDMI IN 1 (DVI)
port with an HDMI to DVI cable, select DVI Devices
under Edit Name to enter a device name.
Information
You can see detailed information about the connected
external device.
How to Navigate Menus
How to Operate the Main Menu
(OSD - On Screen Display)
Your TV’s Main and Tools menus contains functions that let
you control the TV’s features. For example, in the Main menu
you can change the size and configuration of the picture, its
brightness, its contrast and so on. There are also functions
that let you control the TV’s sound, channel configuration,
energy use, and a host of other features. To access the
main, on-screen menu, press the MENU (m) button on your
remote. To access Tools menus, press the TOOLS button.
Tools menus are available when the TOOLS menu Icon is
displayed on the bottom right of the screen.
The illustration below displays the buttons on the remote you
use to navigate the menus and select and adjust different
functions.
CONTENT
The access steps may differ depending on the menu option
you select.
1
MENU
2
▲/▼
3
4
5
ENTERE
6
7
ENTERE
▲/▼
◄/►
EXITe
The main menu options appear on
the screen:
Picture, Sound, Channel,
Network, System, Support.
Select a main menu option on the
left side of the screen with the ▲ or
▼ button.
Press ENTERE to access the
sub-menus.
Select the desired submenu with
the ▲ or ▼ button.
Adjust the value of an item with the
◄ or ► button. The adjustment in
the OSD may differ depending on
the selected menu.
Press ENTERE to confirm the
selection.
Press EXIT.
1 MENU button: Displays the main on-screen menu.
2 ENTERE and Direction buttons: Use the Direction
buttons to move the cursor and highlight an item. Use
the Enter button to select an item or confirm the setting.
3 RETURN button: Returns to the previous menu.
4 EXIT button: Exits the on-screen menu.
5 TOOLS button: Displays Tools menus when available.
English - 12
[UE6030-ZA]BN68-04458A.indb 12
2012-05-10 �� 5:38:30
Using the TV’s Controller (Panel Key)
The TV’s Controller, a small joy stick like button on the bottom right side of the TV, lets you control the TV without the remote
control.
Function menu
CONTENT
m
R
s
P
Return
TV Controller
Remote control sensor
Power on
Turn the TV on by pressing the Controller when the TV is in standby mode.
Adjusting the
volume
Adjust the volume by moving the Controller from side to side when the power is on.
Selecting a channel
Select a channel by moving the Controller backwards and forwards when the power is on.
Using the Function
menu
To view and use the Function menu, press and release the Controller when the power is on. To close the Function
menu, press and release the Controller again.
Selecting Contents
Home
With the Function menu visible, select CONTENT by moving the Controller backwards. The Contents Home main
screen appears. Select a media source by moving the Controller back and forth, and then pressing the Controller.
Selecting the Menu
(m)
With the Function menu visible, select the Menu (m) by moving the Controller to the left. The OSD (On Screen
Display) Menu appears. Select an option by moving the Controller to the right. Move the Controller to the right or left,
or backwards and forwards to make additional selections. To change a parameter, select the it, and then press the
Controller.
Selecting a Source
(s)
With the Function menu visible, open the Source (s) by pushing the Controller to the right. The Source screen
appears. To select a source, move the Controller back and forth. When the source you want is highlighted, press the
Controller.
Power Off (P)
With the Function menu visible, select Power Off (P) by pulling the Controller forwards, and then press the Controller.
✎✎To close the Menu, Contents Home, or Source, press the Controller for more than 1 second.
✎✎When selecting the function by moving the controller to the up/down/left/right directions, be sure not to press the
controller. If you press it first, you cannot operate it to move the up/down/left/right directions.
Standby mode
Your TV enters Standby mode when you turn it off and continues to consume a small amount of electric power. To be safe
and to decrease power consumption, do not leave your TV in standby mode for long periods of time (when you are away on
vacation, for example). It is best to unplug the power cord.
Using Contents Home
Contents Home provides easy, on-screen access to four functions that let you manage and access channels, set favorite
channels, access photos, videos, or music on USB devices, cameras, and PCs, select video sources, and set the TV to turn
on automatically when a show you want to watch is on. The four functions are listed below:
yy Channel List: Lets you manage channels, select favorite channels, and delete channels from the Added Channel list (the
channels that appear when you press the CH button).
yy AllShare Play: Lets you access, view, or play photos, videos, or music located on USB devices, digital cameras, cell
phones, and PCs. PCs and cell phones can be accessed wirelessly, through your wireless network.
yy Schedule Manager: Lets you schedule shows and channels for viewing. When a show or channel is scheduled, the TV
automatically turns on at the set time and changes the channel to the selected channel.
yy Source: Lets you select a connected external video source to view.
To access Contents Home, press the CONTENT button on your remote.
For more information about Contents Home, see the e-Manual.
English - 13
[UE6030-ZA]BN68-04458A.indb 13
2012-05-10 �� 5:38:31
Installing the Wall Mount (Optional)
Wall or Ceiling Mounting
If you mount this product on a wall, it should be mounted only as recommended by the manufacturer. Unless it is
correctly mounted, the product may slide or fall, causing serious injury to a child or adult, and serious damage to the
product.
Installing the Wall Mount Kit
The wall mount kit (sold separately) lets you mount the TV on the wall. For detailed information about installing the wall mount,
see the instructions provided with the wall mount. Contact a technician for assistance when installing the wall mount bracket.
Samsung Electronics is not responsible for any damage to the product or injury to yourself or others if you elect to install the
wall mount on your own.
To order the wall mount, contact Samsung Customer Care at 1-800-SAMSUNG (1-800-726-7864).
Wall Mount Kit Specifications (VESA)
Install your wall mount on a solid wall perpendicular to the floor. Before attaching the wall mount to surfaces other than plaster
board, please contact your nearest dealer for additional information. If you install the TV on a ceiling or slanted wall, it may fall
and result in severe personal injury.
✎✎NOTE
xx Standard dimensions for wall mount kits are shown in the table below.
xx Samsung wall mount kits contain a detailed installation manual and all parts necessary for assembly are provided.
xx Do not use screws that do not comply with the VESA standard screw specifications.
xx Do not use screws that are longer than the standard length or do not comply with the VESA standard screw
specifications. Screws that are too long may cause damage to the inside of the TV set.
xx For wall mounts that do not comply with the VESA standard screw specifications, the length of the screws may differ
depending on the wall mount specifications.
xx Do not fasten the screws too firmly. This may damage the product or cause the product to fall, leading to personal
injury. Samsung is not liable for these kinds of accidents.
xx Samsung is not liable for product damage or personal injury when a non-VESA or non-specified wall mount is used or
the consumer fails to follow the product installation instructions.
xx Do not mount the TV at more than a 15 degree tilt.
xx Always have two people mount the TV on a wall.
Product Family
TV size in
inches
VESA screw hole
specs (A * B) in
millimeters
Standard Screw
32~40
200 X 200
M6
46~60
400 X 400
M8
LED-TV
Quantity
4
✎✎ Remove the screws in the mounting holes before you install the wall mount.
Do not install your Wall Mount Kit while your TV is turned on. It may result in personal injury due to
electric shock.
English - 14
[UE6030-ZA]BN68-04458A.indb 14
2012-05-10 �� 5:38:33
Configuring Network Connections after Initial Setup
If you did not configure the network connections during initial setup, you can configure them through the Network Settings
option in the Main menu.
Configuring a Wireless Network Connection
The instructions below are for wireless networks that use the Dynamic Host Configuration Protocol (DHCP) to configure
network connections automatically. Most wireless networks use DHCP. If your have a Static IP network, see the e-Manual for
configuration instructions.
To configure the network connection for a network that uses DHCP, follow these steps:
1. Connect your TV to your network as shown in the illustration on page 7.
2. Turn on your TV, press the MENU button on your remote, and the select Network → Network Settings.
3. Select Start, and then press ENTERE button.
4. The Network function searches for available wireless network. When done, it displays a list of the available networks.
5. In the list of networks, press the ▲ or ▼ button to select a network, select Next, and then press ENTERE button.
✎✎ If you have a WPS(PBC) compatible router, select WPS(PBC) instead, press ENTERE, and then follow the
directions on the screen. When done, go to Step 8.
6. Enter your network security key or WPS PIN using the remote.
✎✎ Enter numbers by pressing the number buttons on your remote.
✎✎ Enter letters by selecting a letter using the ▲/▼/◄/► buttons, and then pressing ENTERE.
✎✎ To display capital letters (or redisplay small letters if capital letters are displayed), select Shift, and then press
ENTERE.
✎✎ To display symbols and punctuation, select , and then press ENTERE. To redisplay letters, select Shift, and
then press ENTERE.
7. When done, use the ▲/▼/◄/► buttons to select Next if you have entered a security key or WPS PIN if you have
entered a WPS PIN, and then press ENTERE.
8. The TV checks the wireless connection. If the connection is successful, the “Wireless network and Internet connection
complete” message appears. The cursor jumps to Next. Press ENTERE.
✎✎ For more detailed information, see “Setting the Wireless Network” in the e-Manual.
✎✎ If you want to configure the connection manually, select IP Settings on the Network Connection screen. Set IP
Setting to Enter manually, and then enter the IP Address, Subnet Mask, Gateway, and DNS Server manually.
Configuring a Wired Network Connection
Most home networks use the Dynamic Host Configuration Protocol (DHCP) to configure network connections. Home networks
that support DHCP automatically provide the IP address, subnet mask, gateway, and DNS values your TV needs to access
the Internet so you don’t have to enter them manually. If your have a Static IP network, see the e-Manual for configuration
instructions.
To configure the network connection for a wired network that uses DHCP, follow these steps:
1. Connect your TV to your network as shown in one of the illustrations on page 8.
2. Turn on your TV, press the MENU button on your remote, and then select Network → Network Settings. The Network
Settings screen will appear.
3. Select Start, and then press ENTERE button.
4. The Network Connection screen appears, and verifies the network connection. Network set up is complete.
✎✎ If your TV cannot acquire network connection values automatically or if you want to set the connection manually,
select IP Settings on the network test screen. Set IP Setting to Enter manually, and then enter the IP Address,
Subnet Mask, Gateway, and DNS Server manually.
✎✎ For more detailed information, see “Setting the Wired Network” in the e-Manual.
English - 15
[UE6030-ZA]BN68-04458A.indb 15
2012-05-10 �� 5:38:34
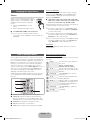
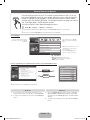
How to View the e-Manual
You can find instructions for your TV’s features in the e-Manual in your TV. To use,
press the E-MANUAL button on your remote. Move the cursor using the right/left
buttons to highlight a main category. Use the up/down buttons to select a topic,
and then press the ENTERE button. The e-Manual displays the page you want to
see. To change pages, use the right/left buttons.
You can also access the e-Manual through the menu:
E-MANUAL
OO MENUm → Support → e-Manual → ENTERE
✎✎If you want to return to the e-Manual, press the E-MANUAL button on your remote.
✎✎You can not use the Try Now function if the menu is not activated.
Screen Display
TV Screen: Displays the program,
movie, video, etc. you are currently
watching.
The category list. Press l or r
button to select the category you
want.
Basic Features
Changing the Preset Picture Mode
Adjusting Picture Settings
Displays the sub-menu list. Use the
arrow buttons on your remote to
move the cursor.
Press the ENTERE button to
select the sub-menu you want.
Changing the Picture Options
Changing the Preset Sound Modes
Sound Settings
} Index
E Enter
e Exit
Operation Buttons:
} Blue (Index): Displays index screen.
E Enter: Select a category or sub-menu.
e Exit: Exit the e-Manual.
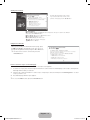
How to toggle between an e-Manual topic and the corresponding OSD menu(s).
Picture
Basic Features > Changing the Preset Picture Mode (1/1)
Picture Mode
Standard
Changing the Preset Picture Mode
■■ Picture Mode t
OO MENUm → Picture → Picture Mode → ENTERE
Try Now
Picture modes apply preset adjustments to the picture. Select a mode using the
▲/▼ buttons, and then press ENTERE.
Backlight
10
Contrast
95
Brightness
45
Sharpness
50
NN When connecting a PC, you can only select Entertain and Standard.
• Dynamic: Suitable for a bright room.
• Standard: Suitable for a normal environment.
• Natural: Suitable for reducing eye strain.
• Movie: Suitable for watching movies in a dark room.
• Entertain: Suitable for watching movies and games.
NN It is only available when connecting a PC.
E-MANUAL
Color
Tint (G/R)
a Try Now b Home { Zoom } Index L Page e Exit
50
R50
R50
✎✎This function is not enabled in some menus.
Method 1
Method 2
1. If you want to use the menu that corresponds to an
e-Manual topic, press the red button to select Try Now.
2. To return to the e-Manual screen, press the E-MANUAL
button.
1. Press the ENTERE button when a topic is displayed.
“Do you want to execute this?” appears. Select Yes,
and then press the ENTERE button. The OSD window
appears.
2. To return to the e-Manual screen, press the E-MANUAL
button.
English - 16
[UE6030-ZA]BN68-04458A.indb 16
2012-05-10 �� 5:38:39
Viewing the Contents
Basic Features > Changing the Preset Picture Mode (1/1)
Changing the Preset Picture Mode
■■ Picture Mode t
OO MENUm → Picture → Picture Mode → ENTERE
Picture modes apply preset adjustments to the picture. Select a mode using the
▲/▼ buttons, and then press ENTERE.
Contents Area: Contains the topic contents
if you selected a sub-menu. To move to the
previous or next page, press the l or r button.
NN When connecting a PC, you can only select Entertain and Standard.
• Dynamic: Suitable for a bright room.
• Standard: Suitable for a normal environment.
• Natural: Suitable for reducing eye strain.
• Movie: Suitable for watching movies in a dark room.
• Entertain: Suitable for watching movies and games.
NN It is only available when connecting a PC.
a Try Now b Home { Zoom } Index L Page e Exit
Operation Buttons:
a Red (Try Now): Displays the OSD menu that corresponds to the topic. To return to the e-Manual
screen, press the E-MANUAL button.
b Green (Home): Moves to the e-Manual home screen.
{ Yellow (Zoom): Magnifies a screen.
} Blue (Index): Displays the Index screen.
L (Page): Moves to previous or next page.
e (Exit): Exit the e-Manual.
Using the Zoom mode
When you are viewing an e-Manual instruction page, press
the { Yellow (Zoom) to magnify the screen. You can scroll
through the magnified screen by using the u or d buttons.
✎✎To return to the screen to normal size, press the
Changing the Preset Picture Mode
■■ Picture Mode t
OO MENUm → Picture → Picture Mode → ENTERE
Picture modes apply preset adjustments to the picture. Select a mode using the
▲/▼ buttons, and then press ENTERE.
RETURN button.
NN When connecting a PC, you can only select Entertain and Standard.
• Dynamic: Suitable for a bright room.
• Standard: Suitable for a normal environment.
• Natural: Suitable for reducing eye strain.
• Movie: Suitable for watching movies in a dark room.
U Move R Return
How to search for a topic on the index page
1. Press the Blue (Index) button on the remote. The Index screen appears.
2. To search for a topic, press the left or right arrow button to select a letter. The Index displays a list of topics and keywords
that begin with the letter you selected.
3. Press the up or down arrow button to select a topic or keyword you want, and then press the ENTERE button to select
a topic you want to see.
4. The e-Manual page with the topic appears.
✎✎To close the Index screen, press the RETURN button.
English - 17
[UE6030-ZA]BN68-04458A.indb 17
2012-05-10 �� 5:38:41
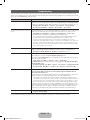
Troubleshooting
If the TV seems to have a problem, first review this list of possible problems and solution. Also review the Troubleshooting
Section in the e-Manual. If none of the troubleshooting tips apply, visit www.samsung.com/support or call Samsung customer
Service at 1-800-SAMSUNG(1-800-726-7864).
Issues
Solutions and Explanations
Flickering and Dimming
If your Samsung Television is flickering or dimming sporadically, you may need to
disable some of its energy efficient features like the Eco Sensor or the Energy Saving
feature. If you follow below step with your remote, you can turn these features off or on.
yy Energy saving: User Menu → System → Eco Solution → Energy Saving
yy Eco Sensor: User Menu → System → Eco Solution → Eco Sensor
Component Connections / Screen
Color
If you find that the color on your Samsung television’s screen is not correct or black and
white, first run a Self Diagnosis on the TV to make sure there are no device issues.
yy Self Diagnosis : User Menu → Support → Self Diagnosis → Picture Test
If the problem does not appear in the Test Picture, try making sure :
yy Your connections are all consistent. For example, if you’ve used the AV In jack on
your TV, make sure you have used the AV Out jack on your video source.
yy You have connected your devices to the correct jacks. For example, if you use the
Component jacks, labeled Pb, Pr, and Y, to connect your TV and video source, make sure
you have connected the blue Pb jack on the video source to the blue Pb jack on the TV,
the red Pr jack on the source to the red Pr jack on the TV, and the yellow Y jack on video
source to the yellow Y jack on the TV..
Screen Brightness
If you find that the colors on your Samsung TV are correct but just a little too dark or
bright, try adjusting the following settings in the Picture option of the Main menu:
yy Backlight, Contrast, Brightness, Sharpness, Color, Tint and so on.
Unwanted Powering Off
If your Samsung TV appears to turn off by itself, there may be an issue with either your
Timer settings or your Eco friendly No Signal Power Off feature.
First make sure the Sleep Timer is not accidentally set. The sleep timer turns the TV off
after a certain period of time.
yy Sleep Timer : User Menu → System → Time → Sleep Timer
If the Sleep Timer is not activated, you may have engaged the No Signal Power Off or
Auto Power Off feature.
yy No Signal Power Off : User Menu → System → Eco Solution → No Signal Power Off
yy Auto Power Off : User Menu → System → Eco Solution → Auto Power Off
Trouble Powering On
Before you turn the TV on, find the red light on the right or left bottom of your TV.
Press the power button on the TV or remote and the light should blink about 5
times before the TV turns on.
If you find that you are having trouble powering on your Samsung television, there are a
number of things to check before making a call to the service department.
yy If you happen to be using the TV as a monitor and the stand-by light only blinks for a few
seconds when you press the power button, your PC is in sleep mode. To take your PC out of
sleep mode, press a key on your keyboard or move the mouse. Then try turning your TV on.
If you’re sure your power cord, remote control, and PC are functioning properly, you may
be having a cable issue. If you have a cable or satellite box, your TV may appear to be off
because the cable or satellite box is not outputting a signal. To test the signal output of your
cable or satellite box, press the guide or info button on the cable or satellite box remote
control. If the screen displays the guide or info data, the problem is caused by the box.
Cannot Find a Channel
• Re-run Setup (Go to Menu - System - Setup) or run Auto Program. (Go to MENU Channel - Auto Program).
✎✎For detailed troubleshooting information, watch the troubleshooting videos at
www.samsung.com/spsn
English - 18
[UE6030-ZA]BN68-04458A.indb 18
2012-05-10 �� 5:38:42
Issues
Solutions and Explanations
The TV Won’t Turn On.
• Make sure the AC power cord is securely plugged in to the wall outlet and the TV.
• Make sure the wall outlet is working.
• Try pressing the POWER button on the TV to make sure the problem is not the remote. If
the TV turns on, refer to “The remote control does not work” below.
There is no picture/video.
• Check the cable connections. Remove and reconnect all cables connected to the TV
and external devices.
• Set the video outputs of your external devices (Cable/Sat Box, DVD, Blu-ray etc) to
match the TV’s input connections. For example, if an external device’s output is HDMI, it
should be connected to an HDMI input on the TV.
• Make sure your connected devices are powered on.
• Be sure to select the correct input source by pressing the SOURCE button on the
remote control.
• Reboot the connected device by unplugging it, and then reconnecting the device’s
power cable.
The Remote Control Does Not Work.
• Replace the remote control batteries. Make sure the batteries are installed with their
poles (+/–) in the correct direction.
• Clean the sensor’s transmission window on the remote.
• Try pointing the remote directly at the TV from 5~6 feet away.
The cable/set top box remote control
doesn’t turn the TV on or off, or
adjust the volume.
• Program the Cable/Set remote control to operate the TV. Refer to the Cable/Set Top Box
user manual for the SAMSUNG TV code.
✎✎This TFT LED panel uses a panel consisting of sub pixels which require sophisticated technology to produce. However,
there may be a few bright or dark pixels on the screen. These pixels will have no impact on the performance of the
product.
✎✎Some functions and pictures shown in this manual are available on specific models only.
✎✎To keep your TV in optimum condition, upgrade to the latest firmware on the Samsung web site by USB (Go to samsung.
com → Support → Downloads).
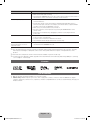
Licenses
List of Features
yy 3D: This exciting new feature enables you to view 3D content.
yy AllShare Play: AllShare Play lets you access, view, or play photos, videos, or music located on USB devices, digital
cameras, cell phones, and PCs. PCs, cell phones, and other compatible devices can be accessed wirelessly, through your
wireless network.
English - 19
[UE6030-ZA]BN68-04458A.indb 19
2012-05-10 �� 5:38:44
Securing the TV to the Wall
Caution: Pulling, pushing, or climbing on the TV may cause the TV to fall. In particular, ensure your
children do not hang over or destabilize the TV. Doing so may cause the TV to tip over, causing serious
injuries or death. Follow all safety precautions provided in the included Safety Flyer with your TV. For
added stability and safety, you can purchase and install the anti fall device as described below.
The TV-Holder Kit (Sold Separately):
The parts below are included in the TV Holder kit. In addition, you need to provide a wood screw, a screw and molly, or other
screw appropriate for the wall or cabinet you intend to secure the TV-Holder string to. We recommend a size M4xL20 wood
screw.
TV-Holder (BN96-15753A)
Screw (M8 X L19)
Installing the TV-Holder
1. Remove the screw attached to the back of your TV, and then connect the TV-Holder to the TV with the screw included in
the TV-Holder Kit that is designated for your TV.
✎✎ Make sure to use only the appropriate supplied screw. If you use a different screw, you can damage your TV.
2. Firmly fasten the screw you provided (size M4 x L20 or similar) to the wall or cabinet where the TV is to be installed.
✎✎ If you fasten the screw to the wall, we recommend you drive the screw into a stud. If that is not possible, use a
molly to anchor the screw.
3. Tie the TV-Holder cord to the screw fastened to the wall or cabinet so that the TV is fixed. See the illustrations below.
✎✎ Install the TV close to the wall so that it does not fall.
✎✎ When attaching the TV-Holder cord to the wall, tie the cord level with the ground or slanted downwards for safety
purposes.
✎✎ Check the cord occasionally to make sure it is secure.
✎✎ Before moving the TV, separate the connected cord first.
Wall
4. Verify all connections are properly secured. Periodically check the connections for any sign of fatigue or failure. If you have
any doubt about the security of your connections, contact a professional installer.
To purchase the TV-Holder Kit, contact Samsung Customer Care
–– In the United States: 1-800-SAMSUNG (1-800-726-7864)
–– In Canada: 1-800-SAMSUNG (1-800-726-7864)
English - 20
[UE6030-ZA]BN68-04458A.indb 20
2012-05-10 �� 5:38:46
Specifications
Display Resolution
1920 X 1080
Environmental Considerations
Operating Temperature
Operating Humidity
Storage Temperature
Storage Humidity
50°F to 104°F (10°C to 40°C)
10% to 80%, non-condensing
-4°F to 113°F (-20°C to 45°C)
5% to 95%, non-condensing
Model Name
UN40EH6030
UN46EH6030 / UN46EH6070
Screen Size
(Diagonal)
40” Class
(40.0” measured diagonally)
46” Class
(45.9” measured diagonally)
Sound (Output)
Dimensions (W x H x D)
Body
With stand
Weight
Without Stand
With Stand
10W X 2
36.5 X 21.5 X 3.6 inches
(927.5 X 548.0 X 93.1 (mm))
36.5 X 23.9 X 8.9 inches
(927.5 X 607.2 X 227.6 (mm))
41.7 X 24.5 X 3.7 inches
(1060.0 X 622.5 X 96.2 (mm))
41.7 X 26.8 X 10.9 inches
(1060.0 X 681.1 X 277.6 (mm))
19.6 Ibs (8.9 kg)
24.0 Ibs (10.9 kg)
24.9 Ibs (11.3 kg)
29.3 Ibs (13.3 kg)
Model Name
UN55EH6030 / UN55EH6070
Screen Size
(Diagonal)
55” Class
(54.6” measured diagonally)
Sound (Output)
10W X 2
Dimensions (W x H x D)
Body
49.2 X 28.7 X 3.7 inches
(1251.4 X 730.1 X 94.4 (mm))
49.2 X 31.0 X 8.9 inches
(1251.4 X 789.6 X 227.6 (mm))
With stand
Weight
Without Stand
With Stand
39.6 lbs (18.0 kg)
45.4 lbs (20.6 kg)
✎✎Design and specifications are subject to change without prior notice.
✎✎This device is a Class B digital apparatus.
✎✎For information about the power supply, and more about power consumption, refer to the label attached to the product.
✎✎Typical power consumption is measured according to Energy Star Program requirements for Televisions.
Dispose unwanted electronics through an approved recycler.
To find the nearest recycling location, go to our website:
www.samsung.com/recyclingdirect Or call, (877) 278 - 0799
English - 21
[UE6030-ZA]BN68-04458A.indb 21
2012-05-10 �� 5:38:47
Supported Video Formats
File Extension
Container
*.avi
*.mkv
*.asf
*.wmv
*.mp4
*.3gp
*.vro
*.mpg
*.mpeg
*.ts
*.tp
*.trp
*.mov
*.flv
*.vob
*.svi
*.divx
Video Codec
Resolution
Frame rate (fps)
Bit rate (Mbps)
Audio Codec
30
AC3
LPCM
ADPCM
(IMA, MS)
AAC
HE-AAC
WMA
DD+
MPEG(MP3)
DTS Core
G.711(A-Law,
μ-Law)
DivX 3.11/4.x/5.x/6.x
MPEG4 SP/ASP
AVI
MKV
ASF
MP4
3GP
VRO
VOB
PS
TS
1920 x 1080
H.264 BP/MP/HP
Motion JPEG
640 x 480
6~30
8
Window Media Video v9
MPEG2
1920 x 1080
30
MPEG1
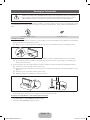
Storage and Maintenance
✎✎If a sticker was attached to the TV screen, some debris can remain after you remove the sticker. Please clean the debris
off before watching TV.
✎✎The exterior and screen of the product can get scratched during cleaning. Be sure to wipe the exterior and screen
carefully using the cloth provided or a soft cloth to prevent scratches.
Do not spray water directly onto the product. Any liquid that
goes into the product may cause a failure, fire, or electric
shock.
Clean the product with a soft cloth dampened with a
small amount of water. Do not use a flammable liquid (e.g.
benzene, thinners) or a cleaning agent.
English - 22
[UE6030-ZA]BN68-04458A.indb 22
2012-05-10 �� 5:38:48
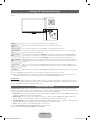
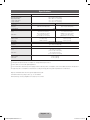
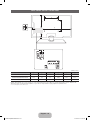
JACK PANEL DETAIL / REAR VIEW
5
1
6
4
2
3
(Unit: inches)
Model name
1
2
3
4
5
6
UN40EH6030
9.6
5.8
6.0
24.1
7.8
7.8
UN46EH6030/UN46EH6070
11.2
5.3
7.3
29.8
15.7
15.7
UN55EH6030/UN55EH6070
15.6
6.2
7.8
36.4
15.7
15.7
NOTE: All drawings are not necessarily to scale. Some dimensions are subject to change without prior notice. Refer to the
dimensions prior to performing installation of your TV. Not responsible for typographical or printed errors.
© 2012 Samsung Electronics America, Inc
English - 23
[UE6030-ZA]BN68-04458A.indb 23
2012-05-10 �� 5:38:48